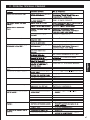
1
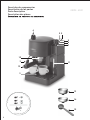
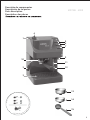
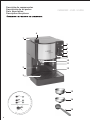
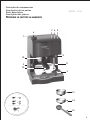
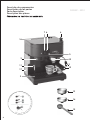
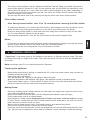
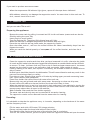
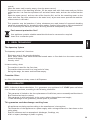
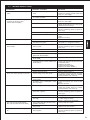
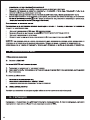
LIVRO DE INSTRUÇÕES
LIBRO DE INSTRUCCIONES
INSTRUCTION MANUAL
MANUEL D’UTILISATION
www.fapindustria.pt
CAPRI
ESTORIL
CHAMONIX
CLASSIC
KENYA
Descrição de componentes
Descripción de las partes
Parts description
Description des pièces
CAPRI - ES31
4
55
5
6
7
10
2
11
12
P
É - NO ONER DEM
AS
CAF
IAD
DO
A
O
I
AS
PUT TOO MU
CH
NOT
CO
DO
FF
EE
PAS TROP CAFÉ
ISEZ
TIL
’U
-N
2
13
FÉ
CA
NÃO CO
LOC
AR
DE
M
3
14
15
Descrição de componentes
Descripción de las partes
Parts description
Description des pièces
ESTORIL - ES33
4
1
5
6
7
9
10
11
12
2
P
É - NO ONER DEM
AS
CAF
IAD
DO
A
O
I
AS
13
FÉ
CA
PUT TOO MU
CH
NOT
CO
DO
FF
EE
PAS TROP CAFÉ
ISEZ
TIL
’U
-N
NÃO CO
LOC
AR
DE
M
3
14
15
3
Descrição de componentes
Descripción de las partes
Parts description
Description des pièces
CHAMONIX - ES35 / ES35A
4
1
5
6
7
8
9
10
11
2
12
P
É - NO ONER DEM
AS
CAF
IAD
DO
O
IA
AS
PUT TOO MU
CH
NOT
CO
DO
FF
EE
PAS TROP CAFÉ
ISEZ
TIL
’U
-N
4
13
FÉ
CA
NÃO CO
LOC
AR
DE
M
3
14
15
Descrição de componentes
Descripción de las partes
Parts description
Description des pièces
KENYA - ES36
4
7 6 5
1
9
10
11
2
12
P
É - NO ONER DEM
AS
CAF
IAD
DO
O
IA
S
A
13
FÉ
CA
PUT TOO
M
U
CH
NOT
CO
DO
FF
EE
PAS TROP CAFÉ
ISEZ
TIL
’U
-N
NÃO CO
LOC
AR
DE
M
3
14
15
5
Descrição de componentes
Descripción de las partes
Parts description
Description des pièces
CLASSIC - ES51
7 6
4
16
5
9
10
11
2
12
17
P
É - NO ONER DEM
AS
CAF
IAD
DO
A
O
I
AS
PUT TOO MU
CH
NOT
CO
DO
FF
EE
PAS TROP CAFÉ
ISEZ
TIL
’U
-N
6
13
FÉ
CA
NÃO CO
LOC
AR
DE
M
3
14
15
Tampa de entrada de água
Tubo de vapor com ponteira para Cappuccino
Apára-águas com grelha removíveis
Manípulo de vapor (fechado /
aberto)
Interruptor vapor (
)
Interruptor café ( ) com lâmpada avisadora
de funcionamento
7. Interruptor ON/OFF (
) com lâmpada
avisadora de funcionamento
8. Auto Espresso Flow - seleccionador da
quantidade de café (apenas disponível no
modelo ES35A)
9.
10.
11.
12.
13.
1.
2.
3.
4.
5.
6.
7.
8.
Tapa del depósito de água
Tubo de capuccino
Bandeja recoge gotas
Regulador del vapor cerrado / ( ) abierto
Interruptor del vapor ( )
Interruptor del café ( ) con piloto indicador
Interruptor ON/OFF ( ) con piloto indicador
Auto Espresso Flow - Selector cantidad de
agua (solamente disponible en lo modelo
ES35A)
9. Prensador del café
10.
11.
12.
13.
14.
Salida de agua
Tanque de agua con visor de nivel de agua
Portafiltros
Filtro Cremaker para dos tazas de café molido
Filtro Cremaker para una taza de café molido
o monodosis
15. Cuchara dosificadora
16. Apoyo para colocation de la cuchara
dosificadora
17. Tanque de agua
1.
2.
3.
4.
5.
6.
Water entry cover lid
Cappuccino nozzle
Drip tray with grid
Steam control closed / ( ) opened)
Steam botton ( )
Coffee button ( ) with power on indicator
lamputton
7. ON/OFF ( ) button with power on indicator
lamp
8. Auto Expresso Flow - water volume adjuster
(model ES35A )
9. Coffee tamper
10. Brew head
11. Water tank level indicator
12. Filter-holder
13. Cremaker filter for two cups of ground coffee
14. Cremaker filter for one cup of ground coffee
or coffee pods
15. Measuring spoon
16. Measuring spoon support
17. Water tank
1.
2.
3.
4.
5.
6.
9.
10.
11.
12.
13.
14.
1.
2.
3.
4.
5.
6.
Couvercle (réservoir amovible à l´intérieur
Buse eau chaude/vapeur
Bac collecteur avec grille amovible
Robinet vapeur fermé / ouvert)
Interrupteur de vapeur ( )
Interrupteur café ( ) avec voyant de
fonctionnement
7. Interrupteur Marche/Arrêt ( ) avec voyant
de fonctionnement
8. Auto Espresso Flow - Quantité d’eau (modèl
ES35A)
14.
15.
16.
17.
Calcador de café
Saída de água
Depósito de água com janela transparente
Porta-filtros
Filtro Cremaker para duas doses de café
moído
Filtro Cremaker para uma dose de café moído
ou mono-doses de café (pastilhas)
Colher doseadora
Apoio para colocação da colher doseadora
Depósito de água
Égaliseur de mouture
Porte-filtre
Indicateur de niveau d’eau
Porte-filtre
Filtre Cremaker pour deux tasse café moulu
Filtre Cremaker pour une tasse café moulu
où dosette à café
15. Doseur café
16. Support pour la colocation de la doseur café
17. Réservoir amovible
7
INDEX
1. Introduction...............................................................................22
2. Important Safeguards.....................................................................22
3. Special Cord Set Instructions Regarding Your Cord Set.................................23
4. Preparation.................................................................................23
5. Making Espresso...........................................................................24
6. Preparing Cappuccino.....................................................................25
7. Making Tea..................................................................................26
8. Cleaning and maintenance...............................................................26
9. BRIEL Technology..........................................................................27
10. Guarantee...................................................................................27
11. Troubleshooting............................................................................29
1. INTRODUCTION
Dear client:
Congratulations for wisely choosing BRIEL.
We have created this Instructions and Recommendations Manual so that you can find out about... THE
REAL ESPRESSO.
Would you like an Espresso? You can now enjoy it in the comfort of your home, alone or with friends.
This is BRIEL’s invitation.
The velvety cream on the surface is the main characteristic of a wonderful Espresso, which must be
served in small cups right after the preparation.
Unlike what many people seam to think, this type of coffee is not stronger than the regular one; it is
even softer, due to its preparation method. Espresso coffee is made by rapidly forcing water that has
been heated to the correct brewing temperature through a special finely ground coffee or coffee pod.
The pump and the water flow are easily controlled with the button or switch.
This is the Espresso. A different way of getting pleasure from ground coffee, invented in Europe in the
beginning of the 20th century, which now BRIEL brings to you.
Making Espresso or Cappuccino is very different from using a conventional coffee make r. The Espresso
maker operates with pressure and steam - it is therefore important to read all the instructions before
using it.
2. IMPORTANT SAFEGUARDS
When using electrical appliances, basic safety precautions should always be
followed, including the following:
·
·
·
·
·
·
·
24
Read all the instructions;
Do not touch hot surfaces. Use handles or knobs;
To protect against fire, electrical shock and injury to persons do not immerse cord,
plugs or appliance in water or other liquid;
Close supervision is necessary when any appliance is used by or near children;
Unplug from the outlet when not in use and before cleaning. Allow to cool before putting
on or taking off parts, and before cleaning the appliance;
Do not operate any appliance with a damaged cord or plug or after the appliance
malfunctions, or has been damaged in any manner. Return appliance to the nearest
authorized service facility for examination, repair or adjustment;
The use of accessory attachments or spare parts not recommended by the appliance
·
·
·
·
·
·
·
·
manufacturer may result in fire, electric shock or injury to persons;
Do not use outdoors;
Do not let cord hang over edge of table or counter, or touch hot surfaces;
Do not place on or near a hot gas or electrical burner, or in a heated oven;
Do not use the appliance for other than the intended use. The appliance is for household
use only;
To disconnect, place the power button or switch to “OFF”, then remove the plug from
the wall outlet;
After unpacking the appliance, be sure to dispose carefully of the plastic bags so that
children or the infirm cannot reach them;
To reduce the risk of injury, do not drape cord over the counter top or table top where
it can be pulled on by children or tripped over unintentionally;
Never remove the Cappuccino nozzle when the steam control is opened;
SAVE THESE INSTRUCTIONS
Technical Data:
Please consult the rating place on the below or at the back of your appliance.
The level of equivalent weighted continuous accoustic pressure A, to which the user of this
appliance is subjected during normal use, is inferior to 70 dB (A).
3. SPECIAL CORD SET INSTRUCTIONS REGARDINGYOUR CORD SET:
A. A short power-supply cord is provided to reduce risks resulting from becoming entangled
in or tripping over a longer cord;
B. Longer extension cords are available and may be used if care is exercised in their use;
C. If an extension cord is used, the marked electrical rating of the extension cord should
be at least as great as the electrical rating of the appliance. If the appliance is of the
grounded type, the extension cord should be a grounding type 3-wire cord, and the
longer cord should be arranged so that it will not drape over the counter-top or table
top where it can be pulled on by children or tripped over;
D. Your product is equipped with a polarized alternating current line plug (a plug having
one blade wider than the other). This plug will fit into the power outlet only one way.
This is a safety feature. If you are unable to insert the plug fully into the outlet, try
reversing the plug. If the plug should still fail to fit, contact your electrician to replace
your obsolete outlet. Do not defeat the safety purpose of the polarized plug;
Note: Paragraph D only applies to USA and Canada.
4. PREPARATION
All accessories (filter-holder, measuring spoon, filters, water tank) must be washed with detergent
and tepid water.
25
Remove the water reservoir by pulling it outward and fill it with cold water. Turn the machine ON.
The power ON indicator lamp will light. Place an Espresso cup under the brew head (with the filter
holder inserted in the brew head) and turn ON the coffee function. You will hear the sound of the pump
and after a few seconds water will flow from the brew head. Allow water to flow until cup is filled.
When the machine is new, it is recommended that several cups of water be allowed to flow through
to clean it.
Sometimes the self-priming pump feature may not work due to a momentary “air lock” condition. If
water does not flow from brew head, place a cup under the cappuccino nozzle. Open steam control
and turn ON the coffee function, until water flows from the cappuccino nozzle. Close steam control,
as Espresso maker is now ready.
You must never operate the machine without water in the tank!
5. MAKING ESPRESSO
Preparing the appliance:
·
·
·
·
Remove the water tank by pulling it outward and fill it with cold water (water tank can also be
filled by raising the cover lid);
Insert plug into a wall outlet;
Turn the machine ON. The power ON indicator lamp will light;
Choose the Cremaker filter to use, according to the instructions on pages two and three (2, 3).
With ground coffee:
Place a measuring-spoon for each coffee to be prepared!
·
·
Fill the chosen filter with ground coffee using the measuring spoon provided. Place one level
measure of coffee in the filter for each cup of Espresso. Do not overfill. Gently tamp down coffee
with the tamper on the left side of your machine. Insert filter-holder into brew head, by turning
it to the right as you face machine;
Place one or two Espresso cups on the drip tray to line up with the spouts of the filter-holder.
With coffee pods:
With the coffee pod, you may prepare only one Espresso at a time!
·
·
Place a fresh coffee pod in the Cremaker filter. Insert filter-holder into brew head, by turning it
to the right as you face machine;
Place one Espresso cup on the drip tray to line up with the spouts of the filter-holder.
Brew coffee:
·
·
·
·
·
·
Make sure steam control is closed;
When the machine is ready,the temperature OK indicator lamp will light;
After completing all the above steps, your machine is now ready to brew coffee;
Press brew coffee position . After a few moments, Espresso will start to flow into the cups;
The more water you allow to flow, the softer the coffee will be.The espresso will have a light
brown foam floating on top;
To stop the water flow, simply press the coffee botton again.
Model ES35A is equipped with an electronic timer which allows you to choose in advance the
quantity of espresso you want to flow to the cups. It will automatically stop when the quantity
is reached.
26
The water volume adjuster may be adjusted as desired. The half filled cup symbol represents a
short coffee (about 2 ounces for 1 cup). On the opposite side, the full filled cup represents a tall
coffee (about 8 ounces for 1 cup). Place the water volume adjuster at any point, depending on
the taste you prefer. The more water you use, the softer the coffee flavour will be; less water
means a stronger coffee flavour.
You can stop the water flow at any time by turning the switch onto brew coffee position.
Filter holder removal:
After having brewed coffee, wait 10 to 15 seconds before removing the filter-holder.
·
·
·
To make more Espresso, or to remove the filter-holde r, move handle to the left. Be careful, as hot
water will be on top of the ground coffee or on the top of the coffee pod in the holder;
Knock out used coffee grinds or coffee pod from filter using filter retainer to keep it from fallin
out. For more Espresso repeat the above steps;
After Espresso preparation, rinse the the filter-holder and the used Cremaker filter.
Notes:
·
·
If you have just used ground coffee and want to use a coffee pod now, simply turn press the coffee
botton of your machine, and let the water clean the remaining powder;
With the coffee pod, you may prepare only one Espresso at a time!
6. PREPARING CAPPUCCINO
“Cappuccino” is the name given by the Italians to the mixture of Espresso and milk foam. This foam
is obtained by using the Cappuccino nozzle. Then the foam and a little bit of milk are blended with
the coffee.
Note: use larger cups (5–6 oz.) than those used for Espresso.
Preparing the appliance:
·
·
·
·
·
Remove the water tank by pulling it outward and fill it with cold water (water tank can also be
filled by raising the cover lid);
Insert plug into a wall outlet;
Turn the machine ON. The power ON indicator lamp will light;
When the temperature OK indicator light glows, the machine is ready to produce steam.
Slowly open steam control . A little portion of water will flow from the nozzle. Wait until steam
starts to come out from the nozzle and close steam control.
Making Steam:
·
·
·
·
·
·
·
Place the frothing jug half-filled with low fat milk under the cappuccino nozzle so that its tip is
just under the surface of the milk;
Press on the steam botton and wait untill the temperature indicator lamp will light;
Slowly open steam control to release steam;
Move pitcher in circular motion keeping the tip of frother just under surface of milk as it begins
to froth. The air intake holes on side of frother should not be immersed in the milk. Do not let
milk come to a boil since it will not froth;
When you have made enough froth, close steam control, and remove the pitcher;
Press on the coffee function to assure you refill the boiler;
Spoon the froth onto the Espresso in each cup and gently pour the hot milk along the side of the
cup. Top each cup of cappuccino with a dash of cinnamon, cocoa, nutmeg or chocolate shavings.
27
If you need to produce some more steam:
·
When the temperature OK indicator light glows, repeat all the steps above indicated.
Milk residues, when dry, can damage the cappuccino nozzle. You must clean it after each use. To
do it, remove it and rinse it well.
7. MAKING TEA
And you can make TEA as well!
Preparing the appliance:
·
·
·
·
·
·
·
Remove the water tank by pulling it outward and fill it with cold water (water tank can also be
filled by raising the cover lid);
Insert plug into a wall outlet;
Turn the machine ON. The power ON indicator lamp will light;
When the machine is ready,the temperature OK indicator lamp will light;
Place the cup with the tee bag inside under the cappuccino nozzle.
Open the steam control , and turn the coffee function ON. Water immediately drops from the
cappuccino nozzle.
When you reach the desired quantity of water,eam
turn off the coffee function, and close the st
control.
8. CLEANING AND MAINTENANCE
·
·
·
·
·
·
·
·
·
·
Clean the cappuccino nozzle each time after you have immersed it in milk; otherwise the inside
of nozzle and air intake holes become clogged and milk deposits on outside harden and are difficult
to remove. To clean – hold wet cloth very close to tip of nozzle and open steam control. Let steam
escape into the cloth for one or two seconds to clear out nozzle. Wipe outside of nozzle.
Clean by soaking in hot water, then replace. If necessar y, use a needle to clean air intake holes on
side of frother.
No Briel parts should be placed in the dishwasher. This will cause distortion and may result in the
parts not functioning properly or safely;
From time to time, remove lower section of frother by holding upper part and unscrewing lower
part. Clean carefully and reassemble;
Clean filter-holder and coffee filters with water after each use;
Remove drip tray and grid and wash with warm water. Use sponge to clean out drip area;
Ground coffee will adhere to the seal inside of the brew head. Keep it clean;
When the machine is not in use for a long period, drain stale water from machine by turning the
coffee function ON. However, do this only after you have filled reservoir with fresh water. Never
operate pump unless there is water in the machine;
Wash Cremaker filters and the filter-holder regularly;
The water tank and the drip tray can be removed for an easier cleaning;
The cappuccino nozzle can be removed from the steam tube for cleaning.
Descaling:
It is advisable to descale the appliance every 4- 6 months, depending on the hardness of the water
and the frequency of use.
·
·
·
·
28
Fill the water tank with a 50% water, 50% vinegar solution;
Place a recipient under the brew head without filter-holder;
Turn ON the coffee funtion and let most of the solution flow to a recipient;
Turn OFF the coffee function, put the recipient under the Cappuccino nozzle and open the steam
·
·
·
control;
When the water tank is nearly empty, close the steam control;
To remove traces of the descaling solution, fill the water tank with fresh water and turn ON the
coffee function. Let flow the equivalent to 2 and a half water tanks, and turn the coffee function
OFF;
Open the steam control, and turn the coffee function ON, and let the remaining water on the
water tank flow. Pay close attention to the water level, as you must never operate the machine
without water in the tank!
This operation may be hazardous if other substances are used instead of approved descaling
materials recommended for household coffee makers. Product failure due to scale accumulation
is not covered by the warranty. No other servicing should be attempted by the user.
Environment protection first!
Your appliance contains valuable materials which can be recovered or recycled.
Leave it at a collection point.
9. BRIEL TECHNOLOGY
The Aquastop System
The Aquastop system has 3 functions:
·
·
·
Eliminates most of the annoying dripping;
Has a water-return tube which allows the heated water to flow back into the water reservoir,
instead of dripping;
Security valve.
It starts working, when:
·
·
·
The machine is used for the first time;
The machine does not work for a long period of time;
During the usage, the water tank becomes empty.
Cremaker filter:
Is a filter that assures a velvety cream in all Espressos.
10. GUARANTEE
BRIEL- Indústria de electrodomésticos, S.A. guarantees your appliance for 2 YEARS* parts and labour
from the date of purchase, according to the following conditions:
·
·
·
This guarantee is limited to the the replacement of inefficient parts or assembly malfunctions in
Briel’s authorized service centers;
This guarantee is valid exclusively in the country where the appliance was bought;
To take advantage of this guarantee, present proof of purchase.
This guarantee excludes damage resulting from:
·
·
·
·
All appliances not being used according to the manufacturer’s instructions;
The connection of the appliance to a power supply with a voltage different to that shown on the
rating plate;
Exterior influences such as atmospheric discharges, floodings, etc;
A fall or impact (breakage of plastic or glass);
29
·
·
·
·
·
·
·
Incorrect handling not in compliance with the instructions for use;
Parts with natural consuming such as, filter-holder vedation joint, coffee filters;
Insufficient aftercare or cleanning, excessive limescale;
The use of abrasive detergents unsuitable for plastic items;
Damaged parts;
Coffee machines inwhich labels with the serial number and/or production date have been removed
or damaged;
Use for commercial purposes (including small offices).
Customer Service
At Briel´s authorized customer services.
Consult the list of authorized service centers provided with the appliance.
*
30
The Guarantee períod is valid only for the European Comunity. For more information contact the Briel´s local dealer
or the place of purchase.
11. TROUBLESHOOTING
Problems
Possible Causes
· The coffee has little or unpleasant · The ground coffee may be stale or too
acid;
taste;
Solution
· Try another brand;
· Always use freshly-ground coffee and
keep it in the fridge;
· Your tap water may be of bad quality · Use filtered water or bottled water;
or contain chloride;
· There is little or no creamy top; The · Coffee may be stale;
cream is too bright or fine;
· Coffee flows to rapidly;
· Very coarse grind;
· Always use freshly-ground coffee and
keep it in the fridge;
· Try a finer grind for espresso;
· Adjust the grinder level to a finer grind
(between level 2 and 3);
· Your coffee dose has less than 7 grams;· Increase the amount of coffee;
· Use the measuring spoon (1 spoon for
each cup);
· Water flows instead of coffee;
· Little pressure tamping the coffee;
· Tamp the coffee a bit more;
· Cremaker filter is not well adjusted;
· Clean and tighten the screw of the
filter;
· Replace the filter;
· The pod is not correctly placed;
· Center the pod in the filter;
· The filter is not adequate for pods or · Use the Cremaker filter for one dose
not able to use pods;
(for pods or 1 cup ground coffee);
· The coffee flows over the sides of the · Too much coffee in the filter, more · Reduce the amount of coffee;
filter holder;
than 7 grams;
· Use the measuring spoon (1 spoon for
each cup);
· You tamped the coffee too hard;
· Pod incorrectly placed;
· Gently tamp the coffee;
· Center the pod in the filter;
· The filter-holder is not correctly · T ighten the filter-holder;
placed in the machine;
· There are coffee remaining in the · Clean the brew-head;
brew-head;
· Cremaker filter or filter-holder are · Clean and unscrew the screw in the
obstructed;
Cremaker filter;
· Replace the filter *;
· Clean the filter-holder;
· Replace the filter-holder *;
· Water drops from the steam nozzle;
· There are coffee grounds in the cup.
· Steam control is opened;
· Close steam control;
· Steam control is worn;
· Replace steam control *;
· You are using a very fine grind;
· Try another coffee brand for espresso;
· Adjust the grinder level to a coarser
grind (between level 2 and 3);
· There are coffee remaining in the · Clean the filter-holder with tap water;
filter-holder;
· Cremaker filter is damaged / holes · Clean and tighten the screw of the
are very large;
filter;
· Replace the filter *;
· The coffee tastes burned;
· You are using a very fine grind;
· Try another coffee brand for espresso;
· Adjust the grinder level to a coarser
grind (between level 2 and 3);
· There is too much coffee in the filter, · Use a smaller amount of coffee;
more than 7 grams;
· Use the measuring spoon (1 spoon for
each cup);
· The cups are not filled equally;
· One cup fills faster than the other;
· You tamped the coffee too hard;
· Gently tamp the coffee;
· The temperature of the water may be
too high;
· Proceed as if you were about to prepare
a coffee using no coffee;
· Verify / replace the thermostat *;
· The ground coffee has not been evenly
spread in the filter;
· Gently tamp the coffee;
· Filter-holder is not clean or is · Verify / clean filter-holder;
obstructed;
· Replace the filter-holder *;
· The Espresso flows too slowly or not at · Too much coffee in the filter, more · Reduce the amount of coffee;
all.
than 7 grams;
· Use the measuring spoon (1 spoon for
each cup);
31
Problems
Possible Causes
· The Espresso flows too slowly or not at · Very fine grind;
all.
Solution
· Try another coffee brand for espresso;
· Adjust the grinder level to a coarser
grind (between level 2 and 3);
· There are coffee remaining in the · Clean the brew-head;
brew-head;
· There is calcareous in the machine;
· Descale the machine as described in
the instructions manual;
· There is no water flow and the pump · Check out if the water tank is filled
is abnormally noisy;
and correctly placed;
· Insufficient pressure
· The coffee is not hot enough;
· Verify pressure / replace pump *;
· The machine has not pre-heated · Verify the temperature lamp;
enough time;
· Place the filter-holder without coffee
in the machine as it pre-heats, so that
the filter-holder can also heat;
· Allow some water to flow through the
filter-holder, so that it can get warm;
· Cold cups
· Pre-heat the cups with the steam
nozzle;
· Low temperature water flows from · Verify / replace thermostat *;
the brew-head;
· Verify / replace resistance *;
· You cannot froth the milk.
· The nozzle is obstructed;
· Clean the steam nozzle;
· Inadequate recipient;
· Use a tall, narrow container, preferably
metal.
· Inadequate milk;
· Use cold whole milk, preferably low
fat milk;
· Waters flows before steam;
· This is a normal procedure;
· Allow water to flow and place the
recipient only as steam starts;
· No steam;
· Press the steam button (when
applicable) until the temperature lamp
lights;
· The boiler does heat when you press · Verify / replace thermostat *;
the steam button;
· Verify / replace resistance *;
· The pod or the filter are gripped in the · You did not wait for 15 seconds before
machine;
removing the filter-holder;
· Wait for 15 seconds before removing
the filter-holder;
· When removing the filter-holder, make
some lateral pressure to let the filter
or pod fall;
· The machine is not working at all;
· Check the connections;
· Incomplete connections;
· The machine ran out of water and the · Wait 30 min. before using the machine
safety system has been triggered;
again;
*
32
This must be done in an authorized service facility only.
3. ÑÏÅÖßËÍÈ ÓÊÀÇÀÍÈß ÇÀ ÁÅÇÎÏÀÑÍÎÑÒ:
·
4. ÏÎÄÃÎÒÎÂÊÀ
43
5. ÏÐÈÃÎÒÂßÍÅ ÍÀ ÅÑÏÐÅÑÎ :
44
6. ÏÐÈÃÎÒÂßÍÅ ÍÀ ÊÀÏÓ×ÈÍÎ:
7. ÏÐÈÃÎÒÂßÍÅ ÍÀ ×ÀÉ
8. ÏÎ×ÈÑÒÂÀÍÅ ÍÀ ÌÀØÈÍÀÒÀ
45
9. ÒÅÕÍÎËÎÃÈÈ ÍÀ BRIEL
10.
46
ÃÀÐÀÍÖÈß
11. ÏÐÎÁËÅÌ- ÏÐÈ×ÈÍÀ- ÐÅØÅÍÈÅ
47
FAP - Indústria de Electrodomésticos S.A.
MAIA - Portugal
www.fapindustria.pt
EL734D02
Classic Series