1
TIPS BEFORE INSTALLATION
RESET
CAUTION
TEST
!
UNIT OPERATION HAZARD
Failure to follow this caution may result in damage to unit
components.
To avoid installation/operating difficulties, read the
instructions thoroughly.
Your Room Air Conditioner unit is designed to be highly efficient
and save energy. Follow these recommendations for greater
efficiency.
1. Select thermostat setting that suits your comfort needs and
leave the thermostat at that chosen setting.
2. The air filter is very efficient in removing airborne particles.
Keep the air filter clean. Typically, the filter should be
cleaned once a month. More frequent cleaning may be
necessary depending on outdoor and indoor air quality.
3. Use drapes, curtains, or shades to keep direct sunlight from
heating your room, but DO NOT obstruct the air
conditioner. Allow air to circulate around the unit without
obstructions.
4. Start your air conditioner before outdoor air becomes
hot/cold and uncomfortable. This avoids an initial period of
discomfort while the unit is cooling or heating off the room.
5. When outdoor temperature is cool enough, use HIGH or
LOW FAN only. This circulates indoor air, providing some
cooling comfort, and utilizes less electricity than when
operating on a cooling setting.
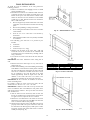
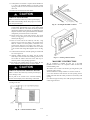
Your Room Air Conditioner was designed for easy installation in a
single or double--hung window.
NOTE: This unit is NOT designed for vertical (slider type)
windows.
NOTE: Save the shipping carton and packing materials for future
storage or transport of the unit. Please check the contents of the
hardware kit against the corresponding model check list, prior to
installation of the unit. See lists below in Fig. 4.
3/4”Screws (10)
Shutter Clamp(2)
1/4”Screws (23)
Top Channel(1)
Bottom Channel(1)
(For 10K to 12K models)
Washer(10)
Side Curtain RH(1)
Side Curtain LH(1)
Bottom Channel(1)
(For 14K to 23K models)
---Factory Installed)
Lock Washers(4)
1--- 1/2”x1/4 Bolts(4)
Seal(1)
1/4” Nuts(4)
Foam (1)
Mounting
Brackets(2)
Angle
Brackets(2)
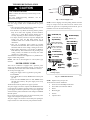
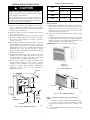
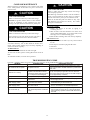
POWER SUPPLY CORD
This room air conditioner is equipped with a protective power
supply cord that senses current leakage (see Fig. 3). Unit power is
automatically disconnected when unsafe conditions are detected.
To test the power supply cord:
1. Plug power supply cord into a grounded 3--prong outlet
2. Press RESET.
3. Press TEST (listen for click; RESET button will trip and
pop out).
4. Press and release RESET (listen for click; RESET button
will latch and remain in). The power supply cord is ready
for operation.
The Reset button must be pushed in for proper operation.
The power supply cord must be replaced if the RESET button fails
to trip when the test button is pressed or fails to reset. A damaged
power supply cord must be replaced with a new power supply cord
obtained from the product manufacturer. The damaged cord MUST
NOT be repaired.
Do not use the power supply cord as an off/on switch. The power
supply cord is designed as a protective device.
The power supply cord contains no serviceable parts. Opening the
tamper--resistant case voids all warranty and performance claims.
A06531
Fig. 3 --- Power Supply Cord
Double
Adhering
Seal(1)
End Cap &
Leveling Legs(2)
Fig. 4 --- Installation Hardware
NOTE: Surplus screw(s) for spare use.
Tools needed for window installation
S
S
S
S
S
S
5
Screw drivers: both Phillips and flat head
Power drill: 1/8 inch diameter drill bit
Pencil
Measuring tape
Scissors
Carpenters level
A06532