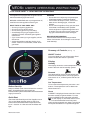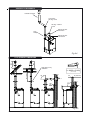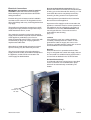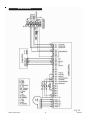
1
March 2010 NEOflo Condensing Water Heaters Operating, Installation and Servicing Instructions Working towards a cleaner future Serial No: WARNING: If the information in these instructions are not followed exactly, a fire or explosion may result causing property damage, personal injury or death. - Do not store or use gasoline or other flammable vapours and liquids in the vicinity of this or any other appliance. - WHAT TO DO IF YOU SMELL GAS • Do not try to light any appliance. • Do not touch any electrical switch; do not use any phone in your building. • Immediately call your gas supplier from a neighbour's phone. Follow the gas supplier's instructions. - Installation and service must be performed by a Registered installer. A page is included on the inside back page of this booklet for recording commissioning and service details. NEOflo Condensing Water Heaters Models: SC25/200 SC25/300 SC25/400 0087 NEOflo Operating, Installation and Servicing Instructions for GB, IE, M2574 TECHNICAL DATA Gas Category, Type and Supply pressure I 2H G20 @ 20 mbar Permitted Flue Systems Flue Connection Maximum Flue Equivalent Lengths Concentric 80/125 mm Twin (combined length) 80 mm Maximum Flue Temperature Gross Input Net Input Output Gas Rate, NG B23, C13, C33 80 mm 20m FEL 40m FEL 75 °C 26.3 kW 23.7 kW 25.0 kW 2.4 m3/h Combustion NG, CO2, CO NOx Class 9.2 – 9.5 %, 10- 30 ppm 5 Efficiency net 105% Gas Connection Tank Construction & Type Minimum Working Water Pressure Maximum Working Water Pressure Water Inlet Connection Hot Water Connection Drain Connection Condensate Connection Recovery Rate through 50°C Drawoff rate at operating pressure Condensate rate 22mm Copper Stainless Steel, Type 6 0.2 bar 6.0 bar G ¾” M G ¾” M 22 mm 40 mm 430 l/h 0.61 litres/sec 2 l/h Electrical Supply Power Consumption External Fuse Rating Pump, Lockout & Running maximum rating Protection rating 230 V 50Hz 50 to 130W 3 Amp 0.8 Amp IP 20 Nominal Capacity Time to recover a tank through 50°C Weight, empty Weight, full Height Width Depth Service clearance, infront Service clearance, rear Service clearance, left / right / above NEOflo 25/200 200 29 103 303 1570 600 600 800 100 300 25/300 300 44 127 427 1575 730 730 800 100 300 25/400 400 59 151 551 1900 730 730 800 100 300 litres mins kg kg mm mm mm mm mm mm 13/03/09 GB, IE, IMPORTANT INFORMATION Reproduction of any information in this publication by any method is not permitted unless prior written approval has been obtained from Andrews Water Heaters. Andrews Storage Water Heaters have been designed and manufactured to comply with current International standards of safety. In the interests of the health and safety of personnel and the continued safe, reliable operation of the equipment, safe working practices must be employed at all times. The attention of U.K. users is drawn to their responsibilities under current Health and Safety Regulations. This Heater is not intended for use by persons (including children) with reduced physical, sensory or mental capabilities, or lack of experience and knowledge, unless they are given supervision or instruction concerning the use of it by a person responsible for their safety. Children should be supervised to ensure they do not play with the appliance. These instructions apply in the UK and must be followed except for any statutory obligation. All installation and service work on the Andrews Water Heater must be carried out by a competent person, failure to install correctly could lead to prosecution. The Andrews Water Heaters policy is one of continuous product improvement, and therefore the information in this manual, whilst completely up to date at the time of publication, may be subject to revision without prior notice. Further information and assistance can be obtained from: Andrews Water Heaters Wood Lane Erdington Birmingham B24 9QP Tel: +44 (0)845 070 1056 Fax: +44 (0)845 070 1059 Email: [email protected] Website: www.andrewswaterheaters.co.uk Check List Item Qty Andrews SC 25/200, SC 25/300 or SC 25/400 Water Heater Installation Guide, Operation and Service Manual Condensate pipe, 385 x 40 mm Condensate 40 mm Elbow Twin to Concentric Adapter parts. NEOflo Water Heater 1 1 1 1 1 1 02/02/09 List of Figures & Tables CONTENTS Section TECHNICAL DATA Page Inside cover User Instructions 3 User Control 3 Fig 2.1 General Dimensions 7 Fig 3.1 Open Vent Example 9 Fig 3.2 Re-Circulation Design 9 Fig 3.3 De-Stratification Design 9 Fig 4.1 Unvented Design 11 Fig 5.1 Condensate Soakaway 11 Fig 5.2 Condensate Soil Stack 11 8 Fig 5.3 Condensate Internal Sink 11 8 8 8 10 10 12 12 17 17 18 Fig 5.4 Condensate Gully 11 Fig 6.1 Flue Parts 13 Fig 6.2 Open Flue Systems 14 Fig 6.3 Horizontal Flue Systems 14 Fig 6.4 Vertical Flue Systems 15 Fig 6.5 Flue Terminal Dimensions 15 Fig 6.6 Terminal Locations 16 Fig 7.1 Electrical Connections 18 20 Fig 7.2 Wiring Diagram 19 20 20 20 Fig 8.1 Throttle Adjustment 20 Fig 8.2 User Control 20 Fig 9.1 Throttle Adjustment 24 6 21 21 21 22 Fig 9.2 LCD Display 25 Fig 9.3 Heater Components External 26 Fig 9.4 Heater Components Internal 27 Table 1.0 Lockout Codes 21 INSTALLATION OF HEATER Heater Location Water Quality & Treatment Water Connections Unvented Water Supply Condensate Drain Flue Systems Flue Equivalent Length Calculation Ventilation Requirements Gas Supply Electrical Connections COMMISSIONING Filling Starting Commisioning the Burner SERVICING Routine Service Burner & Combustion Chamber Spark & Sense Electrode Air & Flue Duct Seals Condensate Syphon Gas Rate & Combustion CHANGING COMPONENTS Pressure Temperature Safety Valve LCD Display High Limit Sensor Control Sensor Flue Thermostat Ignition Control Electrode & Gasket Gas Valve Fan Venturi SPARE PARTS Fig 1.1 5 5 5 5 6 GENERAL & SAFETY INFORMATION Gas Safety Standards Health & Safety Regulations Legionella Cold Water Supply Systems FAULT FINDING OF HEATER INSTALLATION Operation Controls & Lockouts Diagnostics Page 23 23 23 23 23 23 23 23 23 24 24 24 24 24 24 24 25 25 25 COMMISSIONING & SERVICE HISTORY Inside back cover NEOflo Water Heater 2 12/03/10 NEOflo USER'S OPERATING INSTRUCTIONS FOR YOUR SAFETY - READ BEFORE OPERATING This appliance is equipped with an ignition device which automatically lights the burner. WARNING * Do not remove or adjust any component part of this water heater; contact the installer. * If this heater developes a fault, such as hot water from a discharge pipe, contact the installer. * Do not use this appliance if any part has been under water. Immediately call a qualified service engineer to inspect the appliance and to replace any part of the control system and any gas control which has been damaged. BEFORE OPERATING after a prolonged time off, smell all around the appliance area for gas. WHAT TO DO IF YOU SMELL GAS * Do not try to light any appliance * Do not touch any electric switch * Do not use any phone in your building. * Immediately call your gas supplier from a neighbour's phone. Follow the gas supplier's instructions. * If you cannot reach your gas supplier, call the fire service. * Isolate the appliance with the Service Cock inside. If this is not accessible, isolate at the gas meter. IMPORTANT INFORMATION Incorrect water balance will cause premature failure of this heater. Such damage is not covered under warranty. Summary of Controls (See Fig. 1.1) ON/OFF Switch Turns the Heater On and Off and when illuminated indicates the Heater is powered. Display Standby The display shows the current temperature of the water in the tank and the standby symbol. Demand The Heater will be running and the display will show the tank temperature, and a tap symbol. If the burner is on, a flame symbol willl also be shown. Set Temperature Fig 1.1 To set a new set temperatures press the + and buttons. The temperature can be altered between 45 and 70°C. Before Start Up Keep the Heater area clear and free from combustibles, flammable liquids and chemicals. Ensure that the system is filled with water and the water supply is turned on. Reset If ‘RESET’ is displayed it means the Gas Control has been unable to light the Heater. To reset, press the RESET button below the indication on the display or, the Reset button on the Burner Control behind the lower front panel. If this requires repeated use, there is a fault that will require the attention of a qualified Engineer Quick Start Check that the Electricity and Gas Supplies are on. Turn on the Heater with the switch on the Front Panel and set the desired water temperature with the + / - buttons. In a few seconds the Heater will light. NEOflo Water Heater 3 02/02/09 De-Stratification If your installation has been equipped with a destratification pump wired from the Heater, a Pump symbol will show on the display when it is running. Other symbols If the wrong buttons are pressed it is possible that an engineering mode might be accidentally entered and different symbols will be displayed. In this instance, do not press any buttons for at least 60 seconds and the control will revert back to a normal display. Anti Legionella - Default Off The Heater has the option to automatically run a high temperature Anti-Legionella programme. The period between these runs and the temperature can be selected by the Commissioning Engineer. Frost Protection This Heater is provided with Frost protection and will run if the temperature of the water in the tank drops below 6°C and run until it is 16°C. It uses the De-Stratification pump if fitted. Note: The Heater must be connected to gas and mains electricity for this function to operate. Cleaning The casing is finished with a painted epoxy paint and will mark if abrasive cleaners are used. It should be cleaned using standard non-abrasive proprietary products. Service & Maintenance It is a mandatory requirement that any gas work carried out must be by a registered engineer with an appropriate accreditation. It is recommended that the Heater is serviced at least every twelve months. NEOflo Water Heater 4 02/02/09 GENERAL & SAFETY INFORMATION BS 7206: Specification for unvented hot water storage units and packages. The NEOflo range features a stainless steel tank with a stainless steel integrated heat exchanger and a fully automatic electronic control. It also provides mains outputs for Standby, Running and Lockout, for remote use. The following could be relevant dependant upon the installation: I/M2 Purging procedures for non-domestic gas installations. The appliance has been designed for use with NATURAL GAS only and is manufactured to give an efficient, reliable and long service life. I/M5 Soundness testing procedures for industrial and commercial gas Installations. To ensure the continued, trouble-free operation of the Heater at maximum efficiency, it is essential that correct installation, commissioning, operation and service procedures are carried out strictly in accordance with the instructions given in this manual. I/M11 Flues for commercial and industrial gas fired boilers and air heaters. I/M16 Notes on installation of gas pipework, (excluding 25mm and below). IGE/UP/10 Pt.1: Edition 2 Installation of Gas Appliances in Industrial and Commercial Premises By law, installation and commissioning of the heater must be carried out by a competent person. NOTE: Consideration should be given to amendments or updates to the above standards. The heater(s) must be installed in accordance with the following requirements; Health and Safety Regulations It is the duty of manufacturers and suppliers of products to ensure, so far as is practicable, that such products are safe and without risk to health when properly used and to make available to users, adequate information about their safe and proper operation. This Water Heater should only be used in the manner and purpose for which it was intended and in accordance with the instructions in this manual. Although the Heater has been manufactured with paramount consideration to safety, certain basic precautions specified in this manual must be taken by the user. It is imperative that all users of the Heater must be provided with all the information and instruction necessary to ensure correct and safe operation. GAS SAFETY (INSTALLATION AND USE) REGULATIONS BUILDING REGULATIONS THE WATER SUPPLY (WATER FITTINGS) REGULATIONS Additionally the installation should be in accordance with all relevant requirements of the Local Gas Supplier, Local Authority and recommendations of the British Standards and Codes of Practice detailed below. British Standards and Codes of Practice BS 6700: Specification for design, installation, testing and maintenance of services supplying water for domestic use within buildings and their curtilages. This standard supersedes the following British Standards and Codes of Practice: CP99, CP310, CP324, 202, CP342 Part 2, Centralised Hot Water Supply. Combating Legionella Water systems in buildings have been associated with outbreaks of Legionnaires’ Disease, particularly in health care facilities where occupants are significantly more susceptible to infection. BS 5440: Installation of flues and ventilation for gas appliances of rated output not exceeding 60kW. Part 1 Specification for installation of flues. Part 2 Specification for installation of ventilation for gas appliances. In recognition of the risks in hospitals, a Code of Practice for the Control of Legionella in Health Care premises has been issued by the Department of Health. Codes of Practice applicable to other premises have been published by other organisations, principally the Health and Safety Executive (HS) (G70) and the Chartered Institute of Building Services Engineers (CIBSE, TM13). BS 5546: Installation of gas hot water supplies for domestic purposes. BS 6891: Installation of low pressure gas pipework of up to 28mm in domestic premises. NEOflo Water Heater 5 02/02/09 All Codes of Practice draw attention to the design and operation of water systems with reference to avoidance of factors that favour colonisation by Legionella bacteria. These factors include stagnation, lukewarm conditions (20ºC to 45ºC) and the accumulation of debris, scale and corrosion in the base of tanks and calorifiers. Andrews Water Heaters has commissioned an independent evaluation of their products to investigate their resistance to build-up of Legionella bacteria. Experiments were conducted to determine whether, following a substantial challenge by Legionella Pneumophilia, after overnight and stagnation conditions, the system was rendered free from viable recoverable Legionella. It was found that at 61ºC, following a challenge of approximately 107 organisms per litre, within one hour, more than 99.999% of organisms had been killed. After a subsequent stagnation period, sampling did not reveal any residual contamination. The design of the base of the Water Heater precludes Legionella colonisation, even after build-up of debris. The burner positioning ensures that the water at the bottom of the heater reaches the same, or higher temperature as in the rest of the heater. Based on data obtained through experiment, this Water Heater can be described as Legionella resistant as it is considered unlikely that, at the temperature tested, the organism would colonise the water heater and present a possible health risk. Cold Water Supply System (See Page 9) The appliance may be connected to an open vent or sealed system supply. When connected to a sealed system an unvented water kit must be installed with a minimum water pressure of 1 bar. The heaters are factory fitted with temperature and pressure relief valve. Flue Systems (See Page 12) The appliance is fitted with two 80mm ducts for the connection of air inlet and flue discharge. A number of different flue and air supply configurations can be used depending on the accessories that are chosen. NEOflo Water Heater 6 02/02/09 GENERAL DIMENSIONS 380 345 F 164 66 100 45 Electric & BMS entry Fig 2.1 LH Side D G Flue PT Valve Hot Out Drain 57 55 C 128 256 Width Front 55 57 Air In Cold In Inspection Hatch Height A B Depth RH Side D NEOflo Water Heater Condensate - Left or Right exit E Gas - Left, Right or Rear entry 66 100 Service Clearance all models mm Model Width Depth Height 25/200 600 600 25/300 730 25/400 730 Left & Right 100 Above 300 In Front 800 A B C D E F G 1570 130 300 300 226 236 240 226 730 1545 194 365 365 290 233 237 290 730 1900 194 365 365 290 233 237 290 7 11/08/09 The heater is fitted with an inspection point and the tank should be inspected at least annually. (Fig. 2.1 & 9.3) INSTALLATION OF HEATER Location The location selected for installation of the heater must allow the provision of a satisfactory flue, and adequate air supply (for type B23) A purpose built water heater room or compartment is strongly recommended. Water Connections The cold water inlet and hot water outlet connection nipples are identified on top of the appliance. Connect the cold water feed and hot water outlet to these nipples with union adaptors for ease of servicing. Connect the supplied isolating valve to the drain connection and pipe to a suitable discharge point. A manual valve for isolation of the gas supply to the Heater should be installed nearby and it should be clearly identified and readily accessible for use at all times. If a purpose built water heater room is not available, measures should be taken to protect the Heater from damage and prevent any extraneous matter from being stored on or around the Heater. See BS 6644 Clauses 4, 5 and 6 for details. CAUTION! Do not apply excessive torque to these nipples when making these connections. The use of an appropriate pipe sealing compound is recommended Secondary Return (Fig 3.2) There must be easy access to the water heater room and Heater at all times. The Heater must be located in an area where leakage from the tank, water connections or the combination temperature and safety valve will not result in damage to the area adjacent to it. When such locations cannot be avoided, a suitable drain tray must be installed under the Heater. The drain tray must be no deeper than 38mm and must be 100mm wider and longer than the heater. It should be piped to an adequate drain using 20mm (0.75in) diameter pipe, angled for proper drainage. A Secondary Return may be fitted into the cold water inlet to the storage cylinder down stream from the connection of any unvented system kit or may be coupled into the storage vessel drain point using suitable tee connections. In all cases, for serviceability, the recirculation pipe must be fitted with a stop valve immediately before the reconnection point. De-Stratification Pump (Fig 3.3) A de-stratification pump can be controlled by the Heater. It will operate automatically dependant upon the temperatures in the tank. It is connected into the Heaters main wiring centre.The default condition for the pump is ‘Off’. (See P22 for setting) Access must be provided to the front of the water heater with adequate clearance for servicing and operation. (Fig 2.1) The floor on which the heater is installed must be flat, level and of sufficient strength to withstand the weight of the Heater when filled with water, and should satisfy the requirements of the Local Authority & Building Regulations. Any combustible material adjacent to the heater must be so placed and shielded as to ensure that it’s temperature does not exceed 66ºC (150ºF). Open Vented Design (Fig 3.1) The Heater must be supplied from a cold water feed cistern and the hot water supply pipe must be fitted with an open vent pipe in accordance with BS 5546 and BS 6644.The Water Supply (Water Fittings) Regulations must be observed when installing the system. The cold water feed cistern must have an actual capacity greater than the hourly recovery rate of the heater or heaters to which it is fitted, the minimum actual capacity allowed for a feed cistern being 227 litres (50 gallons). Water Quality and Treatment When installing an Andrews Water Heaters in hard water areas we would recommend that a water treatment specialist is consulted. In hard water areas, scale formation can occur in all hot water systems and water heaters. The higher the temperature and volume of water used, the more problematic the scale build-up can be. Water treatment is normally recommended when the hardness reaches 100 - 150 ppm (7 – 10 degrees Clark) and above. This problem can be minimised by reducing the water temperature in, the Heater and by fitting suitable water pre-treatment equipment. Andrews strongly recommend water pretreatment is fitted, the base-exchange type of softener is recommended. NEOflo Water Heater The actual cistern capacity is the capacity to the normal water level of the cistern. All cisterns should be manufactured to the relevant British Standard. The distance from the normal water level to the top of the cistern should comply with that specified by the Water Authorities. 8 03/03/09 NEOflo OPEN VENT EXAMPLE Service Valve PT Valve Outlets Minimum 2.0m Service Valve Hot Out Cold In Fig 3.1 Drain NEOflo SECONDARY RETURN DESIGN NEOflo DE-STRATIFICATION DESIGN 3 4 Outlets 2 1 Cold In Hot Out 5 1. Pressure Reducing Valve 2. Non Return Valve 3. Expansion Vessel 4. Pressure Relief Valve Pump 5. Temp & Pressure Relief Valve Pump 6 6. Drain Cock Drain Drain Fig 3.3 Fig 3.2 NEOflo Water Heater 9 03/03/09 Unvented Water Supply (Fig. 4.1) Condensate Drain Unvented Systems should only be fitted by an Approved Installer Condensation is formed in the heater and this must be continuously discharged into a drain. This can be acomplished by a drop of around 5 mm for every 100 mm of pipework. A trap is supplied which should be connected into a drain via a tundish or air break. (Figs.5.1, 5.2, 5.3, 5.4) The condensate flow must not be allowed to block otherwise the heater will fail to work correctly. NOTE: An air break is required downstream of the trap to protect the Heater from blockages and subsequent damage. The appliance can produce up to 2 litres of condensate per hour. When using the Heater on an unvented hot water storage system, the Unvented System Kit, part number B314, available from Andrews Water Heaters must be fitted. See Parts List Page 25. When used in an unvented system, the Heater will supply hot water at 3½ bar or the pressure available at the mains feed if this is lower. During conditions of no-flow, system pressure may rise to a maximum of 6 bar, whilst the burner is operating. When testing the system, it is recommended that a maximum test pressure of 7bar is employed. Never discharge the condensate into a sink, bath, bidet or toilet etc. A 25 litre expansion vessel is suitable for the stored volume of all models of the Heater and an average pipework system. FOR SYSTEMS WITH LARGER PIPE VOLUMES OR ADDITIONAL STORAGE, EXPANSION VESSELS WITH GREATER CAPACITY ARE AVAILABLE. Assemble the components of the unvented system kit as shown in Fig. 4.1. The condensate trap must be connected in a minimum diameter of 19 mm plastic pipe inside a building. External pipework and that passing through a wall to the outside should be run in a min of 32mm diameter. All external pipework should be insulated to protect against frost. The length of external drain pipe should be kept as short as possible and not more than 3m. IMPORTANT: When assembling the Pressure Reducing Valve and Double Non-return Valve, ensure that the flow arrows marked on the components are pointing in the direction of flow i.e. towards the Heater. The relief valves fitted to this appliance must not be used for any other purpose. No fitting should be installed between the expansion valve and the cylinder. The cold water for services may be drawn from the 22mm compression port on Pressure Reducing Valve. The water pressure at this point will be similar to that available at the hot water outlet of the water heater. If this port is not used, it should be sealed with the blanking plug supplied. If higher flow rates are required for the cold water services, a suitable tee fitting should be fitted to the pipework, upstream of the Pressure Reducing Valve. The pipework fitted to the tundish outlet should be at least 28mm diameter and made of metal it should be terminated at a suitable drain (see Building Regulations Approved Document G3). All fittings and materials supplying water to the storage vessel must be suitable for use with drinking water and listed in the current Water Research Centre “Materials and Fittings Directory”. Installation of unvented hot storage water systems must comply with Part G of Schedule 1 of the Building Regulations. NEOflo Water Heater 10 02/02/09 NEOflo UNVENTED SYSTEM DESIGN Expansion Vessel Temperature/Pressure Relief Valve Hot Water Wall Bracket Assembly Hose Assembly Cold Water Inlet of Water Heater Pressure Reducing Valve/Strainer Check Valve Expansion Valve Tundish CONDENSATE DISPOSAL METHODS Balanced Cold Water Take-off (if required) i MIN 110mm FROM A BRANCH PIPE CONDENSATE DISPOSAL METHODS 110MM SOIL / DRAIN ST ACK STACK Fig 4.1 Cold Water Feed HEA TER HEATER Soakaway Soil / Vent Stack You can form a soakaway by using a 150mm Dia drain pipe cut to 400mm long (approx) Filled With Limestone Chippings or Equivalent. Fig 5.2 110MM SOIL / DRAIN Fig 5.1 There is no requirement for an additional trap or air break when connecting drain pipework to an internal or external soil or vent stack HEA TER HEATER HEA TER HEATER SINK MIN 450mm UP TO 3 FL OORS FLOORS Internal Sink Gully There is no requirement for an additional trap or air break when connecting drain pipework downstream of a sink There is no requirement for an additional trap if discharging direct into an open gully. Fig 5.3 NEOflo Water Heater Fig 5.4 11 08/06/09 Examples: A C33 Concentric flue system that uses one straight length and one 90° bend. 1 x 1m straight length 1.0 1 x 90° bend 1.5 Total (within 20m limit) 2.5 Flue Systems The appliance can be installed using a number of alternative arrangements depending upon the installation requirements It is delivered with its two 80 mm connection points combined into a 80/125 concentric outlet on the left. Flue components are ordered separately as required. A C13 or C33Concentric system that rises from the Heater and uses eight straight lengths and seven 90° bends. 8 x 1m straight lengths 8.0 7 x 90° bends 10.5 Concentric Adapter 0 Terminal 0 Total (within 20m limit) 18.5 Available Flue Types Open Flue (Type B23) This is an open flued arrangement where the air for combustion is drawn from the Water Heater room and because of this the room must be ventilated. If the Heater is installed in a compartment then it will require both a high level and a low level vent. See Page 17. Open Flue Type B23 The maximum FEL of flue in this configuration is 40 metres. The flue products are discharged either horizontally or vertically using any of the supplied separate duct components. The air inlet connection to the appliance must be fitted with a Debris Guard. Air is drawn from the room or compartment in which the heater is installed and therefore the room or compartment must be ventilated. See Page 17. Room Sealed (Type Cxy ) There are a two approved room sealed arrangements where both the air inlet and flue discharge terminate outside the building. Type C13 Flue and air ducts terminate horizontally in the same position The flue duct can discharge either vertically or horizontally by selection of the correct flue terminal. The flue pipe can be fitted with 90 and 45 degree bends as well as extensions. Type C33 Flue and air ducts terminate vertically in the same position Example: A B23 system with air collected from the plant room and the flue exiting via four straight length and four 90° bends to a roof terminal. 4 x 1 m straight lengths of FLUE. 4.0 4 x 90° bends of FLUE 14.0 1 x Roof Terminal 6.6 Total (within 40m limit) 24.6 Flue and air ducts are supplied to a concentric design (80/125). See Fig. 6.1 for component choices. Flues should slope back to the Heater by 3 degrees. Terminal positions must comply with the requirements detailed in Fig. 6.6. Maximum Flue Lengths The combustion fan fitted to the appliance moves the air and flue products through the system and can provide sufficient capacity for a Flue Equivalent Length (FEL) of 20 metres for type C13 and C33 systems and 40 metres for type B23 system. Flue support All installed flues, vertical or horizontal, should be supported every 1m using the appropriate brackets. Fixing the Wall Terminal A hole size of 175mm is recommended. The terminal should be installed with a three degree slope back to the Heater and the gap around it filled with mortar, both on the inside and outside. (See Fig 6.5). Wall plates can then fixed inside and out to present a clean finish. Each flue accessory such as bends and straight lengths restrict the flue system and have a FEL which must be added together to determine the total. NB: For C13 and C33 systems the Terminal and the Twin Flue to Concentric Adapter do not have to be included, they have already been taken into account. Referring to the diagrams Fig. 6.2, 6.3, 6.4, 6.5 select a suitable flue system for the particular installation requirement and then calculate the FEL of the system, this must not be greater than that stated above. NEOflo Water Heater Fixing a Vertical Terminal A suitable flashing for the roof angle should be selected and fitted to the vertical terminal. The Terminal should then be fitted to the roof, securing it from below with the appropriate bracket. (See Fig 6.5) 12 09/06/09 Balanced Flue. FEL NB Do not include the Twin Adapter nor the Terminal 1m length 1.0 45° bend 0.8 90° bend 1.5 Open Flue. FEL NB Do not include the Twin Adapter 1m length 1.0 45° bend 1.0 90° bend 3.5 Horizontal Terminal 5.5 Vertical Terminal 6.6 Flue Parts Twin to Concentic Kit, 200/300 Twin to Concentic Kit, 400 Horizontal Terminal Vertical Terminal 1m Concentric Length Flue Parts Concentric 90° Bend Concentric 45° Bend Debris Guard Condensate Trap Kit Flue Clamp, 125 mm Part Number G101 G102 G108 G107 G111 Part Number G110 G109 G126 G127 G128 FLUE PARTS Horizontal Terminal Concentric 45° Bend 0.8 FEL Twin to Concentric Kit Concentric 90° Bend 1.5 FEL 25/200: 375mm 25/300 & 25/400: 500mm Vertical Terminal 6.6 FEL 1m Concentric Length 1.0 FEL Debris Guard 0.0 FEL Fig 6.1 NEOflo Water Heater 13 09/12/09 OPEN FLUE EXAMPLE Vertical Terminal Debris Guard 125mm length Horizontal Terminal 80mm Air duct connection Incline 3° back to Heater 80mm Flue duct connection Fig 6.2 HORIZONTAL FLUE EXAMPLE Concentric 90 deg. bend Horizontal Terminal SC 25/200: 375mm SC 25/300: 500mm SC 25/400: 500mm 90 deg. x 80mm bend 80mm Air duct 110mm extension Twin Adapter 80mm Air duct connection Fig 6.3 NEOflo Water Heater 14 09/06/09 VERTICAL FLUE EXAMPLE Vertical Terminal Concentric 90 deg. bend 90 deg. x 80mm bend 80mm Air duct extension Twin Adapter 80mm Air duct connection Fig 6.4 1000mm Clip pipes every 1000mm 52mm 600 3° 600 FLUE TERMINAL DIMENSIONS L= 0.052 x (G+56) 93 ° 56 G (150 min.) 93 ° NOT>1000mm (tan3°=0.052) 320+L 100 min. 56 Fig 6.5 NEOflo Water Heater 15 09/06/09 FLUE TERMINAL POSITIONS The flue discharge position for any flue type must conform to the following requirements Fig 6.6 Minimum Distance A B C D E F G H I J K L M N mm Directly below an opening, air brick, opening window etc. Above an opening, air brick, opening window etc. Horizontally to an opening, air brick, opening window etc. Below a gutter or sanitary pipework Below the eaves Below a balcony or carport roof From vertical drain/soil pipework From an internal or external corner Above ground, roof or balcony level From a surface facing terminal From a terminal facing the terminal From a opening in a carport (e.g. door, windows) into the building Vertically from a terminal on the same wall Horizontally from a terminal on the same wall NEOflo Water Heater 16 300 300 300 75 200 200 150 300 300 600 1200 1200 1500 300 02/02/09 Natural Gas The gas meter, regulator and supply pipework must be sized so as to provide an adequate supply to the Heater in addition to any other appliances connected to the supply. (See Technical Data on the inside cover for Pressure and Flow Rate requirements.) Where the Heater is installed in a plant room or purpose built compartment, a manually operated valve must be fitted in accordance with the Gas Safety (Installation and Use) Regulations. The valve must be easily identified and readily accessible. Ventilation Requirements Refer to BS 6798 and BS 5440:2 for additional information Open Flue Type B23 The room in which an appliance is installed must have a permanent air vent to outside air or to a room which itself has direct access to outside air. Installations in compartments require permanent vents for cooling purposes, one at high level and one at low level, either direct to outside air or to a ventilated room. Both vents must pass to the same room or be on the same wall to outside air. The minimum free areas required are given below. In a room to outside In a compartment to outside In a compartment to inside 85 cm2 85 cm2 high level 170 cm2 low level 170 cm2 high level 340 cm2 low level A compartment containing an open-flued appliance shall be labelled as follows: “IMPORTANT: Do not block the vents. Do not use the compartment for storage.” There must be sufficient clearance around the appliance to allow proper circulation of ventilation air. The clearances required for Installation and Servicing will normally be adequate. Fig. 2.1. The effect of any type of extract fan in the premises must be considered and an additional air inlet may be needed from outside to counter the effect of the fan. Room Sealed (Type C ) Where the appliance is installed in a ROOM or COMPARTMENT no ventilation is required. Gas Supply The installation of the gas supply must conform, to the British Standards and Codes of Practice listed in Section 1 of this manual. The appliance is fitted with a gas isolating cock and supply pipe of 22mm copper and can be supplied from the rear, left or right. The gas supply pipework must be fitted with suitable unions so the Heater can be safely removed for major service or repair. NEOflo Water Heater 17 02/02/09 Access to the terminal connections (Fig. 7.1) Remove the Lower Front Panel, the Connection Box is facing you on the left hand side. See Fig 7.1. The Connection Box can be completely removed by loosening its fixing screws in its keyhole slots. Electrical Connections IMPORTANT, this appliance must be earthed CAUTION: Isolate the mains electrical supply before starting any work and observe all relevant safety precautions External wiring to the Heater must be installed in accordance with current I.E.E. Regulations for the wiring of buildings and to any Local Regulations that may apply. The appliance is designed to operate from a 230V, single phase supply fused at 3 amps. Mains input cable should be 0.75mm2, 3 core The method of connection to the mains electricity supply should facilitate complete electrical isolation of the appliance, preferably by use of an unswitched shuttered socket outlet in conjunction with a fused three pin plug, both complying with the requirements of BS 1363. Cable supports are provided from the Connection Box to the rear of the appliance. A permanent live supply must be connected to the appliance. Automatic timed or remote operation of the appliance can be achieved by connecting a switched live to terminal “Remote Enable” and removing the link wire. The connector can be unplugged for ease of wiring. (Fig. 7.1) Lockout If the appliance goes into a safety shutdown condition (Lockout) terminal “Lockout” is energised with a 230V AC supply and can be connected to a suitable warning system with a current limit as detailed in the Technical Data. Alternatively, a fused double pole switch or fused spur box serving only the heater may be used. Running When the burner is in operation terminal “Running” is energised with a 230V AC supply and can be connected to a suitable warning system with a current limit as detailed in the Technical Data. The point of connection to the mains electricity supply should be readily accessible and adjacent to the appliance, and should be connected to the mains supply as detailed above De-Stratification Pump Live Neutral and Earth connections are provided for the connection of a De-Stratification pump which will be automatically controlled by the Heater. Link Wire Fixing Screws on LH side Fig 7.1 NEOflo Water Heater 18 02/02/09 WIRING DIAGRAM Fig 7.2 NEOflo Water Heater 19 30/04/09 COMMISSIONING After installation of the water system, open the main water supply valve, flush the system and fill the heater. Filling With Water 1. Check that the tank drain connection is fitted and closed. 2. If the appliance is connected to a hot water recirculation system, open the isolation valve immediately before the connection point to the tank. 3. Turn on all the hot water draw off taps. 4. Turn on the cold water supply and fill the heater. 5. Close each hot water draw off tap when water is discharged. 6. After initial filling open each hot water draw off tap in succession and check that all the air is vented from the system. 7. Check for leaks Fig 8.2 Set the Tank Temperature In standby the display shows the temperature of the water in the tank. Press the + or - button and the setpoint temperature is shown and can be altered to the desired figure between 45 and 70°C The burner will ignite automatically after a short initiation period, indicated by Flame graphic on the display. Starting the appliance Plug the appliance in at the wall socket or turn on the switched spur supplying the appliance. The appliance is fitted with a fully automatic ignition and temperature control system. Once set in operation the appliance will require minimal attention. If the burner does not light, a Lockout error number, and RESET will be displayed. If the Error is “1”, it is possible that the gas supply has not been purged sufficiently. Reset the lockout condition by using the reset button (Fig.8.2) and repeat the operation. Once the main burner has ignited it will operate continuously until the required water temperature has been obtained. On/Off switch Turns the appliance on. The appliance will start if there is an external demand, if the link wire has been replaced by a remote switch, and the temperature of the water in the tank is lower than the setpoint. When the Heater is in standby mode a symbol is shown on the display. When the Heater has ignited a flame shown on the display. Commissioning the Burner The Heater gas rate is factory set however it is an important part of comissioning that the combustion settings are checked. 1. Remove the Lower Front Panel. 2. Switch on the Heater and allow three or four minutes for the Heater to warm up before checking the combustion. 3 Remove the Access Plug in the Sump and push the probe of a combustion analyser fully in. 4. The CO2 figure should be as shown in the Datatable on inside of the cover of this manual. If adjustment is required, pull off the cover from the Throttle Screw and adjust. Screw clockwise to reduce CO2, anti-clockwise to increase the CO2. Fig. 8.1 5. When correct replace the cover over the Throttle Screw and replace the Lower Front Panel. is Throttle Adjustment Fig 8.1 NEOflo Water Heater 20 02/02/09 Lockouts If the Heater is unable to light or detects a safety condition the control will lockout and the Heater will stop firing. The display will show RESET and a number referring to the type of error. See the table above. To clear a Lockout press the RESET button and provided the condition has been corrected the Heater will try to light. There is a second reset button and indicator on the Burner Control behind the lower front panel. 1 2 3 5 7 8 9 13 21 23 25 31 32 33 34 99 The Lockout condition should not be repeatedly reset. If the condition persists then a qualified repair engineer should be called. Handover When commissioning is satisfactorily completed the operation of the heater and its controls should be explained to the user and the installation details should be completed in the back of these Instructions and on the appliance label. Finally these instructions should be handed over to the user. No Flame established. False Flame detected Overheat sensor > 95C or short circuit. Incorrect Fan speed detected Flue Thermostat tripped Flame circuit error Gas Valve not detected Reset used more than 5 times in 15 mins Control Internal error. Overheat Sensor mismatch Control/Display software mismatch Overheat Sensor1 open circuit. Control Sensor short or open circuit. Overheat Sensor2 open circuit. Low Mains Voltage detected. Communication error between controls. Table 1.0 Controls and Lockouts (Table 1.0) The Display indicates the actual and set temperature of the tank and also displays all the lockouts. Frost Protection FAULT FINDING The Heater is fitted with automatic Frost Protection. Provided there is Mains and Gas, if the High Limit sensor reads less than 6°C the De-Stratification pump, if fitted, will run and the burner will fire at ignition rate until the sensor reads 16°C. WARNING: Before commencing or completing any electrical work on the appliance, it is recommended that the basic safety checks for earth continuity, short circuit, polarity and resistance to earth are made. All work carried out should follow guidelines laid down by the I.E.E. Anti-Legionella The Heater is provided with an automatic AntiLegionella programme. It set by default to be off but can be set using in the Installer+ Mode (See Page 22). This mode allows the temperature and frequency to be set between 72 and 168 hours. Operation The Heater requires Mains on both the Live (L) and Remote Enable connection to be able to run. It is delivered with a link between them which can be removed if a Timer or Remote Switch is used. To run the Heater you must have a Mains supply, Gas, the Flue Thermostat closed and a Tank temperature below the setpoint. If all the above are correct then the Gas Ignition Control starts the Ignition sequence: 1. The Fan runs as a pre-purge of the Heat Exchanger 2. After a few seconds a spark is created at the electrode and the burner is lit. 3. The burner flame is sensed and the spark is removed. 4. The Fan speed is then raised to maximum. 5. If it fails to light the burner the spark will stop and the Fan will run on as a postpurge of the Heat Exchanger. 6. The ignition sequence will be repeated up to five times, then the control will lockout and will require a reset to start again. NEOflo Water Heater 21 04/03/10 Diagnostics The Display can provide additional information whilst Running, In Standby and In Error, when the buttons are pressed. The table below details the sub-sections available. Pressing Service A, Service B and Reset together will, test all the segments of the LCD display. MODE + - Buttons Service A Service B Reset ----- Standby Increase setpoint Decrease setpoint ----- < 1 sec Installer > 3 secs Installer + Running Increase setpoint Decrease setpoint ----- < 1 sec, Installer > 3 secs, Installer + In Error ----- ------ ----- ----- > 3 secs, Error History < 1 sec, Resets Error > 3 secs, Error History Error History (Reset pressed > 3 seconds) The last eight errors can now be recalled by pressing button Service B. The format of the Display is Hn.## Where n is error record 1 to 8, one being the most recent, and ## is the error number. The Display will step out of this mode if untouched for 30 seconds or the Reset button is pressed. The Error History can be cleared in Installer+ mode. 1 2 3 5 7 8 9 13 21 23 25 31 32 33 34 99 Installer Mode (Service B pressed < 1 second) The symbol appears on the Display. Press Service B to step through the information. The Display will step out of this mode if untouched for 60 seconds or the Reset button is pressed. Default 01 02 03 04 05 06 07 08 09 10 11 12 13 Flame current, mA High Limit Sensor 1, °C High Limit Sensor 2, °C Tank Temperature, °C Not used Esys type Flue Switch DHW Kp DHW Ki Fan Kp Up Fan Ki Up Fan Kp Down Fan Ki Down NEOflo Water Heater No Flame established. False Flame detected Overheat sensor > 95C or short circuit. Incorrect Fan speed detected Flue Thermostat tripped Flame circuit error Gas Valve not detected Reset used more than 5 times in 15 mins Control Internal error. Overheat Sensor mismatch Control/Display software mismatch Overheat Sensor1 open circuit. Control Sensor short or open circuit. Overheat Sensor2 open circuit. Low Mains Voltage detected. Communication error between controls. Installer+ Mode (Service B pressed > 3 seconds) The symbols appear on the display. - 7 Off 60 245 25 220 30 244 Press Service B to step through the information. Press Buttons + or - to alter the setting. The Display will step out of this mode if untouched for 60 seconds or the Reset button is pressed. Default P 01 Ignition Level, % 50 P 02 DHW Setpoint, °C 60 P 03 DHW Hysteresis 5 P 04 DHW Maximum fan speed % 100 P 05 Anti-Legionella enabled 0 P 06 Anti-Legionella timer 168 P 07 Anti-Legionella temperature °C 75 P 08 Clear Error History 22 04/03/10 SERVICING Spark & Sense Electrode Health and Safety Statement : This Heater contains no asbestos. Turn off the Heater. Pull off the HT and Earth leads. Remove the cover over the Ignition Control connections and pull it off the Gas Valve. Undo the two screws retaining the electrode assembly and carefully withdraw. The spark gap should be 3.0 mm ± 0.5. Assembly is the reverse, ensuring the gasket is correctly placed. In all cases, before work commences turn off the Mains Electricity and Gas Supply. Routine Service To ensure continued efficient operation of the Heater it is recommended that it is checked and serviced at regular intervals. The frequency of servicing will depend upon the particular installation and usage but in general every twelve months should be the maximum. It is law that any service work should be carried out by Registered personnel. Air Duct & Flue Seals A visual inspection should establish there are no leaks around any of the seals, including the flexible Air Duct to the Venturi. Condensate Syphon 1. Clean the burner and check the Combustion Chamber. 2. Check condition of ignition spark and sensing probe. 3. Check the Air duct and Flue seals. 4. Check condensate syphon and pipework for leaks. 5. Check the combustion CO, CO2 and Gas Rate. Follow the procedures given in Changing Components for parts removal in addition to the following notes. In all cases, before work commences turn off the Mains Electricity and Gas Supply. The lower bowl of the Syphon can be unscrewed, examined and cleaned. Check its connection to the Heat Exchanger and pipework for leaks. Gas Rate & Combustion See the Datatable on the inside of the cover for the correct values. A Combustion sample point is provided at the front of the Sump. (Fig.9.4) To check, re-establish gas and electricity and then run the Heater for at least 5 minutes. If adjustment is required remove the cover over the Throttle screw and turn anti-clockwise to increase CO2, clockwise to decrease.(Fig. 9.1) Allow at least a minute between adjustments to obtain stable readings.The Gas Rate will be correct when the CO and CO2 figures are to specification. Burner & Combustion Chamber To clean the burner and view the inside of the Combustion Chamber it is necessary to remove the Fan and Gas Valve: Remove Lower Front Panel. Disconnect Gascock flange from Valve. Unplug Fan electrical connector. Remove Air tube from Venturi. Undo the cover over Ignition Control connections and remove the three connectors. Pull off the Ignition and Earth Lead connection on the Valve and Heat Exchanger. Undo the two screws holding the Venturi and Gas Valve to the Fan and remove. Undo the four screws holding the Fan Mount ing Spacer to the sump and remove. Inspect the rubber burner gasket fitted between the Burner and the Fan Mounting Spacer and replace if damaged. The burner should withdraw with the Spacer and expose the inside of the combustion chamber. Note: The burner is marked with a line which should be used to position it. It should align with fixing hole for the Spacer to the left of the Electrode assembly. Assembly is the reverse. NEOflo Water Heater Changing Components NONE OF THE CONTROLS ARE REPAIRABLE IF THEY ARE NOT WORKING THEY MUST BE REPLACED. In all cases, before work commences turn off the Mains Electricity and Gas Supply. The following items can be replaced: Pressure Temperature Relief Valve The LCD Display. . High Limit Sensor. Tank Sensor. Flue Thermostat Ignition Control. Electrode Gas Valve. Fan. Pressure Temperature Relief Valve (Fig. 2.1) The removal of this valve will require either the draining or the valving-off of the system that is above tank level. 23 12/01/10 Unclip the Sensor Retainer and withdraw the Sensor. Trace the sensor cable back to its in-line two way connector, de-latch and disconnect. Replacement is the reverse. Throttle Adjustment Flue Thermostat (Fig. 9.4) This is located on the Sump Flue Connection. Remove the Lower Front Panel. Pull off the electrical connector. Undo from the Flue Connection. Replacement is the reverse. Ignition Control (Fig.9.4) Fig 9.1 Remove the Lower Front Panel. Remove the cover over the Ignition Control connections, then de-latch and remove them. Pull the Ignition Control away from the Gas Valve. Replacement is the reverse. Undo the connection to drain and remove the pipe from the Valve. Unscrew the Pressure Temperature Relief Valve. Replacement is the reverse. Electrode & Gasket (Fig.9.4) LCD Display (See Fig. 9.2) Remove the Lower Front Panel. Remove the cover over the Ignition Control connections, then de-latch and remove them. Pull the Ignition Control away from the Gas Valve. Undo the two screws retaining the Elecrode and pull straight out. Inspect the Gasket and replace if damaged Replacement is the reverse. Undo the single fixing on the front of the Display Panel and hinge forward. Pull off the two wired electrical connectors and the one dummy connector. Undo the four nuts holding the PCB and remove. Replacement is the reverse. High Limit Sensor (Fig. 9.3) Undo the single fixing on the front of the Display Panel and hinge forward. Remove the Front Top Panel of the Heater to expose the Sensor Pocket. Move the Sensor Retainer aside and withdraw the Sensor. Through the Display Panel access, trace the four way in-line cable connector to the High Limit Sensor, de-latch and disconnect. Replacement is the reverse. Gas Valve (Fig.9.4) Remove the Ignition Control, see above. Release the Gascock by undoing the four shoulder bolts holding it to the Gas Valve. Remove the Offset tube from the Gas Valve, unscrew the Offset Connector and transfer to the new Gas Valve. Release the Gas Valve from the Venturi by undoing three screws. (See Fig.9.1) IMPORTANT Ensure the rubber seal and orifice are transfered from the old Valve and placed between the Venturi and Gas Valve before re-assembly. Control Sensor (Fig. 9.3) Remove the Lower Front Panel. Undo the single fixing on the front of the Display Panel and ‘post’ it back in to the access hole, using the clip to hold it in position. Remove the two retaining screws on the side of the Front Panel of the Heater then pull it forward and away. Place safely to one side. NEOflo Water Heater Replacement is the reverse. Light the Heater and check for gas leaks. After five minutes check the rate and combustion is correct to the Datatable. (inside Front cover). Adjust using the Throttle Screw on the Gas Valve clockwise to decrease CO2, anticlockwise to increase CO2. (Fig. 9.1) 24 12/03/10 Fan (See Fig. 9.4) Venturi (Fig. 9.4) Remove the Lower Front Panel. Remove the electrical connector on the Fan. Remove the two screws holding the Venturi to the Fan. Undo the four screws holding the Fan to the Fan Mounting and remove. Ensure the Baffle Plate and Fan Gasket is retained on the Fan Mounting. (Fig. 9.4) Transfer the Venturi gasket to the new fan. Replacement is the reverse. Remove the Lower Front Panel. Pull off the Air Tube (Fig. 9.4) Undo the three screws holding the Venturi to the Gas Valve. Undo the two screws holding the Venturi to the Fan and remove. Ensure the gasket is transferred to the new venturi or positioned on the Fan before positioning the replacement. Ensure the rubber gasket between the Gas Valve and Venturi is correctly positioned. Replacement is the reverse. Light the Heater and check for gas leaks. After five minutes check the rate and combustion is correct to the Datatable. (inside Front cover). Adjust using the Throttle Screw on the Gas Valve clockwise to decrease CO2, anticlockwise to increase CO2. (Fig. 9.1) SPARE PARTS G061 G062 G063 G064 G065 G066 G067 G068 G069 O ring, gascock Gas Valve Electrode gasket Electrode Burner Insulation Burner Ignition Lead Pressure & Temperature Relief Valve Venturi B314 G070 G071 G072 G073 G074 G075 G076 G077 Unvented Kit Fan Gasket Fan User LCD Control Burner Control Flue Thermostat High Limit Sensor Pocket, Thermostat Control Sensor LCD DISPLAY LCD PCB On/Off Switch connections Earth connection Fig 9.2 NEOflo Water Heater 25 12/03/10 HEATER COMPONENTS EXTERNAL Tank Inspection Hatch Temperature & Pressure Relief Valve High Limit Sensor Removable Cover (To access Control Sensor) Display Panel Control Sensor Door Fig 9.3 NEOflo Water Heater 26 15/06/09 HEATER COMPONENTS INTERNAL Combustion Test Point Flue Thermostat Spark & Sense Electrode Ignition Lead Fan Mounting Spacer Fan Gasket Wiring Connection Box Ignition Control Flue Elbow Release Gas Cock Condensate Pipe 41mm Gas Valve Air Duct Cylinder Drain Pipe 22mm Fig 9.4 Condensate Trap NEOflo Water Heater Fan 27 Venturi Air Tube Gas Connection 22mm 08/06/09 INSTALLATION & SERVICE HISTORY Tick appropriate: SC25/200 Model SC25/300 SC25/400 Commissioning Installer Registration No Working pressure CO ppm Instructed User in operation? Date: mbar CO2 % Yes/No Service Record Date Cleaned ? Pressure CO CO2 Date Cleaned ? Pressure CO CO2 Date Cleaned ? Pressure CO CO2 NEOflo 02/02/09 Baxi Commercial Division Wood Lane, Erdington, Birmingham B24 9QP Email: [email protected] www.andrewswaterheaters.co.uk Sales: 0845 070 1056 Technical: 0845 070 1057