1
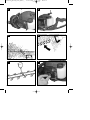
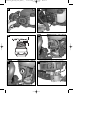
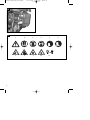
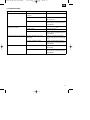
Anleitung_BG-PH_2250_SPK1:_ 15.10.2008 Bedienungsanleitung Benzin-Heckenschere Operating Instructions Petrol Hedge Trimmer Mode dʼemploi du taille-haies à essence Istruzioni per lʼuso Cesoie per siepi a benzina 8:27 Uhr Seite 1 Bf Upute za uporabu Škare za živicu s benzinskim motorom 4 Uputstva za rukovanje Benzinske makaze za živicu j Návod k použití Benzínové plotové nůžky W Návod na obsluhu Benzínové záhradnícke nožnice � Art.-Nr.: 34.038.40 I.-Nr.: 01018 BG-PH 2250 Anleitung_BG-PH_2250_SPK1:_ 15.10.2008 8:27 Uhr Seite 2 Vor Inbetriebnahme Bedienungsanleitung und Sicherheitshinweise lesen und beachten. Read and follow the operating instructions and safety information before using for the first time. Avant la mise en service, lisez le mode dʼemploi et les consignes de sécurité et respectez-les. Prima della messa in esercizio leggete e osservate le istruzioni per lʼuso e le avvertenze di sicurezza. Bf Prije puštanja u rad pročitajte i pridržavajte se ovih uputa za uporabu i sigurnosnih napomena. 4 Prije puštanja u pogon pročitajte i uvažite uputstva za upotrebu i napomene bezbednosti. j Před uvedením do provozu si přečíst návod k obsluze a bezpečnostní předpisy a oboje dodržovat. W Pred uvedením do prevádzky si prečítajte a dodržiavajte návod na obsluhu a bezpečnostné pokyny. 2 Anleitung_BG-PH_2250_SPK1:_ 15.10.2008 1 8:27 Uhr 3 Seite 3 4 11 16 2 1 17 13 14 2 5 10 9 12 6 15 19 7 8 3 13 6 18 14 20 3 Anleitung_BG-PH_2250_SPK1:_ 4 15.10.2008 8:27 Uhr 5 5 9 4 6 7 8 9 Seite 4 A Anleitung_BG-PH_2250_SPK1:_ 15.10.2008 8:28 Uhr 10 11 12 13 14 15 Seite 5 A 5 Anleitung_BG-PH_2250_SPK1:_ 16 15.10.2008 8:28 Uhr Seite 6 5 2 1 3 4 17 6 1 2 3 4 5 7 8 9 10 11 6 Anleitung_BG-PH_2250_SPK1:_ 15.10.2008 8:28 Uhr Seite 13 GB Important! When using the equipment, a few safety precautions must be observed to avoid injuries and damage. Please read the complete operating instructions and safety regulations with due care. Keep this manual in a safe place, so that the information is available at all times. If you give the equipment to any other person, hand over these operating instructions and safety regulations as well. We cannot accept any liability for damage or accidents which arise due to a failure to follow these instructions and the safety instructions. 1. Safety regulations The corresponding safety information can be found in the enclosed booklet. CAUTION! Read all safety regulations and instructions. Any errors made in following the safety regulations and instructions may result in an electric shock, fire and/or serious injury. Keep all safety regulations and instructions in a safe place for future use. Explanation of the warning signs on the equipment (see Fig. 17) 1. Warning! 2. Read the directions for use before operating the equipment. 3. Do not expose the hedge trimmer to rain or wet conditions. 4. Wear eye protection and ear plugs. 5. Wear safety gloves. 6. Wear sturdy, non-slip footwear. 7. Caution: Sharp blades! Always keep hands and feet away from the blades. 8. Operate and start the equipment only outdoors in well ventilated areas to reduce the danger of injury from toxic gases. 9. Explosive material. 10. Very hot surface. Do not touch the hot exhaust silencer, gearbox or cylinder. You may burn yourself. These parts have become very hot during operation and remain very hot over a long period even after the equipment has been switched off. 11. Maintain a distance of at least 15 m from other persons. 2. Layout and items supplied (Fig. 1-2) 1. 2. 3. 4. 5. 6. 7. 8. 9. 10. 11. 12. 13. 14. 15. 16. 17. 18. 19. 20. Cutting blade Cutting blade safety cover Safety plate Front handle Choke lever ON/OFF switch Lubrication nipple Gears Fuel pump (primer) Air filter cover Starter handle Rear handle Throttle lever “release” Throttle lever Silencer cover Tank for fuel mixture Spark plug boot Spark plug wrench Combined oil/petrol cylinder Cutter rail cover 3. Proper use Important. This hedge trimmer is suitable for cutting hedges, bushes and shrubs. Please note that our equipment has not been designed for use in commercial, trade or industrial applications. Our warranty will be voided if the equipment is used in commercial, trade or industrial businesses or for equivalent purposes. The machine is to be used only for its prescribed purpose. Any other use is deemed to be a case of misuse. The user / operator and not the manufacturer will be liable for any damage or injuries of any kind caused as a result of this. 13 Anleitung_BG-PH_2250_SPK1:_ 15.10.2008 8:28 Uhr Seite 14 GB 4. Technical data 6. Operation Engine type: 2-stroke engine, air-cooled, chrome cylinder Engine output (max.): 0.65 kW / 0.9 hp Displacement: 22 cc Idle speed of engine: 3000 min-1 Max. engine speed 8500 min-1 Weight (with empty tank): 5.6 kg Cutting length: 50 cm Tooth spacing: 28 mm Vibration (front handle) ahv 7.63 m/s2 Vibration (rear handle) ahv 5.01 m/s2 Sound pressure level LpA 95 dB Sound power level LWA 106 dB Please note that the statutory regulations governing noise abatement may differ from town to town. Sound and vibration were measured in accordance with DIN EN 10517. 5. Before starting the machine 5.1 Fuel and oil Recommended fuels Use only a mixture of normal unleaded petrol and special 2-stroke engine oil. Mix the fuel mixture as indicated on the fuel mixing table. Please note: Do not use a fuel mixture which has been kept for longer than 90 days. Please note: Do not use 2-stroke oil with a recommended mixing ration of 100:1. If inadequate lubrication causes engine damage, the manufacturerʼs engine warranty will be voided. Please note: Only use containers designed and approved for the purpose to transport and store fuel. Pour the correct quantities of petrol and 2-stroke oil into the mixing bottle (see scale printed on the bottle). Then shake the bottle well. 5.2 Fuel mixture table Mixing procedure: 40 parts petrol to 1 part oil Petrol 2-stroke oil 1 liters 25 ml 5 liters 125 ml 14 6.1 Starting the engine from cold (Fig. 3-5) Fill the tank with the required amount of oil/petrol mix. 1. Set the machine down on a hard, level surface. 2. Set the choke lever (Fig. 4/Item 5) to “ ”. 3. Press the fuel pump (primer) (Fig. 4/Item 9) 10 times. 4. Move the ON/OFF switch (Fig. 3/Item 6) to “I” 5. Set the throttle lever to full throttle. To do so, press the throttle lock (Fig. 3/Item 13). 6. With the other hand pull out the starter cable (Fig. 5/Item A) until you feel it starts to resist. Now pull the starter cable repeatedly until the equipment starts up. Important: Never allow the starter cable to snap back. This may damage the equipment. 7. If the engine has started, set the choke lever immediately to “ ” and allow the machine to warm up for approx. 10 seconds. 8. If the engine does not start up, repeat steps 6-7 above. Please note: If the engine does not start up even after several attempts, read the section “Engine Troubleshooting”. Please note: Always pull the starter cable out in a straight line. If it is pulled out at an angle, then friction will occur on the eyelet. As a result of this friction, the cable will become frayed and will wear away faster. 6.2 Starting the engine when warm (if the machine has not been switched off for more than 15 – 20 minutes) 1. Set the machine down on a hard, level surface. 2. Switch the ON/OFF switch to “I”. 3. Hold the machine by the front handle in your right hand and pull the starter cable up to the first resistance point (approx. 10 cm). Then tug sharply on the starter cable. The machine should start after 1-2 tugs. If the machine does not start after 6 pulls, repeat steps 1 – 7 of the procedure for starting the engine from cold. 6.3 Switching off the engine Emergency Stop procedure: If it becomes necessary to stop the machine immediately, set the ON/OFF switch to “Stop” or “0” Anleitung_BG-PH_2250_SPK1:_ 15.10.2008 8:28 Uhr Seite 15 GB Normal procedure: Let go of the throttle lever and wait until the engine has changed to idling speed. Then set the ON/OFF switch to “Stop” or “0”. 6.4 Practical tips Never allow the machine to run at low speed for starting or for cutting. Cutting for dense growth: The most effective method is to use wide, sweeping movements, guiding the cutting edge of the blade straight through the branches. A slight incline of the blade downwards towards the movement will produce best cutting results. It is recommended to tie a guide line of string or the like along the hedge so that you cut the hedge to a level height. The branches above it will be cut off. (Fig. 6) Cutting the side of a hedge: Cut the sides of the hedge with curve-shaped movements from the bottom up. (Fig. 7) Please note: As a result of its design, if you work with the machine on its side for a lengthy period and the tank not completely filled, the motor may stall. 7. Cleaning, maintenance, storage and ordering of spare parts 7.1 Cleaning Keep all safety devices, air vents and the motor housing free of dirt and dust as far as possible. Wipe the equipment with a clean cloth or blow it with compressed air at low pressure. We recommend that you clean the device immediately each time you have finished using it. Clean the equipment regularly with a moist cloth and some soft soap. Do not use cleaning agents or solvents; these could attack the plastic parts of the equipment. Ensure that no water can seep into the device. 7.2 Maintenance Always switch off the head trimmer and remove the spark plug boot before carrying out any maintenance work. 1. The cutter blades are high quality, made of tempered steel and in normal use there is no need to sharpen the blades. If you accidentally strike a wire, stone, glass or other hard object, this may cause a notch in the blade. There is no need to remove the notch as long as it does not adversely affect the movement of the cutting edges. If it does adversely affect this movement, switch off the machine and use a fine file or a fine grinding stone to remove the notch. Ensure that the bladeʼs cutting edge is always well oiled (see Fig. 8). 2. If you drop the hedge trimmer, check whether it has suffered any damage. If it is damaged contact an authorized customer service outlet or send the machine to ISC GmbH to have it repaired. 3. Only clean the machine after it has been switched off. Use only mild soap and a damp cloth to clean it. Never allow fluid to get into the machine. Do not use caustic cleaning products. 7.2.1 Maintenance of the air filter (Fig. 9-11) Soiled air filters reduce the engine output by supply too little air to the carburetor. Regular checks are therefore essential. The air filter should be checked after every 25 hours of use and cleaned if necessary. If the air contains a lot of dust, the air filter should be checked more frequently. 1. Remove the air filter cover (Fig. 9-10) 2. Remove the filter element (Fig. 11) 3. Clean the filter element by tapping it or blowing it. 4. Assemble in reverse order. Please note: Never clean the air filter with petrol or inflammable solvents. Clean the air filter with compressed air or by tapping it. 7.2.2 Maintenance of the spark plug (Fig. 12-14) Spark plug gap = 0.025 inch (0.635 mm). Tighten the spark plug with a torque of 12-15 Nm. Check the spark plug for dirt and grime after 10 hours of operation and if necessary clean it with a copper wire brush. Thereafter service the spark plug after every 50 hours of operation. 1. Pull off the spark plug boot (Fig. 13) by twisting. 2. Remove the spark plug (Fig. 14) with the supplied spark plug wrench. 3. Assemble in reverse order. 7.2.3 Maintenance of the gearbox (Fig. 15) The gearbox must be lubricated every year before the start of the season at the lubrication nipple (Fig. 15/Item A). Place a conventional grease gun on the nipple and press approx. 3 strokes of conventional machine grease into the gearbox. If you use the trimmer frequently, grease the gearbox more often. 15 Anleitung_BG-PH_2250_SPK1:_ 15.10.2008 8:28 Uhr Seite 16 GB 7.2.4 Carburetor settings Important. Settings on the carburetor may only be made by authorized customer service personnel. The air filter cover must be removed before any work on the carburetor, as shown in Figures 9 – 10. Setting the throttle cable: If the maximum speed of the machine falls over time and you have ruled our all the other causes listed in section 9 Troubleshooting, it may be necessary to adjust the throttle cable. First of all check whether the carburetor opens fully when the throttle handle is pressed fully. This is the case if the carburetor slide (Fig. 16/Item 1) rests against the stop (Fig. 16/Item 2) when the throttle is fully open. Figure 16 shows the correct setting. If the carburetor slide does not touch the stop, it must be adjusted. The following work is required to adjust the throttle cable: Undo the lock nut (Fig. 16/Item 3) a few turns. Undo the adjusting screw (Fig. 16/Item 4) until the carburetor slide rests against the stop when the throttle is fully open, as shown in Figure 16. Retighten the lock nut. Setting the idling speed: Important. Set the idling speed when the machine is warm. If the engine stalls when the throttle is not pressed and you have ruled out all the other causes listed in section 9 Troubleshooting, the idling speed must be adjusted. To do this turn the idling speed screw (Fig. 16/Item 5) clockwise until the machine runs smoothly at idling speed. If the idling speed is so fast that the cutting blades do not reach a standstill, the idling speed must be reduced by turning the idling speed screw (Fig. 16/Item 5) counterclockwise until the cutting blades stop. 7.3 Storage Please note: If you fail to follow these instructions correctly, deposits may form on the interior of the carburetor which may result in the engine being more difficult to start or the machine suffering permanent damage. 1. Carry out all the maintenance work. 2. Drain the fuel out of the tank (use a conventional plastic petrol pump from a DIY store for this purpose). 3. When the fuel has been drained, start the engine. 4. Allow the engine to run at idling speed until it 16 5. 6. 7. 8. 9. stops. This will clean the remainder of the fuel out of the carburetor. Leave the machine to cool (approx. 5 minutes). Remove the spark plug (see point 7.2.2). Place a teaspoon full of 2-stroke engine oil into the combustion chamber. Pull the starter cable several times carefully to wet the internal components with the oil. Fit the spark plug again. Clean the exterior housing of the machine. Store the machine in a cold, dry place where it is out of the reach of ignition sources and inflammable substances. Fertilizers and other chemical garden products often contain substances that accelerate the rate of corrosion of metals. Do not store the machine on or near fertilizers or other chemicals. Restarting 1. Remove the spark plug. 2. Pull the starter cable several times to clean the oil residue out of the combustion chamber. 3. Clean the spark plug contacts or fit a new spark plug. 4. Fill the tank. See the section entitled Fuel and oil. 5. Complete steps 1-7 described under the point entitled “Starting the engine from cold”. 7.4 Ordering replacement parts Please quote the following data when ordering replacement parts: 앬 Type of machine 앬 Article number of the machine 앬 Identification number of the machine 앬 Replacement part number of the part required For our latest prices and information please go to www.isc-gmbh.info 8. Disposal and recycling The unit is supplied in packaging to prevent its being damaged in transit. This packaging is raw material and can therefore be reused or can be returned to the raw material system. The unit and its accessories are made of various types of material, such as metal and plastic. Defective components must be disposed of as special waste. Ask your dealer or your local council. Anleitung_BG-PH_2250_SPK1:_ 15.10.2008 8:28 Uhr Seite 17 GB 9. Troubleshooting Fault The machine does not start. The machine starts but does not develop its full output. The engine does not run smoothly Engine smokes excessively Possible cause Troubleshooting Correct starting procedure not followed. Follow the instructions for starting. Sooted or damp spark plug Clean the spark plug or replace it with a new one. Incorrect carburetor setting Contact an authorized customer service outlet or send the machine to ISC-GmbH. Incorrect choke lever setting Set choke lever to Soiled air filter Clean the air filter Incorrect carburetor setting Contact an authorized customer service outlet or send the machine to ISC-GmbH. Incorrect electrode gap on the spark plug Clean the spark plug and adjust the electrode gap or fit a new spark plug. Incorrect carburetor setting Contact an authorized customer service outlet or send the machine to ISC-GmbH. Incorrect fuel mix Use the correct fuel mix (see fuel mixing table) Incorrect carburetor setting Contact an authorized customer service outlet or send the machine to ISC-GmbH. 17 Anleitung_BG-PH_2250_SPK1:_ 15.10.2008 8:28 Uhr Konformitätserklärung k t p m O U q T B Q Z z ISC-GmbH · Eschenstraße 6 · D-94405 Landau/Isar C erklärt folgende Konformität gemäß EU-Richtlinie und Normen für Artikel declares conformity with the EU Directive and standards marked below for the article déclare la conformité suivante selon la directive CE et les normes concernant lʼarticle verklaart de volgende conformiteit in overeenstemming met de EU-richtlijn en normen voor het artikel declara la siguiente conformidad a tenor de la directiva y normas de la UE para el artículo declara a seguinte conformidade de acordo com a directiva CE e normas para o artigo förklarar följande överensstämmelse enl. EUdirektiv och standarder för artikeln ilmoittaa seuraavaa Euroopan unionin direktiivien ja normien mukaista yhdenmukaisuutta tuotteelle erklærer herved følgende samsvar med EUdirektiv og standarder for artikkel заявляет о соответствии товара следующим директивам и нормам EC izjavljuje sljedeću uskladjenost s odredbama i normama EU za artikl. declarå urmåtoarea conformitate cu linia directoare CE μi normele valabile pentru articolul. ürün ile ilgili olarak AB Yönetmelikleri ve Normlar∂ gere©ince aμa©∂daki uygunluk aç∂kla mas∂n∂ sunar. ‰ËÏÒÓÂÈ ÙËÓ ·ÎfiÏÔ˘ıË Û˘Ìʈӛ· Û‡Ìʈӷ Ì ÙËÓ √‰ËÁ›· ∂∂ Î·È Ù· ÚfiÙ˘Ô ÁÈ· ÙÔ ÚÔ˚fiÓ Seite 52 l j A X W e 1 . G 4 H E dichiara la seguente conformità secondo la direttiva UE e le norme per lʼarticolo attesterer følgende overensstemmelse i henhold til EU-direktiv og standarder for produkt prohlašuje následující shodu podle směrnice EU a norem pro výrobek. a következő konformitást jelenti ki a termékekre vonatkozó EU-irányvonalak és normák szerint pojasnjuje sledečo skladnost po smernici EU in normah za artikel. deklaruje zgodność wymienionego poniżej artykułu z następującymi normami na podstawie dyrektywy WE. vydáva nasledujúce prehlásenie o zhode podľa smernice EÚ a noriem pre výrobok. деклаpиpа следното съответствие съгласно диpективите и ноpмите на ЕС за пpодукта. заявляє про відповідність згідно з Директивою ЄС та стандартами, чинними для даного товару deklareerib vastavuse järgnevatele EL direktiivi dele ja normidele deklaruoja atitikti pagal ES direktyvas ir normas straipsniui izjavljuje sledeçi konformitet u skladu s odred bom EZ i normama za artikl Atbilstības sertifikāts apliecina zemāk minēto preču atbilstību ES direktīvām un standartiem Samræmisyfirl‡sing sta›festir eftirfarandi samræmi samkvæmt reglum Evfrópubandalagsins og stö›lum fyrir vörur Benzin-Heckenschere BG-PH 2250 X 98/37/EC 87/404/EEC 2006/95/EC R&TTED 1999/5/EC 97/23/EC X X 95/54/EC: 2004/108/EC 90/396/EEC LWM = 85 dB; LWA = 106 dB P = 0,65 kW 2000/14/EC_2005/88/EC: X 2004/26/EC: e13*97/68SH2G3*2002/88*0603*00 89/686/EEC EN 774; EN ISO 14982; KBV V Landau/Isar, den 12.08.2008 Weichselgartner General-Manager Art.-Nr.: 34.038.40 I.-Nr.: 01018 Subject to change without notice 52 Frank Product-Management Archivierung: 3403840-40-4155050-08 Anleitung_BG-PH_2250_SPK1:_ 15.10.2008 8:28 Uhr Seite 57 p BULLETIN DE GARANTIE Chère Cliente, Cher Client, Nos produits sont soumis à un contrôle de qualité très strict. Si cet appareil devait toutefois ne pas fonctionner impeccablement, nous en serions désolés. Dans un tel cas, nous vous prions de bien vouloir prendre contact avec notre service après-vente à l‘adresse indiquée sur le bulletin de garantie. Nous restons également volontiers à votre disposition au numéro de téléphone de service indiqué plus bas. Pour faire valoir une demande de garantie, ce qui suit est valable : 1. Les conditions de garantie règlent les prestations de garantie supplémentaires. Vos droits de garantie légaux ne sont en rien altérés par la garantie présente. Notre prestation de garantie est gratuite. 2. La prestation de garantie s’applique exclusivement aux défauts occasionnés par des vices de fabrication ou de matériau et est limitée à l’élimination de ces défauts ou encore au remplacement de l’appareil. Veillez au fait que nos appareils, conformément à leur affectation, n’ont pas été construits pour être utilisés dans un environnement professionnel, industriel ou artisanal. Un contrat de garantie ne peut avoir lieu dès lors que l’appareil est utilisé à des activités dans des entreprises professionnelles, artisanales ou industrielles ou toute autre activité du même genre. Sont également exclus de notre garantie : les prestations de substitution de dommages dus aux transports, les dommages occasionnés par le non-respect des instructions de montage ou en raison d’une installation non conforme, du non-respect du mode d’emploi (comme par exemple le raccordement à une mauvaise tension réseau ou à un mauvais type de courant), les applications abusives ou non conformes (comme par exemple une surcharge de l’appareil ou encore l’emploi d’accessoires non homologués), le non-respect des prescriptions de maintenance et de sécurité, l’infiltration de corps étrangers dans l’appareil (comme par exemple du sable, des pierres ou de la poussière), l’emploi de la force ou l’influence extérieure (comme par exemple les dommages dus à une chute), ainsi que l’usure normale conforme à l’utilisation. Le droit à la garantie disparaît dès lors que des interventions ont lieu sur l’appareil. 3. Le délai de garantie s’élève à 2 ans et commence à la date de l’achat de l’appareil. Les demandes de garanties doivent être présentées avant écoulement du délai de garantie, dans les deux semaines suivant le moment auquel le défaut a été reconnu. Toute reconnaissance de demande de garantie après écoulement du délai de garantie est exclue. La réparation ou l’échange de l’appareil n’entraîne nullement une prolongation de la durée de garantie. Elle ne fait pas non plus commencer un nouveau délai de garantie, en raison de cette prestation, pour l’appareil ou pour toute autre pièce de rechange intégrée. Ceci est également valable lorsqu’un service après-vente sur place a été consulté. 4. Pour faire reconnaître votre demande de garantie, veuillez nous envoyer l’appareil défectueux franco de port à l’adresse indiquée ci-dessous. Ajoutez à l’envoi l’original du bon d’achat ou de tout autre preuve de l’achat datée. Veuillez donc toujours bien conserver le bon d’achat en guise de preuve ! Décrivez la raison de la réclamation le plus précisément possible. Si le défaut de l’appareil est compris dans notre prestation de garantie, nous vous retournerons sans délai un appareil réparé ou encore un nouveau. Bien entendu, nous sommes prêts également à réparer les appareils défectueux contre remboursement des frais, dès lors que l’appareil n’est plus ou pas garanti. Pour ce faire, veuillez envoyer l’appareil à notre adresse de service après-vente. 57