1
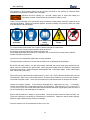
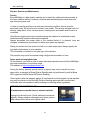
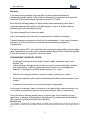
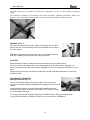
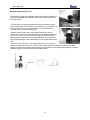
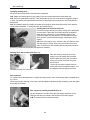
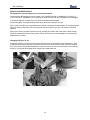
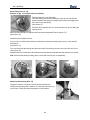
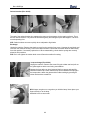
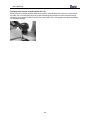
Bona MiniEdge Manual and safety instructions in original AMO260000.3 | AMO260001.0 | AMO260001.3 | AMO260003.3 Translation of manual in originals v1.1 Bona MiniEdge TECHNICAL DATA Motor type: Voltage (+/- 10%): Frequency: Power: Rated current: Recommended fuses: Isolation class: Safety class: Sanding disc speed: Illumination: Total weight: Dust discharge: Abrasive disc diameter: Sanding arm height: Hour meter: EU 1-fasmotor 230V 50/60 Hz 1,3 kW 6A 10A F IP54 Ca 3 800 rpm normal load 25W halogen 9 kg < 2 mg/m³ air 150mm 145mm, 245mm 99 999 timmar USA 1-phasemotor 115V 60 Hz 1-3/4 HP 15A 20A F IP54 4400 rpm normal load 25W halogen 18,7 lbs < 2 mg/m³ air 5,9” 5,711”, 9,65” 99 999 hours Noise measurement according to SS-EN ISO 3746:1995 & SS-EN ISO 11202:1995: Abrasive 80 87,3 dB(A) 96,1 dB Noise level: Calculated sound effect: Vibration measurements according to SS-EN ISO 5349-2:2001: X 0,6 Vibrations RMS (m/s²) Vibrations vector sum (m/s²) Y 0,7 1,1 Z 0,6 According to used standard SS-EN ISO 3746:1995 is the maximum standard deviation of reproducibility 3dB, defined in ISO 7574-1. According to Swedish Work Environment Authority the measure uncertainty at vibrations measurements estimated to 20-40%. The thing that contributes to the measuring uncertainty is the transfer of vibrations to the accelerometer. We congratulate you on your choice of a new Bona MiniEdge sanding machine. Carefully read through the entire user manual before you begin working with the machine. If anything is unclear, turn to your reseller with confidence or to Bona AB. Safety instructions Read through the safety instructions carefully and inform your employees and users, so no one comes to harm when using the machine. Then save the instructions! The manufacturer is not liable for personal injury or machine damage due to incorrect operation of the machine! The machine is only built for sanding of wooden floors! The machine may only be used by authorised persons that have been trained in its function. Voltage: Make sure the voltage stated on the machine’s rating plate corresponds to the voltage in the power outlet before you start the machine. NOTE! It is obligatory to read and understand the user manual before the machine is used. 2 Bona MiniEdge DANGER means that you or other staff can suffer a serious injury or death if THE INSTRUCTIONS MARKED WITH DANGER ON THIS MACHINE OR IN THESE USER INSTRUCTIONS are ignored or are not followed. Read the entire user manual before you use the machine. WARNING means that you or other staff can suffer an injury if the instructions marked with WARNING on this machine or in this user manual are ignored or not followed. The machine or other property may also be damaged if instructions marked with WARNING are ignored. Under adverse conditions, a mixture of dust and air can be explosive. Sanding of wooden floors can create an environment that can be explosive. The safety routines below must be followed. Cigarette lighters, control lamps and all other sources of ignition can cause explosions if they are active during sanding. All sources of ignition should be extinguished or if possible removed completely from the work area. In work areas with poor ventilation, an explosive environment can occur if certain flammable materials, that is to say solvents, thinners, alcohol, fuel, certain polishes, wood dust and other flammable materials are in the atmosphere. Floor grinders can cause slightly flammable materials and vapours to burn. Read the manufacturer’s label on all chemicals to be used so that you can determine the flammability. Ensure that the work area always has good ventilation. Dispose of the contents in the dust bag when the bag is one-third full. After you have finished sanding, the dust bag must be empties and the contents must be stored in a safe place outdoors due to fire hazard. Never leave a dust bag containing sanding dust unattended. Never empty the contents in an open fire. Hitting a nail during sanding can produce sparks and cause explosion or fire. Always use a hammer to pound in any metal pieces before sanding the floor. Always keep a fire extinguisher (ABC-class or water) available. Use of a machine that is not complete or that is not fully mounted can result in personal injury or damage to property. Never use these machines before they are fully mounted. Ensure that all fastening devices are fixed. Make adjustment as per the machine specifications. NOTE! Never remove or disable the earth lead in the power cable. Consult an electrician if the earth lead is missing or if you suspect that your circuit is not properly earthed. There is a risk of electric shock if the machine is used in a circuit that breaks repeatedly or is under dimensioned. Allow an authorised electrician to control the fuse, breaker or the power supply. The operator or other persons present can be injured if the power to the machine is connected while maintenance is performed. Always remove the power cable to the machine from the power point. There is a risk of personal injury if the grinder runs over and damages the power cable. Ensure that the power cable does not come into contact with the sanding disc. Always lift the power cable over the machine and grind in a direction away from the power cable. Always use an earth fault breaker that breaks the current immediately in the event of a fault in the electrical system or in the extension power cable. In order to prevent unintentional start of the machine, the power cable must be removed when the machine is not used and during service. Use of the machine with a damaged power cable can cause electric shock. Do not pull the machine by the power cable. Movable parts of the machine can cause serious personal injury and/or material damage. Keep hands, feet and loosely fitting clothing away from all movable parts of the grinder. If a edge floor grinder is used without all protection covers in place it may lead to personal injury or material damage. 3 Bona MiniEdge The operator or other persons present can be injured if the power to the machine is connected while maintenance is performed, or while a tool is changed. Because dust from sanding (i.e. red lead, certain types of wood and metals) are hazardous to health, a face mask of at least class P2 must be used. There is a risk of damage to the eyes and/or body if protective clothing and/or protective equipment is not used during sanding. Always use protective glasses, protective clothing, ear protection and a face mask of at least class P2 during sanding. Use ear protection Use face mask Read manual and safety instructions Dangerous High voltage Do not touch For minimized dust environment use a vacuum cleaner intended for wooden dust. The air flow on the vacuum cleaner should at least be 245m³/h. We strongly recommend Bona DCS system for best result. Store contained wooden dust outdoors in a safe place, due to the risk of fire. Never leave contained wooden dust without supervision. Always keep a fire extinguisher (ABC-class or water) available. Take precautionary measures to ensure that the machine is not damaged during transport. Be careful with power cables. Use the correct power cable with the correct length (see accessories list). Never carry the machine by the power cable. Never pull power cables from the machine or wall socket with strong movements. Protect the power cables against heat, oil and sharp edges. Power cables longer than 10m should not be used. Remove the power cable from the machine when it is not in use. Ensure that the machine does not start unintentionally. Never carry a connected machine. Ensure that the breaker is not on once the machine is connected to a power socket. Never use the machine if the start handle does not function as it should. Inspect the machine regularly. If you discover damaged parts, replace them at once. If necessary, contact the manufacturer, an authorised reseller or service partner. Note! Because of this construction is in many ways unique use of other spare parts and accessories than Bona original spare parts can cause a risk of personal injury and/or damage to the machine. Ensure that the machine is always in good condition. Keep the machine clean for better and safer use. Follow the instructions concerning the replacement of accessories. Inspect the power cables regularly. Repair or replace defective parts if they are damaged. Store the machine in a dry and locked area when not in use. 4 Bona MiniEdge Do not forget to put the on the tool before you start the machine. Always check that the sanding paper is correctly adjusted before you begin sanding. Keep the handle clean and free from grease. Keep unauthorised persons away from the work site. Do not allow unauthorised persons to come into contact with the machine or power cables. Do not misuse the machine. The machine works better when it is used according to its capacity and design. Allow the motor to “rest” during periods of heavier use. The motor will cool better, thus increasing its lifespan. Use fuses with the correct ampere number in relation to the motor. Never use a machine for anything else other than sanding, polishing and oiling of wooden floors. Service or repairs performed by unauthorised persons can cause damage or accidents. If service and repairs are performed by unauthorised persons, the warranty may become invalid. Service and repairs must be performed by Bona or retailers authorised by Bona. Be aware when you work. Use common sense. Do not use the machine if you are tired, have consumed alcohol or have taken medication that can affect your judgement or your body control. Due to the potential fire hazard involved with sanding dust, smoking is not permitted while sanding. Always use earth fault breaker! 5 Bona MiniEdge Repairs, Service and Maintenance Service Bona MiniEdge is a high quality machine and is tested by authorised test personnel at the factory before delivery. However, electrical and mechanical parts wear down and age during long-term use. In order to keep the machine in a safe and functioning condition, service must be performed every 250 work hours or at least once a year. This service includes control of wheels, cable stand, motor, tension device, sanding drum and handle shaft function is controlled. Only Bona's original parts may be used because the machine is considered unique, otherwise safety functions can become impaired. Always disconnect the power cable to the machine before it is cleaned, tools are changed, maintenance is performed or when worn parts are replaced. When you contact us in the event of a fault or to order spare parts, always specify the type and serial number of your machine. This information is located on the type sign of the machine. The machine may never be cleaned using a high pressure washer or hose. Spare parts and exploded views On the Internet, you will find a list of spare parts and exploded views for Bona MiniEdge and other machines in our product range. The address is: http://spareparts.bona.com/ During the factory warranty period, service or repairs may only be carried out upon approval by a manager at Bona Division Sanding and only performed by staff at Bona AB or approved staff at Bona AB Division Sanding. Other repairs (after the warranty period) of mechanical or electrical parts on the machine may only be carried out by Bona AB Division Sanding approved staff or authorised technician who has experience and knowledge concerning safety regulations. SERVICE AND MAINTENANCE All maintenance must be done on neutral machine! Unplug from the wall outlet. Check cable and connectors regularly. Always replace a damaged cord (slots, jacks or cable connections) with a new original cable. 6 Bona MiniEdge Warranty A 24 month factory warranty (from the date of invoice) against material and manufacturing faults applies to Bona Division Sanding’s own manufactured machines and Bona DCS with accessories manufactured after 01-01-2008. Bona Division Sanding pledges to rectify material and manufacturing faults free of charge provided that the machine, with paid freight, is sent to us with the relevant warranty claim form describing the fault. The factory warranty only covers new sales. We do not undertake any other form of compensation or liability to damages. Transport damage or transport costs will not be compensated. In the event of transport damage it is up to the receiver to contact the relevant transport company for compensation. The warranty does NOT cover faults that have occurred via normal wear, incorrect spare parts, carelessness, incorrect use, procedures without Bona Division Sanding’s approval or that the machine is connected to incorrect current. THE WARRANTY DOES NOT COVER: • • Consumable materials such as wheels, electric cables, abrasives, lamps, coal brushes, etc. Indirect damage, damage and errors that occur due to external damage, accidents, poor maintenance, overload, repairs performed outside of our knowledge and approval, or damages for another reason outside of our control. • With the use of parts produced by another company outside of our control. • Electrical components with current variations beyond what has been specified in the manual. • If payment for the machine is not made according to agreement In the event of a warranty claim, the machine or the agreed part must be returned to us or our dealer for warranty testing and for potential warranty repair or replacement. During the factory warranty period, service or repairs may only be carried out upon approval by a manager at Bona Division Sanding and only performed by staff at Bona AB or approved staff at Bona AB Division Sanding. Machine use: The machine is intended for the edge sanding of wooden floors, parquet floors as well as cork floors. It maybe used on newly laid and untreated floors and existing floors that have been treated with lacquer or oil. 7 Bona MiniEdge The main function of the machine is to serve as a complement to a belt or a drum sander for sanding edges. The machine is designed in accordance with latest information regarding ergonomics, safety and efficiency. The machine has been thoroughly checked and approved before leaving the factory. ASSEMBLY (Pict. 1) 1 Push the dust tube into the dust bag. Tighten the dust bag with the Velcro band on the tube. Put the dust bag with the dust tube back into the hole on the motor bracket . N.B. When emptying the dust bag remove the dust tube together with the dust bag completely, open the zipper and empty the content. STARTING Before starting the machine, instructions should be obtained from your dealer or Bona . Never touch neither the sanding disc nor the sanding plate when the power cable is plugged in. For security reasons, the extension cable must be unplugged from the motor cable when the machine is not used. Always unplug the machine and remove the cable from the wall outlet when maintenance job with the machine is made. 2 SWITCHING ON THE MOTOR Starting instructions (Pict. 2) Connect the machine cable to the extension cable. The machine must always be started while tilting backwards with the sanding arm lifted from the surface. Stand behind the machine and hold both machine handles firmly while pressing the start button on the side of the machine. The machine is ready to run immediately after start. The motor is provided with 0-tension release and overload protection. Always use original cable (120V 3xAWG14 Article no: ASO901527) (230V 3 x 1,5mm2 Article no: ASO908215) 8 Bona MiniEdge Machine adjustment (Pict. 4-5) 4 The machine is designed to angled forwards with an angle of approx. 4°. The distance between the underside of the motor bracket and the floor should be 58 mm. . This is achieved by adjusting the wheels using the adjusting screws. Correct adjustment of the machine is very important, as only approx. 1/3 of the disc should be in contact with the floor. The simplest way of checking this is to make a sanding proof. 5 Start the machine and lower the disc against the floor for a short moment without moving the machine laterally. The sanded area should look like a 1/3 ”piece of a cake” with the complete radius of the disc having sanded. Adjustment may be needed between very rough and very fine abrasive paper due to the difference of the height between the grits. If the whole disc is flat and in full contact with the floor you will create excessive resistance in the motor, circular scratch marks, and the machine becomes hard to handle. Using the screw on the handle bracket the angle of the handles can be adjusted, depending on required operating position, using the screw on the handle bracket. 58mm / 2,2” 9 Bona MiniEdge Changing sanding discs Never start the machine before a sanding disc is attached. N.B. Always use sanding discs of high quality in the correct dimension with a stable back side. N.B. Check the sanding disc regularly. If the sanding disc is worn out or has become clogged by lacquer or paint, the sanding result deteriorates and there is less efficient and the surface of wood may become discoloured. N.B. Only abrasive paper for sanding of wooden floors shall be used. When delivered a Velcro backed sanding disc is attached. To change the disc, proceed as follows: Sanding disc with velcro back (Pict. 6) Place the machine carefully on its side, resting on the left handle 6 and one wheel. Take holds of one edge and pull the abrasive paper from the Velcro disc. Fit a new abrasive paper to the Velcro disc. Make sure that the disc is centred and covers the whole surface. Press the abrasive paper, attaching the whole surface. 6 N.B. If the velcro disc is worn, scrape the disc off, clean the steel disc with meths or similar. Glue a new velcro disc on the steel plate. Check that the disc is positioned correctly as an off centre positioning unbalances the machine and produces vibrations. Sanding discs with a centre hole (Pict. 7-8) 7 8 Place the machine carefully on its side, resting on the left handle and one wheel. Hold the steel plate firmly with your hand, remove the nut anti-clockwise using box wrench NV13. Loosen the nut and the washer from the centre and remove the abrasive paper. Fit a new abrasive disc and tighten the screw clockwise until the disc is secured. Dust collection For minimum dust discharge Bona ’s original dust bag must be used. The dust bag shall be emptied when it is 1/3 full. When emptying the dust bag, remove the dust tube together with the dust bag completely, open the zipper and empty the contents. 9 Stair support for sanding thresholds (Pict. 9) Lay the machine on one side. Press the stair support springs on to the wheels so that they are resting in the two holes of the stair support. N.B. The wheels must be pointed forwards. 10 Bona MiniEdge SERVICE AND MAINTENANCE All maintenance must be made on an unconnected machine Check that the cable keeps an area of at least (120V 3xAWG14 Article no: ASO901527) or (230V 3 x 1,5mm2 Article no: ASO908215). If the cable is too weak the motor can be overloaded and be damaged. If the power supply is too weak the motor can be overloaded and damaged. Avoid prolonged or very hard sanding as will cause the motor to become very hot. As the motor cools this may cause deterioration of both it and other mechanical parts i.e. ball bearings etc. When the machine has been used for sanding sticky floors (varnish, glue etc.) the machine should be cleaned. Remove the dust cover plate loosen the screws, sanding disc and the belt cover plate to allow access. Clean all contamination from the belt system. Failure to do this may lead to damage to the pulleys and deterioration of the belt. Changing belt (Pict. 10-14) Unplug the machine. Loosen the three screws that fix the belt cover attached to the sanding arm. Then loosen the two screws on the belt cover plate. Loosen the four screws on the upper side of the sanding arm. Don’t remove the screws completely but only as much as you can in order to press out the bearing housing. Turn the machine upside down. Remove and replace the belt. 10 12 11 14 13 11 Bona MiniEdge Reassembly (Pict. 15 -18) Distance of gap Line-up the holes consistently 15 Place the new belt on the belt pulley. Twist the Bearing house while holding the pulley in such way that the distance between the bearing housing and the pulley is the biggest and the holes line up consistently. (See picture15) Place the whole package as it is, into the sanding arm, do not fasten the bearing house. Baring house and plate hub against each other with accompanied Textron wrench T15. (See picture 16) Assemble conical washer and nut. If you turn the nut (with the box wrench) clockwise the exocentric bearing house turns in a way that the belt tightens. (See picture 17) Turn until the belt is tight enough and the screw holes to the bearing house on the top of the arm line up. (See picture 18) Assembly the four screws and to the bearing house and then proceed with the dust and belt cover plates. N.B. Check that the bearing housing place is clean and dust free prior to reassembly. 16 17 18 Replacing the dust bag (Pict. 19) 19 Unplug the machine. Loosen the Velcro band at the dust tube. Change dust bag and pull the cable tie on each side of the stop ring on the tube. Put the tube with the bag back on the machine. 12 Bona MiniEdge Carbon brushes (Pict. 20-22) 20 21 19 22 The task of the carbon brushes is to transport the power to the armature via the rotating collector. There are two carbon brushes. They should be checked regularly and changed in pairs after approx. 100 hours normal operating time. N.B. Carbon brushes wear more quickly when subjected to high loads. Exchange: Unplug the machine. Remove the plastic covers from the machine front cover. Unscrew the two black coal covers on the machine housing. Pull out the carbon brushes. Check that the carbon brushes slides easily from their position. If necessary replace them. When reassembling, check that the springs are correctly placed in their positions. N.B. Don’t over tighten the carbon brush covers! Start the machine for testing. 23 Lamp exchange (Pict. 23-24) Unplug the machine. Remove the screw fixing the rubber seal and pull out the glass together with the seal using a screwdriver. Change the lamp after you have loosened the four screws and carefully lifted the machine cap. Check that the lamp is fixed between the springs in the lamp socket. Attach the glass and the rubber sealing by pressing thr rubber hooks with a screwdriver. 24 N.B. Always use gloves or a rag when you hold the lamp. Never place your fingers directly on to the lamp. Assemble in the reverse order. 13 Bona MiniEdge Changing wheel bracket, complete wheel (Pict. 25) When you wish to change complete wheel do as follows: Insert the Allen key in the key in the socket on the shaft, use a universal pliers and pull the wheel adjusting anti-clockwise. Loosen the wheel locking completely and unscrew the wheel nut from the motor bracket. Do in the opposite way when assembling the new wheel bracket. 25 14 Bona MiniEdge Trouble shooting Fault Cause Action The machine doesn’t start No power. Cable broken. Rotation of the disc is impossible Change to another wall socket. Change the cable. Rotate the sanding disc, remove possible blockages. Check that the ventilator runs smoothly. Adjust the ventilator. The sanding disc doesn’t rotate The cogged belt is broken/worn out. Change the cogged belt. The machine is faltering The carbon brushes are worn out. The carbon brackets are broken. The carbon brushes are binding. Change the carbon brushes. Big blue sparks in the motor Short-circuit at the carbon brushes. Change the carbon brushes or perhaps the armature. The machine is vibrating heavily Off centre sanding disc. Centre the disc. Ventilator damaged. Object stuck in the pulley. Change ventilator. Clean the pulley. Badly adjusted wheels. Unevenly worn wheels. The wheels are binding. The sanding disc is loose. Object between sanding disc and plate. Binding sanding disc. Adjust the wheels. Change the wheels. Clean or change the wheels. Fix or adjust the disc. Clean. The lamp is damaged. The lamp is loose. Change the lamp. Fix the lamp in the socket. Uneven sanding The lamp is not working 15 Change the carbon brushes. Clean the carbon brush channel. Change the velcro disc or tighten the centre screw. Bona MiniEdge SAFETY INSTRUCTIONS FOR USE OF BONA EDGE MACHINES IMPORTANT! During use of electrical machinery, basic safety precautions should be followed in order to reduce the risk of fire, electrical accidents or personal injury. Therefore, read the following instructions thoroughly before the machine is used. Save the instructions. Always use an earth circuit breaker! 1. For safer use, keep the work area clean. An untidy work area increases risk for accidents. 2. Consider the surroundings. Do not allow the machine to come in contact with water or moisture. Do not use the machine near flammable liquid or gases. 3. Keep unauthorized persons away from the work place. Do not permit unapproved persons to come in contact with the machine or cable. 4. Storage of the machine. When the machine is not in use, store it in a dry and, preferably locked space. 5. Do not abuse the machine. The machine works best when it is used within its capacity and design. Let the motor ”rest” periodically with a lower load. The motor will cool down and thus have a longer life. Use fuses with correct amperage in relation to the motor. 6. Use the right machine. Do not let a smaller machine or accessories do a work of bigger machine’s work. Never use a machine for other than what it was designed to do. 7. Wear the right clothes. Do not wear loose-fitting clothing that can easily be caught fasten in the machine. 8. Be careful with cables. Use the right cable in the right length (see accessory list). Never carry the machine by holding its cable. Never sharply tug cables out from the machine or from wall outlets. Protect cables from heat, oil and sharp edges. Keep cables away from the machine’s sanding area. 9. Unplug the machine when not in use. Make sure the machine is not started unintentionally. Never carry a connected machine with a hand on the power switch. Make sure that the power switch is not on when the machine is connected to an outlet. Never use the machine if the power switch does not function, as it should. 10. Remove service tools before start. Check that no tools are on the machine during start or during operation. 11. Use recommended safety equipment. Use face mask min. class P2 and ear defenders. 12. Check the machine regularly. If any damaged parts are detected, replace them at once. If necessary, contact the manufacturer or an authorized distributor or service company. Note! Use of other spare parts and accessories other than those recommended may can damage the machine and potentially increase the risk of personal injury. 13. Keep the machine in good condition. Keep the machine clean for better and safer use. Follow instructions regarding replacement of accessories. Check cables regularly. In case of damage, repair or replace defective parts. Keep handles dry, clean and free from grease. 14. Pay attention while working. Use common sense. Don’t run the machine if you are tired. If you have been drinking alcohol or taken drugs which can affect your judgement or control of your body. Due to a potential fire risk from sanding dust do not smoke whilst sanding. 15. Emptying the dust bag. After each complete sanding, the dust bag should be emptied and the contents kept safely outdoors due to potential fire hazard. 16 Bona MiniEdge division Sanding Vallgatan 45, SE-716 31 Fjugesta, Sweden Tel.: +46 (0)40 38 73 90 Fax: +46 (0)585 204 Please visit: www.bona.com/compliance for more information about the Waste Electrical and Electronic Equipment 17 Bona MiniEdge Bona AB, Division Sanding Vallgatan 45, SE-716 31 Fjugesta, Sweden Tel.: +46 (0)40 38 73 90 Fax: +46 (0)585 204 Bona AB Box 21074, SE-200 21 Malmö, Sweden Tel.: +46 (0)40 38 55 00 www.bona.com EU assurance of conformity As per directive 2006/42/EC, appendix IIA We hereby guarantee that Bona MiniEdge with article number: AMO260000.3 | AMO260001.0 | AMO260001.3 | AMO260003.3 beginning from serial number 1001AMO260001 fulfils the requirements in the Council’s directives: 2006/42/EC on machines. 2006/95/EEC regarding electrical equipment intended for use within certain voltage tolerances, 2004/108/EEC regarding electromagnetic compatibility, including applicable amendments. The following norms have been used as guidelines when designing the machines: SS-ISO 2768-1 General tolerances for linear measurements and angle measurements without direct tolerance specifications. SS-ISO 1940-1 Balancing requirement of rotors in stable state - Determination and verification of balancing tolerances SS-EN ISO 13920 Welding - General tolerances for welded constructions - Dimensions for lengths and angles – Form and position SS-EN ISO 14121-1 Machine safety – Principles for risk assessment SS-EN ISO 12100 -1,-2 Machine safety – Fundamental terms, general construction principles SS-EN ISO 13857 Machine safety - Safety distances to prevent hazard zones being reached by upper and lower limbs SS-ISO 60204-1 Machine safety - Electrical equipment of machines – Part 1: General requirements SS EN 55014 -1, -2 Electrical household appliances, electrical tools and similar articles - Electromagnetic compatibility (EMC), Part 1: Emission Part 2: Immunity SS-EN 61000-3-2 - Electromagnetic compatibility (EMC), Part 3-2: Limits - Limits for overtones caused by apparatuses with saturation current max. 16 A per phase SS-EN 61000-6-2 - Electromagnetic compatibility (EMC), Part 6-2: General requirements - Immunity in equipment in an industrial environment SS-EN ISO 8062 -1,-3 Geometric product specifications (GPS) - Dimension tolerances and geometric tolerances for moulding – Part 1: Glossary - Part 3: Geometric tolerances and machining castings SMP, The Swedish Machinery Institute Fyrisborgsgatan 3 SE-754 50 Uppsala Sweden Fjugesta, 2010-08-16 Lasse Waineby has carried out voluntary type approval certificate no: SEC/09/2148 Sign: R&D Manager Telefon nr: +46 40 387 392 ……………………………………………………………………………. (The undersigned is authorized to compile the technical documentation) 18