1
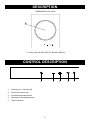
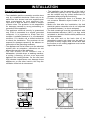
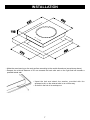
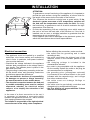
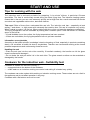
GB
Instruction manual for induction wok
Model code: C930I
Contact Caple on 0844 800 3830 or for spare parts www.4caple.co.uk
Dear Customer,
We thank you and congratulate you on granting us your preference, by purchasing one of our products.
We are sure that this new appliance, manufactured with quality materials, will meet your requirements in
the best possible way.
The use of this new equipment is easy. However, we invite you to read this booklet carefully, before
installing and using the appliance. This booklet gives the right information on the installation, use and
maintenance, as well as useful advice.
CAPLE
ENVIRONMENT PROTECTION
This product complies with EU Directive 2002/96/EC.
The crossed-out dustbin symbol reported on the appliance indicates that the appliance
must be disposed of separately from other domestic refuse at the end of its useful life.
It must therefore be delivered to a waste recycling centre specifi cally for electric and
electronic equipment or returned to the retailer at the moment of purchase of a new
equivalent appliance.
The user is responsible for delivering the appliance to the appropriate collection centre at the end of its
useful life, failure to do so may result in a fine, as provided for by laws governing waste disposal.
Differential collection of waste products for eventual recycling, treatment and environmentally friendly
disposal helps reduce possible negative effects on the environment and health, and also enables the
materials making up the product to be recycled.
For more detailed information on the available refuse collection systems, refer to the local Municipal Solid
Waste disposal centre or the shop where the product was purchased.
Producers and importers are responsible for fulfilling their obligations as regards recycling, treatment and
environmentally friendly disposal by directly or indirectly participating in the collection system.
2
DESCRIPTION
DIMENSIONS: 520 X 400
1
1 - Cooking area Ø 300 (2400 W - Booster 3000 W)
CONTROL DESCRIPTION
4
5
1
Switching on - switching off
2
Controls functions lock
3
Increase temperature/timer
4
Decrease of temperature/timer
5
Timer activation
3
3
2
1
SAFETY AND CARE DIRECTIONS
Correct use.
•• Do not use pots or pans with rough bottom
(i.e. cast iron), because they could scratch the
surface of the hob. Also grains of sand could
cause scratches.
•• Make sure that sugar, liquefied or solid, plastic or
silver paper do not be leant on the hot cooking
areas. These materials melt, stick on the surface
and when they cool they can crack, break or
damage permanently the ceramic surface. If
these substances inadvertently reach the hot
cooking areas, switch off the hob and eliminate
them with a spatula as soon as possible, when
the appliance is already hot. Attention: since
the cooking areas are very hot there is the
possibility to scald yourself.
•• To avoid a risk of dishes remains burning, get rid
of them immediately in case they overflowed in
the surface during the cooking; make sure that
the pot bottom is not grease, but clean and dry
before leaning it on the hob.
•• Never use vapour devices. The vapour
pressure could damage permanently surfaces
and components of devices, for which the
manufacturer will not be responsible.
•• Never lean too hot pots or pans on the control
panel. The electronics situated under the panel
could be damaged.
•• If under the embedded appliance there is a
drawer, take care of that the distance between
the drawer, and so its content, and the lower
side of the appliance is enough. On the
contrary the aerification of the hob is not
warranted.
•• To avoid damages to persons and fittings read
carefully this directive before use the hob for the
first time.
•• Use the hob after embedding it correctly; it is
important to avoid the contact with electric wire
components.
•• The hob is meant to be used only in domestic
background not in the industrial field.
•• Use the appliance only to prepare dishes; other
uses at consumer risk, they can be dangerous.
The manufacturer do not answer to damages
caused by an incorrect use of the appliance.
If there are children at home.
•• Use controls lock so as the children can not switch
on the hob or modify its setting.
•• The appliance must be used only by adults, who
are able to understand the indications on this
directive. Often children can not perceive the
damages of a functioning hob. Keep an eye on the
children carefully.
•• Grown-up children can use the appliance only if
they have been educated to use it carefully and
in absolute security and if they know the possible
damages caused by an incorrect usage.
•• Do not permit to children to play with the
appliance.
•• The hob warms and stays warm for some time
also after the switching off. For this reason
children must be taken far from the appliance to
avoid every scorch risk.
•• Take attractive objects far from children and the
hob, because they could lead them to approach
the appliance with consequent scorch risks.
•• Make sure that children could not have the
possibility to upset hot pots or pans. Danger of
explosion and fire, in addition with scorch. In the
market there is a special pan support which could
be useful to reduce accident risks.
•• Children should be taken far from the packaging,
because some of its components (in plastic or
polystyrene) are dangerous (choking danger).
Provide immediately for the elimination of the
packaging.
To avoid burns.
•• When functioning the appliance is too hot and
maintains the temperature for some minutes
after the switching off. Only when the afterheat
lights go off there is no more danger of burns.
Pay attention to children at home, they must not
approach the still hot hob.
•• Always use the proper knobs or pot holders to
move or to put pots and pans on the hob. The
knobs and pot holders material must not be wet
or damp. The dampness increases the heat
conductivity and so the risks of burns.
•• Do not heat closed vessels, i.e. tin vessels, on
the cooking areas. The resulting overpressure
could cause the explosion of this material. Burn
and hurt danger.
•• Do not use the appliance as a rest surface and
in particular do not lean on metallic objects. If the
hob is unintentionally switch on or if the cooking
Advice to better use the hob.
•• Take care not to throw objects or cutlery on the
ceramic surface. Also light objects (i.e. a saltcellar) might crack or damage the ceramic plate.
4
SAFETY AND CARE DIRECTIONS
The main sheathing could be damaged. Electrical
shock danger.
•• Warm sufficiently the dishes. Germs present in
the food are eliminated only at high temperature
and in a long period of time.
•• Do not use plastic or tin foil dishes. High
temperature could melt these materials. Fire
danger.
•• Do not approach to the functioning hob magnetic
objects like credit cards, floppy disks, calculators.
Their functions could be compromised.
•• Do not put canisters, liquids or other flammable
materials in drawers under the appliance. The
drawer’s cutlery tray, if present, should be in heat
resistant material.
•• areas afterheat is already functioning there is
the risk that the resting object, depending on its
material, heats (burn danger), start melting or
burning.
•• Do not cover the hob with a cloth or a protective
film. The hob could be hot; burning danger.
•• Stay near the hob when using fats and oils
because when they overheat, they can start
burning and ignite also the cooker hood. Fire
danger.
•• If fats and oils used to cook start burning, do not
try to extinguish the fire with water. Smother the
fire with a blanket or an extinguisher.
•• Do not cook flambè dishes under the cooker
hood. Flames could reach the cooker hood and
burn it.
If there is a faulty appliance.
•• If the cosumer finds an anomaly in the appliance,
disconnect the electricity of the hob. If the
appliance is not definitively setted and linked
up, detach also the stoker wire from the electric
system. For this purpose do not hold the wire but
the plug, if present. Call the technical assistance.
Pay attention not no connect the appliance to the
electrical system before repairing it.
•• If there are cracks on the ceramic surface,
disconnect the electricity of the appliance.
Electrical shock danger.
•• Repairs have to be made only by skilled and
authorized staff. Uncorrect repairs could
be cause of danger and further damage
the appliance. Never undo the appliance
wrapping.
•• Repairs on the appliance during the warranty
period can be done only by the firm technical
assistance, otherwise the consumer will not have
the right of calling for the following damages.
Further damages.
•• Only for pacemaker carrier: to consider
that near the functioning appliance there
is a electromagnetic field, which could
compromise the pacemaker performance.
For doubts regarding the pacemaker apply its
producer or the doctor.
•• Take care of positioning the dishes in the centre
of the cooking area, so that the pot’s backside
can cover all the electromagnetic field.
•• Using a socker near the appliance, make sure
that the supply wire do not touch the hot hob.
5
INSTALLATION
General Instructions.
•• The installation and the assembly of the hob in
non-stationary places, like for example a ship,
can be realized only by skilled technicians to
guarantee safety during the functioning.
•• If under the appliance there is a drawer, do
not conserve flamable object inside of it (i.e.
canisters).
•• Make sure that after the installation, the hob
electrical system connection wire is not subjected
to mechanical stress, (i.e. doe to a drawer).
•• The hob veneerings must be manufactured with
thermoresistant adhesive (100°C), so they could
not detach or bunckle. Also the back profiles must
be thermoresistant.
•• On one side and on the back side of an
embedded ceramic hob there can be walls or
furnitures of every height, while on the other side
the furniture or an existing appliance must not be
higher than the hob.
•• The installation and the connection must be done
only by a qualified electrician. Refer only to an
electrician who knows local and supplemental
rules promulgated by local electrical firm.
Take care of that the work is made in respect
of these rules. The producer is not responsible
for damages caused by wrong embedding or
connection of the appliance.
•• The appliance electrical security is guaranteed
only if this is connected to a regular grounded
conductor. It is important to check that this
condition is satisfied because it is a fundamental
condition. If in doubts call a skilled technician
to check the installation. The producer do not
respond for damages caused by the absence or
interruption of the grounding conductor.
•• The appliance do not be linked up to the electrical
system with an extension; extensions do not
warrant the security of the appliance.
•• The hob should not be installed over a
dishwasher, a tumble dryer, a washing machine,
a cooling, a freezing, an oven or an unprovide
appliance fan cooling kitchen. On the one hand
high release temperatures can damage these
appliances, on the other hand in this way the
ventilation of the hob is not ensured.
RECOMMENDED
DISTANCE BETWEEN APPLIANCE AND HOOD
50 mm
50 mm
NOT RECOMMENDED
NOT RECOMMENDED
6
INSTALLATION
40
0
20
5
130
5
49
37
0
•• Make the wood-carving on the work surface according to the model dimensions (see pictures above).
•• Respect the minimal distance of 50 mm towards the back side and on the right and left towards a
possible lateral wall.
•• Upset the hob and attach the washer, provided with the
accessories kit, on the external side in an uniform way.
•• So build in the hob in its worktop-out
7
INSTALLATION
50 min.
20-40
5 mm
Min. 4
Max. 50
ATTENTION:
To guarantee a correct functioning of the appliance it is important to
provide the work surface, during the installation, of a 4mm chink for
the length of the recess on the front side of the furniture.
This, because the electrical controls have a guard which, if the
electronic system overcome a 94°C temperature, switches off
the hob until the temperature return under the limit. So during
the functioning, to guarantee a rush of air which maintains the right
temperature, a fan start up.
Provide the assembling with an underlying cover which ensures
the rush of air from the back side of the forniture or, if the hob is
installed over an oven, a suitable insulation to guarantee that the
temperature do not overcome 85°C.
If this happens there can be damages to the electronic system, for
which the manufacturer do not have responsibilities.
Electrical connection.
Before effecting the connection, make sure that:
•• the outlet has the grounding and is make
according to law;
•• the outlet could bear the highest load of the
machine, shown in the indicator placed on the
appliance;
•• the charging voltage is included in the
characteristics indicator;
•• the outlet is plug-compatible with the appliance.
On the contrary replace the outlet or the plug; do
not use extansions or multiplexes;
•• the grounding wire (yellow/green coloured)
is connected to the terminal board on the point
indicated with the respective sign, and is longer
than other conductor wires;
•• the cable must not undergo foldings or
compressions;
•• the cable must be periodically controlled and
changed only by authorized technicians.
•• the firm declines all responsabilities if these
rules are not respected.
•• The appliance must be installed by a qualified
technician, who knows safety and assembling
rules in force. In particular, local power institution
rules must be observed.
•• Check that the voltage indicated in the appliance
indicator plate corresponds to the voltage used in
your house. The indicator plate is placed in the
back side of the hob.
•• The grounding is compulsory according to the law.
All the electric wires and grounding conductors
should have appropriate dimensions.
•• The manufacturer declines all responsibility
for damages on person or things caused by
the non-observance of rules written above.
•• The electrical connection between the hob and
a possible embedding oven must be realized
separated, whether for electrical safety
reasons, or to simplify the extraction of the
appliances.
In the case of a direct connection to the net, it
is neccesary to interpose a mono-pole switch
between the appliance and the net , with a minimal
3mm opening between the contacts.
The installer is responsible of the right electrical
connection and of the safety rules compliance.
8
START AND USE
Tips for cooking with the wok
The induction wok is eminently suitable for preparing “á la minute” dishes, in particular Chinese
specialities. The food is continuously turned during the short frying time. The induction heating system
means that in the wok you can cook extremely quickly and at high heat. As a result meat and fish remain
succulent and vegetables retain colour, taste and vitamins.
Take care! Risks of burns from overheated fats and oils. The induction wok has – especially at heat
setting 7 and above – a high power with extremely fast reaction time. Fat and oil overheat very quickly.
When it starts to smoke, it is too hot. When cooking with fat or oil do not leave the appliance unattended.
The frying temperature can be estimated by testing with a wooden spoon. Hold the handle of a wooden
spoon in the hot fat:
– If small bubbles rise to the surface, the frying temperature has been reached.
– If there are no bubbles, the frying temperature has not yet been reached.
Information on acrylamides
According to the latest scientific knowledge, intensive browning of food, especially in products containing
starch, can constitute a health risk due to acrylamides. Therefore we recommend cooking at the lowest
possible temperatures and not browning foods too much.
Handling the wok
• Place the wok pan into the wok niche carefully. If handled carelessly, the handle can hit the glass
ceramic surface and damage it.
• Do not shake the wok pan while it is in the wok niche. The glass ceramic surface can be scratched or
damaged by the handle.
Cookware for the induction wok - Suitability test
Cookware is suitable for induction cooking, if …
• ... a magnet sticks to the bottom of the cookware.
• ... a little water on an induction cooking zone set to heat setting 9 is heated very quickly.
The cookware can make noises while working on induction cooking zones. These noises are not a fault in
the appliance and do not affect operation in any way.
Cookware with a flat bottom must not be used.
9
START AND USE
4
5
3
2
1
Switching on.
The control is switched on by pressing the on/off key (n°1). When this sensor is selected a sound is made.
The heaters remain off (all the digits show 0) until a power level is selected. If the selection is not made in 10
seconds, and if the timers are off, the control turns off automatically.
With the control on, the first time the sensor (+) is pressed, the heater switches on at level 4.
The sensor (+) raises the cooking level to a maximum of 9, whereas the sensor (-) reduces the cooking
level to 0 (heater off).
With the heater at position 0, the sensor (-) raises the cooking level to 9.
If the sensor is held down, the action is repeated twice every second.
Booster function
The cooking zone must be set to level 9. Once you set this value, by pressing the "+" button will activate the
booster function. The display will show the letter "P".
Key function (lock)
Key lock
Holding the key lock sensor down turns the key lock function on or off. If the pilot light associated with the
key lock sensor is on, the keypad is locked.
The locking function can be activated when the cooking levels are activated or when the cook top is off.
If the cook top is on, the key lock function locks all the sensors except the general on/off sensor and the
key lock. When the cook top is off, the key lock function locks all the sensors, including the general on/off,
except the key lock.
Unlocking the keypad
If the keypad is locked (the pilot light associated with the key lock sensor is on), holding down the key
lock sensor turns the key lock function off and the pilot light goes off.
10
START AND USE
Timer function
Activate the appliance and select the desired power level (it can also be changed as a result of' activation
function).
and set the duration (in minutes, from 0 to 99)
To activate the timer function is to press the sensor
with the 'use of sensors (+) and (-). Pressing the sensor timer will turn on a red light above the 'display of
power that confirms the' activation function.
When the time set an acoustic signal will alert the end of the function, just press a sensor to turn off the
touch controls.
Automatic switch-off.
If the power level is not changed during a preset time, the corresponding heater turns off automatically.
The maximum time a heater can stay on depends on the selected cooking level.
POWER LEVEL
MAX. TIME ON
(Minutes)
ABSORBED POWER
W (indicative)
1
520
300 (in steps of 4s)
2
402
300 (in steps of 3s)
3
318
300 (in steps of 2s)
4
260
300 (in steps of 1s)
5
212
350
6
170
600
7
139
900
8
113
1350
9
90
2300
P
10*
3000
* If you are using the booster function after 10 minutes the appliance will not switch off, but it go down to
the level of power 9.
Pressing the heater keys (+) and (-) at the same time switches off the corresponding heater and the
display shows the power level as 0. We can also switch off the heater by pressing the key (-) until the
display shows the power level as 0.
General off
The general off function can be performed regardless of the operating mode of the cook top by pressing
the on/off sensor. When the cook top is turned off, a beep sounds and the displays turn off, as long as an
‘H’ is not being shown on the corresponding display as a result of residual heat or an alarm.
11
PROBLEMS AND SOLUTIONS
What to do if …
Problem
The cooking zone cannot be
switched on or is not operating
The residual heat indicator is
not displaying anything
lights up
It is very hard to adjust the
heat settings
Possible cause
Remedy
More than 10 seconds have
passed since the appliance was
switched on
Switch the appliance on again.
The child safety device is
switched on
Deactivate child safety device
(See the section “Child safety
device”)
Several sensor fields were
touched at the same time
Only touch one sensor field
Automatic switch off has been
triggered
Remove any objects (pan,
cloths, etc.) that are lying on
the control panel. Switch
appliance on again
The cooking zone was only on
for a short time and is therefore
not hot
If the cooking zone is supposed
to be hot, call the Customer
Service Department.
Unsuitable cookware
Use suitable cookware
No cookware on the cooking
zone
Put cookware on zone
Potential differences
Do not touch the pan handle
when setting the heat settings
and do not position over the
control panel.
If you are unable to remedy the problem by following the above suggestions, please contact your local
Service Centre.
Warning! Repairs to the appliance are only to be carried out by qualified service engineers.
Considerable danger to the user may result from improper repairs. 3 If the appliance has been
operated incorrectly, the engineer's visit will be chargeable, even during the warranty period.
12
CARE AND CLEANING
Never use vapour machines to clean. On
the one hand the vapour can reach electrical
conductor components and cause a short-circuit.
On the other hand vapour pressure can cause
permanent damages on the surfaces and on the
appliance components; the manufacturer is not
responsible of these damages.
Do not put metallic objects on the hob, like for
example knives, spoones, covers and so on.
Always blot the appliance after pass it with a wet
cloth to avoid the formation of calcareous rests.
Clean the appliance regularly, always after use it.
Before the cleaning, wait till the hob is cold.
Do not use pointed objects, as not to damage
washers between ceramic and frame and between
frame and working surface.
Eliminate dirty with a wet cloth; if there are hard
stains use the appropriate spatule.
Do not use products with sands, alkali, acids or
chlorides, oven spray, detergents used to clean
dishwashers, steel wool or abrasive dampers
or a hard bristle brush. Do not use also dampers
or other products which have abrasive detergents
residuals because they could scratch the surface.
At the end clean the hob with some drops of a
special ceramic detergent and with kitchen paper
or with a wet cloth. In this way also calcareous
rests, caused by water overflowed during the
cooking, and stains with metallic reflections
(alluminium residuals) can be eliminated.
Pay attention to the detergent used to clean the
ceramic because if it is not the right one, it could
bleach the surface; it could appear permanent blue
stains.
Clean the surface with a wet cloth and pass it with
a clean one after finishing to use the hob.
So, clean the cooking zone when it cool down as
described above.
Use special detergent for ceramic.
Eliminate from the cooking zones with a wet cloth
all detergent rests used to clean the ceramic; if the
cooking zones are reinserted, these substances
could damage the ceramic.
For this reason, clean immediately all dirty
residues so that they do not burn. Make sure
that pots bottom is clean, dry and without grease
before putting the dishes in the hob.
13
14
15
16
COD. 208464-00 - 01.12.2011
The manufacturing firm refuses all responsibility for any possible imprecision in this booklet, due
to misprints or clerical errors. It reserves the right to make all the changes that it will consider
necessary in its own products, without affecting the essential characteristics of functionality and safety.