1
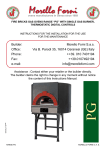
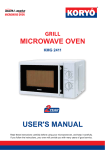
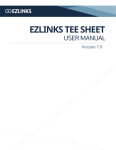
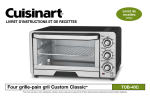
GB
Instruction manual for induction hob
Model code: C993I
Contact Caple on 0844 800 3830 or for spare parts www.4caple.co.uk
DESCRIPTION
C933I
2
DIMENSIONS:
385 X 525
1
Booster
1 - Cooking area Ø 145 (1600 W)
2 - Cooking area Ø 210 (2000 W - Booster "P" 3000 W)
CONTROL DESCRIPTION
6
0
4 3
00
1
1
Switching on - switching off
2
Controls functions lock
3
Cooking area directions
4
Cooking area controls
5
Cooking area timer checks
6
Cooking area power indicator
7
Booster functions switching on/off
5
0
2
2
Booster
7
SAFETY AND CARE DIRECTIONS
Correct use
surface of the hob. Also grains of sand could
cause scratches.
•• Make sure that sugar, liquefied or solid, plastic
or silver paper are not leant on the hot cooking
areas. These materials melt, stick on the surface
and when they cool they can crack, break or
damage permanently the ceramic surface. If
these substances inadvertently reach the hot
cooking areas, switch off the hob and remove
them with a spatula as soon as possible, when
the appliance is already hot. Attention: since
the cooking areas are very hot there is the
possibility to scald yourself.
•• To avoid a risk of food remains burning, get rid of
them immediately in case they overflow on to the
surface during the cooking; make sure that the
pot bottom is not soiled, but clean and dry before
leaning it on the hob.
•• Never use vapour devices. The vapour
pressure could permanently damage surfaces
and components of devices, for which the
manufacturer will not be responsible.
•• Never lean hot pots or pans on the control panel.
The electronics situated under the panel could be
damaged.
•• If under the installed appliance there is a
drawer, take care of that the distance between
the drawer, and so its content, and the lower
side of the appliance is enough. On the
contrary the aerification of the hob is not
warranted.
•• To avoid damages to persons and fittings please
read this manual carefully before using the hob for
the first time.
•• Use the hob after installing it correctly; it is
important to avoid the contact with electric wire
components.
•• The hob is meant to be used only in domestic
installations not in the industrial field.
•• Use the appliance only to prepare dishes; other
uses at consumer risk, they can be dangerous.
The manufacturer does not accept responsibility
for to damages caused by an incorrect use of the
appliance.
If there are children at home
•• Use control lock so as the children can not switch
on the hob or modify its setting.
•• The appliance must be used only by adults,
who are able to understand the indications in
this manual. Often children can not perceive the
dangers of a functioning hob. Keep an eye on the
children carefully.
•• Grown-up children can use the appliance only if
they have been educated to use it carefully and
in absolute security and if they know the possible
damages caused by an incorrect usage.
•• Do not permit children to play with the appliance.
•• The hob warms and stays warm for some time
also after the switching off. For this reason
children must be taken far from the appliance to
avoid the risk of burns.
•• Take attractive objects far from children and the
hob, because they could lead them to approach
the appliance with consequent burn risks.
•• Make sure that children could not have the
possibility to upset hot pots or pans. Danger of
explosion and fire, in addition with burns. In the
market there is a special pan support which could
be useful to reduce accident risks.
•• Children should be taken far from the packaging,
because some of its components (in plastic or
polystyrene) are dangerous (choking danger).
Carefully dispose of the packaging immediately.
To avoid burns
•• When functioning the appliance is too hot and
maintains the temperature for some minutes
after the switching off. Only when the afterheat
lights go off there is no more danger of burns.
Pay attention to children at home, they must not
approach the hot hob.
•• Always use the proper knobs or pot holders to
move or to put pots and pans on the hob. The
knobs and pot holders material must not be wet
or damp. The dampness increases the heat
conductivity and so the risks of burns.
•• Do not heat closed vessels, i.e. tin vessels, on
the cooking areas. The resulting overpressure
could cause the explosion of this material.
Producing a risk of danger.
•• Do not use the appliance as a rest surface and
in particular do not lean on metallic objects. If
the hob is unintentionally switched on or if the
cooking areas afterheat is already functioning
there is the risk that the resting object, depending
Advise for better use of the hob
•• Take care not to throw objects or cutlery on the
ceramic surface. Also light objects (i.e. a saltcellar) might crack or damage the ceramic plate.
•• Do not use pots or pans with rough bottom
(i.e. cast iron), because they could scratch the
3
SAFETY AND CARE DIRECTIONS
on its material, heats (danger of burns), start
melting or burning.
•• Do not cover the hob with a cloth or a protective
film. The hob could be hot; danger of burning.
•• Stay near the hob when using fats and oils
because when they overheat, they can start
burning and ignite also the cooker hood. Danger
of fire.
•• If fats and oils used to cook start burning, do not
try to extinguish the fire with water. Smother the
fire with a blanket or an extinguisher.
•• Do not cook flambè dishes under the cooker
hood. Flames could reach the cooker hood and
burn it.
high temperature and in a long period of time.
•• Do not use plastic or tin foil dishes. High
temperature could melt these materials. Fire
danger.
•• Do not approach to the functioning hob magnetic
objects like credit cards, floppy disks, calculators.
Their functions could be compromised.
•• Do not put canisters, liquids or other flammable
materials in drawers under the appliance. The
drawer’s cutlery tray, if present, should be in heat
resistant material.
If there is a faulty appliance
•• If the cosumer finds an anomaly in the appliance,
disconnect the electrical supply of the hob. If the
appliance is not definitively setted and linked
up, detach also the stoker wire from the electric
system. For this purpose do not hold the wire but
the plug, if present. Call the Caple service centre.
Pay attention not to connect the appliance to the
electrical system before repairing it.
•• If there are cracks on the ceramic surface,
disconnect the electrical supply of the appliance.
There is danger of electrical shock.
•• Repairs have to be made only by skilled and
authorised staff. Uncorrect repairs could
be cause of danger and further damage the
appliance. Never dismantle the appliance
casing.
•• Repairs on the appliance during the warranty
period can be done only by Caple technical
assistance, otherwise the product will no longer
be covered by the warranty.
Further Information
•• Notes for users with Pacemakers: please
consider that near the functioning appliance
there is a electromagnetic field, which could
compromise the pacemaker performance.
For doubts regarding the pacemaker Please
speak to its producer or your doctor.
•• Take care of positioning the dishes in the centre
of the cooking area, so that the pot’s underside
can cover all the electromagnetic field.
•• Using a socket near the appliance, make sure
that the supply wire does not touch the hot hob.
The main sheathing could be damaged. Electrical
shock danger.
•• Ensure foods are cooked/heated correctly.
Germs present in the food are eliminated only at
4
INSTALLATION
General Instructions
non-stationary places, like for example a ship,
can be installed only by skilled technicians to
guarantee safety during the functioning.
•• If under the appliance there is a drawer, do not
store flamable object inside of it (i.e. canisters).
•• Make sure that after the installation, the hob
electrical system connection wire is not subjected
to mechanical stress, (i.e. fixed to a drawer).
•• The hob veneerings must be manufactured with
thermoresistant adhesive (100°C), so they cannot
detach or buckle. Also the back profiles must be
thermoresistant.
•• On one side and on the back side of an installed
ceramic hob there can be walls or furnitures of
every height, while on the other side the furniture
or an existing appliance must not be higher than
the hob.
•• The installation and the connection must
be done only by a qualified electrician.
Refer only to an electrician who knows local
and supplemental rules and regulations. Take
care of that the work is carried out in respect
of these rules. The producer is not responsible
for damages caused by incorrect installation or
connection of the appliance.
•• The appliance electrical security is guaranteed
only if this is connected to a regular grounded
conductor. It is important to check that this
condition is satisfied because it is a fundamental
condition. If in doubts call a skilled technician to
check the installation. The producer do not accept
responsibility for damages caused by the absence
or interruption of the grounding conductor.
•• The appliance must not be linked up to the
electrical system with an extension; extensions do
not warrant the security of the appliance.
•• The hob should not be installed over a
dishwasher, a tumble dryer, a washing machine,
a cooling appliance, an oven or cooling fan. On
the one hand the high temperatures released can
damage these appliances, on the other hand in
this way the ventilation of the hob is not ensured.
•• The installation and the assembly of the hob in
RECOMMENDED
DISTANCE BETWEEN APPLIANCE AND HOOD
50 mm
50 mm
NOT RECOMMENDED
NOT RECOMMENDED
5
INSTALLATION
H
A
B
CUT-OUT DIMENSIONS VERSION 380 X 520: 350 (A) X 495 (B)
HEIGHT OF ELECTRICAL CONNECTION BOX: H=75 mm
•• Make the cut-out on the work surface according to the model dimensions (see pictures above).
•• Respect the minimal distance of 50 mm towards the back side and on the right and left towards a
possible lateral wall.
•• Reverse the hob and attach the washer, provided with the
accessories kit, on the external side in an uniform way.
•• Attach the provided stirrup to the relative places and fix the hob to
the surface.
6
INSTALLATION
50 min.
5 mm
Air outlet
20-40
Min. 4
Air inlet
Max. 50
ATTENTION:
To guarantee a correct functioning of the appliance it is important to
provide the work surface, during the installation, of a 4mm space for
the length of the recess on the front side of the furniture.
This, because the electrical controls have a guard which, if the
electronic system exceeds a 85°C temperature, switches off
the hob until the temperature returns below this limit. So during
the functioning, to guarantee a rush of air which maintains the right
temperature, a fan starts up.
Provide the assembling with an underlying cover which ensures
the rush of air from the back of the furniture or, if the hob is
installed over an oven, a suitable insulation to guarantee that the
temperature does not exceed 85°C.
Please provide a protection below to ensure the correct air flow
from the back of the cabinet, or, if the hob is installed above
the oven, please ensure adequate insulation to be sure of not
exceeding temperature.
If this happens it can cause damages to the electronic system, for
which the manufacturer does not have responsibilities.
Initial Light Conditions
In order to prevent a incorrect operation of the
keyboard, when the hob is connected, if the direct
environmental lighting conditions are excessive
(i.e. halogen hood lights on), the user interface
operation is stopped until the correct light
conditions are recovered.
The displays of the User Interface heaters are
switched on and the control operation stopped
Electrical connection.
The installer is responsible for the correct
electrical connection and of the compliance of
the safety rules.
•• The appliance must be installed by a qualified
technician, who knows security and installation
rules in force. In particular, local power institution
rules must be observed.
•• Check that the voltage indicated on the appliance
indicator plate corresponds to the voltage used in
your house. The indicator plate is placed in the
back side of the hob.
•• The grounding is compulsory according to the law.
All the electric wires and grounding conductors
should have appropriate dimensions.
•• The manufacturer declines all responsibility
for damages on person or things caused by
the non-observance of rules written above.
•• The electrical connection between the hob
and a possible built-in oven must be installed
separately, whether for electrical safety
reasons, or to simplify the extraction of the
appliances.
Before beginning the connection ,make sure that:
•• the cable has the grounding and is make
according to law;
•• the cable could bear the highest load of the
machine, shown in the indicator placed on the
appliance;
•• the charging voltage is included in the
characteristics indicator;
•• the cable is plug-compatible with the appliance.
On the contrary replace the cable; do not use
extansions or multiplexes;
•• the grounding wire (yellow/green coloured)
is connected to the terminal board on the point
indicated with the respective sign, and is longer
than other conductor wires;
•• the cable must not undergo foldings or
compressions;
•• the cable must be periodically controlled and
changed only by authorised technicians.
•• the manufacturer declines all responsabilities
if these rules are not respected.
In the case of a direct connection to the net, it
is neccesary to interpose a mono-pole switch
between the appliance and the net , with a minimal
3mm opening between the contacts.
7
START UP AND USE
Practical advice for appliance use.
To obtain the best performance from your hob:
•• Use flat bottom pots with elevated thickness, to
be sure that these perfectly adhere to the heating
areas.
•• Use cooking vessels made from material that
is compatible with the induction principle
(ferromagnetic material). It is recommended
the use of cast iron, enameled steel or special
induction inox pots. To assure the compatibility of
a vessel it is sufficient to check with a magnet.
SUITABLE MATERIAL
UNSUITABLE
MATERIAL
Cast iron, enamelled
steel, special inox
Copper, aluminium,
g l a s s , Te r r a c o t t a ,
ceramics,not magnetic
inox
•• Use pots with a diameter big enough to cover
the heating area completely, as to guarantee the
exploitation of all available heat.
•• Avoid using the same pots used on the gas
burners: the gas burners heat concentration
could deform the pot bottom which lost adhesion.
Key lock
Holding the key lock sensor down turns the key lock function on or off. If the pilot light associated with the
key lock sensor is on, the keypad is locked.
The locking function can be activated when the cooking levels are activated or when the cook top is off. If
the cook top is on, the key lock function locks all the sensors except the general on/off sensor and the key
lock.
When the cook top is off, the key lock function locks all the sensors, including the general on/off, except
the key lock.
The key lock is always taken from the control device is switched.
Booster
8
START UP AND USE
The hob switches on selecting the sensor on the controls area. When this sensor is selected a sound is
uttered. Disconnect the key selecting the sensor.
Booster
0
0
Booster
The heat areas switch on and all stay at “0” until a power level is selected. If this does not succeed in 10
seconds, the hob automatically switch off.
0
9
Booster
Than select the key (+) for the wanted cooking area, which will positioning itself at level 1.The highest level
achievable is 9.
With the sensor (-) the power reduces until 0.
If with the 0 level selected the sensor (-) start functioning, the power becomes to 9 level.
Maintaining the sensor selected, the power selection repeats 2 times every second.
The zone can be disabled by pressing keys (-) and (+). A buzzer sounds and the corresponding display
shows "0"
0
p
Booster
Booster function
This function consists in bringing every back power zones at the highest level (position 10) for a
maximum period of 10 minutes. Passed this period the power returns that automatically selected with the
uttering of a sound. On the selected area display appears the letter "P".
When selected, the sensor is a beep sounds and the display shows "P".
Deleting Booster function
This function can be excluded any time reselecting on the comands zone the function “Booster”. The
same will bring back the power to the one preselected with the uttering of the confirming sound.
This function can be excluded also acting on the keys (+) or (-). In this case the power level will be
immediately higher or lower than that selected before the connection of the “Booster” function.
For example, if the power level is 2, you activate the booster and then you select the sensor (+), the
display shows the power of 3.
Conversely, if it is selected (-), the display shows the power level 1.
If, with the booster function enabled, you reselect the Booster function, the function is canceled and the
power level is reset to the initial one.
9
START UP AND USE
Automatic switch-off.
If during the functioning the power level is not changed, for safety reasons the cooking areas
authomatically switch off after a time indicated in the table below:
POWER LEVEL
MAX. TIME ON
(HOURS)
1
10
2
5
3
5
4
4
5
3
6
2
7
2
8
2
9
1
P
10 (minutes)
The cooking area can be switched off also manually pushing simultaneously on (+) and (-) sensors or
bringing the (-) sensor to "0" position.
Appliance switch off.
To switch off the appliance it is necessary to push on ON/OFF sensor. When the hob is switched off a
sound is uttered and on the cooking areas appears an “H” symbol, which indicate the residual heat or a
possible failure.
10
START UP AND USE
Operating the timer
The timer is activated by pressing the timer keys (+) or (-). The timer value can be selected between 1
and 99 minutes, and can be modified at any time.
To cancel the operation of the timer, select a timer value of <00> using the sensor (-), or switch off the
timer by pressing the corresponding sensors (+) and (-) at the same time.
Initial default setting of the timer
With the timer off, it is activated by pressing the timer keys (+) or (-). The initial value is "00" min by
default. On display of power zones appear the "t" flashing.
0
0
00
Booster
Booster
Timer running with cooking areas
All cooking areas can be commanded by the timer, but they can operate one at a time.
To make the cooking area function with the timer, operate as specificated below:
•• activate the timer;
•• select one cooking area. A led will lights both on the timer and on the selected cooking area;
•• in 10 seconds select the time to pre-set on the timer. If this do not happen, the area will authomatically
switch off.
Programmed time, after 10 seconds, the countdown begins for the cooking area selected. A confirmation
sound and display the operation of the cooking zone and timer stop flashing.
00
4
00
Booster
0
Booster
4
26
0
Booster
11
START UP AND USE
Change the setting of the Timer
When the timer is running, you can change at any time before the scheduled time by tapping the keys (+)
or (-). The countdown will stop waiting for the new setting.
End of countdown timer
When the timer has reached the end of the allotted time, the timer display will flash and the cooking area
is brought to the value "0". You will hear a sound that alerts the end of this function remains active for 1
minute. The sound can be stopped even before the touch of any key area of controls.
Switching the timer off
You can stop the timer at any time by pressing the keys (+) or (-) or pressing them simultaneously.
Automatic Key Lock
In case the hob is working on the level 0 over 1 minute (also the timer is 0), it will turn off automatically.
12
PROBLEMS AND SOLUTIONS
Below are listed some possible fault messages
for which it is necessary to seek technical
support.
Afterheat:
For safety reasons these information are the most
important.
•• If the hob is switch off, the zones which show
the power are fixed on “H”.
•• if the hob is switch on, the zones which show
the power visualize alternatively “H” and “0”.
If the power level is not “0”, in the display is shown
the selected level.
Cooking zone temperature sensor:
•• Short-circuit: in the corresponding cooking
zone, the symbols “F” and “1” are alternatively
visualized.
•• Open circuit: in the corresponding cooking
zone, the symbols “F” and “2” are alternatively
visualized.
•• No operation: The corresponding heater display
alternates between an ‘F’ and a "7"
Cooking zone without or with an inadequate
pot:
•• if the selected level is “0”, this one is also shown in
the indicator.
•• If it is different from “0”, it is also shown in the
indicator, but it flashes.
Power temperature sensor:
•• Short-circuit: if the 2 elements controlled by the
induction generator are in short-circuit, “F” and “3”
are visualized alternatively.
•• Open circuit: if the 2 elements controlled by the
induction generator have an open circuit, “F” and
“4” are visualized alternatively.
•• Loss of zero crossing detection: the display
of the 2 heaters controlled by the induction
generator with which communication has been
lost alternates between 'F' and '8’.
Authomatic actions in case of failure:
If there are failures on the temperature sensor
and on the cooking zones power sensor, these
immediately are switch off and the keys (+/-) are
blocked.
This happens also if there are loss of
comunication with the induction generator or
overloading.
Comunications loss:
If a cooking zone without a pot is selected for
more than 30 seconds, passed this time the
zone will automatically switch off.
•• If the 2 elements controlled by the induction
generator lost comunications, “F” and “5” are
visualized alternatively.
Generator overcurrent:
•• if the 2 elements controlled by the induction
generator are overloaded, “F” and “9” are
visualized alternatively.
Generator overheating:
•• if the 2 elements controlled by the induction
generator are overheated, “POWER LEVEL” and
“C” are visualized alternatively.
13
ENVIRONMENT PROTECTION
This product complies with EU Directive 2002/96/EC.
The crossed-out dustbin symbol reported on the appliance indicates that the appliance
must be disposed of separately from other domestic refuse at the end of its useful life.
It must therefore be delivered to a waste recycling centre specifi cally for electric and
electronic equipment or returned to the retailer at the moment of purchase of a new
equivalent appliance.
The user is responsible for delivering the appliance to the appropriate collection centre at the end of its
useful life, failure to do so may result in a fine, as provided for by laws governing waste disposal.
Differential collection of waste products for eventual recycling, treatment and environmentally friendly
disposal helps reduce possible negative effects on the environment and health, and also enables the
materials making up the product to be recycled.
For more detailed information on the available refuse collection systems, refer to the local Municipal Solid
Waste disposal centre or the shop where the product was purchased.
Producers and importers are responsible for fulfilling their obligations as regards recycling, treatment and
environmentally friendly disposal by directly or indirectly participating in the collection system.
14
15
16
COD. 208462 - 14.11.2011
The manufacturing firm refuses all responsibility for any possible imprecision in this booklet, due to
misprints or clerical errors. It reserves the right to make all the changes that it will consider
necessary in its own products, without affecting the essential characteristics of functionality and safety.