1
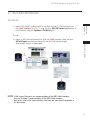
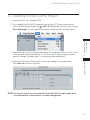
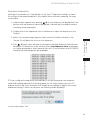
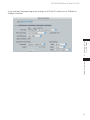
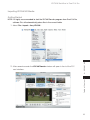
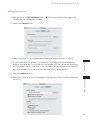
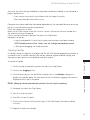
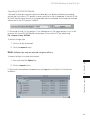
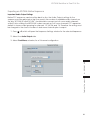
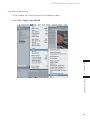
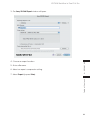
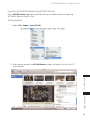
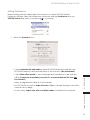
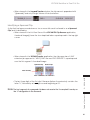
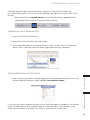
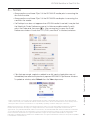
Sony XDCAM HD &
XDCAM EX Workflows
in Apple Final Cut Pro
XDCAM HD Overview
XDCAM EX Overview
. . . . . . . . . . . . . . . . . . . . . . . . . . . . . . . . . . . . . . .4
. . . . . . . . . . . . . . . . . . . . . . . . . . . . . . . . . . . . . . . .4
2 – XDCAM Workflows . . . . . . . . . . . . . . . . . . . . . . . . . . . . . . . . . . . . . . . .5
. . . . . . . . . . . . . . . . . . . . . . . . . . . . . . . . . . . . . . . . . . . . .5
XDCAM EX . . . . . . . . . . . . . . . . . . . . . . . . . . . . . . . . . . . . . . . . . . . . . .6
Overview of XDCAM Transfer Application . . . . . . . . . . . . . . . . . . . . . . . . . . . .7
Overview of Flip4Mac XDCAM Pro Plug-in . . . . . . . . . . . . . . . . . . . . . . . . . . . .8
XDCAM HD
3 – Creating a Final Cut Pro Project . . . . . . . . . . . . . . . . . . . . . . . . . . . . .9
Sequence Preparation
. . . . . . . . . . . . . . . . . . . . . . . . . . . . . . . . . . . . . .10
4 – XDCAM HD . . . . . . . . . . . . . . . . . . . . . . . . . . . . . . . . . . . . . . . . . . . .12
. . . . . . . . . . . . . . . . . . . . . . . . . . . .12
System Requirements . . . . . . . . . . . . . . . . . . . . . . . . . . . . . . . . . . . . . . .12
Connections & Drivess . . . . . . . . . . . . . . . . . . . . . . . . . . . . . . . . . . . . . .12
PDW-F75 iLink Setup . . . . . . . . . . . . . . . . . . . . . . . . . . . . . . . . . . . . . . .13
PDW-F75 Network Setup . . . . . . . . . . . . . . . . . . . . . . . . . . . . . . . . . . . . .14
Importing XDCAM HD Media over iLink or USB2.0 . . . . . . . . . . . . . . . . . . . . . .15
Getting Started . . . . . . . . . . . . . . . . . . . . . . . . . . . . . . . . . . . . . . . . . .15
Setting Preferences . . . . . . . . . . . . . . . . . . . . . . . . . . . . . . . . . . . . . . . .16
Creating Subclips . . . . . . . . . . . . . . . . . . . . . . . . . . . . . . . . . . . . . . . . .17
Importing XDCAM HD Media . . . . . . . . . . . . . . . . . . . . . . . . . . . . . . . . . .18
General Notes on XDCAM Transfer Operations . . . . . . . . . . . . . . . . . . . . . . . .19
Importing XDCAM HD Media Over a Network . . . . . . . . . . . . . . . . . . . . . . . .20
Adding Clips to the Timeline . . . . . . . . . . . . . . . . . . . . . . . . . . . . . . . . . . .21
Exporting an XDCAM-Native Sequence . . . . . . . . . . . . . . . . . . . . . . . . . . . .22
Important Audio Output Settings . . . . . . . . . . . . . . . . . . . . . . . . . . . . . . . .22
Exporting a Sequence . . . . . . . . . . . . . . . . . . . . . . . . . . . . . . . . . . . . . .23
2 – XDCAM
Workflows
1– Introduction . . . . . . . . . . . . . . . . . . . . . . . . . . . . . . . . . . . . . . . . . . . . .4
3 – Creating a Final
Cut Pro Project
Table of Contents
1 – Introduction
XDCAM Workflow in Final Cut Pro
6 – Notes
5 – XDCAM EX
4 – XDCA M HD
Key Workflow Features and Restrictions
2
2 – XDCAM
Workflows
3 – Creating a Final
Cut Pro Project
4 – XDCA M HD
5 – XDCAM EX
. . . . . . . . . . . . . . . . . . . . . . . . . . . .25
System Requirements . . . . . . . . . . . . . . . . . . . . . . . . . . . . . . . . . . . . . . .25
Optional Software . . . . . . . . . . . . . . . . . . . . . . . . . . . . . . . . . . . . . . . .25
Connections & Drivers . . . . . . . . . . . . . . . . . . . . . . . . . . . . . . . . . . . . . .25
Importing XDCAM EX Media Using XDCAM Transfer . . . . . . . . . . . . . . . . . . . . .26
Getting Started . . . . . . . . . . . . . . . . . . . . . . . . . . . . . . . . . . . . . . . . . .26
Setting Preferences . . . . . . . . . . . . . . . . . . . . . . . . . . . . . . . . . . . . . . . .27
Selecting and Previewing Clips . . . . . . . . . . . . . . . . . . . . . . . . . . . . . . . . .29
Creating Subclips . . . . . . . . . . . . . . . . . . . . . . . . . . . . . . . . . . . . . . . . .29
Importing . . . . . . . . . . . . . . . . . . . . . . . . . . . . . . . . . . . . . . . . . . . . . .30
General Notes on XDCAM Transfer Operations . . . . . . . . . . . . . . . . . . . . . . . .31
Importing Using Log and Transfer . . . . . . . . . . . . . . . . . . . . . . . . . . . . . . . .32
Using XDCAM EX Clip Browser . . . . . . . . . . . . . . . . . . . . . . . . . . . . . . . . . .34
Copying Clips . . . . . . . . . . . . . . . . . . . . . . . . . . . . . . . . . . . . . . . . . . .35
Copy All (using the Copy All button) . . . . . . . . . . . . . . . . . . . . . . . . . . . . . .36
Copying Clips Individually or in Batches . . . . . . . . . . . . . . . . . . . . . . . . . . . .37
Preparing to Copy . . . . . . . . . . . . . . . . . . . . . . . . . . . . . . . . . . . . . . . .37
Using Copy/Paste . . . . . . . . . . . . . . . . . . . . . . . . . . . . . . . . . . . . . . . . .38
Using Drag/Drop . . . . . . . . . . . . . . . . . . . . . . . . . . . . . . . . . . . . . . . . .39
Moving Clips . . . . . . . . . . . . . . . . . . . . . . . . . . . . . . . . . . . . . . . . . . . .39
Working With Split and Spanned XDCAM EX Clips . . . . . . . . . . . . . . . . . . . . . .41
Identifying a Split Clip . . . . . . . . . . . . . . . . . . . . . . . . . . . . . . . . . . . . . .41
Identifying a Spanned Clip . . . . . . . . . . . . . . . . . . . . . . . . . . . . . . . . . . .42
Preparing to Join a Spanned Clip . . . . . . . . . . . . . . . . . . . . . . . . . . . . . . .43
Copying Media from the First Card . . . . . . . . . . . . . . . . . . . . . . . . . . . . . .43
Copying Media from the Next Card . . . . . . . . . . . . . . . . . . . . . . . . . . . . . .45
Converting XDCAM EX Media for use on Other Platforms . . . . . . . . . . . . . . . . . .46
Adding Clips to the Timeline . . . . . . . . . . . . . . . . . . . . . . . . . . . . . . . . . . .47
Key Workflow Features and Restrictions
6 – Notes
5 – XDCAM EX . . . . . . . . . . . . . . . . . . . . . . . . . . . . . . . . . . . . . . . . . . . .25
1 – Introduction
XDCAM Workflow in Final Cut Pro
6 – Notes . . . . . . . . . . . . . . . . . . . . . . . . . . . . . . . . . . . . . . . . . . . . . . . .48
3
The Sony XDCAM® workflow makes use of IT-based technology and workflows familiar to the
realm of personal computers, allowing the user to browse, ingest, and export content as data
files – greatly enhancing the speed and flexibility of the editing process.
This document explains how to import, edit, and export XDCAM HD and XDCAM EXTM
based media utilizing Final Cut Pro® software. Please note that the workflows outlined within
represent just a few examples of how to work with the XDCAM formats and the Final Cut
Pro System, and that workflows can vary based on the project and/or installation.
For more detailed information on any of the software or hardware mentioned in this
document, please refer to the manufacturer-supplied Operation Guides for the associated
product.
Table of Contents
1 – Introduction
1 – Introduction
XDCAM Workflow in Final Cut Pro
XDCAM HD Overview
Sony’s XDCAM HD format is based on optical media, Sony’s Professional DiscTM system.
Sony XDCAM HD cameras and decks may also operate as VTR replacement units;
essentially emulating traditional linear-based workflows.
Sony XDCAM HD camcorders record high-resolution MPEG-2 Long-GOP files, using
the standardized Material Exchange Format container, otherwise known as MXF.
A low-resolution MPEG-4 video stream for proxy-based video editing is also created
simultaneously with the high-resolution content during recording.
XDCAM EX Overview
The Sony XDCAM EX format provides another tapeless format for HD video acquisition and
storage. XDCAM EX products are not intended as a replacement for XDCAM HD products,
but rather a cost-effective addition to the XDCAM HD family. The primary difference
between XDCAM HD and XDCAM EX formats is the recording medium. Rather than using
the Sony Professional Disc system for recording video, XDCAM EX uses solid state SxSTM
removable media, based on the latest ExpressCard® technology, the successor to the older
CardBus® PC card technology. Both ExpressCard and CardBus are PCMCIA standards.
With the proper drivers installed, SxS media may be read by any Macintosh® or PC fitted
with an internal ExpressCard slot or externally-connected reader. You can also use the
camera as a reader by connecting it through the USB port.
However, unlike XDCAM HD, XDCAM EX devices are only capable of being accessed via
file-based methods. They do not support VTR emulation. The PMW-EX1 camera does have
an HD-SDI output that can be used in a manual control mode.
4
XDCAM Workflow in Final Cut Pro
2 – XDCAM Workflows
1– Import XDCAM HD Professional Disc media into Final Cut Pro Software over
the i.LINK® interface* or USB 2.0 using the Sony XDCAM Transfer application, or
over Ethernet using the Filp4MacTM XDCAM plug-In.
2– Edit
2 – XDCAM
Workflows
XDCAM HD
XDCAM Export function provided with the XDCAM Transfer plug-in.
Alternatively, output to videotape.
Table of Contents
3– Export to XDCAM Professional Disc over the i.LINK interface using the Sony
NOTE: i.LINK is Sony Electronic Inc implementation of the IEEE-1394A interface.
Firewire® is Apple’s implementation of the IEEE-1394A interface.
Both terms refer to the same interface and may be used interchangeably in
this document.
5
XDCAM Workflow in Final Cut Pro
XDCAM EX
1– Import XDCAM EX media into Final Cut Pro software over USB 2.0 (or internal PC
reader) using the Sony XDCAM Transfer application.
media to local storage, prior to importing with XDCAM Transfer.
2– Edit
3– Export to XDCAM Professional Disc media, or Hard Drive via Sony Export plug-in.
2 – XDCAM
Workflows
NOTE: You may use the Sony XDCAM EX Clip Browser to first copy the SxS–based
Alternatively, output to videotape.
Some video formats or bit rates may require rendering prior to Export.
Table of Contents
NOTE:
6
XDCAM Workflow in Final Cut Pro
Overview of XDCAM Transfer Application
The XDCAM Transfer application lets users view, search and modify metadata. Clips can be
filtered based on Clip Status. A key feature is the ability to preview clips and either import
the entire clip or multiple segments, known as subclips.
2 – XDCAM
Workflows
In the Final Cut Pro application, the Sony XDCAM Transfer application is used for all
XDCAM-based file imports over the i.LINK (Firewire), USB 2.0, or internal Card Reader
interfaces. The workflow for importing XDCAM HD (optical) and XDCAM EX (solid state)
based media is similar. Both media types require the XDCAM Transfer application to
unwrap the XDCAM-native file types (XDCAM Professional Disc media uses MXF and
XDCAM EX media uses MP4) and rewraps them as QuickTime® files.
Below is an overview of the XDCAM Transfer user interface:
Filter Clip Display by Status
Select a Volume to Browse
View/Edit Volume and Clip Metadata
Table of Contents
Select Clip(s) to Preview and/or Import
View/Edit Clip and Subclip Metadata
Preview Clip and Set Subclip In/Out
Select FCP Project to Import to
7
XDCAM Workflow in Final Cut Pro
Overview of Flip4Mac XDCAM Pro Plug-in
The Flip4Mac XDCAM Pro plug-in (purchased separately) is used to import HDVTM, DV, or
MPEG IMX® MXF files into Final Cut Pro as QuickTime movies. Below is a quick overview of
the interface:
Table of Contents
Proxy Viewer
2 – XDCAM
Workflows
IP Address of Connected Device
Clip List
Click to Choose a Destination for Imported Clips
Click to Import All Files
Click to Open Connection Dialog
Click to Import Selected Files
Important: The Flip4Mac plug-in cannot be used with XDCAM EX media.
8
XDCAM Workflow in Final Cut Pro
3 – Creating a Final Cut Pro Project
1– Launch Final Cut Pro software (FCP).
2– If not adding the XDCAM HD material to an existing FCP Project, create a new
/Users/username/Documents/Final Cut Pro Documents/ folder. During the Save
process, change “Untitled Project” to something more meaningful.
4– Verify the FCP Scratch Disk location and set according to your preference.
Press Shift + Q to access this menu.
Table of Contents
3– Save the Project to the computer hard drive. The standard location for this is in the
3 – Creating a Final
Cut Pro Project
Project by simultaneously pressing + Shift + N. Alternatively, use the mouse to select
File > New Project. This will create a new project initially entitled “Untitled Project.”
Note: The previous step is not an essential part of the XDCAM HD media import, but is
recommended as a “best practice” of media management.
9
XDCAM Workflow in Final Cut Pro
Sequence Preparation
Although not mandatory, it is typically best to set the FCP Sequence Settings to match
the settings of the preponderance of your media, which minimizes rendering. The steps
involved are:
1– Create a New Sequence by pressing
+ N. A new Sequence will be placed in the
Browser, with the Sequence name highlighted. If desired, edit the default name to
something more meaningful.
2– Double-click on the Sequence icon in the Browser to open the Sequence in the
Timeline.
3– Select the corresponding Sequence tab in either the Timeline window or the
4– Press
Table of Contents
+ 0 (zero), which will open the Sequence Settings window for the selected
Sequence. At the bottom of the window, select Load Sequence Preset, whereupon
you will be prompted to select a preset from a list. To work natively with XDCAM HD
material, the following presets are available:
3 – Creating a Final
Cut Pro Project
Canvas. This will place the focus on the Sequence.
FCP can configure the Sequence automatically if you are creating a new sequence
rather than adding material to an existing sequence. For empty Sequences only, FCP
analyzes the first clip that is entered in the Timeline and compares it against the current
Sequence Settings. If there is a mismatch, the following will be displayed:
In most cases, select “Yes.”
10
XDCAM Workflow in Final Cut Pro
Table of Contents
3 – Creating a Final
Cut Pro Project
As an example, the proper Sequence Settings for XDCAM HD media shot at 1080i/60 at
35 Mbps would be:
11
XDCAM Workflow in Final Cut Pro
4 – XDCAM HD
Key Workflow Features and Restrictions
• Support for 1080 50/60i, 24/25/30p
• Support for XDCAM HD Essence Marks
• Proxy may be viewed and Hi-Resolution XDCAM HD media may be imported via
i.LINK, USB, or Ethernet interfaces
• Sequences may be written back to XDCAM optical disc via the i.LINK interface
• FCP does not support Proxy media in a Sequence
System Requirements
• Apple OS X 10.4.11 / OS X 10.5 or later
• Apple Final Cut Pro (FCP) 6.0.2 or later
• Sony XDCAM Transfer Ver. 2.0 or later for i.LINK and USB interface transfers
• Flip4Mac XDCAM Pro plug-in v2.1.0.23 (for Ethernet transfers of XDCAM HD)
• Sony PDW-U1 Professional Disc Drive
a. Sony PDW-U1 Professional Disc Drive
b. Sony PDW-F75 or PDW-F70 XDCAM Professional Disc Recorder
c. Sony PDW-F30 Professional Disc Player
d. Sony PDW-F330, PDW-F335, PDW-F350 or PDW-F355 Professional Disc Camera
Connections & Drivers
4 – XDCAM HD
• Sony Professional Disc Camera, Deck or Drive:
When using the Sony PDW-F75 or similar deck, connect to the host computer via either:
• Firewire 400 (i.LINK) cable
• RJ45 Ethernet cable
Important: Ensure that the latest software drivers are loaded. These drivers are typically
Table of Contents
When using the Sony PDW-U1, connect to the host computer via a USB 2.0 cable.
included as an accessory with XDCAM devices, and are also available for
download from manufacturer’s websites. The Sony url is: www.sony.com/xdcam
Click on the Support pulldown menu.
12
XDCAM Workflow in Final Cut Pro
PDW-F70, PDW-F75 and PDW-F30 i.LINK Setup
For data transfers, the i.LINK Mode of the deck must be set to “File Access Mode” (FAM),
which allows the XDCAM volume to be mounted as a drive by the host computer. The other
i.LINK mode, AV/C, configures the deck for standard i.LINK audio, video and transport control.
To configure the PDW-F75 for FAM mode, utilize the front panel buttons to do the following:
• Press the MENU button.
• Press the Up or Down arrow buttons to navigate to Setup Menu.
• Press the Right Arrow button to enter the Setup Menu.
• Press the Up or Down Arrow buttons to navigate to the Interface submenu.
• Press the Right Arrow button to enter the Interface submenu.
• Press the Up or Down Arrow buttons to navigate to the i.LINK Mode submenu.
• Press the Right Arrow button to display the current i.LINK Mode setting.
• Utilize the Up or Down Arrow buttons to set the mode to FAM.
• Press the SET button to save the changes.
Note: The FAM mode will not start if the unit is showing thumbnails, SubClip, or is in
record mode when the i.LINK connection is made.
Note:
The menu navigation and settings illustrated above may not apply to other
devices in the Sony XDCAM product line. Please consult the device’s
Operation Guide.
Table of Contents
hardware controls (with the exception of the EJECT button) are disabled. For
System Menu access (such as to change the i.LINK Mode to AV/C), a
mounted XDCAM disc should be ejected, and the Firewire cable
disconnected from either the PDW-F75 or the host computer.
4 – XDCAM HD
Note: When the PDW-F75 is connected to the host computer under FAM mode, all
13
XDCAM Workflow in Final Cut Pro
PDW-F70, PDW-F75 and PDW-F30 Ethernet Setup
For data transfers over Ethernet, the PDW-F75 must be fitted with a Sony PDBK-101 Network
Board. “Network” mode allows XDCAM media to be moved to the host computer via
high-speed FTP file transfers.
To configure the PDW-F75 to for Network mode, utilize the front panel buttons to do
the following:
• Press the MENU button.
• Press the Up or Down arrow buttons to navigate to Setup Menu.
• Press the Right Arrow button to enter the Setup Menu.
• Press the Up or Down Arrow buttons to navigate to the Interface submenu.
• Press the Right Arrow button to enter the Interface submenu.
• Press the Up or Down Arrow buttons to navigate to the Network submenu.
• Utilize the Up or Down Arrow buttons to set networking values applicable to the
network environment (such as IP address, subnet, etc).
• Press the SET button to save the changes.
• Set the front panel Network/Local/Remote switch to Network.
Note: The menu navigation and settings illustrated above may not apply to
other devices in the Sony XDCAM product line. Please consult the device’s
Operation Guide.
Table of Contents
disc must be inserted in the drive.
4 – XDCAM HD
Important: In order for the Flip4Mac software to connect to the PDW-F75, an XDCAM
14
XDCAM Workflow in Final Cut Pro
Importing XDCAM HD Media
Getting Started
NOTE: It is highly recommended to start the XDCAM Transfer program from Final Cut Pro
software. This will automatically place files in the correct folder.
user interface.
Table of Contents
2– After several seconds the XDCAM Transfer window will open in front of the FCP
4 – XDCAM HD
1– Select File > Import > Sony XDCAM :
15
XDCAM Workflow in Final Cut Pro
Setting Preferences
1– With the focus on XDCAM Transfer, press
, (the comma key), which opens the
XDCAM Transfer Preferences window.
2– Select the Cache button.
4– If “Automatically fetch proxies” is checked, XDCAM Transfer will download proxy
data as soon as a disc is mounted. Left unchecked, XDCAM Transfer will download
the thumbnails only. This is faster, but the clip cannot be previewed until the proxy is
also downloaded. Entire clips may be imported without proxy preview.
5– Select the Import button.
4 – XDCAM HD
3– Select a location for downloaded proxy data (the default location is shown).
set in FCP.
Table of Contents
6– Select the “Choose” button to navigate to the Capture Scratch location previously
16
XDCAM Workflow in Final Cut Pro
Also note the other settings available for imported media are enabled to suit individual or
project preferences.
• Each source may have its own folder within the Import Location.
• Files may either be overwritten, or not.
Filenames may have additional metadata appended to the standard filename, and may
be set to suit individual or project preferences.
Close the Preferences window.
Select an XDCAM volume under the “Source” column. After a few seconds, media from
the selected volume will appear.
Click on a clip thumbnail to preview the clip in the Clip Viewer.
Navigate the clip by:
• Using the keyboard J, K, and L keys to play reverse, pause, and play forward.
NOTE: Multiple presses of the J and L keys will change the playback speed.
• Clicking and dragging the timeline pointer.
Creating Subclips
1– Click on a clip thumbnail to preview the clip in the Clip Viewer.
2– Click on the Logging button.
3– Click (if necessary) on the disclosure triangle next to the Subclips category to
display the Subclips pane. The clip name and its full-duration logging information is
displayed at the top of the pane.
Note: Adding a subclip automatically deselects the full clip for importing.
4– Navigate the clip in the Clip Viewer.
5– Press I to set and In point.
Table of Contents
To create a subclip:
4 – XDCAM HD
A subclip is a part or segment of a larger clip. The XDCAM Transfer application provides a
convenient way to create subclips from the raw camera original material, saving time
during the import process and valuable hard drive space.
6– Press O to set an Out point.
7– Click on the + button at the bottom right of the Clip Viewer. This adds a subclip
to the list.
8– Repeat to add more subclips.
17
XDCAM Workflow in Final Cut Pro
Importing XDCAM HD Media
Clips and/or Subclips may be imported individually or in batches. Before proceeding,
ensure that the correct FCP project is open, and that its title is displayed to the left of the
XDCAM Transfer Import button. In the example below, metadata for the imported media
will be sent to the FCP project “NAB08”.
If “Send clip to Final Cut Pro project” is not displayed or if the target project is not in the
resource list, close XDCAM Transfer and reopen it from within FCP by reselecting
File > Import > Sony XDCAM
To Import a single clip:
1– Click on a clip thumbnail.
2– Click the Import button.
Note:
Multiple clips may be selected using the shift key.
To Import all clips for a selected volume:
If Clips have EssenceMark metadata they will appear in the Final Cut Pro Browser,
as below:
Table of Contents
2– Click on Import button.
4 – XDCAM HD
1– Press and hold the Option key.
18
XDCAM Workflow in Final Cut Pro
General Notes on XDCAM Transfer Operations
• XDCAM Transfer can be utilized in a standalone fashion without Final Cut Pro
software running.
• When XDCAM Transfer is launched independently (not via Final Cut Pro software),
XDCAM Transfer will not make entries in the FCP Browser when performing an
Import. (Note the lack of the “Send Clip to FCP project” selection at the bottom of
the window)
• If XDCAM Transfer is opened from within FCP, and FCP is subsequently closed prior
to an Import, the media will be imported to the designated Import Location, but
no XML data will be sent to FCP.
• If XDCAM Transfer is opened from within FCP, and the designated FCP Project is
closed prior to an Import, FCP will erroneously enter a “Project Save” dialog that
could potentially overwrite a Project file. You MUST cancel out of this dialog.
• If XDCAM Transfer is launched from within a FCP Project AND subsequently
another FCP project is opened or created, XDCAM Transfer must be relaunched
from within either FCP Project for the “Send Clip to FCP project” list to recognize
the new project. Relaunch by selecting File > Import > Sony XDCAM.
• This document has not covered every option available in XDCAM Transfer. Please
see the XDCAM Transfer documentation for more advanced topics.
Table of Contents
• There are various view options. The LIST view reveals some of the metadata
associated with the clips. The clips may be filtered in both the CLIP and LIST views
based on CLIP STATUS.
4 – XDCAM HD
• To manually add imported media to a FCP project, select File > Import > Files and
navigate to the .mov files OR select File > Import > XML and navigate to the XML
files that correspond to the desired media. Either method yields the same results.
19
XDCAM Workflow in Final Cut Pro
Importing XDCAM HD Media Over a Network
To import XDCAM files over an Ethernet network, do the following:
1– Insert an XDCAM disc in the drive.
2– Select File > Import > Sony XDCAM (Ethernet). The Connection Window will appear.
3– Enter the XDCAM device IP address.
5– Enter the Password (usually the device model name – in lower case and include the
hyphen. For example, in the case of the PDW-F75, the password is pdw-f75).
6– Click Connect. When a connection has been established, the Flip4Mac Main
Window will open and the Clip List pane will populate.
The connection will fail if there is no disc in the drive.
7– Click on an item in the Clip List to display its proxy in the Proxy Viewer.
8– Place a checkmark (by clicking on the box to the left of the filename) next to each
clip to be imported. Alternatively, click on the Check All button to enable all clips.
9– Click the Import button to begin the import process.
Table of Contents
Note:
4 – XDCAM HD
4– Enter “admin” for the Username.
Important: Although Flip4Mac permits importing of Proxy media, the FCP Timeline will
not work properly with it.
20
XDCAM Workflow in Final Cut Pro
Adding Clips to the Timeline
There are a variety of methods for placing clips in the timeline. For purposes of illustration,
below are just a few methodologies:
To add a clip to a Sequence without trimming, simply drag the clip from the Browser to
the Timeline.
To trim a clip prior to adding it to the Sequence:
1– Double-click on a clip in the Browser. This will load the media into the
Viewer window.
2– Play the clip by either pressing the spacebar or the L key.
3– Select the yellow Viewer Playhead and scrub to an exact Inpoint. Press I
to mark the Inpoint.
4– Select the yellow Viewer Playhead and scrub to an exact Outpoint. Press O
to mark the Outpoint.
5– Click and drag the image in the Viewer over to the Canvas window (notice that
Table of Contents
4 – XDCAM HD
a thumbnail image appears under the cursor). An Edit Overlay will appear in
the Canvas.
6– Continue dragging the thumbnail onto the red “Overwrite” section of the overlay,
then release. The clip will be added to the Timeline.
7– Repeat for subsequent clips.
Refer to the Final Cut Pro User Guide for more detailed editing information.
21
XDCAM Workflow in Final Cut Pro
Exporting an XDCAM-Native Sequence
Important Audio Output Settings
Before FCP sequences can be written back to disc, the Audio Outputs settings for the
sequence must be adjusted so that they match the number of available audio channels on
the disc. XDCAM HD and DVCAM®- formatted discs accept up to 4 mono audio channels,
while SD discs utilizing the MPEG IMX codecs accept up to 8 mono channels. FCP sequences
default to stereo output grouping for channels 1-2, 3-4, 5-6, and 7-8: Therefore the settings must
be changed to the correct number of dual mono channels prior to export.
1– Press
+ 0, which will open the Sequence Settings window for the selected Sequence.
2– Select the Audio Outputs tab.
Table of Contents
4 – XDCAM HD
3– Select Dual Mono, as below, for a 2-channel configuration.
22
XDCAM Workflow in Final Cut Pro
Exporting a Sequence
1– In the Timeline, set In and Out points for the range to export.
Table of Contents
4 – XDCAM HD
2– Select File > Export > Sony XDCAM.
23
XDCAM Workflow in Final Cut Pro
3– The Sony XDCAM Export window will open.
6– Select an export compression setting.
7– Select Export (or press Enter).
Table of Contents
5– Enter a filename.
4 – XDCAM HD
4– Choose an export location.
24
XDCAM Workflow in Final Cut Pro
5 – XDCAM EX
Key Workflow Features and Restrictions
• Support for 1080 50/60i, 24/25/30p.
• Support for XDCAM EX Essence Marks.
System Requirements
• Apple OS X 10.4.11+
• Apple Final Cut Pro (FCP) 6.0.3+
• Sony SxS Pro Device Driver (required for MacBook Pro ExpressCard slot)
• Sony XDCAM Transfer v2.7.1
• XDCAM Ex Clip Browser v2.0+
• Sony SBAC-US10 SxS Card Reader (or internal laptop card reader)
Optional Software
• Sony PDZK-LT1 Log and Transfer Utility v1.0+
Connections & Drivers
When using the Sony SBAC-US10, connect to the host computer via a USB 2.0 cable.
Note: XDCAM Transfer, and XDCAM EX Clip Browser software must be loaded in order for
Table of Contents
5 – XDCAM EX
SxS media to be recognized, viewed, and manipulated. The latest version of these
applications may be obtained from the Sony website at www.sony.com/xdcamex.
25
XDCAM Workflow in Final Cut Pro
Importing XDCAM EX Media Using XDCAM Transfer
Sony's XDCAM Transfer application provides the most versatile method of importing
XDCAM EX clips into Final Cut Pro.
Getting Started
1– Select File > Import > Sony XDCAM.
2– After several seconds the XDCAM Transfer window will open in front of the FCP
Table of Contents
5 – XDCAM EX
user interface.
26
XDCAM Workflow in Final Cut Pro
Setting Preferences
Before working with SxS media, take a few moments to review XDCAM Transfer's
Preference Settings. Open the Preferences window by selecting Preferences from the
XDCAM Transfer drop menu, or by pressing
+ , (comma).
1– Select the General button.
• Check Show offline media to view thumbnails and metadata of cards that are
offline. (If cards are immediately recycled, it is recommended that this item not
be checked.)
• Select a magnification value for the thumbnails.
• For XDCAM EX, ensure that Audio Channels 1/2 are checked. Settings for the other
channels do not apply.
5 – XDCAM EX
• Check Automatically add media to have XDCAM Transfer automatically scan
XDCAM EX memory cards and add them to the source list. (Recommended)
Table of Contents
• In most cases, Import clips with no installed codec should be left unchecked.
27
XDCAM Workflow in Final Cut Pro
2– Select the Cache button.
• Select a location for metadata and thumbnail caches by selecting the “Choose”
button, and navigating to a desired location.
• Adjust the Cache Size, if necessary.
• The setting for Automatically fetch proxies is not applicable to XDCAM EX.
• Set an Import Location by selecting the “Choose” button, and navigating to the
Capture Scratch location previously set in FCP. (Recommended)
Table of Contents
5 – XDCAM EX
3– Select the Import button.
28
XDCAM Workflow in Final Cut Pro
Also note the other settings available for imported media, and set to suit individual or
project preferences.
• Each source may have its own folder within the Import Location. Left unchecked,
clips will be saved directly to the root of the Import Location.
• Files with duplicate names may be overwritten, or not. Left unchecked, duplicate
filenames will be appended with a serial number to differentiate between the clips.
• Filenames may have additional metadata appended to the standard filename,
and may be set to suit individual or project preferences. In general, set the
preferences as in the graphic on the previous page.
• Subclips may have handles applied.
• The number of audio channels can be limited to only those being monitored.
In general, leave this item unchecked.
• You may choose to have subclips automatically uncheck after importing, which is
a safeguard against creating duplicate imports.
• Imported files may be set to automatically open in FCP or another compatible
application. In general, leave this item unchecked.
4– Close the Preferences window.
Selecting and Previewing Clips
1– Select an XDCAM volume under the “Source” column. After a few seconds, media
from the selected volume will appear in the List View area.
2– Click on a clip thumbnail to preview the clip in the Clip Viewer.
• Clicking and dragging the timeline pointer.
Creating Subclips
The XDCAM Transfer application provides a convenient way to create subclips of the raw
camera original material, saving both time and hard drive space.
To create a subclip:
1– Click on a clip thumbnail to preview the clip in the Clip Viewer.
2– Click on the Logging button.
3– Click (if necessary) on the disclosure triangle next to the Subclips category to
Table of Contents
• Using the keyboard J, K, and L keys to play reverse, pause, and play forward
5 – XDCAM EX
3– Navigate the clip by:
display the Subclips pane. The clip name and its full-duration logging information
are displayed at the top of the pane.
29
XDCAM Workflow in Final Cut Pro
4– Click on the + button at the bottom right of the Clip Viewer. This adds a subclip to
the list.
Note:
Adding a subclip automatically deselects the full clip for importing.
5– Navigate the clip in the Clip Viewer.
6– Press I to set an Inpoint.
7– Press O to set an Outpoint.
8– Repeat to add more subclips.
Importing
Clips and/or Subclips may be imported individually or in batches. Before proceeding,
ensure that the correct FCP project is open, and that its title is displayed to the left of the
XDCAM Transfer Import button. In the example below, metadata for the imported media
will be sent to the FCP project “NAB08”.
If “Send clip to Final Cut Pro project” is not displayed or if the target project is not in the
resource list, close XDCAM Transfer and reopen it from within FCP by reselecting
File > Import > Sony XDCAM.
To Import a single clip:
2– Click the Import button, or press
+ I.
To Import all clips for a selected volume:
1– Press and hold the Option key (the Import button changes to Import All Clips).
5 – XDCAM EX
1– Click on a clip thumbnail.
To Import all subclips (if present) for a selected volume:
1– Press and hold the
& Shift keys (the Import button changes to Import All Subclips).
2– Click on Import All Subclips button, or press the I key.
Note:
Table of Contents
2– Click on Import All Clips button, or press the I key.
As part of the Import process, clips will be rewrapped from MP4 to QuickTime.
30
XDCAM Workflow in Final Cut Pro
General Notes on XDCAM Transfer Operations
• When XDCAM Transfer is launched independently (not via Final Cut Pro), XDCAM
Transfer will not make entries in the FCP Browser when performing an Import. (Note
the lack of the “Send Clip to FCP project” selection at the bottom of the window)
• If XDCAM Transfer is opened from within FCP, and FCP is subsequently closed prior
to an Import, the media will be imported to the designated Import Location, but
no XML data will be sent to FCP.
• If XDCAM Transfer is opened from within FCP, and the designated FCP Project is
closed prior to an Import, FCP will erroneously enter a “Project Save” dialog that
could potentially overwrite a Project file. You MUST cancel out of this dialog.
• If XDCAM Transfer is launched from within a FCP Project AND subsequently another
FCP project is opened or created, XDCAM Transfer must be relaunched from
within either FCP Project for the “Send Clip to FCP project” list to recognize the
new project. Relaunch by selecting File > Import > Sony XDCAM.
Table of Contents
5 – XDCAM EX
• To manually add imported media to a FCP project, select File > Import > Files and
navigate to the .mov files OR select File > Import > XML and navigate to the XML
files that correspond to the desired media. Either method yields the same results.
31
XDCAM Workflow in Final Cut Pro
Importing Using Log and Transfer
As an alternative to Sony's XDCAM Transfer application, Final Cut Pro's Log and Transfer
feature may also be used to import clips. Installation of Sony's PDZK-LT1 Log and Transfer
Utility is required for support of EX media.
Log and Transfer automatically scans for connected SxS card media, and displays clips in
the Clip List. Additional EX media folders (such as those created when archiving from SxS
to hard disc) may be added to the Clip List by selecting the Add Folder button, as shown
below.
Prior to transfer, logging data may be entered for a clip, along with preferences for Video
and Audio import.
Upon transfer, the clips are automatically rewrapped as QuickTime.
Select Log and Transfer from Final Cut Pro's File drop menu, or by pressing
Clip List
Preview Window
5 – XDCAM EX
Add Folder
+ Shift + 8
Enter Logging Data Here
For more detailed information on the Log and Transfer feature, please consult
the Final Cut Pro User Manual.
Table of Contents
Drag Clips here for immediate transfer to Capture Scratch
32
XDCAM Workflow in Final Cut Pro
To import a clip(s), select and drag either to:
• The Import Queue below, which will register the clips in the root Project Bin of the
selected FCP project.
• Directly to a specific Bin.
To create and import a subclip, do the following:
1– Select a clip from the Clip List.
2– Navigate the clip in the Preview Window.
Table of Contents
4– Click the Add Clip to Queue button.
5 – XDCAM EX
3– Set In and Out points.
33
XDCAM Workflow in Final Cut Pro
Using XDCAM EX Clip Browser
To archive media from an SxS card to hard disc or other media, the Sony XDCAM EX Clip
Browser application must be used. Copying individual clips via the Macintosh Finder will
result in unusable media on the target drive.
XDCAM EX Clip Browser provides a unified interface for folder navigation, copying, moving,
previewing and transcoding clips In the default layout below, two Explorer windows are
stacked one above the other on the left side of the screen, and are used to navigate and
manipulate media files. These windows are divided into two halves: The Tree View Pane, on
the left, and the List View Pane on the right. Selections made in the Tree View Pane affect
the contents of the List View Pane.
List View Pane
Preview Window
Logging Window
5 – XDCAM EX
Tree View Pane
Table of Contents
Explorer Button Bar Overview:
34
XDCAM Workflow in Final Cut Pro
The right side of the screen contains the Preview window, which automatically updates
based on the selections made in the active Explorer window. Clip information is displayed in
the lower portion of the Preview window, and logging data may be entered here as well.
Note that the user may freely reposition and resize the windows, as well as add additional
Explorer windows (up to 10 total) and Preview windows (up to 5 total) to the screen. To
conserve screen real estate, multiple windows may be consolidated into a single window
by converting them into tabs.
Please refer to the Sony XDCAM EX Clip Browser 2.0 Operations Guide for complete details
on all features of the application.
Copying Clips
Sony's XDCAM EX Clip Browser provides several methods for copying clips from an
SxS card:
• Copy All to an application-specified folder.
• Cut/Copy/Paste (one or more clips) to any location.
• Drag/Drop (one or more clips) to any location.
Copy All (using the Copy All button)
By far, the fastest method of transferring the entire contents of an SxS card to hard disc is
through the use of the Copy All feature, which copies an entire card to a unique folder in
a user-defined directory. To set the directory location for the copied media, do the
following:
Table of Contents
5 – XDCAM EX
1– Open XDCAM EX Clip Browser Preferences.
35
XDCAM Workflow in Final Cut Pro
2– In the Copy pane of the General tab, enter (or browse to) a location for the copied clips.
3– To ensure data integrity, check marking the Perform CRC Check After Copy item is
recommended.
4– Click OK (or press Enter).
5– In the Tree View pane of an Explorer window, click on the SxS card icon for the card
you want to copy from.
6– In the Button Bar, Click the
button. A confirmation message such as the
derived from the current date and time (20080917155438, above). This provides a high
degree of organization and data overwrite protection. Subsequent Copy All routines
will create additional folders, even if the contents are identical.
8– Click Yes (or press Enter) to copy the clips.
Table of Contents
7– Take note of the unique Folder Name that the system automatically assigns, which is
5 – XDCAM EX
one below will appear:
36
XDCAM Workflow in Final Cut Pro
Copying Clips Individually or in Batches
As an alternative to copying the entire contents of a card, clips may be copied
individually or in batches to a user-selectable folder. Please note that the following steps
are designed as a guide to the Copy workflow, and that folder names and locations are
entirely at the user's discretion.
Preparing to Copy
1– Launch XDCAM EX Clip Browser.
2– In the Tree View pane of an Explorer Window, select the SxS card. The card contents
will be displayed in the List View Pane.
3– Unless a second window is already open (as in the default layout), open a new Clip
Browser\Explorer Window by selecting File > New Explorer Window.
In this second or newly opened window, use the Tree View pane to navigate to the editing
system's media volume, and create a folder for copied media. For this example, a new
folder will be created in the folder “Documents”, and named “SxS Media.”
6– Name the folder (In this example, the folder has been named “SxS Media”).
Table of Contents
5– Click the New Folder button.
5 – XDCAM EX
4– Navigate to Documents.
37
XDCAM Workflow in Final Cut Pro
7– Double-click on the newly created folder to display its contents (currently empty). In
the example below, the upper window displays a portion of the contents of the SxS
card, while the lower window displays the contents of the “SxS Media” folder.
With the above accomplished, the user is now free to choose from the following two
Copy methods.
Using Copy/Paste
1– In the List View pane of the upper Explorer Window (the one displaying the contents
2– Do one of the following:
• Click the Copy
button.
• Right click and select Copy from the contextual menu.
• Press _ + C
to select
5 – XDCAM EX
of the SxS card), select the clips to be copied. As necessary, press Shift or
multiple clips (or
+ A to select all the clips).
copied clips.
4– Do one of the following.
• Click the Paste
button.
• Right click and select Paste from the contextual menu.
• Press
+V
Table of Contents
3– In the other Explorer window, navigate and select the desired folder for the
38
XDCAM Workflow in Final Cut Pro
5– A confirmation message will appear:
6– Click Yes (or press Enter) to copy the clips.
Using Drag/Drop
1– In the List View pane of the upper Explorer Window (the one displaying the
contents of the SxS card), select the clips to be copied. As necessary, press
Shift or Control to select multiple clips (or _ + A to select all the clips).
2– Drag the clips from the upper List View pane to the lower List View pane.
3– A confirmation message will appear.
4– Click Yes (or press Enter) to copy the clip(s).
Moving Clips
Browser drop menu.
Table of Contents
1– Open the XDCAM EX Clip Browser Preferences menu from the XDCAM EX Clip
5 – XDCAM EX
XDCAM EX Clip Browser supports the relocation of clips between volumes and directories.
Do not use the Macintosh Finder for moving clips.
39
XDCAM Workflow in Final Cut Pro
2– In the Priority in Move pane of the General tab, select one of the two options:
• Processing Speed provides the fastest possible transfer.
• Data Protection creates a duplicate before deletion of the original clip.
In general, select Data Protection when moving clips that have not been archived.
3– Click OK (or press Enter).
4– In the List View pane of a Clip Browser Explorer Window, navigate to a location for
the moved media. Create a new folder, if necessary, using the New Folder button.
5– In the List View pane of another Clip Browser Explorer Window, select the clips to be
moved. As necessary, press Shift or Control to select multiple clips (or _ + A to select
all the clips).
6– Do one of the following:
• Click the Cut
button.
• Press _ + X
7– Click in the List View pane of the other Explorer Window.
8– Do one of the following.
• Click the Paste
button.
5 – XDCAM EX
• Right click and select Cut from the contextual menu.
• Press
+V
9– A confirmation message will appear:
Table of Contents
• Right click and select Paste from the contextual menu.
10– Click Yes (or press Enter) to move the clip(s).
40
XDCAM Workflow in Final Cut Pro
Working With Split and Spanned XDCAM EX Clips
An XDCAM EX device automatically saves video that exceeds 4 GB in size as multiple
clips. Clips that are divided in this manner on a single card are referred to as Split Clips.
Clips that are divided across 2 or more SxS cards are referred to as Spanned Clips.
For Split Clips, both XDCAM Transfer and XDCAM EX Clip Browser automatically interpret
the metadata necessary for the multiple segments to display and behave like a single
clip. No special interaction on the part of the user is required.
For Spanned Clips, XDCAM EX Clip Browser is used to join the segments, and does require
some user interaction, as described below.
Note: With the exception of file conversion and rewrapping operations, media segments
that comprise Split or Spanned clips always remain as separate entities. Only the
metadata is altered.
Identifying a Split Clip
A clip that has been split into two or more segments on the same card is referred to as a
Split Clip, and is identified by:
• When viewed in the Macintosh Finder, the presence of two or more similarlynamed folders, as below:
Note how the filename prefix is identical for the two clip folders above, with the last two
digits differentiating one clip from the other. If there were a third segment, it would be
named FISH0046_03.
• When viewed in the XDCAM Transfer application, the clip name has a “.SMI”
extension (as opposed to “.MP4”)
Normal Clip
Note a difference in extensions
Table of Contents
Split Clip
5 – XDCAM EX
Split Clip
41
XDCAM Workflow in Final Cut Pro
• When viewed in the Log and Transfer window, the clip name is appended with
“(Spanned)” and only a single Volume is listed, as below:
Identifying a Spanned Clip
A clip that has been recorded across two or more SxS cards is referred to as a Spanned
Clip, and is identified by:
• When viewed in the List View Pane of the XDCAM EX Clip Browser application,
thumbnail image(s) have the icon depicted below superimposed in the top right
corner.
• When viewed in the XDCAM Transfer application, the clip name has a “.SMI”
extension (as opposed to “.MP4”) AND the word “INCOMPLETE” is superimposed
over the first segment's thumbnail image.
Spanned Clip
Normal Clip
Note Overlay
• The last three digits of the first clip’s filename (before the extension) contains the
letter “U”, followed by a two digit numeral beginning at 01.
Note: The last segment of a spanned clip does not receive the “Incomplete” overlay or
5 – XDCAM EX
Note a difference in extensions
Table of Contents
the “U” designation in the filename.
42
XDCAM Workflow in Final Cut Pro
Although spanned clips may be imported in segments using XDCAM Transfer, the
recommended workflow is to first join these spanned clips together using XDCAM EX Clip
Browser.
• When viewed in the Log and Transfer window, the clip name is appended with
“(Spanned)” and multiple Volumes are listed, as below:
Preparing to Join a Spanned Clip
1– Launch XDCAM EX Clip Browser.
2– Insert the first SxS Card into the card reader.
3– In the Tree View pane of an Explorer Window, select the SxS card. In the example
below, Card 1 has been selected, and a single spanned clip is displayed.
Browser Explorer Window by selecting File > New Explorer Window.
In this second or newly opened window, use the Tree View pane to navigate to the editing
system's media volume, and create a folder for the joined clips. In this example, a new
folder will be created in the folder “Documents”, and named “Joined Clips.”
Table of Contents
1– Unless a second window is already open (as in the default layout), open a new Clip
5 – XDCAM EX
Copying Media from the First Card
43
XDCAM Workflow in Final Cut Pro
2– Navigate to Documents.
3– Click the New Folder button.
4– Name the folder “Joined Clips”.
window. A dialog box will appear:
6– Select Yes (or press Enter).
7– When the copy is complete, perform a software Eject of the SxS card.
8– Remove the SxS card from the reader.
Table of Contents
5– Select the spanned clip(s) from the first card (upper window) and drag to the lower
5 – XDCAM EX
In the example below, the upper window displays the contents of the first card, while the
lower window displays the contents of the “Joined Clips” folder, which is currently empty.
44
XDCAM Workflow in Final Cut Pro
Copying Media from the Next Card
1– Insert the next card into the SxS Card Reader.
2– In the upper window, navigate to this card (in this example, named “Card 2”).
3– Select the spanned clip from the second card (upper window) and drag to the
lower window. A dialog box will appear:
4– Select Yes (or press Enter).
5– As the media from the second card is copied, Clip Browser automatically creates
Note: Although the example above depicts placing Spanned Clips in a separate folder,
all clip types may be freely intermingled in a single target folder.
In a workflow where the entire contents of all cards are archived to a single
location on a hard disc prior to import to FCP, the joining of Spanned Clips occurs
automatically.
Table of Contents
5 – XDCAM EX
new metadata that effectively makes the spanned clips behave as a single clip
(note that the Spanned Clip Icon is no longer displayed).
45
XDCAM Workflow in Final Cut Pro
Converting XDCAM EX Media for use on Other Platforms
With optional Main Concept Conversion Packs, XDCAM EX Clip Browser may be utilized
to convert XDCAM EX source material for use on a wide variety of other platforms,
including Apple iPod, Sony PSP, and Sony XDCAM Optical formats.
Table of Contents
5 – XDCAM EX
Main Concept conversion packs are available at www.mainconcept.com.
46
XDCAM Workflow in Final Cut Pro
Adding Clips to the Timeline
There are a variety of methods for placing clips in the timeline. For purposes of illustration,
below are just a few methodologies:
To add a clip to a Sequence without trimming, simply drag the clip from the Bin to the
Timeline.
To trim a clip prior to adding it to the Sequence:
1– Double-click on a clip in the Browser. This will load the media into the Viewer window.
2– Play the clip by pressing either the spacebar or the L key.
3– Select the yellow Viewer Playhead and scrub to an exact Inpoint. Press I to mark
the Inpoint.
4– Select the yellow Viewer Playhead and scrub to an exact Outpoint. Press O to mark
the Outpoint.
5– Click and drag the image in the Viewer over to the Canvas window. (Notice that
6– Continue dragging the thumbnail onto the red “Overwrite” section of the overlay,
then release. The clip will be added to the Timeline.
7– Repeat for subsequent clips.
Table of Contents
5 – XDCAM EX
a thumbnail image appears under the cursor) An Edit Overlay will appear in
the Canvas.
Refer to the Final Cut Pro User Guide for more detailed editing information.
47
XDCAM Workflow in Final Cut Pro
6 – Notes
• Always perform a software “Eject” of the XDCAM HD media prior to removing the
disc from the drive.
• Always perform a software “Eject” of the XDCAM EX media prior to removing the
card from the reader.
*i.LINK is a trademark of Sony used only to designate that a product contains IEEE 1394 connector. All products with an
i.LINK connector may not communicate with each other. Please refer to the documentation that comes with any device
having an i.LINK connector for information on compatibility, operating conditions and proper connection.
©2009 Sony Electronics Inc. All rights reserved. Reproduction in whole or in part without written permission is prohibited.
Features and specifications are subject to change without notice. All non-metric weights and measurements are
approximate. Sony, XDCAM, XDCAM EX, i.LINK, Professional Disc, SXS, DVCAM, MPEG IMX and EssenceMark are trademarks
of Sony. HDV and the HDV logo are trademarks of Sony Corporation and Victor Company of Japan, Limited. Apple, Final
Cut Pro, Macintosh and Firewire are registered trademarks of Apple Inc. ExpressCard and CardBus are registered
trademarks of PCMCIA. Windows, Windows XP and QuickTime are registered trademarks of Microsoft Corporation. Flip4Mac
is a trademark of Telestream, Inc.
6 – Notes
• Clips that are moved, copied, or added to an SxS card or hard drive may not
immediately be reflected in previously opened XDCAM EX Clip Browser windows.
To update a window, select Refresh from the View drop menu.
Table of Contents
• If a Desktop Icon does not appear when XDCAM media is inserted, it may be that
the Macintosh Finder Preferences are set to hide removable media. To verify,
select the Finder and then press
+ , (the comma key) to open the Finder
Preferences window. Ensure that “CDs, DVDs, and iPods” is checked, as below:
48