1
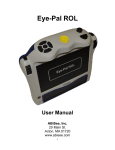
Eye-Pal Ace User Manual ABiSee, Inc. 20 Main St. Acton, MA 01720 www.abisee.com 1 Table of Content Table of Content...................................................................................................2 Introduction...........................................................................................................3 What's in the Box..................................................................................................3 The Basics............................................................................................................4 Reading/Magnification Cameras.....................................................................4 Object Lighting................................................................................................4 Speakers.........................................................................................................4 Reading with the Eye-Pal Ace for the First Time..................................................4 Power and Battery................................................................................................5 Power Switch Button.......................................................................................5 Power Indicator Light......................................................................................5 Power Up........................................................................................................5 Standby Mode.................................................................................................5 Power Down....................................................................................................5 Checking the Battery Charge Status...............................................................6 Charging the Battery.......................................................................................6 Extending Battery Life.....................................................................................6 Buttons, Controls, Connections............................................................................7 P................................................................................................................7 Audio Output Socket..................................................................................9 Side Connections......................................................................................9 Navigation and Settings.......................................................................................9 Main Menu......................................................................................................9 Scan and Read........................................................................................10 Calendar/Reminders.....................................................................................15 Clock/Alarm Clock.........................................................................................16 Magnification................................................................................................17 Photo Album..................................................................................................17 Settings.........................................................................................................17 Help...............................................................................................................18 Appendix B. Troubleshooting........................................................................19 We welcome your comments, questions and suggestions. .........................20 2 Introduction Congratulations on choosing the Eye-Pal Ace device. ABiSee’s Eye-Pal Ace is a portable electronic text-to-speech device. At the same time Eye-Pal Ace can be used as a multi-tasking daily assistant for the visually impaired. It has internal speakers, rechargeable battery, and a 10-inch built-in screen. You can enjoy reading any printed material such as letters, newspapers and books. The text will be displayed as a magnified large font e-book and will be read out loud to you using a naturally sounding voice. You can use Eye-Pal Ace as an electronic picture frame, magnifying glass, alarm clock, and an appointment reminder as well. It is a truly portable device, weighing only four pounds, characterized by a contemporary design with time-tested simple controls. Thus, it is easy to operate for the elderly and people with disabilities: whether used to read, to record and schedule voice reminders, or to listen to the alerts. The additional talking clock feature comes handy many times a day. This manual will familiarize you with the functions and features of Eye-Pal Ace. In order to get the maximum benefit from using your new Eye-Pal Ace, please browse the description of all of the device's functions. If you have any questions or suggestions concerning the use of Eye-Pal Ace, please contact us at ABiSee, Inc. using the contact information on the last page of this manual - your feedback is greatly appreciated. We hope you enjoy using your Eye-Pal Ace. What's in the Box In the Eye-Pal Ace box you will find: • • • • • the Eye-Pal Ace device the Eye-Pal Ace power supply the Eye-Pal Ace power cord this user manual a small objects placemat If any of these items are missing from your package, please contact us at ABiSee, Inc. using the contact information on the last page of this manual. 3 The Basics Reading/Magnification Cameras Eye-Pal Ace has two 5 mega pixel cameras. Both cameras work simultaneously to take a snapshot of your material. Position the document sideways in front of EyePal Ace. The optimal camera-viewable area is a letter/A4 paper-sized (8.5" by 11") rectangle alongside the front of the device. Object Lighting Both cameras automatically provide sufficient lighting when taking a snapshot. No additional light is needed even in a dark room. Speakers Any material with printed text placed in front of Eye-Pal Ace will be read out loud using built-in speakers. Reading with the Eye-Pal Ace for the First Time Before first use, the Eye-Pal Ace’s battery needs to be charged. Plug your Eye-Pal Ace into the outlet using the power supply provided, and let it charge for two hours. After the device has been charging for two hours, place a document in front of the Eye-Pal Ace, with the text’s side margin (right or left margin is fine) alongside the Ace’s screen. Turn on the Eye-Pal Ace device. You will hear a series of beeps followed by the announcement: “Main Menu: Scan and Read”. Press the SCAN button once – you will hear a shutter sound. The Eye-Pal Ace device will start reading the text almost immediately after that. Press the SCAN button only once. Do not press any other buttons when doing the scan-and-read operation, as it will interrupt the scanning/reading process. Buttons and menu navigation are described in detail in the Buttons, Controls and Connections section and the Navigation and Settings section of this document. 4 Power and Battery Power Switch Button Power button is located on the front of the device in the lower left corner. Power Indicator Light Power indicator light is located above the power button. The light glows steady green when the device is on; the light blinks when device is in standby mode; the light is off when the device is turned off. The power indicator light glows red when the device is off and is being charged. The power indicator light glows orange when the device is on and is being charged. Power Up Press the POWER button to power the device up. The start-up process takes approximately 50 seconds. You will hear a series of beeps that let you know that the device is starting up. When Eye-Pal Ace is ready, you’ll hear the announcement: “Main Menu: Scan and Read”. Standby Mode After five minutes of inactivity, Eye-Pal Ace goes into standby mode, in order to consume less power. A “power down” beep sound and a blinking power indicator light indicate that the device is on standby. Press the power button to wake Eye-Pal Ace up and return it to the active mode. It will take about 30 seconds for Eye-Pal Ace to “wake up”: you will hear a beep followed by the announcement: “Main Menu: Scan and Read”. Power Down Press and hold the power button for approximately 5 seconds to power down EyePal Ace completely. 5 Checking the Battery Charge Status In order to view the battery charge status, follow the steps below: 1. Press the HOME Button 2. Scroll to Settings menu item -> press ACTION button to select 3. Scroll to Status menu item -> press ACTION button to select Eye-Pal Ace will announce the percentage of available battery charge (also displayed in the screen): “100%” means a fully charged battery. If the battery charge is below 15%, it is time to re-charge the device. Eye-Pal Ace can be used while it is being charged. Charging the Battery In order to charge Eye-Pal Ace, put together the power supply and the power cord; plug the power supply cord into the power port located at the bottom of the left side panel; plug the power supply into a power outlet. Before first use, the Eye-Pal Ace’s battery needs to be charged. Plug your Eye-Pal Ace into the outlet using the power supply provided, and let it charge for two hours. Do not use Eye-Pal Ace while it is being charged for the first time. Later on, the device can be used while it is being charged. In general, charging a depleted Eye-Pal Ace battery to full capacity takes approximately two hours. A fully charged Eye-Pal Ace battery lasts for about five hours of continued use. Please note that, for safety reasons, only the adapter supplied by ABiSee, Inc. should be used to charge the Eye-Pal Ace device. Extending Battery Life In order to ensure that the battery operates efficiently for a long time, disconnect Eye-Pal Ace from the power source at least once a month and operate it on battery power until the battery charge goes down to below 15%. 6 Buttons, Controls, Connections P 7 Front panel has these buttons: Home Button: press to get to the Main Menu Scan Button: press to take a snapshot of a document Volume Knob Right Roller: scroll down the menu Action Button: confirm selection of the menu item Left Roller: scroll to zoom in (up) and out (down) Back Button: press to back up one step to the previous menu Set of 5 DAISY buttons: press to move up, down, left, right; press the center daisy button to remind you of which function you are currently using Home button: A large round button located in the middle on top of the device. Press it anytime to get to the main menu. Volume Knob: Located in the upper right corner, on top of the device. Use it to increase or decrease the volume. Daisy buttons Located on the left side on top of the device. Daisy buttons have total of 5 buttons. 4 arrow buttons and 1 button located in the middle. In Scan and Read mode: –Press the round button in the middle of the arrow keys to stop/resume reading. --Press the left arrow to read the previous word --Press the right arrow to read the next word --Press the up-arrow to go to the top of text --Press the down-arrow to go to the bottom of text Action button Located on the right side of the device above the Right Roller Press this button to select the desired menu option In Reading mode – this button is used to pause and resume reading. The Right Roller Located on the front right shoulder of the device Scroll it up or down to go through the menu options In reading mode – Scroll up or down to go to the previous or next line 8 The Left Roller Located on the front left shoulder of the device Scroll it to zoom in, zoom out images and font size. Scan button A semi-circle button located on the right on top of the device in front of the volume button. Back button Located above the left roller. Press it to bring you back to the previous menu option. Audio Output Socket A 3.5mm audio output socket is located on the front of the device in the lower left corner, below the power button. The audio socket can be used for plugging in external speakers or a headset. Side Connections On the left side panel there is an outlet for the power connector and a USB port. Navigation and Settings In general, use the right roller to scroll through the menu items and the Action button to confirm the menu selection. Use the Back button to return to the previous menu. Use the Home button to return to the main menu. Main Menu The Main Menu consists of the following menu items: Scan and Read Magnification Calendar/Reminders Photo Album Clock Settings 9 Help Scan and Read This application helps you read printed text like letters, documents, books, food packages, pill bottle labels, including the fine print. Eye-Pal Ace reads printed text out loud and displays magnified text on the screen. POSITIONING THE DOCUMENT Position the document sideways in front of Eye-Pal Ace. The optimal cameraviewable area is a letter/A4 paper-sized (8.5" by 11") rectangle alongside the front of the device. The orientation of the document will not influence the recognition of the text. SCANNING PRINTED MATERIAL Press the Action button to enter the Scan and Read menu item; then press the Scan button to capture the page for magnifying and reading aloud/in larger font. Alternatively, you can press the Scan button right away: Eye-Pal Ace will take a snapshot and present the material to you in one of the Scan and Read browsing modes. SCAN AND READ BROWSING MODES The scanned material may be browsed in: 1. Text Mode: convenient for reading text 2. Voice Mode: convenient for having the text read out loud - the default choice The Scan and Read browsing modes can be changed under the Settings menu item of the Main Menu. In order to change the Scan and Read browsing mode: 1. Press the Home button to find yourself in the Main Menu, 2. Use the right roller to scroll down to the Settings menu item, 3. Press the Action button to confirm the menu item selection, 4. Use the right roller to scroll down to the General Settings, 5. Press the Action button to confirm the menu item selection, then 10 6. Use the right roller to scroll down to the Reading Mode, 7. Press the Action button to confirm the menu item selection, then 8. Use the right roller to scroll down to the desired option, and 9. Press the Action button one final time to set the selection VOICE MODE The Voice Mode is the default mode. Use this mode when you want Eye-Pal ACE to read the text out loud. Eye-Pal ACE will automatically start reading as soon as the Scan button is pressed. To pause/resume the reading, press the Action button (or, alternatively, press the center Daisy button). Captured text will be formatted and displayed on the screen in high contrast. VOICE MODE SETTINGS READING SPEED The speed with which the document is read out loud by Eye-Pal Ace (the Reading speed setting) is relevant for the Voice browsing mode only, and can be adjusted under the Settings menu item of the Main Menu. In order to change the Reading speed setting: 1. Press the Home button to find yourself in the Main Menu, 2. Use the right roller to scroll down to the Settings menu item, 3. Press the Action button to confirm the menu item selection, 4. Use the right roller to scroll down to the General Settings, 5. Press the Action button to confirm the menu item selection, then 6. Use the right roller to scroll down to the Reading Speed option, 7. Press the Action button to confirm the menu item selection, then 8. Use the right roller to scroll between the speed values from 1 (the slowest) to 10 (the fastest), and 9. Press the Action button one final time to set the selection Voice/Language In order to adjust the setting for your preferred reading voice or language: 11 1. Press the Home button to find yourself in the Main Menu, 2. Use the right roller to scroll down to the Settings menu item, 3. Press the Action button to confirm the menu item selection, 4. Use the right roller to scroll down to the General Settings, 5. Press the Action button to confirm the menu item selection, then 6. Use the right roller to scroll down to the Voice option, 7. Press the Action button to confirm the menu item selection, then 8. Use the right roller to scroll through available language/voice combinations, 9. Press the Action button one final time to set the selection The reading language and language of the document need to match. If the language of the document does not match the selected reading language, the text recognition will not be accurate. Navigate through the Text Five standard DAISY buttons are used for text navigation. Pressing the left or right arrow buttons moves to, respectively, the previous or next word that Eye-Pal Ace reads out loud. Pressing the up or down arrow buttons moves to, respectively, the top or bottom of the page. Scrolling up or down with the right roller moves to, respectively, the previous or next line. Press the center button to pause/resume reading. By default, Eye-Pal ACE will recognize text columns as separate pages. If you wish to disable the column recognition in order to accurately read tabulated text, press and hold the left and right arrow buttons simultaneously until you hear the announcement "Switched to table mode". Press the same two buttons again when you want to switch back. Press the up and down arrow buttons simultaneously to hear the orientation of the document. TEXT MODE In Text Mode, the scanned document is presented on the screen as an electronic book (e-book). The number of lines on the page depends on magnification. Because the width of Eye-Pal Ace screen is the same as the width of a letter-size page, you can read your document as if it were a large font e-book, where you 12 control the size of the font. Use the right roller to move one line up/down. Press the left or the right Daisy button, the center Daisy button or the Action button to activate the reading out loud. Press the center Daisy button or the Action button to stop reading out loud. GENERIC SCAN AND READ SETTINGS Generic Scan and Read settings apply to both reading modes. Font, Font Size, Contrast In order to adjust the setting for your preferred font, font size or contrast: 1. Press the Home button to find yourself in the Main Menu, 2. Use the right roller to scroll down to the Settings menu item, 3. Press the Action button to confirm the menu item selection, 4. Use the right roller to scroll down to the General Settings, 5. Press the Action button to confirm the menu item selection, then 6. Use the right roller to scroll down to one of the options: Font, Font Size or Contrast, 7. Press the Action button to confirm the menu item selection, then 8. Use the right roller to scroll through available options, 9. Press the Action button one final time to set the selection Reading Volume Turn the Volume Knob clockwise to increase the volume of the voice. Alternatively, turn the Knob counterclockwise to decrease the volume. Tables and Spreadsheets By default, Eye-Pal ACE will recognize text columns as separate pages. If you wish to disable the column recognition in order to accurately read tabulated text, press and hold the left and right arrow buttons simultaneously until you hear the announcement "Switched to table mode". Press the same two buttons again when you want to switch back. Reading Small Print 13 To read fine print on a small objects, place the object under the right camera, and press and hold the Scan button for 3 seconds - that way the camera will bring the item into sharp focus before taking the snap shot. Saving, Opening, Deleting Documents To access the commands to save, open, and delete documents while in Scan and Read mode, press and hold Action button then press Back button. As usual use the Right Roller to select desired function and the Action button to confirm your selection. Save Open Delete Save Document You have three options for saving documents: Save Without Voice Label Save With Voice Label Save Book Scan a document you want to save. To save a document without a voice label select the option “Save without voice label” and press the Action button. The scanned document will be saved and the device will be ready to scan another document. The name of the document will be the first line of the document. If you select the option “Save with voice label” press the Action button again. You will hear “Please, start recording”. Speak the name of the document after you hear a beep. At the end of the recording you will hear another beep sound and the voice label will be played back to you. If you are satisfied with your recording press the Action button and the document will be saved. To cancel the recording press the Back button. To start saving a book, select the “Save book” option and press the Action Button. You will hear “Please, start recording”. Speak the name of the document after you hear a beep. At the end of the recording you will hear another beep sound and the voice label will be played back to you. If you are satisfied with your recording press the Action button and the document will be saved. To cancel the recording press the Back button. The book will be saved and you can start adding pages to your book. 14 To start adding pages to your book, place the book under the camera and press the Scan button. Turn the page and press the Scan button again to add the next page. When you have finished adding pages, press and hold the Action then press the Back button, you’ll hear ‘Book saved’. After that the saved book will be opened automatically and read aloud page by page. Note: Documents can be saved internally or on USB external memory device (flash drive). Open Document To open previously saved document or book select Open Document option. EyePal Ace will read the label for the last saved document. Use Right Roller to scroll through the list and press the Action button to select the doc you need. Delete Document To delete previously saved document or book select Delete Document option. Eye-Pal Ace will read the label for the last saved document. Use Right Roller to scroll through the list and press the Action button to select the doc you wish to delete. Eye-Pal Ace will ask you to confirm the deletion. Press the Action button to delete the document or the Back button to select another document. Calendar/Reminders Calendar application allows you to create reminders for yourself using your voice. You can create a new reminder for today or any future date. You can define the exact time hour/minutes when you want to hear an alarm with the message you recorded. You can hear your reminder for the today, or for the next week (7 days) or for the next month (31 days). Any reminder may be deleted or re-recorded. 1. Press the Home button to find yourself in the Main Menu, 2. Use the right roller to scroll down to the Calendar menu item, 3. Press the Action button to confirm the menu item selection, 4. Use the right roller to scroll down to one of the options: Add reminder, All reminders, next 7 days, next 31 day, Reminders by day, 5. Press the Action button to confirm the menu item selection, then follow the voice commands, 6. Use the right roller to scroll through available options, 7. Press the Action button one final time to set the selection 15 When you select the Calendar application from the Main Menu Eye-Pal ACE announces the current date. Use the Right Roller to scan through the options and press the Action button to select one of them: Today Add Reminder Reminders by Day Next 7 days Next 31 days All Reminders For any of the above options you will use the Right Roller to scroll through saved reminders or hear the message that there is no reminders for the selected day. To add a new reminder select “Add Reminder” option. Select a date using the Left Roller to change the month and the Right Roller to change the day of the month. Press the Action Button to confirm the selected day. You will be prompted to start recording your reminder. Your recording may be no longer than 30 seconds. EyePal Ace will play back the recording and you will be given an option to delete or to change it. Clock/Alarm Clock Select this application from the Main Menu to instantly hear current day/time. Press the Action button to set the alarm time and alarm mode. To set time use the Left Roller to change hour and the Right Roller to change minute. Press the Action button to select the mode – One Time Alarm or Daily Alarm. Press the Action button to confirm your mode selection. 1. Press the Home button to find yourself in the Main Menu, 2. Use the right roller to go to the One Time Alarm or Daily Alarm menu options, 3. Press the Action button to confirm the menu item selection, 4. Use the right roller to change minute, 5. Use the left roller to change hour, 6. Press the Action button to confirm the menu item selection. 16 Magnification Select Magnification when you need to write a check or magnify any small object like a hearing aid. Right camera will be used to see magnified image on the screen. Place a small object in the designated area on the placemat. Use the Left Roller to zoom in/out. Use the right roller to adjust sharpness. Use the Action button to re-focus. Use the right arrow (Daisy buttons) to adjust the contrast. Use the middle round button (Daisy buttons) to return to the original contrast. Photo Album Select this application from the Main Menu to look at your family pictures. To magnify the picture on the screen use the Left Roller. To move the magnified image use the left/right and up/down arrows. Use the Right Roller to move to the next picture. Use USB flash drive to save new set of pictures. They have to be saved in a folder named ‘Pictures’. Then insert the USB flash drive into the USB port located on the left side of the device. From Main Menu scroll to Settings then select Add/Remove Photos and follow the voice instructions. Settings The following options are available: General Settings Reading Speed Reading Mode Voice Font Font Size Contrast Time Format Add/Delete Photos Set Time and Date Set Time Set Date Status: Battery Version Model Serial Number Customize Main Menu Upgrade Software 17 Reset All Settings Please note: Eye-Pal Ace must be turned off/on after changing the Time and Date. Help Select the Help option from the Main Menu to hear the detailed description of EyePal Ace functionality and how to use each function. You can interrupt the Help talk by pressing any button and Eye-Pal Ace will explain when to use this button and what it is for. If you press The Home button it will bring you to the Main Menu. Appendix A: Safety Rules Handle the Eye-Pal Ace with care. Rough handling will damage the device. Be especially careful with the screen – don't touch it with sharp objects, when you carry the device outside use the special bag. If Eye-Pal Ace is not in a standing position, do not place any heavy or sharp objects on the screen surface. Use only the Power Adapter that you get with the Eye-Pal Ace. Do not open Eye-Pal Ace under any circumstances, it will void the warranty. Contact AbiSee or your dealer for service if necessary. Remember that the battery is build-in, it can't be removed. Do not expose the Eye-Pal Ace to excessive heat or direct sunlight to avoid the risk of fire. Do not use the Eye-Pal Ace near inadequately shielded medical devices. To avoid risk of electrical damage, keep your Eye-Pal Ace away from water or fluid chemicals. To clean the device first unplug it. You can clean only the exterior of the Eye-Pal Ace with soft fabric. Do not use chemicals or abrasive materials. Use the special spray that is used for cleaning laptop screens to clean EyePal Ace screen. When storing devices do not put any heavy items on top of it. Use of the Eye-Pal Ace only as it is described in this manual. Warranty will be voided if the device is used with violations of these rules. 18 Appendix B. Troubleshooting Troubleshooting for power/battery/connections 1. If the Eye-Pal Ace does not respond to any button. Make sure the battery is charged. If the battery is empty, connect the power adaptor to charge the battery. If the battery is fully charged, but the device stopped responding to any button, turn the device off, then on again. 2. If the adaptor does not power the Eye-Pal Ace: Check the connections. Make sure the power adaptor is firmly connected to the Eye-Pal Ace and to the power outlet. If the adaptor still does not power the unit, contact Abisee or your ABiSee distributor. 3. If the battery does not power the Eye-Pal Ace. The battery may be empty. Connect the power adaptor to charge the battery. Troubleshooting: Scan and Read Application 1. If the text you are reading does not make sense Do not stress Scan button. Press it and wait for the shutter sound. Make sure your reading language is the same as the language of your document. Switch to/from tables reading mode. 2. If the text recognition takes unusually long before starting to read your document or it is not accurate: Make sure your reading language is the same as the language of your document. Place a document, leave it still and make sure that there is nothing between the cameras and the document. Press Scan button just once and wait for the shutter sound. 19 Don’t stress the Daisy keys during the OCR process, wait until OCR is done before you navigate through the text. Troubleshooting the Calendar Application 1. If you don't hear the reminder after you finished your recording Increase the volume – turn Volume knob clockwise. Make sure that when you are talking your face is close to the device. 2. If you think that you did not hear the reminder you have entered at the right date/time go to Main Menu, Select Calendar, View reminders and check if the expected reminder exists. It is most likely that it has not been scheduled for the time you tried to hear it. Contact ABiSee: We welcome your comments, questions and suggestions. Our business hours: Monday through Friday, 8:30 am to 5:00 pm EST. By Phone: 1-978-635-0202 20 By Fax: 1-253-595-3623 By E-mail: Sales: [email protected] Tech Support: [email protected] General Info: [email protected] By Mail: ABiSee, Inc. 20 Main Street, Suite G2 Acton, Massachusetts 01720 21