Download CASELLA CEL CEL-490 Instruction manual
Transcript
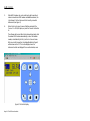
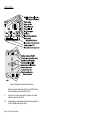
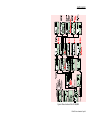
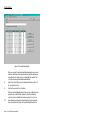
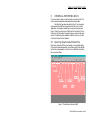
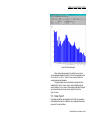
January 2004 CEL-6813 dB23 V1.0 DOWNLOAD, REPORT & CONTROL SOFTWARE FOR the CEL-450 & CEL-490 SLMs Users Handbook HB3309.01 Software for the CEL-450/CEL-490 Sound Level Meters CASELLA CEL Regent House Wolseley Road Kempston Bedford MK42 7JY U.K. Phone: +44 (0) 1234 844 100 Fax: +44 (0) 1234 841 490 E-mail [email protected] Web: www.casellacel.com CASELLA USA 17 Old Nashua Road #15 Amherst NH 03031 U.S.A. Toll Free: Fax: E-mail: Web: +1 800 366 2966 +1 603 672 8053 [email protected] CASELLAUSA.com Contents Page 2 - CEL dB23 Users Handbook Contents CONTENTS . . . . . . . . . . . . . . . . PAGE 1. SOFTWARE INSTALLATION . . . . . . . . . 1.1 Introduction . . . . . . . . . . . . . . . . . . 1.1.1 The Software . . . . . . . . . . . . . . . . . 1.1.2 Data Terms Used . . . . . . . . . . . . . . . 1.1.3 Using Microsoft Windows . . . . . . . . . . . 1.2 File Handling . . . . . . . . . . . . . . . . . . 1.2.1 File Handling - Input . . . . . . . . . . . . . . 1.2.2 File Handling - Output . . . . . . . . . . . . . 1.2.3 Notepad Functions . . . . . . . . . . . . . . . 1.3 Installation & Un-Installation . . . . . . . . . . 1.3.1 System Requirements . . . . . . . . . . . . . 1.3.2 Installation On Windows 98TM and Later . . . TM 1.3.3 Un-Installation from Windows 98 and Later 2. ESTABLISHING COMMUNICATION . . . . . . . . . 9 2.1 Establishing Local Communication . . . . . . . . . . 9 2.2 Remote Communication Via Modem With Up To 8 Sound Level Meters . . . . . . . . . . . . . . . . 11 2.2.1 Configuring the Software for Modem Communication 11 2.2.2 Establishing Communication With a Remote Sound Level Meter . . . . . . . . . . . . . 13 3. CONTROLLING SOUND LEVEL METERS . . . . . . 15 4. DOWNLOADING STORED DATA FROM THE SOUND LEVEL METER . . . . . . . . . . . . . . . 21 5. VIEWING & EXPORTING DATA . . . . . . . . . . . 25 5.1 Opening Downloaded Data Files . . . . . . . . . . 25 5.2 Viewing Data . . . . . . . . . . . . . . . . . . . . . 26 5.3 Data Export . . . . . . . . . . . . . . . . . . . . . 27 6. REPORT PREPARATION 6.1 6.2 6.3 7. . . . . . . . . . . . . . . . . . . . . . . . . . . . . . . . . . . . . . . . . . . . . . . . . . . . . . . . . . . . . . . . . 5 5 5 5 6 6 6 6 7 7 7 7 7 29 Standard Format Text Reports . . . . . . . . . . . . 29 Opening a Customised Report . . . . . . . . . . . 29 Saving & Printing a Report . . . . . . . . . . . . . . 30 SOFTWARE WARRANTY . . . . . . . . . . . . . 23 CEL dB23 Users Handbook - Page 3 Software Installation 1. SOFTWARE INSTALLATION 1.1 Introduction 1.1.1 The Software The dB23 software is suitable for downloading data stored in the CEL-450 and CEL-490 Sound Level Meters, plus post processing with cut and paste between applications. There are comprehensive word processing capabilities and extensive on-screen graphing facilities. Data displayed on the screen may be assembled in any order to produce reports that can be stored and recalled for editing and printing. Up to eight sound level meters can be connected and interrogated via GSM modems. A PC can be used to present screen messages, menus and data in a local language, and exercise control of the sound level meter showing control information plus measured data on-line on the PC monitor. A diagram illustrating the relationships of the menu bars and main command options is shown on the fold-out sheet at the back of this book. Please review the readme.txt file included on the program disk for the latest setup information. In addition, please register your copy of the software by completing and returning the accompanying reply card, to ensure that you receive information on software upgrades. 1.1.2 Data Terms Used Datafile: Once downloaded to the PC, the data set for a single run is stored in three files where the term Datafile means all of these files. The files have the same filename with .dta, .rec and .not file extensions. Copying Datafiles: When copying Datafiles to another disk or directory, make sure CEL dB23 Users Handbook - Page 5 Installation that you always copy ALL FILES with the same filename, otherwise you will not be able to use the data. Target File: The filepath and filename for saving the next run to be downloaded. Flags: Sometimes dB values are accompanied by additional information in the form of “Flag” characters. Refer to the sound level meter instruction manual for details of these characters. 1.1.3 Using Microsoft Windows dB23 requires a basic working knowledge of the Microsoft Windows TM 98 or later user interface and operating system. This manual assumes the reader is familiar with Microsoft Windows and associated terminology. 1.2 File Handling 1.2.1 File Handling - Input On installation, Data, Export and Reports directories are created in the dB23 program directory. The files are stored with a filename specified by the user and a .dta file extension. Each downloaded run will also include other types of file, with the same filename as follows. .dta Run summary file, .not Text file, accessed via the View menu, in which comments and information can be entered by the user, .rec All run data: dose results plus profiles, stored in binary format. 1.2.2 File Handling - Output The dB23 software offers the following formats when you open or save a report file. .hed HighEdit: not recommended, as editing can be performed only by CEL dB software. .txt ANSI: recommended for text only report files, as it uses the same character set as Windows. Page 6 - CEL dB23 Users Handbook Software Installation .txt OEM: not recommended for text only report files, as some characters may be changed, depending on the current MS-DOS settings. .rtf Rich Text Format: recommended for reports that are to contain text and graphical information, as further editing can be performed by many other Windows applications. 1.2.3 Notepad Functions Once you have opened a datafile, a notepad becomes available via the View menu that allows you to enter relevant notes and comments that will be attached to the datafile under the same filename, but with a .not file extension. This allows any unusual or special circumstances about the measurements to be noted. 1.3 Installation & Un-Installation 1.3.1 System Requirements IBM® compatible PC, with 80486, or better processor, At least 8 MByte of free RAM space (16 MB is recommended), Microsoft Windows® 98 or later, Hard disk drive with at least 10 MB of free space, RS 232 Serial Communications Port or USB Connector with USB to RS232 converter, PC CD Rom Drive, Monochrome or colour VGA or Super VGA monitor, Printer - Optional. 1.3.2 Installation on Windows 98TM and Later Before installation, it is recommended that back-up copies be made of the CD-ROM program disk. Keep the original in a safe place and use the copy to install the software as described below. To start the installation, run the “Setup” program on the application disk and follow the on-screen instructions. When the software is started, it checks what the local language is then attempts to match it and show displays and messages in this language. If the software is unable to determine a language, it will display in English. CEL dB23 Users Handbook - Page 7 Installation 1. To change the displayed language, click on the Language option on the main application screen and display a Select... option. Please note that the Language option is available only while both Control and Download windows are closed. 2. Click on the Select option to display the Select Fixed Languages dialog. The following options are available from the Select Fixed Languages dialog: ¤ Attempt to match loaded OS language (this is the default where the software attempts to match the local language) ¤ Use English ¤ Use other available languages 3. Choose a language from those available and click OK. 4. Restart the software to display information in the selected language. From now on, the information will be displayed in the chosen language every time the software is started, unless changed again via this procedure. 1.3.3 Un-Installation from Windows 98 TM and Later The Setup program installs files in both specified Program directory (i.e. c:\celprogs\dB23) and in the Windows\System directory. Run the uninstall program and use the Add/Remove programs in Control panel. Page 8 - CEL dB23 Users Handbook Establishing Communication 2. ESTABLISHING COMMUNICATION 2.1 Establishing Local Communication Local communication is used for testing sound level meter control and for downloading data in the office or laboratory. Establish local communication between sound level meter and PC as follows. 1. With the sound level meter switched OFF, connect it to the PC serial port using the C6724/2 Communication Cable as shown in Figure 1. The C6724/2 fits a 9-way communication port, however a 9-to-25way Adaptor may be used to fit a 25-way communication port. 2. Start dB23 by double clicking on the icon in the CEL Soundtrack Program Group or from the Windows Start Menu. The main application screen will be displayed. The communication settings for dB23 must be configured BEFORE instrument control or download can take place. 3. Select the Change Com Port... option from the Instrument menu. Figure 1: Local connection between sound level meter and PC CEL-dB23 Users Handbook - Page 9 Establishing Communication Options for the COM port, baud rate and Stop bits can now be configured. 4. Select the COM port to which the CEL-450/490 is connected. 5. Select the same baud rate that has been set on the CEL-450/490. It is recommended that the highest setting (115200) be selected on both the instrument and dB23 in order to give the fastest communication. (NOTE: When communicating with sound level meters via a GSM modem, a Baud rate of 9600 must be used.) No communication will be possible if the instrument and software have different baud rates selected (See the CEL-450/490 manual for instructions on setting the instrument baud rate). 6. Select either 1 or 2 stop bits. When communicating with a PC it makes no difference which option is selected. 7. Select OK to accept the settings and close the dialog. The settings will be stored and retained for further dB23 sessions. 8. Switch the CEL-450/490 ON. Interface status: RS 232 connected The sound level meter recognises that it is connected to a PC and indicates this during the start up sequence, before continuing on to a Calibration screen. Communication with the sound level meter can now occur at any time. However, if the instrument is carrying out a run, the current measurement cannot be downloaded, although all other stored runs can be accessed. Page 10 - CEL dB23 Users Handbook Establishing Communication 2.2 Remote Communication Via Modem With Up To 8 Sound Level Meters This type of communication is used to control or download remote sound level meters. 2.2.1 Configuring the Software for Modem Communication Communication with up to eight sound level meters is possible when they are connected via GSM (Global System for Mobile communications) modem. When the PC has an internal modem, this must be configured to be seen as a serial modem connected directly to one of the available COM ports on the PC. It is not necessary to have any sound level meter connected to the PC while configuring modem communication by entering GSM contact phone numbers and modem settings as follows. 1. Start dB23 by double clicking on the icon in the CEL Soundtrack Program Group or from the Windows Start Menu. The main application screen will be displayed. 2. Configure the communication settings by selecting the COM Port... option from the Instrument menu. The Change COM port dialog allows the COM port, Baud rate and Stop bits settings to be configured. 3. Select the COM port to which the external modem is connected. 4. Select a Baud rate of 9600 for communication with GSM modems (NOT the rate of 115200 more commonly used for direct communication with a PC). 5. Select either 1 or 2 stop bits, as when communicating with a PC it makes no difference which option is selected. 6. Select OK to accept the settings and close the COM port dialog. The settings will be stored and retained for further dB23 sessions. 7. Configure the modem settings by selecting the Modem... option from the Instrument menu. CEL-dB23 Users Handbook - Page 11 Establishing Communication The Modem settings dialog requires the following entries: Initialisation Dial Connect OK Busy No carrier No dialtone No answer These fields may already contain settings. 8. Tick the Edit Local and Remote Modem settings box to use these settings (and allow them to be edited). 9. Press the Reset button to enter complete settings for a standard GSM Wavecom modem into the relevant fields. When a different type of modem is to be used, enter details (available from the modem supplier) into the individual fields and identify the modem as Generic or Non Standard. 10. To avoid having to re-enter modem settings each time the software is started, remove the tick from the Edit Local and Remote Modem settings (Modem enabled) box. The current settings will now be loaded each time the software is started. 11. Select OK to accept the settings and close the Modem settings dialog. 12. Enter the phone number and location of each sound level meter to be interrogated by selecting the Phone numbers... option from the Instrument menu. The Phone numbers dialog requires the following entries: Phone number Location. 13. Enter up to eight phone numbers and locations to identify the sound level meters to be interrogated. Page 12 - CEL dB23 Users Handbook Establishing Communication 14. Select OK to accept the settings and close the Phone numbers dialog. 2.2.2 Establishing Communication With a Remote Sound Level Meter Establish communication between a remote sound level meter and the PC as follows. 1. Refer to the sound level meter handbook and set the baud rate on the remote sound level meter to 9600 (NOT the rate of 19200 more commonly used for direct communication with a PC). 2. With the sound level meter switched OFF, connect it to the PC serial port using the remote links required by the specific system. 3. Switch the sound level meter ON manually. During the start up sequence, the instrument display will indicate that the interface is connected. Interface status: RS 232 connected 4. Start dB23 by double clicking on the icon in the CEL Soundtrack Program Group or from the Windows Start Menu. The main application screen will be displayed. 5. The communication settings for dB23 must be configured BEFORE instrument control or download can take place. 6. Select the Com Port... option from the Instrument menu. Options for the COM port, baud rate and Stop bits can now be configured. 7. Select the COM port to which the CEL-450/490 is connected. 8. Select a baud rate of 9600 to match that set on the sound level meter. CEL-dB23 Users Handbook - Page 13 Establishing Communication 9. Select either 1 or 2 stop bits as when communicating with a PC it makes no difference which option is selected. 10. Select OK to accept the settings and close the dialog. The settings will be stored and retained for further dB23 sessions. Communication with the sound level meter can now occur at any time. Page 14 - CEL dB23 Users Handbook SLM Control 3. CONTROLLING SOUND LEVEL METERS 1. Establish communication between the sound level meter and PC as described in the relevant section of Chapter 2. It is not possible to open the Control and Download windows at the same time. 2. Select Control CEL-450/490, from the Instrument menu on the main application screen. A “Disconnected” message is displayed. 3. Press the Connect Link button on the top button bar (Figure 3) to connect directly with the ticked (Ö) entry on the Instrument menu, (ticked as described in steps 4 and 5), then go to step 7. Or, select the Instrument menu and and see additional entries, like the example shown in Figure 2, then go to step 4. 4. When dB23 (Version 2.0 and later) has been set up to control a local sound level meter connected directly to the PC, tick (Ö) the Control CEL-450/490 menu entry. Connect Link Break Link Figure 2: The full Instrument menu CEL-dB23 Users Handbook - Page 15 SLM Control 5. When dB23 has been set up to control up to eight sound level meters connected via GSM modems and landline modems, tick (Ö) instrument 1 to 8 on the menu list of currently connected instruments (see Figure 2). 6. Return to the Instrument menu a third time and select the Connect to 450/490 option, or press the Connect Link button to. The software will connect either the local sound level meter, dial the relevant GSM modem automatically, or select the landline modem, as indicated by the tick (Ö) on the Instrument menu. After a successful connection, the display illustrated in Figure 3 will be shown on the PC. This on-line display echoes the instrument controls and display of the sound level meter, were Figure 3: The Control display Page 16 - CEL dB23 Users Handbook SLM Control mouse clicks on the PC screen buttons duplicate key presses on the instrument. The refresh rate of the data panel on this screen is approximately 1 second, but may be longer, depending on the the modem used. The control button panel can be moved, while the data panel can be both moved and resized, by using the mouse. A smoother movement of the data panel is achieved when the red STOP button on the top button bar is pressed to interrupt the data transfer. Remember to press the green GO button to resume data transfer after movement or resizing. Cautions ! If the keys on the PC monitor are used to STOP the instrument*. If the keys on the PC monitor are used to change the communication baud rate on the instrument*, all communication with it will be lost. This can be restored only by locally resetting the baud rate via the instrument keys. 7. Change settings, make measurements and observe data on-line on the PC display. Figure 4 shows the main key functions and identifies information shown on the sound level meter display, while figure 5 illustrates the instrument menu structure. Please refer to the CEL-450/490 Operators Handbook or Field Guide for more detailed instructions on operation and obtaining data from the display. Although data is displayed on the PC monitor, it is saved only in the sound level meter store and when required, must be downloaded to the PC as described in Chapter 4. 8. When all required measurements have been taken with this sound level meter, or it is to continue storing data without Note*: A warning will be given asking for confirmation of these actions. CEL-dB23 Users Handbook - Page 17 SLM Control Figure 4: Displayed information and key functions attention, press the Break Link button or the red STOP button to stop downloading screen information to the PC. 9. Open the Instrument menu and tick (Ö) another sound level meter for connection with the PC. 10. Change settings, make measurements and observe data on-line on the PC display as described in step 7. Page 18 - CEL dB23 Users Handbook SLM Control Figure 5: Menu structure of the CEL-450/490 CEL-dB23 Users Handbook - Page 19 SLM Control 11. When all required measurements have been taken with all sound level meters, press the Break Link button or the red STOP button to stop downloading screen information to the PC. 12. Close the Control window. 13. Proceed to Chapter 4 to download data from the sound level meters, or close the software down. Page 20 - CEL dB23 Users Handbook Download 4. DOWNLOADING STORED DATA FROM THE SOUND LEVEL METER 1. Establish communication between the sound level meter and PC as described in the relevant section of Chapter 2. It is not possible to open the Control and Download windows at the same time. 2. Select Download CEL-450/490, from the Instrument menu on the main application screen. An empty Download window will be displayed. 3. Press the Connect chain button on the top button bar (Figure 2) to connect directly with the ticked (Ö) entry on the Instrument menu, (ticked as described in steps 4 and 5), then go to step 7. Or, select the Instrument menu and and see additional entries, like the example shown in Figure 2, then go to step 4. 4. When dB23 has been set up to download data from a local sound level meter connected directly to the PC, tick (Ö) the Control CEL-450/490 entry. 5. When dB23 has been set up to download data from up to eight sound level meters connected via GSM modems and landline modems, tick (Ö) instrument 1 to 8 on the menu list of currently connected instruments (see Figure 2). 6. Return to the Instrument menu a third time and select the Connect to 450/490 option, or press the Connect chain button. The software will connect either the local sound level meter, dial the relevant GSM modem automatically, or select the landline modem, as indicated by the tick (Ö) on the Instrument menu. The display illustrated in Figure 6 will be shown on the PC. 7. Give a filename to the files you wish to download by writing the required filepath and filename in the Target File field. Alternatively use the Target File button to display a dialog, into which you can specify the required filepath and filename. CEL-dB23 Users Handbook - Page 21 Download Figure 6: The Download display When you expect to perform a multiple download, use no more than five characters in the filename as the software deletes any more than this to make room for a three digit file number. The .dta file extension will be added automatically. 8. Select the run(s) that you wish to download shown on the List of Completed Runs. 9. Use the Download Run(s) button. When you have highlighted more than one run, a dialog box will prompt you to select a start number for the file numbering scheme. Enter a suitable start number and press Continue. 10. Downloaded run data will be transferred from the instrument, then converted and stored in the specified filepath under the Page 22 - CEL dB23 Users Handbook Download chosen filename. Multiple downloaded files will also carry the file number in their filename as an identifier. 11. Halt or the red STOP button can be used to stop the transfer for any reason during download. Refresh List or the GO button will restart the data transfer from the beginning. Once data transfer and conversion are complete, a “Download Successful” message and dialog box asking: “Do you wish to see the Run Summary for filepath\filename ?” will be displayed for the last successfully downloaded run. 12. Select Yes to see the run summary displayed. 13. To download from another local sound level meter connected directly to the PC, switch OFF the currently connected instrument and disconnect the serial cable. Connect the next instrument, switch it ON and wait for approximately 15 seconds, then press the Refresh List button to obtain the List of completed Runs stored in the new instrument. 14. To download from another sound level meter connected via a modem, tick (Ö) the relevant entry on the Instrument menu: Download from CEL-450/490 or instrument 1 to 8 and wait for approximately 15 seconds, then press the Refresh List button to obtain the List of completed Runs stored in the new instrument. 15. Re-start the procedure from step 6. CEL-dB23 Users Handbook - Page 23 Download Page 24 - CEL dB23 Users Handbook Viewing & Exporting Data 5. VIEWING & EXPORTING DATA It is not necessary to have a sound level meter connected to the PC in order to view and manipulate downloaded measurement data. Data files that have been transferred to the PC can be opened and reviewed inside dB23 and exported as text files for use in other applications, for example a spreadsheet or word processor package. Figure 7 shows the screen layout of dB23 and the functions of the top button bar. All of the toolbar commands can be accessed via the menu system. The different options available to dB23 are shown on the fold out sheet at the back of this handbook. 5.1 Opening Downloaded Data Files Data can be viewed in dB23 as a text readout or as a graphical display. At the end of a download operation, the software can open the data file for the last run downloaded. In order to access a different stored data file, proceed as follows: Figure 7: The buttonbar functions of dB23 CEL dB21/dB22 Users Handbook - Page 25 Viewing & Exporting Data 1. Select Open Data File... from the File Menu, choose the data file that you want to open and confirm your choice (OK). The data file will be opened and a run summary window displayed. 2. The View menu can then be used to select which data type should be displayed. Only types available in the opened data file can be selected from the View menu. 3. Any comments relating to the measurement can be added using the Notes option on the View menu. Any data viewed in dB23 can be printed using the Print option from the File menu. Reports can be compiled by copying data from the display windows to a report window. Both text and graph displays can be copied to reports. 5.2 Viewing Data Data is viewed by selecting the appropriate measurement data type from the View menu. This generates a graph as in Figure 8. To view the equivalent text information, select the Text option from the View menu. A text display of the measured data will then be shown. This text can be selected and copied to the Windows clipboard for pasting into other applications. The View menu allows the following data types to be displayed: Run Summary, Period Results, Profile, Statistical Information, Notes. Only the types of data that have been stored with the run will be indicated as available on the View menu. The Period Results display shows only a single period or the cumulative reading. To scroll through the period records, use the Period Record option from the View menu, or the appropriate toolbar buttons. There is also a Period Profile view that displays a graph of the period results against time, in a similar fashion to the profile data. Page 26 - CEL dB21/dB22 Users Handbook Viewing & Exporting Data Figure 8: Third-octave graph When viewing data as a graph, it is possible to see only one acoustic parameter displayed at a time. To view other parameters, select Period Result Function... from the View menu and choose the required measurement parameter. The graph display can be customised by using the selections available on the Options menu. Cursors can be controlled using the mouse, toolbar or Cursors menu. When viewing profile data, the graph can be zoomed between the two cursors using Zoom from the Options menu. 5.3 Data Export Period data (and profiles downloaded from a CEL-490) can be exported as tab delimited text which is suitable for use in spreadsheets and word processors. Proceed as follows. CEL dB21/dB22 Users Handbook - Page 27 Viewing & Exporting Data 1. Select Open Data File... from the File menu. The Run Summary for this file will be displayed. 2. Select the data set required for exporting from the View menu. If you wish to export all available data from the run, leave the Run Summary as the active Window. 3. From the File menu, select Export Options. Make the required settings to ensure that the correct data is exported. 4. From the File menu, select the Export Data as Text File... option. A windows dialog is opened which allows data types and data ranges to be specified. Make suitable entries, then press OK. 5. A standard Windows dialog will be opened that allows a filename and file path for the text file to be specified. Insert a suitable filename and file path then press OK. For example call the file run01 and save it in the c:\dB23\export directory. An appropriate file extension will be added automatically, such as .sum (summary), .per (period), .prf (profile) and .sts (statistical data). A further information box will be displayed asking if you wish to continue 11. Press Yes. While the data conversion and export operation are in progress, dB23 locks out all other Windows applications. This prevents any other operations from being started that could destroy, corrupt or otherwise change the datafile being exported. Page 28 - CEL dB21/dB22 Users Handbook Report Preparation 6. REPORT PREPARATION The dB23 software is able to produce simple text reports in a format standardised for the relevant measurement protocol. Alternatively, the built-in word processor allows you to prepare totally customised reports. This word processor offers many of the abilities found in professional TM packages such as Microsoft Word , and has a similar method of operation. It is possible to edit reports created in dB22 using such packages. 6.1 Standard Format Text Reports Proceed as follows: 1. Open the required datafile. 2. From the View menu, select the required option to display a report in the standardised format. 3. Should you want to save (or modify) a standard format text or graphic report, select the Edit menu and use the Copy All to New Report Window option. A report window is opened and the whole of the standard report text or graph copied into it. The contents of this window can now be edited, saved and printed out as detailed in the following sections. 6.2 Opening a Customised Report 1. Select New Report from the File menu if a new customised report is to be produced. Alternatively, use Open Report if an existing report is to be edited. A report window is opened. If a new report has been opened, the report filename will be shown as Report plus a unique number. However, if an existing report has been opened, the report filename will be shown. 2. If you are generating a new report, use the Print Setup options in the File menu to select a suitable page orientation (portrait or landscape), and the toolbar options to select font, justification CEL dB23 Users Handbook - Page 29 Report Preparation and line spacing, then start entering text at the cursor, or import text from other files as described in the tutorial below. 3. If you are editing an existing report move the cursor to the part of the report to be changed, then use the text editing and import options as described in the tutorial below. Some other windows applications change the system default page settings. 4. The software makes use of the default windows printer page size and orientation. If another application has changed the default settings, even though a report was compiled and saved with portrait oriented pages for example, when you next open it, they may be in landscape orientation. 5. If page orientation has been changed, select the File menu again. When a report file is open, it includes a Print Setup option. 6.3 Saving & Printing a Report When you have finished inserting text and graphs from the data files, or typing text into a report, proceed as follows. 1. Make the Report window the active window. 2. Select the Save option from the File menu. Alternatively, use the Save As option when you have just prepared a new report, or wish to save the edited version of an existing report under a new identity. You will be required to enter a filename. The report will be saved with an .rtf file extension. 3. If necessary, use the Print Preview option on the File menu to see how your report pages will look. The Print Preview window shows the whole of the current page, with paper size and margin information. 4. Use the Print Preview option from the File menu to return to the Report window. Page 30 - CEL dB23 Users Handbook Report Preparation 5. If necessary, use the Print Setup option to check and adjust the printer settings to match your report. 6. Select the File menu and use the Print option to print the report. A standard windows print dialog box will be displayed so that specific instructions can be given to the printer. Click OK to start printing. CEL dB23 Users Handbook - Page 31 Report Preparation Page 32 - CEL dB23 Users Handbook Warranty 7. SOFTWARE WARRANTY The manufacturers undertake to replace any disk containing significant errors that are directly attributable to faulty design or manufacture that make the program unusable, and which become apparent during the warranty period. In order to take advantage of this warranty, the disk or disks must be returned, carriage paid, to the manufacturers factory or accredited agent. The warranty period runs for three months from the date of receipt of goods. CASELLA CEL’s liability is limited to items of their own manufacture, and they do not accept liability for any loss resulting from the operation of, or the interpretation of results obtained by using this software. All technical information for individual sets of software is filed under the version and issue number given on the installation disks, therefore the version and issue numbers should be quoted in any correspondence concerning this software. In the event of a malfunction appearing during the warranty period, the disk or disks should be returned either to CASELLA CEL’s local agent or to the CASELLA CEL Customer Services Department at Bedford. Please include the following information: Instrument Type(s), Serial Number(s) and Firmware Version Number(s), Customer name and address, Contact name and phone number, Details of any PC and Software involved, including Version Number(s), Reason for returning the equipment with a detailed description of the fault, List of any error messages that may have been displayed. All disks are checked for viruses before they are dispatched. We recommend that you check your own system periodically to prevent problems with viruses. As CASELLA CEL are continually improving their software, please complete the details on the card supplied, and register your copy to receive comprehensive technical support and information on software upgrades. CEL dB23 Users Handbook - Page 33 Warranty The manufacturers reserve the right to change the contents of this handbook without notice. CEL software and instrumentation is designed, manufactured and serviced by: CASELLA CEL Page 34 - CEL dB23 Users Handbook Warranty CEL dB23 Users Handbook - Page 35 Warranty Page 36 - CEL dB23 Users Handbook