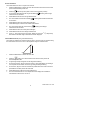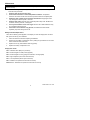
1
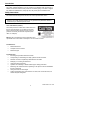
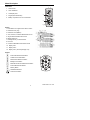
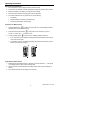
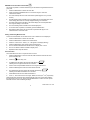
User Guide
Laser Distance Finder
Extech DT300
Introduction
Congratulations on your purchase of the Extech Model DT300 Laser Distance Finder.
This meter measures Distance up to 164 ft (50m) and calculates Area and Volume. In
addition, the DT300 includes a laser pointer for accurate targeting. This meter is shipped
fully tested and calibrated and, with proper use, will provide years of reliable service.
Safety Instructions
This meter has been designed for safe use, but must be operated with caution.
WARNING: Do not directly view or direct the laser pointer at an eye. Low power visible
lasers do not normally present a hazard, but may present some potential for hazard if
viewed directly for extended periods of time.
Laser classification (Class 2)
The DT300 produces a visible Class 2 laser beam from
the top of the instrument. Do not stare into the laser
beam or direct the beam toward anyone’s eyes. Eye
protection is normally an automatic response (‘blink
reflex’, for example).
Warning: Do not look directly into the laser beam using
optical aids such as binoculars or telescopes. This can create a hazard.
Permitted Uses
•
•
•
Measure Distances
Compute Area and Volume
Measure Angles
Prohibited Uses
•
•
•
•
•
•
•
•
•
Exceeding the specified measurement limits
Compromising or deactivating the safety systems built into the meter
Removal of hazard or explanatory labels affixed to the meter
Modifying or converting the instrument
Using third party accessories
Operation on scaffolding or ladders without proper safety precautions
Measuring near machines that are operating or near parts of machine installations
that are unprotected
Aiming the meter into the sunlight
Outdoor measurements or measurements on roads, near construction sites, etc.
without adequate safeguards
2
Model DT300 V1.0 11/09
Meter Description
2
Front Panel
1.
Laser Pointer
2.
Laser Test Beam
3.
LCD display area
4.
Keypad (described below)
5.
Battery compartment on rear of instrument
1
3
4
5
Display
1. Laser Status icon appears when laser is active
2. Reference level (Top)
3. Reference Level (Bottom)
4. Area, Volume, and Indirect Measurement icons
5. Single Distance Measurement mode
6. Battery status icon
7. Reading Memory Location Number
8. Error icon
9. Continuous MIN-MAX measurement mode
10. Display Line 1
11. Display Line 2
12. Display Line 3 (Summary Display Line)
Keypad
Power ON / Measurement Button
CLEAR / Power OFF Button
Measurement Reference Button
Backlight / Unit Button
MAX-MIN Continuous Measurement Button
Indirect Measurement Button
Memory Button
Add/Subtract Buttons
Area-Volume Button
3
Model DT300 V1.0 11/09
Operating Instructions
Measurement Considerations
1. For best results, choose a target that is flat, hard and smooth
2. Use a section of cardboard or similar material if the target size needs to be increased
3. Replace the battery if the battery icon appears on the display
4. The meter will not measure through glass, liquid, or Styrofoam
5. Inaccurate measurements may result from any of the following:
•
Low battery
•
Measured distance exceeding specified range
•
Irregular shaped objects near the target
Preparation for Measurements
1. Press the MEAS button
to switch the meter ON. The unit automatically switches
OFF after three (3) minutes of inactivity.
to change the unit of measure (ft = feet, in =
2. Press and hold the UNIT button
inches, m = meters, and ‘ “ (feet and inches).
3. Use the reference button
to select the Top or Bottom distance reference.
•
In the Top mode (2), the displayed reading will represent the distance from the top
of the meter to the target.
•
In the Bottom mode (1), the displayed reading will represent the distance from the
bottom of the meter to the target.
1
2
Single Distance Measurement
1. Momentarily press the MEAS button to switch the meter ON; Dashes (- - -) will appear
on the display and the Laser pointer will switch ON.
2. Aim the meter and momentarily press the MEAS button again to take and display a
reading.
3. The reading will remain on the display for 60 seconds.
4
Model DT300 V1.0 11/09
MAX-MIN Continuous Measurement Mode
This mode of operation is useful for determining the shortest and longest distances from a
given point.
1.
Press the MEAS button to switch the meter ON.
2.
Press and Hold the MAX/MIN button for 3 seconds to begin a continuous
measurement session.
3.
The meter will beep with each new measurement update (approx. every one half
second).
4.
The MIN reading will be indicated on the top display line and will update each time a
lower reading (lower than the currently displayed reading) is encountered.
5.
The MAX reading will be indicated on the middle display line and will update each
time a higher reading is encountered.
6.
The actual reading will be indicated on the bottom display line.
7.
To exit this mode of operation, momentarily press the MEAS button.
8.
Note that the meter exits to the normal mode of operation after approx. 100
measurements in continuous mode.
Adding / Subtracting Measurements
A series of measurements can be taken and the sum or difference can be displayed.
1.
Press the MEAS button to switch the meter ON.
2.
Press the MEAS button to take the first measurement.
3.
Press the + button or the - button (+ or – will appear in the display flashing).
4.
Press the MEAS button again to take another measurement.
5.
The two individual measurements will be shown on display lines 1 and 2.
6.
The sum or difference will be indicated on display line 3.
7.
Repeat the above steps as desired.
Area Calculation
The DT300 allows the user to compute the area of a room.
1.
Press the MEAS button to turn the meter ON; wait several seconds and the Laser
pointer will switch ON.
2.
Press the
3.
A parallelogram will appear with its length side flashing
indicating that a Length measurement is to be taken.
4.
Aim the meter and press MEAS to take the room length measurement.
5.
Press the MEAS again to switch the Laser Pointer back ON.
6.
The parallelogram will now appear with its Width side flashing
indicating that a Width measurement is to be taken.
button firmly once.
7.
Press MEAS to take the room width measurement.
8.
Lines 1, 2, and 3 will now show the Length, Width, and Area (in ft or m ) respectively.
2
2
Note that the laser pointer will switch off automatically if too much time is taken between
the steps above. If this occurs, simply press the MEAS button to switch the Laser pointer
back ON and then continue following the steps.
5
Model DT300 V1.0 11/09
Volume Calculation
The DT300 allows the user to compute room Volume.
1.
Press the MEAS button to switch the meter ON. Wait several seconds and the Laser
pointer will automatically switch ON.
2.
Press the
3.
A cube shape will appear with its Length side flashing
measurement is to be taken.
4.
Press MEAS to take the room Length measurement.
5.
The cube’s Width side will now be flashing
is to be taken.
6.
Press MEAS to switch the Laser pointer ON again.
7.
Press MEAS again to take the room Width measurement.
8.
The cube’s Height side will now be flashing
measurement is to be taken.
9.
Press MEAS to switch the Laser pointer ON again.
button firmly twice (allow a second or so between presses).
indicating that a Length
indicating that a Width measurement
indicating that a Height
10. Press MEAS to take the room Height measurement.
11. Lines 1, 2, and 3 will now show the Length, Width, and Area (in ft
Note that the individual Height measurement is NOT displayed.
3 or
3
m ) respectively.
Indirect Measurements (Using Two Measurements)
The DT300 can measure the vertical height from Point 1 to Point 2 with the operator taking
the measurement from Point X. This is accomplished using two measurements.
1
2
X
1.
Press the MEAS button to switch the meter ON.
2.
Press the
button once. Wait several seconds and the Laser pointer will
automatically switch ON.
3.
A right triangle shape will appear with its diagonal line flashing.
4.
From exactly Point X, aim the instrument at Point 1 and press MEAS. One reading is
now complete and the bottom line of the right triangle will begin flashing.
5.
From Point X, align the meter as horizontal as possible and aim for Point 2 and then
press MEAS. The laser pointer will switch ON.
6.
Press MEAS again to take the second measurement.
7.
The second measurement is now complete.The lower display line indicates the
vertical distance from Point 1 to Point 2.
6
Model DT300 V1.0 11/09
Indirect Measurements (Using Three Measurements)
The DT300 can measure height in two segments by taking three measurements. The
operator stands at Point X. The first measurement is Point X to 1, the second
measurement is a horizontal line from Point X to 2, and the third measurement is from
Point X to 3.
1
2
X
3
1.
Press the MEAS button to switch the meter ON. Wait several seconds and the Laser
pointer will switch ON.
2.
Press the
button two times.
3.
The triangle icon
4.
From Point X aim the instrument at Point 1 and press MEAS. One reading is now
complete and the middle line of the triangle will begin flashing.
will appear with its bottom diagonal line flashing.
5.
Press MEAS again to turn on the laser pointer to prepare for the next measurement.
6.
From Point X, aim the instrument horizontally at a Point 2 and press MEAS. The
second reading is now complete and the top diagonal line of the triangle will begin
flashing.
7.
Press MEAS to turn on the laser pointer and prepare for the third measurement.
8.
From Point X, aim the instrument at Point 3 and press MEAS. The third measurement
is now complete.
9.
The distance from Point 1 to Point 3 will now be indicated on the bottom display line.
7
Model DT300 V1.0 11/09
Storing and Recalling Readings
The DT300 stores up to twenty (20) readings in memory for later recall.
1.
Take a reading as previously described.
2.
With the reading displayed, press the
3.
The reading will be stored in location 1.
4.
Take another reading press the store button. This new reading will be stored in
location 1 and the previous reading from location 1 will be moved to location 2.
5.
When all twenty locations have been filled the meter begins overwriting the existing
readings.
6.
The memory location number is indicated on the upper left hand area of the display (1
to 20).
7.
Use the + and – bottons to scroll through the the stored readings.
8.
To clear all readings, enter the memory mode using the Memory button
and
then press and hold the CLR and the Memory buttons until the displayed memory
location reading value switches to zeros.
button.
8
Model DT300 V1.0 11/09
Maintenance
WARNING: Do not operate the meter until the battery compartment cover is in place and
fastened securely.
This instrument is designed to provide years of dependable service, if the following care
instructions are performed:
1.
Keep the meter dry and free from dust.
2.
Use and store the meter in nominal temperature conditions. Temperature
extremes can shorten the life of the electronic parts and distort or melt plastic parts.
3.
Handle the meter carefully and avoid shock and vibration. Dropping the meter
may damage the electronic parts or the case.
4.
Keep the meter clean. Wipe the case occasionally with a damp cloth. DO NOT use
chemicals, cleaning solvents, or detergents.
5.
Use only fresh batteries of the correct type. Remove old or weak batteries so they
do not leak and damage the unit.
6.
If the meter is to be stored for long periods, the batteries should be stored
separately to prevent damage to the unit.
Battery Installation/Replacement
When the low battery symbol appears on the display or when the display does not switch
ON, replace the two (2) ‘AAA’ batteries.
1.
Switch the instrument off before replacing the batteries.
2.
Remove the rear battery compartment cover by sliding the grooved latch on the meter
bottom toward the rear of the meter.
3.
Replace the two (2) ‘AAA’ batteries observing polarity.
4.
Replace the battery compartment cover.
Display Error Codes
204 – Calculation Error (Retry the procedure)
208 – Received signal too weak (Use target plate)
209 – Received signal too strong (Target too reflective, use target plate)
252 – High Temperature (Cool down the instrument)
253 – Low Temperature (Warm up the instrument)
255 – Hardware error (Return the instrument for service)
Wrench icon – Hardware error (Return the instrument for service)
9
Model DT300 V1.0 11/09
Specifications
General Specifications
Laser diode
Class 2 red laser (wavelength: 635nm)
Battery
Two (2) ‘AAA’ alkaline batteries
Dust/Splash Proof
IP 54
Operating conditions
32 to 104°F (0 to 40°C)
Storage conditions
14 to 140°F (-10 to 60°C)
Dimensions
4.5 x 1.9 x 1.1” (115 x 48 x 28mm)
Weight
5.3 oz. (150g)
Recommended use
For indoor use only
Range Specifications
Distance Range
2” to 164’ (0.5 to 50m)
Resolution
0.001 inches, feet, or meters
Accuracy
± 0.06” (±1.5mm)
Displayed Calculation Ranges
Length
99’ 11” (99.99m)
Area
999.99 sq. ft. (999.99m2)
Volume
999.99 cu. ft. (999.99m3)
10
Model DT300 V1.0 11/09
Warranty
EXTECH INSTRUMENTS CORPORATION warrants this instrument to be free of defects in parts and
workmanship for one year from date of shipment (a six month limited warranty applies to sensors and
cables). If it should become necessary to return the instrument for service during or beyond the
warranty period, contact the Customer Service Department at (781) 890-7440 ext. 210 for authorization
or visit our website www.extech.com for contact information. A Return Authorization (RA) number must
be issued before any product is returned to Extech. The sender is responsible for shipping charges,
freight, insurance and proper packaging to prevent damage in transit. This warranty does not apply to
defects resulting from action of the user such as misuse, improper wiring, operation outside of
specification, improper maintenance or repair, or unauthorized modification. Extech specifically
disclaims any implied warranties or merchantability or fitness for a specific purpose and will not be
liable for any direct, indirect, incidental or consequential damages. Extech's total liability is limited to
repair or replacement of the product. The warranty set forth above is inclusive and no other warranty,
whether written or oral, is expressed or implied.
Support line (781) 890-7440
Technical support: Extension 200; E-mail: [email protected]
Repair & Returns: Extension 210; E-mail: [email protected]
Product specifications subject to change without notice
For the latest version of this User Guide, Software updates, and other
up-to-the-minute product information, visit our website: www.extech.com
Extech Instruments Corporation, 285 Bear Hill Road, Waltham, MA 02451
ISO9001 Certified
Calibration and Repair Services
Extech offers repair and calibration services for the products we sell. Extech also
provides NIST certification for most products. Call the Customer Service Department for
information on calibration services available for this product. Extech recommends that
annual calibrations be performed to verify meter performance and accuracy.
Copyright © 2009 Extech Instruments Corporation (a FLIR company)
All rights reserved including the right of reproduction in whole or in part in any form.
11
Model DT300 V1.0 11/09