1
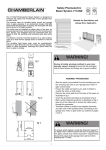
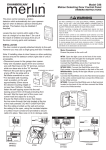
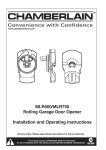
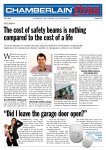
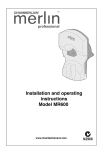
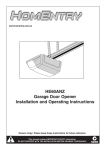
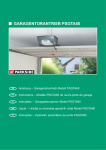
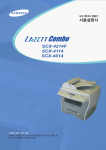
This door control contains a motion
detector which automatically turns your openers light on when it detects a person entering
the garage. This feature may be disabled if
required.
Locate the door control within sight of the
door at a height of no less than 1.5m (out of
the reach of children and away from any of
the door’s moving parts and hardware).
INSTALLATION
The door control is typically attached directly to the wall. However you
may use a single gang wall box if installed.
Note: If installing close to door frames or the switching devices
ensure the detector switch (right side of unit) is accessible.
• Disconnect power to the garage door opener.
• Strip wire insulation approx 6mm and connect
wire with Red trace to the “R” terminal, connect
white non trace wire to the “W” terminal.
• Remove the push bar by gently
To Replace
prying off the top edge with a
Insert Top
flat blade screwdriver or coin.
Tabs First
• For standard wall mounting,
mark a position on the wall
approximately 20mm above
the desired mounting height of
Push Bar Cover
no less then 1520mm. Partially
fasten the self tapping screw into the wall
leaving around 5mm of thread protruding from
the wall. Slip the lower part of the cover over
screw head and adjust for a snug fit.
Ensure the Wall control is level, then fasten
the top screw through the hole located at the top
of the wall controller. DO NOT OVERTIGHTEN.
Run a figure 8 cable up the wall and across
the ceiling to the opener, using the insulated
staples or surface mount conduit (not provided)
to secure cable into place. Take care not to damage
cable.
PRE-WIRED INSTALLATION
(Wall box not provided)
24 Volt Bell Wire
Model C198
LCD Motion Detecting Control Panel
OWNERS INSTRUCTIONS
DO NOT CONNECT TO LIVE ELECTRICAL WIRING.
CONNECT ONLY TO 24 VOLT LOW VOLTAGE WIRES.
CONNECTION TO LIVE WIRES OR HIGHER VOLTAGE
MAY CAUSE SERIOUS INJURY FROM SHOCK, BURN
OR ELECTROCUTION.
Children operating or playing with a garage door opener
can injure themselves or others. The garage door could
close and cause serious injury or death.
Install the door control (or any additional push buttons) out
of the reach of children and away from all moving parts of
the door and door hardware, but where the garage door is
visible. Do not allow children to operate the push button(s)
or the remote control transmitter(s).
A moving garage door could injure someone under it.
Activate the opener only when the door is properly adjusted, you can see it clearly, and there are no obstructions
to door travel.
Top
Mounting
Hole
Bell
Wire
Terminal
Screws
R
1
W
2
(BACK VIEW)
Bottom
Mounting
Hole
Opener Connections
Ensure the power to the unit is off.
MT60: Open the light cover at the front of the opener. Direct
the bell wire through the rectangular opening located above
the openers terminals.
Connect the Red/White wire to the 1 terminal then
connect the White wire to the 2 terminal.
MT600/800/1000: Connect the Red/White wire to the
Red number 1 terminal then connect the White wire to number 2 terminal located on the back of the opener.
MR600a/800a/MR850: Remove the diffuser up and away
from the opener to expose the terminals.Connect the
Red/White wire to the Red terminal located on the unit’s control board then connect the White wire to the White terminal.
MT5580/MT3850: Connect the Red/White wire to Red
terminal located on the back of the opener then connect the
White wire to the White terminal.
CG3800/CG3800R: Open the flap located on the front of the
opener to access the terminals. Connect the Red/White wire
to the Red terminal located on the unit’s control board then
connect the White wire to the White terminal.
FOR TERMINAL DETAILS SEE NEXT PAGE
INPUT TERMINALS FOR COMMON MODELS
ROLLER DOOR OPENERS
red white
Merlin
MotorLift
Professional MLR750
MR800a /
MLR500
MR600a
HomEntry
HE60R
Merlin
Professional
MR850
6mm
white
white/red
SECTIONAL/TILT DOOR OPENERS
2
6mm
white
1
Merlin
Professional
MT3850
6mm
Merlin
Professional
MT60
red white
To release wires
press tab with a
screwdriver or pen
MotorLift
ML750
red
2
1
white
6mm
6mm
red
red
white
white
1
O
white/red
2
white/red white
3
–
60 s
180 s
120 s
Merlin
Professional
MT600 /
MT800 /
MT1000
Merlin
professional
MT5580
Grifco
CG3800
CG3800R
USING THE C198 LCD MOTION
DETECTING CONTROL
Motion Sensing
ON/OFF
Push Bar
Prog <LEARN>
Hour
Minute
Language
Light Button
Degrees (F/C)
Lock Button
Press the push bar to open or close the door. Press again to reverse the door during the closing cycle or to stop the door while it
is opening.
This door control contains a motion detector that will automatically turn on the light when it detects a person entering the
garage. This feature can be easily turned off for extended work
light use.
LIGHT
Light Feature
Press the Light button to turn the opener light on or off if desired
(the 2-1/2 minute timer will automatically re-engage upon activation of the opener).
LOCK
(Prog) Learn Feature
The control console is equipped with a Prog<LEARN> button to
assist in learning transmitters to the unit. Press the Prog<LEARN>
button once to initiate LEARN mode and the display will show
‘Learn Remote Control-Press Learn Button Again to Confirm’.
Press the Prog<LEARN> button a second time and the display
will show ‘Learn Mode – Press Remote Control Button to Learn
Remote’. Press the button of the remote control to be learned and
the opener light will flash to confirm the transmitter has been
learned.
Lock Feature
Designed to prevent operation of the door from hand-held transmitters. However, the door will open and close from the wired
Door Control, the Outside Keylock and the Keyless Entry
Accessories.
To activate, press and hold the Lock button for 2 seconds. The
push bar light will flash as long as the Lock feature is on. Locked
mode will display on LCD.
To turn off, press and hold the Lock button again for 2 seconds.
Locked mode no longer displayed. The Lock feature will also turn
off whenever the “learn” button is activated.
Motion Detecting Light Feature
The opener light will turn on automatically when a person walks in
front of the wall-mounted control console. This feature works by
detecting motion and body heat and may not work in temperatures around 1000F or 37.70C. The opener light will turn on for 21/2 minutes, then shut off automatically if no further heat and
movement is detected.
To disable this feature, press the Motion Detecting Light
On/Off button on the left side of the control
console.
It is recommended that the motion sensor be disabled
when using the opener lights as working lights to ensure the lights
do not time out whilst you are working beyond the sensor range.
H
M
Hour & Minute Feature
Press or hold either of these buttons to increment the hour or
minute displayed on the LCD display.
(Lang) Language Feature
Press this side button to toggle between the three languages –
English, Spanish and French.
Degrees F/C Feature
Press this side button to toggle the temperature units between
Fahrenheit and Celsius.
Additional feature when used with the 3-button hand-held
transmitter.
To control the opener lights:
In addition to operating the door, you
may program the transmitter to operate
the lights.
1.With the door closed, press and hold the button that you want
to control the light.
2.Press and hold the Light button on the door control.
3.While holding the Light button, press and hold the Lock button
on the door control.
4.After the opener lights flash, release all buttons.
PROGRAMMING WIRELESS DEVICES USING THE C198
USING THE MOTION DETECTING CONTROL PANEL
TO PROGRAM YOUR KEYLESS ENTRY SYSTEM
NOTE: This method requires two people if the Keyless
Entry is already mounted outside the garage.
1. Press the Prog <Learn> button on the
Motion Detecting Control Console.
2. Press the Prog <Learn> button again
to confirm Learn Mode.
3. Enter a four digit personal
identification number (PIN) of your
choice on the keypad. Then press
ENTER.
4. When the opener unit lights flash, it
has learned the code. If light bulbs
are not installed, two clicks will be
heard.
USING THE MOTION DETECTING CONTROL PANEL
TO PROGRAM YOUR TRANSMITTER
1. Press the Prog <Learn> button on the
Motion Detecting Control Console.
2. Press the Prog <Learn> button again
to confirm Learn Mode.
3. Press the button on the hand-held
transm itter* that you wish to operate
your garage door.
4. When the opener’s light flashes, it has
learned the code. If light bulbs are not
installed, two clicks will be heard.
CONTACT DETAILS:
Chamberlain Australia Pty Ltd
PO Box
1446 Pty Ltd
Chamberlain
Australia
Lane Cove NSW 1595
PO Box 1446
Lane Cove NSW 1595
Chamberlain New Zealand Ltd
1800 638 234
PO Box 100-221
North
Shore
0745 Ltd
Chamberlain
New
Zealand
PO Box 100-221
North Shore 045
www.chamberlainanz.com
0800 653 667
www.chamberlainanz.com