1
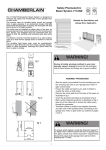
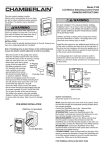
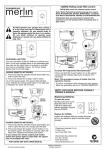
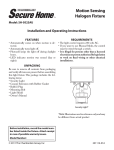
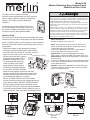
Model C98
Motion Detecting Door Control Panel
OWNERS INSTRUCTIONS
professional
WARNING
This door control contains a motion
detector which automatically turn your openers
light on when it detects a person entering the
garage. This feature may be disabled if
required.
Locate the door control within sight of the
door at a height of no less than 1.5m out of
the reach of children and away from any of
the door’s moving parts and hardware.
LOCK
DO NOT CONNECT TO LIVE ELECTRICAL WIRING. CONNECT
ONLY TO 24 VOLT LOW VOLTAGE WIRES. CONNECTION TO
LIVE WIRES OR HIGHER VOLTAGE MAY CAUSE SERIOUS
INJURY FROM SHOCK, BURN OR ELECTROCUTION.
Children operating or playing with a garage door opener can injure
themselves or others. The garage door could close and cause serious
injury or death.
Install the door control (or any additional push buttons) out of the
reach of children and away from all moving parts of the door and door
hardware, but where the garage door is visible. Do not allow children
to operate the push button(s) or the remote control transmitter(s).
A moving garage door could injure someone under it. Activate the
opener only when the door is properly adjusted, you can see it clearly,
and there are no obstructions to door travel.
LIGH
T
INSTALLATION
The door control is typically attached directly to the wall.
However you may use a single gang wall box if installed.
Note: If installing close to door frames or other switching
devices ensure the detector switch (right side of unit) is
accessable.
• Disconnect power to the garage door opener.
• Strip wire insulation approx 6mm and connect
wire with Red trace to the “R” terminal, connect
white non trace wire to the “W” terminal.
STANDARD WALL MOUNT
• Remove the push bar by gently
To Replace
prying off the top edge with a
Insert Top
Tabs First
flat blade screwdriver or coin.
partially
fastened
• For standard wall mounting,
screw
mark a position on the wall
Detector
approximately 20mm above
Switch
ON
the desired mounting height of
OFF
Push Bar Cover
no less then 1520mm. Partially
fasten the self tapping screw into the wall
leaving around 5mm of thread protruding from
the wall. Slip the lower part of the cover over
screw head and adjust for a snug fit.
Ensure the Wall control is level, then fasten
the top screw through the hole located at the top
of the wall controller. DO NOT OVERTIGHTEN.
Run the cable provided up the wall and across
the ceiling to the open, using the insulated staples
or surface mount conduit (not provided) to secure
cable into place. Take care not to to damage cable.
LOCK
LIGHT
Motor Connetions
Ensure the power to the unit is off.
MT60: Open the light cover at the front of the motor.
direct the bell wire throught the rectangular opening
located above the unit’s terminals.
Connect the Red/White wire to the 1 terminal then
connect the White wire to the 2 terminal.
MT600/1000: Connect the Red/White wire to the
Red number 1 terminal located on the back of the unit.
MR600a/800a: Gently lift the light diffuser up and away
from the motor.
Connect the Red/White wire to the Red terminal located
on the unit’s control board then connect the White wire
to the White terminal.
MT5580: Connect the Red/White wire to Red terminal
located on the back of the unit then connect the White
wire to the White terminal.
Push Bar
2-Conductor
Bell Wire
2
E
WHIT
1
RED
Door
Control
Terminal
Screws
LOCK
Lock
Button
LIGH
T
Light Button
2
1
2
6mm
6mm
white
red
1
white
red
white
red
0
red
red white
white
180 sec.
1
2
3
5
50
O
180 s
–
60 s
MR800a/MR600a
MR800a /
MR600a
MT60
MT600 /
MT1000
MT5580
OPERATION
Door Control Push Bar: Press to open or close the door. Press
again to reverse the door during the closing cycle, or to stop the
door while it is opening.
Light Feature: Press the Light button to switch the opener light
on or off. When the door is opened or closed, the light will remain
on for 4-1/2 minutes. Press the Light button to turn it off sooner.
The Light button will not control the opener light when the door is
in motion. When using the opener lights as working lights, we
recommend that you first disable the motion sensor. See
Automatic Light Override Feature, below.
When used with openers manufactured after December 1, 1999,
(check the date on the opener panel) the 4-1/2 minute interval can
be changed to 1-1/2, 2-1/2, or 3-1/2 minutes as follows: Press
and hold the Lock button until the light blinks (about 10 seconds).
A single blink indicates that the timer is reset to 1-1/2 minutes.
Repeat the procedure and the light will blink twice, resetting the
timer to 2-1/2 minutes. Repeat again for a 3-1/2 minute interval,
etc., up to a maximum of four blinks and 4-1/2 minutes.
Automatic Light Feature: The opener light will turn on
automatically when a person enters the garage. When a person
walks in front of the door control, the opener light will come on for
five minutes, then shut off. This feature works by detecting body
heat. It is more sensitive in front of the door control than at its
sides, and works better as a person moves closer. It may not
work in temperatures around 37 0 C.
Energy Saving Feature: This door control senses the brightness
inside the garage, and will not turn the light on if it is already
bright enough. If the light sensor turns on the light when it is not
needed or does not turn it on when it is dark, the sensitivity can
be adjusted. Remove the push bar cover by gently prying off the
top edge with a coin or screwdriver. Underneath there is a dial
below the green light on the right side. Use a small screwdriver to
turn the dial by 1/4 turns: counterclockwise to make the light
come on, or clockwise to make the light go off. Replace the cover
by inserting top tabs and snapping into place.
Lock Feature: Designed to prevent operation of the door from
portable remote controls. However, the door will open and close
from the Door Control push bar and from the Keylock and
Keyless Entry accessories.
To activate: Press and hold the Lock button for 2 seconds. The
push button indicator light will flash as long as the lock is on.
To turn off: Press and hold the Lock button again for 2 seconds.
The indicator light will stop flashing. Normal operation will
resume. The Lock feature will also turn off whenever the Smart
button on the opener end panel is activated.
This device complies with Part 15 of the FCC Rules. Operation is subject to the
following two conditions: (1) this device may not cause harmful interference, and (2)
this device must accept any interference received, including interference that may
cause undesired operation.
To disable this feature, slide the Detector Switch on the right side
of the door control down (off).
Special note for older garage door openers: If this door control is
installed on an opener manufactured from January 1, 1995 to
December 1, 1999, the following difference may apply: If the light
is on when the opener is actuated, the light may go off for a
moment, then turn on again as the detector senses you.
Automatic Light Override Feature: We recommend that you
disable the motion sensor when using the opener lights as
working lights. Otherwise, they will turn off automatically if you
are working beyond the sensor’s range. Slide the Detector Switch
on the right side of the door control down (off), then press the
light button to control the lights.
Chamberlain Australia Pty Ltd
PO Box 1446
Lane Cove NSW 1595
Chamberlain New Zealand Ltd
PO Box 100-221
North Shore 0745
www.chamberlainanz.com
114A3375B