1
HOW TO USE YOUR AquaNoir SHOWER (DETAILED)
1.
Ensure the electricity and water are turned on to the unit.
2.
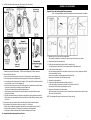
Your shower has 2 control knobs (see Diagram 7).
Knob “A” controls the 3 power settings.
The most popular is High (3 red bands).
There are also options for a Medium (2 red bands)
or Cold (1 white band) shower (see notes 7 and 8).
c) ELECTRICAL
WARNING: THIS SHOWER MUST BE EARTHED.
The electrical installation must be in accordance with the current BS.7671 (IEE Wiring Regulations)
and “Part P” of the Building Regulations and/or local regulations.
1.
Rating
Knob “C” controls the temperature of the water.
For this example turn knob “A” to High (3 red bands)
and set knob “C” to “12 o’clock”, as shown in Diagram 7.
The raised pip on the control knob is the indicator
3.
4.
The shower unit is designed for a single phase AC electrical supply.
Please check the rating plate on the unit to see what details apply to your shower.
AS A GUIDE ONLY (* Only applies if external earth impedance is less than 0.35 Ohms)
8.5 / 7.8kW 240 / 230V
Press button “B”.
The water will flow and the area around the control knobs
and button will illuminate.
9.5 / 8.7kW 240 / 230V
Allow about 20 seconds for the temperature of the water to stabilise.
It is recommended that you do not wholly enter the water spray during
this period, especially if the shower has just been used.
IF WATER IS TOO HOT
IF WATER IS TOO COLD
Turn knob “C” clockwise towards the white
bands to 1 o’clock and continue turning clockwise
until you get the water temperature of your liking.
Turn knob “C” anti-clockwise to 11 o’clock and
continue turning anti-clockwise until you get the
water temperature of your liking.
Wait 20 seconds after each adjustment for the
water temperature to stabilise.
Wait 20 seconds after each adjustment for the
water temperature to stabilise.
The final adjustment may be anywhere on the dial.
The final adjustment may be anywhere on the dial.
If after turning fully clockwise, water is still too hot,
adjust knob “A” to Medium setting (2 red bands)
and re-adjust as above.
If after turning fully anti-clockwise water is still too
cold, set shower pattern on shower handset to
outer or inner pattern only.
10.5 / 9.6kW 240 / 230V
Fuse / MCB
Cable Sizes
6.0mm²
10.0mm²
6.0mm²
10.0mm²
6.0mm²
10.0mm²
40A Type B MCB
45A BS.1361 fuse
40A Type B MCB
Cable Length
27m Max.
45m Max.
12m Max.*
21m Max.*
27m Max.
45m Max.
6.0mm²
10.0mm²
45A BS.1361 fuse
12m Max.*
21m Max.*
10.0mm²
45A BS.1361 fuse
12m Max.*
Remember to upgrade the cable if it runs in thermal insulation in a loft, or for a longer distance.
2.
A means for disconnection in all poles must be incorporated in the fixed wiring in accordance with
the wiring rules. We recommend a ceiling switch mounted in a convenient position.
3.
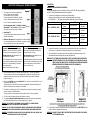
If you have decided to connect the cable on the left hand side then please remove and use the
cable clamp that was provided along the right side (see Diagram 3b).
WARNING: IF LEFT HAND SIDE CABLE ENTRY IS USED, THE MAINS CABLE OUTER SHEATH
MUST BE STRIPPED BACK TO THE LEVEL MARKED ON THE BACKPLATE, AND ALL
THREE CONDUCTORS MUST BE FULLY SLEEVED WITH THE SLEEVING PROVIDED
BETWEEN THERE AND THE TERMINAL BLOCK (SEE DIAGRAM 3a).
Water flow will be reduced on this setting.
5.
Once a temperature setting to your liking has been achieved, knob “C” will rarely need adjusting.
You must however take into account required adjustments for variations of incoming mains water
temperature between summer and winter (see “Effect of Seasonal Incoming Water Temperature
Changes” see page 14).
6.
When you have finished showering, press button “B” only. You have no need to adjust knobs “A or C”.
The illuminated areas will go out.
10.5kW Variants Only - Water will continue to flow for approximately 7 seconds before switching off
Switch off the electricity at the ceiling switch or local isolator.
7.
The Medium (2 red bands) setting of knob “A” reduces the power used by the shower giving a cooler
shower or the option of reduced water flow.
This option is mainly for summer usage and if this is used then knob “C” must be re-adjusted.
8.
The Cold (1 white band) setting will supply water without any heating.
9.
Your shower is designed to stabilise temperature changes caused by water pressure fluctuations
(see “Effect of Other Water Devices on Incoming Water Supply” see page 14).
WARNING: DO NOT SWITCH THE SHOWER ON IF YOU SUSPECT IT OF BEING FROZEN.
WAIT UNTIL YOU ARE SURE IT HAS THAWED OUT.
WARNING: DO NOT OPERATE THE SHOWER IF WATER IS DISCHARGED FROM THE PRESSURE
RELIEF VALVE. MAINTENANCE IS REQUIRED BEFORE THE SHOWER CAN BE USED.
4.
WARNING: CONSIDERATION SHOULD BE GIVEN TO SUPERVISING THE YOUNG, ELDERLY AND
THE INFIRM WHILST THEY USE THIS SHOWER.
WARNING: FAILURE TO COMPLY WITH THESE INSTRUCTIONS COULD RESULT IN FAILURE
OF THE TERMINAL BLOCK.
10
Connect cable to terminal block making sure that all the retaining screws are VERY TIGHT and that
no cable insulation is trapped under the screws.
7