1
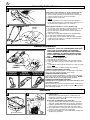
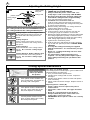
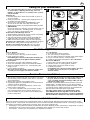
Micro
Compact 30
TIO
A
M
R
N
NFO
I
T
AN
T
R
nce
e
O
e
s
r
P
u
e
f
e
M
I
efor uture re
b
d
a
Re
or f
f
n
i
ta
& re
For all customer enquiries or for replacement parts, contact:-
☎
01325 300303
www.flymo.com
[email protected]
1
Carton Contents
switchbox
start/stop lever
plastic handle
knob
upper handle
washer
bolt
cable clip
nut
(if applicable)
lower handle
electric
cable with
moulded
on plug
fixing pin
grassbox
hood
cutting height spacer
instruction
manual
spanner/scraper
tool
plastic cutters
IMPORTANT !
Please check the contents of the carton are correct BEFORE assembling your new Flymo product.
IF ANY PARTS ARE MISSING CONTACT:Electrolux Outdoor Products Customer Service Department direct
Telephone :
01325 300303
Fax :
01325 318193
Safety
If not used properly this lawnmower can be dangerous! This lawnmower can cause serious
injury to the operator and others, the warnings and safety instructions must be followed to
ensure reasonable safety and efficiency in using this lawnmower. The operator is responsible
for following the warning and safety instructions in this manual and on the lawnmower.
Explanation of Symbols on the Micro Compact 30
Keep bystanders away. Do not mow
whilst people especially children or pets
are in the mowing area
Warning
Read the user instructions carefully to
make sure you understand all the
controls and what they do.
Do not mow in the rain or leave the
lawnmower outdoors while raining
Switch off! Remove plug from mains
before adjusting, cleaning or if cable is
entangled or damaged. Keep the cable
away from the plastic cutters.
The use of eye protection is recommended to protect against objects
thrown by the nylon line.
General
1. Never allow children or people unfamiliar with these
instructions to use the mower. Local regulations may
restrict the age of the operator.
2. Only use the lawnmower in the manner and for the
functions described in these instructions.
3. Never operate the lawnmower when you are tired, ill or
under the influence of alcohol, drugs or medicine.
4. The operator or user is responsible for accidents or hazards occurring to other people or their property.
Electrical
1. The British Standards Institute recommend the use of
a Residual Current Device (R.C.D.) with a tripping current of not more than 30mA. Even with a R.C.D.
2.
3.
4.
5.
installed 100% safety cannot be guaranteed and safe
working practice must be followed at all times. Check
your R.C.D. every time you use it.
Before use, examine cable for damage, replace it if
there are signs of damage or ageing.
Do not use the lawnmower if the electric cables are
damaged or worn
Immediately disconnect from the mains electricity supply
if the cable is cut, or the insulation is damaged. Do not
touch the electric cable until the electrical supply has
been disconnected. Do not repair a cut or damaged
cable. Replace it with a new one.
Your cable must be uncoiled, coiled cables can overheat and reduce the efficiency of your mower.
2
6. Keep cable away from lawnmower, always work away from
the power point mowing up and down, never in circles.
7. Do not pull cable around sharp objects.
8. Always switch off at the mains before disconnecting
any plug, cable connector or extension cable.
9. Switch off, remove plug from mains and examine electric
supply cable for damage or ageing before winding cable
for storage. Do not repair a damaged cable, replace it
with a new one. Use only Flymo replacement cable.
10. Always wind cable carefully, avoiding kinking.
11. Never carry the product by the cable.
12. Never pull on the cable to disconnect any of the plugs.
13. Use only on AC mains supply voltage shown on the
product rating label.
14. Our products are double insulated to EN60335.
Under no circumstance should an earth be connected to any part of the product.
Preparation
1. While using your product always wear substantial
footwear and long trousers.
2. Make sure the lawn is clear of sticks, stones, bones, wire
and debris; they could be thrown by the plastic cutters.
3. Before using the machine and after any impact, check
for signs of wear or damage and repair as necessary.
4. Replace worn or damaged plastic cutters together with
their fixings in sets to preserve balance.
Use
1. Use the lawnmower only in daylight or good artificial light.
2. Avoid operating your lawnmower in wet grass,
where feasible.
3. Take care in wet grass, you may lose your footing.
4. On slopes, be extra careful of your footing and wear
non-slip footwear.
5. Mow across the face of slopes, never up and down.
6. Exercise extreme caution when changing direction
on slopes. Walk never run.
7. Mowing on banks and slopes can be dangerous.
Do not mow on banks or steep slopes.
8. Do not walk backwards when mowing, you could trip.
9. Never cut grass by pulling the mower towards you.
10. Switch off before pushing the mower over surfaces
other than grass.
11. Never operate the lawnmower with damaged guards
or without guards in place.
12. Keep hands and feet away from the cutting means at
all times and especially when switching on the motor.
13. Do not tilt lawnmower when the motor is running,
except when starting and stopping. In this case, do
not tilt more than absolutely necessary and lift only
the part which is away from the operator. Always
ensure that both hands are in the operating position
before returning the appliance to the ground.
14. Never pick up or carry a mower when it is operating
or still connected to the mains supply.
15. Remove the plug from the mains :
CABLES
IMPORTANT
• Use only 1.00mm2 size cable up to 30 metres length
maximum for trimmers and 60 metres length maximum for lawnmowers.
Maximum rating :
1.00mm2 size cable, 10 amps 250 volts AC.
THE MICRO COMPACT IS SUPPLIED WITH
CABLE WIRED DIRECTLY INTO THE PRODUCT
1. Flymo Mains Cables and Extension Cables are
available from your local Electrolux Outdoor
Products Approved Service Centre.
2. Do not wire an extension cable directly to your product
yourself. Please contact your local Electrolux Outdoor
Products Approved Service Centre for further information on the connectors and kits available.
3. Only use extension cables specifically designed for
outdoor use.
CONNECTORS
IMPORTANT
• Flymo connectors are suitable for use with 2 core
cable only. Under no circumstances should these
connectors be used for earthed products.
• All Flymo connectors and cables are of splashproof
construction. They are not waterproof and must not
be left outside permanently nor should they be submerged or immersed in water. Do not let cable lay
or trail through pools of water or splashed with
water from hose pipes.
MAINS PLUG REPLACEMENT
• If the plug supplied is cut off it should be
destroyed. There is an electric shock hazard if a
cut off plug is inserted into a 13 amp socket.
1. No earth required. Our products are double insulated
to EN60335 and under no circumstances should an
earth be connected to any part of the product.
2. Ensure the mains voltage suits your product
3. IMPORTANT!
The wires in the mains lead are coloured in accordance with the following code:
BLUE
NEUTRAL
BROWN LIVE
The wire which is coloured BLUE must be connected to
the Terminal which is marked with the letter 'N' or
coloured BLACK. The wire which is coloured BROWN
must be connected to the Terminal which is marked
with the letter 'L' or coloured RED.
4. It is important that the outer sheath is clamped correctly into the 3-pin plug.
5. If in doubt consult your local Service Repairer or
qualified electrician before the machine is used.
6. A 13 Amp fuse must be fitted to the Mains Plug.
7. The normal plug fuse and household fuse only protect the electrical equipment and are not a safeguard against electrocution.
-
-
before leaving the mower unattended for any period;
before clearing a blockage;
before checking, cleaning or working on the appliance;
if you hit an object. Do not use your lawnmower
until you are sure that the entire lawnmower is in a
safe operating condition.;
if the lawnmower starts to vibrate abnormally. Check
immediately. Excessive vibration can cause injury.
Maintenance and storage
1. Keep all nuts, bolts and screws tight to be sure the
lawnmower is in safe working condition.
2. Check the grassbox/grassbag frequently for wear or
deterioration
3. Replace worn or damaged parts for safety.
4. Only use the replacement plastic cutters, cutting
head fixing bolts, spacer and impeller specified for
this product.
5. Be careful during adjustment of the lawnmower to
prevent entrapment of the fingers between moving
blades and fixed parts of the machine.
If your product is hard wired i.e. non detachable
mains electric cable, a conversion kit and extension cable is available from all Electrolux Outdoor
Products Approved Service Centres which can be
found in your local yellow pages.
3
Assembly Instructions
A
Fitting the Lower Handles to Your Lawnmower (A)
1. Place the end of the lower handle into the slots.
2. Secure lower handles to hood by firmly pushing fixing pin through holes in hood and handle.
3. Repeat on the other side.
• NOTE
Should a problem occur when securing handle to
hood with the fixing pin, carefully lever fixing pin out
of location and repeat steps 1 to 3 above.
B
lock-off
button
Fitting Upper Handles to Lower Handles (B)
1. Ensure the upper handle is located correctly with the
lock-off button on the switchbox uppermost.
2. Ensure the upper handle and the lower handle are
aligned correctly.
handle
knob
3. Insert the nut into the handle knob. (if applicable)
nut
bolt
washer
4. Fit the bolts, washers and handle knobs.
5. Fit the cable to the handles with the clips provided
making sure the cable is not trapped between the
upper and lower handles.
Handle Adjustment
•
C
PULL
LOWER
HANDLE
FORWARD
POSITION
DOWN
POSITION
OPERATING
POSITION
WARNING! STOP THE LAWNMOWER AND WAIT
UNTIL THE CUTTING HEAD HAS STOPPED
ROTATING BEFORE ADJUSTING THE HANDLE.
• NOTE! REMOVAL OF LOWER HANDLE FIXING
PINS IS NOT REQUIRED TO ADJUST THE HANDLE
TO ADJUST THE HANDLE (C)
1. Hold handle as illustrated.
2. Take the weight of the handle with your right hand...
3. ...then grip the lower part of the handle with your left
hand...
4. ...and pull the lower handle towards you with your left
hand.
5. Move to forward or down position as required.
HANDLE IN FORWARD POSITION
Follow procedure described in "TO ADJUST THE HANDLE" and push handle forward until it stops.
HANDLE IN DOWN POSITION
Follow procedure described in "TO ADJUST THE HANDLE" and move handle downward until it stops.. NOTE The handle does not rest flat on the ground.
HANDLE IN OPERATING POSITION
Adjustment is not required to move the handle to the
operating position
Simply pull down from the forward position or lift up from
the down position until the handle is in the most comfortable operating position.
Grassbox
D
E
lip on the hood
Fitting the grassbox
• IMPORTANT!
Before using your lawnmower - make sure the
grassbox is securely located inside the lip on the
hood indicated in figure D.
Removing and Emptying the Grassbox
• Stop the lawnmower and wait until the blade has
stopped rotating BEFORE removing the grassbox.
1. Hold the grassbox by the moulded handle recess
and support grassbox base with the other hand.
2. Move grassbox to emptying site and press release
button to open grassbox as in figure E.
3. Ensure the grassbox is clean BEFORE closing and
refitting the grassbox.
4
Starting and Stopping
1. Form loop in mains cable and push the loop through
the slot as illustrated in picture (F).
2. To secure, position loop over the hook and pull the
cable back through the slot as illustrated in picture
(G).
3. Connect plug to mains.
4. Move handle to the mowing position. See Fig. C.
5. To prevent a ring being cut in your lawn and to clear
any residual grass in the collection chute, tilt your
lawnmower slightly (H).
• The switchbox is provided with a lock-off button
(J1) to prevent accidental starting.
6. Press and hold the lock-off button (J) on the switchbox, then squeeze one of the Start/Stop levers
towards the upper handle (K).
7. Continue to squeeze the start/stop lever towards the
upper handle and release the lock-off button.
8. When the lawnmower has reached full speed gently
lower it onto the lawn.
• NOTEThere are two start/stop levers fitted.
Either one can be used for starting the lawnmower.
• IMPORTANTDo not use the start/stop levers
intermittently
To Stop your Lawnmower
1. To prevent a ring being cut in your lawn, tilt your
lawnmower slightly (H).
2. Release the pressure on the Start/Stop lever.
F
G
H
J
1
K
The Flymo Micro Compact uses an advanced belt drive system, between the motor and the blade which improves cutting
power and flotation in all conditions. Due to the high turning force (Torque) which this motor develops a light squeak may be
heard when the machine is started, this is quite normal and will not effect the performance of the product.
How to Mow
L
1. Start mowing the edge of the lawn nearest to the
power point so the cable is laid out on the lawn you
have already cut. (L)
2. Cut your grass twice a week during the growing season, your lawn will suffer if more than a third of its
length is cut at one time.
Do Not Overload Your Mower
Mowing long thick grass may cause the motor speed to
drop, you will hear a change in the motor sound. If the
motor speed drops you may overload your lawnmower
which may cause damage. When mowing in long thick
grass a first cut with the cutting height set higher will
help reduce the load. See Adjusting the Cutting Height.
Remember : for best grass collection, always mow in a straight line, do not swing the lawnmower from side to side
Note : If a trail of grass is left by your lawnmower this indicates that your cutting height needs to be raised or the
grassbox is full. If the grassbox is full, empty is as described in "Removing and emptying the grassbox". Fit the
grassbox, start the lawnmower and mow over the grass trail to collect any residual grass.
5
Adjusting the Cutting Height
M
cutting head
fixing nut
cutting head
plastic cutter
cutting height
spacer
fan
Cutting height spacer must only be fitted between
the cutting head and the fan and NEVER between
the cutting head and the cutting head fixing nut
Cutting Height 1- Lowest Height of Cut
Fit the cutting height spacer to the fan and
the raised side of the cutting head to the
spacer.
Cutting Height 2
Fit the cutting height spacer to the fan
and the level side of the cutting head to
the spacer.
Cutting Height 3
Fit the raised side of the cutting head to
the fan. Do not fit the cutting height
spacer.
Cutting Height 4- Highest Height ofCut
Fit the level side of the cutting head to
the fan. Do not fit the cutting height
spacer.
Adjusting the Cutting Height
• THERE ARE 4 CUTTING HEIGHTS
• Always handle the plastic cutters with care sharp edges could cause injury. USE GLOVES
1. Disconnect from the mains electricity supply and
wait until the cutting head has stopped rotating
2. Turn your lawnmower upside down.
3. TO REMOVE THE CUTTING HEAD FIXING NUT
Hold the cutting head and fan firmly and with the
spanner provided loosen the cutting head fixing bolt
by turning it anti-clockwise
4. Remove cutting head fixing nut, cutting head and
cutting height spacer (if used).
5. Adjust the height of cut as required.
6. If using spacers, place the spacers onto the fan,
ensuring the pegs are located in to the holes.
6. Replace the cutting head fixing nut into the cutting head
and cutting height spacer (if used). Ensure the nut is
correctly located through the centre hole of the cutting
head, cutting height spacer (if used) and fan.
7. Tighten down clockwise by hand.
8. Hold the fan firmly and tighten the cutting head fixing nut with the spanner provided. DO NOT OVER
TIGHTEN.
• Use only the cutting head fixing nut supplied
with the lawnmower - it is insulated for your protection.
• Never use a cutting head fixing nut if it is damaged or cracked.
• If a replacement cutting head fixing nut is
required - use only the genuine Flymo replacement cutting head fixing nut specified for this
product.
Cutting System Maintenance
N
Use only genuine Flymo
replacement plastic
cutters specified for
this product
1.
Push plastic cutter towards centre of cutting disc. Lift plastic cutter away from cutting disc.
2.
If the plastic cutter is broken during use - lever cutter out of the
slot, and dispose of carefully.
3.
Fit new plastic cutters into the
slots at each side of the cutting
disc and pull into place.
Checking your Cutting System
The cutting system must be kept in good condition and
inspected before and after use.
1. Turn your lawnmower upside down.
2. Visually check cutting head for wear. Replace if
damaged.
3. Visually check plastic cutters for wear and replace
when necessary.
4. Plastic cutters should be straight. Replace if bent or
twisted.
Replacing Plastic cutters (N)
• Plastic cutters must be replaced in pairs to
retain balance.
• Two plastic cutters of the same type should be
fitted.
• Never fit a steel bar blade to this product.
• Always handle the plastic cutters with care sharp edges could cause injury.
• IMPORTANT: Ensure plastic cutters are correctly
located.
6
•
Caring for your Lawnmower
It is very important that you keep your lawnmowP
er clean. Grass clippings left in any of the air
intakes or under the hood could become a potential fire hazard.
Cleaning (P)
1. Remove grass from under the hood with a piece of
wood or similar.
2. Using a soft brush - remove grass clippings from all
air intakes and the grassbox.
3. Remove the cutting head, see Figure N, to gain
access to the fan and clean with a soft brush.
4. Wipe over the surface of your lawnmower with a dry cloth.
• IMPORTANT
Never use water for cleaning your lawnmower. Do not
clean with chemicals, including petrol, or solvents some can destroy critical plastic parts.
At the End of the Mowing Season
1. Replace plastic cutters, bolts, nuts or screws, if necessary.
2. Clean your lawnmower thoroughly.
3. Ask your local Service Centre to clean the air filter thoroughly and carry out any service or repairs required.
4. Make sure that the electric cable is coiled properly.
Carrying your Lawnmower : Hold as illustrated in Figure
Q. Ensure the cutting head is facing away from you.
Storing your Lawnmower (R) Store in a dry place
where your lawnmower is protected from damage.
Q
R
Fault Finding Hints
Fails to Operate
1. Is the Power Turned On?
2. Check the fuse in the plug, if blown replace.
3. Fuse continues to blow?
Immediately disconnect from the mains electricity supply and consult your local approved Service Centre.
Poor Flotation
1. Disconnect from the mains electricity supply.
2. Clean the underside of the hood and the fan blades.
3. Raise to a higher height of cut. See Adjusting the
Height of Cut.
4. If poor flotation persists?
Disconnect from the mains electricity supply and
consult your local approved Service Centre.
Poor Collection
1. Is the grassbox fitted correctly?
2. Are you mowing in straight lines?
3. Are you cutting more than one third of the grass length?
4. Do you need to raise the cutting height?
5. Follow the procedure described in "Poor Flotation".
Excessive Vibration
1. Disconnect from the mains electricity supply.
2. Replace broken or missing plastic cutters.
3. Check plastic cutters are fitted correctly.
4. If vibration persists?
Immediately disconnect from the mains electricity supply and consult your local approved
Service Centre.
Service Recommendations
1. We strongly recommend that your product is serviced
at least every twelve months, more often in a professional application.
2. Always use genuine Flymo Spare Parts.
3. Prepacked spares are available from most Electrolux
Outdoor Products stockists.
4. Your product is uniquely identified by a silver and
black product rating label
5. If you have a problem with your machine contact
your local Approved Service Centre ensuring you
have full details of your product as described on the
product rating label.
6. Should it be necessary for work to be carried out
by your Service Centre, it is important to take
your complete machine including cable and any
extension cables used.
A network of specialist dealers can be found in your local
Yellow Pages. To obtain service on your Flymo product
simply telephone or visit your local Service Centre. Should
you require service under the terms of our guarantee the
Service Centre will require proof of purchase.
All of the centres listed stock genuine Flymo Spare
Parts.NOTE: Our Service Repairers act on their own
behalf and are not empowered to commit or legally bind
Electrolux Outdoor Products in any manner whatsoever.
Environmental Information
Electrolux Outdoor Products are manufactured under an Environmental Management System (ISO 14001) using,
where practical, components manufactured in the most environmentally responsible manner, according to company
procedures, and with the potential for recycling at the end of the products’ life.
•
Packaging is recyclable and plastic components have been labelled (where practical) for categorised recycling.
•
Awareness of the environment must be considered when disposing of ‘end-of-life’ product.
•
If necessary, contact your local authority for disposal information.
Guarantee & Guarantee Policy
If any part is found to be defective due to faulty manufacture
within the guarantee, Electrolux Outdoor Products, through its
Authorised Service Repairers will effect the repair or replacement to the customer free of charge providing:
(a) The fault is reported directly to the Authorised Repairer.
(b) Proof of purchase is provided.
(c) The fault is not caused by misuse, neglect or faulty
adjustment by the user.
(d) The failure has not occurred through fair wear and tear.
(e) The machine has not been serviced or repaired, taken
apart or tampered with by any person not authorised by
Electrolux Outdoor Products.
(f) The machine has not been used for hire.
(g) The machine is owned by the original purchaser.
(h) The machine has not been used outside of the country
for which it was specified.
(i) The machine has not been used commercially.
*
This guarantee is additional to, and in no way diminishes the customers statutory rights.
Failures due to the following are not covered, therefore it is
important that you read the instructions contained in this
Operator's Manual and understand how to operate and
maintain your machine:
Failures not covered by guarantee
*
Replacing worn or damaged blades
*
Failures as a result of not reporting an initial fault.
*
Failures as a result of sudden impact.
*
Failures as a result of not using the product in accordance with the instructions and recommendations contained in this Operator's Manual.
*
Machines used for hire are not covered by this guarantee.
*
The following items listed are considered as wearing
parts and their life is dependent on regular maintenance and are, therefore not normally subject to a valid
warranty claim: Plastic cutters, Electric Mains cable.
*
Caution!
Electrolux Outdoor Products does not accept liability
under the warranty for defects caused in whole or part,
directly or indirectly by the fitting of replacement parts
or additional parts that are not either manufactured or
approved by Electrolux Outdoor Products, or by the
machine having been modified in any way
EC Declaration of Conformity
I, the undersigned M. Bowden of Electrolux
Outdoor Products, Aycliffe Industrial Park,
NEWTON AYCLIFFE, Co. Durham. DL5
6UP. Certify that the Lawnmower:Category........ Electric Hover
Make.............. Electrolux Outdoor
Products
Conforms to the specifications of Directive
2000/14/EEC
I, the undersigned M. Bowden of Electrolux
Outdoor Products, Aycliffe Industrial Park,
NEWTON AYCLIFFE, Co. Durham. DL5
6UP Certify that a sample of the above
product has been tested using directive
81/1051/EEC as a guide. The maximum Aweighted sound pressure level recorded at
operator position under free field semi anechoic chamber conditions was :-
Type of Cutting Device.... Plastic Blade
Identification of Series......See Product Rating Label
Conformity Assesment Procedure....ANNEX VI
Notified Body.................... I.T.S., Cleeve Road, Leatherhead,
Surrey. KT22 7SB England
Other Directives:-............. 98/37/EEC, 89/336/EEC, 73/23/EEC
& applicable standards:-. EN786:1996, EN786A2:1996, IEC335-1:1991,
IEC60335-2-91:1997, EN60555-2:1987, EN60555-3:1987,
EN55014:1993, EN55014:1995
A
B
C
D
E
F
G
H
I, the undersigned M. Bowden of Electrolux
Outdoor Products, Aycliffe Industrial Park,
NEWTON AYCLIFFE, Co. Durham. DL5
6UP Certify that a sample of the above
product has been tested using ISO 5349 as
a guide. The maximum weighted root mean
square value of vibration recorded at operator’s hand position was:-
Type............................................................................ A
Width of Cut................................................................ B
Speed of Rotation of Cutting Device.......................... C
Guaranteed sound power level................................... D
Measured Sound Power Level.................................... E
Level............................................................................ F
Value........................................................................... G
Weight...........................................................................H
Micro Compact 30
30 cm
5,300 RPM
94 dB (A)
93 dB (A)
81 dB(A)
1.94 m/s2
8 kg
Newton Aycliffe,06/01/2003
M. Bowden,
Research & Development Director
Electrolux Outdoor Products
Aycliffe Industrial Park
NEWTON AYCLIFFE
Co.Durham DL5 6UP
ENGLAND
Telephone - (00) 44 1325 300303 Fax - (00) 44 1325 310339
UK Customer Helpline - 01325 300303 Fax - 01325 310339
Our policy of continuous improvement means that the specification of products may be altered from time to time without prior notice.
Electrolux Outdoor Products manufacture products for a number of well known brands under various registered patents, designs and
trademarks in several countries.
© Electrolux Outdoor Products Ltd. Registered Office, Electrolux Works, Oakley Road, Luton LU4 9QQ
Registered number 974979 England
The Electrolux Group. The world’s No.1 choice.
The Electrolux Group is the world’s largest producer of powered appliances for kitchen, cleaning and outdoor use. More than 55 million
Electrolux Group products (such as refrigerators, cookers, washing machines, vacuum cleaners, chain saws and lawn mowers) are sold
each year to a value of approx. USD 14 billion in more than 150 countries around the world.
5118085-08