1
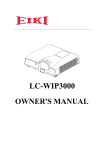
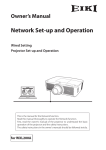
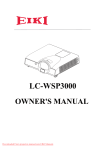
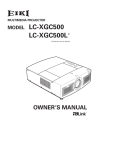
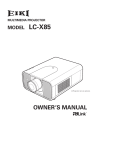
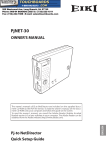
Owner's Manual
Memory Viewer function
This is the manual for the Memory Viewer function.
Read this manual thoroughly to operate the Memory Viewer function.
First, read the owner's manual of the projector to understand the basic operation of the
projector and the safety instructions.
The safety instructions in the owner's manuals should be followed strictly.
Some functions are non-Mac-Compliant.
Contents
USB thumb drive for the Memory Viewer function............................................................................3
Inserting the USB thumb drive..................................................................................................................3
Direct start-up into the memory viewer mode...................................................................................4
Entering the memory viewer mode.........................................................................................................5
Displaying the memory viewer browser window...............................................................................6
Selection of menu..........................................................................................................................................8
Image viewer in the manual mode..........................................................................................................8
Image viewer in the program mode for Windows..............................................................................8
Operation during image viewer in the manual/program mode...................................................9
Operation during playback movie file....................................................................................................9
Termination of memory viewer.................................................................................................................9
Duplicating the data into the USB thumb drive for Windows........................................................10
Formatting the USB thumb drive..............................................................................................................11
Memory Viewer function
Memory Viewer function
The Memory Viewer function is to make a presentation or project an image without using computers
or some other external equipment. You do not have to carry a computer or other equipment to project
images.
Store images on a dedicated USB (Universal Serial Bus) thumb drive and insert it into the USB port
(Series A) of the projector, then you can project those images.
Notes for Windows
This projector is also equipped with dedicated Network Viewer 5 software to edit the presentation
images to project with the Memory Viewer function. With this function, you can edit images, photo
data, or Power Point data into a more effective presentation data. For further information of the
Network Viewer software, see the chapter "9. Network viewer function" on the separated "Network
Owner's manual for Windows".
Which images can be projected with the Memory Viewer function?
With the Memory Viewer function, you can project images in these formats below.
• Bitmap data
• PNG data
• GIF data (Animation GIF is not supported.)
• JPEG data converted with the Network Viewer 5 [File Converter 1 and 2] software.
• Text data
• Movie file (Supporting file formats are Mpeg1, Mpeg2, Mpeg4, H.264 and VC-1.)
• Program file created with the Network Viewer 5 [Program Editor].
*Some data may not be projected even with these formats. In that case, convert that kind of
data into JPEG data with the Network Viewer 5 [File Converter 1 and 2] software.
Text data used with Memory Viewer
Memory viewer supports the text file with the ASCII format for single byte. Other text formats cannot
be supported.
Back up the data
It is recommended that important data to edit with Network Viewer and store in USB thumb drive
should be stored in other media in advance. We are not responsible for any data losses or damages
resulting from use of the Memory Viewer function.
Trademarks
Microsoft, Windows, and PowerPoint are either registered trademarks or trademarks of Microsoft
Corporation in the United States and/or other countries. Macintosh is a registered trademark of Apple,
Inc. in the USA and other countries. PowerPC is a registered trademark of IBM Corporation. Intel Core is
a registered trademark of Intel Corporation in the USA and other countries.
Each name of corporation or product in this owner's manual is either a registered trademark or a
trademark of its respective corporation.
• The On-Screen Menu and figures in this manual may differ slightly from the product.
• The contents of this manual are subject to change without notice.
USB thumb drive for the Memory Viewer function
Commercially available USB thumb drives or the supplied one for Auto Capture with this projector can
be used for this Memory Viewer function.
The USB port is compatible with USB thumb drive formatted with FAT16 or FAT32.
It is not compatible with other formats. Please note that when you format the USB thumb drive.
Inserting the USB thumb drive
Insert the USB thumb drive into the USB port on the rear terminal of the projector as shown in the
figure below.
USB port (Series A)
USB thumb drive
Note:
When inserting, confirm the direction
of the plug not to damage the terminal.
CAUTION on insertion and removal of the USB thumb drive
Please note following points to insert and remove the USB thumb drive.
- The indicator of the USB thumb drive will be blinking when it is inserted to the projector or while the
projector is reading out the data. Do not remove the USB thumb drive while it is blinking.
- When using a USB thumb drive without indicator, you cannot recognize when the projector reading
out the data. Please remove it from the projector after closing the memory viewer function or turning
off the projector.
- Do not install and remove the USB thumb drive frequently. Remove the USB thumb drive at least 5
seconds after installation. And install at least 5 seconds after removal. While installing or removing the
USB thumb drive, the projector is in switching period for those operation.
CAUTION on Handling and Storing the USB thumb drive
- Do not put USB thumb drive or its cap within close reach of children. Swallowing them may
cause suffocation.
- I f the smoke or questionable odor rise, turn off the peripheral equipment and contact your
dealer.
- Do not put water, chemical or oil to the USB thumb drive. It may cause short out or fire.
- Do not put foreign objects or put metal objects to the USB terminal. Static electricity may cause
data loss or data corruption.
- Do not remove the USB thumb drive from the computer or the projector while the USB thumb
drive is reading out or writing the data. It may cause data loss or data corruption.
- Do not store the USB thumb drive where high temperature, humid or dusty place or magnetized
items are around.
Memory Viewer function
Direct start-up into the memory viewer mode
After inserting the USB thumb drive, the USB thumb drive blinks, Network (“Wired” or "Wireless") from
the Input menu is automatically selected, the memory viewer start-up image appears briefly and then
an image stored in the USB thumb drive is displayed on the screen.
*Automatically, the same input of “Wired” or "Wireless" is selected as last time.
*If the image file is not available in the root directory of the USB thumb drive, the memory viewer
browser window appears.
*During operating the Network Viewer, the Network Capture or the Moderator functions, the direct
start-up into the memory viewer mode can not operate.
*When the projector is turned off and on while the USB thumb drive is left inside in the memory
viewer mode, the projector starts into the memory viewer mode and an image stored in the USB
thumb drive is displayed on the screen.
When you press AUTO SET/CANCEL button in the memory viewer mode, the memory viewer browser
window as shown on page 6 appears on the screen.
When you remove the USB thumb drive during operating the projector in the memory viewer mode,
the input source returns to the previous one selected just before inserting the USB thumb drive.
Remote Control
AUTO SET/CANCEL
button
Note:
✐ During accessing to the USB thumb drive, do not turn off the power or eject the USB thumb drive
because the data in the USB thumb drive might get damaged. During accessing, the USB thumb
drive is blinking
✐ The USB thumb drive allows you to insert or remove regardless of the power status of the projector.
✐ The direct start-up into the memory viewer mode may not operate when the USB thumb drive is
inserted immediately after being removed.
✐ The Network Viewer and the Moderator functions are non-Mac-compliant.
✐ When using the following functions, you cannot use the memory viewer function. In addition, when
using the memory viewer function, you cannot use the following functions adversely.
Network viewer, Network capture, Moderator function, Play Movie files function
"Connect to a Network projector" in Windows Vista
Entering the memory viewer mode
In case of already USB thumb drive is inserted into the USB port on the rear terminal of the projector
and you want to enter the memory viewer mode again:
1. Select Input in the main-menu, press Point 8 or SELECT buttons, select Network in the sub-menu,
and then press SELECT button, or press NETWORK button on the remote control.
* After short time, the network connection standby display screen "Ready for use" will appear.
2. Select Network in the main-menu and then press SELECT button.
3. Select Memory viewer with Point ed buttons and press SELECT button.
4. Select Start and press SELECT button. The image file stored in the root directory of the USB thumb
drive is displayed on the screen.
* If the image file is not available in the root directory of the USB thumb drive, the memory viewer
browser window appears.
Memory Viewer function
Displaying the memory viewer browser window
When you press AUTO SET/CANCEL button in the memory viewer mode, following browser window
"Thumbnail" or "Filename list" appears on the screen.
Thumbnail display
Displays current directory path
Menu
Moves
to upper
directory
Filename list display
Displays current directory path
Menu
Moves
to upper
directory
✐ Even before the completion of thumbnail images drawing, the image selection is available by
pressing point ed 7 8 buttons. (Though thumbnail images drawing cannot be interrupted by
pressing any of point ed 7 8 buttons, the operation is valid.)
✐ A file more than 10MB is not displayed as thumbnails. Icons are displayed in substitution for
thumbnails.
Menu tree
Menu
Sub menu
Description
Menu
Manual mode
Mode to select a playing file respectively
Available file types are JPEG(.jpg), Bitmap(.bmp),Movie file, Text(.txt).
Others are not available.
Program modeMode to select a program file (.dpf ) created by the program editor.
* This mode is non-Mac-compliant.
Format
Formats the USB thumb drive
View
Thumbnail
Displays files with the thumbnail on the browser window.
Filename list
Displays files with the file name on the browser window.
Set
English < > Selects display menu language, Japanese or English. Set with 7 8 button
3 sec. < > Sets display period of an image in the auto display mode. (3 to 240
seconds) Set with point 7 8 button.
0 times < >Sets the repeating times in the auto display mode. (0 to 255 times). 0
means endless play. Set with point 7 8 button.
Quits the Memory Viewer operation.
Exit
Icon indication
Folder icon. Displays the contents of the selected folder with SELECT button
Top directory icon. Moves to upper directory with SELECT button
JPEG file icon
Bitmap file icon
PNG file icon
GIF file icon
Text file icon
Movie file icon
Program file icon (Playback with the program mode)
Un-supported file icon
Note:
* The resolution of the image which can be playing with memory viewer is as follows.
PG,BMP............ up to 8192 x 8192
PNG,GIF........... up to 2048 x 1024
Memory Viewer function
Selection of menu
1. To select the menu, press AUTO SET/CANCEL button in the memory viewer mode. The cursor moves
from file selection window to menu.
2. Select the sub-menu with point buttons and press SELECT button. To cancel the selection, press
AUTO SET/CANCEL button.
Image viewer in the manual mode
1. Select "Manual mode" from "Menu" on the browser window of the memory viewer and press SELECT button.
2. S elect a file to display with point buttons and press SELECT button. The selected file image is
displayed on the screen.
3. During displaying the image, you can switch the displayed image with the Point ed buttons, and
start auto-playback with the Point 8 button. Refer to the control buttons as described in the table
on the next page.
Image viewer in the program mode for Windows
1. Select "Program mode" on "Menu" of the browser window of the memory viewer. And press SELECT
button. The program files (.dpf ) in the DispParam folder under the current directory are displayed.
* If the DispParam folder is not placed in the current directory, the list of the folder name is displayed.
Find the DispParam folder which stores the program file manually to display the contents of the
folder.
2. Select a program file with point buttons and press SELECT button. The dialogue window appears
and select "Yes" and press SELECT button to start the auto display. The images programmed by
program file are displayed on the screen. The display period of the image and the number of repeat
are set with the program file. If they are not set with the program file, the data which is set up from
the "Set" menu on the browser window will be applied.
3. During displaying the image, you can switch the displayed image with the Point ed buttons, and
stop auto-playback with the Point 7 button. Refer to the control buttons as described in the table
on the next page.
Note:
During operating the memory viewer, the Network Viewer and Network Capture function cannot be used.
The program file does not support in the manual mode. Use it in the program mode.
Notes for Windows:
* The program file (.dpf ) is created with the program editor software. For further information, see the
item "Creating a program file [Program Editor]" (p.119) described on the separated network owner's
manual.
* The DispParam folder is automatically created when the program file with the program editor
is stored. For further information, see the item "Creating a program file [Program Editor]" (p.119)
described on the separated network owner's manual.
* When storing the program file into the USB thumb drive manually, create folder with the name of
"DispParam" and store the program file into this folder.
* In the program mode, the browser window lists the program files and folders only. Other files are
not listed.
Operation during image viewer in the manual/program mode
During displaying the image, you can control the displayed image with control buttons as described in
the table below.
Point
e
d
8
7
Operation
Manual playback with previous file
Manual playback with next file
Start auto-playback* (program mode), or scroll down during displaying the text file*
Stop auto-playback* (program mode), or scroll up during displaying the text file*
* The display time of the image and the number of repeat at the auto-playback mode are set up
from the "Set" menu on the browser window. (p.7)
* The scrolling of the text file can be operated only in the manual mode.
Operation during playback movie file
During the playback of the movie files, by the following number of times pressing the point buttons,
you can pause, review or forward the playback.
Point
Operation
e
d
Manual playback with previous file
Manual playback with next file
7 or 8 x1/2/3/4
See the figure below
7 X 4
7 X3
7 X 2
7 X1
Review
in 8
double
speed
Review
in 4
double
speed
Review
in 2
double
speed
Pause
8 X 1
8 X 2
8X3
Forward Forward Forward Forward
normal
in 2
in 4
in 8
speed
double double double
speed
speed
speed
Termination of memory viewer
To terminate the memory viewer function, take one of methods described below.
- Terminate with projector's on-screen menu.
1. Select “Wired” or "Wireless" from the input menu of the projector. Press SELECT button.
2. Select "Memory Viewer" with the point ed buttons and press SELECT button. The "Enter/Exit" pallet
of the memory viewer appears.
3. Select "Exit" and press SELECT button.
- Terminate with memory viewer mode
1. During the image displaying, press AUTO SET/CANCEL button. The browser window appears on the
screen.
2. Press AUTO SET/CANCEL button again. The cursor moves to menu item.
3. Select "Exit" on the browser window with the point 7 8 buttons and press SELECT button.
Memory Viewer function
Duplicating the data into the USB thumb drive for Windows
It is described how to duplicate the data converted with the Network Viewer 5 [File Converter 1, File
Converter 2] into the USB thumb drive through the network.
1. Launch the explorer software of the computer and type the IP address of the projector which has the
USB thumb drive onto the address column. For example, "ftp://192.168.1.201".
The contents of the USB thumb drive appear on the explorer window as below.
2. Move the projection data from the computer into the USB thumb drive.
Note:
If the network PIN code is set for the projector, the authentication window appears as below. In that
case, enter "user" into the User Name column and the network PIN code of the projector into the
Password column. *User Name must be "user".
10
* The data converted by the Network Viewer 5 [File Converter1] can be stored into the USB thumb drive
mounted on the projector directly. For further information, refer to chapter Network Viewer function,
"Setting of output destination and conversion mode" (p.117) described on the separated Network
Owner's manual for Windows.
* The program file created by the Program Editor can be stored into the USB thumb drive mounted on
the projector directly. For further information, refer to chapter Network Viewer function, "Creating a
program file" (p.119) described on the separated Network Owner's manual for Windows.
Formatting the USB thumb drive
A new USB thumb drive or a USB thumb drive formatted by computer or camera must be formatted by
this product. Memory Viewer function may not operate properly with a USB thumb drive formatted by
other equipment.
1. In the memory viewer mode, press AUTO SET/CANCEL button. The browser window appears on the
screen.
2. Press AUTO SET/CANCEL button again. The cursor moves to menu item.
3. S elect "Format" from "Menu" with the point buttons and press SELECT button. The format
confirmation window appears.
4. Select "Yes" with the point buttons and press SELECT button to start formatting. It takes about 1-2
seconds to complete the formatting.
Note:
✐ During formatting the USB thumb drive, do not turn off the power or eject the USB thumb drive
because the data in the USB thumb drive might get damaged. During formatting, the USB thumb
drive is blinking.
11
U.S.A.
Canada
EIKI International, Inc.
30251 Esperanza
Rancho Santa Margarita
CA 92688-2132
U.S.A.
Tel : 800-242-3454 (949)-457-0200
Fax : 800-457-3454 (949)-457-7878
E-Mail : [email protected]
EIKI CANADA - Eiki International, Inc.
P.O. Box 156, 310 First St. - Unit 2,
Midland, ON, L4R 4K8, Canada
Tel : 800-563-3454 (705)-527-4084
Fax : 800-567-4069 (705)-527-4087
E-Mail : [email protected]
Deutschland & Österreich
Eastern Europe
EIKI Deutschland GmbH
Am Frauwald 12
65510 Idstein
Deutschland
Tel : 06126-9371-0
Fax : 06126-9371-14
E-Mail : [email protected]
EIKI CZECH SPOL. s.r.o.
Nad Cementárnou 1163/4a
Paraha 4, Podolí
147 00
Czech Republic
Tel : +42 02 4141 0928
+42 02 4140 3095
Fax: +42 02 4140 9435
E-Mail : [email protected]
China
South East Asia
EIKI (Shanghai) Co., Ltd.
Lakeside Oasis Middle Ring Business Centre
Block 10. #16-07,
1628, Jin Sha Jiang Road,
Shanghai, 200333. China
Main Line :
86-21-3251-3993
Service Hot Line :
86-21-3251-3995
Fax :
86-21-3251-3997
E-mail : [email protected]
EIKI Industrial (M) Sdn Bhd
No. 3A-2C, 4th Floor, Jalan PJU 8/3A,
Perdana Business Centre,
Bandar Damansara Perdana,
47820 Petaling Jaya, Selangor
Malaysia
Tel : +603-7722-4362
Fax : +603-7722-4392
E-Mail : [email protected]
Japan & Worldwide
EIKI Industrial Company Limited.
4-12 Banzai-Cho, Kita-Ku, Osaka,
530-0028 Japan
Tel :
+81-6-6311-9479
Fax :
+81-6-6311-8486
WorldWide Website
MV-KY7BC
MEMORY VIEWER OWNER'S MANUAL
http://www.eiki.com
© 2009 Eiki International, Inc.