1
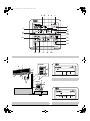
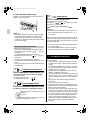
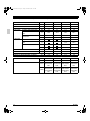
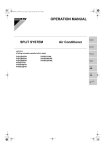
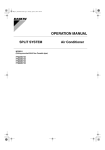
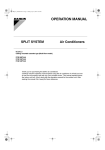
00_CV_3P170549-3.fm Page 1 Friday, December 9, 2005 1:46 PM
OPERATION MANUAL
SPLIT SYSTEM
Air Conditioner
English
Español
MODELS
(Wall mounted type)
FAY71FVE
FAY100FVE
FAY71FAVE
FAY100FAVE
FA71FVEK
FA100FVEK
READ THESE INSTRUCTIONS CAREFULLY BEFORE INSTALLATION.
KEEP THIS MANUAL IN A HANDY PLACE FOR FUTURE REFERENCE.
LEA CUIDADOSAMENTE ESTAS INSTRUCCIONES ANTES DE INSTALAR.
GUARDE ESTE MANUAL EN UN LUGAR A MANO PARA LEER EN CASO DE
TENER ALGUNA DUDA.
00_CV_3P170549-3.fm Page 3 Friday, December 9, 2005 1:46 PM
Thank you for purchasing this Daikin air conditioner. Carefully read this operation manual
before using the air conditioner. It will tell you
how to use the unit properly and help you if any
trouble occurs. After reading the manual, file it
away for future reference.
Le agradecemos la compra de este acondicionador de aire Daikin.
Lea cuidadosamente el manual de funcionamiento antes de utilizar el acondicionador de
aire. Dicho manual le indicará cómo utilizar adecuadamente la máquina y le ayudará en caso
de avería. Después de leer el manual, consérvelo para consultas futuras.
00_CV_3P170549-3.fm Page 2 Friday, December 9, 2005 1:46 PM
5 12
4
2
1
3
7
hr
C
hr
6
8
NOT
AVAILABLE
TEST
9
11
10
13
L H
14
21
20
TEST
16
19
17
15
18
22
1
R(Y)100
j
d
a
h
f
e
g
i
3
b
c
R(Y)71
d
e
f
k
hr
C
2
[1]
4
H
01_EN_3P170549-3.fm Page 1 Friday, December 9, 2005 11:45 AM
CONTENTS
ILLUSTRATIONS................................................ [1]
1. WHAT TO DO BEFORE OPERATION .......... 1
2. SAFETY CONSIDERATIONS........................ 1
3. OPERATION RANGE .................................... 3
4. INSTALLATION SITE .................................... 3
5. NAME AND FUNCTION OF EACH SWITCH
AND DISPLAY ON THE REMOTE
CONTROLLER .............................................. 4
6. OPERATION PROCEDURE .......................... 5
7. OPTIMUM OPERATION ................................ 7
8. MAINTENANCE
(FOR SERVICE PERSONNEL) ..................... 8
9. NOT MALFUNCTION OF THE AIR
CONDITIONER .............................................. 9
10. TROUBLE SHOOTING ................................ 10
11. SPECIFICATIONS ....................................... 11
1. WHAT TO DO BEFORE OPERATION
This operation manual is for the following systems
with standard control. Before initiating operation,
contact your Daikin dealer for the operation that corresponds to your system.
Indoor unit
Outdoor unit
Unit with
remote
controller
PRECAUTIONS FOR GROUP CONTROL
SYSTEM OR TWO REMOTE CONTROLLER
CONTROL SYSTEM
This system provides two other control systems
beside individual control (one remote controller controls one indoor unit) system. Confirm the following if
your unit is of the following control system type.
• Group control system
One remote controller controls up to 16 indoor units.
All indoor units are equally set.
• Two remote controller control system
Two remote controllers control one indoor unit (In case
of group control system, one group of indoor units)
The unit is individually operated.
NOTE
• Contact your Daikin dealer in case of changing
the combination or setting of group control and
two remote controller control systems.
Names and functions of parts
Refer to figure 2 on page [1]
a
b
c
d
e
f
g
h
i
j
NOTE
• If the unit you purchased is controlled by a wireless remote controller, also refer to the wireless
remote controller’s operation manual.
If your installation has a customized control system,
ask your Daikin dealer for the operation that corresponds to your system.
• Heat pump type
This system provides cooling, heating, automatic,
program dry, and fan operation modes.
• Cooling only type
This system provides cooling, program dry, and
fan operation modes.
1
k
Indoor unit
Outdoor unit
Remote controller
Inlet air
Discharged air
Air outlet
Air flow flap (at air outlet)
Refrigerant piping, connection electric wire
Drain pipe
Air inlet
The built-in air filter removes dust and dirt.
Ground wire
Wire to ground from the outdoor unit to prevent electrical shocks.
2. SAFETY CONSIDERATIONS
We recommend that you read this instruction manual carefully before use to gain full advantage of the
function of the air conditioner, and to avoid malfunction due to mishandling.
This air conditioner comes under the term “appliances not accessible to the general public”
English
01_EN_3P170549-3.fm Page 2 Friday, December 9, 2005 11:45 AM
• The precautions described below are WARNING and CAUTION. These are very important
precautions concerning safety. Be sure to
observe all of them without fail.
WARNING ...These are the matters with possibilities leading to serious consequences such as death or serious
injury due to erroneous handling.
CAUTION ....These are the matters with possibilities leading to injury or material
damage due to erroneous handling including probabilities leading to serious consequences in
some cases.
• After reading, keep this manual at a place
where any user can read at any time. Furthermore, make certain that this operation manual
is handed to a new user when he takes over
the operation.
WARNING
Avoid exposure of your body directly to the
cold air for a long time, or avoid excessive
exposure of your body to the cold air.
Otherwise, your physical condition may be deteriorated and/or your health may be ruined.
When the air conditioner is in abnormal conditions (smell of something burning, etc),
unplug the power cord from the outlet, and
contact the dealer where you purchased the
air conditioner.
Continued operation under such circumstances
may result in a failure, electric shock, and fire.
Ask your dealer for installation of the air conditioner.
Incomplete installation performed by yourself
may result in a water leakage, electric shock,
and fire.
Ask your dealer for improvement, repair, and
maintenance.
Incomplete improvement, repair, and maintenance
may result in a water leakage, electric shock, and
fire.
Do not insert your finger, a stick, etc., into the
air inlet, outlet, and fan blades.
A fan in high-speed running may result in injury.
The refrigerant in the air conditioner is safe
and normally does not leak. If the refrigerant
leaks inside the room, the contact with a fire
of a burner, a heater or a cooker may result in
a harmful gas.
Do not use the air conditioner until when a service person confirms to finish repairing the portion where the refrigerant leaks.
English
For refrigerant leakage, consult your dealer.
When the air conditioner is to be installed in a
small room, it is necessary to take proper measures so that the amount of any leaked refrigerant does not exceed the limiting concentration
even when it leaks. If the refrigerant leaks
exceeding the level of limiting concentration, an
oxygen deficiency accident may happen.
For installation of separately sold component parts, ask a specialist.
Be sure to use the separately sold component
parts designated by our company.
Incomplete installation performed by yourself
may result in a water leakage, electric shock,
and fire.
Ask your dealer to move and reinstall the air
conditioner.
Incomplete installation may result in a water
leakage, electric shock, and fire.
Do not use any fuse with improper capacity.
The use of a piece of wire and whatnot may
result in a failure and fire.
Be sure to establish an earth.
Do not earth the unit to a utility pipe, arrester,
or telephone earth.
Incomplete earth may cause electrical shock, or
fire.
A high surge current from lightning or other
sources may cause damage to the air conditioner.
Be sure to install an earth leakage breaker.
Failure to install an earth leakage breaker may
result in electric shocks, or fire.
CAUTION
Do not use the air conditioner for other purposes.
Do not use the air conditioner for a special application such as the storage of foods, animals and
plants, precision machines, and art objects as
otherwise the deterioration of quality may result.
Do not remove the air outlet of the outdoor
unit.
The fan may get exposed and result in injury.
When the air conditioner is used in combination with burners or heaters, perform sufficient ventilation.
Insufficient ventilation may result in an oxygen
deficiency accident.
Check and make sure that foundation blocks
are not damaged after a long use.
If they are left in a damaged condition, the unit
may fall and result in injury.
Neither place a flammable spray bottle near
the air conditioner nor perform spraying.
Doing so may result in a fire.
To clean the air conditioner, stop operation,
and unplug the power cord from the outlet.
Otherwise, an electric shock and injury may
result.
2
01_EN_3P170549-3.fm Page 3 Friday, December 9, 2005 11:45 AM
Do not operate the air conditioner with a wet
hand.
An electric shock may result.
Do not place items which might be damaged
by moisture under the indoor unit which may
be damaged by water.
Condensation may form if the humidity is above
80%, if the drain outlet gets blocked or the filter is
polluted.
Do not place a burner or heater at a place
directly exposed to the wind from the air conditioner.
Incomplete combustion of the burner or heater
may result.
Do not allow a child to mount on the outdoor
unit or avoid placing any object on it.
Falling or tumbling may result in injury.
Never expose little children, plants or animals directly to the air flow.
Adverse influence to little children, animals and
plants may result.
Do not wash the air conditioner with water.
An electric shock or fire may result.
Do not install the air conditioner at any place
where flammable gas may leak out.
If the gas leaks out and stays around the air conditioner, a fire may break out.
Execute complete drain piping for perfect
drainage.
Incomplete piping may result in a water leakage.
The appliance is not intended for use by
young children or infirm persons without
supervision.
Young children should be supervised to
ensure that they do not play with the appliance.
Consult with installation contractor for
cleaning the inside of the air conditioner.
Wrong cleaning may make the plastics parts
broken or cause failure of water leakage or electric shock.
Do not touch the air inlet or aluminium fin of
the air conditioner.
Otherwise, injury may be caused.
Do not place objects in direct proximity of
the outdoor unit and do not let leaves and
other debris accumulate around the unit.
Leaves are a hotbed for small animals which can
enter the unit. Once in the unit, such animals can
cause malfunctions, smoke or fire when making
contact with electrical parts.
3. OPERATION RANGE
If the temperature or the humidity is beyond the following conditions, safety devices may work and the
air conditioner may not operate, or sometimes,
water may drop from the indoor unit.
3
COOLING
OUTDOOR
UNIT
R71, 100
K(U)
COOL- SERIES
ING
ONLY
TYPE R71, 100
FU
SERIES
RY71,
100
K(U)
SERIES
HEAT
PUMP
TYPE RY71,
100
FU
SERIES
INDOOR
TEMPERAHUMIDITY
TURE (°C)
D
20 to 35
B
W
14 to 25
B
80% or
below
D
20 to 35
B
W
14 to 25
B
D
18 to 35
B
W
12 to 25
B
80% or
below
D
20 to 35
B
W
14 to 25
B
OUTDOOR
TEMPERATURE (°C)
D
B
21 to 46
<For 50Hz>
D 21 to 52
B <For 60Hz>
21 to 54
D
B
– 5 to 46
<For 50Hz>
D – 5 to 52
B <For 60Hz>
– 5 to 54
HEATING
OUTDOOR
UNIT
INDOOR
TEMPERATURE (°C)
RY71,
D
100
B
K(U)
SERIES
HEAT
PUMP
TYPE RY71,
100
D
FU
B
SERIES
15 to 27
<For 50Hz>
15 to 27
<For 60Hz>
15 to 24
OUTDOOR
TEMPERATURE (°C)
D
– 9 to 21
B
W
– 10 to 15
B
D
– 9 to 21
B
W
– 10 to 15
B
D B: Dry bulb temperature
WB: Wet bulb temperature
The setting temperature range of the remote controller is 16°C to 32°C.
4. INSTALLATION SITE
Regarding places for installation
• Is the air conditioner installed at a well-ventilated place where there are no obstacles
around?
• Do not use the air conditioner in the following
places.
a. Filled with much mineral oil such as cutting oil
b. Where there is much salt such as a beach area
c. Where sulfured gas exists such as a hot-spring
resort
English
01_EN_3P170549-3.fm Page 4 Friday, December 9, 2005 11:45 AM
d. Where there are considerable voltage fluctuations such as a factory or plant
e. Vehicles and vessels
f . Where there is much spray of oil and vapor
such as a cookery, etc.
g. Where there are machines generating electromagnetic waves
h. Filled with acid and/or alkaline steam or vapor
• Is a snow protection measure taken?
For details, consult your dealer.
5. NAME AND FUNCTION OF EACH
SWITCH AND DISPLAY ON THE
REMOTE CONTROLLER
Refer to figure 1 on page [1]
The illustrations in this operating manual correspond to the remote control format BRC1C type.
Although the display and shape of the buttons on
the BRC1B type are slightly different, they may be
operated in the same manner.
Regarding wiring
• All wiring must be performed by an authorized
electrician.
To do wiring, ask your dealer. Never do it by
yourself.
• Make sure that a separate power supply circuit is provided for this air conditioner and
that all electrical work is carried out by qualified personnel according to local laws and
regulations.
1
2
3
Pay attention to running noises, too
• Are the following places selected?
a. A place that can sufficiently withstand the
weight of the air conditioner with less running
noises and vibrations.
b. A place where the hot wind discharged from the
air outlet of the outdoor unit and the running
noises.
• Are you sure that there are no obstacles near
the air outlet of the outdoor unit?
Such obstacles may result in declined performance and increased running noises.
• If abnormal noises occur in use, consult your
dealer.
4
5
6
Regarding drainage of drain piping
• Is the drain piping executed to perform complete drainage?
If proper drainage is not carried out from the outdoor drain pipes during air-conditioning operation,
chances are that dust and dirt are clogged in the
pipe. This may result in a water leakage from the
indoor unit. Under such circumstances, stop the
operation of the air conditioner, and then consult
your dealer or our service station.
ON/OFF BUTTON
Press the button and the system will start.
Press the button again and the system will
stop.
OPERATION LAMP (RED)
The lamp lights up during operation.
DISPLAY “
” (UNDER CENTRALIZED CONTROL)
When this display shows, the system is
UNDER CENTRALIZED CONTROL.
DISPLAY “
” “ ”“
”“
”
(VENTILATION/AIR CLEANING)
This display shows that the total heat
exchange and the air cleaning unit are in
operation (These are optional accessories).
DISPLAY “ ” “ ” “ ” “ ” “ ”
(OPERATION MODE)
This display shows the current OPERATION
MODE. For cooling only type, “ ” (Auto)
and “ ” (Heating) are not installed.
TEST” (INSPECTION/TEST
DISPLAY “
OPERATION)
When the INSPECTION/TEST OPERATION
BUTTON is pressed, the display shows the
system mode is in.
hr
DISPLAY “
” (PROGRAMMED TIME)
hr
7
This display shows the PROGRAMMED TIME
of the system start or stop.
DISPLAY “
” (SET TEMPERATURE)
8
This display shows the set temperature.
DISPLAY “
” (FAN SPEED)
9
This display shows the set fan speed.
DISPLAY “ ” (AIR FLOW FLAP)
10 Refer to “ADJUSTING THE AIR FLOW
DIRECTION”.
C
DISPLAY “
” (TIME TO CLEAN AIR FIL11 TER)
Refer to “HOW TO CLEAN THE AIR FILTER”.
DISPLAY “
” (DEFROST)
12
Refer to “DEFROST OPERATION”.
English
4
01_EN_3P170549-3.fm Page 5 Friday, December 9, 2005 11:45 AM
13
14
15
16
17
18
19
20
21
22
NON-FUNCTIONING DISPLAY
If that particular function is not available,
pressing the button may display the words
“NOT AVAILABLE” for a few seconds.
When running multiple units simultaneously
The “NOT AVAILABLE” message will only be
appear if none of the indoor units is equipped
with the function. If even one unit is equipped
with the function, the display will not appear.
TIMER MODE START/STOP BUTTON
Refer to “PROGRAM TIMER OPERATION”.
TIMER ON/OFF BUTTON
Refer to “PROGRAM TIMER OPERATION”.
INSPECTION/TEST OPERATION BUTTON
This button is used only by qualified service
persons for maintenance purposes.
PROGRAMMING TIME BUTTON
Use this button for programming “START and/
or STOP” time.
TEMPERATURE SETTING BUTTON
Use this button for SETTING TEMPERATURE.
FILTER SIGN RESET BUTTON
Refer to “HOW TO CLEAN THE AIR FILTER”.
FAN SPEED CONTROL BUTTON
Press this button to select the fan speed,
HIGH or LOW, of your choice.
OPERATION MODE SELECTOR BUTTON
Press this button to select OPERATION MODE.
AIR FLOW DIRECTION ADJUST BUTTON
Refer to “ADJUSTING THE AIR FLOW
DIRECTION”.
NOTE
• For the sake of explanation, all indications are
shown on the display in figure 1 contrary to
actual running situations.
6. OPERATION PROCEDURE
Refer to figure 1 on page [1]
• Operating procedure varies with heat pump type
and cooling only type. Contact your Daikin dealer
to confirm your system type.
• To protect the unit, turn on the main power switch
6 hours before operation.
• If the main power supply is turned off during operation, operation will restart automatically after the
power turns back on again.
COOLING, HEATING, AUTOMATIC, FAN,
AND PROGRAM DRY OPERATION
Operate in the following order.
5
1
OPERATION MODE SELECTOR
Press OPERATION MODE SELECTOR button several times and select the OPERATION MODE of your choice as follows.
COOLING OPERATION ......................... “
HEATING OPERATION.......................... “
AUTOMATIC OPERATION..................... “
”
”
”
• In this operation mode, COOL/HEAT
changeover is automatically conducted.
FAN OPERATION................................... “
DRY OPERATION .................................. “
”
”
• The function of this program is to decrease the
humidity in your room with the minimum temperature decrease.
• Micro computer automatically determines
TEMPERATURE and FAN SPEED.
• This system does not go into operation if the
room temperature is below 16°C.
Refer to figure 3 on page [1]
• For cooling only type, “COOLING”, “FAN” and
“DRY” operation are able to select.
2
ON/OFF
Press ON/OFF button
OPERATION lamp lights up or goes off and the system starts or stops OPERATION.
[ EXPLANATION OF HEATING OPERATION ]
DEFROST OPERATION
• As the frost on the coil of an outdoor unit increase,
heating effect decreases and the system goes
into DEFROST OPERATION.
• The indoor unit fan stops and the remote controller display shows “
”.
• After 6 to 8 minutes (maximum 10 minutes) of
DEFROST OPERATION, the system returns to
HEATING OPERATION.
Regarding outside air temperature and heating capacity
• The heating capacity of the air conditioner
declines as the outside air temperature falls. In
such a case, use the air conditioner in combination with other heating systems.
• A warm air circulating system is employed, and
therefore it takes some time until the entire room
is warmed up after the start of operation.
English
01_EN_3P170549-3.fm Page 6 Friday, December 9, 2005 11:45 AM
• An indoor fan runs to discharge a gentle wind
automatically until the temperature inside the air
conditioner reaches a certain level. At this time,
the remote controller displays “
”. Leave it
as it stands and wait for a while.
• When the warm air stays under the ceiling and
your feet are cold, we recommend that you use a
circulator (a fan to circulate the air inside the
room). For details, consult your dealer.
A. UP AND DOWN DIRECTION
Press the AIR FLOW DIRECTION ADJUST button to select the air direction as shown below.
The AIR FLOW FLAP display
swings as shown below and the
air flow direction continuously
varies. (Automatic swing setting)
swing
ADJUSTMENT
Press AIR FLOW DIRECTION
ADJUST button to select the air
direction of your choice.
For programming TEMPERATURE, FAN SPEED
and AIR FLOW DIRECTION, follow the procedure
shown below.
The AIR FLOW FLAP display
stops swinging and the air flow
direction is fixed (Fixed air flow
direction setting).
TEMPERATURE SETTING
Press TEMPERATURE SETTING button and
program the setting temperature.
Each time this button is pressed, setting
temperature rises 1°C.
MOVEMENT OF THE AIR FLOW FLAP
Each time this button is pressed, setting
temperature lowers 1°C.
For the following conditions, micro computer controls the air flow direction so it may be different from
the display.
• The setting is impossible for fan operation.
NOTE
• The setting temperature range of the remote controller is 16°C to 32°C.
Operation
mode
Cooling
Heating
Operation
condition
• When room
temperature is
lower than the
set temperature
• When operating continuously at
horizontal air
flow direction
• When room
temperature is
higher than the
set temperature
• At defrost operation
FAN SPEED CONTROL
Press FAN SPEED CONTROL button.
High or Low fan speed can be selected.
The microchip may sometimes control the fan speed
in order to protect the unit.
AIR FLOW DIRECTION ADJUST
• There are 2 ways of adjusting the air discharge angle.
Operation mode includes automatic operation.
Recommended flap positions
Cooling
Heating
We recommend using the fan in the position listed
above when fixing the fan direction.
B. Left and right direction
A. Up and down adjustment
English
6
01_EN_3P170549-3.fm Page 7 Friday, December 9, 2005 11:45 AM
B. LEFT AND RIGHT DIRECTION
Grasp the air flow blades at the tip and move the
blades to the left and right.
3
TIMER ON/OFF
Press the TIMER ON/OFF button.
The timer setting procedure ends.
The display “
or
” changes from flashing light to a constant light.
Refer to figure 4 on page [1]
NOTE
• Only make adjustments after you have stopped
the air flow direction swing in a position where
adjustments are possible. Your hand may get
caught if you attempt to make adjustments while
the unit is swinging.
PROGRAM TIMER OPERATION
Operate in the following order.
• The timer is operated in the following two ways.
• Programming the stop time (
) .... The system stops
operating after the set time has elapsed.
• Programming the start time (
) .... The system starts
operating after the set time has elapsed.
• The timer can be programmed a maximum of 72
hours.
• The start and the stop time can be simultaneously
programmed.
1
TIMER MODE START/STOP
Press the TIMER MODE START/STOP button several times and select the mode on the display.
The display flashes.
For setting the timer stop .... “
For setting the timer start .... “
2
”
”
PROGRAMMING TIME
Press the PROGRAMMING TIME button and set
the time for stopping or starting the system.
When this button is pressed, the time
advances
by 1 hour.
When this button is pressed, the time
goes backward by 1 hour.
7
NOTE
• When setting the timer Off and On at the same
time, repeat the above procedure from 1 to 3
once again.
When the timer is programmed to stop the system
after 3 hours and start the system after 4 hours, the
system will stop after 3 hours and then 1 hour later
the system will start.
• After the timer is programmed, the display shows
the remaining time.
• Press the TIMER ON/OFF button once again to
cancel programming. The display vanishes.
7. OPTIMUM OPERATION
Observe the following precautions to ensure the
system operates.
• Adjust the room temperature properly for a comfortable environment. Avoid excessive heating or
cooling.
• Prevent direct sunlight from entering a room during cooling operation by using curtains or blinds.
• Ventilate the room regularly.
Using the unit for long periods of time requires
attentive ventilation of the room.
• Keep doors and windows closed. If the doors and
windows remain open, room air will flow out and
cause to decrease the effect of cooling and heating.
• Do not place other heaters directly below the
indoor unit.
They may deform due to the heat.
• Never place objects near the air inlet and the air
outlet of the unit. It may cause deterioration in the
effect or stop in the operation.
• Turn off the main power supply switch when it is
not used for long periods of time. When the main
power switch is turned on, some watts of electricity is being used even if the system is not operating. Turn off the main power supply switch for
saving energy. When reoperating, turn on the
main power supply switch 6hours before operation for smooth running (Refer to MAINTENANCE).
English
01_EN_3P170549-3.fm Page 8 Friday, December 9, 2005 11:45 AM
• When the display shows “
” (TIME TO CLEAN
AIR FILTER), ask a qualified service person to
clean the filters (Referó to MAINTENANCE).
B)Washing with water
When the air filter is very
dirty, use soft brush and
neutral detergent.
Remove water and dry in the shade.
8. MAINTENANCE
(FOR SERVICE PERSONNEL)
ONLY A QUALIFIED SERVICE PERSON IS
ALLOWED TO PERFORM MAINTENANCE
IMPORTANT!
• BEFORE OBTAINING ACCESS TO TERMINAL
DEVICES, ALL POWER SUPPLY CIRCUITS
MUST BE INTERRUPTED
• To clean the air conditioner, be sure to stop operation, and turn the power switch off. Otherwise, an
electric shock and injury may result.
• Do not wash the air conditioner with water
Doing so may result in an electric shock.
• Be careful with a scaffold or staging
Caution must be exercised because of work at a
high place.
HOW TO CLEAN THE AIR FILTER
Clean the air filter when the display shows “
”
(TIME TO CLEAN AIR FILTER).
Increase the frequency of cleaning if the unit is
installed in a room where the air is extremely
contaminated.
(As a yardstick for regulating yourself, consider
cleaning the filter once every two weeks.)
1. Remove the air filters.
Pull the handle in the direction of the arrow.
NOTE
• Do not wash the air conditioner with hot water of
more than 50°C, as doing so may result in discoloration and/or deformation.
• Do not expose it to fire, as doing so may result in
burning.
3. Reset the air filter in place.
After cleaning the filter, do not forget to put it
back the way it was before.
4. Press the FILTER RESET button on the
remote controller.
The display “
”(TIME TO CLEAN AIR FILTER)
vanishes.
HOW TO CLEAN AIR OUTLET AND OUTSIDE PANELS
• Clean with soft cloth.
• When it is difficult to remove stains, use water or
neutral detergent.
NOTE
• Do not use gasoline, benzene, thinner, polishing
powder, liquid insecticide. It may cause discoloring or warping.
• Do not use water or air of 50°C or higher for cleaning air filters and outside panels.
START UP AFTER A LONG STOP
Confirm the following
• Check that the air inlet and outlet are not blocked.
Remove any obstacle.
• Check if the earth is connected.
Might there be a broken wire somewhere?
Contact your dealer if there are any problems.
Clean the air filter and outside panels
• After cleaning the air filter, make sure to attach it.
2. Clean the air filter.
Use vacuum cleaner A) or
wash the air filter with water B).
A)Using a vacuum cleaner
English
Turn on the main power supply switch
• The display on the remote controller will be shown
when the power is turned on.
• To protect the unit, turn on the main power switch
at least 6 hours before operation.
8
01_EN_3P170549-3.fm Page 9 Friday, December 9, 2005 11:45 AM
WHAT TO DO WHEN STOPPING THE SYSTEM FOR A LONG PERIOD
Turn on FAN OPERATION for a half day and dry
the unit.
• Refer to “FAN OPERATION”.
Cut off the power supply.
• When the main power switch is turned on, some
watts of electricity is being used even if the system is not operating.
Turn off the main power supply switch for saving
energy.
• The display on the remote controller will vanish
when the main power switch is turned off.
Clean the air filter and the exterior.
• Be sure to replace the air filter to its original place
after cleaning. Refer to “MAINTENANCE”.
9. NOT MALFUNCTION OF THE AIR
CONDITIONER
The following symptoms do not indicate air conditioner malfunction
I. THE SYSTEM DOES NOT OPERATE
• The system does not restart immediately after
the ON/OFF button is pressed.
If the OPERATION lamp lights, the system is in
normal condition.
It does not restart immediately because a safety
device operates to prevent overload of the system. After 3 minutes, the system will turn on again
automatically.
• The system does not restart immediately
when TEMPERATURE SETTING button is
returned to the former position after pushing
the button.
If the OPERATION lamp lights, the system is in
normal condition.
It does not restart immediately because a safety
device operates to prevent overload of the system. After 3 minutes, the system will turn on again
automatically.
• The system does not start when the display
shows “
” (UNDER CENTRALIZED
CONTROL) and it flashes for few seconds
after pressing an operation button.
This is because the system is under centralized
control. Flashes on the display indicates that the
system cannot be controlled by the remote controller.
• The system does not start immediately after
the power supply is turned on.
Wait one minute until the micro computer is prepared for operation.
9
II. WHITE MIST COMES OUT OF A UNIT
• When humidity is high during cooling operation (In oily or dusty places)
If the inside of an indoor unit is extremely contaminated, the temperature distribution inside a room
becomes uneven. It is necessary to clean the
inside of the indoor unit. Ask your Daikin dealer
for details on cleaning the unit. This operation
requires a qualified service person.
• When the system is changed over to HEATING
OPERATION after DEFROST OPERATION.
Moisture generated by DEFROST becomes
steam and exists.
III.NOISE OF AIR CONDITIONERS
• A ringing sound after the unit is started.
This sound is generated by the temperature regulator working.
It will quiet down after about a minute.
• A continuous flow “Shuh” sound is heard
when the systems is in COOLING or
DEFROST OPERATION.
This is the sound of refrigerant gas flowing
through both indoor and outdoor units.
• A “Shuh” sound which is heard at the start or
immediately after the stop of operation or
which is heard at the start or immediately after
the stop of DEFROST OPERATION.
This is the noise of refrigerant caused by flow stop
and flow change.
• A continuous low “Shah” sound is heard
when the system is in COOLING OPERATION
or at a stop.
The noise is heard when the drain pump is in
operation.
• A “Pishi-pishi” squeaking sound is heard
when the system is in operation or after the
stop of operation.
Expansion and contraction of plastic parts caused
by temperature change makes this noise.
IV.DUST FROM THE UNITS
• Dust may blow out from the unit after starting
operation from long resting time.
Dust absorbed by the unit blows out.
V. THE UNITS GIVE OFF ODORS
The unit absorbs the smell of rooms, furniture,
cigarettes, etc., and then emits them.
VI.THE LIQUID CRYSTAL OF THE REMOTE CONTROLLER SHOW “
”
• It happens immediately after the main power
supply switch is turned on.
This shows that the remote controller is in normal
condition.
This continues temporary.
English
01_EN_3P170549-3.fm Page 10 Friday, December 9, 2005 11:45 AM
10. TROUBLE SHOOTING
I. If one of the following malfunctions occurs,
take the measures shown below and contact
your Daikin dealer.
The system must be repaired by a qualified service
person.
WARNING
When the air conditioner is in abnormal conditions (smell of something burning, etc),
unplug the power cord from the outlet, and
contact your dealer
Continued operation under such circumstances
may result in a failure, electric shock, and fire.
• If a safety device such as a fuse, a breaker or an
earth leakage breaker frequently actuates;
Measure: Do not turn on the main power switch.
• If the ON/OFF switch does not properly work;
Measure: Turn off the main power switch.
• If water leaks from unit.
Measure: Stop the operation.
• If the display “
” (INSPECTION), “UNIT No.”,
and the OPERATION lamp flash and the “MALFUNCTION CODE” appears.
OPERATION lamp
UNIT No.
C
INSPECTION
display
L H
INDOOR UNIT
No. in which a
malfunction occurs
MALFUNCTION
CODE
Measure: Notify your Daikin dealer and inform
him/her of the display.
II. If the system does not properly operate
except for the above mentioned case, and
none of the above mentioned malfunctions is
evident, investigate the system according to
the following procedures.
• Check if no fuse has blown.
Turn off the power supply.
• Check if the breaker is
ON
Switch
blown.
Turn the power on with
Trip position
the breaker switch in
Breaker
OFF
the off position.
Do not turn the power on with the breaker
switch in the trip position.
(Contact your dealer.)
2. If the system stops operating after operating
the system.
• Check if the air inlet or outlet of outdoor or
indoor unit is blocked by obstacles.
Remove the obstacle and make it well-ventilated.
• Check if the air filter is clogged.
Ask a qualified service person to clean the air
filters (Refer to MAINTENANCE).
3. The system operates but it does not sufficiently cool or heat.
• If the air inlet or outlet of the indoor or the outdoor unit is blocked with obstacles.
Remove the obstacle and make it well-ventilated.
• If the air filter is clogged.
Ask a qualified service person to clean the air
filters (Refer to MAINTENANCE).
• If the set temperature is not proper (Refer to
ADJUSTMENT).
• If the FAN SPEED button is set to LOW
SPEED (Refer to ADJUSTMENT).
• If the air flow angle is not proper (Refer to
ADJUSTING THE AIR FLOW DIRECTION).
• If the doors or the windows are open. Shut
doors or windows to prevent wind from coming
in.
• If direct sunlight enters the room (when cooling).
Use curtains or blinds.
• When there are too many inhabitants in the
room (when cooling).
Cooling effect decreases if heat gain of the
room is too large.
• If the heat source of the room is excessive
(when cooling).
Cooling effect decreases if heat gain of the
room is too large.
1. If the system does not operate at all.
• Check if there is a power failure.
Wait until power is restored. If power failure
occurs during operation, the system automatically restarts immediately after the power supply recovers.
English
10
01_EN_3P170549-3.fm Page 11 Friday, December 9, 2005 11:45 AM
11. SPECIFICATIONS
(These specifications are in compliance with SASO386.)
INDOOR UNIT
FA71FVEK FA100FVEK
OUTDOOR UNIT
R71FUVAL R100FUVAL RY71FUVAL RY100FUVAL
RATED VOLTAGE
RATED FREQUENCY
COOLING POWER INPUT RATING
CURRENT INPUT RATING
CAPACITY
HEATING
POWER INPUT RATING
CURRENT INPUT RATING
CAPACITY
WEIGHT OF INDOOR UNIT
WEIGHT OF OUTDOOR UNIT
REFRIGERANT
MASS OF REFRIGERANT CHARGE
COUNTRY OF ORIGINÍÍ
FAY100FVE
V
Hz
kW
220
60
4.1
220
60
5.7
220
60
4.2
220
60
5.8
A
19.3
26.6
19.7
26.7
kW
kcal/h
6.7
5800
9.5
8200
6.7
5800
9.0
7700
kW
3.7
4.9
A
17.4
22.6
kW
8.5
11.8
kcal/h
7300
10100
kg
kg
kg
indoor
outdoor
MANUFACTURER’S NAME
indoor
outdoor
11
FAY71FVE
26
87
R22
2.2
27
117
R22
2.9
26
91
R22
2.3
27
120
R22
2.6
JAPAN
THAILAND
DAIKIN
INDUSTRIES
LTD.
DAIKIN
INDUSTRIES
(THAILAND)
LTD.
JAPAN
THAILAND
DAIKIN
INDUSTRIES
LTD.
DAIKIN
INDUSTRIES
(THAILAND)
LTD.
JAPAN
THAILAND
DAIKIN
INDUSTRIES
LTD.
DAIKIN
INDUSTRIES
(THAILAND)
LTD.
JAPAN
THAILAND
DAIKIN
INDUSTRIES
LTD.
DAIKIN
INDUSTRIES
(THAILAND)
LTD.
English
00_CV_3P170549-3.fm Page 4 Friday, December 9, 2005 1:46 PM
3P170549-3 EM95A057F
(0602) HT