1
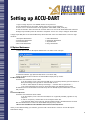
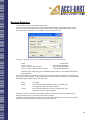
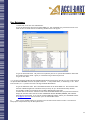
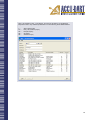
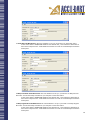
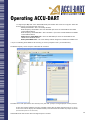
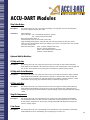
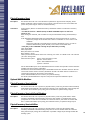
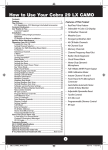
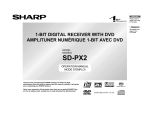
ACCU-DART
User Manual
A guide to installing and operating
the ACCU-DART system
f or Windows Mobile Devices
ACCU-DART for Sage Accpac
Updated: July 2010
Table of Contents
Introduction 3
About ACCU-DART 3
About Executive Concepts Inc 3
ACCU-DART Components 3
Installation 4
ACCU-DART Software Installation 4
IIS or Web Server Installation 4
Handheld CAB Files Installation 6
Setting the CONFIG.XML File 7
Setting up ACCU-DART 9
RF Options Maintenance 9
Warehouse Maintenance 10
User Maintenance 11
Bar Code Maintenance 13
Operating ACCU-DART 15
Advanced User Instructions 37
Installing the latest software from ACCU-DART’s website 37
Installing ACCU-DART on a separate Workstation 38
Setting up an OE Miscellaneous Charge to Post Freight Charges
Directly Through ACCU-DART 39
ACCU-DART Modules 16
Ship Sales Orders 16
Receive Purchase Orders 17
Physical Inventory Count 18
IC Warehouse Transfers (one-step) 19
In-Transit Warehouse Transfers (two-step) 20
IC Shipments 21
IC Receipts 22
Vendor Receipts 23
Commit Sales Order 24
SO Ship Commit 25
Split/Combine Lots 26
Collect Barcodes 26
Change Warehouse 26
Orchid Bins - Bin Transfers 27
Orchid Bins - Picking 27
Orchid Bins - Putaways 27
Orchid Bins - Pick by SO 28
AutoSimply Integration - Issuance 29
AutoSimply Integration - Returns 29
AutoSimply Integration - Receipts 29
AutoSimply Integration - Close MO 30
MISys Item to Sales 31
MISys Bin Transfer 31
MISys Warehouse Transfer 31
MISys PO Receipt 32
MISys Physical Inventory Count 32
MISys Finished Goods / WIP Assembly from BOM 32
MISys Complete MO 33
MISys Change Plant 33
Inquiry Modules 34
Item/Location Inquiry 34
Item/PO Inquiry 34
Item/SO Inquiry 34
PO Inquiry 34
SO Inquiry 34
Customer Inquiry 35
Vendor Inquiry 35
Item/Lot Inquiry 35
Item/Serial # Inquiry 35
Item/Bin Inquiry 35
Bin Inquiry 36
MISys Bin Inquiry 36
MISys Item/Location Inquiry 36
MISys Item/Bin Inquiry 36
Introduction
About ACCU-DART:
ACCU-DART is a real-time radio-frequency inventory management solution designed to integrate directly with AccountMate, Sage Accpac ERP, and Sage Pro ERP. Using radio-frequency scanners, it allows the warehouse/shop floor
staff to instantly update the accounting system, ensuring that all users throughout the organization have the most upto-the-minute information.
About Executive Concepts Inc:
Executive Concepts Inc. was established in 1988 with the objective of providing information system solutions to our
clients. Our combination of business and technical expertise has allowed us to deliver on this objective.
ACCU-DART is a result of years of experience in providing cost effective and efficient solutions to warehouse and
manufacturing operations. We realized that there was a need to provide real time integration between the warehouse or shop floor, and the information system. ACCU-DART will revolutionize the way your operation runs.
ACCU-DART Components:
Hardware:
ACCU-DART is compatible with the 900 MHz hardware devices from Worth Data, as well as with 802.11 Windows
Mobile v5 or v6 devices.
With Windows Mobile, ACCU-DART clients have the freedom to choose the best hardware solutions to suit their business. There are virtually limitless options to choose from. As such, we strongly encourage our resellers to extensively
research the options available for each of their clients.
Clients who already own Motorola/Symbol devices running Windows Mobile version 5 or 6 may be able to use their
existing equipment with this new version of ACCU-DART. If you have a particular hardware device in mind for your
clients, please contact us to confirm if it’s been certified to work with the ACCU-DART system.
Software:
ACCU-DART is 100% modular, making it easy to purchase the exact functions needed to improve operations. Upon
purchasing the required modules, you will receive the ACCU-DART setup.exe, along with authorization files (and activation key) required to activate the product for your company.
ACCU-DART integrates directly with the accounting system. There is no second database to maintain or reconcile, and
the software is accessible from the accounting systems menu.
ACCU-DART Modules:
Please see our latest Price List for the most current available modules
(see also: Using ACCU-DART – Prompts)
Installation
ACCU-DART Software Installation
Your copy of ACCU-DART should include the setup program (setup.exe) and at least one authorization file (RF.ECI for
the RF version, and/or RFNO.ECI for the Desktop version, and RFX.ECI for Sage Accpac v5.6+ users). Sage Accpac
users will also require an activation key to activate their software.
1. Send a print-screen capture of the registered company information (including Database ID for Sage Accpac
users) to [email protected] to receive the authorization files and activation key.
2. Run the Setup Program
3. Copy the authorization file(s) (RF.ECI and/or RFNO.ECI, and RFX.ECI) into the appropriate directory:
3.1. For Sage Accpac users – copy into the RF54A, RF55A, or RF56A directories (as appropriate)
where Sage Accpac is installed
4. Set-up the warehouses and users in the maintenance Tab. See the ACCU-DART handbook for instructions.
5. You can now run the ACCU-DART application
**Sage Accpac users will be prompted to enter their activation key upon running ACCU-DART for the first time.
IIS or Web Server Installation:
1. Copy Files
1.1. Unzip wwwroot.zip to the root of your web server
2. Open IIS Manager
2.1. Go to the <START> menu
2.2. Go to <All Programs>
2.3. Go to <Administrative Tools>
2.4. Select <Internet Information Services (IIS) Manager>
2.5. The following window should open on the desktop
3. Identify the default website
3.1. Click on the <Web Sites> folder
3.2. Click on the <Default Web Site> folder in the left-hand pane
3.3. The files copied in Step 1 should appear in the right-hand pane:
4. Configure ASP.NET
4.1. With the <Default Web Site> folder selected in the left-hand pane…
4.2. Bring up the properties page for the <Deafult Web Site> by
a) Right-clicking on the web site folder and selecting <Properities>
b) Select the <Properties> button from the tool bar
4.3. The Properties Sheet for the web site should open
4.4. Click on the <ASP.NET> tab
4.5. From the drop-down list for ASP.NET version, select <2.0>
4.6. Click <OK>
5. Set-Up Directory for ACCU-DART
6. Copy <CONFIG.INI> files to ACCU-DART Directory
6.1. These files are used to know the servers are installed and the terminal IDs that are available.
[ACCUDART]
SERVER_ID=SERVER678
TERMINAL_IDS=2,3,4,5,6,7,8,17,18,22,54,
6.2. TERMINAL_IDS is a list of valid terminal IDs for this installation, separated by commas
7. Copy the WMOBILE.INI file to both the IIS start-up directory and the RF5xA directory
[TERMINALID=2]
DIRECTORY=C:\ACCUDART\SERVER678\2\
SERVER=SERVER678
ARRAY=2
[TERMINALID=4]
DIRECTORY=C:\ACCUDART\SERVER678\4\
SERVER=SERVER678
ARRAY=4
[TERMINALID=ACCUDART9]
DIRECTORY=C:\ACCUDART\SERVER678\5\
SERVER=SERVER678
ARRAY=5
[TERMINALID=ACCU9]
DIRECTORY=C:\ACCUDART\SERVER678\6\
SERVER=SERVER678
ARRAY=6
7.1. The TERMALID is the terminal ID on the device
7.2. The DIRECTORY is the directory on the IIS machine or network in which the communication files will
be stored
7.3. The SERVER is the Server ID which should be the same as the CONFIG.INI file
7.4. The ARRAY is the value in ACCU-DART that will communicate. Values can be 1 to 64, and must be
unique for each device.
8. Test connectivity to IIS/Web Server
8.1. Open Internet Explorer; type http://localhost/ to test. You should see the Ant Colony/ACCU-DART
screen
8.2. Type the IP Address to test the IIS Server. You should see the same screen as above.
NOTE: If you have an issue seeing the screen, check your security settings. You do not want security on
the server running the ACCU-DART software. You may need to set the firewall/security to a higher level
9. Create server directories
10. Create workstation directories within the server directories
Handheld CAB Files Installation:
1. Copy the CAB File to the Windows Mobile Device
1.1. Connect the handheld to any Windows PC using MS ActiveSync
NOTE: a partnership is not required, just connectivity
1.2. Use the <EXPLORE> button on ActiveSync to open up the handheld device
1.3. Copy the .cab file from the PC to the \My Documents folder on the device
1.4. Copy the custom <CONFIG.XML> file to the \My Documents folder on the device
1.5. Disconnect the handheld from the PC
2. Launch the .cab file on the Windows Mobile Device
2.1. Open File Explorer (Start > Programs > File Explorer on most devices)
2.2. Open the \My Documents folder you copied the .cab file into in Step 1
2.3. Click on the .cab file; this will launch the installer and install the file
NOTE: depending on the OS version the .cab file may auto-delete when done
3. Configure ACCU-DART for Windows Mobile
3.1. Click and hold the stylus on the <CONFIG.XML> file copied in Step 1
3.2. When the context menu appears, choose <COPY>
3.3. Use File Explorer to go to \Program Files\AccuDart
3.4. Click and hold down the stylus in this window
3.5. When the context menu appears, choose <PASTE>
4. Create a shortcut to the application
4.1. Use File Explorer to go to \Program Files\AccuDart
4.2. Click and hold down the stylus on the ACCU-DART application
4.3. When the context menu appears, choose <COPY>
4.4. Use File Explorer to go to \Windows\Start Menu
4.5. Click and hold down the stylus in this window
4.6. When the context menu appears, choose <PASTE SHORTCUT>
4.7. Click and hold down the stylus on the shortcut name
4.8. When the context menu appear, choose <RENAME>
4.9. Name the Shortcut <ACCUDART>; Click the stylus off the shortcut to save the name
5. Installation Clean-up (Optional)
5.1. If the .cab file did not auto-delete, it may be deleted from \My Documents
5.2. The <CONFIG.XML> file may also be deleted from \My Documents
NOTE: You may wish to leave both files on the device for support and troubleshooting purposes
6. Launch ACCU-DART for Windows Mobile
6.1. Open ACCU-DART (Start Menu > AccuDart)
6.2. The ACCU-DART for Windows Mobile client will launch using the settings in <CONFIG.XML>
Setting the CONFIG.XML File:
The <CONFIG.XML> is where all parameters for the ACCU-DART for Windows Mobile application are set. Incorrect configuration settings may result in poor output display, or failed connectivity. It is highly recommended that all
configuration settings be tested and finalized prior to deploying to individual terminals.
Typical <CONFIG.XML> file:
<?xml version=”1.0” encoding=”utf-8” ?>
<configuration>
<appSettings>
<add key=”TERMID” value=”5” />
<add key=”POLLINTERVAL” value=”250” />
<add key=”BGCOLOR” value=”E” />
<add key=”FGCOLOR” value=”1” />
<add key=”FSIZE” value=”M” />
<add key=”FSMALL” value=”10” />
<add key=”FMEDIUM” value=”14” />
<add key=”FLARGE” value=”20” />
<add key=”WEBSERVER” value=”10.0.1.162” />
<add key=”SPLASHTIMEOUT” value=”2” />
<add key=”CLIENTLOG” value=”1” />
<add key=”SOFTKEYBOARD” value=”1” />
</appSettings>
</configuration>
Information on each of the settings appears below:
TERMID
POLLINTERVAL
BGCOLOR
FGCOLOR
FSIZE
FSMALL
FMEDIUM
FLARGE
WEBSERVER
SPLASHTIME
CLIENTLOG
SOFTKEYBOARD
This needs to be a unique value within the client’s installation. This can be an 8 character name
or numeric value. Installer should keep track of which terminal IDs are assigned to which devices
This value is used to indicate how often (in milliseconds) that the mobile device should check to
see if there is anything from the ACCU-DART server that needs to be acted upon. The default
value is 250
The default background color for the display. Having value of <E> matches what is currently
in ACCU-DART system and probably results in the best display
The default foreground color for display and value <1> works well
The default font size
The size of “small” font. 10 seems to work best on most devices. It may be that this value should
be changed for smaller/larger displays
The size of “medium” font. 14 seems to work best on most devices. It may be that this value
should be changed for smaller/larger displays
The size of “large” font. 20 seems to work well. NOTE that ACCU-DART does not currently use
large fonts
The value of the IP address of the web server ACCU-DART is talking to. It is important that it
has the correct value, or no communications will take place. This value can be tested once IIS is
set up by going to this address in the web browser on the devices
The number of seconds the ACCU-DART splash screen is displayed on start-up
Optional field – indicates if system should update logo n this device. 0 = No and 1 = Yes
Optional field – indicates if virtual keyboard is to be active;
0 = No virtual keyboard
1 = virtual keyboard but not active on start-up,
2 = virtual keyboard active on start-up
Default value is 0
This ability is not available until release 1.02 of ACCU-DART for Windows Mobile.
Setting up ACCU-DART
1. Sign in to Sage Accpac as user ADMIN with the correct password.
2. In the Administrative Services folder, double click on the icon “Data Activation”.
3. Answer “Yes” to Proceed and click on the application “ACCU-DART (V53B, V54A, etc).
4. Click the “Activate” button and then the “Proceed” button. You will see the ACCU-DART folder added to
the Sage Accpac desktop after the activation is completed. You are now ready to configure ACCU-DART.
In Sage Accpac ERP, Click on the ACCU-DART folder, then double click on the icon “Maintenance”. There are eight
selections:
1. RF Options Maintenance
5. Label Maintenance
2. Warehouse Maintenance
6. Worksheet Maintenance
3. User Maintenance
7. Optional Fields
4. Bar Code Maintenance
8. Purge Transactions
RF Options Maintenance
1. Double click on the icon “RF Options Maintenance”. The follow screen will open:
2. Select the Database Type (Microsoft SQL Server or Pervasive SQL)
3. Enter the Database Server Name in the ACCU-DART Company Set-Up window
For Microsoft SQL Server
To find the correct Database Server Name:
a. On the computer/server where Microsoft SQL Server is physically installed, open the SQL Server
Enterprise Manager and right-click on “Microsoft SQL Servers”
b. Click on “About SQL Server Enterprise Manager…” and then click on “System Info…”
c. The system information box will open. The System Name is the Database Server Name
For Database User ID and Database Password fields, enter the MS SQL System Administrator’s user ID
and password.
OR
For Pervasive.SQL Server
To find the correct Database Server Name:
a. On the computer/server where Pervasive.SQL server is physically installed, right-click on “My
Computer”
b. Click on “Properties”, and then click on the “Computer Name” tab.
c. The Computer Name screen will open. The Full Computer Name is the Database Server Name
Enter the Database Server name in the ACCU-DART Company Set-up window
**Do not enter a Database User ID or Database Password for Pervasive.SQL Version
When you are finished making your selections, press the Add or Save button to create or save the RF Options
Maintenance settings.
Warehouse Maintenance
1. Double click on the icon, “Warehouse Maintenance”.
2. Type in the desired warehouse code(s) for this ACCU-DART installation. ACCU-DART will validate the
warehouse codes entered against the IC location codes entered in Sage ACCPAC ERP Inventory Control.
Only valid codes are allowed. In our example, we will use warehouse code 1:
3. Log Level: Press the down arrow and select the desired Log Level. The choices are:
Name
Log In / Log Out
Log In / Log Out / Menu Functions
Log In / Log Out / Menu Functions / Prompts
No Information
Least Detailed Information
More Detailed Information
Most Detailed Information
Depending on the selected Log Level, ACCU-DART will do nothing or write detailed information to
the file RFLOGS.
4. Input Freight Dollars when Shipping: Press the down arrow and select the desired level. This selection is
only valid if you purchased the “1 - Ship a Sales Order” advanced update module and purchased/installed
the ACCPAC Optional Fields module. The choices are:
Never
Always
Prompt
Do nothing
Always force the ACCU-DART user to enter a freight $ value
when shipping an OE order. $0 is acceptable
Prompt the ACCU-DART user to enter a freight $ value when
shipping an OE order. $0 is acceptable.
5. Company Code: If you have any customizations, enter your company code here. You should only be
changing this field if you get instructions from Executive Concepts.
6. When you are finished making your selections, press the Add or Save button to create or save the Ware
house Setup options. Repeat these steps for all required warehouses.
10
User Maintenance
1. Double-click on the icon “User Maintenance”.
2. Type the desired User ID for the first ACCU-DART user. We recommend using a numerical user ID as it is
easier to enter on the RF devices. The following detailed screen will appear:
3. Type the desired Password. The password is required by the user to operate ACCU-DART in either Desk
top or Radio Frequency mode. Again, we recommend using a numerical password.
4. Type the user name.
** If you have purchased/installed the Sage ACCPAC ERP Optional Fields program, then the user name will be posted to
an optional field “DARTUSER” whenever an update transaction: 1 – Ship a Sales Order, 2 – PO Receipt, or 33 - Warehouse Transfers, etc. – is posted in real time in the Sage ACCPAC ERP database.
5. Type the Warehouse code. This is the HOME warehouse for this ACCU-DART user. The warehouse code
entered is validated against the warehouse codes previously set up in the Warehouse Setup function.
6. If the MISys modules are activated, enter the MISys Manufacturing Plant code
7. Double click on the “Access” column for each of the ACCU-DART modules that you purchased from ECI to change the activation status from NO to YES. IMPORTANT: Modules RFLOGIN, RFMENU, and LOGOUT
should always be activated. If you want to purchase additional modules, contact your ACCU-DART reseller or [email protected] and we will refer you to an ACCU-DART reseller.
8.
When you are finished making your selections, press the Add or Save button to create or save the User
Setup options. Repeat these steps for all required users.
11
Here is an example of user 1, Joe Blough. Joe works at warehouse 1 in the Shipping
Department and is only authorized/activated to use the following ACCU-DART functions:
1–
51 – 53 –
55 –
56 –
Ship a Sales Order
Item / Bin (Location) Inquiry
Item/SO Inquiry
SO Inquiry
Customer Inquiry
12
Bar Code Maintenance
1. Double click on the icon, “Bar Code Maintenance”.
There are five Bar Code databases: Customer Bar Code, Internal Bar Code,Vendor Bar Code, MISys Internal
Bar Code, and MISys Supplier Bar Code.
2. Internal Bar Code Maintenance: This is the first database that you need to set up.
a. Enter YOUR UNIQUE BAR CODE for each desired Item/Unit of Measure combination as shown in
the examples below. ACCU-DART will use these bar codes for all transactions and inquiries.
3. Customer Bar Code Maintenance: This is the database to set up if you intend to use Customer Bar Codes.
a. Enter each customer’s UNIQUE BAR CODE for each desired Item/Unit of Measure combination as
shown in the examples below. ACCU-DART will use these bar codes for all OE Shipment
transactions and inquiries.
13
4. Vendor Bar Code Maintenance: This is the database to set up if you intend to use Vendor Bar Codes.
a. Enter each vendor’s UNIQUE BAR CODE for each desired Item / Unit of Measure combination as
shown in the examples below. ACCU-DART will use these bar codes for all PO Receipts transactions and inquiries.
5. MISys Internal Bar Code Maintenance: This is the database to set up if you intend to use MISys Internal
Bar Codes. You must have MISys activated on your computer to access this feature
a. Enter each vendor’s UNIQUE BAR CODE for each desired Item / Unit of Measure combination as
shown in the examples below. ACCU-DART will use these bar codes for all PO Receipts transactions and inquiries.
6. MISys Supplier Bar Code Maintenance: This is the database to set up if you intend to use MISys Supplier
Bar Codes. You must have MISys activated on your computer to access this feature
a. Enter each vendor’s UNIQUE BAR CODE for each desired Item / Unit of Measure combination as
shown in the examples below. ACCU-DART will use these bar codes for all PO Receipts transactions
and inquiries.
14
Operating ACCU-DART
1. In Sage Accpac ERP, Click on the ACCU-DART folder, then double click on the icon “Program”. Select the
version program you purchased and wish to use:
Desktop ACCU-DART – This is the desktop emulator
Radio-Frequency ACCU-DART – This is the 900 MHz R/F version of ACCU-DART for the LT700
series handheld devices
Radio-Frequency ACCU-DART 802 – This is the 802.11 R/F version of ACCU-DART for the LT800
series handheld devices
Radio-Frequency ACCU-DART Color – This is the 900 MHz R/F version of ACCU-DART for the
LT7000 series handheld devices
Desktop ACCU-DART Colour - This is the desktop emulator designed to emulate the LT7000 series.
**If you are launching ACCU-DART for the first time, you will be prompted to enter your Activation Key.
The Radio-Frequency version will open a table like the one below:
This table shows which R/F Scanners are currently in use, and what “prompt” is being displayed on the R/F screen.
2. Users turn on the R/F Scanner, and are prompted to enter their username and password (see: User Set-Up)
3. The screen will now display the available modules; select the function and follow the prompts on-screen.
(see: Module Descriptions for more information)
ACCU-DART sends and receives data from Sage Accpac in real time.
15
ACCU-DART Modules
Ship Sales Orders
Description:
This function allows the user to scan items (& quantity) to be shipped, review the total shipment,
and, when complete, ship the sales order.
Instructions:
Menu Option #1
Ask for Quantity “Yes” – ACCU-DART will ask for quantity
“No” – Scan each item individually
Enter/Scan the Sales Order #
Confirm that this is the correct customer/sales order
Begin Scanning/Entering items – Scan the item, then enter the quantity for that item; repeat
When you have scanned all the items to be shipped, press ‘enter’ on a blank screen – this will take
you to the “closing menu”
Select from the options: (P)ost – Post the complete sales order
(R)eview – Review this shipment
(A)dd – Add additional items to shipment
(C)ancel – Cancel Shipment
Optional Add-On Modules:
SO Ship with Lots
Description:
This function allows the user to ship items from a sales order using lot control. When activated,
ACCU-DART will automatically check if the item scanned is a lot-controlled item. It then prompts the
user to enter the lot number. Upon posting, the lot information is updated in Sage Accpac.
SO Ship with Serial Numbers
Description:
This function allows the user to ship items from a sales order using serial numbers. When activated,
ACCU-DART will automatically check if the item scanned is a serialized item. It then prompts the
user to enter the serial numbers for each item shipped, and verifies in real-time that this is a valid
serial number. Upon posting, the serialized inventory is updated in Sage Accpac.
SO Ship with Bins
Description:
This function allows the user to ship items from a sales order using bin tracking. When activated,
ACCU-DART will automatically prompt the user to enter the bin number from which each item is
shipped. Upon posting, the bin information is updated in Sage Accpac through Orchid’s Bin Tracking
system.
Ship Kit Components
Description:
This function allows the user to ship kit items from a sales order. When activated, ACCU-DART
will automatically check if the item scanned is a kitted item. It then prompts the user to enter the
kit item and the components for the kit. Upon posting, ACCU-DART will adjust the kit component
inventory in Sage Accpac.
Print Forms
Description:
This function allows the user to automatically print selected forms. Upon completing a transaction,
ACCU-DART can be set to automatically print a packing slip or invoice, etc.
16
Receive Purchase Orders
Description:
This function allows the user to scan the items (& quantity) being received; review the total delivery,
and, when complete, post the receipt of goods
Instructions:
Menu Option #2
Enter/Scan the Purchase Order #
Confirm that this is the correct vendor/purchase order
Begin Scanning/Entering items – Scan the item, then enter the quantity for that item; repeat
When you have scanned all the items to be received, press ‘enter’ on a blank screen – this will take
you to the “closing menu”
Select from the options: (P)ost – Post the complete purchase order
(R)eview – Review this receipt
(A)dd – Add additional items to receipt
(C)ancel – Cancel Receipt
Optional Add-On Modules:
Receive POs with Lots
Description:
This function allows the user to receive items from a purchase order using lot control. When
activated, ACCU-DART will automatically check if the item scanned is a lot-controlled item. It then
prompts the user to enter the lot number. Upon posting, the lot information is updated in Sage
Accpac.
Receive POs with Serial Numbers
Description:
This function allows the user to receive items from a purchase order using serial numbers. When
activated, ACCU-DART will automatically check if the item scanned is a serialized item. It then
prompts the user to enter the serial numbers for each item receives, and verifies in real-time that
this is a valid serial number. Upon posting, the serialized inventory is updated in Sage Accpac.
Receive POs with Bins
Description:
This function allows the user to recieve items from a purchase order using bin tracking. When
activated, ACCU-DART will automatically prompt the user to enter the bin number to which each
item is shipped. Upon posting, the bin information is updated in Sage Accpac through Orchid’s Bin
Tracking system.
PO Receipts – Ask for Serial Number or Lot Optional Fields
Description:
This function allows the user to update the Sage Accpac Optional Fields for Serial Numbers or Lot
Control. When activated, ACCU-DART will automatically check if the item scanned is a kitted item.
It then prompts the user to enter the kit item and the components for the kit. Upon posting, ACCUDART will adjust the kit component inventory in Sage Accpac.
17
Physical Inventory Count
Description:
This function allows the user to scan the items & quantities for physical counts. Uniquely, ACCUDART is configured to allow multiple users to perform a physical count at once. It also makes this
process easy when using lot control or serialized inventory
Instructions:
In Sage Accpac, Run the “IC Generate Inventory Worksheet” function to create the IC Inventory
Worksheet
* Turn OFF the check box – Default Quantity On Hand. ACCU-DART requires an intial count
quantity of zero
After running the worksheet, take a moment to verify that the default starting Count Quantity is zero.
In the Worksheet Maintenance folder, the ACCU-DART icon “Prepare SNs and Lots” is used to:
Temporarily change all Lots and SN with a status of “available” to a new status of “not
available”
Temporarily adjust all Lots and SN in the IC Inventory Worksheet to zero – in order to
match the default starting Count Quantity of zero at the IC item detail level
* Verify that you have a BACKUP of all Sage Accpac data before proceeding.
Open ACCU-DART
Menu Option #61
Enter/Scan item to be counted
Enter Quantity; repeat
When you have scanned all the items to be received, press ‘enter’ on a blank screen – this will take
you to the “closing menu”
Select from the options: (S)ave – Save the Inventory Count
(R)eview – Review this IC
(A)dd – Add additional items to IC
(C)ancel – Cancel IC
Use the ACCU-DART Import into IC Worksheet function to transfer the imported PI Count transaction
quantities into the IC Inventory Worksheet.
Print & Review the IC Reconciliation report. ACCU-DART removes the “On-Hold” status for all items
with a count variance in the IC Inventory Worksheet. All other “On-Hold” statuses will need to be
reviewed and resolved by the inventory count manager.
Create another BACKUP (do not overwrite your previous backups)
Post the PI Count Reconciliation in Accpac IC and print all required reconciliation reports.
Optional Add-On Modules:
Physical Inventory Count with Lots
Description:
This function allows the user to perform a physical inventory count using lot control. When activated,
ACCU-DART will automatically check if the item scanned is a lot-controlled item. It then prompts the
user to enter the lot number. Upon posting, the lot information is updated in Sage Accpac.
Physical Inventory Count with Serial Numbers
Description:
This function allows the user to perform a physical inventory count using serial numbers. When
activated, ACCU-DART will automatically check if the item scanned is a serialized item. It then
prompts the user to enter the serial numbers for each item receives, and verifies in real-time that this is a valid serial number. Upon posting, the serialized inventory is updated in Sage Accpac.
Physical Inventory Count with Bins
Description:
This function allows the user to perform a physical inventory count using bin tracking. When
activated, ACCU-DART will automatically prompt the user to enter the bin number for each item
being counted. Upon posting, the bin information is updated in Sage Accpac through Orchid’s Bin
Tracking system.
18
IC Warehouse Transfers (one-step)
Description:
This function allows the user to transfer items from one warehouse to another in one-step. When an
item is transferred using this module, it is removed from the inventory in one warehouse, and added
to the inventory of the other warehouse.
Instructions:
Menu Option #33
Enter/Scan the Destination Warehouse
Enter/Scan the item(s) to be transferred
Enter the quantity to be transferred; repeat
When you have scanned all the items to be received, press ‘enter’ on a blank screen – ACCU-DART
will then ask if you want to “Update the Transfer” – Select “Yes” to update, or “No” to cancel
Optional Add-On Modules:
Warehouse Transfers with Lots
Description:
This function allows the user to transfer items from one warehouse to another using lot control. When
activated, ACCU-DART will automatically check if the item scanned is a lot-controlled item. It then
prompts the user to enter the lot number. Upon posting, the lot information is updated in Sage
Accpac.
Warehouse Transfers with Serial Numbers
Description:
This function allows the user to transfer items from one warehouse to another using serial numbers.
When activated, ACCU-DART will automatically check if the item scanned is a serialized item. It
then prompts the user to enter the serial numbers for each item receives, and verifies in real-time
that this is a valid serial number. Upon posting, the serialized inventory is updated in Sage Accpac.
Warehouse Transfers with Bins
Description:
This function allows the user to transfer items from one warehouse to another using bin tracking.
When activated, ACCU-DART will automatically prompt the user to enter the bin number for each
item being transferred, and enter the bin number to where it is being allocated. Upon posting, the
bin information is updated in Sage Accpac through Orchid’s Bin Tracking system.
19
In-Transit Warehouse Transfers (two-step)
Description:
This function includes two modules that allow the user to transfer items from one warehouse to
another in two-steps. First an item is transferred out of a warehouse; then, upon receipt, the items
are added in to the second location.
Instructions:
In “From” Warehouse, open ACCU-DART
Menu Option #31
Enter/Scan the Destination Warehouse
Enter/Scan the item(s) to be transferred
Enter the quantity to be transferred; repeat
When you have scanned all the items to be received, press ‘enter’ on a blank screen – ACCU-DART
will then ask if you want to “Update” – Select “Yes” to update, or “No” to cancel
*This will place items “in transit”
In “To” Warehouse, open ACCU-DART
Menu Option #32
Enter/Scan items received
Enter the quantity received
When you have scanned all the items, press ‘enter’ on a blank screen – ACCU-DART will then ask if
you want to update – select “Yes” to update, or “No” to cancel
*This will update the inventory in the “To” warehouse, and complete the warehouse transfer
Optional Add-On Modules:
Warehouse Transfers with Lots
Description:
This function allows the user to transfer items from one warehouse to another using lot control. When
activated, ACCU-DART will automatically check if the item scanned is a lot-controlled item. It then prompts the user to
enter the lot number. Upon posting, the lot information is updated in Sage Accpac.
Warehouse Transfers with Serial Numbers
Description:
This function allows the user to transfer items from one warehouse to another using serial numbers.
When activated, ACCU-DART will automatically check if the item scanned is a serialized item. It then prompts the user
to enter the serial numbers for each item receives, and verifies in real-time that this is a valid serial number. Upon
posting, the serialized inventory is updated in Sage Accpac.
Warehouse Transfers with Bins
Description:
This function allows the user to transfer items from one warehouse to another using bin tracking.
When activated, ACCU-DART will automatically prompt the user to enter the bin number for each
item being transferred, and enter the bin number to where it is being allocated. Upon posting, the
bin information is updated in Sage Accpac through Orchid’s Bin Tracking system.
20
IC Shipments
Description:
This function allows the user to indicate what items have been shipped and generate an IC
Shipment in real-time.
Instructions:
Menu Option #62
Ask for Quantity “Yes” – ACCU-DART will ask for quantity
“No” – Scan each item individually
Enter/Scan the Price List OR Leave Blank. If you press “enter” to leave blank, ACCU-DART will ask
if you want to “Exit Y/N”, select “No” to continue
Enter/Scan the item to be shipped
Enter the quantity to be shipped; repeat
When you have scanned all the items to be shipped, press ‘enter’ on a blank screen – this will take
you to the “closing menu”
Select from the options: (P)ost – Post the complete IC Shipment
(R)eview – Review this shipment
(A)dd – Add additional items to shipment
(C)ancel – Cancel Shipment
(S)ave – Save the shipment to post or continue later.
Optional Add-On Modules:
IC Ship with Lots
Description:
This function allows the user to indicate what items have been shipped and generate an IC
Shipment using lot control. When activated, ACCU-DART will automatically check if the item
scanned is a lot-controlled item. It then prompts the user to enter the lot number. Upon posting, the
lot information is updated in Sage Accpac.
IC Ship with Serial Numbers
Description:
This function allows the user to indicate what items have been shipped and generate an IC
Shipment using serial numbers. When activated, ACCU-DART will automatically check if the item
scanned is a serialized item. It then prompts the user to enter the serial numbers for each item
receives, and verifies in real-time that this is a valid serial number. Upon posting, the serialized
inventory is updated in Sage Accpac.
IC Ship with Bins
Description:
This function allows the user to indicate what items have been shipped using bin tracking. When
activated, ACCU-DART will automatically prompt the user to enter the bin number from which each
item is shipped. Upon posting, the bin information is updated in Sage Accpac through Orchid’s Bin
Tracking system.
21
IC Receipts
Description:
This function allows the user to indicate what items have been received and generate an IC Receipt
in real-time.
Instructions:
Menu Option #63
Ask for Quantity “Yes” – ACCU-DART will ask for quantity
“No” – Scan each item individually
Enter/Scan the PO # OR Leave Blank. If you press “enter” to leave blank, ACCU-DART will ask if
“PO# Required (Y/N/Exit)”, select “No” to continue
Enter/Scan the item to be received
Enter the quantity to be received; repeat
When you have scanned all the items to be shipped, press ‘enter’ on a blank screen – this will take
you to the “closing menu”
Select from the options: (P)ost – Post the complete receipt
(R)eview – Review this receipt
(A)dd – Add additional items to receipt
(C)ancel – Cancel receipt
(S)ave – Save the receipt to post or continue later.
Optional Add-On Modules:
IC Receipts with Lots
Description:
This function allows the user to indicate what items have been received and generate an IC Receipt
using lot control. When activated, ACCU-DART will automatically check if the item scanned is a lotcontrolled item. It then prompts the user to enter the lot number. Upon posting, the lot information is
updated in Sage Accpac.
IC Receipts with Serial Numbers
Description:
This function allows the user to indicate what items have been received and generate an IC Receipt
using serial numbers. When activated, ACCU-DART will automatically check if the item scanned is
a serialized item. It then prompts the user to enter the serial numbers for each item receives, and
verifies in real-time that this is a valid serial number. Upon posting, the serialized inventory is
updated in Sage Accpac.
IC Receipts with Bins
Description:
This function allows the user to indicate what items have been received into which bins. When
activated, ACCU-DART will automatically prompt the user to enter the bin number to which each
item is shipped. Upon posting, the bin information is updated in Sage Accpac through Orchid’s Bin
Tracking system.
22
Vendor Receipts
Description:
This function allows the user to indicate what items have been received and generate a Vendor
Receipt in Accounts Payable in real-time, without requiring a PO#.
Instructions:
Menu Option #63
Ask for Quantity “Yes” – ACCU-DART will ask for quantity
“No” – Scan each item individually
Enter/Scan the Vendor # OR Leave Blank. If you press “enter” to leave blank, ACCU-DART will ask
if “Vendor# Required (Y/N/Exit)”, select “No” to continue
Enter/Scan the item to be received
Enter the quantity to be received; repeat
When you have scanned all the items to be shipped, press ‘enter’ on a blank screen – this will take
you to the “closing menu”
Select from the options: (P)ost – Post the complete receipt
(R)eview – Review this receipt
(A)dd – Add additional items to receipt
(C)ancel – Cancel receipt
(S)ave – Save the receipt to post or continue later.
Optional Add-On Modules:
Vendor Receipts with Lots
Description:
This function allows the user to indicate what items have been received and generate an IC Receipt
using lot control. When activated, ACCU-DART will automatically check if the item scanned is a lotcontrolled item. It then prompts the user to enter the lot number. Upon posting, the lot information is
updated in Sage Accpac.
Vendor Receipts with Serial Numbers
Description:
This function allows the user to indicate what items have been received and generate an IC Receipt
using serial numbers. When activated, ACCU-DART will automatically check if the item scanned is
a serialized item. It then prompts the user to enter the serial numbers for each item receives, and
verifies in real-time that this is a valid serial number. Upon posting, the serialized inventory is
updated in Sage Accpac.
Vendor Receipts with Bins
Description:
This function allows the user to indicate what items have been received into which bins and
generate an IC Receipt. When activated, ACCU-DART will automatically prompt the user to enter
the bin number to which each item is shipped. Upon posting, the bin information is updated in Sage
Accpac through Orchid’s Bin Tracking system.
23
Commit Sales Order
Description:
This function allows the user to enter item & quantity for a Sales Order; ACCU-DART will commit
those values. This function can be used in conjunction with SO Ship Commit.
Instructions:
Menu Option #11
Ask for Quantity “Yes” – ACCU-DART will ask for quantity
“No” – Scan each item individually
Enter/Scan the Sales Order #
Confirm that this is the correct customer/sales order
Begin Scanning/Entering items – Scan the item, then enter the quantity for that item; repeat
When you have scanned all the items to be shipped, press ‘enter’ on a blank screen – this will take
you to the “closing menu”
Select from the options: (P)ost – Post the complete sales order
(R)eview – Review this shipment
(A)dd – Add additional items to shipment
(C)ancel – Cancel Shipment
Optional Add-On Modules:
Commit Sales Order with Serial Numbers
Description:
This function allows the user to commit items from a sales order using serial numbers. When
activated, ACCU-DART will automatically check if the item scanned is a serialized item. It then
prompts the user to enter the serial numbers for each item shipped, and verifies in real-time that
this is a valid serial number. Upon posting, the serialized inventory is updated in Sage Accpac.
Commit Sales Order with Kit Components
Description:
This function allows the user to commit kit items from a sales order. When activated, ACCU-DART
will automatically check if the item scanned is a kitted item. It then prompts the user to enter the
kit item and the components for the kit. Upon posting, ACCU-DART will adjust the kit component
inventory in Sage Accpac.
24
SO Ship Commit
Description:
This function allows the user to ship committed items. This function can be used in conjunction with the
Commit Sales Order function.
Instructions:
Menu Option #1
Ask for Quantity “Yes” – ACCU-DART will ask for quantity
“No” – Scan each item individually
Enter/Scan the Sales Order #
Confirm that this is the correct customer/sales order
Begin Scanning/Entering items – Scan the item, then enter the quantity for that item; repeat
When you have scanned all the items to be shipped, press ‘enter’ on a blank screen – this will take
you to the “closing menu”
Select from the options: (P)ost – Post the complete sales order
(R)eview – Review this shipment
(A)dd – Add additional items to shipment
(C)ancel – Cancel Shipment
Optional Add-On Modules:
SO Ship Commit with Lots
Description:
This function allows the user to ship committed items from a sales order using lot control. When
activated, ACCU-DART will automatically check if the item scanned is a lot-controlled item. It then
prompts the user to enter the lot number. Upon posting, the lot information is updated in Sage
Accpac.
SO Ship Commit with Serial Numbers
Description:
This function allows the user to ship committed items from a sales order using serial numbers. When
activated, ACCU-DART will automatically check if the item scanned is a serialized item. It then
prompts the user to enter the serial numbers for each item shipped, and verifies in real-time that
this is a valid serial number. Upon posting, the serialized inventory is updated in Sage Accpac.
SO Ship Commit with Kit Components
Description:
This function allows the user to ship committed kit items from a sales order. When activated, ACCUDART will automatically check if the item scanned is a kitted item. It then prompts the user to enter
the kit item and the components for the kit. Upon posting, ACCU-DART will adjust the kit component
inventory in Sage Accpac.
25
Split/Combine Lots
Description:
This function allows the user to take items from part of an old lot # and move it to another lot #.
This function is often used as a substitute for bin tracking. Using the lot #s in lieu of bin #s, this
function will allow you to move items from one “bin” to another.
Instructions:
Menu Option #34
Ask for Quantity “Yes” – ACCU-DART will ask for quantity
“No” – Scan each item individually
Enter/Scan the item(s) to be transferred
Enter/Scan from which lot they are being transferred out
Enter/Scan the lot into which they are being received
Enter the quantity to be transferred;
When you have scanned all the items to be split, press ‘enter’ on a blank screen – ACCU-DART will
then ask if you want to “Update Y/N” – Select “Yes” to update, or “No” to cancel
Collect Barcodes
Description:
This function allows the user to assign a bar code for a specific item
Instructions:
Menu Option #91
Enter/Scan the item; press “enter”
Enter/Scan the barcode associate with this item
If there is another barcode for this item, enter/scan it when prompted
When finished, select “Yes” to update, or “No” to cancel
Change Warehouse
Description:
When setting up the ACCU-DART users, a default warehouse is assigned. This function allows the
user to change the warehouse in which they are working.
Instructions:
Menu Option #90
Screen will display the current warehouse name
Enter the name of the warehouse in which the user will be working
When finished, select “Yes” to update, or “No” to cancel
26
Orchid Bin Tracking - Bin Transfers
Description:
This function allows the user to transfer items from on particular bin to another with Orchid’s Bin
Tracking system.
Instructions:
Menu Option #35
Ask for Quantity “Yes” – ACCU-DART will ask for quantity
“No” – Scan each item individually
Enter/Scan the item # for the item being transferred
Enter/Scan the bin # that the item is being taken from
Enter/Scan the bin # where the item is being transferred to
Enter the quantity;
When you have scanned all the items to be transferred, press ‘enter’ on a blank screen - ACCU
DART will then ask if you want to “Update Y/N”
– Select “Yes” to update, or “No” to cancel
Orchid Bin Tracking - Picking
Description:
This function allows the user to pick items that need to be shipped and transfer them to the shipping
bin with Orchid’s Bin Tracking system. In order to have this function they must have a ship bin setup in
the RFWHSE table.
Instructions:
Menu Option #36
Ask for Quantity “Yes” – ACCU-DART will ask for quantity
“No” – Scan each item individually
Enter/Scan the item # for the item being transferred
Enter/Scan the bin # that the item is being picked from
Enter the quantity being picked;
When you have scanned the items to be transferred, press ‘enter’ on a blank screen - ACCU
DART will then ask if you want to “Update Y/N”
– Select “Yes” to update, or “No” to cancel
Orchid Bin Tracking - Putaways
Description:
This function allows the user to put items into their particular bins after receiving them into the
receiving bin with Orchid’s Bin Tracking system. In order to have this function they must have a
receiving bin setup in the RFWHSE table.
Instructions:
Menu Option #37
Ask for Quantity “Yes” – ACCU-DART will ask for quantity
“No” – Scan each item individually
Enter/Scan the item # for the item being put away
Enter/Scan the bin # that the item is being put into
Enter the quantity being put away;
When you have scanned the items to be transferred, press ‘enter’ on a blank screen - ACCU
DART will then ask if you want to “Update Y/N”
– Select “Yes” to update, or “No” to cancel
27
Orchid Bin Tracking - Pick by SO
Description:
This function allows the user to pick items that need to be shipped for a specific sales order and
transfer them into the shipping bin with Orchid’s Bin Tracking system. In order to have this function
they must have a ship bin setup in the RFWHSE table.
Instructions:
Menu Option #38
Ask for Quantity “Yes” – ACCU-DART will ask for quantity
“No” – Scan each item individually
Enter/Scan the Sales Order #
Enter/Scan the item # for the item being picked
Enter/Scan the bin # that the item is being picked from
Enter the quantity being picked
When you have scanned the items to be transferred, press ‘enter’ on a blank screen - ACCU
DART will then ask if you want to “Update Y/N”
– Select “Yes” to update, or “No” to cancel
28
AutoSimply Integration - Issuance
Description:
This function allows the user to issue items to a specific Manufacturing Order with AutoSimply’s
Manufacturing system.
Instructions:
Menu Option #80
Ask for Quantity “Yes” – ACCU-DART will ask for quantity
“No” – Scan each item individually
Enter/Scan the Manufacturing Order #
The item and BOM # is displayed and user confirms that it is the correct
Enter/Scan from Operation #
Enter/Scan the item and enter the quantity; repeat
To change the operation number, press “enter” on a blank item number to go back and enter a new
operation #
When you have scanned all the items to be issued, press ‘enter’ on a blank operation # – this will
take you to the “closing menu”
Select from the options: (P)ost – Post the complete manufacturing order
(R)eview – Review this issuance
(A)dd – Add additional items to manufacturing order
(C)ancel – Cancel issuance
AutoSimply Integration - Returns
Description:
This function allows the user to return items to inventory that have previously been issued but not
usedwith AutoSimply’s Manufacturing system.
Instructions:
Menu Option #81
Ask for Quantity “Yes” – ACCU-DART will ask for quantity
“No” – Scan each item individually
Enter/Scan the Manufacturing Order #
The item and BOM # is displayed and user confirms that it is the correct
Enter/Scan from Operation #
Enter/Scan the item and enter the quantity; repeat
To change the operation number, press “enter” on a blank item number to go back and enter a new
operation #
When you have scanned all the items to be issued, press ‘enter’ on a blanks creen – this will
take you to the “closing menu”
Select from the options: (P)ost – Post the complete return
(R)eview – Review this return
(A)dd – Add additional items
(C)ancel – Cancel return
AutoSimply Integration - Receipts
Description:
This function allows the user to create receipts for the manufactured items with AutoSimply’s
Manufacturing system.
Instructions:
Menu Option #82
Enter/Scan the Manufacturing Order #
The item and BOM # is displayed and user confirms that it is the correct
29
Enter the quantity of items that have been manufactured
When you have entered the quantity, ACCU-DART will then ask if you want to “Update Y/N”
– Select “Yes” to update, or “No” to cancel
AutoSimply Integration - Close MO
Description:
This function allows the user to close the manufacturing order with AutoSimply’s Manufacturing
system.
Instructions:
Menu Option #83
Enter/Scan the Manufacturing Order #
The item and BOM # is displayed and user confirms that it is the correct
ACCU-DART will then ask if you want to “Close MO Y/N”
– Select “Yes” to update, or “No” to cancel
30
MISys Item to Sales
Description:
This function allows the user to transfer MISys finished goods to Accpac Sales inventory. ‘
You must have MISys activated to use this module.
Instructions:
*You must have MISys running on your desktop
Menu Option #40
Ask for Quantity “Yes” – ACCU-DART will ask for quantity
“No” – Scan each item individually
Enter/Scan the item(s) being transferred to Accpac IC sales inventory
Enter/Scan the “To Bin” (opt)
Enter the correct IC Sales Location code
Enter the quantity transferred
When you have scanned all the items, press “enter”
Select from the options:
(S)ave – store the transaction in a new or unposted batch for the RF User
(P)ost – record the transaction
MISys Bin Transfer
Description:
This function allows the user to transfer MISys stock from one bin to another at a single MISys
location.
You must have MISys activated to use this module.
Instructions:
*You must have MISys running on your desktop
Menu Option #41
Enter/Scan the item(s) to transfer
Enter/Scan the “From Bin” (source)
Enter/Scan the “To Bin” (target)
Enter the quantity transferred; repeat
When you have scanned all the items to be transferred, press “enter”
Select from the options:
(S)ave – store the transaction in a new or unposted batch for the RF User
(P)ost – record the transaction
MISys Warehouse Transfer
Description:
This function allows the user to transfer MISys stock between two MISys locations.
You must have MISys activated to use this module.
Instructions:
*You must have MISys running on your desktop
Menu Option #42
Enter/Scan the item(s) to transfer
Enter/Scan the “From Bin” (source) (if applicable)
Enter the “To Warehouse (and “To Bin”, if applicable)
Enter the quantity transferred; repeat
When you have scanned all the items to be transferred, press “enter”
Select from the options:
(S)ave – store the transaction in a new or unposted batch for the RF User
(P)ost – record the transaction
31
MISys PO Receipt
Description:
This function allows the user to receive MISys POs from suppliers.
Instructions:
*You must have MISys running on your desktop
Menu Option #43
Enter/Scan the PO #
Confirm that this is the correct vendor/Purchase Order
Enter/Scan the item to be received
Enter the quantity received
Enter/Scan the “To Bin” (opt); repeat
When you have scanned all the items to be received, press “enter”
Select from the options:
(S)ave – store the transaction in a new or unposted batch for the RF User
(P)ost – record the transaction
MISys Physical Inventory Count
Description:
This function allows the user to count MISys inventory and post reconciliation.
Instructions:
*You must have MISys running on your desktop
Menu Option #44
Select from the Options: (S)tock – Stock only items
(W)IP – WIP only items
Ask for Quantity “Yes” – ACCU-DART will ask for quantity
“No” – Scan each item individually
Enter/Scan the item
Enter the quantity counted
Enter/Scan the “To Bin” (opt); repeat
When you have scanned all the items to be counted, press “enter” to Save the scanned
transactions to the MISys PI Count Batch.
MISys Finished Goods / WIP Assembly from BOM
Description:
This function allows the user to assemble MISys finished goods and/or WIP from Bills of Material.
Instructions:
*You must have MISys running on your desktop
Menu Option #45
Ask for Quantity “Yes” – ACCU-DART will ask for quantity
“No” – Scan each item individually
Enter/Scan the Finished Goods item being assembled
*By Default, ACCU-DART uses the current revision of the BOM
Enter/Scan the “To Bin” (opt)
Enter the Build quantity for the finished good item that has been assembled; repeat
When you have scanned all the items, press “enter”
Select from the options:
(S)ave – store the transaction in a new or unposted batch for the RF User
(P)ost – record the transaction
32
MISys Complete MO
Description:
This function allows the user to assemble MISys finished goods and/or WIP from Bills of Material.
Instructions:
*You must have MISys running on your desktop
Menu Option #47
Ask for Quantity “Yes” – ACCU-DART will ask for quantity
“No” – Scan each item individually
Enter/Scan the Finished Goods item being assembled
*By Default, ACCU-DART uses the current revision of the BOM
Enter/Scan the “To Bin” (opt)
Enter the Build quantity for the finished good item that has been assembled; repeat
When you have scanned all the items, press “enter”
Select from the options:
(S)ave – store the transaction in a new or unposted batch for the RF User
(P)ost – record the transaction
MISys Change Plant
Description:
When setting up the ACCU-DART users, a default warehouse/plant is assigned. This function allows
the user to change the warehouse in which they are working.
Instructions:
Menu Option #92
Screen will display the current manufacturing plant name
Enter the name of the plant in which the user will be working
When finished, select “Yes” to update, or “No” to cancel
33
Inquiry Modules
Item/Location Inquiry
Description:
This function allows the user to enter an item # and view the locations and quantities
Instructions:
Menu Option #51
Enter/Scan the item
Screen will display the location(s) & quantities for this item
When finished reviewing, press “enter” to return to the main menu.
Item/PO Inquiry
Description:
This function allows the user to enter an item # and view the purchase orders which contain the item
Instructions:
Menu Option #52
Enter/Scan the item
Screen will display the current purchase orders & quantities for this item
When finished reviewing, press “enter” to return to the main menu.
Item/SO Inquiry
Description:
This function allows the user to enter an item # and view the sales orders which contain the item.
Instructions:
Menu Option #53
Enter/Scan the item
Screen will display the current sales orders & quantities for this item
When finished reviewing, press “enter” to return to the main menu.
PO Inquiry
Description:
This function allows the user to enter a purchase order and view the details
Instructions:
Menu Option #54
Enter/Scan the Purchase Order #
Screen will display the required items and quantities for this order
When finished reviewing, press “enter” to return to the main menu.
SO Inquiry
Description:
This function allows the user to enter a sales order and view the details
Instructions:
Menu Option #55
Enter/Scan the Sales Order #
Screen will display the required items and quantities for this order
When finished reviewing, press “enter” to return to the main menu.
34
Customer Inquiry
Description:
This function allows the user to enter a customer # and view the current sales order information
Instructions:
Menu Option #56
Enter/Scan the Customer #
Screen will display the current sales orders for this customer
When finished reviewing, press “enter” to return to the main menu.
Vendor Inquiry
Description:
This function allows the user to enter a vendor # and view the current purchase order information
Instructions:
Menu Option #57
Enter/Scan the Vendor #
Screen will display the current purchase orders for this vendor
When finished reviewing, press “enter” to return to the main menu.
Item/Lot Inquiry
Description:
This function allows the user to enter the item, and view the lot numbers and quantities
Instructions:
Menu Option #58
Enter/Scan the item #
Screen will display the lot(s) & quantities for this item
When finished reviewing, press “enter” to return to the main menu.
Item/Serial # Inquiry
Description:
This function allows the user to enter the item, and view the serial numbers assigned
Instructions:
Menu Option #59
Enter/Scan the item #
Screen will display the serial numbers & quantities for this item
When finished reviewing, press “enter” to return to the main menu.
Item/Bin Inquiry
Description:
This function allows the user to enter the item, and view which bins contain the item, along with the
quantities. *This module requires Orchid’s Bin Tracking system.
Instructions:
Menu Option #70
Enter/Scan the item #
Screen will display the bin(s) & quantities for this item
When finished reviewing, press any key to enter a new item, or press “enter” to return to the main
menu.
35
Bin Inquiry
Description:
This function allows the user to enter the bin # and view which items, along with the
quantities, that this bin contains. *This module requires Orchid’s Bin Tracking system.
Instructions:
Menu Option #71
Enter/Scan the bin #
Screen will display the itemss) & quantities for this bin
When finished reviewing, press any key to enter a new bin, or press “enter” to return to the main
menu.
MISys Bin Inquiry
Description:
This function allows the user to enter a bin # and view the items and quantities within the bin.
Instructions:
Menu Option #46
Enter/Scan the bin #
Screen will display the items & quantities for this bin
When finished reviewing, press “enter” to return to the main menu.
MISys Item/Location Inquiry
Description:
This function allows the user to enter an item # and view the locations and quantities
Instructions:
Menu Option #48
Enter/Scan the item
Screen will display the location(s) & quantities for this item
When finished reviewing, press “enter” to return to the main menu.
MISys Item/Bin Inquiry
Description:
This function allows the user to enter an item # and view the bins and quantities
Instructions:
Menu Option #49
Enter/Scan the item
Screen will display the bin(s) & quantities for this item
When finished reviewing, press “enter” to return to the main menu.
36
Advanced User Instructions
Installing the latest software from ACCU-DART’s website
1. Download the latest setup file from the ACCU-DART Reseller-only section (www.accu-dart.com/resellers).
There may be multiple version of ACCU-DART available for download. Be certain to download the correct
version (for Sage Accpac 5.3, 5.4, etc.)
2. STOP! – Make a backup
a. Rename your existing ACCU-DART program folder (eg. \Sage Accpac\RF54A) with a new name
(eg… \Sage Accpac\54Abackup)
3. Run the latest setup file that you downloaded from the web. The setup file will recreate the ACCU-DART
program folder and upgrade all application files to the latest version.
4. Copy the following files from the backup folder – per step 2 above – to the newly created ACCU-DART
program folder:
a. ACCU-DART License Files
RF.ECI
RFNO.ECI
RF.LIC
RFMISYS.ECI
ACCU-DART for MISys installations only
b. ACCU-DART Print Form Configuration Files
RFPrintForm
File type TXT
RFreportconfig File Type INI
c. ACCU-DART Customized Files
rfmodu_eng_”COMPANY”.dbf
rfmodu_eng_”COMPANY”
rfprmt_eng_”COMPANY”.dbf
rfprmt_eng_”COMPANY”
Clients with customizations to core ACCU-DART only!
File type CDX
File type CDX
5. Contact ECI – 1-888-324-7877 if you have any questions after completing these steps.
37
Installing ACCU-DART on a separate Workstation
When ACCU-DART is installed on a server, and the user is setting up a new ACCU-DART
Workstation, the following steps should be followed:
1. Ensure that ACCU-DART is installed on the server as per the instructions on Page 6.
2. Download the “Register RF DLLs” Macro from the Reseller-only section of the website
(www.accu-dart.com/resellers)
3. In the Accpac “Macro” menu, run the “Register RF DLLs” Macro
a. The DLL macro should be set to a path to the RF55A (or RF54A) directory
4. Continue setting up the ACCU-DART system, as per the instructions on page 7.
38
Setting up an OE Miscellaneous Charge to Post Freight Charges Directly Through ACCU-DART
**The steps below are to be used to configure ONE miscellaneous charge code to post the freight charge to the ACCPAC
shipment transactions through ACCU-DART**
Note: This feature is only available if all of the following conditions are met:
a. the ACCU-DART advance update module “1 – Ship a Sales Order” is installed,
b. the Sage ACCPAC ERP Optional Fields module is installed and activated, and
c. the setting for “Input Freight Dollars when Shipping?” is set to either ‘Always’ or ‘Prompt’ in the
ACCU-DART Warehouse Setup options.
1. Open Sage ACCPAC ERP.
2. Double click on the ACCPAC folder, “Order Entry”.
3. Double click on the ACCPAC folder, “OE Setup”.
4. Double click on the ACCPAC icon, “Miscellaneous Charges”.
5. Add or select ONE miscellaneous charge code only. In our example, we will use an existing charge code
“UPS”. Set the default charge amount to $0. The ACCU-DART user will be prompted to enter a charge
amount when shipping the Sage ACCPAC ERP Sales Order with ACCU-DART.
6. In our example, the Sage ACCPAC ERP Optional Fields module is already installed and activated, so click
on the up arrow on the left in the middle of screen to access the optional fields screen.
7. Double click and type or select Optional Field “DARTFREIGHT” and then press the TAB key and set both
Value Set = Yes and Value = Yes as shown below:
8. Click on the Close button to close the optional fields screen then press the Save button to save and
“attach” the optional field selection of “DARTFREIGHT” to the miscellaneous charge code ‘UPS’.
9. Press the Close button to close the Miscellaneous Charges screen.
You are now ready to ship Sage ACCPAC ERP Sales Orders and automatically enter a variable freight amount and
ship the freight charge with the ACCU-DART radio frequency solution.
39