1
Advanced Printer Driver for TM-T81 Ver.4
TM Printer Manual
APD Overview
Descriptions of the APD features.
Using the APD
Descriptions of simple printings and useful functions.
Reference
Descriptions of property seings of the printer driver.
TM Flash Logo Setup Utility
Descriptions of how to set and use the
TM Flash Logo Setup Utility.
Restrictions
Descriptions of restrictions on use of the APD.
Printer Specification
Descriptions of the specifications of the TM-T81.
M00003900
Rev.A
Cautions
• No part of this document may be reproduced, stored in a retrieval system, or transmitted in any form
or by any means, electronic, mechanical, photocopying, recording, or otherwise, without the prior
written permission of Seiko Epson Corporation.
• The contents of this document are subject to change without notice. Please contact us for the latest
information.
• While every precaution has taken in the preparation of this document, Seiko Epson Corporation
assumes no responsibility for errors or omissions.
• Neither is any liability assumed for damages resulting from the use of the information contained
herein.
• Neither Seiko Epson Corporation nor its affiliates shall be liable to the purchaser of this product or third
parties for damages, losses, costs, or expenses incurred by the purchaser or third parties as a result of:
accident, misuse, or abuse of this product or unauthorized modifications, repairs, or alterations to this
product, or (excluding the U.S.) failure to strictly comply with Seiko Epson Corporation’s operating
and maintenance instructions.
• Seiko Epson Corporation shall not be liable against any damages or problems arising from the use of
any options or any consumable products other than those designated as Original EPSON Products or
EPSON Approved Products by Seiko Epson Corporation.
Trademarks
EPSON® and ESC/POS® are registered trademarks of Seiko Epson Corporation in the U.S. and other
countries.
MS-DOS®, Microsoft®, Win32®, Windows®, Windows Vista®, Visual Studio®, Visual Basic®, Visual C++®,
and Visual C#® are either registered trademarks or trademarks of Microsoft Corporation in the United
States and other countries.
ESC/POS® Command System
EPSON has been taking industry’s initiatives with its own POS printer command system (ESC/POS).
ESC/POS has a large number of commands including patented ones. Its high scalability enables users
to build versatile POS systems. The system is compatible with all types of EPSON POS printers (excluding
the TM-C100) and displays. Moreover, its flexibility makes it easy to upgrade the future. The functionality
and the user-friendliness is valued around the world.
2
For Safety
Key to Symbols
The symbols in this manual are identified by their level of importance, as defined below. Read the following carefully before handling the product.
Provides information that must be observed to avoid damage to your equipment or a
malfunction.
Provides important information and useful tips.
Restriction of Use
When this product is used for applications requiring high reliability/safety such as transportation devices related to aviation, rail, marine, automotive etc.; disaster prevention devices; various safety devices etc; or functional/precision devices etc, you should use this product only after giving consideration to including fail‐safes and redundancies into your design to maintain safety and total system reliability. Because this product was not intended for use in applications requiring extremely high reliability/safety such as aerospace equipment, main communication equipment, nuclear power control equipment, or medical equipment related to direct medical care etc, please make your own judgment on this product’s suitability after a full evaluation.
3
About this Manual
Aim of the Manual
This manual is aimed to provide all the necessary information for development engineers to develop, design, and install POS system, or to develop and design printer applications.
Manual Content
The manual is made up of the following sections:
4
Chapter 1
APD Overview
Chapter 2
Using the APD
Chapter 3
Reference
Chapter 4
TM Flash Logo Setup Utility
Chapter 5
Restrictions
Appendix
Printer Specification
Contents
■ For Safety............................................................................................................................... 3
Key to Symbols ....................................................................................................................................... 3
■ Restriction of Use ..................................................................................................................3
■ About this Manual ................................................................................................................4
Aim of the Manual................................................................................................................................. 4
Manual Content .................................................................................................................................... 4
■ Contents ................................................................................................................................5
APD Overview ................................................................................9
■ Introduction...........................................................................................................................9
Manual organization ............................................................................................................................. 9
■ Inquiries................................................................................................................................10
■ APD4 Features.....................................................................................................................10
Printing Example .................................................................................................................................. 12
Using the APD ...............................................................................13
■ Application Printer Settings................................................................................................13
■ Character Printing (TrueType fonts) ..................................................................................14
■ Character Printing (Device Font)......................................................................................15
Setting Device Font ............................................................................................................................. 15
Printing Method ................................................................................................................................... 16
Program ................................................................................................................................................ 17
■ Printing a Barcode..............................................................................................................18
Barcode font setting............................................................................................................................ 18
Printing Method ................................................................................................................................... 19
Program ................................................................................................................................................ 20
■ Printing a 2D-Code.............................................................................................................21
Setting the 2D-Code Font ................................................................................................................... 21
Printing Method ................................................................................................................................... 22
Program ................................................................................................................................................ 23
■ Device Font Printing in a .NET Environment......................................................................24
Substituting Fonts ................................................................................................................................. 24
Printing Using a Device Font............................................................................................................... 26
Printing BarCodes/2D-Code Fonts..................................................................................................... 27
Controlling the TM Printer: Control Font/Control A Font.................................................................. 28
■ Rotated Printing..................................................................................................................29
Rotated Printed Settings ..................................................................................................................... 30
5
■ Background printing .......................................................................................................... 31
Water Mark setting ...............................................................................................................................31
■ Printing a Logo ................................................................................................................... 32
Bit map data registration.....................................................................................................................32
Bit map data printing...........................................................................................................................32
■ Paper Feed and Paper Cut .............................................................................................. 35
Setting paper cut with the printer driver ...........................................................................................35
Specifying Control Font and performing paper cut in programming............................................36
■ Drawer Control ................................................................................................................... 37
Opening Drawer with printer driver setting .......................................................................................37
Opening Drawer by Control Font .......................................................................................................38
■ How to Use ControlA Font ................................................................................................. 39
Setting ControlA Font...........................................................................................................................39
Using ControlA Font..............................................................................................................................40
Reference .....................................................................................43
■ Properties ............................................................................................................................ 44
General..................................................................................................................................................45
Sharing...................................................................................................................................................46
Ports........................................................................................................................................................47
Advanced .............................................................................................................................................48
Color Management .............................................................................................................................50
Security ..................................................................................................................................................51
Utility.......................................................................................................................................................52
Version ...................................................................................................................................................56
■ Printing Preferences ........................................................................................................... 57
Main .......................................................................................................................................................58
Layout ....................................................................................................................................................59
Water Mark............................................................................................................................................62
Document Settings...............................................................................................................................64
Halftone Settings ..................................................................................................................................76
Printer Settings.......................................................................................................................................77
Barcode.................................................................................................................................................80
2D-Code................................................................................................................................................83
Font ........................................................................................................................................................88
6
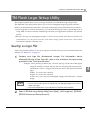
TM Flash Logo Setup Utility ..........................................................89
■ Saving a Logo File...............................................................................................................89
■ Reference............................................................................................................................93
Selection Logo Files ............................................................................................................................. 93
Preview.................................................................................................................................................. 94
Logo Upload ........................................................................................................................................ 96
Logo Printout ........................................................................................................................................ 97
Setup ..................................................................................................................................................... 98
Restrictions ...................................................................................99
Printer Specification...................................................................103
7
8
Chapter 1 APD Overview
APD Overview
Introduction
The Advanced Printer Driver (APD) is a Windows driver for the EPSON TM/BA/EU printers (referred to as the TM printer henceforth). Using the Status API, the APD also can be used to monitor the TM printer status in your POS system.
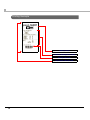
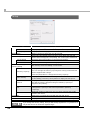
Manual organization
1
Install Manual
Descriptions of the procedures from installing the APD to performing test print, adding printer drivers, and the silent install which is an automated APD installation. TM Printer Manual
This manual. Descriptions of how to use the APD and its functions.
Descriptions of the specifications of TM‐T81
Status API Manual
Descriptions of how to get the status of the TM printer from the user application by using the Status API. Devmode API / PRINTERINFO Manual
Descriptions of how to configure some printer functions on your application using the Devmode API. Explanations about PrinterInfo, which is one of the Windows functions, are also provided. 9
Inquiries
Drivers and manuals for using the TM‐T81 are not packed with it, so inquire to your dealer as for them.
ESC/POS commands
ESC/POS commands are not open to the public. Ask your sales representative for details. APD4 Features
Easy
• Allows you to print from commercially available applications, since the APD is a Windows driver. • Allows you to print a Barcode and 2D‐Code with the fonts built in the APD. (ʺPrinting a Barcodeʺ on page 18)
• Allow you to print logos and graphics. (ʺPrinting a Logoʺ on page 32)
• Allows you to send the paper cut command to the TM printer. (ʺPaper Feed and Paper Cutʺ on page 35)
• Allows you to send the open command to the cash drawer. (ʺDrawer Controlʺ on page 37)
Fast
The printing speed differs depending on the models or interfaces of the TM printers. For more details, see the Technical Reference Guide of the TM printer. • Achieves high speed printing using the Device fonts of the TM printer. (ʺCharacter Printing (Device Font)ʺ on page 15)
• Allows you to convert the Windows fonts to the Device fonts. • Allows you to print an image such as a store logo faster by registering the image in the TM printer. (ʺPrinting a Logoʺ on page 32)
10
Chapter 1 APD Overview
Convenience
• Allows you to make horizontally long printings by rotated printing, for example landscape format receipt. When using the TM printer oriented vertically (wall mount), it can print backward to make it easy to read for customers. (ʺRotated Printingʺ on page 29)
• Allows you to print characters and images as a background. (ʺBackground printingʺ on page 31)
• Allows you to print A4 size document automatically scaled down to fit the paper width. Expandability
• Printer sharing is supported. Allows you to share TM printer with other computers on a network. (Printer sharing through a print server is not supported.)
• Allows you to use ESC/POS commands control. (ʺHow to Use ControlA Fontʺ on page 39)
Programming
• Win32/.Net environment is supported. See the ʺStatus API Manualʺ to find out which development language is supported. • Allows you to check the status of the device (TM printer) by using the Status API. Installation
• Allows you to copy the existing settings of the APD environment to other computers. (Silent Install) • After the APD installation, the printer driver will be automatically installed to the TM printer equipped with a USB interface by the Plug and Play function. Compatibility
• Note that APD 4.xx cannot coexist with APD 2.xx or 3.xx. • When you install APD 4.xx in an environment in which APD 2.xx or 3.xx is already
installed, APD first automatically uninstalls the previous version before installing 4.xx
• APD 4.xx does not support some TM printers. Check that your TM printer is, in fact,
supported by APD 4.xx. If you install APD4.xx in an environment featuring an
unsupported TM printer, then you will no longer be able to use that TM printer.
• Coexistence with OPOS in a computer is not possible. 11
1
Printing Example
Printing a Logo
Character Printing (Device Font)
Printing a Barcode
Paper Feed and Paper Cut
12
Chapter 2 Using the APD
Using the APD
This chapter explains how to use the functions contained in the APD. • Some functions cannot be used, depending on the model of TM printer.
• Administrator permission is required for property settings of the printer driver.
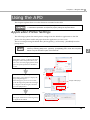
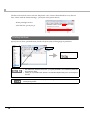
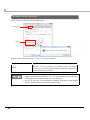
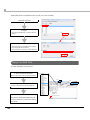
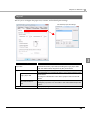
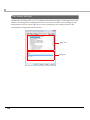
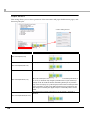
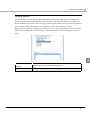
Application Printer Settings
The following explains the initial printer settings from the Windows application to the TM printer. Set the printer model and paper from the application you are to use. This is an example using WordPad. Run [All Programs] ‐ [Accessories] ‐ [WordPad] from the [Start] menu. When printing device fonts with Microsoft Word, convert the application to "Microsoft Word
6.0/95" by selecting [Tools] menu - [Options] - [Compatibility] tab or check the "Use printer
metrics to lay out document" option on the same tab.
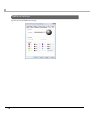
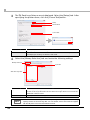
1. Printer driver specification
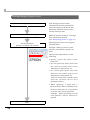
Select [File] ‐ [Print...] to display the print dialog box. Select the printer driver you are to use. Press the [Apply] button, then press the [Cancel]. Return to WordPad screen. (1)
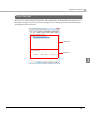
2. Page Setup
(2)
Select [File] ‐ [Page Setup] to display the Page Setup dialog box. Select the paper you are to use. At this point the Page Setup illustration changes to roll paper. Set the margins, and then press the [OK] button. Image of the page
(3)
3. Exit Settings
The paper width selected with Page Setup is applied to WordPad. Roll paper width
13
2
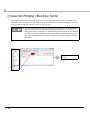
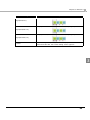
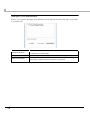
Character Printing (TrueType fonts)
Printing is performed with the TrueType fonts (Arial, Times New Roman, etc.) available with Windows. You can apply italic and other character modifications, and freely change the font size. You can also print almost exactly what you see on screen. • You cannot obtain full text quality with TrueType fonts depending on TM printer model. In
this case, specify device font. (See "Character Printing (Device Font)" on page 15.)
• When printing with a TrueType font, the data volume sent to the TM printer increases
since the print image is expanded by the computer before sending to the printer. Due to
this, when connected using the serial port, printing time is longer compared with other
interfaces.
Specify TrueType font, Point and Style for print data. 14
Chapter 2 Using the APD
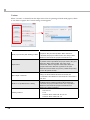
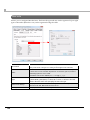
Character Printing (Device Font)
Device Font is the font set built into the TM printer. You can obtain text quality in line with the performance of the TM printer. You can print text at a higher speed than TrueType font. To print Device Font in a .NET environment, you must replace the font. See ʺDevice Font Printing in a .NET Environmentʺ on page 24 for details. Setting Device Font
When printing with Device Font, set the Device Font type. Device Font Type
The xx after the font name specifies two digits, expressing the character size. Font with [254/255] after the font name is user‐defined pages. See the Technical Reference Guide for the TM printer you are using for a description of this setting. Also see the manual regarding the number of dots for each font. See ʺPrinter Specificationʺ for details. • FontAxx
• FontBxx
Device Font Size
Device Font prepares fonts for each character size. As with TrueType fonts, point size is not specified separately from the font; rather, character size is specified by selecting a font. The following sizes are available with Device Font. Height \ Width
Standard
Standard
FontA11
FontA12
Double
FontA21
FontA22
FontA24
FontA42
FontA44
FontA48
FontA84
FontA88
Fourfold
Eightfold
Double
Fourfold
Eightfold
Standard
FontA11
Double height
FontA12
Double width
FontA21
Double height / width
FontA22
15
2
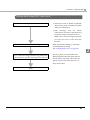
The Device Font Point varies with the TM printer. Also, Point is determined for every Device Font. Check with the Printer Settings ‐ [Font] tab of the printer driver. When printing FontA11 with TM‐T81, specify 9.5 pt. Printing Method
Specify Device Font, specified Point (check with [Font] tab) and language in print data. • Not reflected in characters even when you specify bold/italic. The underline is printed but
the position is offset.
• Printing is not possible when Device Font and Barcode(2D-Code) Font are arranged in
one line.
The character design and size displayed on the application screen are a little different from
actual printing results.
16
Chapter 2 Using the APD
Program
The following is an example program for reference.
---------------------------------------------------------------Printer.Font.Charset = 0
`Font
Printer.Font.Name = "FontA44"
`Size
Printer.Font.Size = 38.5
`Printing text
Printer.Print "EPSON"
----------------------------------------------------------------
Font and Point Size differ with the TM printer model. Check the Point Size of the font
displayed on the [Font] tab of the printer driver. (The above example is from the TM-T81
Receipt.)
2
17
Printing a Barcode
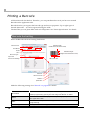
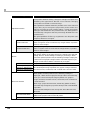
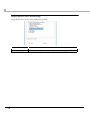
APD has Barcode font built in. Therefore, you can print Barcode even if you have not created Barcode on the application side. Barcode font lets you register the barcode type and size as properties. Up to eight types of barcode (Barcode 1 ~ 8) can be registered using the APD. The barcodes you can print differ with each TM printer. See ʺPrinter Specificationʺ for details. Barcode font setting
Select the Barcode tab from Printing Preferences. Element width
(width of the thin lines in dots)
Barcode tab
Font Name
Points
Element height
(height of the thin lines in dots)
Alias
Barcode type
Open the
Advanced settings
HRI characters
Element
HRI characters
Rotation
Quiet Zone
Make the following settings. See ʺBarcodeʺ on page 80 for details. Setting
18
Description
Font Name
You can set Barcode font for up to 8 barcode types (Barcodes 1 ~ 8).
When programming, specify the font using "Font Name" or "Alias".
Points
The barcode font size is displayed. When printing, specify this value from
the application side.
Alias
You can make optional settings. You can specify Alias during
programming.
Barcode type
Configures the Barcode type (UPC-A, RSSetc.)
Chapter 2 Using the APD
Setting
Description
Element
Determines the Barcode size. Specifies the finest Element width and
height. Units are the smallest dot of the TM printer. This result determines
the Barcode font Point.
HRI characters
Sets with/without HRI characters, position and font.
Rotation
Sets whether to independently rotate Barcode.
Hex Input Mode
Allows the Barcode characters to be entered in binary.
Add Quiet Zone
The blank margin on either side of a Barcode required in order to read
the Barcode.
When Rotate is set with the [Layout] tab, the printing direction of the barcode matches
[Layout] tab Rotate and the Rotation of [Barcode]-[Advanced settings] printing direction.
Ex: When specifying [Rotate by 90 degrees] with [Layout] Rotate and [Rotate by 90
degrees] with [Barcode] Rotation, the printing direction is turned through 180 degrees.
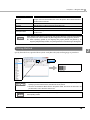
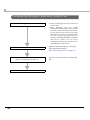
Printing Method
2
Specify Barcode Font, specified Point (check with [Barcode] tab) and language in print data. • Barcode Font Points determined. Check with Printing Preferences - [Barcode]. When
specifying a value other than this, the Barcode is not printed.
• Since the dot resolution differs with the TM printer model, the size of the barcode to be
printed varies, even if the same value is set.
The character design and size displayed on the application screen are a little different from
actual printing results.
19
Program
The following is an example program for reference.
---------------------------------------------------------------Printer.Font.Charset = 0
`Font
Printer.Font.Name = "Barcode1"
`Size
Printer.Font.Size = 18.5
`Printing text
Printer.Print "12345678"
----------------------------------------------------------------
20
Chapter 2 Using the APD
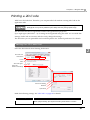
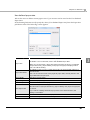
Printing a 2D-Code
APD has a 2D‐Code font. Therefore, you can print 2D‐Code without creating 2D‐Code on the application side. When used in combination with Rotation, set a slow Printing Speed with the [Document
Settings] tab. It may not be possible to print clearly when the printing speed is high.
The 2D‐Code font allows registration of 2D‐Code type and size properties. Up to eight types (2D‐Code 1 ~ 8) of setting can be registered using the APD. You can make fine settings of 2D‐Code at one time, and also easily change the settings. The 2D‐Codes you can print differ with each TM printer. See ʺPrinter Specificationʺ for details. Setting the 2D-Code Font
Select the 2D‐Code tab from Printing Preferences. 2
2D-Code tab
Font Name
Points
Alias
2D-Code types
Open the
Advanced settings
Advanced setting
Rotation
Quiet Zone
Make the following settings. See ʺ2D‐Codeʺ on page 83 for details. Setting
Font Name
Description
You can set the 2D-Code font from the 8 types of 2D-Code(1 ~ 8).
When programming, specify the font using "Font Name" or "Alias".
21
Setting
Description
Points
The 2D-Code font size is displayed. When printing, specify this value
from the application side.
Alias
You can make optional settings. You can specify Alias during
programming.
Barcode type
Sets the 2D-Code type. (CPU-A, JAN8([EAN], ITF, etc.)
Advanced setting
Sets the 2D-Code size and Error Correction Level, etc. Setting contents
differ with the
2D-Code type.
Rotation
Sets whether to independently rotate 2D-Code.
Hex Input Mode
Allows the 2D-Code characters to be entered in binary.
Add Quiet Zone
Check this box to add a quiet zone, the blank margin on either side of a
2D-Code required to be properly read.
When Rotate is set with the [Layout] tab, the printing direction of the barcode matches
[Layout] tab Rotate and the Rotation of [Barcode]-[Advanced settings] printing direction.
Ex: When specifying [Rotate by 90 degrees] with [Layout] Rotate and [Rotate by 90
degrees] with [2D-Code] Rotation, the printing direction is turned through 180
degrees.
Printing Method
Specify 2D‐Code Font, specified Point (check with [2D‐Code] tab) and language in print data. • 2D-Code Font Points determined. Check with Printing Preferences - [2D-Code]. When
specifying a value other than this, the 2D-Code is not printed.
• Since the dot resolution differs with the TM printer model, the size of the 2D-Code to be
printed varies, even if the same value is set.
22
Chapter 2 Using the APD
Program
The following is an example program for reference.
---------------------------------------------------------------Printer.Font.Charset = 0
`Font
Printer.Font.Name = "2D-Code1"
`Size
Printer.Font.Size = 9.5
`Printing text
Printer.Print "http:/www.epson.mart.com/"
----------------------------------------------------------------
2
23
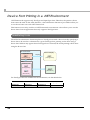
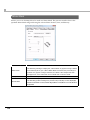
Device Font Printing in a .NET Environment
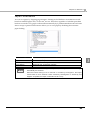
.NET Framework supports only TrueType and OpenType fonts. Therefore, the printer’s device fonts cannot be used. In the APD, therefore, a font substitution function is provided to allow you to use device fonts even with .NET Framework. This function is not only useful in a .NET Framework environment: it also allows you to use the device fonts from an application that only supports TrueType fonts. Substituting Fonts
The APD font substitution function replaces a TrueType font with a device font. By specifying a device font to be used as a substitute for a given TrueType font, printing can be done using a device font. While it may appear that a TrueType font is selected, the actual printing will be done using the device font. .Net Framework
Application
ABC
Screen display
Display
(TrueTypeFont)
ABC
(TrueTypeFont)
Printing
APD
Substituting fonts
TM Printer
ABC
(TrueTypeFont)
ABC
(DeviceFont)
ABC
(DeviceFont)
For TrueType fonts not available for the substitution, see the table below. TrueType fonts not available for the substitution
24
Marlett
Symbol
MS Outlook
Wingdings
Webdings
Wingdings 2
Wingdings 3
Chapter 2 Using the APD
Select the Printer Settings tab from Printing Preferences. Printer Settings tab
TrueType Font Substitution
TrueType Font
Font to substitute
2
Substitute
Make the following settings. See ʺTrueType Font Substitutionʺ on page 78 for details. Setting
Description
TrueType Font Substitution
Enables TrueType font substitution. Select "Substitute".
TrueType Font
Specifies TrueType font to substitute.
Replacement font
Specifies the device font for substitution.
Substitute All
Check this to replace all TrueType fonts with the same device font.
25
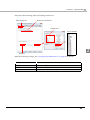
Printing Using a Device Font
Select the TrueType font to be substituted.
Font Substitution Settings
For the print data, specify a TrueType font and size.
That TrueType font for which substitution has been specified will always be output as the device font. Otherwise, therefore, always select another TrueType font. Make the [Printer Settings] ‐ TrueType Font Substitution settings. (See ʺSubstituting Fontsʺ on page 24.)
Specifying device font size using the specified Point. Example: When you want to print FontA11 with TM‐T81, specify a 9.5 Point. Specify Point with reference to the following. • Specify a point size shown on the [Font] tab.
• You can print only device fonts with the same horizontal and vertical dimensions as FontA11/22, etc. • You cannot print device fonts with different horizontal and vertical dimensions as FontA12/22, etc. And you cannot print a smaller point than the smallest device font (Example: Font11). • When specifying a point that is between device fonts or different sizes (FontA11, FontA22, etc.), the smaller of the two device fonts is printed. Example: When specifying 12 point with TM‐T81ʹs FontA, FontA11 is printed. Print
26
Chapter 2 Using the APD
Printing BarCodes/2D-Code Fonts
Select the TrueType font to be substituted
• Wide fonts such as FONT A12/24/48, and tall fonts such as FONT A21/42/84 cannot be substituted.
• That TrueType font for which substitution has been specified will always be output as the device font. Make sure to select TrueType font that you will not use for other than the barcode.
Font Substitution Settings
For a character string printed using a BarCode/
2D‐Code font, specify a TrueType font and size
Make the [Printer Settings] ‐ TrueType Font Substitution setting. (See ʺSubstituting Fontsʺ on page 24.)
Specify a point size specified on the [Barcode]/[2D‐Code] tab. Note that the layout will be adversely affected if you specify a point size other than one of those shown here.
Print
27
2
Controlling the TM Printer: Control Font/Control A Font
Select the TrueType font to be substituted
Font Substitution Settings
For the print data, specify a TrueType font and size.
Print
28
• Select a TrueType font to be used as a control font.
• That TrueType font for which substitution has been specified cannot be used as other than the control font. If you specify this font for any other characters, not only will printing fail, but the system may operate as if another command had been specified. Therefore, make sure to select TrueType font that you will not use as other than the control font.
Make the [Printer Settings] ‐ TrueType Font Substitution setting. (See ʺSubstituting Fontsʺ on page 24.)
Specify a point size shown on the [Font] tab.
Chapter 2 Using the APD
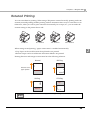
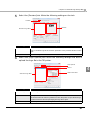
Rotated Printing
You can rotate data for printing. When using a TM printer oriented vertically, printing with 180× rotation (inverted printing) enables printing with an orientation that is easy for customers to see. Otherwise, when you want to print characters horizontally, for receipts, etc., you can make the rotation setting on the printer driver side. Standard
90° rotation
180° rotation
270° rotation
When setting rotated printing, ʺpaper conservationʺ is enabled automatically.
2
• Top: Paper can be saved because the top blank is not printed.
• Bottom: Paper can be saved because the bottom blank is not printed
Printing direction and margin conservation have the following relations. Bottom
90 Deg.
EPSON
1
2
Bottom
Top
270 Deg.
Top
EPSON
1
2
Direction of the
paper ejection
EPSON
1
2
180 Deg.
EPSON
1
2
Normal
See "Paper Conservation" on page 65 for margin setting.
29
Rotated Printed Settings
Select the Layout tab from Printing Preferences. Layout tab
Rotate
Make the following settings. See ʺLayoutʺ on page 59 for details. Setting
Rotate
Description
Select the printing orientation you want. With settings other than
Nor mal, all text is printed as a graphic image, and Paper
Conservation is changed automatically. When the Information
screen is displayed, click "OK".
• When the printing orientation setting is other than standard, since [Print all text as
graphics] under Document Settings is "Yes", you cannot use Device Font, Control Font
control (logo printing using NV memory, etc.) or ControlA Font.
• Do not use with your own independently developed application’s rotated printing
function. Use only one or the other rotated printing function.
30
Chapter 2 Using the APD
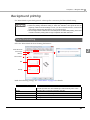
Background printing
Use Water Mark to print background. A bit map file is necessary for Water Mark setting. • You may not be able to print a Water Mark depending on the application.
• When the printing orientation setting is other than standard, since [Print all text as
graphics] under Document Settings is "Yes" you cannot use Device Font, Control Font
control (logo printing using NV memory, etc.) or ControlA Font.
• Since a large volume of data is sent to the TM printer for Water Mark printing, in the case
of serial connection printing time is longer compared with other interfaces.
Water Mark setting
Select the Water Mark tab from Printing Preferences. 2
Water Mark tab
Water Mark
Bitmap
Print Position
Size
Density
Make the following settings. See ʺWater Markʺ on page 62 for details. Setting
Description
Water Mark
Check to print Water Mark. When checked, [Print all text as
graphics] under Document Settings is automatically set to "Yes".
Bitmap
Specifies the background bit map data file.
Print Position
Make the following settings.
Size
Configures the size of the Water Mark.
Density
Configures the density of the Water Mark.
31
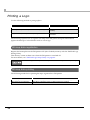
Printing a Logo
Use the following method to print graphics. Method
Features
Print bit map on the application screen
Large data volume, printing is slow.
Specify bit map file in the printer driver for printing.
Slow, because file is read each time for
printing.
Register bit map in TM printer for printing
Data volume is small, therefore you can
print fast.
The following explains how to register a bit map in the TM printer and print. Method that applies the bit map of a fixed format such as a store logo. Bit map data registration
Register the bit map data in the TM printer’s NV (Non Volatile) memory with the TM Flash Logo Setting Utility. This memory retains its data even when the TM printer is switched off. For more details, see ʺTM Flash Logo Setup Utilityʺ on page 89.
You cannot register bit map data in a TM printer unless it has NV (Non Volatile) memory.
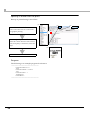
Bit map data printing
The following method is for printing bit maps registered in a TM printer. Method
32
Features
Setting by printer driver
Prints the bit map in a document or before and after a page.
Specifying by Control Font.
Specifies control font at the position for bit map printing.
Chapter 2 Using the APD
Setting by printer driver for printing
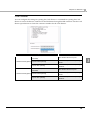
Select the Document Settings tab from Printing Preferences. Document Settings tab
Printing position setting
Select logo registered in
printer
2
Specify the registered
NV graphic number’s Key code.
Make the following settings. See ʺLogo Printingʺ on page 75 for details. Setting
Description
Printing position setting
Select the position in which you want to print the logo from Print
Logo.
Specifying the bit map to
print
Select whether to use the logo registered in the TM printer or to
specify and use an image file.
Specify logo registered in
printer*
Specify by key code the bit map registered in the TM printer’s NV
memory.
* The Key code and graphic in the NV memory for printing are as follows.
NV graphics
number
Key code
1st byte
2nd
byte
NV graphics 0
48
48
NV graphics 1
48
49
NV graphics 2
48
50
NV graphics 3
48
51
NV graphics 4
48
52
33
Specify Control Font to print
Bit map is printed using Control Font. (2)
(2)
1. Enter Control Character
Enter control character for Control Font NV graphics printing. (1)
2. Specify Control Font
Select the control character of the Control Font, and specify Control Font, Point and Style. (3)
3. Print
Program
The following is an example program for reference.
---------------------------------------------------------------Printer.Font.Charset = 0
`Font
Printer.Font.Name = "control"
`Size
Printer.Font.Size = 1
`Printing text
Printer.Print "i"
----------------------------------------------------------------
34
(2)
Chapter 2 Using the APD
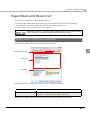
Paper Feed and Paper Cut
There are two methods for controlling the paper cut.
• Configure the APD to feed and cut the paper automatically at the end of each printing.
This method is valid even when [Print all text as graphics image] is set.
• Cut the paper using Control Font in the program.
When using Control Font, you cannot use it in combination with a <Print all text as graphics
image> setting such as Rotated Printing/Water Mark/Scale-down Printing.
Setting paper cut with the printer driver
Select the Document Settings tab from Printing Preferences. 2
Document Settings tab
Setting item
Paper Source
Make the following settings. See ʺPaper Sourceʺ on page 68 for details. Setting
Description
Setting item
Select Paper Source
Paper Source
Select whether to feed paper per job (document) or page, and
whether to cut paper with the auto-cutter or not.
Making this setting controls paper feed and paper cut when printing a document. 35
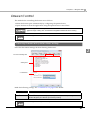
Specifying Control Font and performing paper cut in programming.
The following is an example program for reference.
---------------------------------------------------------------Printer.Font.Charset = 0
`Font
Printer.Font.Name = "control"
`Size
Printer.Font.Size = 1
`Printing text
Printer.Print "P"
----------------------------------------------------------------
36
Chapter 2 Using the APD
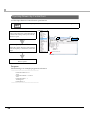
Drawer Control
The methods for controlling the drawer are as follows.
• Make the drawer open automatically by configuring the printer driver.
• Open the drawer from the application using the Open Drawer Control Font.
When using Control Font, you cannot use it in combination with the <Print all text as
graphics image> setting such as Rotated Printing/Water Mark/Scale-down Printing.
For closing the drawer, push manually.
Opening Drawer with printer driver setting
Select the Document Settings tab from Printing Preferences. 2
Document Settings tab
Setting item
Cash Drawer
Make the following settings. See ʺCash drawerʺ on page 73 for details.
Setting
Description
Setting item
Selecting Cash drawer
Cash Drawer
With a drawer provided by Epson, if you set "Open after printing" for Cash
drawer #2 (5pins), the drawer opens after printing.
For closing the drawer, push manually.
37
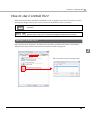
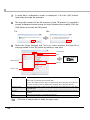
Opening Drawer by Control Font
Use the Open drawer Control Font to open Drawer. Set "Do not open (do not send command)" for Cash Drawer in Document Settings.
1. Enter Control Character
(2)
Enter control character of the Open drawer Control Font in the position you want the drawer to open. (2)
2. Specify Control Font
Select the control character of the Control Font, and specify Control Font, Point and Style. 3. Print
Drawer opens. Program
The following is an example program for reference.
---------------------------------------------------------------Printer.Font.Charset = 0
`Font
Printer.Font.Name = "control"
`Size
Printer.Font.Size = 1
`Printing text
Printer.Print "a"
----------------------------------------------------------------
38
(1)
(2)
Chapter 2 Using the APD
How to Use ControlA Font
With the ControlA Font, ESC/POS commands can be assigned to the selected characters, and on printing the assigned characters can be executed as defined ESC/POS commands. ESC/POS commands are not open to the public. Ask your sales representative for more
information.
When using ControlA Font, you cannot use it in combination with the <Print all text as
graphics image> setting such as Rotated Printing/Water Mark/Scale-down Printing.
Setting ControlA Font
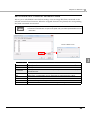
Select [Utility] from Properties, and then press the [Edit controlA font Character Translation Table] button. Edit controlA font character translation table is displayed.
2
Edit controlA font Character Translation Table
39
Define ESC/POS commands in the record you want to define. 1. Record selection
(1)
2. Open
(2)
Press the [Edit] button to open ControlA Editor.
3.ESC/POS command definition
Enter ESC/POS command in Command. Press the [OK] after entering. Up to 255 bytes characters can be defined. (3)
(3)
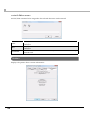
Using ControlA Font
Use the defined ControlA Font. 1. Enter Control Character
(2)
Enter control character for ControlA Font. (2)
(2)
2. Specify ControlA Font
Specify ControlA Font, Point and Style. 3. Print
ESC/POS command defined for the control character of ControlA font is executed.
40
(1)
Chapter 2 Using the APD
Program
The following is an example program for reference.
---------------------------------------------------------------Printer.Font.Charset = 0
`Font
Printer.Font.Name = "controlA"
`Size
Printer.Font.Size = 1
`Printing text
Printer.Print "a"
----------------------------------------------------------------
2
41
42
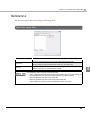
Chapter 3 Reference
Reference
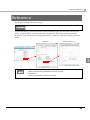
This chapter describes the APD settings.
Administrator permission is required for property settings of the printer driver.
To open the setting screen of the printer driver Properties, right click the printer driver from [Start] ‐ [Control Panel] ‐ [Printers] and select [Properties]. Select the [General] tab on the Properties screen and click the [Printing Preferences...] button to open the Printing Preference screen.
Properties
Printing Preferences
3
• Windows Vista
[Start] - [Control Panel] - [Hardware and Sound] - [Printer]
• Windows XP
[Start] - [Control Panel] - [Printers and Faxes]
43
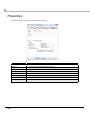
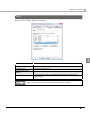
Properties
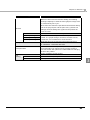
The following settings are available in the Property.
Tab
44
Description
General
Configures printer name and printing preference, or makes a test print.
Sharing
Configures settings for sharing the printer.
Ports
Configures ports settings.
Advanced
Configures detailed settings for printing.
Color Management
Configures color management settings.
Security
Configures Windows security setting.
Utility
Configures Log File and ControlA font settings.
Version
Displays version information.
Chapter 3 Reference
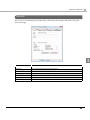
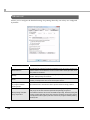
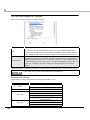
General
Allows you to check/change the printer name, check the print settings, and make a test print (Print Test Page).
3
Setting
Description
Printer Name
Displays the printer driver name.
Location
Accepts the printer location to be input.
Comment
Accepts comments about the printer driver to be input.
Model
Displays the driver name of the TM printer.
Features
Displays functions and papers available with the TM printer.
Printing Preferences...
Displays the Printing Preferences screen.
Print Test Page
Prints the Windows test page.
45
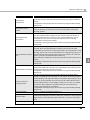
Sharing
Allows you to configure the settings for sharing the printer.
Printer sharing through a print server is not supported.
In Windows VIsta, elevation of UAC is required.
Setting
46
Description
Change sharing options
Check this box when a printer is to be shared.
Share this printer
When this box is checked, network users can access a printer
connected to this computer.
Share name
Specifies the name of a shared printer.
Chapter 3 Reference
Ports
Allows you to configure Epson Port settings.
Setting
3
Description
Add Port...
Creates a new Epson Port.
Delete Port
Deletes an Epson Port.
Configure Port...
Configures an Epson Port.
Enable bidirectional
support
Do not uncheck. The APD will become unusable.
Enable printer pooling
Enables printing to two or more identical print devices through one
logical printer.
Select the Epson Port Driver (ESDPRTxxx) to be used for printing. Do not use COM or
USB, or any other ports. The APD works only with the Epson Port Driver.
47
Advanced
Allows you to configure the detailed settings for printing. Basically, use as they are configured by default.
Setting
48
Description
Always available
Makes the printer always available.
Available from
Configures the printer for limited availability. If you send a document to a
printer when it is unavailable, the document will be held (spooled) until
the printer is available.
Priority
Indicates the current priority setting. Higher-priority documents will print
before lower-priority documents.
Driver
Lists the name of the installed printer driver. The printer driver name
usually corresponds to the name of the print device.
Spool print documents
so program finishes
printing faster
Specifies that documents should be spooled before being printed.
Start printing after last
page is spooled
Specifies that the print device should wait to begin printing until after the
last page of the document is spooled. The printing program is
unavailable until the document has finished spooling. However, using this
option ensures that the whole document is available to the print device.
Configurable when [Spool print documents so program finishes printing
faster] is set.
Chapter 3 Reference
Setting
Description
Start printing
immediately
Specifies that the print device should begin printing after the first page
of the document is spooled. This makes the printing program available
sooner.
Configurable when [Spool print documents so program finishes printing
faster] is set.
Print directly to the
printer
Specifies that the document should be sent directly to the print device
and not spooled. Use this if you cannot print using either of the print
spooling options.
Hold mismatched
documents
Directs the spooler to check the printer setup and match it to the
document setup before sending the document to the print device. If
the information does not match, the document is held in the queue.
A mismatched document in the queue will not prevent correctly
matched documents from printing.
Configurable when [Spool print documents so program finishes printing
faster] is set.
Print spooled documents
first
Specifies that the spooler should favor documents that have completed
spooling when deciding which document to print next, even if the
completed documents are a lower priority than documents that are still
spooling. If there are no documents that have completed spooling, the
spooler will favor larger spooling documents over smaller ones. Use this
option if you want to maximize printer efficiency.
When this option is disabled, the spooler picks documents based only on
priority.
Configurable when [Spool print documents so program finishes printing
faster] is set.
Keep printed documents
Specifies that the spooler should not delete documents after they are
printed. This allows a document to be resubmitted to the printer from the
printer queue instead of from the program.
Configurable when [Spool print documents so program finishes printing
faster] is set.
Enable advanced
printing features
Specifies whether the advanced printing feature is enabled. When
enabled, metafile spooling is turned on and options such as Page Order,
Booklet Printing, and Pages Per Sheet are available, depending on your
printer. For normal printing, leave the advanced printing feature set to
the default (Enabled). If compatibility problems occur, you can disable
the feature. When disabled, metafile spooling is turned off and the
printing options might be unavailable.
Configurable when [Spool print documents so program finishes printing
faster] is set.
Printing Defaults...
Click to configure the Printing Preferences.
Print Processor...
Click to specify the data type. In general, you do not need to change
either the default print processor or data type. However, a few programs
might require a specialized print processor and a particular data type to
print.
Separator Page...
Not available.
49
3
Color Management
Allows you to set color displayed on the screen.
Setting
Color Management
50
Description
Set the color management.
Chapter 3 Reference
Security
Security setting for Windows.
Setting
3
Description
Group or user names
Lists the users and groups with assigned permissions for this object.
The permissions for the highlighted group or user appear in the list box
below.
Add
If you want to add permissions for users or groups, click their names.
Remove
Removes highlighted permission entry. More than one permission entry
can be connected with a user or group.
Permissions for
Administrators
Permissions you can allow or deny for each user or group are listed. To
allow or deny the permission, check or clear the appropriate check- box.
Shaded checkboxes indicate inherited permissions. To see additional
information on permissions or inheritance, click Advanced.
Advanced
Click for viewing and setting special permissions, auditing information,
owner information, and permissions effective for this object.
51
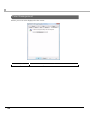
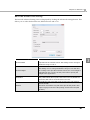
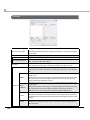
Utility
Allows you to use EPSON Log File Settings, Edit CotrolA Font Character Translation Table, and other utilities.
Setting
52
Description
EPSON Logo Settings
The TM Flash logo registration screen appears.
For more details, see "TM Flash Logo Setup Utility" on page 89.
EPSON Log File Settings
Opens the Log File Setting screen.
Edit ControlA Font
Character Translation
Table
Opens the EPSON controlA font setting screen.
Chapter 3 Reference
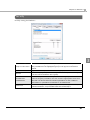
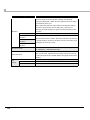
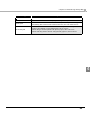
EPSON Log File Setting
Allows you to create a log file which can help you to troubleshoot a problem quickly. See the Status API Manual for more details about the log file. Setting
Logging
Description
Enable (Default)
Enables log output.
Disable
Disables log output.
Select how the Windows error information is output.
Critical
Log Text Only
Outputs the log as text data.
Log Text and Binary (Default)
Outputs the log as text and binary data.
3
Select how the Status API log is output.
Status API
Do Not log
A Status API log is not output.
Log Text Only
Outputs the log as text data.
Log Text and Binary (Default)
Outputs the log as text and binary data.
Select how the log of the communication port is output.
Port
Do Not log
A communications port log is not output.
Log Text Only
Outputs the log as text data.
Log Text and Binary (Default)
Outputs the log as text and binary data.
Select how the log of the application on the client-server system is output.
Client
Do Not log
A client log is not output.
Log Text Only (Default)
Outputs the log as text data.
Log Text and Binary
Outputs the log as text and binary data.
Select how the log of the server on the client-server system is output.
Server
Do Not log
A service log is not output.
Log Text Only (Default)
Outputs the log as text data.
Log Text and Binary
Outputs the log as text and binary data.
Select how the log of print jobs is output.
Print Job
Do Not log
A print job information log is not output.
Log Text Only (Default)
Outputs the log as text data.
Log Text and Binary
Outputs the log as text and binary data.
53
Setting
Description
Configures the binary data format.
Binary Format
Hexadecimal (Default)
Outputs the log to a hexadecimal log file.
Base64
Outputs the log to a Base64 log file.
Specify where to output the log file.
Log File
Directory
(Default)
Windows XP:
C:\Documents and Settings\All Users\Application Data\Epson\POSPort
Windows Vista:
C:\ProgramData\Epson\POSPort
Specify the upper limit of the log file size.
Log Size Limit
(MB)
When the upper limit is exceeded, the log file is compressed using zip format and
saved as a BAK file. The subsequent log information is saved as a new log file. A
sequential number is added to the name of the BAK files. (example:
EpsonPOSPort1.bak).
Specify the number of log files to be backed up.
(Range: 1 to 1024 , Default: 5)
Backup File
Count
Specify the number of log files to be backed up. (Range 1 to 9 , Default: 1)
Output function of hexadecimal dumping list is not supported.
54
Chapter 3 Reference
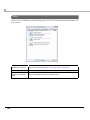
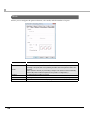
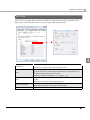
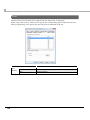
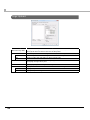
Edit controlA font character translation table
Allows you to edit EPSON controlA Font settings. You can assign ESC/POS commands to the selected controlA Font characters. When the assigned characters are printed, the corresponding ESC/POS commands are executed. • Up to 255 bytes characters can be assigned.
• ESC/POS commands are not open to the public. Ask your sales representative for more
information.
Control A Editor screen
Setting
3
Description
Driver Name
Displays the printer driver name for which the controlA Font will be configured.
Char
Displays the selected ASCII code as characters.
Hex
Displays the selected ASCII code as hexadecimals.
Command
Displays the ESC/POS command corresponding to the ASCII code. It is displayed
in hexadecimal.
Help
Displays the EPSON controlA Font help.
Edit
Displays the controlA Editor screen. Allows the [Command] to be edited.
Delete
Deletes the [Command] selected from the list box.
OK
Saves the configured settings and closes the EPSON controlA Font.
Cancel
Closes EPSON controlA Font without reflecting the changes.
55
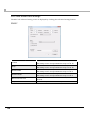
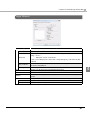
controlA Editor screen
An ESC/POS command to be assigned to the selected character can be entered.
Setting
Description
Char
Displays the selected ASCII code as characters. The content cannot be
changed.
Hex
Displays the selected ASCII code as hexadecimals. The content cannot be
changed.
Command
Enter the ESC/POS command that will correspond to the ASCII code. Enter using
hexadecimal.
Version
Displays the printer driver version information.
56
Chapter 3 Reference
Printing Preferences
The Printing Preferences screen is displayed by selecting the Properties ‐ [General] tab and clicking the [Printing Preferences...].
You can configure the following settings in the Printing Preferences screen.
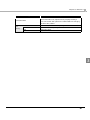
3
Tab
Main
Description
Configures basic print settings, such as the number of copies, and color
setting.
Layout
Configures paper size and rotation of print images.
Water Mark
Configures Water Mark setting.
Document Settings
Configures the Document Settings.
Halftone Settings
You do not set the Halftone Settings.
Printer Settings
Configures paper width for the TM printer.
Barcode
Configures the barcode settings. (Displayed only when the printer supports
the barcode printing.)
2D Code
Configures the 2D-Code settings. (Displayed only when the printer supports
the 2D-Code printing.)
Font
Displays the list of Device fonts.
57
Main
Allows you to configure the print resolution, color mode, and the number of copies.
Setting
58
Description
Resolution
The resolution of the TM printer is specified.
Color
Select whether to print in color or monochrome. Select the [Color] for
making color print (two-color printing is made when the printer is two-color
printer).
Select [Monochrome] to print using a single color (black is uses as default).
Some TM printer models require memory switch configuration.)
Copies
Configures the number of copies.
Collate
Configures the number of copies of document with multiple pages.
Reverce Print Order
Prints the document with multiple pages in backward order.
Chapter 3 Reference
Layout
Allows you to configure the paper size, rotation, and reduced print settings.
User defined paper size settings.
Setting
3
Description
Paper Size
Select the paper size from list.
The list shows all the paper sizes (including the logic paper sizes
and user defined sizes) supported by the printer driver.
Paper size
The sizes of paper which can be set in the TM printers.
Logic paper size
The original size of a print image which can be scaled down by the
printer driver.
An image is scaled down to the size of paper loaded on the TM
printer.
User Defined Paper
Size
The paper size defined by the users.
Setting the paper size can be made in the User Defined Paper Size
screen.
Output Paper
Displays paper types available with the TM printer.
59
Setting
Adjust Print Position
Description
Allows you to fine adjust the print start position. You can adjust the
print position without making changes in margins and print area
defined by the applications. This also can be used for changing
print position of rotated or reduced image.
This adjustment is limited within the printable area of the selected
[Paper Size]. If you change the [Paper Size] to the smaller one
without changing the print position setting, causing the position
settings to fall outside the new printable area, the settings will be
automatically changed so that the print image fits inside the new
printable area.
The print position of the logo registered in the TM printer (NV
Graphics) will not be changed.
Vertical Direction
This adjusts the print position in horizontal direction.
Enter a negative value to make the top margin smaller, or positive
value to make it larger.
Horizontal Direction
This adjusts the print position in vertical direction.
Enter a negative value to make the left margin smaller, or positive
value to make it larger.
This configures print direction.
The graphic shown on the right changes according to the selected
setting. Select a desired setting for rotating a print image. When
other than [Normal] is selected, the following message is displayed;
"<Print all text as graphics image> will be automatically set to yes.
<Paper Conservation> will be automatically changed.".
Rotate
Normal
This prints in normal direction. This is the default.
Rotate by 90 Degrees
This rotates a print image as specified.
The rotated print image is printed as a graphics image, therefore,
the Device fonts, control font, and controlA font cannot be used.
Rotate by 180 Degrees
Rotate by 270 Degrees
Reduced Size Print
This configures reduced print, [Fit to Printable Width] or [Custom].
When [Reduced Print] is selected, the following message is
displayed; "<Print all text as graphics image> will be automatically
set to yes.". The reduced print image is printed as a graphics
image, therefore, the Device fonts, control font, and controlA font
cannot be used.
When Logic paper size is selected, deselecting [Reduced Print]
automatically changes the paper size to Paper size or User Defined
Paper Size.
Reduced Print setting does not change the size of Barcode and
2D-Code.
60
Fit to Printable Width
A print image is automatically scaled down so that it fits inside the
width of the paper loaded on the TM printer.
Custom
You can manually set the reduction percentage.
Chapter 3 Reference
User defined paper size.
Allows the users to define custom paper sizes. Up to 30 sizes can be saved as the User Defined Paper Sizes. In the Printing Preferences ñ [Layout] tab, select [User Defined Paper Size] from the Paper Size pull‐down menu. The following screen appears.
Setting
Description
3
This shows the list of saved User defined paper sizes.
"To define a new custom size, select "User Defined Paper Size".
Paper Size
Paper Size Name
When one of the saved custom sizes is selected from the list, the configured
[Paper Size name], [Paper Width], and [Paper Length] are displayed and
you can edit the setting.
An arbitrary name of each custom paper size can be specified using up to
24 characters.
You can not use the name of the physical paper sizes, already shown in the
Paper Sizes list in [Layout] tab.
Paper Width
Specifies a paper width.
Paper Length
Specifies a paper length.
Delete Paper Size
Deletes a selected custom paper size shown in the list.
Save Paper Size
Saves a configured custom paper size.
The information of [Paper Size Name], [Paper Width], and [Paper Length] will
be saved.
If you edit the existing User defined paper size and click this button, the
setting is overwritten.
OK
Saves the selected User Defined paper size.
Cancel
Cancels changes made on an existing User Defined paper size.
61
Water Mark
Allows you to set a bitmap file to be used as a Water Mark. The preview window shows the specified Water Mark image reflecting the selected Print Position, Size, and Density. Setting
Description
Tick the checkbox to set a Water Mark.
Water Mark
Bitmap
The following message is displayed; "<Print all text as graphics image> will be
automatically set to yes.". When Water Mark is enabled, the print image is
printed as a graphics image, therefore, the Device font is replaced with
TrueType font, and control font and controlA font cannot be used.
Specifies a bitmap file to be used as a Water Mark.
Select a desired print position from the pull-down menu.
Print Position
62
The following position settings are provided: Top Left/Top Center/Top Right/
Middle Left/Middle Center/Middle Right/Bottom Left/Bottom Center/Bottom
Right/Tiled
Chapter 3 Reference
Setting
Description
Configures the size of Water Mark in a percentage of print area. The
percentage can be specified within the range of 0 to 100. However, if you
select "0", the Water Mark becomes too small and cannot be printed.
Size
Density
When "100" is specified, the Water Mark will be enlarged or reduced so that it
fits in the print area of the selected paper. However, depending on the
horizontal to vertical ratio of the Water Mark image, such as a vertically long
image, some portions of the image may exceed the print area and may not
be printed. The length of paper is not changed according to the length of
the Water Mark image.
Configures the density of the Water Mark. The density can be adjusted in the
"Light" to "Dark" range.
3
63
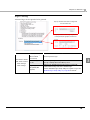
Document Settings
The Document Settings allows you to configure the document property. In the upper area of the window, the setting items are displayed in a tree view format, and the current settings of each setting items are shown on the right. If you select a setting item, the setting options for the selected item are displayed in the lower box. Setting item
Setting box
64
Chapter 3 Reference
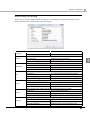
Paper Conservation
You can save paper by skipping page margins. Printing in the Windows environment is made based on standard paper sizes, such as A4, A5 size. Therefore, regardless of whether print data has been received or not, paper is advanced automatically by a predetermined amount each time after a receipt is printed. This function allows you to save paper by disabling the automatic paper feeding. Setting
Description
None
Does not save paper.
Top
Saves the top margin.
Bottom (Default)
Saves the bottom margin.
Top & Bottom
Saves both top and bottom margins.
3
According to the Rotate setting in the Layout tab, the Paper Conservation setting is
automatically set as follows.
When the Rotate setting is set to "Normal" or "Rotate by 90 Degrees", the Paper
Conservation is set to "Bottom". When "Rotate by 180 Degrees" or "Rotate by 270
Degrees" is specified, the Paper Conservation is set to "Top".
65
Print all text as graphic images
All the data will be printed as a graphic images.
Setting
Description
Yes
All print data is printed as a graphics image.
The computer creates the print data in the same way as Windows driver does,
therefore, the print data size becomes larger. In addition to that, Device fonts are
replaced with TrueType fonts, and Device fonts are not displayed in the Font tab.
No * (Default)
Device fonts are printed.
The TM printer creates the print data, therefore, the data size becomes smaller. In
addition to the Device fonts, you can also use control font, and controlA font. Due
to some settings, you may not be able to change the setting from "Yes" to "No". In
such case, a message appears to notify you of the setting that prevents the
change.
* When this setting is changed to "Yes" because of other settings, a message appears to notify you of the change.
"If you select "Yes", you can not use control font and controlA font.
Related APD settings.
The following settings automatically change this setting to ʺYesʺ.
Setting tab
Layout
Water Mark
Item
Rotate
Reduced print
Water Mark
Add Quiet Zone
Barcode
Rotation
Composite (when not installed on the device)
Type (when not installed on the device)
Add Quiet Zone
2D-Code
Rotation
Type (when not installed on the device)
66
Chapter 3 Reference
Input Unit
The unit to express a length in the Property screen can be changed. Paper size or any other length settings are expressed in the selected unit in the user interface.
Setting
Description
0.1mm (Default)
The length settings in the user interface can be made in increments of
"0.1mm".
0.01inch
The length settings in the user interface can be made in increments of
"0.01inch".
3
Related APD settings.
Setting tab
Layout
Barcode
Item
Paper Size (User Defined Paper Size : Paper Width, Paper Length)
Adjust Print Position (Vertical Direction, Horizontal Direction)
Element Height
67
Paper Source
This setting allows you to select operations of the autocutter and paper feed between pages, and between print jobs. Custom setting window
Setting
Description
The paper is advanced and cut each time a print job is finished.
Document[Feed,Cut]
The paper is advanced, but not cut each time a print job is finished.
Document[Feed,No Cut]
The paper is cut, but not advanced each time a print job is finished.
Document[No Feed,Cut]
Because of the space between the autocutter and the print head (1
to 2 cm), a minimum top margin is provided even if you set the top
margin to ì0î. To avoid the waste, this setting allows you to print the
top of the next page (e.g. store logos) on the bottom of the previous
page and then cut the paper without advancing it. In this way, the
top margin created by the physical space of the TM printer can be
used.
The paper is not advanced and not cut each time a print job is
finished.
Document[No Feed,No Cut]
68
Chapter 3 Reference
Setting
Description
The paper is advanced and cut each time a page is printed.
Page[Feed,Cut]
The paper is advanced, but not cut each time a page is printed.
Page[Feed,No Cut]
The paper is cut, but not advanced each time a page is printed.
Page[No Feed,Cut]
Custom
Use this setting when printing on black-mark papers or labels.
When this is selected, the Custom setting screen appears.
3
69
Custom
When ʺCustomʺ is selected from the Paper Source list for printing on black‐mark papers, labels or cut sheets of paper, the Custom setting screen appears.
Setting
Description
Feed paper to the print starting position
Specifies whether to advance labels or black mark
papers to the print start position. When this box is
checked, the paper is advanced to the start position.
When not checked, the paper is not advanced.
Paper feed
Specifies the amount of paper to be advanced. When
a positive value is specified, the paper is fed in the print
direction. When 0 is specified, the paper is not
advanced. When a negative value is specified, the
paper is fed in the direction opposite to the print
direction (reverse-feed may not be possible depending
on the TM printer model).
Eject single-cut sheets
Specifies whether to send a form feed command when
using cut sheets. When this box is checked, the
command is sent. When not checked, the command is
not sent.
Feed to cut position before cutting
Specifies whether to advance the paper to the cut
position before cutting operation. When this box is
checked, the paper is advanced to the cut position.
When not checked, the paper is not advanced.
Select the cutting operation.
• Do not cut
Cutting method
• Cut
• Feed to black mark and do not cut
• Feed to black mark and cut
70
Chapter 3 Reference
Printing Speed
You can change the print speed (paper feed speed), if that of your TM Printer is changeable. When a large bitmap is printed using a thermal printer with the print speed set to higher, the data transmission may not be able to keep up with the print speed. This can cause the printer to pause during printing. Should this occur, the bitmap may not be printed correctly. Adjust the print speed by changing the setting to 1st (fast), then 2nd (slightly slower), and then 3rd (slowest) in that order, until the image is printed properly without causing the printer to pause. Setting
Use the printer setting.
(Default)
1st~9th
3
Description
The print speed set at the TM Printer is applied.
The 1st is the fastest print speed, and the 9th is the slowest.
71
Large device font smoothing
Large device fonts can be clearly and neatly printed. Setting
72
Description
Enable (Default)
Performs smoothing of the large Device fonts to print them neatly.
Disable
The corners of large device fonts may be printed with jaggies.
Chapter 3 Reference
Cash drawer
You can configure the setting for opening the Cash drawer. A command for opening the Cash drawer is sent to the drawer connected to the TM Printer through the DK connector. See the Cash drawer specifications to check the connector number for the Cash drawer. Setting
Do not open (do not send command)
(Default)
Cash drawer #1 [2pins]
The drawer does not open.
Open before printing
The drawer opens when printing
starts.
Open after printing
The drawer opens when printing is
finished.
Do not open (do not send command)
(Default)
Cash drawer #2 [5pins]
Description
The drawer does not open.
Open before printing
The drawer opens when printing
starts.
Open after printing
The drawer opens when printing is
finished.
73
3
Send command
ESC/POS commands can be sent to the TM printer directly. ESC/POS commands are not open to the public. Ask your sales representative for more
information.
Setting
Send command
Start of Document
End of Document
Start of Page
End of Page
74
Command
Description
Check this box to send a command when printing.
Enter a desired ESC/POS command to be sent to the
TM printer.
You cannot enter the command without checking the
"Send command" box.
Chapter 3 Reference
Logo Printing
A desired logo can be specified to be printed. Pop-up window when Select image file
for use is selected
Pop-up window when logo registered
in the printer (NV graphic) is selected
Setting
Description
Do not print logo
Start of Document
End of Document
Start of Page
End of Page
(Do not send
command)
Does not print a logo.
Select Image file
for use
Prints a logo using an image file.
Logo registered in
the printer (NV
graphic)
3
Specify a bitmap file in the "Bitmap" box.
Prints a logo registered in the NV memory of the TM
printer. Enter a Keycode of the desired logo.
Use the "TM Flash Logo Setup Utility" to register a logo. See
"TM Flash Logo Setup Utility" on page 89 for details.
75
Halftone Settings
You do not set the Halftone Settings.
76
Chapter 3 Reference
Printer Settings
Allows you to make settings of the printer. The setting items are displayed in the upper box of the Printer Settings screen. If you select a setting item, the setting options for the selected item are displayed in the lower box. Setting item
Setting box
3
77
TrueType Font Substitution
Allows you to replace TrueType Font with Device font, Barcode font, 2D‐Code font, control font, or controlA font. Setting
Substitute (Default)
Replaces TrueType font with Device font, Barcode font, 2D-Code font,
control font, or controlA font.
Do not Substitute
Does not replace the TrueType font.
Advanced settings
78
Description
Displays the "TrueType Font Substitution" screen.
This button is enabled when the "Replace" is selected.
Chapter 3 Reference
TrueType Font Substitution settings
Allows you to configure TrueType substitution settings. In the case that Device fonts cannot be used, the substitution setting is ignored and TrueType fonts are printed as they are. Setting
Description
TrueType Font
Displays the TrueType font list. Select TrueType fonts to be replaced.
TrueType Font for
substitution
Displays the fonts selected by the "TrueType Font" list.
Device Font Name
Specify the device fonts to be replaced, "Barcode","Control","ControlA"
and "2D-Code".
Substitute All
Replace all the TrueType Font on the "TrueType Font" list to the fonts
selected on [Device Font Name]. If you put a check mark next to this
item, [TrueType Font] will be grayed out.
79
3
Barcode
Allows you to configure Barcode fonts. The barcode type and size can be registered. Up to eight types of barcodes (Barcode 1 to 8) can be registered using the APD. Setting
Font Name
Alias
Description
Select a desired barcode font from the pull-down list.
The point value changes according to the height of the element.
An alias name can be specified for the selected barcode font. Up to 31
characters can be entered. Alphameric characters, spaces, and the
following symbols can be used.
Available characters: !"#$%&'()*+,-./:;<=>?@[\]^_`{|}~
80
Type
Select a desired barcode type from the pull-down list (UPC-A, UPC-E,
JAN13 (EAN), JAN8 (EAN), Code39, ITF, Codabar, Code93, Code128).
Select "Not Use" when not specifying the barcode type.
Advanced settings
Displays the barcode advanced setting screen that allows you to select
the barcode size, HRI characters and so on.
Settings
Displays the barcode font settings.
Chapter 3 Reference
Barcode advanced setting
The barcode advanced setting screen is displayed by clicking the Advanced settings button. This allows you to select the barcode size, HRI characters and so on. Setting
Description
Element Width
Specifies the barcode element width. The thin element width is
expressed in the number of dots. The setting can be changed
within the range of 2 to 6.
Element Height
Specifies the barcode element height using the number of dots.
The setting can be changed within the range of 1 to 255 dots.
According to the specified number of dots, the actual height is
expressed in mm or point. Use the point value to specify the
height in the application.
HRI Position
Specifies the position of the HRI characters (barcode data) from
the pull-down list (Do not print, Above the barcode, Below the
barcode, Both above and below the barcode).
HRI Font
Specifies the font of the HRI characters from the pull-down list
(FontA, FontB).
The FontC is available only with some specific TM printers. This
option is grayed out when "No printing" is selected in the [HRI
Position].
81
3
Setting
Description
Specifies the print direction of barcode. When other than
"Normal" is selected in the Rotation setting, the following
message is displayed: "<Print all text as graphics image> will be
automatically set to yes."
When other than "Normal" is specified for the Rotation setting
both in the [Layout] tab and the [Barcode] - [Advanced
settings], the both settings are applied to the printed barcode
at a time.
Rotation
Normal
Prints the barcode without rotating it.
Rotate by 90
Degrees
Rotate by 180
Degrees
Rotates the barcode to print it. The whole print data is printed as
a graphics image, therefore, the Device fonts, control font, and
controlA font cannot be used.
Rotate by 270
Degrees
Hex lnput Mode
Add Quiet Zone
Allows the barcode characters to be entered in binary.
Ex : "00010203" J 0x00 0x01 0x02 0x03
Check this box to add a quiet zone, the blank margin on either
side of a barcode, required to be properly read by a barcode
reader. The quiet zone is added without changing the barcode
position.
Prints a set barcode as test printing.
Test
Printing
82
Test Data
Inputs data for test printing.
Run
Prints input data.
Chapter 3 Reference
2D-Code
Allows you to configure 2D‐Code fonts. The 2D‐Code type and size can be registered. Up to eight types of barcodes (2D‐Code 1 to 8) can be registered using the APD. 3
Setting
Font Name
Alias
Description
Select a desired 2D-Code font from the pull-down list. The point value
changes according to the height of the 2D-Code.
An alias name can be specified for the selected 2D Code font.
Up to 31 characters can be entered. Alphameric characters, spaces,
and the following symbols can be used.
Available characters: !"#$%&'()*+,-./:;<=>?@[\]^_`{|}~
Type
Select a desired 2D-Code type from the pull-down list (PDF417 or QR
Code).
Select "Not Use" when not specifying the type.
Advanced settings
Displays the 2D-Code advanced setting screen that allows you to make
the detailed settings for each type of the 2D-Code.
Settings
Displays the current 2D-Code font settings.
83
2D-Code advanced settings
The 2D‐Code advanced setting screen is displayed by clicking the Advanced settings button. PDF417
Setting
84
Description
Column
Specifies the number of columns of PDF417 to be printed.
The setting can be changed within the range of 0 to 30.
Steps
Specifies the number of steps of PDF417 to be printed.
The setting can be changed within the range of 0 to 30.
Module Width
Specifies the cell (module) width of PDF417 to be printed.
The setting can be changed within the range of 2 to 8.
Module Height
Specifies the cell (module) height of PDF417 to be printed.
The setting can be changed within the range of 2 to 8.
Error Correction Level
Specifies the error correction level for PDF417 (Level 0 to
Level 8).
Simple PDF
Specifies the option of PDF417 to be printed.
Chapter 3 Reference
Setting
Description
Specifies the print direction of 2D-Code. When other than
"Normal" is selected in the Rotation setting, the following
message is displayed: "<Print all text as graphics image> will
be automatically set to yes."
When other than "Normal" is specified for the Rotation setting
both in the [Layout] tab and the [2D-Code] - [Advanced
settings], the both settings are applied to the printed 2DCode at a time.
Rotation
Normal
Prints the 2D-Code without rotating it.
Rotate by 90 Degrees
Rotates the 2D-Code to print it. The whole print data is
printed as a graphics image, therefore, the Device fonts,
control font, and controlA font cannot be used.
Rotate by 180 Degrees
Rotate by 270 Degrees
Hex Input Mode
Add Quiet Zone
Allows the 2D-Code characters to be entered in binary.
Ex : "00010203" J 0x00 0x01 0x02 0x03
Check this box to add a quiet zone, the blank margin
around the 2D-Code, required to be properly read by a
barcode reader. The quiet zone is added without changing
the 2D-Code position.
Prints a set PDF417 as test printing.
Test
Printing
Test Data
Inputs data for test printing.
Run
Prints input data.
3
85
QR Code
Setting
Description
Model
Specifies a QR Code model (Model 11 or Model 12).
Module Width
Configures the cell (module) of QR Code to be printed. The
setting can be changed within the range of 1 to 16.
Version
Specifies the QR Code version.
Depending on the QR Code version, the number of
characters to be used for the 2D-Code changes.
The settable versions are 1 to 16 when the "Model 1" is
selected in the [Model], and 1 to 40 when the "Model 2" is
selected.
Error Correction Level
Specifies the error correction level for QR Code (Level L,
Level M, Level Q, Level H).
Specifies the print direction of 2D-Code. When other than
"Normal" is selected in the Rotation setting, the following
message is displayed: "<Print all text as graphics image> will
be automatically set to yes."
When other than "Normal" is specified for the Rotation setting
both in the [Layout] tab and the [2D-Code] - [Advanced
settings], the both settings are applied to the printed 2DCode at a time.
Rotation
Normal
Prints the 2D-Code without rotating it.
Rotate by 90 Degrees
Rotates the 2D-Code to print it. The whole print data is
printed as a graphics image, therefore, the Device fonts,
control font, and controlA font cannot be used.
Rotate by 180 Degrees
Rotate by 270 Degrees
Hex Input Mode
86
Allows the 2D-Code characters to be entered in binary.
Ex : "00010203" J 0x00 0x01 0x02 0x03
Chapter 3 Reference
Setting
Add Quiet Zone
Description
Check this box to add a quiet zone, the blank margin
around the 2D-Code, required to be properly read by a
barcode reader. The quiet zone is added without changing
the 2D-Code position.
Prints a set QR Code as test printing.
Test
Printing
Test Data
Inputs data for test printing.
Run
Prints input data.
3
87
Font
The list of Device fonts and Points supported by the TM printer is displayed. When using a Device font, make sure to specify the corresponding point indicated in the list. When programming, also specify the font and point as indicated in the list. Setting
Description
Prints the device font as test printing.
Test
Printing
88
Test Data
Inputs data for test printing.
Run
Prints input data.
Chapter 4 TM Flash Logo Setup Utility
TM Flash Logo Setup Utility
This chapter explains how to save your logo and how to use TM Flash Logo Setup Utility. The TM Flash Logo Setup Utility allows you to save a bitmapped image (logo file) to the NV memory of the TM printer and make a test print of the image. The main features are as follows. • Once a logo file is saved to the memory, you can print the logo file only by specifying to do so using APD. You do not need to send the logo file from your application each time you need to print it. • Because the logo file (bitmapped image) is saved on the printer and does not need to be transmitted, you can print it faster even when using serial connection, whose data transmission speed is relatively slow. Saving a Logo File
Follow the procedure below to save your logo file to the NV memory. For more details about the settings, see ʺReferenceʺ on page 93.
1
Prepare your logo file (bitmapped image). For information about
allowable file size of the logo file, refer to the resolution and paper size
provided in the "Print Specification".
Example: when printing a 60mm (W) x 20 mm (H) logo on 80 mm‐width paper using the TM‐T81, calculate the logo file size using the following formula.
Formula:No. of dots = Length (cm) 2.54 (one inch) x TM printer resolution (dpi) Width: 6.0 2.54 x 180 = 425 dots
Height: 2.0 2.54 x 180 = 142 dots
In this case, your logo file (bitmapped image) should be 425 x 142‐dot image. • 24-bit bitmap files can not be saved.
• You can use the TMF Logo Tool to change a full-color bitmapped image to a two-color or
single-color image.
• See "Printer Specification" of your TM printer to check the printer resolution.
2
Select [TM Flash Logo Setup Utility] from [Start] - [All Programs] - [EPSON] [EPSON Advanced Printer Driver 4].
89
4
3
The TM Flash Logo Setup screen is displayed. Select the [Setup] tab. After
specifying the printer name, click the [Comm.Test] button.
Setup
Printer Name
Comm Test
Setting
Description
Printer Name
Specify the printer to save a logo.
Comm Test
Checks whether the communication between devices is normally established
and displays a message to show the test result.
4
Select the [Bitmap Selection] tab and make the following settings.
Bitmap Selection
Open file
Selection Logo Files
Setting
Description
Open file
Add a logo file (*.bmp) to save. You cannot add a logo file if the total number
or size of the logo files listed in the "Selection Logo Files" box exceed the
allowable numbers or size.
Selection Logo Files
Displays a list of selected logo files.
The allowable number of logo files varies depending on the TM printer’s NV memory
capacity and size of the saved logo files. For more details, see the User's Manual supplied
with the TM printer or the Technical Reference Guide.
90
Chapter 4 TM Flash Logo Setup Utility
5
Select the [Preview] tab. Make the following settings on the tab.
Preview
Preview
Selection Logo Files
Setting
Selection Logo Files
Description
Displays a list of logo files selected in the [Bitmap Selection] tab.
Select a desired logo file in the list to preview it in the preview window on the
right.
Preview
6
Previews a logo file selected in the "Selection Logo Files" box.
Select the [Logo Upload] tab. Make the following settings and start to
upload the logo file to the TM printer.
Logo Upload
4
Device
APD Control Font
Selection Logo Files
Setting
Description
Selection Logo Files
Select a logo file to be saved to the TM printer in this box.
APD Control Font
Specify the destination to where the logo file is saved.
The destination NV memory address of the TM printer is specified using a
control font that is used for specifying the logo file to print.
Device
Starts to upload the selected logo file to the TM printer.
91
7
A write start confirmation screen is displayed. Click the [OK] button.
Uploading the logo file is started.
8
The logo file is saved to the NV memory of the TM printer. A completion
screen is displayed when saving the logo is finished successfully. Click the
[OK] button and reset the TM printer.
7>
9
8>
Select the [Logo Printout] tab. You can check whether the logo file is
properly saved to the TM printer by making a test print.
Logo Printout
Print
Printing Range
Header
Get key code
Setting
Printing Range
Description
Select a logo file saved to the TM printer.
Select "All" to print the all saved logo files.
In the case of NV graphics, select a desired logo file in the "Key code list" box.
Click the "Get key code" to display the available key code list in the box.
Get key code
Displays a list of key codes of logo files saved to the TM printer in the "Key
code list" box.
Header
Select whether to print the logo file with additional information such as its logo
number.
Print
Starts to print the logo as specified on this tab.
10
92
Click the [Close] button to finish the logo entry.
Chapter 4 TM Flash Logo Setup Utility
Reference
This section explains about the settings of TMF Logo Tool. Selection Logo Files
Setting
Description
Selection Logo Files
Open file
Remove
A list of selected logo files is displayed.
Specify a logo file (*.bmp) to be newly added to the TM printer.
The specified logo file is added in the "Selection Logo Files" list.
Delete a logo file selected in the "Selection Logo Files" box from the box.
Multiple logo files can be selected at a time.
4
In the following cases, a logo file cannot be selected.
∗ When a specified logo file itself exceeds the NV memory capacity or when adding the
logo file makes the total size of logo files exceed the NV memory capacity.
∗ When the specified logo file is not a bitmap file.
∗ When the specified logo file is a full-color (24-bit) bitmap file.
∗ When adding the logo file exceeds the allowable number of logo files.
93
Preview
Setting
Description
Displays a list of logo files selected in the [Bitmap Selection] tab. Select a
Selection Logo Files
logo file in the list to preview the bitmapped image in the preview window
on the right.
Preview
Previews a bitmapped image selected in the "Selection Logo Files" list.
Original
Displays an original bitmapped image.
After Transformation
Displays a bitmapped image reflecting the [Half Tone], [Quality], [Primary
Ink], and [Secondary Ink] settings.
Select a desired half tone setting. This setting is applied to the selected
logo image when the logo is saved to the printer or output as a file.
Half Tone
Select one of the options for converting a color bitmap file into
monochrome or two-color image, or reducing colors from a color bitmap
file.
Method
Dither
Reproduces the image tones as rich as possible within the allowable grayscale range.
The darker portions of the image are printed using the Primary Ink and the
Secondary Ink is used for the lighter portions of the image. Each one of
image pixels is expressed by one dot.
Error
Diffusion
Reproduces the image tones as rich as possible within the allowable grayscale range.
The darker portions of the image are printed using the Primary Ink and the
Secondary Ink is used for the lighter portions of the image. For error
diffusion, each one of image pixels is expressed with multiple dots.
None
Reduces colors from the original image. The original bitmapped image is
binarized or trinarized. The darker portions of the image are printed using
the Primary Ink and the Secondary Ink is used for the lighter portions of the
image.
None
94
Select this to print a simple bitmapped image such as a shop logo.
Expresses the image using the same color extracted from Primary Ink and
Secondary Ink.
Chapter 4 TM Flash Logo Setup Utility
Setting
Brightness
Description
Specifies the brightness of the bitmapped image.
Quality
Select the resolution used to display the image in the preview window.
Primary Ink
Select an ink color to be used as the Primary Ink. When [Color Setting] on
the [Setup] tab has been set to "Monochrome", the color is fixed to "K".
Secondary Ink
Select an ink color to be used as the Secondary Ink. This setting is enabled
when [Color Setting] on the [Setup] tab is set to "Color".
When using a thermal printer and special paper, select "K" or "R".
When selecting "Monochrome" using the NV graphics, select "None".
4
95
Logo Upload
Setting
Selection Logo Files
Upload
96
Description
Displays a list of logo files selected in the [Bitmap Selection] tab.
The logo file selected here is saved to the TM printer.
Starts to upload the selected logo file to the device or output as a file.
Device
Starts to upload the selected logo file to the NV memory of the device.
File
Starts to output the selected logo file as a binary file.
APD Control Font
Specifies the destination NV memory using a control font that is used for
specifying the logo file to print.
Custom
Specify any key code to register the logo.
Device
Displays device information of the device to where the logo file is saved.
Printer Name
Displays the printer model name.
Port Name
Displays the port setting of the destination device.
Chapter 4 TM Flash Logo Setup Utility
Logo Printout
Setting
Printing Range
All
Description
Specifies a print range of the logo image.
Prints all logo files saved in the NV memory of the device.
Enter a print range of an NV monochrome bitmapped image in the edit box
using "," and "-".
Selection
Example) "1,5,10" "1-5,8,20-22"
In the case of NV graphics, select the corresponding key code from the Key
code list.
Key code list
When the [Get key code] button is clicked, a list of key codes obtained from
the device is displayed.
Get key code
Obtains key codes from the device.
Print
Prints a logo file selected in the Printing Range box.
Quality
Specifies the print resolution.
Header
Prints the selected logo file with its logo number added above the logo
image.
Device Details
Displays device information of the device that prints the logo file.
Printer Name
Displays the printer model name.
Port Name
Displays the port setting of the destination device.
4
97
Setup
Setting
Device Class
Description
Select the device type to be displayed in the [Printer Name] box.
POS Printer
Displays TM printer model names in the [Printer Name].
LineDisplay
Displays Customer Display model names in the [Printer Name].
Printer Name
Select a device to where the logo file is saved.
Color Setting
Select the color setting of the logo file to save. When the selected
device does not support color printing, the "Color" option is disabled.
Monochrome
Saves the selected logo file as a NV bitmapped image.
Color
Saves the selected logo file as a NV graphics.
Device NV bitimage
memory setting
NV memory check and setting can be made.
Displays the NV memory capacity.
Memory capacity
You can change the memory capacity here as long as the selected
device supports the change.
Click the [Set] button to change the memory capacity.
Free memory
Displays free space of the NV memory when "Color" is selected in
[Color Setting]. Click the [Check] button to display the free space.
Check
Displays the current capacity or free space of the NV memory when
the selected device supports change of memory capacity or
supports color printing.
Set
When the selected device supports change of NV memory capacity,
changes the capacity to the amount specified in [Memory
capacity].
Delete KC
When NV graphics is selected, you can check or delete key codes
saved in the device.
Comm.Test
Performs a communication test with the selected device.
About
Displays the version information of the TM Flash Logo Setup Utility.
If you change the memory setting, the logo data already registered is not guaranteed. It
may be lost. Be sure to confirm the registered logos.
98
Chapter 5 Restrictions
Restrictions
This chapter describes the restrictions that apply to the APD.
OS Settings
1. When connecting Windows XP/Vista to a printer using serial I/F, printing may not operate correctly depending on the computer and printer combination. In such cases, disable FIFO in the Windows COM port detailed settings.
2. With a serial connection, when the OS recovers from a sleep or hibernate status, the printer may print ʺ??.ʺ
3. With Windows XP/Vista, use [Enable advanced printing features] (EMF spool) in the printer driver Properties ‐ [Advanced] tab set to ON. Setting otherwise (RAW spool) applies the following restrictions to the GDI functions:
• Raster operation cannot be printed as specified by StrtchBlt()/BitBlt().
• When transferring bit information from display device context to the printer device context using StretchBlt(), the GDI function returns ʺFailureʺ and prevents the driver from printing.
4. When printing multiple pages, if you change the paper orientation from one page to another and/or other settings using ResetDC(), the print result may be incorrect. In such cases, set RAW spool (with Windows XP/Vista, set [Enable advanced printing features] to OFF) although some restrictions apply. See the previous paragraph for the restrictions.
5. When printing device fonts with Microsoft Word, convert the application to ʺMicrosoft Word 6.0/95ʺ by selecting [Tools] menu ‐ [Options] ‐ [Compatibility] tab or check the ʺUse printer metrics to lay out documentʺ option on the same tab.
6. If you print more than one Excel sheet at the same time when different print settings are set for each sheet, the setting for the last sheet is effective.
7. When printing with Microsoft ACCESS, the text in the print result may be misaligned or align left may not be possible.
8. Operation in a Windows XP multi‐user environment is not guaranteed.
99
5
Printing
1. Print data outside of the printable area will not be printed. 2. When printing on receipt paper, blank space appears at the top of the paper which is greater than the top margin setting value. This is caused by the fact that the paper cutting position (autocutter) and the printing position (printer head) are separated and the distance between them results in extra margin.
3. Device fonts cannot be used in rotated, condensed or enlarged printing. Use Windows fonts.
4. If a device font and graphics data (Windows font or ruled line, etc.) are defined on the same line, the print result may be misaligned.
5. Printing takes longer with serial models than with other interfaces. If you want to print faster, other than a serial model is recommended.
6. Euro currency symbol cannot be printed. 7. The paper size displayed in the printer driver Properties ‐ [General] tab may differ from what is stated in the ʺPrinter Specification.ʺ In such cases, select the paper size stated in the userʹs manual.
8. With Windows XP/Vista, printing of codes 80H, 8EH, or 9EH from an application when device Font A or B, or blank page Font A or B (254 or 255) is specified may not operate correctly.
9. Align center or left using Control Font cannot be used with graphics printing.
10. [Separator Page] in the printer driver Properties ‐ [Advanced] tab is not available.
11. With some applications, several device font size options are displayed, however, device font is always printed in a fixed size regardless of your size selection. 12. With some applications, print settings such as ʺCollateʺ and ʺOrientationʺ configured on the application side may differ from the printer driver settings. In such cases, the settings on the application side take priority. However, it is not possible to print beyond the printerʹs capabilities. (For example, printing in landscape format using device font)
13. Even when you specify bold or italic font settings, it will not be reflected in the printings. The underline is printed but the position is offset. 14. The color format is fixed to 24 BPP. So check that dmColor setting for Devmode is set to ʺColorʺ on the application side.
15. You cannot print data with water mark setting and logo files with a shared printer. 16. When water mark and 2‐D symbol are used in a single data, the printout could be misaligned (displaced). 100
Chapter 5 Restrictions
17. When you print a narrow width barcode with a high‐resolution printer, all of the HRI characters may not be printed. In such case, specify narrow width fonts; FontB/C for the HRI characters. 18. If you manually remove printed paper when the paper source selection is set to [No Eject] with the slip driver, the following printing will not be performed correctly.
In that case, turn off the power of the printer, and then turn it on again.
19. If you print color logos with a printer that does not support color printing of slip/validation/
endorsement and so on, only the black parts will be printed.
5
101
102
Appendix Printer Specification
Printer Specification
This chapter explains the specifications of the Device Font, the Control Font, the Control A Font, the Resolution, the Paper Size, the Rotate, the Reduce and the Water Mark of the TM‐T81 printer drive.
Administrator permission is required for property settings of the printer driver.
Item
Description
Driver Name
EPSON TM-T81 ReceiptE4
Device Font
Prohibited when rotation is selected.
Prohibited when resizing a font in a smaller size or when Water Mark is selected.
FontA11
FontA12
FontA44
FontA48
FontB21
FontB22
FontB84
FontB88
• Code Page WPC1252
FontA21
FontA84
FontB24
FontA22
FontA88
FontB42
FontA24
FontB11
FontB44
FontA42
FontB12
FontB48
FontA11[255] FontA12[255] FontA21[255] FontA22[255] FontA24[255] FontA42[255]
FontA44[255] FontA48[255] FontA84[255] FontA88[255] FontB11[255] FontB12[255]
FontB21[255] FontB22[255] FontB24[255] FontB42[255] FontB44[255] FontB48[255]
FontB84[255] FontB88[255]
• Space Page (255)
Barcode Font
Barcode Font Points determined. When specifying a value other than this, the Barcode is
not printed.
Barcode1~Barcode8
Layout possible Barcode
Codabar Code39 ITF JAN13(EAN)
JAN8(EAN) UPC-A UPC-E Code93
Code128
2D-Code Font
2D-Code1~2D-Code8
Layout possible 2D-Code
QR Code PDF417
Control Font
Font Name : control , Point : 1
• No operations for characters other than those mentioned above.
• Prohibited when rotation is selected.
• Prohibited when resizing a font in a smaller size or when Water Mark is selected.
Char
Function
Char
Function
5
Transmits HT
k
NV graphics 3 printing (48,51)
6
Transmits LF
l
NV graphics 4 printing (48,52)
7
Transmits CR
w
Position alignment left
a
Open Drawer 5pin(50ms)
x
Position alignment center
b
Open Drawer 5pin(100ms)
y
Position alignment right
c
Open Drawer 5pin(150ms)
A
Open Drawer 2pin(50ms)
d
Open Drawer 5pin(200ms)
B
Open Drawer 2pin(100ms)
e
Open Drawer 5pin(250ms)
C
Open Drawer 2pin(150ms)
g
No paper feeding + Partial cut
D
Open Drawer 2pin(200ms)
h
NV graphics 0 printing (48,48)
E
Open Drawer 2pin(250ms)
i
NV graphics 1 printing (48,49)
P
Paper feeding +Partial cut
j
NV graphics 2 printing (48,50)
103
Item
Description
ControlA Font
Font Name : controlA , Point : 1
• Characters defined by ControlA Definition File can be selected.
• No operations for characters not defined. No printing for spaces.
• No paper feeding for any functions that do not include paper feeding.
• Prohibited when rotation is selected.
• Prohibited when resizing a font in a smaller size or when Water Mark is selected.
Resolution
180x180DPI
Paper Size
80mm Roll Paper
Paper Size
Printing Width
Margin
80mm x 297mm
(566dot x 2104dot)
72.2mm
(512dot)
top 0mm
bottom 0mm
left 3.6mm(26dot)
right 3.9mm(28dot)
User Defined Paper Size
Width 72.2~210.0mm, Height 25.4~3276.0mm
Logic paper size (when resizing in a smaller size)
A4 210mm x 297mm
LT 8.5" x 11"
Postcard 100 x 148 mm
Rotate
Normal
Rotate by 180 Degrees
Reduce Printing
ON/OFF
Fit to Printable Width/Custom(10 - 100%)
Water Mark
Supported
• When Water Mark is specified to the printer, the printer cannot use Device Font, Control Font
and ControlA Font.
104
Rotate by 90 Degrees
Rotate by 270 Degrees