1
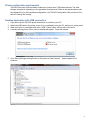
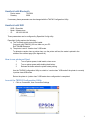
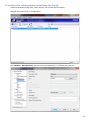
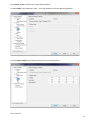
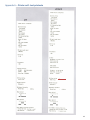
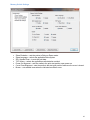
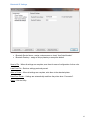
TM-P60II w/ Zebra Emulation
Setup Manual - 05/14
1
Table of Contents
Printer configuration requirements................................................................................................................................... 3
Desktop application with USB connection ...................................................................................................................... 3
Handheld with Bluetooth ................................................................................................................................................... 7
Handheld with WiFi ............................................................................................................................................................ 7
How to run printer self test .................................................................................................................................. 7
Launch the TM-P60 Configuration Utility ............................................................................................................ 7
To configure the LAN parameters, Install EpsonNet Config. ........................................................................... 10
Appendix A – Printer self- test printouts........................................................................................................................ 13
Appendix B - TM-P60 Configuration Utility Detailed Setup ........................................................................................ 14
Printer Settings .................................................................................................................................................. 14
Memory Switch Settings.................................................................................................................................... 15
Paper Layout Settings ....................................................................................................................................... 16
Bluetooth I/F Settings ........................................................................................................................................ 17
2
Printer configuration requirements
TM-P60II must have Zebra emulation enabled and “printer class” USB mode selected. The other
settings are optional, depending on the application’s requirements. Refer to the attached printer self
test (Appendix A) for the completed configurations. Use TM-P60 Configuration Utility revision 2.09 or
above to change the settings.
Desktop application with USB connection
1
2
3
4
Copy and unzip the TM-P60II printer class driver to a folder on your PC.
Attach the USB cable to the printer, plug it in to an available port on the PC, and turn on printer power.
When the Printer is connected while set to “USB = Printer class” a Driver will not be found…
A window advising that a Driver was not installed will appear. Close that window.
5
Go to Device Manager and right click on the printer at “Other Devices”. Select Update Driver
Software…
3
6
Select Browse my computer for driver software…
7
Browse to the folder where you unzipped the PrintClass Driver.
a. Point to the “Driver folder if your PC OS is Win 32 bit.
b. Point to the Driver64 folder if your PC OS is Win 64 bit.
4
8
Click Next…
9
Select “Epson TM-P60IIPeeler ReceiptE4”, and click Next.
5
10 Click Close when the update is complete.
11 After the update is complete, a new printer “EPSON TM-P60IIPeelerReceiptE4” will be listed in the
“Printers and Faxes” list.
12 Direct the label application to the printer “EPSON TM-P60IIPeelerReceiptE4”.
6
Handheld with Bluetooth
-
Device name:
Passkey:
TM-P60II
0000
If necessary these parameters can be changed with the TM-P60 Configuration Utility.
Handheld with WiFi
-
SSID: EpsonNet
Mode: Infrastructure
IP:
192.168.192.168
These parameters can be configured by EpsonNet Config utility.
EpsonNet Config requires the following…
a) The Tmusbxp.sys driver muist be loaded.
Copy and unzip TMUSB_610 to a folder on your PC.
Run TMUSB\Setup.exe
b) The printer is set to “Vendor class” USB mode
To determine vendor class or printer class, run the printer self-test, the mode is printed in the
middle of the self-test page (See Appendix A).
How to run printer self test
1
2
3
Turn off printer power, install media, close cover.
Turn on printer power while holding feed button.
Release the button when the printer starts printing.
Use the TM-P60 Configuration Utility to switch to “vendor class” USB mode if the printer is currently
in printer class USB mode.
Return the printer to “printer class” USB mode when configuration is completed.
Launch the TM-P60 Configuration Utility
1
Click on Connection, then Connection Settings.
7
2
Select USB Port (Printer Class) or USB Port (TMUSB i.e. Vendor Class).
Click OK…
Then click on Connection, and Connect.
3
The Connected message will appear…Click OK.
4
Click on Configuration, then Switch USB Class (Vendor/Printer).Note: After switching USB
mode, reconnecting using the new class is required in order to continue using the utility.
8
5
Click Yes to Switch to Vendor Class.
6
The Printer will Reset / No Message will appear.
9
To configure the LAN parameters, Install EpsonNet Config.
Launch the EpsonNet Config Utility, select “Refresh” if the printer does not appear…
Highlight the printer and click “Configuration”.
Click “Network – Basic (Wireless)” and enter the correct parameters, i.e. SSID, Security Level, etc.
10
Click “TCP/IP – Basic” and enter the correct LAN parameters.
To enable DHCP, select Automatic (Clear - “Set using Automatic Private IP Addressing (APIPA))
To Use a Fixed IP address, select Manual and enter the correct parameters.
Click “Transmit”
11
Click “OK” at the “complete message
12
Appendix A – Printer self- test printouts
13
Appendix B - TM-P60 Configuration Utility Detailed Setup
Select Manual Configuration
Printer Settings
Print Density - adjusts the darkness of print.
Sleep Timeout - adjusts the idle time after which the printer will time out / go to sleep.
14
Memory Switch Settings
•
•
•
•
•
•
•
Zebra Emulation – sets the printer to Zebra or Epson mode.
Zebra Language – selects the applicable Zebra syntax.
ZPLII Upside Down – inverts the print data.
TOF Sensor – selects the applicable media detection method.
Power On Alignment – sets the media to the print start position upon power on.
Cover Close Alignment – sets the media to the start print position whenever the cover is closed.
Buzzer – sets audible tones when the indicated conditions occur.
15
Paper Layout Settings
•
•
•
Label Length - sets the media height when printing upside down.
TOF Offset – adjusts the vertical position of the first printed line on the form (top margin).
Label Auto Detection – starts a printer media alignment sequence to set the media size.
o
Note: it will save the values automatically.
Note:
Label length is required when the ZPL upside down print command is enabled. When the upside down
print command is disabled, label length is not used, even though it’s defined in the printer.
Label length is defined as from top label edge to bottom label edge, excluding liner.
The values can be entered manually or “Label Auto Detection” can be used. “Label Auto Detection”
feeds 6 labels, calculates the label length, updates the values on the screen, and stores the value in
printer NV.
Caution:
When using Label Auto Detection, it is very important to place the paper guide in proper position, to
prevent the label shifting during the length detection. Since the label sensor is mounted on the side,
label shifting away from the sensor may result in incorrect length detection.
When the label length is entered manually, pressing the “Write to Printer” button will save the length in
printer NV.
16
Bluetooth I/F Settings
•
•
Bluetooth Device Name – assign a unique name or check “Use Serial Number”
Bluetooth Passkey – assign a unique passkey or accept the default.
Save to File – When all settings are complete, save them for ease of configuration of other units.
Load From File – Retrieve settings previously saved.
Write to Printer – When all settings are complete, write them to the attached printer.
Read From Printer – Settings are automatically read from the printer when “Connected”.
Close – Exit the Utility.
17