1
Dell™ PowerConnect™ 3248 and 5224 Network Switches
Addendum to the 3248 and
5224 User’s Guides
w w w. d e l l . c o m | s u p p o r t . d e l l . c o m
Notes, Notices, and Cautions
NOTE: A NOTE indicates important information that helps you make better use of your computer.
NOTICE: A NOTICE indicates either potential damage to hardware or loss of data and tells you
how to avoid the problem.
CAUTION: A CAUTION indicates a potential for property damage, personal injury,
or death.
____________________
Information in this document is subject to change without notice.
© 2003 Dell Computer Corporation. All rights reserved.
Reproduction in any manner whatsoever without the written permission of Dell Computer Corporation is strictly forbidden.
Trademarks used in this text: Dell, the DELL logo, and PowerConnect are trademarks of Dell Computer Corporation;
Microsoft, Windows, and Windows NT are registered trademarks of Microsoft Corporation.
Other trademarks and trade names may be used in this document to refer to either the entities claiming the marks and
names or their products. Dell Computer Corporation disclaims any proprietary interest in trademarks and trade names
other than its own.
January 2003
P/N K0111
Rev. A01
Addendum to the 3248 and 5224
User’s Guides
New Features:
•
Remote System Logging
•
Secure Access — Secure Shell (SSH), Authentication Settings, and
Secure Hypertext Transfer Protocol (HTTPS)
•
Increased Port Security
•
Spanning Tree Protocol (STP)
•
IP Filtering — Simple Network Management Protocol (SNMP)
•
Enhanced Statistics Summaries
NOTE: The graphics in
this section may differ
slightly from the graphics
on your computer.
Addendum to the 3 248 and 52 24 User ’s Guides
3
w w w. d e l l . c o m | s u p p o r t . d e l l . c o m
System Logs
Remote system logging allows you to configure the logging of system
messages directly from the Web interface and the command line interface
(CLI).
The system log messages are categorized, by severity, into eight levels. The
levels range from 0 for Emergencies to 7 for Debugging. See the following
table for descriptions:
Level Argument
Level
Description
Emergencies
0
System unusable
Alerts
1
Immediate action needed
Critical
2
Critical conditions
Errors
3
Error conditions
Warnings
4
Warning conditions
Notifications
5
Normal but significant condition
Informational
6
Informational messages only
Debugging
7
Debugging messages
The system allows you to specify which levels are logged to RAM or flash
memory.
To assist in troubleshooting network problems, severe error messages that
are logged to flash memory are permanently stored in the switch. Up to 4 K
log entries can be stored in the flash memory. When the available memory
for logs exceeds 256 KB, the oldest entries are overwritten.
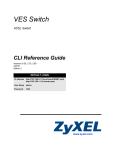
System Logs Configuration
The Switch/General/System Logs page allows you to configure and limit
system messages that are logged to flash or RAM memory. The default is set
for levels 0 to 3 to be logged to flash and levels 0 to 7 to be logged to RAM.
The Switch/General/System Logs page contains the following fields that
can be edited:
•
4
System Log Status — Enables/disables the logging of debug or error
messages to the logging process.
Addendum to the 32 48 and 5 224 User ’s Guides
•
Flash Level — Limits log messages saved to the switch’s permanent
flash memory for all levels up to the specified level. For example, if
level 3 is specified, all messages from level 0 to level 3 are logged to
flash.
•
Ram Level — Limits log messages that are saved to the switch’s
temporary RAM memory for all levels up to the specified level. For
example, if level 7 is specified, all messages from level 0 to level 7 are
logged to RAM.
To save any changes you make in this page, click Apply Changes. If you do
not want to save the changes, click Refresh.
NOTE: The Flash Level
must be equal to or less
than the Ram Level.
NOTE: System log
messages are logged
every 60 minutes.
The following figure is representative of PowerConnect 3248 and 5224.
Addendum to the 3 248 and 52 24 User ’s Guides
5
w w w. d e l l . c o m | s u p p o r t . d e l l . c o m
CLI Commands
The following table summarizes the equivalent CLI commands for items in
the Switch/General/System Logs page.
Command
Usage
logging on
Controls the logging of debug or error messages to
a logging process.
The no form command disables the logging
process.
logging history {flash |
ram} level
Limits syslog messages saved to switch memory
based on severity.
The no form command returns the logging of
syslog messages to the default level.
flash — event history stored in flash memory
(permanent memory)
ram — event history stored in temporary RAM
(memory flushed on power reset)
show logging {flash | ram
| trap}
Displays the logging configuration for system and
event messages
Example
Console(config)#logging on
Console(config)#logging history ram 0
Console(config)#
Console#show logging flash
Syslog logging: Disable
History logging in FLASH: level errors
Console#
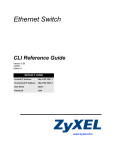
Remote Logs Configuration
The Switch/General/Remote Logs page allows you to configure the logging
of messages that are sent to syslog servers or other management stations.
You can also limit the error messages sent to messages of a specified level.
6
Addendum to the 32 48 and 5 224 User ’s Guides
The Switch/General/Remote Logs page contains the following fields that
can be edited:
•
Remote Log Status — Enables/disables the logging of debug or error
messages to the remote logging process. (Default: Enabled)
•
Logging Facility — Sets the facility type for remote logging of syslog
messages. There are eight facility types specified by values of 16 to 23.
The syslog server uses the facility type to dispatch log messages to an
appropriate service. (Default: 23)
•
Logging Trap — Limits log messages that are sent to the remote syslog
server for all levels up to the specified level. For example, if level 3 is
specified, all messages from level 0 to level 3 are sent to the remote
server. (Default: 3)
•
Host IP List — Displays the list of remote server IP addresses that
receive the syslog messages. The maximum number of host IP
addresses allowed is five.
•
Host IP Address — Specifies a new server IP address to add to the
Host IP List.
To add an IP address to the Host IP List, type the new IP address in the
Host IP Address box, and click Add IP Host. To delete an IP address, click
the entry in the Host IP List, and click Remove Host IP.
To save any changes you make in this page, click Apply Changes. If you do
not want to save the changes, click Refresh.
Addendum to the 3 248 and 52 24 User ’s Guides
7
w w w. d e l l . c o m | s u p p o r t . d e l l . c o m
The following figure is representative of PowerConnect 3248 and 5224.
CLI Commands
The following table summarizes the equivalent CLI commands for items in
the Switch/General/Remote Logs page.
Command
Usage
logging host
host_ip_address
Adds a syslog server host IP address that receives
logging messages.
The no form command removes a syslog server
host.
logging facility
facility_type
Sets the facility type for remote logging of syslog
messages.
The no form command returns the facility type to
the default.
logging trap level
Limits syslog messages saved to a remote server
based on severity.
The no form command returns the remote logging
of syslog messages to the default level.
8
Addendum to the 32 48 and 5 224 User ’s Guides
Command
Usage
show logging {flash | ram
| trap}
Displays the logging configuration for system and
event messages
Example
Console(config)#logging host 10.1.0.9
Console(config)#logging facility 23
Console(config)#logging trap 4
Console(config)#
Console#show logging trap
Syslog logging: Enable
REMOTELOG status: enable
REMOTELOG facility type: local use 7
REMOTELOG level type: Warning conditions
REMOTELOG server ip address: 10.1.0.9
REMOTELOG server ip address: 0.0.0.0
REMOTELOG server ip address: 0.0.0.0
REMOTELOG server ip address: 0.0.0.0
REMOTELOG server ip address: 0.0.0.0
Console#
Security
The Switch/Security page contains new links to Secure Shell (SSH) and
Secure Hypertext Transfer Protocol (HTTPS) configuration. The RADIUS
Settings page was renamed Authentication Settings and updated to
include Terminal Access Controller Access Control System Plus
(TACACS+).
•
SSH
•
Authentication Settings
•
HTTPS
Addendum to the 3 248 and 52 24 User ’s Guides
9
w w w. d e l l . c o m | s u p p o r t . d e l l . c o m
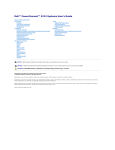
Secure Shell
The Secure Shell (SSH) server feature provides remote management access
using encrypted paths between the switch and SSH-enabled management
station clients.
NOTE: There are two
versions of the SSH
protocol currently
available: SSH v1.x and
SSH v2.x. The switch
supports only SSH v1.5.
•
SSH Server Status — Allows you to enable/disable the SSH server
feature on the switch. (Default: Enabled)
•
SSH authentication timeout — Specifies the time interval in seconds
that the SSH server waits for a response from a client during an
authentication attempt. (Range: 1 to 120 seconds; Default: 120 seconds)
•
SSH authentication retries — Specifies the number of authentication
attempts that a client is allowed before authentication fails and the
client must restart the authentication process. (Range: 1 to 5 times;
Default: 3)
To save any changes you make in this page, click Apply Changes. If you do
not want to save the changes, click Refresh.
The following figure is representative of PowerConnect 3248 and 5224.
10
Addendum to the 32 48 and 5 224 User ’s Guides
CLI Commands
The following table summarizes the equivalent CLI commands for items in
the Switch/Security/SSH page.
Command
Usage
ip ssh server
Enables the SSH server on the switch.
The no form command disables the SSH server.
ip ssh {[timeout seconds]
| [authentication-retries
integer]}
Specifies the authentication timeout for the SSH
server and the number of retries allowed by a
client.
The no form command resets the values to the
default.
disconnect ssh
connection_id
Terminates an SSH connection. The connection_id
is the session number displayed when using the
show ssh command.
show ip ssh
Displays the status of the SSH server and the
configured values for authentication timeout and
retries.
show ssh
Displays the status of current SSH sessions.
Example
Console(config)#ip ssh server
Console(config)#ip ssh timeout 100
Console(config)#ip ssh authentication-retries 5
Console(config)#
Console#show ip ssh
Information of secure shell
SSH status: enable
SSH authentication timeout: 100
SSH authentication retries: 5
Console#show ssh
Information of secure shell
Session Username Version Encrypt method Negotiation
state
Addendum to the 3 248 and 52 24 User ’s Guides
11
w w w. d e l l . c o m | s u p p o r t . d e l l . c o m
------- -------- ------- -------------- ---------------0
started
admin
1.5
cipher-3des
session-
Console#
Authentication Settings
Similar to RADIUS, TACACS+ is a system that uses a central server to
control authentication for access to switches on the network. The RADIUS
Settings page was renamed "Authentication Settings" and updated to
include TACACS+.
The RADIUS system uses User Datagram Protocol (UDP) while TACACS+
uses Transmission Control Protocol (TCP). UDP only offers best-effort
delivery, while TCP offers a connection-oriented transport. Also, note that
RADIUS encrypts only the password in the access-request packet from the
client to the server, while TACACS+ encrypts the entire body of the packet.
Both RADIUS and TACACS+ authentication control management access
using the console port, Web browser, or Telnet. These access options must
be configured on the authentication server together with user names,
passwords, and specific privilege levels for each user name/password pair.
NOTICE: If you are using only a RADIUS server for authentication, you must
configure a special user name on the server for the CLI enable command that
allows access to the Privileged Exe level from the Normal Exe level. The user
name to configure on the RADIUS server for this command is $Enable.
NOTE: When you are
setting up privilege levels
on a RADIUS or
TACACS+ server, level 0
allows Normal Exec
access to the switch, and
level 15 allows Privileged
Exec access.
12
The Switch/Security/Authentication Settings page contains the following
fields that can be edited:
•
Authentication Sequence— Select the authentication, or
authentication sequence, required: (Default: Local)
–
Local — The switch authenticates the user.
–
RADIUS — A RADIUS server authenticates the user.
–
TACACS — A TACACS+ server authenticates the user.
–
Local, RADIUS — The switch attempts to authenticate the user
first, and then a RADIUS server attempts to authenticate the user.
Addendum to the 32 48 and 5 224 User ’s Guides
•
–
Local, TACACS — The switch attempts to authenticate the user
first, and then a TACACS+ server attempts to authenticate the
user.
–
RADIUS, Local — A RADIUS server attempts to authenticate the
user first, and then the switch attempts to authenticate the user.
–
RADIUS, TACACS — A RADIUS server attempts to
authenticate the user first, and then a TACACS+ server attempts
to authenticate the user.
–
Local, RADIUS, TACACS — The switch attempts to
authenticate the user first, then a RADIUS server, and then a
TACACS+ server.
–
Local, TACACS, RADIUS — The switch attempts to
authenticate the user first, then a TACACS+ server, and then a
RADIUS server.
–
RADIUS, Local, TACACS — A RADIUS server attempts to
authenticate the user first, then the switch, and then a TACACS+
server.
–
RADIUS, TACACS, Local — A RADIUS server attempts to
authenticate the user first, then a TACACS+ server, and then the
switch.
–
TACACS, Local, RADIUS — A TACACS+ server attempts to
authenticate the user first, then the switch, and then a RADIUS
server.
–
TACACS, RADIUS, Local — A TACACS+ server attempts to
authenticate the user first, then a RADIUS server, and then the
switch.
RADIUS Server Settings — If using a RADIUS server, specify the
following details:
–
Server IP Address — Identifies the IP address of the RADIUS
server.
–
Server Port Number — Identifies the User Datagram Protocol
(UDP) port number used by the RADIUS server.
–
Secret Text String — Specifies the text string that is shared
between the switch and the RADIUS server. Do not use blank
spaces in the string.
–
Number of Server Transmits — Specifies the number of request
transmits to the RADIUS server before failure.
Addendum to the 3 248 and 52 24 User ’s Guides
13
w w w. d e l l . c o m | s u p p o r t . d e l l . c o m
–
NOTE: The local switch
user database must be set
up through the CLI by
manually entering user
names and passwords.
•
Timeout for a Reply — Specifies the number of seconds the
switch waits for a reply from the RADIUS server before it resends
the request.
TACACS+ Server Settings — If using a TACACS+ server, specify the
following details:
–
Server IP Address — Identifies the IP address of the TACACS+
server.
–
Server Port Number — Identifies the Transmission Control
Protocol (TCP) port number used by the TACACS+ server.
–
Secret Text String — Specifies the text string that is shared
between the switch and the TACACS+ server. Do not use blank
spaces in the string.
To save any changes you make in this page, click Apply Changes. If you do
not want to save the changes, click Refresh.
The following figure is representative of PowerConnect 3248 and 5224.
14
Addendum to the 32 48 and 5 224 User ’s Guides
CLI Commands
The following table summarizes the equivalent CLI commands for items in
the Switch/Security/Authentication Settings page.
Command
Usage
authentication login {radius |
local | tacacs} [tacacs | radius |
local] [local | tacacs | radius]
Defines the login authentication method
and precedence.
radius-server host host_ip_address
Specifies the RADIUS server IP address.
radius-server port port_number
Sets the RADIUS server UDP port number.
radius-server key key_string
Sets the RADIUS encryption key (up to
20 characters).
radius-server retransmit
number_of_retries
Sets the number of times the switch
attempts to authenticate logon access
through the RADIUS server. (The range
is 1–30.)
radius-server timeout
number_of_seconds
Sets the number of seconds the switch waits
for a reply before resending a request. (The
range is 1-65535.)
show radius-server
Displays the current configuration of the
RADIUS server parameters.
tacacs-server host host_ip_address
Specifies the TACACS+ server IP address.
tacacs-server port port_number
Sets the TACACS+ server TCP port
number.
tacacs-server key key_string
Sets the TACACS+ encryption key (up to
20 characters).
show tacacs-server
Displays the current configuration of the
TACACS+ server parameters.
NOTE: The default
password for the enable
command is super. The
manager must change the
password.
Example
Console(config)#authentication login local radius
tacacs
Console(config)#radius-server host 192.168.1.25
Console(config)#radius-server port 181
Console(config)#radius-server key green
Console(config)#radius-server retransmit 5
Addendum to the 3 248 and 52 24 User ’s Guides
15
w w w. d e l l . c o m | s u p p o r t . d e l l . c o m
Console(config)#radius-server timeout 10
Console(config)#tacacs-server host 192.168.1.19
Console(config)#tacacs-server port 49
Console(config)#tacacs-server key tiger
Console(config)#
Console#show tacacs-server
Remote TACACS server configuration:
Server IP address: 192.168.1.19
Communication key with radius server: tiger
Server port number: 49
Console#
Hypertext Transfer Protocol, Secure
Use the Switch/Security/HTTPS page to enable the Secure Hypertext
Transfer Protocol (HTTPS) over the Secure Socket Layer (SSL), providing
secure access (for example, an encrypted connection) to the switch’s Web
interface.
Both the HTTP and HTTPS service can be enabled independently on the
switch. However, you cannot configure the HTTP and HTTPS servers to
use the same TCP port. If you change the HTTPS port number, clients
attempting to connect to the HTTPS server must specify the port number
in the URL, in this format: https://device:port_number.
NOTE: If you enable
HTTPS, you must indicate
this in the URL. For
example: https://device
[:port_number]
The following Web browsers and operating systems currently support
HTTPS:
Web Browser
Operating System
Microsoft®
Windows® 98, Windows NT® (with service
pack 6a), Windows 2000
or later
Internet Explorer 5.0
Netscape Navigator 4.76 or later
16
Addendum to the 32 48 and 5 224 User ’s Guides
Windows 98, Windows NT (with service
pack 6a), Windows 2000, Solaris 2.6
When you start HTTPS, the client and server establish a secure encrypted
connection. A padlock icon should appear in the status bar for Internet
Explorer 5.x and Netscape Navigator 4.x.
The Switch/Security/HTTPS page contains the following fields that can be
edited:
•
HTTPS Status — Allows you to enable/disable the HTTPS server
feature on the switch. (Default: Enabled)
•
HTTPS Port — Specifies the UDP port number used for HTTPS/SSL
connection to the switch’s Web interface. (Default: 443).
To save any changes you make in this page, click Apply Changes. If you do
not want to save the changes, click Refresh.
The following figure is representative of PowerConnect 3248 and 5224.
Addendum to the 3 248 and 52 24 User ’s Guides
17
w w w. d e l l . c o m | s u p p o r t . d e l l . c o m
CLI Commands
The following table summarizes the equivalent CLI commands for items in
the Switch/Security/HTTPS page.
Command
Usage
ip http secure-server
Enables the HTTPS server on the switch.
The no form command disables the HTTPS server.
ip http secure-port
port_number
Specifies the TCP port number used for HTTPS
connection to the switch’s Web interface.
The no form command restores the default port.
copy tftp https-certificate
Copies an HTTPS certificate from an TFTP server
to the switch.
Example
Console(config)#ip http secure-server
Console(config)#ip http secure-port 441
Console(config)#
Port Security
Port security is a feature that allows you to configure a switch port with one
or more device Media Access Control (MAC) addresses that are authorized
to access the network through that port.
When port security is enabled on a port, the switch stops learning new
MAC addresses on the specified port. Only incoming traffic with source
addresses already stored in the dynamic or static address table are accepted
as authorized to access the network through that port. If a device with an
unauthorized MAC address attempts to use the switch port, the intrusion is
detected and the switch can automatically take action by disabling the port
and sending a trap message.
To use port security, first allow the switch to dynamically learn the <source
MAC address, VLAN> pair for frames received on a port for an initial
period, and then enable port security to stop address learning. Be sure you
enable the learning function long enough to ensure that all valid VLAN
members are registered on the selected port.
18
Addendum to the 32 48 and 5 224 User ’s Guides
Note that a secure port has the following restrictions:
•
It should not be connected to a network interconnection device.
•
It cannot be configured as a member of a static trunk.
•
It can be configured as an LACP trunk port, but the switch does not
allow the LACP trunk to be encabled.
NOTICE: A port that is already configured as a LACP or static trunk port
cannot be enabled as a secure port.
Switch 3248: Port Security Configuration
On the Ports/Port Security page, you can enable/disable security for any
switch port. For each port number listed in the Port column, you can
configure the following parameters listed by column name on the screen:
•
Security Status — Enables or disables port security on the port.
(Default: Disabled)
•
Intrusion Shutdown and Trap — Indicates the action to be taken
when a port security violation is detected:
–
None: Indicates that no action should be taken. (This is the
default.)
–
Trap: Indicates that only an SNMP trap message be sent.
–
Shutdown: Indicates that only the port should be disabled.
–
Trap and Shutdown: Indicates that the port should be disabled
and an SNMP trap message sent.
NOTICE: If a port is disabled due to a security violation, it must be manually
re-enabled from the Ports/Port Configuration page. See "Switch 3248: ReEnabling a Shutdown Port" on page 20.
To save any changes you make in this page, click Apply Changes. If you do
not want to save the changes, click Refresh.
Addendum to the 3 248 and 52 24 User ’s Guides
19
w w w. d e l l . c o m | s u p p o r t . d e l l . c o m
The following figure is representative of PowerConnect 3248.
Switch 3248: Re-Enabling a Shutdown Port
If security is enabled on a port and the intrusion action set to Shutdown or
Trap and Shutdown, then a security violation will cause the port to be
disabled. To re-enable a shutdown port, follow these steps:
NOTE: To re-enable a
port using the CLI, use
the no shutdown
command in Interface
Configuration mode.
1
Click the Ports/Port Configuration page.
2
For the port that is disabled, click the check box in the Admin/Oper
column.
3
Click Apply Changes to enable the port.
Switch 3248: CLI Commands
The following table summarizes the equivalent CLI commands for items in
the Ports/Port Security page.
20
Command
Usage
port security [action
{shutdown | trap | trapand-shutdown}]
Enables and configures port security on a port.
Addendum to the 32 48 and 5 224 User ’s Guides
The no form command resets the values to the
defaults.
Example
Console(config)#interface ethernet 1/5
Console(config-if)#port security action shutdown
Console(config-if)#port security
Console(config-if)#
Switch 5224: Port Security
The Ports/Port Security page contains links to the following pages:
•
Global Configuration
•
Port Security Configuration
Switch 5224: Global Configuration
On the Ports/Port Security/Global Configuration page, you can set the
security action to be taken when a port intrusion is detected. This setting
applies to all ports on the switch.
The page provides one parameter to configure:
•
Shutdown and Trap — Indicates the action to be taken when a port
security violation is detected:
–
None: Indicates that no action should be taken. (This is the
default.)
–
Trap and Shutdown: Indicates that the port should be disabled
and an SNMP trap message sent.
To save any changes you make in this page, click Apply Changes. If you do
not want to save the changes, click Refresh.
Addendum to the 3 248 and 52 24 User ’s Guides
21
w w w. d e l l . c o m | s u p p o r t . d e l l . c o m
The following figure is representative of PowerConnect 5224.
Switch 5224: Port Security Configuration
On the Ports/Port Security/Port Security Configuration page, you can
enable/disable security for any switch port. For each port number listed in
the Port column, you can configure the following parameter:
•
Security Status — Enables or disables port security on the port.
(Default: Disabled)
NOTICE: If a port is disabled due to a security violation, it must be manually
re-enabled from the Ports/Port Configuration page. See "Switch 5224: ReEnabling a Shutdown Port" on page 23.
To save any changes you make in this page, click Apply Changes. If you do
not want to save the changes, click Refresh.
22
Addendum to the 32 48 and 5 224 User ’s Guides
The following figure is representative of PowerConnect 5224.
Switch 5224: Re-Enabling a Shutdown Port
If security is enabled on a port and you set the intrusion action to Trap and
Shutdown, a security violation causes the port to be disabled. To re-enable a
shutdown port, follow these steps:
1
Click the Ports/Port Configuration page.
2
For the port that is disabled, click the check box in the Admin/Oper
column.
3
Click Apply Changes to enable the port.
NOTE: To re-enable a
port using the CLI, use
the no shutdown
command in Interface
Configuration mode.
Switch 5224: CLI Commands
The following table summarizes the equivalent CLI commands for items in
the Ports/Port Security pages.
Command
Usage
port security
Enables port security on an interface.
The no form command disables port security.
Addendum to the 3 248 and 52 24 User ’s Guides
23
w w w. d e l l . c o m | s u p p o r t . d e l l . c o m
Command
Usage
port security action {trapand-shutdown}
Configures the port security action for all switch
ports.
The no form command restores the default.
NOTICE: Although the port security action command is an interface-level
CLI command, it applies globally to all switch ports.
Example
Console(config)#interface ethernet 1/5
Console(config-if)#port security action trap-andshutdown
Console(config-if)#port security
Console(config-if)#
Spanning Tree Protocol
The Spanning Tree Protocol (STP) can be used to detect and disable
network loops, and to provide backup links between switches, bridges or
routers. STP allows the switch to interact with other bridging devices in
your network such as an STP-compliant switch, bridge or route. STP
ensures that only one route exists between any two stations on the network
and provides backup links that automatically take over when a primary link
goes down.
The switch supports the following STPs:
•
STP – Spanning Tree Protocol (IEEE 802.1D).
•
RSTP – Rapid Spanning Tree Protocol (IEEE 802.1w).
RSTP is designed as a general replacement for the slower, legacy STP. RSTP
achieves much faster reconfiguration (around one tenth of that required by
STP) by reducing the number of state changes before active ports start
learning, predefining an alternate route that can be used when a node or
port fails, and retaining the forwarding database for ports insensitive to
changes in the tree structure when reconfiguration occurs.
24
Addendum to the 32 48 and 5 224 User ’s Guides
The Spanning Tree page contains links to pages that allow you to specify
the parameters of the Spanning Tree Protocol:
•
Bridge Settings
•
Advanced Bridge Settings
•
Port Settings
•
Trunk Settings
Bridge Settings
The Bridge Settings page contains the following information:
•
Bridge ID — Identifies a unique identifier for the switch in the
Spanning Tree. The ID is calculated using the defined Spanning Tree
priority of the switch and its MAC address. The lower the Bridge ID,
the more likely the switch acts as the root.
•
Max Age — The maximum time, in seconds, that the switch can wait
without receiving a configuration message before attempting to
reconfigure. All device ports, except for designated ports, should
receive configuration messages at regular intervals. If the root port ages
out STP information (provided in the last configuration message), a
new root port is selected from among the device ports attached to the
network. References to “ports” in this section means “interfaces,”
which includes both ports and trunks.
•
Hello Time — Specifies the time interval, in seconds, at which the
root device transmits a configuration message.
•
Forward Delay — The maximum time, in seconds, that the switch
waits before changing states (such as, discarding to learning to
forwarding). This delay is required because every device must receive
information about topology changes before it starts to forward frames.
In addition, each port needs time to listen for conflicting information
that would make it return to a discarding state; otherwise, temporary
data loops might result.
•
Designated Root — Identifies the priority and MAC address of the
device in the Spanning Tree that the switch has accepted as the root
device.
Addendum to the 3 248 and 52 24 User ’s Guides
25
w w w. d e l l . c o m | s u p p o r t . d e l l . c o m
•
Root Port — Specifies the port number on the switch that is closest to
the root. The switch communicates with the root device through this
port. If there is no root port, the switch was accepted as the root device
of the Spanning Tree network.
•
Root Path Cost — Identifies the path cost from the root port on the
switch to the root device.
•
Configuration Changes — Specifies the number of times the
Spanning Tree has been reconfigured.
•
Last Topology Change — Identifies the time since the Spanning Tree
was last reconfigured.
From the Bridge Settings page, under Attributes, you can configure the
following Spanning Tree parameters:
•
Spanning Tree State — Enables or disables the Spanning Tree. If you
enable the Spanning Tree, you must complete the other fields.
(Default: Enabled)
•
Spanning Tree Type — Specifies the type of Spanning Tree Protocol
used on the switch: (Default: RSTP)
–
STP: Spanning Tree Protocol (IEEE 802.1D).
STP creates one Spanning Tree instance for the entire network. If
multiple VLANs are implemented on a network, the path between
specific VLAN members may be inadvertently disabled to prevent
network loops, thus isolating group members.
NOTICE: When the STP option is selected, the switch uses RSTP set to STP
forced-compatibility mode.
–
RSTP: Rapid Spanning Tree (IEEE 802.1w).
RSTP supports connections to either STP or RSTP nodes by
monitoring the incoming protocol messages and dynamically
adjusting the type of protocol messages the RSTP node transmits,
as described below:
–
26
STP Mode – If the switch receives an 802.1D BPDU (such as,
STP BPDU) after a port’s migration delay timer expires, the
switch assumes it is connected to an 802.1D bridge and starts
using only 802.1D BPDUs.
Addendum to the 32 48 and 5 224 User ’s Guides
–
•
•
•
RSTP Mode – If RSTP is using 802.1D BPDUs on a port and
receives an RSTP BPDU after the migration delay expires,
RSTP restarts the migration delay timer and begins using
RSTP BPDUs on that port.
Priority — Bridge priority is used in selecting the root device, root
port, and designated port. The device with the highest priority
becomes the STP root device. However, if all devices have the same
priority, the device with the lowest MAC address becomes the root
device.
–
Default: 32768
–
Range: 0-61440, in steps of 4096
–
Options: 0, 4096, 8192, 12288, 16384, 20480, 24576, 28672, 32768,
36864, 40960, 45056, 49152, 53248, 57344, 61440
Hello Time — Interval, in seconds, at which the switch transmits a
configuration message.
–
Default: 2
–
Minimum: 1
–
Maximum: The lower of 10 or [(Max. Message Age / 2) -1]
Maximum Age — The maximum time, in seconds, the switch can wait
without receiving a configuration message before attempting to
reconfigure. All device ports, except for designated ports, should
receive configuration messages at regular intervals. Any port that ages
out STP information (provided in the last configuration message)
becomes the designated port for the attached LAN. If it is a root port,
a new root port is selected from among the device ports attached to
the network. References to “ports” in this section means “interfaces,”
which includes both ports and trunks.
–
Default: 20
–
Minimum: The higher of 6 or [2 x (Hello Time + 1)].
–
Maximum: The lower of 40 or [2 x (Forward Delay - 1)]
Addendum to the 3 248 and 52 24 User ’s Guides
27
w w w. d e l l . c o m | s u p p o r t . d e l l . c o m
•
Forward Delay — The maximum time, in seconds, the switch waits
before changing states (such as, discarding to learning to forwarding).
This delay is required because every device must receive information
about topology changes before it starts to forward frames. In addition,
each port needs time to listen for conflicting information that would
make it return to a discarding state; otherwise, temporary data loops
might result.
–
Default: 15
–
Minimum: The higher of 4 or [(Max. Message Age / 2) + 1]
–
Maximum: 30
To save any changes you make in this page, click Apply Changes. If you do
not want to save the changes, click Refresh.
The following figure is representative of PowerConnect 3248 and 5224.
28
Addendum to the 32 48 and 5 224 User ’s Guides
CLI Commands
The following table summarizes the equivalent CLI commands for items in
the Spanning Tree/Bridge Settings page.
Command
Usage
spanning-tree
Enables the Spanning Tree algorithm globally for
the switch.
The no form command disables STP.
spanning-tree mode {stp |
rstp}
Selects the Spanning Tree mode for the switch.
spanning-tree forward-time
seconds
Configures the Spanning Tree bridge forward
time globally for the switch.
spanning-tree hello-time
time
Configures the Spanning Tree bridge hello time
globally for the switch.
spanning-tree max-age
seconds
Configures the Spanning Tree bridge maximum
age globally for the switch.
spanning-tree priority
priority
Configures the Spanning Tree priority globally
for the switch.
show spanning-tree
[interface]
Shows the Spanning Tree configuration.
The no form command restores the default
(STP).
Example
Console(config)#spanning-tree mode rstp
Console(config)#spanning-tree
Console(config)#spanning-tree forward-time 15
Console(config)#spanning-tree hello-time 2
Console(config)#spanning-tree max-age 20
Console(config)#spanning-tree priority 40000
Addendum to the 3 248 and 52 24 User ’s Guides
29
w w w. d e l l . c o m | s u p p o r t . d e l l . c o m
Advanced Bridge Settings
From the Advanced Bridge Settings page, under Attributes, you can
configure the following parameters:
•
•
Path Cost Method — The path cost is used to determine the best
path between devices. The path cost method is used to determine the
range of values that can be assigned to each interface.
–
Long: Specifies 32-bit based values that range from 1-200,000,000.
–
Short: Specifies 16-bit based values that range from 1-65535.
(This is the default.)
Transmission Limit — The maximum transmission rate for BPDUs is
specified by setting the minimum interval between the transmission of
consecutive protocol messages. (Range: 1-10; Default: 3)
To save any changes you make in this page, click Apply Changes. If you do
not want to save the changes, click Refresh.
The following figure is representative of PowerConnect 3248 and 5224.
30
Addendum to the 32 48 and 5 224 User ’s Guides
CLI Commands
The following table summarizes the equivalent CLI commands for items in
the Spanning Tree/Advanced Bridge Settings page.
Command
Usage
spanning-tree pathcost
method {long | short}
Configures the path cost method used for Rapid
Spanning Tree.
The no form command restores the default.
spanning-tree transmissionlimit count
Sets the minimum interval between the
transmission of consecutive RSTP BPDUs.
The no form command restores the default.
Example
Console(config)#spanning-tree pathcost method long
Console(config)#spanning-tree transmission-limit 4
Console(config)#
Port and Trunk Settings
You can configure RSTP attributes for specific interfaces, including port
priority, path cost, link type, and edge port. You may use a different priority
or path cost for ports of same media type to indicate the preferred path, link
type to indicate a point-to-point connection or shared-media connection,
and edge port to indicate if the attached device can support fast forwarding.
References to “ports” in this section means “interfaces,” which includes
both ports and trunks.
In the Port Settings page, you can specify Spanning Tree parameters for
each port. For each port number listed in the Port column, the following
information is available:
•
State — Displays current state of this port within the Spanning Tree:
–
Discarding — Port receives STA configuration messages, but does
not forward packets.
–
Learning — Port has transmitted configuration messages for an
interval set by the Forward Delay parameter without receiving
contradictory information. Port address table is cleared, and the
port begins learning addresses.
Addendum to the 3 248 and 52 24 User ’s Guides
31
w w w. d e l l . c o m | s u p p o r t . d e l l . c o m
–
Forwarding — Port forwards packets, and continues learning
addresses.
•
Designated Cost — The cost for a packet to travel from this port to
the root in the current Spanning Tree configuration. The slower the
media, the higher the cost.
•
Designated Bridge — The priority and MAC address of the device
through which this port must communicate to reach the root of the
Spanning Tree.
•
Designated Port — The priority and number of the port on the
designated bridging device through which this switch must
communicate with the root of the Spanning Tree.
•
Trunk — Indicates whether the port is configured as a trunk member
The Port Settings page also contains the following fields that can be edited:
•
Priority — Defines the priority used for this port in the Spanning Tree
Protocol. If the path cost for all ports on a switch is the same, the port
with the highest priority (such as, lowest value) is configured as an
active link in the Spanning Tree. This makes a port with higher priority
less likely to be blocked if the Spanning Tree Protocol is detecting
network loops. Where more than one port is assigned the highest
priority, the port with lowest numeric identifier is enabled.
(Range: 0-240, in steps of 16; Default: 128.)
•
Path Cost — This parameter is used by the STP to determine the best
path between devices. Therefore, lower values should be assigned to
ports attached to faster media, and higher values assigned to ports with
slower media. Path cost takes precedence over port priority.
–
Range —
Ethernet: 200,000-20,000,000
Fast Ethernet: 20,000-2,000,000
Gigabit Ethernet: 2,000-200,000
–
Defaults —
Ethernet — half duplex: 2,000,000; full duplex: 1,000,000; trunk:
500,000
Fast Ethernet — half duplex: 200,000; full duplex: 100,000; trunk:
50,000
Gigabit Ethernet — full duplex: 10,000; trunk: 5,000
NOTICE: When the Path Cost Method is set to short, the maximum path cost
is 65,535.
32
Addendum to the 32 48 and 5 224 User ’s Guides
•
•
Link Type — The link type attached to this interface. (Default: Auto)
–
Point-to-Point — A connection to exactly one other bridge.
–
Shared — A connection to two or more bridges.
–
Auto — The switch automatically determines if the interface is
attached to a point-to-point link or to shared media.
Edge Port — You can enable this option if an interface is attached to a
LAN segment that is at the end of a bridged LAN or to an end node.
Because end nodes cannot cause forwarding loops, they can pass
directly through to the spanning tree forwarding state. Specifying Edge
Ports provides:
–
Quicker convergence for devices such as workstations or servers
–
Retains the current forwarding database to reduce the amount of
frame flooding required to rebuild address tables during
reconfiguration events
–
Does not cause the Spanning Tree to initiate reconfiguration when
the interface changes state,
–
Overcomes other STP-related timeout problems.
Edge Port should only be enabled for ports connected to an end-node
device.
•
Migration — Re-checks the appropriate BPDU format to send on the
selected interface. If, at any time, the switch detects STP BPDUs,
including Configuration or Topology Change Notification BPDUs, it
automatically sets the selected interface to forced STP-compatible
mode. You can also check this Migration check box to manually recheck the appropriate BPDU format (RSTP or STP-compatible) to
send on the selected interfaces.
Addendum to the 3 248 and 52 24 User ’s Guides
33
w w w. d e l l . c o m | s u p p o r t . d e l l . c o m
The following figure is representative of PowerConnect 3248 and 5224.
CLI Commands
The following table summarizes the equivalent CLI commands for items in
the Spanning Tree/Port Settings page.
Command
Usage
spanning-tree port-priority
priority
Configures the priority for the specified
interface.
The no form command restores the default.
spanning-tree cost
cost
Configures the Spanning Tree path cost for the
specified interface.
The no form command restores the default.
spanning-tree link-type
{auto | point-to-point |
shared}
Configures the link type for the Rapid Spanning
Tree.
spanning-tree edge-port
Specifies an interface as an edge port.
The no form command restores the default.
The no form command restores the default.
spanning-tree protocolmigration interface
34
Addendum to the 32 48 and 5 224 User ’s Guides
Re-checks the appropriate BPDU format to send
on the selected interface.
Example
Console(config)#interface ethernet 1/5
Console(config-if)#spanning-tree port-priority 128
Console(config-if)#spanning-tree cost 19
Console(config-if)#spanning-tree link-type auto
Console(config-if)#no spanning-tree edge-port
Console#spanning-tree protocol-migration ethernet 1/5
Simple Network Management Protocol
The Simple Network Management Protocol (SNMP) page contains a new
link to the following page:
•
IP Filtering
IP Filtering
On the SNMP/IP Filtering page, you can create a list of up to 16 IP
addresses or IP address groups that are allowed access to the switch using
SNMP management software.
IP addresses that are permitted SNMP access are specified by an IP address
and a subnet mask that identifies the range of valid addresses. For example:
IP address 192.168.1.1 and mask 255.255.255.0 — Specifies a valid IP
address group from 192.168.1.0 to 192.168.1.255.
IP address 192.168.1.1 and mask 255.255.255.255 — Specifies a valid IP
address of 192.168.1.1 only.
The following options are available:
•
IP Filter List — Displays a list of the IP address/subnet mask entries
currently configured for SNMP access.
•
IP address — Specifies a new IP address to add to the IP Filter List.
•
Subnet Mask — Specifies a single IP address or group of addresses. If
the IP is the address of a single management station, the mask should
be set to 255.255.255.255. Otherwise, the IP address group is specified
by the mask.
NOTE: IP filtering does
not affect management
access to the switch using
the Web interface or
Telnet.
Addendum to the 3 248 and 52 24 User ’s Guides
35
w w w. d e l l . c o m | s u p p o r t . d e l l . c o m
NOTICE: The default setting is null, which allows all IP groups SNMP access
to the switch. If one IP address is configured, the IP filtering is enabled and
only addresses in the IP group will have SNMP access.
To add an IP address, type the new IP address in the IP Address box, type
the appropriate subnet mask in the Subnet Mask box, and click Add IP
Filtering Entry. To delete an IP address, click the entry in the IP Filter List,
and then click Remove IP Filtering Entry.
The following figure is representative of PowerConnect 3248 and 5224.
CLI Commands
The following table summarizes the equivalent CLI commands for items in
the SNMP/IP Filtering page.
Command
Usage
snmp ip filter ip_address
subnet_mask
Sets IP addresses of clients allowed to
management access to the switch using SNMP.
The no form command removes an IP address.
36
Addendum to the 32 48 and 5 224 User ’s Guides
Example
Console(config)#snmp ip filter 10.1.2.3
255.255.255.255
Console(config)#
Statistics
The Statistics page has two new links to the following pages:
•
Utilization Summary
•
Counter Summary
Utilization Summary
The Statistics/Utilization Summary page provides a per-port summary of
traffic types and bandwidth utilization as a percentage of total traffic.
This page displays the following information:
•
%Port Utilization — Displays the percentage of bandwidth used by all
traffic types on the port.
•
%Unicast Received — Displays the percentage of traffic received on
the port that are unicast packets.
•
%Multicast Packets Received — Displays the percentage of traffic
received on the port that are multicast packets.
•
%Broadcast Packets Received — Displays the percentage of traffic
received on the port that are broadcast packets.
•
%Error Packets Received — Displays the percentage of traffic received
on the port that are packets with errors.
Addendum to the 3 248 and 52 24 User ’s Guides
37
w w w. d e l l . c o m | s u p p o r t . d e l l . c o m
The following figure is representative of PowerConnect 3248 and 5224.
Counter Summary
The Statistics/Counter Summary page provides a per-port summary of
traffic-type counters.
NOTE: Counters are
cumulative from the last
time the system was
booted.
38
This page displays the following information:
•
Received Unicast Packets — Total number of unicast packets received
on the port.
•
Transmit Unicast Packets — Total number of unicast packets
transmitted on the port.
•
Received Multicast Packets — Total number of multicast packets
received on the port.
•
Transmit Multicast Packets — Total number of multicast packets
transmitted on the port.
•
Received Broadcast Packets — Total number of broadcast packets
received on the port.
•
Transmit Broadcast Packets — Total number of broadcast packets
transmitted on the port.
Addendum to the 32 48 and 5 224 User ’s Guides
•
Received Errors — Total number of error packets received on the port.
•
Transmit Errors — Total number of error packets transmitted on the
port.
The following figure is representative of PowerConnect 3248 and 5224.
CLI Commands
The following table summarizes the equivalent CLI commands for items in
the Statistics/Counter Summary page.
Command
Usage
show interfaces counters
interface
Displays statistics counters for an interface.
clear counters interface
Clears statistics counters on an interface.
Example
Console#show interfaces counters ethernet 1/17
Ethernet 1/17
Iftable stats:
Octets input: 91248, Octets output: 343887
NOTE: You can also
clear the counters for a
port by clicking the Reset
Counter button at the
bottom of the
Statistics/Table page.
Unitcast input: 680, Unitcast output: 593
Discard input: 0, Discard output: 0
Addendum to the 3 248 and 52 24 User ’s Guides
39
w w w. d e l l . c o m | s u p p o r t . d e l l . c o m
Error input: 0, Error output: 0
Unknown protos input: 0, QLen output: 0
Extended iftable stats:
Multi-cast input: 0, Multi-cast output: 1854
Broadcast input: 138, Broadcast output: 165
Ether-like stats:
Alignment errors: 0, FCS errors: 0
Single Collision frames: 0, Multiple collision frames: 0
SQE Test errors: 0, Deferred transmissions: 0
Late collisions: 0, Excessive collisions: 0
Internal mac transmit errors: 0, Internal mac receive errors:
0
Frame too longs: 0, Carrier sense errors: 0
RMON stats:
Drop events: 0, Octets: 435135, Packets: 3430
Broadcast pkts: 303, Multi-cast pkts: 1854
Undersize pkts: 0, Oversize pkts: 0
Fragments: 0, Jabbers: 0
CRC align errors: 0, Collisions: 997976404
Packet size <= 64 octets: 2584, Packet size 65 to 127 octets:
211
Packet size 128 to 255 octets: 198, Packet size 256 to 511
octets: 317
Packet size 512 to 1023 octets: 95, Packet size 1024 to 1518
octets: 25
Console#
Console#configure
Console(config)#clear counters ethernet 1/17
40
Addendum to the 32 48 and 5 224 User ’s Guides
Printed in Taiwan.
0K0111A01
P/N K0111 Rev. A01
w w w. d e l l . c o m | s u p p o r t . d e l l . c o m