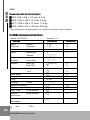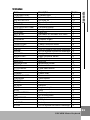
1
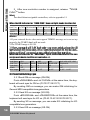
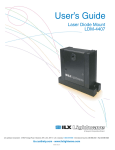
Thank you for choosing CME UF
Professional Master
MIDI Keyboard with Built-in USB
Please keep all the important information here
Attach your invoice or receipt here
○
○
○
○
○
○
○
○
○
○
○
○
○
○
○
○
○
○
○
○
○
○
○
○
○
○
○
○
○
○
○
○
○
○
○
○
○
○
for reference
Purchase date
Dealer's name and addr.
Serial(on the back of the keyboard)
Dealer's tel.
Warning:
Improper connection may cause damage to the device.
Copyright:
Copyright of the manual belongs to Central Music Co. Anyone
must get a written permission from Central Music Co. before copying
any part of the manual to any kind of media.
(c) Central Music Co. 2004
Open the package
Please check all the items in your UF keyboard package:
USB MIDI Master keyboard 1 pcs
AC adapter 1 pcs
USB cable 1 pcs
User's manual 1 pcs
CD-ROM for device driver 1pcs
Sustain pedal 1 pcs (included with UF8 ONLY, optional for
UF5/6/7)
USB MIDI Master Keyboard
1
PRECAUTIONS
IMPORTANT
Always follow the basic precautions listed below to avoid the possibility of
serious injury or even death from electrical shock, damages, fire or other
hazards. These precautions include, but are not limited to, the follows:
1. Read and understand all the instructions.
2. Always follow the instructions on the instrument.
3.Before cleaning the instrument, always remove the electric plug from
the outlet as well as the USB cable. When cleaning, use a soft, dry cloth. Do
not use gasoline, alcohol, acetone, turps or any other organic solution; do
not use liquid cleaner or spray cleaner, or too wet cloth.
4. Do not use the instrument near water or moisture, such as bathtub,
washbasin, or washing poor in the kitchen, or similar places.
5. Do not place the instrument in an unstable position where it might accidentally fall over.
6. Do not jam sinks or holes of the instrument; those sinks of holes are
used for air circulation to prevent the instrument from overheating. Do not
place the instrument near heat sink or any places with poor air circulation.
7. Always use the AC adaptor included with the instrument; do not use any
other AC adaptor.
8. Do not place anything on the power cord. Make sure the power cord is set
on a safe place, so nobody will step on it and no body will get trip over by it.
9. Do not overload the outlet and AC cable to avoid fire or electrical shock.
10. Do not insert anything in the instrument, which may cause fire or electrical shock. Do not splash any kind of liquid to the instrument.
11. Do not disassemble the instrument in case of accidental electrical shock.
12. Always take the instrument to qualified service center in need of repair.
You will cause yourself in danger if you open or remove the cover, and improper assembly may cause electrical shock in the future use.
13. Unplug all the connectors and take the instrument to qualified service
center if anything in the below list happens:
A. The power cord or connector get hurt or worn out.
B. Any liquid get in the instrument.
C. The instrument gets rain or water splash.
D. The instrument dose not work properly after following all the instructions regarding to troubleshooting.
E. The instrument falls down or gets broken.
F. The instrument functions poorly.
14. Do not use the instrument when thundering; otherwise the thundering
may cause long-distance electrical shock.
2
15. Do not use the instrument when there is gas leak nearby.
USB MIDI Master Keyboard
Keep this manual in safe place
CAUTION:
Setting up
Do not connect the instrument when thundering.
Do not set up the cord or outlet to moisture place, except for that the outlet
is specially designed for moisture.
When the power cord is connected to the AC outlet, do not touch the naked
part of cord or connector.
Always follow the instructions carefully when setting up the instrument.
WARING:
Do not expose the instrument to rain or moisture, to avoid fire or electrical
shock.
Other precautions:
Keep the instrument away from electrical interface source, such as fluorescent light and electrical motor.
Keep the instrument away from dust, hear and vibration.
Do not expose the instrument to sun light.
Do not place heavy object on the instrument; do not place containers with
liquid on the instrument.
Do not touch connectors with wet hand
Central Music Co. is not responsible for any damage or data loss caused by
improper operation to the instrument.
All the pictures and LCD display in the manual are used for demonstration;
they may be different from a real instrument.
Features
Professional Master MIDI Keyboard with Built-in USB
49/61/76 keys with Initial Touch/Aftertouch(UF5/6/7)
88keys Hammer Effect with Initial Touch/Aftertouch(UF8)
Pitch wheel and Modulation wheel
8 assignable knobs, preset function includes Cutoff / Resonance / Attack /
Release / Pan / Reverb / Chorus / Tempo
9 assignable faders(sliders), preset function includes channel volume(chn1chn16) and Master volume, Drawbar organ
LED display 9 control buttons for Program change, Transpose, Octave,
Channel, Split, Dual and others.
6 Sequencer remote control buttons: REC, PLAY, STOP, FF, REW, BACKWARD
BC(Breath Controller) port
1 MIDI out port
Sustain pedal and Volume pedal connector
USB MIDI port, power can be supplied with USB
USB Drivers for Win2000/XP and Mac OSX USB MIDI
Compatible with major sequencer and audio software
Optional Firewire expansion board for IEEE 1394 audio interface
USB MIDI Master Keyboard
3
Contents
Contents
1.Connection ............................................................ 5
1.1 Front panel ................................................................................. 5
1.2 Rear panel ................................................................................. 6
1.3 Connect UF to tone generators ................................................. 7
1.4 Add UF to computer music system ........................................... 8
1.5 Driver installation ....................................................................... 9
2.Play the instrument ............................................... 9
2.1 Turn on the instrument .............................................................. 9
2.2 Play the demo song ................................................................... 9
2.3 Reset .......................................................................................... 9
2.4 Value adjustment and display ................................................. 10
2.5 Select voice .............................................................................. 10
2.6 Pitch bend wheel ..................................................................... 10
2.7 Modulation wheel ..................................................................... 10
2.8 Adjust volume and customize faders ..................................... 10
2.9 Transpose ................................................................................ 11
2.10 Octave shift ............................................................................. 11
2.11 All notes off ............................................................................. 13
3.Advanced functions ............................................. 13
3.1 Change MIDI channel .............................................................. 13
3.2 Edit voice and customize knobs .............................................. 13
3.3 Send initializing sysx ................................................................ 14
3.4 Adjust velocity curve ................................................................. 15
3.5 Split .......................................................................................... 15
3.6 Dual .......................................................................................... 16
3.7 After touch ................................................................................. 17
3.8 Drawbar organ ......................................................................... 17
4.Computer music system connection .................. 17
4.1 Sequencer remote control ....................................................... 17
4.2 Select MIDI route ...................................................................... 18
5.Appendix ............................................................. 18
4
5.1 Controller parameters list ........................................................ 18
5.2 Troubleshooting ....................................................................... 20
5.3 Specifications .......................................................................... 21
5.4 MIDI implementation chart ....................................................... 22
5.5 Index ......................................................................................... 23
USB MIDI Master Keyboard
Connection
1.Connection
1.1 Front Panel
Sequencer remote control
Those buttons are used to control external sequencer.
Voice editing knobs
8 assignable knobs with preset for voice editing.
Volume Faders
8 assignable faders (sliders) with preset for channel volume.
Master Volume
Master volume fader for external tone generator (GM standard.)
Knob Func
This button is used to switch knob function.
Fader Func
This button is used to switch fader function.
LED display
The LED displays related information of the keyboard.
Function buttons
Those buttons are used to make a lot of functions of the keyboard.
Data dial
Data dial is used to adjust current value.
Inc/Dec Button
Increase or decrease current value by one when pushed.
5
USB MIDI Master Keyboard
Connection
6
1.2 Rear panel
MIDI OUT
All the MIDI messages from the UF keyboard or from USB
transmission will be outputted to external MIDI devices via MIDI
OUT terminal.
SUSTAIN PEDAL
A sustain pedal can be connected to SUSTAIN PEDAL terminal.
The sustain pedal will generate MIDI controller #64 message.
CONTROLLER PEDAL
A controller pedal can be connected to CONTROLLER PEDAL
terminal. The controller pedal will generate MIDI controller
message, the controller # is assignable
To assign a controller # for the pedal, press DRAWBAR and A.
TOUCH at the same time, then the current controller # (11) will be
displayed on the LED, now we can use DEC/INC button or the
data dial to change the controller # to any number from 0 to 127.
B.C.(Breath Control)
A breath controller (such as YAMAHA BC3) can be connected to
B.C. jack. The breath controller will generate MIDI controller #2
(assignable) message.
To assign a controller # for the B.C.jack, press PROGRAM and
OCTAVE at the same time, then the current controller # (02) will
be displayed on the LED, now we can use DEC/INC button or the
data dial to change the controller # to any number from 0 to 127.
Note: The B.C. jack only works when the keyboard is powered by
AC. Adapter.
USB
USB port is used to connect the UF keyboard to computer by an
USB MIDI Master Keyboard
Connection
USB cable for bi-direction data transmission.
CABLE HOOK
Keep the power cord in the CALBE HOOK when necessary for
good power connection.
POWER INLET
Power supply goes from the A.C. adapter to the POWER INLET.
POWER SWITCH
POWER SWITCH is used to turn on or turn off the UF keyboard.
1.3 Connect UF to tone generators
Warning: Turn off all the devices before connection
Connect UF to a tone generate then you can play
1.3.1 Connect UF MIDI OUT to tone generator MIDI IN via MIDI cable
1.3.2 Connect tone generator to speaker system, or use headphone instead
1.3.3 Switch tone generator HOST SELECT to "MIDI" if there is a
HOST SELECT in the tone generator
1.3.4 Plug AC adaptor's output connector to UF DC IN
1.3.5 Please refer to the figure for connections with Sustain pedal
USB MIDI Master Keyboard
7
Connection
(included with UF8), Controller pedal, or Breath Controller(such as
YAMAHA BC3).
1.3.6 Now you can play the tone generator with UF keyboard.
1.4 Add UF to computer music system
You can add UF keyboard to the computer music system, then
you can use UF as the master MIDI keyboard of the system to play
music as well as input other MIDI messages.
8
1.4.1 Connect UF USB port to your computer USB port via the USB
cable supplied with the UF keyboard.
1.4.2 Install USB driver in the computer(See chapter 1.5)
1.4.3 Install then start your MIDI sequencer software and soft synthesizer (such as SampleTank).
1.4.4 Connect your audio out to the stereo system.
USB MIDI Master Keyboard
1.5 Driver installation
1.5.1 Connect UF to computer via USB cable
1.5.2 Power on the computer
1.5.3 Insert UF CD-ROM to computer
1.5.4 Follow instructions in the README file to finish the installation.
Play the instrument
Hint:
You can also use MIDI cable to connect UF keyboard to computer music
system via a MIDI interface, in this way you do not have to make USB
connection, nor to install USB driver.
Hint:
When using USB cable to connect UF keyboard to computer music
system, you must install the UF driver to the computer; otherwise the system
will not accept the device.
2. Play the instrument
2.1 Turn on the instrument
You can find the Power switch in the rear panel. Make sure all the
devices are properly connected before turn on the keyboard.
2.2 Play the demo song (DEMO)
There is one demo song in the UF keyboard. You can play the
demo song according to below steps:
2.2.1 Turn on UF keyboard, tone generator, and speaker system
2.2.2 Set proper volume for speaker system to avoid damage to
your ear
2.2.3 Push V.CURVE and A.TOUCH on UF front panel at the
same time to play the demo song. Push the two buttons again to stop.
2.3 Reset
By using "Reset" function, you can restore the UF keyboard to
its factory default settings. (Without "Reset", the keyboard always memorize its recent settings.)
2.3.1 Push SPLIT and DUAL" on UF front panel at the same
time and keep the buttons hold down for at least two seconds to actiUSB MIDI Master Keyboard
9
Play the instrument
vate reset function.
2.3.2 During the reset process, the LCD flashes until reset process
is finished.
Hint:
Reset function will clear all of your settings to the keyboard!
2.4 Value adjustment and display
2.4.1 Data dial
Please notice that for current selected function, the value will be
displayed on LCD. When you rotate the Data dial, current value will be
changed accordingly, and the LCD will display the new value.
2.4.2 DEC / INC button
Please notice that for current selected function, the value will be
displayed on LCD. When you push DEC/INC button, current value will
be changed accordingly, and the LCD will display the new value.
Hint:
1.If you push and hold down the button for 0.5 second, the value will repeatedly decrease or increase.
2.If you push DEC and INC at the same time, current value will return
to factory default.
2.4.3 LCD
The LCD displays all the related information of the keyboard.
2.5 Select voice (PROGRAM)
This button is used to change the voice of current channel.
2.5.1 After you push this button, LCD will display current voice
number, then you can use Data dial or DEC/INC button to change the
voice number. The new voice number will be displayed on the LCD.
Hints:
1.Voice number range is 0-127.
2.
10
USB MIDI Master Keyboard
By rotating the pitch bend wheel when playing the keyboard, you
can change the current note pitch.
2.6.1 Pitch bend wheel sends PITCH BEND message.
2.7 Modulation wheel
By rotating the Modulation wheel when playing the keyboard, you
can add vibration to the sound.
2.7.1 Modulation wheel sends MIDI controller 1# message.
Play the instrument
2.6 Pitch bend wheel
2.8 Adjust volume and customize faders
You can use front panel faders to control volumes for each
channel (to send MIDI controller 7# message to the channel).
Before you adjust the volume, please notice the LED indicator
for FADER FUNC. button:
This button will set the 9 faders to one of the three function sets below:
1 When no LED indicator lights, the 9 faders are used to control
master volume and channel volume for channel 1 to channel 8.
2 When the upper LED indicator lights, the 9 faders are used to
control master volume and channel volume for channel 9 to channel 16.
3 When the lower LED indicator lights, the 9 faders are used as
assignable fader controllers (CS0-CS8).
Hints:
1.Make sure your tone generator meets or compatible with General MIDI
specification 1.0, otherwise those faders do not work.
2. Some music software does not fully support the sysx for master volume,
so please be careful using this function.
Assign functions to faders:
1 Push and hold FADER FUNC. button, then move one of the
faders that you wish assign function to, after that you can assign new
controller number to the fader.
2 After new controller number is assigned, release FADER
FUNC. button.
Hint
For detail about assignable controllers, refer to appendix 5.1
USB MIDI Master Keyboard
11
Play the instrument
When no LED lights for “FADER FUNC.” button, faders function list:
Function
Channel
Controller#
Default
Value range
M.Vol
ALL
M.volume
127
0-127
Vol.1
1
7
100
0-127
Vol.2
2
7
100
0-127
Vol.3
3
7
100
0-127
Vol.4
4
7
100
0-127
Vol.5
5
7
100
0-127
Vol.6
6
7
100
0-127
Vol.7
7
7
100
0-127
Vol.8
8
7
100
0-127
When upper LED lights for “FADER FUNC.” button, faders function list:
Function
Channel
Controller#
Default
Value range
M.Vol
ALL
M.volume
127
0-127
Vol.9
9
7
100
0-127
Vol.10
10
7
100
0-127
Vol.11
11
7
100
0-127
Vol.12
12
7
100
0-127
Vol.13
13
7
100
0-127
Vol.14
14
7
100
0-127
Vol.15
15
7
100
0-127
Vol.16
16
7
100
0-127
When lower LED lights for “FADER FUNC.” button, faders function list:
(You can assign each faders to different controller #)
Function
Channel
Controller#
Default
Value range
CS0
11
127
0-127
CS1
11
127
0-127
CS2
11
127
0-127
CS3
11
127
0-127
CS4
11
127
0-127
CS5
CS6
11
11
127
127
0-127 0-127
CS7
11
127
0-127
CS8
11
127
0-127
2.9 Transpose (TRANSPOSE)
By using the transpose function, you can transpose the keyboard
by semitones.
2.9.1 Push TRANSPOSE button, then you can use Data dial or
DEC/INC button to change the transpose value.
2.9.2 The default value for transpose is 00, and the value range is 12 12(One octave up or down).
2.10 Octave shift (OCTAVE)
12
By using the octave shift function, you can transpose the
keyboard by octaves.
2.10.1 Push OCTAVE button, then you can use Data dial or DEC/
INC button to change the octave value.
2.10.2 The default value for octave is 00, and the value range is -3
3(three octaves up or down).
Hint:
If the shifted note exceeds MIDI key range, the exceeded note will not
USB MIDI Master Keyboard
2.11 All notes off (ALL NOTES OFF)
If the external tone generator produces weird voice(such as continuous long voice), you can push TRANSPOSE and OCTAVE at the
same time to send controller 123# to stop all the notes of the tone generator.
Hint:
If the tone generator does not support controller 123#, or the weird
voice is caused by other reasons, this function may not work.
Advanced functions
make sound.
3. Advanced functions
3.1 Change MIDI channel (CHANNEL)
Push CHANNEL button, then you can use Data dial or DEC/INC
button to change the MIDI channel value to send MIDI messages.
3.1.1 The default value for MIDI channel is 01, and the value range
is 01 16
3.2 Edit voice and customize knobs (KNOB FUNC.)
You can use front panel knobs to adjust the sound parameters for
current channel.
Before you adjust the volume, please notice the LED indicator for
KNOB FUNC. button:
This button will set the 8 knobs to one of the two function sets below:
1 hen the LED indicator does not light, the 8 knobs are used to
control 8 upper functions (default).
2 When the LED indicator lights, the 8 knobs are used to control
8 lower functions.
Hint:
Make sure your tone generator meets or compatible with General MIDI specification 1.0, otherwise those faders do not work.
Assign functions to knobs:
1 Push and hold KNOB FUNC. button, then rotate one of the
knobs that you wish assign function to, after that you can assign new
controller number to the knob.
USB MIDI Master Keyboard
13
Advanced functions
2 After new controller number is assigned, release
FUNC. button.
KNOB
Hint
For detail about assignable controllers, refer to appendix 5.1
When the LED indicator for “KNOB FUNC.” does not light, knobs function list:
Knob Func
Controller#
Default
Value range
CUTOFF
74
64
0-127
RESONANCE
71
64
0-127
ATTACK
73
64
0-127
RELEASE
72
64
0-127
PAN
10
64
0-127
REVERB
91
40
0-127
CHORUS TEMPO
93
0
120
0-127
20-250
Hints:
1.If your external device does not support TEMPO message or is not set up
properly, the TEMPO knob will not work.
2.The TEMPO range is 20-250.
When the LED indicator for “KNOB FUNC.” lights, knobs function list (You can
assign each knobs to different controller #):
Knob Name
Knob Func
Controller#
Default
Value range
KN1
Expression
11
127
0-127
KN2
Breath
2
127
KN3
BANK MSB
0
0
0-127
KN4
BANK LSB
32
0
0-127
KN5, KN6, KN7, KN8
Expression
11
127
0-127 0-127
3.3 Send initializing sysx
14
3.3.1Send GM on message (GM ON)
Push DRAWBAR and V.CURVE at the same time, the keyboard will send sysx for GM on (F0 7E 7F 09 01 F7).
By sending GM on message, you can make GM initializing for
General MIDI compatible tone generators.
3.3.2 Send XG on message (XG ON)
Push PROGRAM and TRANSPOSE at the same time, the
keyboard will send sysx for XG on (F0 43 10 4C 00 00 7E 00 F7).
By sending XG on message, you can make XG initializing for XG
compatible tone generators.
3.3.3 Send GS on message (GS ON)
USB MIDI Master Keyboard
Hint:
Some music software may have problem with sysx, so please be careful
using this function.
Advanced functions
Push CHANNEL and SPLIT at the same time, the keyboard
will send sysx for GS on (F0 41 10 42 12 40 00 7F 00 41 F7).
By sending GS on message, you can make GS initializing for GS
compatible tone generators.
3.4 Adjust velocity curve (V.CURVE)
V.CURVE button is used to adjust velocity response of the
keyboard. You can choose from four preset velocity curves.
1 The default velocity curve is normal(NORM) with LCD display
0 and the V.CURVE LED dose not light.
2 Push V.CURVE once, the LCD displays 1 showing the keyboard velocity curve changes to 1(HARD) and the V.CURVE LED lights.
3 Push V.CURVE twice, the LCD displays 2 showing the keyboard velocity curve changes to 2(SOFT),and the V.CURVE LED lights.
4 Push V.CURVE third times, the LCD displays 3 showing
the keyboard velocity curve changes to 3(WIDE),and the V.CURVE LED
lights.
5 Push V.CURVE four times, the LCD displays 0
showing
the keyboard velocity curve changes back to default, and the V.CURVE
LED does not light.
3.5 Split (SPLIT)
By using the split function, you can split the UF keyboard to right
section and left section, each section has its own channel and voice
settings.
USB MIDI Master Keyboard
15
Advanced functions
3.5.1 First you should set up voice and channel for the left section.
3.5.2 Push SPLIT button to activate split function, and the
keyboard is split to two sections at key #F2(54), which is called the
split point.
3.5.3 You can only adjust the voice and channel settings for the
right section when split function is on.
3.5.4 To change the split point: push and hold SPLIT button,
then press a key in the keyboard to indicate a new split point, the key
number will be displayed on the LCD. Release SPLIT button when
finished.
Hints:
1.When playing the keyboard, Pitch bend wheel, Modulation wheel, Sustain pedal, Controller pedal, Breath Control, etc... will work for both left and
right section at the same time.
2.You cannot assign the left and right section to the same MIDI channel.
When you turn on the split function, the keyboard will assign the next channel for the right section than the left section. However, you can change the
MIDI channel after turning on the split function.
3. When SPLIT function is turned on, DUAL function will be automatically
turned off. You cannot turn on DUAL function when SPLIT function is on.
3.6 Dual (DUAL)
By using the dual function, you can select and play two different
voices simultaneously.
3.6.1 Select and set the first voice.
3.6.2 Turn on the dual function by pushing DUAL button, then
select and set the second voice. When you play the keyboard in dual
mode, your performance message will be sent to two MIDI channels
simultaneously. (The default MIDI channels for dual are channel 1 and 2).
16
Hints:
1.When playing the keyboard, Pitch bend wheel, Modulation wheel, Sustain pedal, Controller pedal, Breath Control, etc... will work for both the first
and second voice at the same time.
2.You cannot assign the first and second voice to the same MIDI channel.
When you turn on the dual function, the keyboard will assign the next chanUSB MIDI Master Keyboard
3.7 After touch (A.TOUCH)
A.TOUCH is the switch for the channel after touch function.
3.7.1 By pushing A.TOUCH button, you can turn on or off the after
touch function of the keyboard, to allow or permit the after touch message from the keyboard.
Note: This function only works when the keyboard is powered by the AC. Adapter.
3.8 Drawbar organ (DRAWBAR)
With the drawbar organ function, you can use fader CS0-CS8 as
drawbars to adjust organ voice.
3.8.1 When DRAWBAR function is on, fader CS0-CS8 work as below:
Fader func
Channel
Organ bar
Controller#
Default
Value range
CS0
Current
16'
12
64
127-0
CS1
Current
5 1/3'
13
64
127-0
CS2
Current
8'
14
64
127-0
CS3
Current
4'
15
64
127-0
CS4
Current
2 2/3'
16
64
127-0
CS5
Current
2'
17
64
127-0
CS6
Current
1 3/5'
18
64
127-0
CS7
Current
1 1/3'
19
64
127-0
Computer music system connection
nel for the second voice than the first voice. However, you can change the
MIDI channel after turning on the dual function.
3. When SPLIT function is turned on, DUAL function will be automatically
turned off. You cannot turn on DUAL function when SPLIT function is on.
CS8
Current
1'
20
64
127-0
Hint:
If you tone generator does not support drawbar organ mode, the drawbar function of the keyboard will not work.
4. Computer music system connection
4.1 Sequencer remote control
There are 6 sequencer control buttons. When the UF keyboard
is connected to a computer, you can use those buttons to send MIDI
sync commands, to control PLAY, REC, F.F., REW etc... in the music
software.
4.1.1 The 6 buttons are: Top Rewind Forward Record Stop Play.
Hints:
1.Those functions need software support, and you must make the right
setup in the software before you can use those buttons properly.
USB MIDI Master Keyboard
17
Appendix
2.If you press one of the 6 buttons after the keyboard is powered on, the
keyboard will start sending MTC(MIDI timing clock). To stop sending MTC,
press "Reset" compound, or just turn off then turn on the keyboard.
4.2 Select MIDI route
Press “CHANNEL” and “DUAL” at the same time, the current MIDI
route status (code) will be displayed on the LED, then we can use DEC/INC
button or the data dial to select the MIDI route by its status code.
Status
0
1
KB to USB
on
on
KB to MIDI out
on
off
KB to firewire
on
off
USB to MIDI out USB to firewire
off
off
on
on
5. Appendix
5.1 Controller parameters list
18
Controller#
0
1
2
3
4
5
6
7
8
9
10
11
12
13
14-31
32
33
34
35
36
37
Function
Bank Select MSB
Modulation MSB
Breath MSB
Controller
Foot Controller MSB
Portamento time MSB
Data Entry MSB
Channel Volume MSB
Balance MSB
Controller
Panpot MSB
Expression MSB
Effect Control MSB
Effect Control MSB
Controller
Bank Select LSB
Modulation LSB
Breath Control LSB
Controller
Foot Control LSB
Porta Time LSB
USB MIDI Master Keyboard
Default
0
0
127
0
127
0
2
100
64
0
64
127
0
0
0
0
0
127
0
127
0
Value range
0-127
0-127
0-127
0-127
0-127
0-127
0-127
0-127
0-127
0-127
0-127
0-127
0-127
0-127
0-127
0-127
0-127
0-127
0-127
0-127
0-127
Data Entry LSB
Channel Volume LSB
Balance LSB
Controller
Pan LSB
Expression LSB
Controller
Sustain
Portamento
Sostenuto
Soft Pedal
Legato FootSwitch
Hold 2
Sound Controller
Resonance
Release Time
Attack Time
Cutoff
Decay Time
Vibrato Rate
Vibrato Depth
Vibrato Delay
Sound Controller
Controller
Portamento Control
Controller
Reverb
Effects
Chorus
Effects
Effects
RPN Increment
RPN Decrement
NRPN LSB
NRPN MSB
RPN LSB
RPN MSB
Controller
All Sound Off
Reset All Controllers
Local Controllesr
All Notes Off
OMNI Off
OMNI On
Mono
Poly
0
127
64
0
64
127
0
0
0
0
0
0
0
64
64
64
64
64
0
64
64
64
64
0
0
0
40
0
0
0
0
0
0
0
0
0
0
0
0
0
0
0
0
0
0
0
0-127
0-127
0-127
0-127
0-127
0-127
0-127
0-127
0-127
0-127
0-127
0-127
0-127
0-127
0-127
0-127
0-127
0-127
0-127
0-127
0-127
0-127
0-127
0-127
0-127
0-127
0-127
0-127
0-127
0-127
0-127
0-127
0-127
0-127
0-127
0-127
0-127
0-127
0-127
0-127
0-127
0-127
0-127
0-127
0-127
0-127
USB MIDI Master Keyboard
Appendix
38
39
40
41
42
43
44-63
64
65
66
67
68
69
70
71
72
73
74
75
76
77
78
79
80-83
84
85-90
91
92
93
94
95
96
97
98
99
100
101
102-119
120
121
122
123
124
125
126
127
19
Appendix
5.2 Troubleshooting
Trouble
After turning on the power
switch, the keyboard is not
powered on
Possible reasons and action to solve
1. Make sure you have connect the keyboard to its
AC adaptor with proper AC supply
2. If the power is supplied via host USB, please
check the USB connection, and make sure that
the host computer is turned on.
No sound when playing the 1. There is no tone generator in the UF keyboard.
UF keyboard
To make sound, you can connect the UF keyboard
to an external tone generator, or you can also
use optional Fireware expansion board with
computer software synthesizer
2. Check the volume settings of the tone
generator and speaker system
3. Check the MIDI connection (1.3)
4. Check Master Volume Fader (2.8)
5. Check Channel Volume Faders (2.8)
6. Check Channel Expression Knobs (3.2)
7. Check the attack time of the filter (3.2)
8. Make sure you have the right settings in you
music software.
9. Check the MIDI route in your UF keyboard. (4.2)
10.Check the Controller Pedal plsition(1.2)
Continuous long sound
1. Check Sustain pedal
2. Check the release time of the filter(3.2)
3. Use All notes off(2.11) or Reset (3.3)
Improper voice
Tone generator not set properly please Initialize
(3.3)or Reset(2.3)
Wrong pitch
Check Transpose or Octave function of the
keyboard (2.9 2.10)
SEQ Remote buttons do
Make sure your sequencer software support this
not work
function with the right settings(Refer to the Sync
section of your software manual)
Cannot adjust Tempo
Make sure your sequencer software support this
function with the right settings(Refer to the Sync
section of your software manual)
Some functions do not work It is possible that your tone generator or music
software dose not support those functions
You hear two sounds when Check DUAL function of the keyboard(3.6)
playing one key
Cannot select voice
Read the data list of your tone generator for
voice select detail, and properly set the tone
BANK controller 0&32(3.2)
20
USB MIDI Master Keyboard
Keyboard
UF5: 49 key keyboard (C1-C5), (Initial Touch/After touch)
UF6: 61 key keyboard (C1-C6), (Initial Touch/After touch)
UF7: 76 key keyboard (A-1-C6), (Initial Touch/After touch)
UF8: 88 keys (A-1 - C7), Hammer Effect Keyboard (Initial Touch/After
touch)
Appendix
5.3 Specifications
Functions
Basic: Octave Shift (-3 - +3 octaves), Pitch Bend Wheel, Modulation
Wheel
MIDI Data: Sequencer control, MIDI clock, Bank Select, Program
Change, GM System On, GS System on, XG System On, Control
Change, All Notes Off, and others
Assignable Parameters: Transpose ( 12 semitones), MIDI Transmit
Channel, Velocity Curve(Touch Sensitivity)
Panel Controls and Indicators
SEQ REMOTE buttons, 8 Assignable knobs, 8 Assignable faders,
Assignable Master volume slider, Knob function switch, Fader function
switch, LED lamps, 9 Function buttons (Drawbar, Velocity curve, After
touch, Program change, Transpose, Octave, Channel, Split, Dual), Data
dial, Inc/Dec button.
Display
8 segment, 3 digit
Input/Output Terminals
MIDI OUT, SUSTAIN Pedal, CONTROLLER Pedal, assignable B.C.
(Breath Control), USB port, Cable hook, DC in, Power switch
Expandability:
Ready for UF400e Firewire (IEEE 1394) expansion card (Optional)
Power Supply
AC Power Adaptor included (When used separately.)
Power can be supplied via USB port (when connected to computer via
USB MIDI Master Keyboard
21
Appendix
USB)
Dimensions (W x D x H)and weights
UF5: 859 x 348 x 113 mm, 8.2 kg
UF6: 1022 x 348 x 113 mm, 9.8 kg
UF7: 1232 x 348 x 113 mm, 11.8 kg
UF8: 1408 x 372 x 150 mm, 23.5 kg
* Specifications and appearance are subject to change without notice.
5.4 MIDI Implementation Chart
Model: UF 5/6/7/8
Function
Version: 1.0
Transmitted
Recognized
Basic
Channel
Default
Changed
1-16
1-16
X
X
Mode
Default
Messages
X
X
X
Altered
***********
0-127 X
Number:
Velocity
True voice
Note ON
***********
v=0-127
X
Aftertouch
Note OFF
Key's
X
X
X
X
Note
X
X
Ch's
Pitch Bend
Control Change
Prog
0-127
0-127
Change:
True #
System Exclusive
***********
X
X
System
Real Time
:Clock
:Commands
X
System
command
Song position
X
Aux
Messages
Active Sense
X
:
Yes
X: No
22
USB MIDI Master Keyboard
Name
1394(IEEE1394)
A.TOUCH
ALL NOTES OFF
B.C.
CHANNEL
CONTROLLER Pedal
CS1-CS8
DATA DIAL
DEC & INC
DEMO
DRAWBAR
DUAL
FADER FUNC.
FORWARD
GM ON
GS ON
KN1-KN8
KNOB FUNC.
LED
MIDI OUT
MODULATION
OCTAVE
PITCH BEND
PLAY
POWER
POWER ON/OFF
PROGRAM
RECORD
RESET
REWIND
SPLIT
STOP
SUSTAIN PEDAL
TOP
TRANSPOSE
USB
V.CURVE
Description
Fireware port
Channel after touch
All notes off
Breath Control
Channel
Controller pedal
Assignable faders
Data dial
Decrease or increase the value
Demo song
Drawbar organ
Dual voices
Fader functions select
Fast forward
GM on system exclusive message
GS on system exclusive message
Assignable knobs
Knob functions select
LED display
MIDI out
Modulation wheel
Octave shift
Pitch bend wheel
Play
Power inlet
Power switch
Voice select
Record
Reset
Rewind
Keyboard split
Stop
Sustain pedal
Go to song start
Transpose
USB port
Velocity curve
Chapter
5.3
3.7
2.11
1.2
3.1
1.2
2.8
1.1
1.1
2.2
3.8
3.6
2.8
4.1
3.3
3.3
3.2
3.2
1.1
1.2
2.7
2.10
2.6
4.1
1.2
1.2
2.5
4.1
2.3
4.1
3.5
4.1
1.2
4.1
2.9
1.2
3.4
XG ON
XG on system exclusive message 3.3
Appendix
5.5 Index
23
USB MIDI Master Keyboard
Appendix
Trade marks:
CME is the registered trade mark of Central Music Co.
UF is the registered trade mark of Central Music Co.
XG is the registered trade mark of YAMAHA corporation
GS is the registered trade mark of Roland corporation
GM is the registered trade mark of AMEI.
All the other trade marks belong to their respective owners.
Limited warranty:
All the content and specification in this manual are for reference only. Central Music
Co reserves the rights to modify the manual, but dose not guarantee to notify the modification to anybody. Central Music Co also reserves the right to modify the product specification without notification to anybody, thus there may be difference between the real product
and the manual. Central Music Co will not be responsible for any third-party products.
Central Music Co offers limited warranty to the original purchase user, that is, there
is no material or assembly defect within the warranty period. The warranty period starts
from the purchase date.
For the products with defect found, the user should send the product back to Central
Music Co within the warranty period with shipment cost paid; Central Music Co will repair
or replace the defective products for free. When sending the products, the user must use
the package box supplied or confirmed by Central Music Co, otherwise the warranty will
be invalid. For the shipment cost, the user covers the shipment cost from its place to
Central Music Co, and Central Music Co covers the shipment cost from Central Music Co
back to the user. Please contact Central Music Co (Tel: 8610-8580 1115) in case you
need warranty service, and you need to provide with product serial number and your
purchase warrant (invoice or receipt). Any modification or appendix to the warranty must
be confirmed by Central Music Co or its dealer or agent before it becomes valid.
Responsibility exclusion:
Regular wear and tear or consumption
Abuse or improper use and damage caused by that
Any damage caused by other device or system
Any damage caused by modification or repair not confirmed by Central Music Co
Products with broken or defiled serial number
Any damage caused by non-Central Music Co package box
Any damage caused by improper packaging
All of the above terms and other items not mentioned in the warranty, whether oral,
written, declared or implied, are invalid. Central Music Co denies all the implied warranty,
including (but not limited to) those warranty for sales, for some special purpose, or for
anti-tortious purpose.
For anything out of warranty or any other damage or cost whether special, indirect
or related, including (but not limited to) data loss, income loss, production stop, fame,
device or property damage, or cost for get back, re-make, copy any program or data from
the product, Central Music Co pays no responsibility to them.
For some region where responsibility exclusion is not allowed, the above limit or
exclusion may not be suitable. With the warranty, you will have all the legal rights and
other rights with your region.
Product website:
www.cme-pro.com
Company information:
24
Central Music Co.
Beijing: 8610-85801115
Guangzhou: 8620-81338963
Hongkong: 852-24247368
Website: www.centrmus.com
USB MIDI Master Keyboard