1
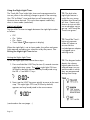
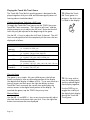
TM
Instructions For Use
Model No. TMT081-US
CAUTION – ELECTRIC TOY:
Not recommended for children under 3 years of age. Long cord.
Strangulation hazard. As with all electric products, precautions should be
observed during handling and use to prevent electric shock. Please
review all important safeguards and operating procedures before using.
Optional Batteries for Backup (Not Included)
Two 1.5V AA (LR6) size batteries may be used for clock backup. Phillips head screwdriver
(not included) required for battery replacement.
Product Registration
Please visit American Innovative on the web at www.americaninnovative.com/register/
to register your new purchase.
IMPORTANT SAFEGUARDS,
PLEASE READ FIRST!
CAUTION – ELECTRIC TOY: Not recommended for children under 3 years of age. As with all
electric products, precautions should be observed during handling and use to prevent electric
shock.
Toy transformer should be periodically examined for conditions that may result in the risk of
fire, electric shock, or injury to persons (such as damage to the output cord, blades, housing,
or other parts) and that, in an event of such conditions, the transformer should not be used
until properly repaired.
ATTENTION - JOUET ELECTRIQUE: Non recommandé pour les enfants de moins de 3 ans.
Comme tous les produits électriques, des précautions doivent être observées lors de la
manipulation et l'utilisation pour éviter toute électrocution.
Transformateur pour jouet être périodiquement examinée pour des conditions qui peuvent
entraîner le risque d'incendie, d'électrocution où de blessures à des personnes (comme les
dommages à la moelle de sortie, les lames, le logement, ou d'autres parties) et que, dans un
cas de telles conditions, le transformateur ne doit pas être utilisé avant sa réparation.
This symbol is intended to
alert the user to the presence
of uninsulated “dangerous
voltage” within the product’s
enclosure that may be of
sufficient
magnitude
to
constitute a risk of electric
shock to persons.
Page 3
TO REDUCE THE RISK OF ELECTRIC SHOCK
DO NOT REMOVE COVER (OR BACK).
THERE ARE NO USER-SERVICEABLE PARTS
INSIDE. PLEASE REFER ANY SERVICING TO
QUALIFIED SERVICE PERSONNEL.
AVERTISSEMENT: RISQUE DE
ÉLECTRIQUE – NE PAS OUVRIR
CHOC
This symbol is intended to
alert the user to the presence
of important operating and
maintenance
(servicing)
instructions in the literature
accompanying the appliance.
IMPORTANT SAFETY INSTRUCTIONS
For your protection, please read these safety instructions completely before operating this
product. All operating and use instructions should be followed. All warnings printed on the
device and in the operating instructions should be adhered to. Please keep this manual for
future reference.
Age Grading
Warning. Not suitable for children under 36 months. Long cord. Strangulation hazard.
Moisture & Heat
Do not use this device near water. For example, do not use this device near a bathtub, wash
bowl, kitchen sink or laundry tub. Do not use this device in a wet basement, near a swimming
pool or near any other source of water. Do not place water-filled vessels on this device. Do
not place this device near any heat sources such as radiators, stoves, amplifiers or other
devices that produce heat. Do not place an open flame on or near this device.
Power Source
This product should be connected to a power supply only of the type marked on the outside
of the provided AC adapter. If you are not sure of the type of power supply to your home,
please consult your product dealer or local power company. Where the main plug is used as
the disconnect device, the disconnect device shall remain readily operable.
Batteries
Do not mix old and new batteries - always replace both batteries at the same time. Always
use two batteries of the same type - do not mix alkaline, standard (carbon-zinc) or
rechargeable (nickel-cadmium) batteries. Always note the correct polarity when inserting
batteries – see diagram inside battery box. When batteries are exhausted, remove them from
the product. Non-rechargeable batteries are not to be recharged. The supply terminals are
not to be short-circuited.
Grounding or Polarization
Precaution should be taken not to defeat the safety purpose of grounding or polarization. If
your product is supplied with a polarized AC power adapter (one blade is wider than the
other) then this plug is designed to fit into the power outlet in only one way. If you are unable
to fully insert the plug into the power outlet, try reversing it. If the plug should still fail to fit,
use a different outlet or contact a certified electrician to have a suitable outlet installed.
Overloading
Do not overload wall outlets, extension cords, etc. beyond their rated capacity.
When Not In Use
Unplug the unit from the wall when not using for prolonged periods of time. When removing
the power cord from the wall, always grasp the plug; do not pull the cord itself.
Page 4
Power Cord Protection
Power cords should be routed so that they are not likely to be walked on or pinched by items
placed on or against them, paying particular attention to cords at plugs, convenience
receptacles, and the point where they exit from the product. Do not use the included plug
with an extension cord, receptacle or other outlet unless the blades can be fully inserted in
order to prevent blade exposure.
Lightning
If the unit is not plugged into an appropriately rated surge protector, unplug the unit from the
wall in the event of a lightning storm in order to protect it from powerline surges. Unplug the
unit if it is to be unused for a long period of time.
Object & Liquid Entry
Never insert objects of any kind into this product, through ventilation openings, as these
objects may touch dangerous voltage points or create a short circuit that could result in a fire
or electric shock. Never spill liquid of any kind on or into the device.
Care & Maintenance
Unplug the unit from the wall before cleaning. Use a soft, damp cloth to wipe down the unit.
Do not use liquid, aerosol or abrasive cleaners. Product may wear over time, with use.
Parents should periodically examine this product for potential hazards. Any potentially
hazardous parts should be repaired or replaced. Keep packaging and manual for future
reference.
Damage Requiring Service
Do not attempt to service the unit yourself as opening or removing covers may expose you to
dangerous voltage or other hazards. All servicing should be referred to qualified personnel.
This product should be fixed by qualified service personnel under the following conditions:
1.
2.
3.
4.
5.
6.
When the power supply, cord or plug has been damaged.
If liquid has been spilled, or objects have fallen into the unit.
If the unit is exposed to rain or water.
If the product does not operate normally when following the operating instructions.
If the unit has been dropped or damaged in any way.
When the product exhibits a distinct change in performance.
Replacement Parts
In the event that replacement parts are required, ensure that the service technician uses parts
specified by the manufacturer or those deemed to be equivalent. Unauthorized substitutions
may result in fire, electric shock, or other hazards.
Safety Information
This product complies with relevant safety standards including those for electronic toys, lead
and phthalate content. RoHS (for the EU): This product contains a maximum value of 0.1
percent by weight in homogenous materials for lead, mercury, hexavent chromium, PBB and
PBDE and a maximum value of 0.01 percent by weight in homogenous materials for cadmium.
Page 5
FCC INFORMATION
NOTE: This equipment has been tested and found to comply with the limits for a Class B
digital device, pursuant to Part 15 of the FCC Rules. These limits are designed to provide
reasonable protection against harmful interference in a residential installation. This equipment
generates, uses and can radiate radio frequency energy and, if not installed and used in
accordance with the instructions, may cause harmful interference to radio communications.
However, there is no guarantee that interference will not occur in a particular installation. If
this equipment does cause harmful interference to radio or television reception, which can be
determined by turning the equipment off and on, the user is encouraged to try to correct the
interference by one or more of the following measures:
•
•
•
•
Reorient or relocate the receiving antenna.
Increase the separation between the equipment and receiver.
Connect the equipment into an outlet on a circuit different from that to which the
receiver is connected.
Consult the dealer or an experienced radio/TV technician for help.
WARNING: Changes or modifications to the equipment that are not expressly approved by
the responsible party for compliance could void the user’s authority to operate the equipment.
SERVICE CONTACT INFORMATION
In the United States
Please visit www.americaninnovative.com/contact/ for the most up-to-date contact information
and for details regarding product servicing and/or warranty claims. You must receive a Return
Merchandise Authorization (RMA) number before shipping any item to AI. This product is
distributed outside of the US, in select regions, by authorized distribution partners. AI does
not handle foreign warranty claims. For warranty service please contact your point of purchase
for assistance. American Innovative products purchased from US retailers and shipped to
international locations are not covered under our domestic warranty policy.
American Innovative, LLC
ATTN Returns: (note: RMA # must be requested online)
398 Columbus Avenue, Suite 321
Boston, MA 02116 United States of America
p. (617) 395-7831
w. www.americaninnovative.com/contact/
In the United Kingdom
This product is distributed in the United Kingdom by Hardenberg&Co Ltd. For warranty
service please contact your point of purchase, with valid proof of sales, for assistance.
Hardenberg&Co Ltd
Consumer Helpline, PO Box 3534
Stone, ST15 9DT United Kingdom
Page 6
p. 0845 009 1789 (charges apply)
e. [email protected]
w. www.onaroo.co.uk
Page 7
Setup
Getting Started
Unpack Teach Me Time! and discard the paper LCD label by
removing the colored bezel (see below). Plug the external AC
adapter into the back of the product. Next plug the AC adapter
into a standard wall outlet.
Changing the Colored Bezel
Change the bezel by gently turning counter-clockwise until it
stops. Pull the bezel away from the clock to remove. Install a
new bezel and turn it clockwise until it locks in place.
TIP: The rear hatch
conceals the parental
controls and is designed to
be “child proof.”
To open the hatch, place
your thumb on the latch
and gently push down and
back. You may flex the
cover slightly to facilitate
opening the hatch:
Setting the Time
The first time you plug in Teach Me Time! you must set the time:
1. Press and hold the SET key for two (2) seconds to enter
set time mode. The numeric portion of the display
flashes and the word “SET” appears.
2. Adjust the time using the HR +/- and MIN +/- keys. Press
and hold these keys for one (1) second to scroll rapidly.
3. Tap the SET key once quickly to exit.
Battery Backup (Optional)
Teach Me Time! may be used with two AA batteries (not
included) to save settings in the event of a power failure. To
insert the batteries, remove the screw from the battery hatch
(bottom of unit) using a small screwdriver. If the hatch does not
fall open freely, use your fingernail or a paperclip to gently
dislodge it.
NOTE: Many functions of Teach Me Time! still work under
backup battery power. However, to conserve battery life, the
night-light and display backlight features do not function.
NOTE: If the battery level is very low Teach Me Time! may not
have enough power to clearly announce the time or may
become unresponsive. In this event, please replace the
batteries with a fresh set.
Page 8
Do not attempt to open
the hatch by using a
fingernail to pull in an
upward direction as this
may break the latch
mechanism.
Ordinary Operation (Current Time of Day)
During ordinary operation the current time of day is displayed.
The following features are available:
Display Presentation
Use the DISP key to toggle the display presentation:
Analog Only
Numeric Only
TIP: The functions on
this page are only
available when Teach
Me Time! is displaying
the current time of day.
Both
Backlight (and Night-Light) Brightness
Use the MIN +/- (Brightness) keys to toggle between HIGH
(default) and LOW brightness options. If the night-light is on, its
intensity is also adjusted.
Master Volume
Use the HR +/- (Volume) keys to adjust the volume. There are
four volume options as follows: OFF, LOW (1), MEDIUM (2) and
HIGH (3). While the volume is being adjusted the display
indicates the current volume level for 5 seconds.
“Toe” Button Operations
LEFT: In ordinary time mode the left toe button
toggles the night-light on and off unless the
night-light timer is enabled (see Using the
Night-Light Timer on p. 11).
RIGHT: Pressing the right toe button announces
the current time.
Page 9
TIP: The master volume
does not affect the
wake chime volume,
only the voice
announcements.
Using the Alarm Clock
For older children, Teach Me Time! has a built-in alarm clock
with snooze function.
Setting the Alarm Wake Time
To set the alarm wake time:
1. Press and hold the WAKE REVIEW key for two (2)
seconds. The bunny icon appears in the display along
with the word “SET”. The wake time is displayed in the
numeric portion of the display (factory default: 7:00am):
2. Adjust the wake time using the HR +/- and MIN +/- keys.
3. Tap WAKE REVIEW once quickly to exit. Teach Me Time!
announces the status of the alarm wake setting for
confirmation.
Toggle the Wake Status (On or Off)
Press the WAKE ON | OFF key to toggle the status of the alarm
clock. Teach Me Time! clearly announces whether or not the
alarm is on and, if it is, for what time it is set.
TIP: Press the WAKE
REVIEW key to review
the current status of the
alarm wake setting.
TIP: If you make a
change to the wake
time, Teach Me Time!
automatically sets the
wake status to ON.
TIP: The presence of
the bunny icon
indicates that the alarm
is enabled to sound at
the appointed time:
“Toe” Button Operations (While The Alarm Is Sounding)
LEFT: Pressing the left toe button causes Teach
Me Time! to snooze for 10 minutes. After ten
minutes the alarm sounds again.
RIGHT: Pressing the right toe button will silence
a sounding alarm or cancel a snooze that is in
progress.
Page 10
TIP: When Teach Me
Time! is snoozing the
sheep icon animates in
the display:
Using the Night-Light Timer
The Teach Me Time! night-light timer can be programmed to
turn on yellow in the evening, change to green in the morning
(the “OK to Wake!” time) and then turn off automatically at
whatever times desired. This cycle then repeats indefinitely
when in timer mode (see below).
Night-Light Modes
Tap the LIGHT button to toggle between the night-light modes
as follows:
•
•
•
•
Off
On - Yellow
On - Green
Timer Mode (
icon appears in display)
When the night-light is set to timer mode, the yellow and green
lights operate according to a schedule set by the parent. See
Setting the Night-Light Timer below.
TIP: The dual-color
night-light feature is
useful for very young
children who cannot yet
tell time. Parents may
choose to instruct their
son or daughter not to
get up “until Teach Me
Time! turns green.”
TIP: Teach Me Time!’s
lights only operate
under AC power so
ensure that the
included power adapter
is plugged into a
working outlet.
Setting the Night-Light Timer
To set the night-light timer follow these steps:
1. Press and hold the LIGHT key for two (2) seconds to enter
night-light timer setup. The yellow night-light ON time
(8:00pm by default) appears and may be adjusted using
the HR +/- and MIN +/- keys.
2. Next, tap the LIGHT key once quickly to move to the next
step. The night-light OFF time (9:00am by default)
appears and may be adjusted in the same manner.
(continued on the next page …)
Page 11
TIP: The diagram below
depicts the chronological order that the
colored lamps turn on
and the order in which
they are programmed
during timer setup.
Using the Night-Light Timer (continued)
3. Tap the LIGHT key once quickly to move to the third and
final step. The night-light CHANGE time (6:00am by
default) appears. The change or “OK to Wake!” time is the
time at which the night-light color changes from yellow to
green. This time may also be adjusted.
4. Tap the LIGHT key once more to exit the night-light timer
setup sequence. Upon exiting, Teach Me Time!
automatically places the night-light in timer mode ( icon
appears).
Disabling Color Changing Of The Night-Light Timer
You may prefer to have the night-light turn on and off
automatically but not change color. In order to disable the colorchange transition do one of the following:
1. Set the CHANGE time equal to the ON time. In this case
the night-light turns on (yellow) at the ON time and off at
the OFF time. It does not change color.
2. Set the CHANGE time equal to the OFF time. In this case
the night-light turns on (green) at the ON time and off at
the OFF time. It does not change color.
In either case, if the CHANGE time is disabled, a small “x”
appears in the center of the light bulb icon during timer setup (this
“x” is not seen during ordinary operation):
Page 12
TIP: The CHANGE (to
green) time may not be
adjusted beyond the
night-light ON (yellow)
time and the night-light
OFF extremes.
Teach Me Time!
automatically enforces
this and it is the reason
that the ON and OFF
times are set first and the
CHANGE time is set last.
Playing the Teach Me Time! Game
The Teach Me Time! built-in teaching game is designed to be
played together with your child and to encourage a pattern of
learning about time before bed.
Getting Started and Selecting a Skill Level
TIP: When the Teach
Me Time! game is in
progress, the chick icon
is visible in the display:
To begin the Teach Me Time! game, tap the TEACH key once.
Teach Me Time! announces, “Let’s learn to tell time!” and the
display prompts you to adjust the skill level. Note that the skill
level may only be adjusted at the beginning of the game.
Use the HR +/- keys to adjust the skill level, if desired. The skill
levels are designed to limit the complexity of the times that are
displayed as follows:
Level
Level 01
(easiest)
Level 02
Description
Round hours only.
i.e. 1 o’clock, 2 o’clock, etc.
Round hours and half-hours only.
i.e. 1 o’clock, 1:30, 2 o’clock, 2:30, etc.
Level 03
Round hours, half-hours and quarter-hours.
Level 04
Round hours, half-hours, quarter-hours and
10-minute intervals.
Level 05
(hardest)
Any time may be displayed.
i.e. 1 o’clock, 1:15, 1:30, 1:45, 2 o’clock, etc.
i.e. 1 o’clock, 1:10, 1:15, 1:20, 1:30, 1:40, 1:45, 1:50, etc.
i.e. 1 o’clock, 1:02, 1:57, etc.
Play the Game
The game is very simple. Ask your child to press the left toe
button to display a time on the analog portion of the display
(the digital clock display is hidden at first). Try to coax them to a
correct answer and then press the right toe button to have
Teach Me Time! announce the correct time and display the
correct answer in the digital clock portion of the display. To
conclude the game, tap the TEACH key at any time.
Manual Adjust
Use the HR +/- and MIN +/- keys at any time to manually adjust
the clock hands to whatever time you wish. Press the right toe
button to announce the time displayed.
Page 13
TIP: You may wish to
view the analog hands
and the related digital
clock display together.
Use the DISP key to
toggle the visibility of
the digital clock display
during the Teach Me
Time! game.
Other Products from American Innovative
Please visit us on the web at www.americaninnovative.com.
Onaroo by American Innovative – Smart Products for Children and Their Parents
Teach Me Time!
Talking Alarm Clock & Night-Light
OK to Wake!
Alarm Clock & Night-Light
OK to Wake! Owl
with Night-Light & Music
Night Owl Portable Night-Light
with OK to Wake!
American Innovative – Specialty Timers and Clocks
Chef’s Quad-Timer
Professional
Page 14
American Innovative
Limited Edition Nixie Clock
American Innovative, LLC * Limited Warranty
Coverage
In the United States, American Innovative, LLC warrants this product against defects in original material
and workmanship for a period of one (1) year, under normal use and conditions. Warranty coverage
outside of the United States may vary. Please see information regarding non-US warranty claims,
below.
Non-Coverage
This warranty does not cover customer instruction, installation, set up or signal reception problems.
This warranty does not cover cosmetic damage or damage resulting from acts of God, accident,
misuse, abuse, negligence, commercial application (or rental), or modification. This warranty does not
cover damage due to improper operation or maintenance, connection to an improper voltage supply,
or attempted repair by anyone other than American Innovative, LLC or American Innovative, LLC
authorized service facilities. This warranty does not cover products sold "as is" or "with all faults". This
warranty is valid only in the United States and is invalid if the product serial number has been altered or
removed.
Making a Warranty Claim - United States
Please check http://www.americaninnovative.com/contact/ for the latest information pertaining to
warranty claims. At the company’s discretion, American Innovative will repair or replace the defective
unit. Proof of purchase in the form of a bill of sale or receipted invoice which is evidence that the unit
is within the warranty period must be presented to obtain warranty service.
REPAIR OR REPLACEMENT AS PROVIDED UNDER THIS WARRANTY IS THE EXCLUSIVE REMEDY OF
THE CONSUMER. ANY APPLICABLE IMPLIED WARRANTIES, INCLUDING THE WARRANTY OF
MERCHANTABILITY, ARE LIMITED IN DURATION TO A PERIOD OF THE EXPRESSED WARRANTY AS
PROVIDED ABOVE, BEGINNING WITH THE ORIGINAL DATE OF PURCHASE. NO WARRANTIES,
WHETHER EXPRESSED OR IMPLIED, SHALL APPLY TO THE PRODUCT THEREAFTER. WE MAKE NO
WARRANTY AS TO THE FITNESS OF THE PRODUCT FOR ANY PARTICULAR PURPOSE OR USE.
THE EXTENT OF OUR LIABILITY UNDER THIS LIMITED WARRANTY IS THE REPAIR OR
REPLACEMENT PROVIDED ABOVE AND IN NO EVENT WILL OUR LIABILITY EXCEED THE PURCHASE
PRICE PAID BY THE PURCHASER. UNDER NO CIRCUMSTANCES WILL WE BE LIABLE FOR ANY
LOSS, DIRECT, INDIRECT, INCIDENTAL, SPECIAL, OR CONSEQUENTIAL DAMAGE ARISING OUT OF
OR IN CONNECTION WITH THE USE OF THIS PRODUCT.
THIS WARRANTY GIVES YOU SPECIFIC LEGAL RIGHTS, BUT YOU MAY ALSO HAVE OTHER RIGHTS
WHICH VARY FROM STATE TO STATE. SOME STATES DO NOT ALLOW LIMITATIONS ON IMPLIED
WARRANTIES OR EXCLUSION OR LIMITATION OF INCIDENTAL OR CONSEQUENTIAL DAMAGE, SO
THESE RESTRICTIONS MAY NOT APPLY TO YOU.
Making a Warranty Claim - Outside of the United States
This product is distributed outside of the United States, in select regions, by authorized distribution
partners. American Innovative does not handle foreign warranty claims. For warranty service please
contact your point of purchase for assistance. American Innovative products purchased from US
retailers and shipped to international locations are not covered under our domestic warranty policy.
Page 15
www.americaninnovative.com
INPUT: 120V AC 60Hz (US Model)
230-240V AC 50Hz (UK Model)
OUTPUT: 4.5V DC 300mA
NO LOAD OUTPUT
VOLTAGE: 8.0V DC
Note: Due to production changes and improvements, actual product may vary slightly
from images shown in manual and/or on packaging. This product should be connected to a
power supply only of the type marked on the outside of the provided AC adapter.
Manual v3.8 (US/UK)
Printed in China.
U.S. Patent No. D588,022.
© 2013 American Innovative, LLC.