1
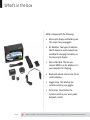
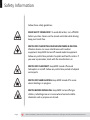
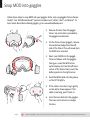
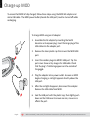
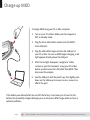
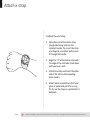
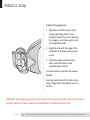
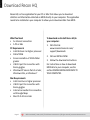
Page 1
MOD User Manual
MOD User Manual | January 2012 | © 2012 Recon Instruments Inc | All rights reserved | www.reconinstruments.com
What’s in the box
MOD is shipped with the following:
• Micro-optic display and battery pack.
This snaps into your goggles.
• AC Adapters. Two types of adapters
(North American and European) are
available for charging the battery on
the micro-optic display.
• Micro USB cable. This lets you
connect MOD to an AC adapter or to
your computer for charging.
• Bluetooth remote control. Use this to
control displays.
• Goggle strap. This attaches the
remote control to your goggle.
• Wrist strap. This attaches the
remote control to your wrist, jacket,
backpack, or belt.
Page 2
MOD User Manual | January 2012 | © 2012 Recon Instruments Inc | All rights reserved | www.reconinstruments.com
Safety Information
Follow these safety guidelines:
ROAD SAFETY COMES FIRST. To avoid distraction, turn off MOD
before you drive. Never use the remote controller while driving:
keep your hands free.
SWITCH OFF IN HOSPITALS AND AROUND MEDICAL DEVICES.
Wireless devices can cause interference with medical
equipment. Keep MOD turned off around medical equipment.
Follow any restrictions posted in hospitals and health centers. If
you wear a pacemaker, check with the manufacturer on
SWITCH OFF IN AIRCRAFT. Keep MOD turned off around
helicopters or aircraft. Follow any restrictions posted in helipads
and airports.
SWITCH OFF NEAR BLASTING. Keep MOD turned off in areas
where blasting is in progress.
SWITCH BEFORE REFUELLING. Keep MOD turned off at gas
stations, refuelling areas or in areas where fuel and volatile
chemicals such as propane are stored.
Page 3
MOD User Manual | January 2012 | © 2012 Recon Instruments Inc | All rights reserved | www.reconinstruments.com
Vision Tips
• If you experience nausea or eye strain
when using MOD, take a break for
several minutes.
• Avoid wearing eyeglasses under
your goggles.
Page 4
MOD User Manual | January 2012 | © 2012 Recon Instruments Inc | All rights reserved | www.reconinstruments.com
Snap MOD into goggles
Follow these steps to snap MOD into your goggles. Note: only use goggles that are ReconReady®. Our 2011 Recon Ready™ partners include Uvex®, Briko®, Zeal®, and Alpina®. To
learn more about Recon-Ready goggles, go to: www.ReconReady.com
1. Remove the lens from the goggle
frame. See instructions provided by
the goggle manufacturer.
2. On the frame of your goggles, remove
the protective badge from the left
side of the frame. This will reveal slots
for MOD to be inserted.
3. Next, insert MOD into the goggle
frame as follows: with the goggles
facing you, snap the MOD micro
optics display unit into the left inner
corner of the frame. Next, insert the
battery pack into the right corner.
4. Push the MOD cable into the groove
so that it fits tightly.
5. If the cable is too short, tug it gently
so the white stripes appear. If the
cable is too long, push it back in.
6. Insert the lens back into the goggles.
Take care not to touch or smudge
the lens.
Page 5
MOD User Manual | January 2012 | © 2012 Recon Instruments Inc | All rights reserved | www.reconinstruments.com
Charge up MOD
To ensure that MOD is fully charged, follow these steps using the MOD AC adapter and
micro USB cable. The MOD power button (beside the USB port) must be turned off while
recharging.
To charge MOD using an AC adapter:
1. Assemble the AC adapter by inserting the North
American or European plug. Insert the large plug of the
USB cable into the adapter port.
2. Remove the clear plastic cap that covers the MOD USB
port.
3. Insert the smaller plug into MOD’s USB port. Tip: the
port cover shows a tiny image of a USB cable. Check
that the plug’s 7L lettering appears on the outside of
the goggle.
4. Plug the adapter into a power outlet. As soon as MOD
begins charging, a red light appears directly above the
USB port.
5. After the red light disappears, disconnect the adapter.
Remove the USB cable from MOD.
6. Seal the USB port with the plastic cap, then tightly push
down on the USB cover to ensure no rain, snow or ice
affects the port.
Page 6
MOD User Manual | January 2012 | © 2012 Recon Instruments Inc | All rights reserved | www.reconinstruments.com
Charge up MOD
To charge MOD using your PC or Mac computer:
1. Turn on your PC or Mac. Make sure the computer is
NOT in standby mode.
2. Plug the micro USB cable’s smaller end into MOD’s
micro USB port.
3. Plug the USB cable’s larger end into the USB port in
your PC or Mac. As soon as MOD begins charging, a red
light appears directly above the USB port.
4. After the red light disappears, navigate to “safely
remove or eject the hardware” using your PC or Mac
before you disconnect the USB cable from MOD. Then
disconnect the adapter.
5. Seal the USB port with the plastic cap, then tightly push
down on the USB cover to ensure no rain, snow or ice
affects the port.
If the battery was drained after the unit left the factory, it can take up to 3 hours for the
battery to becomefully charged although you can achieve an 80% charge within an hour in
optimal conditions.
Page 7
MOD User Manual | January 2012 | © 2012 Recon Instruments Inc | All rights reserved | www.reconinstruments.com
Check the remote controller
MOD is factory-paired (synchronized) with the remote
controller shipped in the box.
To perform a “pair” check, follow
these steps:
1. On MOD, press down the power button for
3 seconds.
2. On the remote controller, press any button and wait
for a blue light to flash. This confirms the remote is
connected to MOD.
You can also check for connectivity by holding the goggles
to your eyes and checking the status bar that appears on
the dashboard. The remote status indicator icon on the
left-hand side should be blue.
Page 8
MOD User Manual | January 2012 | © 2012 Recon Instruments Inc | All rights reserved | www.reconinstruments.com
Attach a strap
To attach the wrist strap:
1. Slip either end of the Velcro strap
(rough side facing out) into the
remote’s handle. Tip: insert the strap
at a diagonal, and either pull or push
it through the handle.
2. Align the “V” of the Velcro strap with
the edge of the controller. Push down
until you hear a click.
3. Stretch the strap and insert the other
end of the Velcro strap repeating
steps 1 and 2.
4. Attach Velcro around the cuff of your
glove or jacket and pull it for a snug
fit. Or, use the strap on a jacket belt or
backpack.
Page 9
MOD User Manual | January 2012 | © 2012 Recon Instruments Inc | All rights reserved | www.reconinstruments.com
Attach a strap
To attach the goggle strap:
1. Slip either end of the Velcro strap
(rough side facing out) into the
remote’s handle. Tip: insert the strap
at a diagonal, and either pull or push
it through the handle.
2. Align the strap with the edge of the
controller. Push down until you hear
a click.
3. Stretch the strap aand insert the
other end of the Velcro strap
repeating steps 1 and 2.
To remove either strap from the remote
handles:
Open the plastic ends of the Velcro strap
using a fingernail or slim object such as a
nail file.
WARNING: Avoid applying pressure to the handles of the remote controller. Velcro straps should
never be attached to heavy objects such as backpacks or snowboard carrier bags.
Page 10
MOD User Manual | January 2012 | © 2012 Recon Instruments Inc | All rights reserved | www.reconinstruments.com
Create an HQ account
Follow these steps to create a free account on HQ Online. HQ Online is Recon Instruments’
online community where you can upload your stats, runs and highlights as well as compete
for prizes.
1. Go to the HQ Online website at
http://hqonline.reconinstruments.com
2. Click on the sign-up hyperlink. In the SIGN UP FORM, enter the
following and click SUBMIT.
• Your name. Enter your first name, an alias or a nickname.
• Your email address. Enter a valid, unique email address. All
account settings are linked to your email. (If you decide to
create a second account, for example, for a family member, you
cannot reuse the same email address.)
• A password. Enter a minimum of six characters.
3. Check your email for a message from
[email protected].
4. Activate your account by clicking the link for account activation
(on the last line of the message).
5. When the HQ Online home page appears, login using the email
address and password in step 2. A Login Successful confirmation
message appears.
Page 11
MOD User Manual | January 2012 | © 2012 Recon Instruments Inc | All rights reserved | www.reconinstruments.com
Download Recon HQ
Recon HQ is a free application for your PC or Mac that allows you to download
statistics and information collected on MOD directly to your computer. This application
needs to be installed on your computer to allow you to download data from MOD.
What You Need
• An Internet connection
• A PC or Mac
PC Requirements
• Intel Pentium 4 or higher processor
• 1GB of RAM
• Screen resolution of 1024x768 or
greater
• USB 2.0 port for connection with
Recon goggles
• Windows XP Service Pack 2 or later,
Windows Vista, or Windows 7
To download and install Recon HQ to
your computer:
1. Click this link:
www.reconinstruments.com/
support/downloads
2. Click on INSTALL NOW.
3. Follow the download instructions.
For instructions on how to download
MOD data to your computer, see the
section DOWNLOADING MOD DATA TO
YOUR COMPUTER.
Mac Requirements
• Intel Core Duo or higher processor
• USB 2.0 port for connection with
Recon goggles
• Internet connection for connection
with Google Maps
• Mac OS X v10.6 or later
Page 12
MOD User Manual | January 2012 | © 2012 Recon Instruments Inc | All rights reserved | www.reconinstruments.com
MOD Quick reference
When this screen appears, press any button on the remote
to launch MOD.
Remote controller buttons
• Press to select an app, see a menu,
or choose an option
• Press to exit a screen or menu
Press repeatedly to exit an app
• Press to navigate vertical menus, zoom or pan in maps
• Press to navigate vertical menus, zoom or pan in maps
• Press to navigate horizontal menus,
zoom or pan in maps
• Press to navigate horizontal menus,
zoom or pan in maps
Page 13
MOD User Manual | January 2012 | © 2012 Recon Instruments Inc | All rights reserved | www.reconinstruments.com
MOD Quick reference
MOD Icons
Use icons to access functions. To navigate, press To choose a function, press
. To exit, press
or
STATS HISTORY. Access accumulated statistics.
JUMPS. View airtime, distance, height and drop.
CHRONO HISTORY. View stopwatch-timed activity records.
PREFERENCES. Change brightness level, time, language,
and units of measure. Clear data from the display.
Status bar
1
1. GPS Indicator
3
2. Time
3. Remote connection indicator
2
4
Page 14
4. Battery charge indicator
MOD User Manual | January 2012 | © 2012 Recon Instruments Inc | All rights reserved | www.reconinstruments.com
MOD Quick reference
Status Indicators
(RED BLINKING) Searching signal
(RED BLINKING) Searching for remote
(GREEN BLINKING) Partial coverage
(SOLID BLUE) Connected remote
(GREEN SOLID) Full GPS signal
More options hidden
(RED SOLID) No remote found
Currently selected feature
DISPLAY OFF
Display off mode
Display off mode saves the battery when the display is
not needed. MOD will continue to record your data and
statistics while in display off mode. Simply press any button
to re-activate the display and continue where you left off.
Turn display off:
• Press
on the remote controller.
• When the DISPLAY OFF screen appears, press
Turn display back on:
• Press any button on the remote controller. Page 15
MOD User Manual | January 2012 | © 2012 Recon Instruments Inc | All rights reserved | www.reconinstruments.com
MOD Quick reference
Performance notifications
These popups are automatically displayed for a few seconds:
MAX km/h
MAX: Appears each time you top your maximum
speed for the day.
3912 m
ALT m
ALT: Appears whenever your maximum altitude
increases by 500 m or 1500 ft.
3500
3912 m
VRT m
1200
VRT: Appears whenever you reach a vertical drop of
500 m or 1500 ft.
3912 m
AIR: Appears each time you jump for more than .6 seconds.
AIR s
3.73
3912 m
Page 16
MOD User Manual | January 2012 | © 2012 Recon Instruments Inc | All rights reserved | www.reconinstruments.com
MOD Quick reference
System notifications
These popups are automatically displayed for a few
seconds:
Battery Critical/Graceful Shutdown: The battery has
almost zero charge. Recharge MOD as soon as possible.
MOD shuts down to ensure your data is saved.
Memory Full: As soon as possible, perform a download
and then select DELETE AFTER DOWNLOAD. Refer to the
section, Downloading MOD Data to your Computer.
Auto shutdown
MOD automatically shuts down after a half-hour of no
movement.
Turn MOD back on:
• Press and hold down the MOD power button. Page 17
MOD User Manual | January 2012 | © 2012 Recon Instruments Inc | All rights reserved | www.reconinstruments.com
MOD Features and functions
RECO MOD® offers comprehensive performance-monitoring and condition-monitoring
that incorporates GPS technology and sensor integration to provide a powerful workout
and training tool for alpine activities.
Overview
STATS HISTORY. View four dashboards showing metrics
including your speed, distance.
JUMPS. View airtime, distance, height and drop.
CHRONO HISTORY. View stopwatch-timed activity records to
track your progress in training and timed events.
PREFERENCES. Change brightness level, time, language, and
units of measure. Clear data from the display.
Page 18
MOD User Manual | January 2012 | © 2012 Recon Instruments Inc | All rights reserved | www.reconinstruments.com
MOD Features and functions
Dashboard
Keep track of the most important metrics including your speed and distance as well as geo
conditions important to backcountry activities. Choose from four dashboard styles:
SPEED. MOD displays your speed as a dial and as digits. The
dial turns red at high speeds to warn you to slow down.
2473 m
ALT. MOD displays the distance above sea-level calculated
automatically using GPS data. NOTE: This value requires a
strong GPS signal.
3912 m
VRT. MOD displays the total vertical distance (descent)
recorded since the start of the day. MOD records your
ascent whether you travelled by gondola, chairlift, or on
snowboard.
TMP
8539 m
TMP. MOD displays the current temperature.
DST. MOD displays the total distance travelled across land
(up, down and sideways) during the current session.
IMPORTANT NOTE: The first time you use MOD, values in the dashboard will be at zero except for
temperature and altitude (elevation above sea level). While MOD acquires GPS data, dashes can
appear. Head to an open area and wait five minutes.
To navigate. Press
Page 19
to navigate to the dashboard you want.
MOD User Manual | January 2012 | © 2012 Recon Instruments Inc | All rights reserved | www.reconinstruments.com
MOD Features and functions
Stopwatch
Use the stopwatch for clocking any timed activity.
8539 m
• To start the timer. Press colour from grey to yellow.
• To stop the timer. Press
CHRONO HISTORY.
in any dashboard. Digits change
. This time is saved in a record in
• To clear timed data and reset the counter to zero. Press
. This resets the displayed counter to zero.
Page 20
MOD User Manual | January 2012 | © 2012 Recon Instruments Inc | All rights reserved | www.reconinstruments.com
MOD Features and functions
Test the dashboard
Follow these steps to get familiar navigating and using the remote controller.
Clock a timed activity (jog, cycle, ski or board)
2473 m
1. Start moving in an open area unobstructed by trees, poles or
cliffs.
2. Watch dial bars light up and change colour as you increase
speed.
Clock a timed activity (jog, cycle, ski or board)
8539 m
1. Press
to start the stopwatch.
2. Press
to stop. Check chrono data in yellow.
Track airtime. Toss your goggles.
LAST JUMP
Air Time
Distance
Height
Drop
#31
1. Press
2. Review your jump stats.
3. Press
Page 21
until you see LAST JUMP.
to exit CHRONO HISTORY
MOD User Manual | January 2012 | © 2012 Recon Instruments Inc | All rights reserved | www.reconinstruments.com
Chrono
Use this function to review stopwatch data. All stopwatch records are saved here. Access
CHRONO HISTORY from the icon menu to view and manage timed activity data. This view
shows no data. Until you start using the stopwatch, no history will appear here. Records
appear in chrono order. Each record shows a unique number for easy reference.
To find and select CHRONO HISTORY:
CHRONO HISTORY
LAST RECORD
0:06:34.72
• Press
Press
until the stopwatch icon is highlighted.
to select CHRONO HISTORY.
• Press
to see lists of saved records
To select, flag or delete records:
14
15
16
17
0:06:34.43
0:07:21.16
0:06:46.32
0:06:34.43
• Press
to select a record for flagging or deletion.
Flagging a record will highlight it in Recon HQ software
after you download data. Deleting a run will delete it
from MOD memory and from CHRONO HISTORY.
• Press
and
and Flag. Press
Page 22
to navigate between Delete
when Delete or Flag is highlighted.
MOD User Manual | January 2012 | © 2012 Recon Instruments Inc | All rights reserved | www.reconinstruments.com
Stats history
Choose STATS HISTORY to see four pages of statistics including performance stats (maximums,
minimums, averages, and totals), distances, elevations, and mountain conditions.
To find and select STATS HISTORY:
Press
Press
until STATS HISTORY is displayed. Press to select it.
and
to navigate between these four displays.
STATS HISTORY show these highlights:
STATS HISTORY
#7
LAST RUN
Max Speed 107
736 m
Vertical
2105 m
Distance
• LAST RUN: MOD identifies your current (latest) run.
• Max Speed: MOD displays the top speed you’ve achieved during
the last run.
• Vertical: MOD displays the total accumulated distance travelled
vertically downwards during the last run.
• Distance: Total Distance Travelled across land (Up, down, and
sideways) during the last run.
Page 23
MOD User Manual | January 2012 | © 2012 Recon Instruments Inc | All rights reserved | www.reconinstruments.com
Stats history
PERFORMANCE STATS show milestones for speeds, activity
length, and airtime:
• Max Speed: MOD displays the top speed for the day or since
you last reset your stats.
• Avg Speed: MOD displays the average speed recorded for
the day or since you last reset your stats.
Max Speed
Avg Speed
Long
Short
Last Air
Max Air
87 Km/h
34 Km/h
2:46.53
4:18.20
1.33 s
1.52 s
• Long: MOD displays the longest timed activity recorded in
Chrono/Stopwatch during the day or since you last reset
your stats.
• Short: MOD displays the shortest timed activity recorded
in Chrono/Stopwatch during the day or since you last reset
your stats.
• Last Air: MOD displays your latest jump’s airtime.
• Max Air: MOD displays the highest airtime recorded the day
or since you last reset your stats.
Page 24
MOD User Manual | January 2012 | © 2012 Recon Instruments Inc | All rights reserved | www.reconinstruments.com
Stats history
ELEVATION STATS show your altitude, downward distances and
total distances.
• Current Altitude: MOD displays the current altitude. This is
updated every 30 seconds.
Current
Max
Total
Total
2053 m
2721 m
1647 m
13 Runs
3214 m
• Maximum Altitude: MOD displays the highest altitude for the
day or since you last reset your stats.
• Total Vertical Distance Travelled: MOD displays the total
vertical distance accumulated during the day or since you last
reset your stats.
• Total Vertical Runs: MOD displays the total vertical runs
accumulated before travelling upwards (on a lift) during the
day or since you last reset your stats.
• Total Distance Travelled: MOD displays the total accumulated
distance travelled (including ramps, paths, magic carpets,
parking lots) during the day or since you last reset your stats.
Page 25
MOD User Manual | January 2012 | © 2012 Recon Instruments Inc | All rights reserved | www.reconinstruments.com
Stats history
MOUNTAIN STATS show GPS coordinates and
temperature stats.
N
W
Current
Max
Min
32 18.385
122 36.875
-2 C
5 C
-11 C
• Current Latitude/Longitude: MOD displays your current
coordinates (latitudinal and longitudinal) using GPS data.
• Current Temperature: MOD displays an updated
temperature every 30 seconds.
• Maximum Temperature: MOD displays the highest
temperature for the day or since you last reset your stats.
• Minimum Temperature: MOD displays the lowest
temperature for the day or since you last reset your stats.
Page 26
MOD User Manual | January 2012 | © 2012 Recon Instruments Inc | All rights reserved | www.reconinstruments.com
Jump stats
JUMP STATS tracks your air time, vertical and horizontal
distances and drops using inertial sensors (GPS, Altimeter, and
Accelerometer). MOD automatically keeps track of jumps, slides,
drops or moves where you are in the air for at least 0.6 seconds
whether you are on skis, on a board, kite, blades, or on a bike.
• Press
• Press
stats.
to navigate to JUMP STATS. Press
to select it.
to switch between LAST JUMP and BEST JUMP
JUMP STATS
LAST JUMP
Air Time
Distance
Height
Drop
#31
Air Time: MOD measures (in seconds) the moment you are no
longer touching the ground until impact.
Distance: MOD displays your horizontal distance travelled while you
are airborne.
Height: MOD displays your vertical distance between takeoff and
the highest point of the jump.
Drop: MOD displays your vertical distance between the highest
point of the jump and the landing.
BEST JUMP: This is your best jump of the day (based on maximum
airtime).
Page 27
MOD User Manual | January 2012 | © 2012 Recon Instruments Inc | All rights reserved | www.reconinstruments.com
Preferences
PREFERENCES
Day 8
Begin 10.26 AM
FW version 2.0
MOD displays four preferences menu options to choose from:
Brightness, Set Time, Reset Stats, and Set Units. Press
to navigate between them.
How to access PREFERENCES:
• Press
to access the icon bar. Press until PREFERENCES is displayed.
repeatedly
• Press
to select PREFERENCES. Press
to navigate
between Brightness, Set Time, Reset Stats, and Set Units.
Page 28
MOD User Manual | January 2012 | © 2012 Recon Instruments Inc | All rights reserved | www.reconinstruments.com
Preferences
Set Brightness
Brightness
Set Time
Set Units
Set Language
MOD has three brightness settings: 3 for direct sunlight, 2 for
overcast conditions, and 1 for dark areas or night skiing. By
default, MOD is set to maximum brightness (3).
The red triangle shows the current setting.
How to set brightness:
1. Press
Medium Brightness
Page 29
to select Brightness.
2. Press
to navigate to the setting you want.
3. Press
to confirm your selection. Press to exit.
MOD User Manual | January 2012 | © 2012 Recon Instruments Inc | All rights reserved | www.reconinstruments.com
Preferences
Set time
Brightness
Set Time
Set Units
Set Language
• Use this function to set the clock for the time zone
you are in. Although MOD sets the clock to Greenwich
Mean Time (GMT) as soon as it locks on a signal; the
clock is NOT adjusted for time zones.
• You can also switch between 12-hour or 24-hour time
modes.
To set time:
1. Press
select it.
2. Press
12HR
3. Press
Press
to navigate to Set Time. Press
to
to navigate to the hour or to the minutes.
and
to save.
to adjust the hour or minutes.
4. To change time mode, press to reach 24HR. Press
and
to switch between 12HR and 24HR time modes.
5. Press
Page 30
to save. Press
to exit.
MOD User Manual | January 2012 | © 2012 Recon Instruments Inc | All rights reserved | www.reconinstruments.com
Preferences
Set units
To switch from metric to Imperial units (or vice versa):
Metric
US / Imperial
Page 31
1. Press
to navigate to Set Units.
2. Press
to select Set Units.
3. Press
and
4. Press
to select. Press
to toggle between US/Imperial and Metric.
to exit.
MOD User Manual | January 2012 | © 2012 Recon Instruments Inc | All rights reserved | www.reconinstruments.com
Preferences
Brightness
Set Time
Set Units
Set Language
Page 32
Set Language
To switch from English to French:
1. Press
to navigate to Set Language. Press
2. Press
and
3. Press
to select. Press
to select it.
to toggle between French and English.
to exit.
MOD User Manual | January 2012 | © 2012 Recon Instruments Inc | All rights reserved | www.reconinstruments.com
Preferences
Reset Stats
Reset Stats
Resetting clears displayed stats including Last Run, Performance,
Elevation, Mountain stats and Jumps and Chrono records. Note that a
reset does not wipe the data stored in MOD.
NOTE: Whenever MOD is turned off for six or more hours, it performs
an automatic reset.
To reset your stats:
1. Press
Save and reset stats?
2. Press
Press
Page 33
to navigate to Reset Stats. Press
and
to select it.
to select YES.
to select NO. Press
to exit.
MOD User Manual | January 2012 | © 2012 Recon Instruments Inc | All rights reserved | www.reconinstruments.com
Downloading MOD data to your computer
Perform a download to Recon HQ software to share MOD stats and highlights on HQ
Online. To clear space on MOD, download data after every five days of use. TIP: If your
battery has been draining quickly, perform a download to ensure no data is lost.
To download data from MOD:
1. Turn MOD off by holding down the power button for 2
seconds.
2. Attach the USB cable shipped with MOD Live to your
computer and to MOD. Plug the micro USB cable’s
smaller end into the micro USB port located under the
protective cover on the right side of the goggles. Plug
the USB cable’s larger end into the USB port in your PC
or Mac.
Tip: If your computer does not recognize MOD try
reinserting the USB cable.
NOTE: Recon HQ must be installed on your Mac or PC.
3. Click DOWNLOAD when the prompt DOWNLOAD TRIPS
FROM GOGGLE appears.
IMPORTANT NOTE: Never disconnect while data is
being transferred from MOD to your PC or Mac.
4. After you download, be sure to replace the plastic cap
on MOD’s USB port cover to ensure no water, snow or
ice damages the port.
Page 34
MOD User Manual | January 2012 | © 2012 Recon Instruments Inc | All rights reserved | www.reconinstruments.com
MOD data
Viewing MOD Data
Recon HQ overlays run data collected from MOD onto Google
map images so you can play back, store, and re-live your MOD
activity. Use Recon HQ to log all activity throughout the course
of the season so you can identify performance highlights,
remember your favourite tracks, trails and runs.
Sharing MOD Data
After you download your MOD data, you can upload the best
moments to HQ Online as well as Facebook and Twitter.
Page 35
MOD User Manual | January 2012 | © 2012 Recon Instruments Inc | All rights reserved | www.reconinstruments.com
MOD Troubleshooting FAQ
MOD DISPLAY
You can quickly find solutions by following
steps and advice in this section.
This happens when you leave your goggles stored in a very cold
location (outdoors overnight, in the trunk of a vehicle).
Steps to take:
1. Warm up MOD (with the power turned off) for at least ten
minutes. Move indoors.
Why is my
display blank?
2. If the display doesn’t appear when you turn the power on, charge
up the MOD battery for an hour using the Recon AC adapter.
3. If the problem persists, contact Recon Support at
[email protected]
• Follow us on Twitter: twitter.com/@Reconinstrument
• Follow us on Facebook at facebook.com/reconinstruments.
• Search for Support FAQs at http://support.reconinstruments.com
Why does the display
looked washed out?
This problem is temporary, and it happens after you leave the goggles
are out in the sun. Direct sunlight reacts with the liquid crystal
display.
Steps to take:
1. Move your goggles into the shade, or cover them until the
brightness and colours return to normal.
2. If the problem persists, contact Recon Support at
[email protected]
Page 36
MOD User Manual | January 2012 | © 2012 Recon Instruments Inc | All rights reserved | www.reconinstruments.com
MOD Troubleshooting FAQ
MOD DISPLAY
Why is the display
hard to read?
Why can’t I see the
edge of the display?
MOD’s default brightness setting isn’t for indoor use, night skiing
or dark environments. Use the Preferences menu to change the
brightness setting. MOD will continue recording even when the
display is turned off.
You need to adjust the head of the micro-optic display in the lower
right-hand corner of the goggle frame. Tilt or rotate it. Or tighten the
strap of your goggle.
MOD has a loose or broken connection. It can happen after a bad
crash that damages MOD components.
Why is my display
solid red or green?
Steps to take:
1. Hold down the Power button, wait a few minutes, and then press
this button again.
2. Try recharging MOD.
3. If this does not work, contact Recon Support.
Page 37
MOD User Manual | January 2012 | © 2012 Recon Instruments Inc | All rights reserved | www.reconinstruments.com
MOD Troubleshooting FAQ
MOD DISPLAY
A red icon means there is no connection between MOD and the
remote controller. Whenever the remote controller is more than ten
feet away from MOD, the connection is lost. If you are using MOD
with a different remote controller, a red icon means that MOD isn’t
paired with the remote.
Why does my display
show a red icon?
Steps to take:
1. Bring MOD into close proximity to the remote controller.
Press any button on the remote controller and wait for the icon
to turn blue.
2. Try to re-pair the remote controller. See the instructions in
Pairing a Remote Controller later in this guide.
Why does my display
show the RECON
logo instead of the
dashboard?
Page 38
This happens when you turn MOD back on after it is powered off.
Wait a few seconds for the dashboard to appear, or restart MOD.
MOD User Manual | January 2012 | © 2012 Recon Instruments Inc | All rights reserved | www.reconinstruments.com
MOD Troubleshooting FAQ
MOD DATA
IMPORTANT NOTE: MOD can lose data or lose its connection to the
remote controller due to electromagnetic interference. Sources of
interference include transmission towers, two-way radios, wireless
devices, industrial devices operating on RF frequency as well as
motion sensors, remote controls, and microwave ovens. steps and
advice in this section.
MOD uses GPS technology to determine speed. When you turn on
MOD, you need to wait ten minutes for it to acquire satellite data.
GPS technology works best in open spaces with a 360 degree view of
the sky which gives access to at least three satellites. Being in a valley,
beside a tree, building or rock face can block MOD from getting GPS
coverage. Avoid using MOD inside buildings and gondolas or near
solid obstructions such as trees and rock faces can interrupt GPS
coverage and cause incorrect data to appear.
Why is the speed
value wrong?
Steps to take:
1. Change location. Move to an open location with a clear view of
the sky. If you are in a valley or gulley, move to higher ground.
2. Wait for the GPS indicator icon to show two or three green
signals.
3. If changing location does not help, restart MOD by turning the
power off and on again.
4. If you can’t get a GPS signal, contact Recon Support.
Page 39
MOD User Manual | January 2012 | © 2012 Recon Instruments Inc | All rights reserved | www.reconinstruments.com
MOD Troubleshooting FAQ
MOD DATA
While MOD is waiting for a GPS signal, the dashboard speedometer
displays “--”until it can calculate a valid speed from GPS data.
Steps to take:
Why does the
speedometer show
“--” instead of
numbers?
1. Change location. Move to an open location with a clear view of
the sky. If you are in a valley or gulley, move to higher ground.
2. Wait a few minutes for the GPS indicator icon to show two or
three green signals.
3. Restart MOD by turning the power off and on again.
4. If the problem continues, contact www.reconinstruments.com/
support for support
MOD calculates altitude using a combination of air pressure
and GPS data.
Why is the
altitude wrong?
When MOD is not moving, data from the air pressure sensor is
changed to match the GPS reading. Storms affect air pressure, causing
the altitude to decrease. In clear weather, altitude data will increase.
Steps to take:
1. If you have been sitting or standing in an open area for more than
a half hour, turn MOD off and on.
2. Wait ten minutes, and turn MOD back on.
Page 40
MOD User Manual | January 2012 | © 2012 Recon Instruments Inc | All rights reserved | www.reconinstruments.com
MOD Troubleshooting FAQ
MOD DATA
MOD uses GPS technology to determine statistics. Your location
affects the GPS coverage, for example, being in a valley, beside a tree,
building or rock face.
Steps to take:
Why are my
statistics wrong?
1. Change location. Move to an open location with a clear view of
the sky. If you are in a valley or gulley, move to higher ground.
2. Wait for the GPS indicator icon to show two or three green signals.
3. If changing location does not help, restart MOD by turning the
power off and on again.
4. If your statistics are still incorrect, reset them using the
Preferences menu.
Why does the clock
show the wrong time?
If this is the first time you are using MOD, the clock will show
Greenwich Time. You need to set the clock for your own time zone.
MOD shuts off the clock when the battery level is almost drained.
To reset the time, see Preferences section earlier in this guide.
Page 41
MOD User Manual | January 2012 | © 2012 Recon Instruments Inc | All rights reserved | www.reconinstruments.com
MOD Troubleshooting FAQ
MOD DATA
MOD’s temperature sensor takes some time to adjust to the ambient
air temperature. The thermometer is located inside the wireless
remote. If you are wearing MOD inside a pocket or jacket, the
temperature will be higher than your surroundings.
Why is the
temperature wrong?
Steps to take:
1. Wear the remote on your wrist, goggle outside your jacket instead
of keeping in an inside pocket.
2. Wait a few minutes for MOD’s temperature sensor to adjust.
Try to reset the stopwatch.
Why can’t I get the
stopwatch to start?
Steps to take:
1. Press
turn grey.
once. The timer is set to 0:00:00 and the numbers
2. To start the counter, press
and the numbers turn yellow.
Page 42
again. The timer starts counting
MOD User Manual | January 2012 | © 2012 Recon Instruments Inc | All rights reserved | www.reconinstruments.com
MOD Troubleshooting FAQ
MOD BATTERY
Steps to take:
• Check that you are using the Recon AC adapter and USB cable
included in the MOD box. Check that the AC cable says Recon
Instruments.
Why can’t I get
a full charge?
• Turn MOD off before you recharge.
• Turn on your PC or Mac; make sure it is not in standby mode.
Check that the port on your PC or Mac is a USB 2.0 port
(not a keyboard port).
• During recharging, check that the red light above the USB port
appears. This shows that MOD is still charging.
Extremely low temperatures can account for a quick drain.
At -10°C (14°F), a fully charged battery lasts between 6 to 8 hours.
If the temperature dips below -20°C (-4°F), the charge won’t last
as long.
Why does my battery
drain so quickly?
Tips to prolong battery life:
• Avoid using MOD at temperatures below -20°C (-4°F).
• Turn off the power when you are not using MOD.
• Use the DISPLAY OFF feature when you are not using MOD.
• Turn the brightness down to 1 or 2.
Page 43
MOD User Manual | January 2012 | © 2012 Recon Instruments Inc | All rights reserved | www.reconinstruments.com
MOD Troubleshooting FAQ
MOD BATTERY
Steps to take:
Why won’t my PC or
Mac recognize MOD
when I try to charge it
or transfer data?
1. Check the port you are using on your PC or Mac. You must use the
USB 2.0 port (not a keyboard port).
2. Check that the USB cable connection is tight. Unplug it and then
plug it back in.
3. Unplug MOD from your PC or Mac, turn the power off, wait a few
seconds, and then turn the power on. Then try plugging the USB
cable in again.
SUPPORT
• Email Recon Instruments [email protected]
• Search for Support FAQs at http://support.reconinstruments.com
When you contact Recon for assistance, you need to provide the
following information:
How to contact Recon
for assistance?
• MOD firmware version number. Go to Preferences
and select Settings.
• MOD serial number. See the white sticker on the back of the
MOD battery pack.
• Operating system
• HQ software version
Page 44
MOD User Manual | January 2012 | © 2012 Recon Instruments Inc | All rights reserved | www.reconinstruments.com
MOD Care
Handle MOD with the same care as a smartphone, iPod,
or MP3 player.
• Make sure that MOD is powered off.
STORAGE AND
TRAVELLING
TIPS
• Pack MOD in a separate compartment away from sharp or
hard objects. Do not place items directly on top of MOD.
• Avoid leaving MOD in direct sunlight.
• Avoid leaving MOD in subzero temperatures.
• Keep MOD out of water.
• Store MOD and its accessories away from the reach
of small children.
CLEANING
TIPS
• Use a delicate tool to clear away ice and debris from the remote
controller buttons.
• Avoid touching the optic lens.
• Always use a soft cleaning cloth or lens cloth.
Page 45
MOD User Manual | January 2012 | © 2012 Recon Instruments Inc | All rights reserved | www.reconinstruments.com
Battery
Battery care
Your battery is designed to last up to three years. Follow these
tips on battery care:
• Never recharge the battery in temperatures below 0°C or
above 40° C.
• Allow enough time for MOD to warm up and reach
ambient room temperature before you recharge.
• Never use a different AC adapter and USB cable than what
was shipped with MOD.
• Use DISPLAY OFF mode when you aren’t checking looking
at the dashboard or stats.
Recharging
the battery
NOTE: Whenever the battery warning popup appears, your
unit will be automatically shut down unless you recharge it
immediately.
Recharge the battery immediately to avoid losing data. The
battery must be recharged within ten days.
Before You Start
• Use the Recon AC adapter and USB cable included in the
MOD box. Check that the AC cable says Recon Instruments.
• Check that the port on your PC or Mac is a USB 2.0 port
(not a keyboard port).
Page 46
MOD User Manual | January 2012 | © 2012 Recon Instruments Inc | All rights reserved | www.reconinstruments.com
Battery
To charge using a PC or Mac:
To charge using a power outlet:
1. Make sure your computer is turned on,
and not in stand-by mode.
1. Connect the USB cable shipped with
MOD. Plug the micro USB cable’s smaller
end into the micro USB port located
under the protective cover on the right
side of the goggles
2. Make sure MOD is turned off. If MOD is
on, hold down the MOD power button
for 2 seconds.Connect the USB cable
shipped with MOD. Plug the micro USB
cable’s smaller end into the micro USB
port located under the protective cover
on the right side of the goggles. Plug the
USB cable’s larger end into the USB port
in your PC or Mac. Tip: If your computer
does not recognize MOD, try reinserting
the USB cable.
3. Check that a red light above the USB
port appears. This shows that MOD is
charging. The red USB port light turns off
when MOD is charged.
Page 47
2. Plug the USB cable’s larger end into
either the North American or European
AC adapter shipped with your unit.
3. Plug the AC adapter into a wall outlet.
4. Check that a red light above the USB
port appears. This shows that MOD is
charging. Keep charging until the red USB
port light turns off (which indicates MOD
is fully charged).
MOD User Manual | January 2012 | © 2012 Recon Instruments Inc | All rights reserved | www.reconinstruments.com
Remote
Replacing the remote battery
The remote controller uses a single 3-volt CR2032 battery.
Replace it every 3 years.
To replace the battery:
1. Using a coin or flathead screwdriver, turn counter clockwise
until you reach the unlock symbol.
2. Remove the back cover.
3. Insert a replacement battery.
4. Replace the back cover.
5. Using a coin or flathead screwdriver, turn the cover
clockwise until the arrow aligns with the closed lock
symbol.
Page 48
MOD User Manual | January 2012 | © 2012 Recon Instruments Inc | All rights reserved | www.reconinstruments.com
Remote
Checking which remote is paired
Press the left or right button on the remote. Check MOD’s
display to see if it responds. Note that the remote controller
status indicator should be blue.
Unpairing a remote controller
Follow these steps when you intend to use your remote
controller with a different RECON product or you are returning
the MOD unit or the remote.
To unpair the remote:
1. Hold down the MOD power button for 3 seconds.
2. Press the right and left arrow buttons on the remote
simultaneously until the remote’s orange light flashes.
Page 49
MOD User Manual | January 2012 | © 2012 Recon Instruments Inc | All rights reserved | www.reconinstruments.com
Remote
Pairing a remote controller
Follow these steps when you unpaired a remote controller
by mistake, performed a factory reset, bought or borrowed a
replacement MOD or MOD Live unit.
To pair the remote controller with MOD:
1. Look on the back of the remote controller for the serial
number printed on a white label. Note the ID number.
2. If MOD is turned on, turn off the power button, wait for a
few seconds, and then turn the power button back on.Wait
for the prompt to press the MOD power button. This prompt
may show one or more remote ID numbers.
3. Press the MOD power button to navigate to the remote ID
that corresponds to your remote controller. Each press of
the power button will take you down to the next ID on the
list.
4. Wait for the counter to reach 0, and then press any button
on the remote.
5. Wait for a blue light to flash on the remote.
6. Check that the remote is paired by looking at the status bar.
The remote connection indicator icon should turn blue.
It can take 10 seconds for the remote indicator to turn blue.
Page 50
MOD User Manual | January 2012 | © 2012 Recon Instruments Inc | All rights reserved | www.reconinstruments.com
Regulatory Compliance
FCC Compliance Class B Digital Device
This equipment has been tested and
found to comply with the limits for a
Class B digital device, pursuant to part 15 of the
FCC Rules. These limits are designed to provide
reasonable protection against harmful interference
in a residential installation. This equipment
generates, uses and can radiate radio frequency
energy and, if not installed and used in accordance
with the instructions, may cause harmful
interference to radio communications. However,
there is no guarantee that interference will not
occur in a particular installation. If this equipment
does cause harmful interference to radio or
television reception, which can be determined
by turning the equipment off and on, the user is
encouraged to try to correct the interference by
one or more of the following measures:
•
Reorient or relocate the receiving antenna.
•
Increase the separation between the
equipment and receiver.
•
Connect the equipment into an outlet on a
circuit different from that to which the receiver
is connected.
•
Consult the dealer or an experienced radio/TV
technician for help.
Changes or modifications not expressly approved
by the party responsible for compliance could void
the user’s authority to operate the equipment.
Page 51
FCC Declaration of Conformity
MOD (FCC ID: ZW5006) and Recon-Ready
Remote (ZW5001) comply with FCC standard
CRF 47 Part 15 subpart B and subpart C – section
15.249. Operation is subject to the following two
conditions:
1. This device may not cause harmful
interference, and
2. This device must accept any interference
received, including interference that may cause
undesired operation.
Industry Canada Compliance
MOD and Recon-Ready Remote were certified
with IC numbers 9717A-006 and 9717A-001,
respectively.
These devices comply with Industry Canada licenceexempt RSS standard(s). Operation is subject to the
following two conditions: (1) this device may not
cause interference, and (2) this device must accept
any interference, including interference that may
cause undesired operation of the device.
Cet appareil est conforme avec les normes de
l’Industrie Canada-sans les standards RSS (s).
L’utilisation est soumise aux deux conditions
suivantes: (1) cet appareil ne peut pas provoquer
d’interférences et (2) cet appareil doit accepter
toute interférence, y compris les interférences qui
peuvent causer un mauvais fonctionnement de
l’appareil.
MOD User Manual | January 2012 | © 2012 Recon Instruments Inc | All rights reserved | www.reconinstruments.com
Technical Specifications
Processing
Ports and Connectivity
•
•
Micro-USB 2.0 (5-pin) port for data transfer
and charging
•
Bluetooth® Low Energy (BTLE) wireless user
interface remote control
ARM® 9 core 96MHz
Sensing
•
Global Positioning System (GPS) Receiver
•
Single-axis Gyroscope
•
Tri-axial Accelerometer
•
Temperature sensor
•
Barometric pressure sensor
System Requirements
•
Windows PC: Intel Pentium 4 or higher,
Windows XP, Vista, 7 or higher
•
Mac: Intel Core Duo or higher, Mac OS X v10.6
or later
Capacity
•
Memory: 3.5 MB
Languages
•
4 days of recording
•
English
GPS Receiver
•
French
•
65-Channel Ultra Low Power GPS IC
Environmental Considerations
•
Cold start of 2-3 minutes in typical outdoor
environment
•
RoHS compliant
•
Brominated flame-retardant-free
Multipath detection and suppression
•
Mercury-free
•
Page 52
MOD User Manual | January 2012 | © 2012 Recon Instruments Inc | All rights reserved | www.reconinstruments.com
Technical Specifications
Environment / Mechanical
•
Weight of the unit
~65 Grams (~2.3oz)
•
Storage Temperature range
-20°C to 60°C (-4°F to 140°F)
•
Operating Temperature range -20°C to 30°C (-4°F to 86°F)
•
Vibration resistance
4.4 g rms 5 Hz to 2000 Hz
•
Shock / drop resistance
40 g, 15-23 ms, ½ sine (1 m vertical drop)
•
Enclosure
Water Resistant enclosure, IP65
Power requirements
•
Primary supply voltage
3.7 Lithium Polymer Rechargeable
•
Charge Time
1 hour fast charge to 80% capacity, 3 hours to full
•
Battery size and life
1200 mAHr / 6 Hours
WQVGA- 428X240
Display and Virtual Image
•
Display resolution
•
Display TypeLCD Microdisplay
•
Virtual image size
•
Diagonal FOV10°
•
Color Depth16 Bit
•
Brightness & Contrast control 4 mode brightness, with video chain sleep mode
•
Max Horizontal field of view 8° Vertical FOV: 6°Horizontal FOV
Page 53
11 ” Diagonal from 5 feet away
MOD User Manual | January 2012 | © 2012 Recon Instruments Inc | All rights reserved | www.reconinstruments.com
Warranty information
LIMITED WARRANTY FOR RECON PRODUCTS
These terms and conditions apply to Your purchase of the GPS-enabled module (the “Product”) marketed by Recon
Instruments Inc. (“Recon”). Any reference below to the term “You” refers to the original buyer of any Product.
1.Statutory Warranties. This Limited Warranty sets out Recon’s responsibilities as to the Product. Nothing in this
Limited Warranty affects any rights You may have as a consumer under applicable laws that cannot be disclaimed
or waived, and does not disclaim any statutory or implied rights that Recon cannot disclaim. The laws of certain
jurisdictions or states may state that the manufacturer may not exclude or limit aspects of its liability to the consumer,
and, in such circumstances, the exclusions and limitations of liability in this Limited Warranty will only apply to you to
the extent permitted under applicable laws.
2.Warranty Terms.
a.
Recon warrants to You that the Product will be free from defects in materials and workmanship under normal
use for two (2) year from the original date of purchase by You (the “Warranty Period”). The Limited Warranty is not
transferable by You. All subsequent purchasers acquire the Product “as is” without benefit of this Limited Warranty. Where You purchased the Product from Recon’s website or other online vendors the date of purchase is the date
of the purchase invoice issued to You by Recon or such online vendors by email. Where you purchased the Product
from an authorized reseller at a physical location, the date of purchase is the date of the invoice issued to you at
the physical location.
b.
In the event Recon determines that the Product is defective, Recon may in its absolute and sole discretion:
i.repair the defective part of the Product free of charge with new or refurbished parts;
ii. replace the defective Product with a comparable new or refurbished product; or
iii. in the event that Recon is unable to repair or replace the Product as provided under (i) or (ii), pay a
proportionate refund of the purchase price You paid for the Product.
c.
Where the Product is repaired or replaced during the Warranty Period, except as otherwise prohibited by
applicable laws, the warranty for the repaired or replaced Product, as applicable, will expire upon the expiration
of the original Warranty Period. Any warranty service or support under this Limited Warranty is conditioned upon
Your return of the Product to Recon or its authorized service provider. Where there has been a replacement of the
Product, the Product or its parts, as provided pursuant to the Limited Warranty, becomes Your property and the
Product being replaced becomes Recon’s property. Where there is a refund, You will return the Product to Recon
and such Product becomes Recon’s property.
3.Exclusions. The Limited Warranty does not apply:
a.
to normal wear and tear;
b.
if the Product or any its parts is opened, disassembled, or repaired by someone not authorized by Recon;
c.
if the Product was not purchased from Recon or its authorized retailers as listed on Recon’s website, as such
list may be amended from time to time by Recon;
Page 54
MOD User Manual | January 2012 | © 2012 Recon Instruments Inc | All rights reserved | www.reconinstruments.com
Warranty information
d.
to damages caused by misuse, moisture or liquids, proximity or exposure to heat, accident, abuse, neglect,
misapplication, Your failure to abide by the use, safety, and maintenance instructions contained in the packaging
of the Product, including, without limitation, a failure to follow such instructions regarding use of the Product with
any other equipment, peripherals, or accessories (e.g. goggles) authorized by Recon to be used with the Product, or
repairs or modifications made by anyone other than Recon or its authorized service providers;
e.
to physical damage to the surface of the Product;
f.to any Product where the serial number has been removed or that has been damaged or rendered defective as
a result of misuse, abuse, contamination, improper or inadequate maintenance or calibration, or other external
causes;
g.
to any equipment other than the Product;
h.
to malfunction or defects resulting from the use of the Product in conjunction with accessories, products,
services or ancillary or peripheral equipment not expressly approved or provided by Recon, and where it is
determined by Recon that such malfunction or defect is not the fault of the Product itself; and
i.to any software, whether or not supplied by Recon.
Please review the Product use, maintenance, and safety instructions contained in the packaging, as well as the user
manual online at www.reconinstruments.com. Returns, repairs, or replacements of parts and/or Products may be
subject to shipping, handling, replacement and/or restocking fees. Recon does not warrant that the operation of the
Product will be uninterrupted or error-free.
4.Returning the Product. Recon is the provider of this Limited Warranty. Recon’s warranty contact information can be
found at www.reconinstruments.com. You may need to provide a proof of purchase of the Product, in the form of
the purchase invoice sent to You by Recon or an invoice from an authorized reseller of the Product, to evidence that
You are the original purchaser of the Product. In the event You return the Product to Recon outside of the Warranty
Period, Recon’s standard repair terms and charges may apply. Recon may limit the Limited Warranty to the country
where Recon or its reseller sold the Product to You. You may be responsible for shipping, handling, or other costs if
You request warranty services not in the country of original purchase.
5.Data Recovery. You acknowledge and agree that Recon will not be responsible for any data, software, application,
or information that may be damaged, lost, or destroyed during the course of evaluating, repairing, or replacing the
Product. This Limited Warranty also does not cover backup, recovery, and reinstallation of Your data on the Product.
6.Exclusive Remedies. Repair or replacement of the Product as provided for in this Limited Warranty is the exclusive
remedy provided to You under this Limited Warranty. To the extent permitted by applicable laws, this Limited Warranty
is in lieu of all other warranties or conditions, express or implied. EXCEPT AS SET OUT IN THIS LIMITED WARRANTY
AND AS PERMITTED BY APPLICABLE LAWS, RECON SPECIFICALLY DISCLAIMS ALL REPRESENTATIONS, WARRANTIES,
ENDORSEMENTS, AND CONDITIONS OF ANY KIND, EXPRESS OR IMPLIED, INCLUDING, WITHOUT LIMITATION,
ANY WARRANTIES OF TITLE OR NON-INFRINGEMENT AND ANY IMPLIED REPRESENTATIONS, WARRANTIES AND
CONDITIONS OF FITNESS FOR A PURPOSE, MERCHANTABILITY, MERCHANTABLE QUALITY, SATISFACTORY QUALITY,
Page 55
MOD User Manual | January 2012 | © 2012 Recon Instruments Inc | All rights reserved | www.reconinstruments.com
Warranty information
DURABILITY, OR ARISING FROM A COURSE OF DEALING OR USAGE OF TRADE. SOME JURISDICTIONS OR STATES DO
NOT ALLOW EXCLUSIONS OF IMPLIED WARRANTIES, AND SO THE LIMITATION IN THIS SECTION 6 MAY NOT APPLY TO
YOU. YOU MAY HAVE OTHER RIGHTS THAT VARY FROM STATE TO STATE OR JURISDICTION TO JURISDICTION.
7.Limitation of Liability.
a.
RECON, ITS OFFICERS, DIRECTORS, AGENTS, EMPLOYEES, LICENSORS, SUPPLIERS, SERVICE PROVIDERS,
RESELLERS, AND DISTRIBUTORS (COLLECTIVELY, “RECON” IN THIS SECTION 7) WILL IN NO WAY BE LIABLE TO YOU
FOR ANY INDIRECT, ECONOMIC, SPECIAL, COMMERCIAL, INCIDENTAL, EXEMPLARY OR CONSEQUENTIAL DAMAGES
(INCLUDING, WITHOUT LIMITATION, LOST PROFITS, LOSS OF BUSINESS REVENUE OR EARNINGS, LOST DATA, LOSS
OF OPPORTUNITY, AND DAMAGES CAUSED BY DELAYS OR A FAILURE TO REALIZE EXPECTED SAVINGS) ARISING
FROM OR IN CONNECTION WITH THE USE OR PERFORMANCE OF THE PRODUCT, EVEN IF SUCH PERSON/ENTITIES
IS/ARE AWARE OF THE POSSIBILITY OF SUCH DAMAGES.
b.
IN NO EVENT SHALL RECON’S LIABILITY UNDER THIS LIMITED WARRANTY TO YOU OR TO ANY THIRD PARTY
CLAIMING THROUGH YOU OR ON YOUR BEHALF EXCEED THE PURCHASE PRICE OF THE PRODUCT THAT YOU
PURCHASED OR THE COST OF REPAIRING OR REPLACING THE PRODUCT, WHICHEVER IS GREATER.
c.
THE LIMITATIONS OF LIABILITY SET OUT IN SECTIONS 7(A) AND 7(B) ABOVE IS INTENDED TO APPLY AND DOES
APPLY TO ANY DAMAGES, LOSSES, OR LIABILITY HOWEVER CAUSED, REGARDLESS OF THE THEORY OF LIABILITY
(CONTRACT, TORT, NEGLIGENCE, OR OTHERWISE) AND EVEN IF RECON HAS BEEN ADVISED OF THE POSSIBILITY OF
SUCH DAMAGES, EXCEPT WITH RESPECT TO LIABILITY FOR DEATH, BODILY INJURY, OR LIABILITY FOR INTENTIONAL
OR GROSS NEGLIGENT ACT OR OMISSIONS, FOR WHICH NO LIMIT APPLIES. SOME JURISDICTIONS OR STATE DO NOT
ALLOW THE EXCLUSION OR LIMITATION OF INCIDENTAL OR CONSEQUENTIAL DAMAGES, SO THE LIMITATIONS OR
EXCLUSIONS ABOVE MAY NOT APPLY TO YOU.
d.
THE LIMITATIONS AND EXCLUSIONS IN THIS SECTION 7 APPLY TO THE FULL EXTENT THEY ARE NOT PROHIBITED
BY APPLICABLE LAW WITHOUT THE POSSIBILITY OF CONTRACTUAL WAIVER.
8.Privacy. Information about You that Recon receives or collects (including, without limitation, Your personal contact
information and financial information such as credit card information) will be used, processed, transferred, stored,
and disclosed in accordance with Recon’s privacy policy (available at http://www.reconinstruments.com/corporate/
legal/privacy-statement) for the purpose of resolving problems with the Product and to provide and perform the
services relating to the warranty described in this Limited Warranty.
9.Dispute Resolution.
a.
Arbitration. Any and all disputes, controversy or claims arising out of or in connection with or in relation to
this Limited Warranty or the breach thereof, including any question regarding its existence, validity, performance
or termination and any tort or other common law or statutory claim arising out of or relating to its negotiation,
execution or performance (collectively, the “Dispute”), will be referred to and finally resolved by binding arbitration,
with the losing party paying all costs of arbitration (including reasonable legal fees and expenses) to be conducted
by a single arbitrator in Vancouver, British Columbia, pursuant to the provisions of the Commercial Arbitration Act
Page 56
MOD User Manual | January 2012 | © 2012 Recon Instruments Inc | All rights reserved | www.reconinstruments.com
Warranty information
(British Columbia) and any amendments thereto, and the determination of such arbitrator will be final and binding
upon You and Recon. The arbitration will be conducted in the English language. A judgment on the award of the
arbitrator may be entered into any court having jurisdiction over the party or parties against whom an award may
be issued and each of You and Recon agrees to and hereby waives any defences against the enforceability and
execution of any such judgment awarded by the arbitrator as contemplated in this Limited Warranty. Judgment
on the award of an arbitrator may be entered by any court having jurisdiction over the person or property of the
person against whom enforcement of the judgment is sought. Where arbitration is prohibited by applicable laws,
you and Recon hereby agree to the exclusive jurisdiction of the courts of the province of British Columbia, Canada
with respect to any Disputes relating to this Limited Warranty.
b.
Any arbitrator will be appointed, pursuant to Subsection 9(a) above, by agreement between You and Recon
or, in default of agreement, such arbitrator will be appointed by a Judge of the Supreme Court of British Columbia
sitting in the Courts of Vancouver, upon the application of either such party.
c.
In any arbitration proceeding between You and Recon, it is agreed that the parties will be entitled to discovery
to the same extent permitted by the Supreme Court of British Columbia as if the matter were being adjudicated in
such Court.
d.
You hereby waive all rights to a trial by jury with respect to any claims and issues relating to or arising out of
this Limited Warranty.
10.
Attornment. You waive (a) any right to object to venue or jurisdiction based on inconvenient forum or for any
other reason; and (b) any statutory or other right pursuant to the laws of the jurisdiction in which the You are resident
to have a court case or arbitral hearing relating to this Limited Warranty adjudicated or resolved in that jurisdiction.
Any rule of interpretation, law or regulation that provides that the language of a contract will be interpreted against
the drafter will not apply to this Limited Warranty.
11.
Governing Law. This Limited Warranty will be governed by and interpreted in accordance with the laws of the
Province of British Columbia and the federal laws of Canada as if made and performed by and between parties situate
in such province and without regard to the conflict of law rules that would apply a different body of law.
12.
Severability. Each provision of this Limited Warranty is declared to be a separate and distinct promise
and to be separable from all other such separate and distinct promises. If any promise, provision or part thereof
is determined by a court of competent jurisdiction or other constituted legal authority to be void, unenforceable
or unreasonable in whole or in part, it will not be deemed to affect or impair the enforceability or validity of any
other promise or provision in this Limited Warranty or any part thereof and the said court or other constituted legal
authority will have the authority to limit such promise or provision as it deems proper.
13.
Waiver. The failure by Recon to insist on strict compliance with any provision of these terms and conditions
will not be deemed to be a waiver of such provision, and a waiver of any provision of these terms and conditions at
any one time or times will not be deemed to be a waiver for any other time. The failure of Recon to assert its rights
in a timely fashion for any of its rights or remedies under these terms and conditions will not be interpreted as a
Page 57
MOD User Manual | January 2012 | © 2012 Recon Instruments Inc | All rights reserved | www.reconinstruments.com
Warranty information
novation or a waiver of any subsequent or continuing breach and will not serve to modify, alter or restrict the right of
Recon to assert any rights at any time thereafter
14.
English Language. Except to the extent prohibited by applicable law, You acknowledge and agree that that
this Limited Warranty and any and all related documents be drawn up in English.
15.
Updates and Supplementary Terms. This Limited Warranty may be updated or supplemented by Recon
from time to time. For Products purchased in specific countries, unique terms may replace or modify this Limited
Warranty if so posted on Recon’s website. All terms that are not changed by these unique country terms (if any)
remain unchanged and in effect. Please visit Recon’s website to obtain the latest version of, or supplements or any
country-unique terms to, this Limited Warranty.
Page 58
MOD User Manual | January 2012 | © 2012 Recon Instruments Inc | All rights reserved | www.reconinstruments.com