1
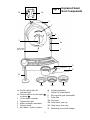
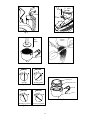
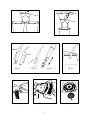
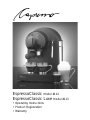
EspressoClassic Model #114
EspressoClassic Luxe Model #113
• Operating Instructions
• Product Registration
• Warranty
CONTENTS
Section
Page
IMPORTANT SAFEGUARDS....................................................................2
LINE DRAWINGS (FIGURES 1-18)...................................................... 3-5
WHO IS CAPRESSO? .............................................................................7
1. The EspressoClassic Coffee Center................................................... 7
2. Capresso Plus Service™ ....................................................................7
3. Equipment ..........................................................................................8
4. Please Do Not! ................................................................................... 8
5. Preparing the Machine ....................................................................... 8
6. Automatic Water Discharge Into Tray................................................. 8
7. Espresso Coffee ..................................................................................8
8. The Coffee Grind ................................................................................9
9. MAKING ESPRESSO .........................................................................9
10. Cleaning Porta Filter and Sieve After Each Use ..............................9
11. Choosing the Right Sieve................................................................10
12. Using Pre-Packed Coffee Pods .....................................................10
13. Frothing and Steaming ...................................................................10
14. MAKING CAPPUCCINO ................................................................10
14a. Frothing Milk for Cappuccino .......................................................11
14b. Increasing Temperature of Frothed Milk ......................................11
14c. Cleaning the Dual Frother ............................................................11
15. MAKING LATTE .............................................................................12
16. Dispensing Hot Water for Tea, Soup, Etc. ......................................12
17. Cleaning .........................................................................................12
18. Cleaning Sieves and Inner Screen .................................................12
19. Decalcifying (with Vinegar) .............................................................12
20. Decalcifying (with Durgol) ...............................................................13
21. Troubleshooting ...............................................................................13
22. Frequently Asked Questions About...Coffee...... .............................14
Frequently Asked Questions About...The Espresso Machine...... ...15
23. Limited Warranty..............................................................................15
Product Registration (mail or fax)..........................................................16
Capresso Customer Service..................................................................17
IMPORTANT SAFEGUARDS
When using electrical appliances, basic safety precautions should always be
followed, including the following:
1. Read all instructions.
2. Do not touch hot surfaces. Use handles or knobs.
3. To protect against fire, electric shock and injury to persons, do not immerse
cord, plugs, or body of machine in water or other liquid.
4. Close supervision is necessary when any appliance is used by or near
children.
5. Unplug from outlet when not in use and before cleaning. Allow to cool before
putting on or taking off parts, and before cleaning the appliance.
6. Do not operate any appliance with a damaged cord or plug or after the
appliance malfunctions, or has been damaged in any manner. Return
appliance to the nearest authorized service facility for examination, repair, or
adjustment.
7. The use of accessory attachments not recommended by the appliance
manufacturer may result in fire, electric shock, or injury to persons.
8. Do not use outdoors.
9. Do not let the cord hang over the edge of a table or counter, or touch hot
surfaces.
10. Do not place on or near a hot gas or electric burner, or in a heated oven.
11. Always attach plug to appliance first, then plug cord into the wall outlet. To
disconnect, turn any control to “OFF”, then remove plug from wall outlet.
12. Do not use appliance for other than intended use.
13. Use extreme caution when disposing hot steam.
14. For household use only.
SAVE THESE INSTRUCTIONS
SPECIAL CORD SET INSTRUCTIONS
1. A short power supply cord is provided to reduce the risk resulting from
becoming entangled in or tripping over a long cord.
2 Longer extension cords are available and may be used if care is exercised in
their use.
3. If an extension cord is used,
a. the marked electrical rating of the extension cord should be at least as great
as the electrical rating of the appliance, and
b. the longer cord shall be arranged so that it will not drape over the counter
top or tabletop where it can be pulled on by children or tripped over.
EspressoClassic
User Components
fig. 1
1a
1b
2
3
4
6
5
6a
inner screen
see fig. 18
7
8
9
11
10b
10a
10c
6a Cylinder (movable)
7 Frother Tip (detachable)
1a On/Off switch with red
indicator light
1b Selector switch for hot water
or steam
2 Lid for water container
3 Thermostat Light
4 Water container, removable
5 Selector knob
6 Hot Water / Frother System
8
9
10a
10b
10c
11
3.
Drip tray with grid (removable)
Porta filter
Pod sieve
Small sieve, one cup
Large sieve, two cups
Measuring scoop with tamper
2 click
insert
1
fig. 2
fig. 3
remove
excess
tamp
slightly
fig. 4
fig. 4a
coffee pod
Standby
Brewing Coffee
fig. 5
fig. 6
special pod sieve
fig. 9
Preheating for steam
steam or hot water
fig. 7
fig. 8
4.
fig. 10
fig. 11
Steam
Froth
Tip
fig. 12
fig. 14
fig. 13
1. lift
fig. 16
fig. 15
2. pull
fig. 17
fig. 18
5.
WHO IS CAPRESSO?
With more than 20 years experience
in coffee equipment for consumers,
I founded Capresso, Inc. in 1994.
My goal is to provide coffee makers
and espresso/cappuccino machines
for the customer who wants a superior
product. Safety, reliability, performance,
and convenience are the cornerstones
of Capresso quality. Our products are
available through selected retailers
who can provide expert advice and
will treat you as a valued customer.
For a listing of Capresso dealers near
you, please check out our website:
www.capresso.com.
I hope you will enjoy your new
Capresso product and will
recommend it to your friends.
Michael Kramm, President
With its moveable cylinder you can
select from "steaming only" (for lattes)
or "steaming and frothing" (for cappuccinos). The extra-long cylinder
allows you to steam directly in tall
latte glasses or in extra large pitchers.
The separate hot water function
allows you to make a cup of hot tea
or instant soup in 30 seconds.
Your EspressoClassic is a true coffee
center. Using the EspressoClassic
reduces the time and effort normally
involved in making espresso and cappuccino. The EspressoClassic comes
equipped with two "regular" sieves as
well as a "pod" sieve. Using coffee
pods eliminates measuring coffee and
facilitates clean-up.
2. CAPRESSO Plus Service™
• HELP CALL 1-800-767-3554
Monday – Friday 9AM to 9PM
Saturday – 9AM to 5PM
Eastern Standard Time
• Email address:
[email protected]
• Fax: 201-767-9684
• Website: www.capresso.com
Our goal is to make sure that all of
our customers are satisfied with
their Capresso purchase. If you
need assistance, call the above
number. Feel free to call any time. If
you are connected to our voicemail,
PLEASE DO NOT HANG UP. Leave
your name, telephone number, and
please say, "EspressoClassic" so we
know what machine you are calling in
reference to. Let us know the best
approximate time to call you back, or
email or fax us at anytime.
Our unique CAPRESSO Plus Service
offers you the following within the first
12 months (within the continental
USA Only):
• Free troubleshooting via telephone
• Free repair or replacement if your
EspressoClassic malfunctions,
including shipping costs both ways
and convenient UPS ARS label.
1. THE ESPRESSOCLASSIC
COFFEE CENTER
Coffee experts consider brewing coffee under high pressure to be the ideal
process to extract maximum flavor
and aroma. The EspressoClassic
produces perfect espresso – coffee
with a thick, foamy layer on top called
"crema." The "crema" traps the fine
aromatics and the light gaseous
flavors that register on the palate. The
"crema" keeps flavor locked in that
would otherwise escape. The high
pressure and short brewing time
prevent the extraction of bitter oils
and release less caffeine than other
brewing methods. For this reason,
many European restaurants serve
"crema" coffee only.
Whether you are brewing a 1 oz. shot
of espresso or a 12 oz. mug of coffee,
your EspressoClassic produces the
absolute freshest and most aromatic
cup of "crema" coffee possible. Not
only will your EspressoClassic make
the perfect espresso, but within seconds the patented DualFrother system
turns your espresso into a delicious
cappuccino or latte.
7.
3. EQUIPMENT
The EspressoClassic comes with:
• Measuring scoop with tamper
• Porta filter
• Small sieve, one cup
• Large sieve, two cups
• Pod sieve
• Removable water container
• Instruction manual
• Mail Order form
locked position. (Do not force past
the "LOCK" position!).
j. Place a cup underneath porta filter.
(fig. 11)
k. Turn selector knob to right "brewing
coffee" position (fig. 6 )
l. Allow 3-4 ounces of water to run
through machine. Turn the selector
knob left back to the "O"-position.
(fig. 5).
4. PLEASE DO NOT!
(Ignoring the following instructions
may result in a VOID of your warranty
protection)
• Do not use coffee pods in regular
sieve; use in pod sieve only.
• Do not force the porta filter past
the locked position.
• Do not attempt to steam/froth with
out pre-warming first.
• Do not run the pump without water
in the water tank.
• Do not try to run the appliance with
a converter on other current or
hertz (HZ) cycle.
6. AUTOMATIC WATER DISCHARGE
INTO TRAY
ATTENTION: The EspressoClassic
heats the water in a stainless steel
lined Thermoblock system. Whenever
you return the selector knob back to
the "O"-position within a few seconds
the machine will start to make noise.
This noise indicates that the machine
is discarding a small amount of warm
"rest" water from the Thermoblock
into the drip tray. (The machine
will do this automatically.) Doing this
eliminates any stale water build-up.
The drip tray holds approximately
16 ounces of water and will overflow
after about 20 cups of espresso.
IMPORTANT: To avoid water overflow
we recommend pulling out and emptying the tray after every 10 cups of
espresso. (fig. 17).
5. PREPARING THE MACHINE:
a. Clean all parts.
b. Lift lid over water tank.
c. Use handle to remove water tank
and fill with cold, fresh water (fig. 2).
d. Insert water tank securely into
place.
e. Turn the machine on (fig.1; 1a). The
red indicator light in the On/Off
switch lights up.
f. When the orange thermostat light
located over the selector knob illuminates, the machine has warmed
up and is ready for use. (fig.1; 3)
g. Place a sieve inside porta filter –
DO NOT ADD COFFEE!
h. Insert porta filter into filter holder by
lining up arrow on thumb guard
with INSERT line (fig. 3 ) Make sure
the thumb guard is pulled back
towards the handle.
i. Lift up slightly and turn porta filter
to the right until it CLICKS into
7. ESPRESSO COFFEE
An espresso is a highly concentrated
coffee beverage (that is the reason, why
most people add a bit of sugar to it!)
Coffee bars use 7 to 8 grams of coffee
per cup. The small sieve (fig. 1; 10b)
holds 7 grams, the large sieve (fig. 1;
10c) holds 15 grams of coffee. A cup
or "shot"of espresso, as it is commonly referred to, is no more than 1
to 1 1/2 oz. Actual brewing time is 20
to 40 seconds. After brewing, the
espresso should have a dense, foamy
layer on top, called "CREMA." The
crema indicates that the espresso is
brewed correctly. It traps the aroma of
the coffee underneath. The two most
8.
important factors for the right espresso flow and the crema production are
• correct grind
• water temperature
9. MAKING ESPRESSO
a. Before making the first cup of
espresso we recommend that you
pre-warm the machine, filter holder,
and cup. Otherwise you may run
the risk that your first cup of espresso
is not as hot as it could be.
b. Insert and lock the filter holder
without a sieve and place an empty
cup underneath spout. Turn selector
knob to the cup position (fig. 6). Let
two or three ounces of water run
into the cup. Turn the selector knob
back to the "O"- position to stop
the flow of water (fig. 5).
c. Remove the porta filter, insert the
sieve and slightly overfill the sieve
with coffee. Use the tamper on the
end of the measuring scoop and
tamp (pack) the coffee slightly
down (fig. 4 ). Do not tamp too hard!
d. Remove any coffee from the rim of
the sieve (fig. 4a).
e. Insert the porta filter and turn to the
right until it is in the locked position
(you will here a "click" as it locks)
(fig. 3).
f. Place a cup underneath the porta
filter and turn the selector knob to
the coffee cup position. Once the
desired amount of coffee has been
dispensed into your cup, turn selector knob back to the "O"-position.
If the grind is too fine, no water or
very little water will pass through the
coffee. The result is no coffee or a bitter
coffee without crema.
CAUTION: Too much pressure!
If no water or very little water passes
through the machine, pressure will
build up. Turn the selector switch
back to the "O"-position and let sit for
a minute. Then remove the porta filter
very slowly, so that the excess pressure can escape. If you remove the
porta filter too fast, hot ground coffee
can jump out of the porta filter.
If the grind is too coarse, water will
pass through too fast. The result is a
weak coffee with little crema.
8. THE COFFEE GRIND
It is very important that your coffee is
ground correctly. Ask your local coffee
store to grind your espresso about
two to three settings coarser than
usual. The vast majorities of coffee
specialty houses have properly maintained grinders and will be able to
accommodate your request.
(Supermarket grinders may not
always be maintained properly. Like
home blade grinders, they may produce
a lot of coffee dust. Coffee dust clogs
the sieve, even if the coffee looks
coarse.) If you have problems with the
flow-through of your coffee call:
HELP CALL: 1-800-767-3554.
g. Remove the cup, add sugar to
taste, and enjoy immediately. (Do
not let an espresso sit for a long
period of time after brewing, as its
temperature will drop rapidly.)
10. CLEANING PORTA FILTER AND
SIEVE AFTER EACH USE
Before making the next espresso:
a. Remove porta filter by turning it
to the left toward the"INSERT"position and release.
b. Tilt thumb guard forward until top is
over sieve and dump used coffee
grinds into garbage (fig. 18 ). If you
fail to place thumb guard over sieve
it will fall into the garbage.
If you prefer to grind your own beans
ALWAYS use a burr grinder. Capresso
offers a range of Burr Grinders which
will grind the coffee perfectly for your
espresso pump machine.
See www.capresso.com
9.
c. Remove sieve from porta filter and
rinse with warm water to remove
any used coffee grinds. Hold sieve
up to light to check if the small
holes are clean.
d. Rinse porta filter with warm water.
**Using coffee pods might not produce as much crema as brewing with
ground coffee.**
One coffee pod normally yields one
serving. If you are making a double
shot you must use two pods. DO
NOT PLACE 2 PODS IN SIEVE AT
THE SAME TIME: to brew a double
shot, you must brew with one pod at
a time, into the same cup.
11. CHOOSING THE RIGHT SIEVE
Your EspressoClassic comes with 3
different sieves. Two "regular" sieves
and one "pod" sieve (see Chapter 12,
"Using Pre-Packed Coffee Pods").
The small (one cup) sieve holds
approximately 7 grams of coffee. This
is normally enough to make one
espresso measuring 1 1/2 oz. or up to a
6 oz. cup of "crema" coffee. The large
(two cup) sieve holds approximately
15 grams of coffee and will produce
an extra strong single espresso, two
espressos, or up to a 12 oz. cup of
"crema" coffee.
Coffee is always dispersed from both
spouts on the porta filter. When making one cup, be sure your cup is centered underneath both spouts. (fig. 11).
When making two espressos or two
cups of coffee, be sure to place two
cups underneath the porta filter (fig. 10).
13. FROTHING AND STEAMING
Use this feature to heat up liquids or
to froth or steam milk for cappuccinos
or lattes.
Before you start:
a. The removable parts of the frother
(cylinder and black tip) are high precision parts (see fig. 12,13, 14). Always
keep these two parts clean and free
of milk residue. The black tip has a
hole on the bottom and two small
holes on the side connected by a
small groove. Make sure that all three
holes and the groove of the tip are
completely free of hardened milk.
Otherwise you won’t get frothy milk
(see chapter 14c for cleaning).
b. Initially the frother tip is attached
more than finger tight at the factory.
Before first use, loosen the tip using a
coin (see fig. 13). Make sure the tip is
screwed on finger tight. If the tip is
sitting loosely on the frother, steam
and air will escape to the sides. You
won’t get frothy milk.
FOR FROTHING: the cylinder of the
frother should be pushed down
(see fig. 12).
FOR STEAMING: the cylinder of the
frother should be pushed up
(see fig. 12).
12. USING PRE-PACKED COFFEE
PODS
The special "pod" sieve allows you to
use pre-packed coffee pods (fig. 9).
Please be sure to use the 45mm
diameter pods with your
EspressoClassic. (These are most
commonly available.) Other sizes do
not work with the EspressoClassic.
ATTENTION: Some pods have a small
tab that sticks out. Be sure to fold the
tab under before inserting the pod
into the pod sieve. (Failure to do so
will result in water spilling out.)
Some coffee pods have a large
paper rim and a "down" and "up"
marking. Cut around the outer rim of
the pod leaving about 3/8 of an inch
around the coffee. Before cutting check
to see which sides goes face down.
14. MAKING CAPPUCCINO
Italian Cappuccino is the combination
of one or two espressos with 3 to 6 oz.
of hot frothed milk. With the
EspressoClassic you can either prepare the coffee first and then froth the
10.
milk, or froth the milk first and then
prepare the espresso directly into the
cup which contains the frothed milk.
14a. FROTHING MILK
FOR CAPPUCCINO
TIP: When frothing milk, make sure
your container has enough room for
the milk froth to expand, e.g. if you
want to steam and froth 6 oz. of milk,
your container should have at least a
12 oz. capacity.
TIP: For a novice it may be easier to
steam and froth with a bit more milk.
No milk will be wasted as it can be
re-used again later. With practice you
will be able to steam even small
amounts of milk directly in your
cappuccino cup and then add the
espresso shot.
a. Fill a pitcher with cold milk.
Note: Always start with cold milk.
Skim milk (0% fat) will produce the
most froth and will let you taste
more of your espresso. 1% and 2%
milk will give you a bit less froth.
Regular milk (3% fat) will produce
half or less than half the froth of
skim milk.
b. Press the selector switch on top of
machine to the steam position
(fig, 1; 1b).
c. Turn selector knob to the pre-heating
position (fig. 7). When the orange
thermostat light illuminates, the
system is ready to froth.
d. Make sure the cylinder of the
frother is pushed down (fig. 12).
e. Immerse the frother into the milk so
that the tip of the frother, including
the small side holes is beneath the
surface of the milk (fig. 15). Make
sure that the frother tip does not
touch the bottom of the pitcher.
f. Turn the selector knob to the steam
position (fig. 8). The machine will
produce steam. Steam output is
continuous.
Note: During steaming you will hear a
slight knocking noise. This indicates
that small water droplets are pumped
into the Thermoblock system to be
transformed into steam.
g. When you have enough hot frothed
milk, turn the selector knob back to
the "O"– position (fig. 5).
h. You can now immediately brew
your espresso coffee and combine
it with the hot frothed milk for a
wonderful cappuccino.
14b. INCREASING TEMPERATURE
OF FROTHED MILK
If your frothed milk is not hot enough,
proceed as follows: Move the cylinder
of the frother up (fig. 12). Immerse the
frother into the frothed milk and continue steaming. Steam will increase
the temperature of the milk without
increasing the froth. Make sure that
the milk does not start boiling. Boiling
will destroy the froth on top of the milk.
14c. CLEANING THE DUAL
FROTHER
Fast Cleaning:
Cleaning the frother takes less than
30 seconds. If you do not clean the
frother after using milk, the milk will
harden and the frother will not be able
to create milk froth the next time you
use it. It is also much more difficult to
remove hardened milk at a later time.
• Clean the outside of the frother
with a damp cloth.
• Hold a container underneath the
frother. Press the selector switch on
top of the machine to the hot water
position
(fig. 1, 1b).
• Turn the selector knob to the steam
position (fig. 8). Let hot water run for
several seconds through the frother.
Thorough Cleaning:
• Unscrew the black tip (fig. 13 & 14).
Make sure that all openings including
the two small side holes and the
groove are free of milk deposits.
• Replace cylinder and screw on tip
finger tight.
11.
making sure that the mesh is free
of coffee oils. Hold sieve up to light
to check if the small holes are
clean. Soak in a mild detergent and
scrub lightly if necessary.
• The inner screen should also be
cleaned. Use a coin to unscrew
inner screen (fig. 18). Wipe inside
clean and replace screen. Make
sure to screw in securely.
15. MAKING LATTE
Latte is similar to Cappuccino. The
difference is that, in general, the milk
added has very little or no froth on top.
• Make sure that the cylinder of the
frother is in the "up" position during
steaming (see fig. 12).
• For detailed steaming instructions
see chapter 14a.
16. DISPENSING HOT WATER FOR
TEA, SOUP, ETC.
You may dispense hot water for
making tea, instant soup, etc. through
the frother.
19. DECALCIFYING (With Vinegar)
For prolonged use of your
EspressoClassic it is necessary to
decalcify the machine regularly.
Calcium (limestone) found in drinking
water will leave deposits in the
machine that may cause clogging.
a. Press the selector switch on top of
the machine to the hot water
position
(fig. 1; 1b).
b. Place a cup or a glass underneath
the tip of the frother.
c. Turn the selector knob to the
steam position (fig. 8).
d. The machine will immediately dis
- pense a fast stream of hot water.
e. To stop the flow of water, turn the
selector knob back to the "O"position (fig. 5).
We highly recommend that you decalcify your machine at least twice a
year or after about 400 uses (= 400
espressos or 200 espressos plus 200
frothing cycles).
Decalcifying Instructions:
MACHINE IS OFF
a. Before you start decalcifying
remove the inner screen (fig. 18).
b. Insert the porta filter without a
sieve and place a large container
underneath the porta filter.
c. Fill the water container with three
cups (24 oz.) of water and 1 1/2
cups (12 oz.) of white household
vinegar.
d. TURN MACHINE ON and pump
about 4 oz. of water through the
portafilter. Stop and let machine
rest for approx. 2 minutes. Repeat
4 times.
e. Now decalcify the frother.
Place a container underneath the
frother. Press the selector switch
on top of the machine to the hot
water position
and turn the
selector knob to the steam position
(fig. 8). Let about 4 oz. of water run
through the steam tube. Then stop
and let machine rest for approx. 2
minutes. Repeat three or four
times.
17. CLEANING
CAUTION: Let the machine cool
down before cleaning. For your safety
we recommend unplugging the
machine before cleaning. Never
immerse the appliance in water or any
other liquid. Never clean appliance
under running water. Never use
scouring agents. To clean:
a. Wipe with a soft, damp cloth.
b. Lift and pull out the drip tray (fig. 17).
c. Clean the grid, drip tray, water tank,
and filter holder under running
water and dry thoroughly. Do not
put drip try in the dishwasher.
d. Rinse porta filter and sieves with
warm, soapy water.
18. CLEANING SIEVES AND INNER
SCREEN
• Clean the sieves with warm water,
12
f. Clean water tank thoroughly, fill
with fresh water and pump half of
the water through the porta filter
and half through the steam tube to
eliminate any vinegar smell or taste.
g. Replace the inner screen and the
steam nozzle.
21. TROUBLESHOOTING
a. My coffee is not hot enough
• See chapter 9 (a).
• Drink your coffee immediately after
brewing.
For cappuccino or latte: make sure
to increase the milk temperature
chapter 14b).
**If using a commercial decalcifying
agent please make sure it is suitable
for drip coffee makers and follow the
manufacturer's instructions.**
b. No coffee or very little coffee
comes through the porta filter
• Make sure the water tank has water
in it and that it is inserted properly.
• Make sure the selector knob
points to the coffee cup position.
• The coffee may be ground too fine,
use coarser coffee (chapter 7).
• The small holes of the sieve may be
blocked, clean sieves (chapter 18).
• The inner screen may be blocked
(chapter 18).
20. DECALCIFYING WITH DURGOL
Capresso and many European companies recommend "Durgol" – a liquid
decalcifying agent that removes
calcium deposits up to 20 times
faster than vinegar.
Prepare the machine as described in
Chapter 19 – steps (a) and (b).
Pour one cup of water, then one cup
of Durgol into the water tank (total of
16 oz.).
a. Turn the machine on and pump
about 4 oz. of water through the
porta filter. Stop and let machine
rest for approximately 2 minutes.
Repeat one more time.
b. Now decalcify the steam tube.
Place a container underneath the
steam tube. Press selector switch
on top of the machine to the hot
water position
and turn the
selector knob to the steam position
(fig. 8). Let about 4 oz. of water run
through the steam tube. Then stop
and let machine rest for approx. 2
minutes. Repeat one more time.
c. Clean water tank thoroughly by filling half way with fresh water. Pump
half of the water through the porta
filter and half through the steam
tube to eliminate Durgol residue.
d. Replace the inner screen and the
steam nozzle.
c. Coffee runs very fast into the
cups with very little crema
• Your coffee may be ground too
coarse. Use a finer grind.
• Make sure the sieve is always filled
completely with coffee.
d. Coffee does not flow into both
cups at exactly the same rate
• Clean the porta filter and the sieve
(chapter 18).
• Make sure the sieve is filled completely and evenly.
• Coffee may be ground unevenly
allowing water to pass through it
faster on one side than through the
other.
e. I am not getting any crema or not
enough crema
• Your coffee is not ground correctly.
If the flow of coffee is too slow, use
a coarser grind, if the flow of coffee
is too fast, use a finer grind.
• When using pre-packed pods you
normally get less crema than when
using ground coffee. Make sure to
use the pod sieve with pods.
13.
f. There is some coffee residue in
the bottom of my cup
• This is normal. With pressure
brewed coffee you will always have
some fine coffee powder in the
bottom of your cup.
• If this bothers you, try pre-packed
coffee pods (chapter 12). The paper
cover acts like a filter.
g. Water and coffee run down on
the side of the porta filter
• Wipe the inner screen with a wet
paper towel.
• Make sure that the rim of the sieve
and the porta filter are free of coffee
grounds before inserting into the
machine.
• When using pre-packed coffee
pods: trim the sides of the paper
cover so that the paper does not
extend outside of the sieve.
h. When using the frother I am not
getting sufficient froth
• If you had sufficient froth before
then some or all of the frother parts
are not clean. See chapter 14c.
• The best froth is made with low or
no fat milk. Using whole milk may
result in a "weaker" froth.
i. The frothed milk is not hot enough
• See Chapter 14b on how to increase
the milk temperature.
22. FREQUENTLY ASKED
QUESTIONS about...
...Coffee
a. Where and how should I store my
coffee?
• Ideally coffee beans should be
ground just prior to brewing.
• Whole coffee beans stay fresh for
approximately two weeks. Store in
a dark, airtight container. Do not
store in freezer or refrigerator.
• Ground coffee loses flavor from
the moment it is ground; be sure to
store in a dark, airtight container.
Do not store in freezer or refrigerator. Ground coffee has a very high
oxidation rate and may take on flavors and aromas from other foods.
b. Should I use dark or light coffee
beans?
• In Italy the beans for espresso are
roasted to a light to medium color
(no oils on the outside). That gives
the espresso a rich, strong taste
without bitterness.
• In the USA most specialty roasters
roast the beans for espresso to a
dark to very dark color with more or
less oils on the outside. This gives
the espresso a more intense and
sometimes bitter taste. Many people
prefer that type roast when drinking
cappuccino or latte since the milk
eliminates some or all of the bitterness.
• Try both kinds and see what you
like best.
c. Can I use the same coffee for
espresso and "crema coffee?"
• Yes, when you brew longer ("Crema
coffee") the taste will be less intense.
You can also brew an espresso and
then add hot water. This is called a
Coffee Americano.
d. Which coffee is better for cappuccino, "French Roast" or
"Italian Roast"?
• This is totally up to you. Try it out.
Normally the "French Roast" is
roasted slightly longer and at a
slightly higher temperature giving it
a stronger and more bitter taste.
e. Can I use coffee that is not
labeled "espresso"?
• Yes you can. Make sure it is
"Arabica" coffee or a blend with
"Arabica" beans. "Robusta" beans
are normally used for drip coffee
and have less aroma.
14.
...the Espresso Machine
f. Can I fill other liquids into the
water tank, such as milk or
sweetened water?
• No, you will destroy the pump and
the Thermoblock system.
Classic machine, model #113 and
#114. This warranty is in effect for
one year from the date of initial consumer purchase, and is limited to the
United States of America. This warranty covers all defects in materials or
workmanship (parts and labor) including UPS ground transportation both
ways, if necessary.
g. Can I use distilled water?
• Yes, although distilled water is free
of important minerals and may give
your coffee a different taste. You can
also use "reverse osmosis" water.
The warranty DOES NOT cover:
• Any machine not distributed by
CAPRESSO within the United States.
• Any machine not purchased from
and Authorized CAPRESSO Dealer.
• Commercial use of the machine.
• Damage caused by accident,
abuse, negligence, misuse, improper
operation or failure to follow
instructions contained in this manual.
• Any service or alteration performed
by an unauthorized person, company,
or association.
h. Can I use the machine overseas
with a converter?
• We do not recommend it. The
machine is designed for 120 volts/
60Hz. Other voltage and Hz cycles
might damage the machine. Also,
Capresso's warranty covers the
United States only (see chapter 23).
i. Can I send the machine to another
country with 120-volt/60Hz configuration?
• Yes, but in case the machine needs
service the transportation costs will
not be covered by Capresso. Our
warranty is limited to the United
States (see chapter 23).
Other limitations and exclusions:
Any implied warranties including fitness for use and merchantability are
limited in duration to the period of the
express warranty set forth above and
no person is authorized to assume for
CAPRESSO any other liability in connection with the sale of the machine.
CAPRESSO expressly disclaims liability for incidental and consequential
damages caused by the machine. The
term "incidental damages" refers to
the loss of the original purchasers
time, loss of the use of the machine
or other costs relating to the care and
custody of the machine. The term
"consequential damages" refers to
the cost of the repairing or replacing
other property which is damaged
when this machine does not work
properly. The remedies provided
under this warranty are exclusive and
in lieu of all others.
This warranty gives you specific
legal rights. Rights may vary from
state to state.
j. I have a small grinder with a
blade. Can I use this grinder to
grind my coffee for this machine?
• Try it. In most cases blade grinders
will create too much "coffee dust".
It will clog the fine holes in the
sieve. The water will not be able to
pass through the coffee. A burr
grinder gives you a more consistent
grind (chapter 8).
k. How long can I leave the
machine on?
• The EspressoClassic is in standby
when not in use. You can leave it
on all day long.
23. LIMITED WARRANTY
This warranty covers your Espresso15.
CAPRESSO EspressoClassic
Product Registration
Please complete this registration after you have used your machine for a
few days. Your information will help us to better serve you in the future.
Thank you for buying from CAPRESSO.
Please print clearly
Last Name_________________________________________________________________
First Name_______________________________________________ ❑ Male ❑ Female
Address___________________________________________________________________
City_________________________________________State_______Zip________________
Your Email Address_________________________________________________________
Purchased from:
❑ Specialty store ❑ Mail order ❑ Department store
❑ Received as gift
❑ Internet company
Name of retailer_____________________________________________________________
Purchase Date_______________ Purchase Price $_____________
Reasons for buying this product:
❑ Concept/Features
❑ Saw it on TV
❑ Retailer recommendation
❑ Print advertising
❑ Recommended by a friend
Do you use an espresso/cappuccino machine regularly?:
❑ Yes
❑ No
I drink (mark all that apply):
❑ Regular coffee
❑ Cappuccino
❑ Latte
❑ Espresso
❑ Hot Chocolate
What other espresso machine did you use before?:
❑ None ❑ Krups ❑ Salton ❑ Gaggia ❑ DeLonghi
❑ Other:______________________________
Would you like more information about our products?: ❑ Yes ❑ No
Your annual household income:
❑ Under $50,000
❑ $50,000 – $100,000
❑ $100,000 – $250,000
❑ $250,000 +
Your age group: ❑ Under 25 ❑ 25–40 ❑ 41–45 ❑ 46-55 ❑ 56-65 ❑ 65 +
Any suggestions on how we can improve this product?
___________________________________________________________________________
___________________________________________________________________________
Would you recommend this product to your friends?: ❑ Yes ❑ No
Mail to CAPRESSO Inc., P.O. Box 775, CLOSTER, NJ 07624
or FAX to: (201) 767-9684.
16.
CAPRESSO CUSTOMER SERVICE
81 Ruckman Road
Closter, New Jersey 07624
HELP CALL: 1-800-767-3554
Fax: 201-767-9684
Email address: [email protected]
Website: www.capresso.com
81 Ruckman Road, Closter, NJ 07624
201-767-3999 • Fax: 201-767-9684
Customer Service: 1-800-767-3554
Email: [email protected]
Website: www.capresso.com
17.