1
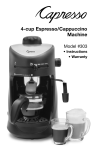
mini-s
Espresso/Cappuccino Machine
Model #302
• Instructions
• Warranty
IMPORTANT SAFEGUARDS
When using electrical appliances, basic safety precautions should always
be followed, including the following:
• Read all instructions.
• Do not touch hot surfaces. Use handles or knobs.
• To protect against fire, electric shock and personal injury do not immerse
cord, plugs, or appliance in water or other liquid.
• Close supervision is necessary when any appliance is used by or near
children.
• Unplug from outlet when not in use and before cleaning. Allow to cool
before putting on or taking off parts, and before cleaning the appliance.
• Do not operate any appliance with a damaged cord or plug or after the
appliance malfunctions, or has been damaged in any manner. Return
appliance to the nearest authorized service facility for examination, repair
or adjustment.
• The use of accessory attachments not recommended by the appliance
manufacturer may result in fire, electric shock or personal injury.
• Do not use outdoors.
• Do not let cord hang over edge of table or counter, or touch hot surfaces.
• Do not place on or near a hot gas or electric burner, or in a heated oven.
• Always attach plug to appliance first, then plug cord into the wall outlet.
To disconnect, turn the selector switch to the "0" position, then remove
plug from wall outlet.
• Do not use appliance for other than intended use.
• Use extreme caution when disposing hot steam.
• Appliances with Glass Containers.
A. The container is designed for use with this appliance. It must never be
used on a range top.
B. Do not set a hot container on a wet or cold surface.
C. Do not use a cracked container or a container having a loose or
weakened handle.
D. Do not clean container with cleansers, steel wool pads, or other
abrasive material.
SAVE THESE INSTRUCTIONS
2
Sleeve
Down:
Frothing
Sleeve
Up:
Steaming
3
SPECIAL CORD SET INSTRUCTIONS
Regarding your Cord Set:
A. A short power-supply cord (or detachable power-supply cord) is to be
provided to reduce risks resulting from becoming entangled in or tripping
over a longer cord.
B. Longer detachable power-supply cords or extension cords are avail able and
may be used if care is exercised in their use.
C. If a long detachable power-supply cord or extension cord is used, (1) the
marked electrical rating of the detachable power-supply cord or extension
cord should be at least as great as the electrical rating of the appliance, (2)
if the appliance is of the grounded type, the extension cord should be a
grounding type 3-wire cord, and (3) the longer cord should be arranged so
that it will not drape over the counter top or table top where it can be
pulled on by children or tripped over.
D. This appliance has a polarized plug (one blade is wider than the other). As a
safety feature, this plug will fit in a polarized outlet only one way. If the
plug does not fit fully in the outlet, reverse the plug. If it still does not fit,
contact a qualified electrician. Do not attempt to defeat this safety feature.
CAUTION:
This appliance is for household use. Any servicing other than cleaning and user
maintenance should be performed by an authorized service representative.
• Do not immerse base in water or try to disassemble.
• To reduce the risk of fire or electric shock, do not remove the base. No user
serviceable parts inside. Repair should be done by authorized service
personnel only.
• Check voltage to be sure that the voltage indicated on the name plate
agrees with your voltage.
• Never use warm or hot water to fill the water container! Use cold water only!
• Keep your hands and the cord away from hot parts of the appliance during
operation .
• Never clean with scouring powders or hard implements.
4
TABLE OF CONTENTS
Page
IMPORTANT SAFEGUARDS............................................................................... 2
ILLUSTRATIONS ................................................................................................. 3
1. WELCOME AND THANK YOU .................................................................... 5
2. HOW TO REACH CAPRESSO ..................................................................... 5
3. DE-PRESSURIZING...................................................................................... 5
4. BEFORE INITIAL USE................................................................................... 6
5. HELPFUL HINTS .......................................................................................... 6
6. PREPARING ESPRESSO.............................................................................. 7
7. PREPARING CAPPUCCINO AND LATTE ..................................................... 8
8. MAKING HOT WATER FOR TEA AND OTHER BEVERAGES ...................... 9
9. CLEANING.................................................................................................... 9
10. DECALCIFYING ............................................................................................ 9
LIMITED WARRANTY ....................................................................................... 10
1. WELCOME AND THANK YOU
Thank you for choosing the CAPRESSO mini-s Espresso / Cappuccino
Machine. The Capresso mini-s is the perfect starter machine for espressos,
cappuccinos and lattes. With a bit of practice you will be able to produce two
to four cappuccinos or lattes at a time. Please watch the enclosed video as it
will give you important hints on how to use the machine successfully and safely.
Please read all of the instructions in this booklet before operating your mini-s.
Understanding and complying with these instructions is essential to ensure that
the machine is utilized without risk and to ensure safety during operation and
maintenance.
2. HOW TO REACH CAPRESSO
Should you require further information or if particular problems occur that are
not covered in this manual, please
• CALL our toll free HELP LINE: 1-800-767-3554 Monday -Thursday 8:30AM to
9PM, Friday 8:30AM to 8PM and Saturday 9AM to 5PM Eastern Standard
Time. Feel free to call at any time. If you are connected to our voicemail,
PLEASE DO NOT HANG UP. Leave your name, telephone number and when
we can call you back. Please also leave the model number of your Capresso
product, in this case it is #302.
• FAX us at 1-201-767-9684
• E-MAIL us at [email protected]
• VISIT our website at www.capresso.com
• WRITE to Capresso Inc., Customer Service, P.O. Box 775, Closter, NJ 07624
3. DE-PRESSURIZING
CAUTION! Never open the boiler cap and never remove the filter holder as long
as there is pressure in the boiler container. In order to check if the machine is
still under pressure follow these steps:
1. The selector switch is in the "0" position and the filter holder is inserted.
2. Place the empty carafe with its lid underneath the filter holder (fig. 8 and 9).
3. Turn the selector switch to the "cup" position. Let all the water process
through the filter into the carafe (during this process the machine will create
quite a bit of steam).
5
4. When there is no more water coming through the filter holder turn the selector
switch back to the "0" position.
5. Hold an empty cup or an empty frothing pitcher underneath the frother (fig. 12).
6. Turn the selector switch to the "steam" position and let steam escape.
7. When no more steam is coming out of the frother, turn the selector switch to
the "0" position.
8. It is now safe to open the boiler cap.
9. Remove the glass carafe and remove the filter holder.
Caution: Never try to remove the filter holder with the carafe in place. Pressure
could force the filter holder down, smashing the carafe and causing severe
injuries. Always remove the carafe first.
Caution: Never leave the Capresso mini-s unattended as long as it is turned on
(red light on). When you are finished, always turn the selector switch to the "0"
position and unplug the machine.
4. BEFORE INITIAL USE
Carefully unpack your Capresso mini-s and remove all packing materials. Wipe
the machine with a damp cloth. Clean the filter holder, the basket and the
carafe with water and wipe dry. The filter holder, the basket, the glass carafe
and lid are dishwasher safe (upper rack, away from any heating element).
Caution: Do not immerse the machine in water or any other liquid. The boiler
cap is not dishwasher safe. Make yourself familiar with the various parts: insert
the basket into the filter holder and insert the filter holder into the machine.
Open and close the boiler cap. Make sure the cord is guided in the back slot
so that the machine sits firmly and flat on an even surface.
5. HELPFUL HINTS
• Espresso Drink: An espresso is a far richer drink with a more intense taste
than regular brewed drip coffee. An espresso is normally 1 1/2 oz. of strong
coffee. Espresso should be served immediately after brewing. Add a little bit
of sugar. If the taste is too strong you can always add a little bit of hot water.
• Preparing espresso is different than preparing regular drip coffee. The mini-s
works under pressure, bringing the water to a boil and then forcing it through
the ground coffee in a short period of time.
• Important: The water in the steam/boiler of the mini-s will get hotter and hotter
during the brewing process. Towards the end of the brewing process the
water will be so hot that it would burn your espresso. Therefore you never
want to process all the water through the coffee as this will result in a burnt
taste (see the video).
• Which Coffee? Any coffee labeled "espresso" is suitable for your mini-s.
Also any coffee with at least 80% Arabica beans is ideal for espresso preparation. Check with your local coffee store.
• Which Grind? Steam boiler espresso machines, such as the mini-s, do not
require a fine espresso grind. For maximum flavor and aroma we recommend
a medium espresso grind or a fine drip grind. If you grind your own coffee we
recommend using a burr or disk/burr grinder. Small blade grinders can create
"coffee dust". Coffee dust can dramatically slow down the water flow during
brewing resulting in bitter and overheated coffee taste.
• Cappuccino: 1 1/2 OZ. of espresso coffee with 3 to 4 oz. of steamed and
frothed milk on top. Sprinkle chocolate shavings or cinnamon on top of the
6
•
•
•
•
milk froth. For a stronger taste increase the amount of coffee. For a milder
taste increase the amount of milk.
Latte: 1 1/2 oz. of espresso coffee with 3 to 4 oz. of steamed milk (very little
or no milk froth).
Frothing: Foamy layer of milk froth on top of hot milk.
Which kind of milk? Skim milk and 1% milk will produce more milk froth
than 2% or regular milk.
Markings on Glass Carafe: The markings on the glass carafe help you in the
preparation of brewing and frothing.
Upper rim of metal band: Maximum capacity of boiler (approx. 11 oz.).
For best results always fill the boiler with 11 oz. of fresh cold water.
4 cup marking: Maximum amount of espresso you should brew (approx.
8 oz.). If you brew more than 8 oz. the coffee will taste burnt. Depending
on the roast you might even want to brew a little less to get a better aroma.
2 cup marking: (approx. 4 oz.). Guideline for a double shot of espresso.
Steam marking: Once the coffee has reached this level there is enough
pressure in the boiler for steaming and frothing.
6. PREPARING ESPRESSO
1. Make sure the machine is plugged in and the selector switch points to the
"0" position
2. Place the filter basket in the filter holder (fig. 2) and fill the basket with
ground coffee, using the measuring scoop (fig. 3). The basket is marked on
the inside indicating "2 cups" and "4 cups". Never overfill the basket. Clear
any excess coffee from the rim of the filter holder.
3. Insert the filter holder into the machine as follows: Line up the arrow on the
thumb guard of the filter holder with the black arrow on the left side of the
brew head. Now insert the filter holder by pushing it upwards and then
moving it firmly to the right (fig. 4).
4. Make sure the arrow of the thumb guard is within the "Lock" marking on
the machine (fig. 1).
5. Fill the glass carafe with approx. 11 oz of with fresh, cold water (to the
upper rim of the metal band).
6. Unscrew the boiler cap by turning it counter-clockwise (fig. 5).
7. Using the glass carafe, fill the boiler container with water (fig. 6) and screw
on the boiler cap firmly (fig. 5).
8. Place the carafe lid on the carafe so that the opening on the lid points
towards the pouring spout of the carafe (fig. 8). Place the carafe on the drip
tray so that the single spout on the filter holder points through the opening
of the carafe lid (fig. 9).
9. Turn the selector switch to the "cup" symbol. The red light will illuminate
and the mini-s will start heating up (fig. 10).
10. After approx. 2 1/2 minutes hot water will start forcing its way through the
filter holder into the carafe. Stand by and turn the selector switch back to
the "0" position when you have enough espresso. To avoid a "burnt taste"
never process all the water through the coffee Once the noise increases
and steam develops around the filter holder, it is time to stop the brewing
by turning the selector switch to the "0" position.
11. Remove the carafe and serve. Add a bit of sugar and enjoy.
12. Important: Place the empty carafe underneath the filter holder and follow
7
the instructions in chapter 3, DE-PRESSURIZING.
13. After de-pressurizing remove the filter holder by turning it to the left. Then
push the thumb-guard of filter holder over the hot rim of the basket. Dumb
the used coffee and rinse the basket and the filter holder under running
water.
7. PREPARING CAPPUCCINO and LATTE
Cappuccino and Latte are the most popular espresso-based coffee drinks. It is
important that you follow the steps below precisely, otherwise you might not
have enough steam pressure to froth and steam milk properly.
1. Follow the steps 1 through 8 in chapter 6. PREPARING ESPRESSO.
2. Make sure the dual frother is screwed on properly and the metal sleeve is in
the "up" position (fig 7).
3. Fill a pitcher with 6 to 8 oz. of cold milk. The pitcher should have at least a
12 oz. capacity. Or fill two cappuccino cups with 3 to 4 oz. of milk each and
set aside. Turn the selector switch to the "cup" symbol. After approx. 2 1/2
minutes hot water will start forcing its way through the coffee into the carafe.
4. When the espresso coffee has reached the "steam" mark on the carafe,
turn the selector switch back to the "0" position. At this time there is
enough pressure and steam build-up in the boiler to froth and steam.
5. Place the frother into the pitcher, so that the black tip is completely
immersed into the milk and the tip does not hit the bottom of the pitcher.
6. Turn the selector switch to the "steam" position. With the metal sleeve in
the "up" position hot steam will be injected into the milk, heating it up.
7. Latte (steaming only): For 4 oz. of milk, steam for about 20 seconds to
warm the milk sufficiently then turn the selector switch back the "0" position.
For 8 oz. of milk, steam for about 35 seconds. Caution: Always return the
selector switch to the "0" position before you remove the pitcher or your
cup from the frother to stop the steam output (If you remove the pitcher or
cup with the selector switch in the steaming position, hot steam will splatter
the milk!).
8. Cappuccino (steaming and frothing): For 4 oz. of milk, steam for about 10 to
15 seconds, then push the sleeve down (fig. 7), while the frother is
immersed in the milk. The frother will now make a "slurping" sound and
milk froth will form on top of the steamed milk. Continue for about 10 to 20
seconds until you have enough froth. Stop the frother by turning the selector
switch to the "0" position.
9. Set the pitcher or the cups with the steamed / frothed milk aside.
10. Continue brewing espresso by turning the selector switch to the "cup"
symbol until the brewing noise increases and steam develops around the
filter holder. Now it's time the stop the brewing process to avoid burning
your espresso coffee. Turn the selector switch to the "0" position.
11. Remove the glass carafe and combine espresso and milk. Add sugar to
taste. Cappuccino: sprinkle the milk froth with cinnamon or chocolate shavings and serve immediately. Now follow steps 11 - 13 under chapter 6
PREPARING ESPRESSO. Wipe the frother clean with a damp cloth.
Tip: When using chocolate milk you can prepare Mocca Latte or Mocca
Cappuccino.
8
8. MAKING HOT WATER FOR TEA or OTHER HOT BEVERAGES
You can use the mini-s to make approx. 10 oz. of extremely hot, delicious tea or to
prepare instant soup. Fill the boiler container with up to 11 oz. of water. Insert the
filter holder into the machine without the filter basket and turn the filter holder to
the right until it hits the right side of the lock area. Close the boiler cap.
For tea: place one or two tea bags in the glass carafe.
Hot instant soup: pour the dry ingredients of the instant soup into the glass carafe.
Place the glass carafe with its lid underneath the filter holder and turn the machine
to the "cup" position. Let all the water pass through. This will take 3 to 4 minutes.
9. CLEANING
• Always unplug the mini-s before cleaning.
• Never use scouring agents.
• Never immerse the mini-s in water. Never hold the machine under running water.
To clean, simply wipe off with a soft, damp cloth.
• Clean the filter basket, the filter holder, and the glass carafe with lid in a hot water
and mild soap solution. For your convenience, the filter holder, filter basket, and
glass carafe can be put in the dishwasher's upper level, away from any heating
element.
• Clean the Frother after each use (be careful it might be still hot). Simply slide the
metal sleeve upwards and unscrew the black tip (fig. 13). Clean under warm
water. Make sure the two small holes on the side and the grove connecting those
two holes are free of any milk deposits. Look through the tip to see if the main
channel is free of any milk deposits. If necessary soak in hot water and use a
safety needle to push out any hardened milk deposits. Replace nozzle.
10. DECALCIFYING
Under normal conditions, it is not necessary to decalcify the mini-s. However, in
some areas where the water is especially hard or if your machine is used very
frequently, calcium (limestone) found in drinking water will leave deposits in the
machine.
When to decalcify Decalcifying is necessary when brewing takes longer than
usual.
CAUTION: Do not use Durgol Decalcifying liquid for the mini-s.
• You can use other decalcifying agents for coffee and espresso makers available
at your local coffee stores or supermarkets, or simply use vinegar and water.
• Using a Phillips screwdriver, remove the stainless steel water screen (9) from the
filter holder (fig. 14).
• Insert the filter holder into the machine without the filter basket.
• Fill the boiler container with 2 oz of vinegar and 6 oz of plain water.
• Place the glass carafe without the lid under the filter holder on the drip tray. Turn
the selector switch to the "cup" position so that the solution runs through the
machine.
• After decalcifying, let the appliance run twice more with plain water. This will rinse
away any remaining vinegar.
• Rinse the carafe and filter holder with luke warm water.
• Using the screwdriver, screw the water screen back into the filter holder.
• Decalcifiers are acids and therefore must be properly handled. Please check the
information on the packaging of the decalcifying agents before using.
9
LIMITED WARRANTY
This warranty covers your CAPRESSO mini-s Model # 302. This warranty is in effect
for one year from the date of the first consumer purchase and is limited to the
United States of America. This warranty covers all defects in materials or workmanship (parts and labor). Capresso will repair or replace your mini-s or parts
thereof within one year from the date of the first consumer purchase.
Capresso will pay for the repair or replacement and the freight back to your
destination within the United States.
The warranty does not cover:
• Any machine not distributed by CAPRESSO within the United States.
• Any machine not purchased from an Authorized CAPRESSO Dealer.
• Commercial use of the machine.
• Damage caused by accident, abuse, negligence, misuse, improper
operation or failure to follow instructions contained in this manual.
• Any service or alteration performed by an unauthorized person, company
or association.
• Any glass parts, including the carafe.
• Any used machines bought at auctions and unauthorized websites.
Other limitations and exclusions:
Any implied warranties including fitness for use and merchantability are limited in
duration to the period of the express warranty set forth above and no person is
authorized to assume for CAPRESSO any other liability in connection with the sale
of the machine.
CAPRESSO expressly disclaims liability for incidental and consequential damages
caused by the machine. The terms "incidental damages" refers to the loss of the
original purchasers time, loss of the use of the machine or other costs relating to
the care and custody of the machine. The term "consequential damages" refers to
the cost of repairing or replacing other property which is damaged when this
machine does not work properly. The remedies provided under this warranty are
exclusive and in lieu of all others.
This warranty gives you specific legal rights, and you may also have other rights
which vary from state to state.
Capresso Inc.
81 Ruckman Road, PO Box 775
CLOSTER, NJ 07624
Tel 1-800-767-3554
Fax 201-767-9864
email: [email protected]
website: www.capresso.com
10