1
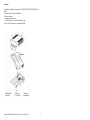
Addonics
T E C H N O L O G I E S
External USB2.0/Firewire Enclosure
Model: AE5IDECSUF, AE5SACSUF
Users Guide
Revision 1.0
FCC Warning Statement
This equipment has been tested and found to comply with the limits for a class
B digital device pursuant to Part 15 of the FCC rules. These limits are
designed to provide reasonable protection against harmful interference in a
residential installation. This equipment generates, uses and can radiate radio
frequency energy. If not installed and used in accordance with the instructions,
it may cause harmful interference to radio communications. However, there is
no guarantee that interference will not occur in a particular installation. If the
equipment does cause harmful interference to radio or television reception,
which can be determined by turning the equipment on and off, the user is
encouraged to try and correct the interference by one or more of the following
suggestions.
• Reorient or relocate the receiving antenna
• Increase the distance between the equipment and the receiver
• Connect the equipment to a different power outlet other than the
one where receiver is connected
• Consult a certified television or radio technician
External USB2.0/Firewire Enclosure Users Guide v1.0
1
Features:
1. Aluminum, Sliding tray design for CD-ROM, CD-RW, DVD-R/RW and
HDD
2. Solid portable and easy installation
3. Stereo earphone
4. Supports plug and play
5. Cooling fan for air ventilation and heat sink
6. No need of side bracket for mounting HDD
External USB2.0/Firewire Enclosure Users Guide v1.0
2
Installation:
1. Loosen the two screws from the rear plate. (Note: the two screws are special
ones, you do not have to loosen them completely to slide out the tray).
2. Press the front panel and push it left/right forward to open the front panel.
The device has to be even with the metal part of the bracket.
3. Connect the 4pin power and the data cable to the drive.
4. Use the enclosed screws to secure the drive on the tray.
5. After the device is installed, slide the tray into the aluminum box and then
fasten the two screws properly on the box.
Connecting the drive to a Computer:
1. Boot-up your computer into the operating system; make sure the
USB2.0/Firewire port from the computer functions well.
2. Connect the power adapter to the drive and the USB or Firewire cable then
turn on the switch.
3. Connect the other USB or Firewire connector end to the computer.
4. Your USB2.0 or Firewire drive is now ready to be use.
5. Follow the software installation for driver installation.
External USB2.0/Firewire Enclosure Users Guide v1.0
3
Windows98, SE
When you plug your device into the USB2.0 or Firewire controller, the OS
should determine a new device has been plugged in and will bring up the new
hardware wizard window. From here you will need to specify the location of the
driver and then browse to the location where you have the drivers saved.
If the drivers are in a floppy diskette, you will need to point the wizard to the
floppy drive to locate and install the driver. Once the driver is loaded, there
should now be a new CD_ROM icon under My Computer if an ATAPI device
is installed. If you installed a hard drive that has already been partitioned, then
you will see a new hard drive icon instead. If you installed a hard drive that has
not been partitioned, e.g., a bran d new hard drive, you will not see a new icon.
In this case, you must partition and format the drive as described below before
you will be able to see the new hard drive icon and be able to access the drive."
Note: brand new harddrives must be partitioned and formatted first.
Ø Firewire connection requires Windows 98SE or higher.
Ø No drivers required for Firewire Connection, Drivers are
built-in on the operating system.
Ø Only USB2.0 connection requires driver under Windows 98.
Windows Me, 2000 or XP
The external USB2.0/Firewire drive is plug and play under these operating
systems. Drivers are built in on the OS. USB mass storage driver from the
system files loads automatically for the USB connection.
NOTE: Install and run your software to support the Optical drives
installed in the External USB2.0/Firewire case. Check with the
manufacturer for more info.
(CD-ROM, DVD-ROM, CDRW, DVD/CDRW, DVD-/+RW are classified
as ATAPI storage devices)
External USB2.0/Firewire Enclosure Users Guide v1.0
4
How to Partition the Hard Disk under Windows 98,SE
Windows comes with a built-in utility called fdisk. This program is used to
partition a large hard drive into smaller virtual drives. One advantage of having
two smaller virtual drives is the decreased downtime while running
applications such as ScanDisk or Defrag.
To use fdisk to partition a hard drive, follow these directions:
1.
To open fdisk, left-click the Start menu, select Run or Hold, and
release the Windows button + R.
2.
At the command line, type "fdisk" (without quotes) and hit Enter.
3. When fdisk opens you'll be asked if you'd like to enable large disk
support. "Y" should already be selected. Hit Enter.
4.
Next, you need to set the current fixed disk drive to equal your newly
installed hard drive. To do this, select 5 from the list and press Enter.
5. Find the number next to your new drive, type it into Enter Fixed Disk
Drive Number, and hit Enter. (In most cases, if you just added a
second hard drive, the number from the list will equal 2. Before you
proceed, double-check that the current fixed hard drive is equal to the
new hard drive you just installed. If it is, you should see any number
other than 1 next to Current Fixed Drive.)
6.
This will take you back to the beginning screen.
7.
From here, select 1 to "Create DOS Partition or Logical DOS Drive"
and hit Enter.
8.
Select 1 to "Create Primary DOS Partition" and hit Enter.
9.
Your computer will begin to verify the new drive's integrity. This
process will only take few minutes to complete.
10. The next screen to appear will ask, "Do you wish to use the maximum
available size for a Primary DOS partition?" Press Y if you only want
to create one partition or N if you'd like to create multiple partitions on
the drive. Then hit Enter.
External USB2.0/Firewire Enclosure Users Guide v1.0
5
Create one partition
1. If you pressed Y, the computer will create the partition and then
transfer you back to the beginning screen. From here, select 4 to
inspect to new hard drive's partition.
Create multiple partitions
1.
If you pressed N, then you're going to create multiple partitions. To do
this, you'll need to set the size of the new partition. This is done by
entering a value next to "Enter partition size in Mbytes or percent of
disk space to create a Primary DOS Partition."
For example, if your new hard drive is 20GB and you'd like to create
two 10GB drives, entering 50% will do just fine. To enter a number in
Mbytes, take the total number in Mbytes and divide it in half to get the
correct number to input. To make thin gs easier, just use a percentage
of the total hard drive and let your computer do the math for you.
2.
When you've finished entering the size of the new partition, hit Enter
to create it.
3. Press Esc to return to the new drives main menu.
4.
From here, select 1 to "Create DOS Partition or Logical DOS Drive."
5.
Now it's time to create the extended partition. To do this, select 2 from
the menu and hit Enter.
6.
A screen that says, "Enter partition size in Mbytes or percent of disk
space to create an Extended DOS Partition" will appear. You should
notice that the computer did the math for you and filled in the
remaining hard drive space to be partitioned. If this number is OK,
press Enter to complete the process. If it's not, and you plan on
creating additional partitions, lower the number accordingly and then
press Enter.
7.
After fdisk creates the partition, press Esc to return to the new hard
drive's main menu.
8.
Before the new extended partition will work, it needs to have a Logical
DOS Drive created on it. To do this, select 1 on the list to "Create
DOS Partition or Logical DOS Drive."
9.
Select 3 from the list to "Create Logical DOS Drive(s) in the Extended
DOS Partition" and hit Enter.
External USB2.0/Firewire Enclosure Users Guide v1.0
6
10. Your computer will then verify drive integrity and automatically
deliver the size of the extended drive. You should see a number next to
"Enter logical drive size in Mbytes or percentage of drive." This
number should equal the size of the extended drive you created earlier.
11. Press Enter to "Create Logical DOS Drive(s) in the Extended DOS
Partition."
12. After hitting Enter, you'll see a new letter assigned to the new partition
you just created.
13. Press Esc to exit this screen and return to main menu.
How many partitions do you have?
1.
To verify the two new partitions were created successfully, select 5 to
"Change current fixed disk drive" and hit Enter.
2.
You should see all the drives on your computer, including the two you
just created.
3.
Hit Esc twice to exit fdisk.
4. You must restart your computer before the new partitions will be
recognized.
How to Format a Hard Disk
IMPORTANT: If you use the following steps on a hard disk that is not empty, all
of the data on that hard disk is permanently deleted.
1.
2.
3.
After the partition there should now be a new drive letter under My
Computer.
Right click on the drive letter and left click Format. A new window
will show up. Select the Full Format option then click Start to
continue.
When the Format is complete, you can now access the drive letter
assigned for the hard drive.
External USB2.0/Firewire Enclosure Users Guide v1.0
7
How to Create a New Partition or Logical Drive
under Windows2000 or Xp
1.
In the Disk Management window, do one of the following:
o
To create a new partition, right-click unallocated space on the
basic disk where you want to create the partition, an d then
click New Partition.
-Or-
o
To create a new logical drive, right-click free space on an
extended partition where you want to create the logical drive,
and then click New Logical Drive.
2.
On the Welcome to the New Partition Wizard page, click Next.
3.
On the Select Partition Type page, click the type of partition that you
want to create, and then click Next.
4.
On the Specify Partition Size page, specify the size in megabytes
(MB) of the partition that you want to create, and then click Next.
5.
On the Assign Drive Letter or Path page, enter a drive letter or drive
path, and then click Next.
6.
On the Format Partition page, specify the formatting options that you
want, and then click Next.
7.
On the Completing the New Partition Wizard page, verify that the
options that you selected are correct, and then click Finish.
Format a Partition or Logical Drive
1.
In the Disk Management window, right-click the partition or logical
drive that you want to format, and then click Format.
2.
Specify the formatting options that you want, and then click OK.
3.
Click OK when you are prompted to confirm the formatting changes.
For more info visit www.microsoft.com
Visit http://www.addonics.com/support/faqs/windows_OS_installation.asp for USB
DOS driver installation.
External USB2.0/Firewire Enclosure Users Guide v1.0
8
Technical Support
If you need assistance to get your unit functioning properly, please call
Addonics Technical Support. Our technical staff will be happy to assist you,
but they will need your help to do so. Calling the technical support staff
without all the proper information can be both time consuming and frustrating.
Here are some tips to help you out:
(1)
(2)
(3)
(4)
MODEL NUMBER – Please have this number on hand.
SYSTEM INFORMATION – Type of computer, peripherals, etc.
OPERATING SYSTEM – What version of Windows?
WHAT’S THE TROUBLE? – Give enough information
About your problem so that we can recreate and diagnose it.
FREE Software Drivers for all Addonics Technologies
Products are available 24 hours per day at the
World Wide Web Site: www.addonics.com.
Contact Information
Addonics Technologies
2466 Kruse Drive
San Jose CA, 95131
Phone:
Fax:
Email:
Internet:
408-433-3899
408-433-3898
[email protected]
http://www.addonics.com
TECHNICAL SUPPORT
Phone:
408-433-3855
Email:
[email protected]
Please use our on-line registration card for your
Warranty registration.
Our web site is www.addonics.com
External USB2.0/Firewire Enclosure Users Guide v1.0
9