1
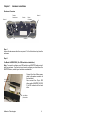
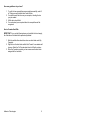
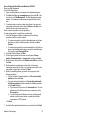
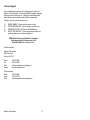
Addonics
TECHNOLOGIES
External USB2.0
Enclosure
For Following Models:
AE5IDECSU2
AE5SACSU2
User Guide
FCC Warning Statement
This equipment has been tested and found to comply with the limits for a
Class B digital device pursuant to Part 15 of the FCC rules. These limits are
designed to provide reasonable protection against harmful interference in a
residential installation. This equipment generates, uses and can radiate
radio frequency energy. If not installed and used in accordance with the
instructions, it may cause harmful interference to radio communications.
However, there is no guarantee that interference will not occur in a particular
installation. If the equipment does cause harmful interference to radio or
television reception, which can be determined by turning the equipment on
and off, the user is encouraged to try and correct the interference by one or
more of the following suggestions.
• Reorient or relocate the receiving antenna
• Increase the distance between the equipment and the receiver
• Connect the equipment to a different power outlet other than the one
where receiver is connected
• Consult a certified television or radio technician
LIMITED WARRANTY
Addonics guarantees that every product is free from physical defects in
material and workmanship during the warranty period specified for each
product when used within the limits set forth in the Specifications section in
the user guide. Unauthorized tempering of the product or using it outside the
scope of the product specifications will result in voiding the warranty. If the
product proves defective during this warranty period, call Addonics Technical
Support to obtain a Return Authorization number. BE SURE TO HAVE
YOUR PROOF OF PURCHASE ON HAND WHEN CALLING. RETURN
REQUESTS CANNOT BE PROCESSED WITHOUT PROOF OF
PURCHASE. When returning a product, mark the Return Authorization
number clearly on the outside of the package and include your original proof
of purchase. Customers are responsible for paying the shipping and handling
of the products to Addonics warranty service location.
IN NO EVENT SHALL ADDONICS’ LIABILITY EXCEED THE PRICE PAID
FOR THE PRODUCT FROM DIRECT, INDIRECT, SPECIAL, INCIDENTAL,
OR CONSEQUENTIAL DAMAGES RESULTING FROM THE USE OF THE
PRODUCT, ITS ACCOMPANYING SOFTWARE, OR ITS
DOCUMENTATION. Addonics makes no warranty or representation,
expressed, implied, or statuary, with respect to its products or the contents or
use of the user guide and all accompanying software, and specifically
disclaims its quality, performance, merchantability, or fitness for any
particular purpose. Addonics reserves the right to revise or update its
products, software, or documentation without obligation to notify any
individual or entity.
Addonics Technologies
2
Contents
FCC Warning........................................................................... 2
Contents.................................................................................. 3
Chapter 1 Hardware Installation ............................................ 4-6
Connecting a Drive to the Computer ......................... 6
Partition Drive in Windows 98, 98SE...................... 7-9
Partition Drive in Windows 2000 & XP ................. 9-11
Technical Support & Contact Information ................................ 12
Addonics Technologies
3
Chapter 1
Hardware Installation
Enclosure Overview
Firewire
Connections
Screw 2
Switch
Power
Connector
Screw 1
Fan
USB Port
Step 1
Loosen the two screws from the rear panel. Pull out the interior tray from the
enclosure.
Step 2
For Model: AE5IDECSU2 (For IDE hard drive installation)
Note: You need to configure your IDE hard drive as MASTER before using it
with the enclosure. If you are not sure how to configure your hard drive as a
MASTER device, contact your hard drive manufacturer.
40-pin IDE
ribbon cable
Connect the 4-pin Molex power
cable to the power connector of
the hard drive.
Also connect the 40-pin IDE
ribbon cable (MASTER DEVICE
0) to IDE connector of the hard
drive.
4-pin Molex
power cable
Addonics Technologies
4
For Model: AE5SACSU2 (For SATA hard drive installation)
Power Connector
(For use with IDE
hard drive only)
SATA to IDE
converter
Connect the SATA hard drive to the
SATA interface of the SATA to IDE
converter. This connection would
provide both power and data
connectivity to the hard drive. It is not
necessary to connect the 4-pin Molex
power connector.
SATA device
converter
Addonics Technologies
attached
to
the
5
Screw holes
Step 3
Use the enclosed screws to
secure the hard drive to the
tray.
Step 4
After the hard drive is installed,
slide the tray back into the
enclosure and then fasten the
two screws properly.
Connecting the Drive to a Computer:
1. Boot-up your computer. Make sure the onboard USB2.0 port from the
computer functions well.
2. Connect the power adapter of the enclosure.
3. Connect the USB connector to the enclosure and the other end to the
computer. Turn on the switch.
4. Follow the software installation for driver installation.
Note: Windows 2000 & XP use built-in drivers. No need to install third-party
drivers.
Addonics Technologies
6
How to Partition the Hard Disk under Windows 98,SE
Windows comes with a built-in utility called fdisk. This program is used to
partition a large hard drive into smaller virtual drives. One advantage of
having two smaller virtual drives is the decreased downtime while running
applications such as ScanDisk or Defrag.
To use fdisk to partition a hard drive, follow these directions:
1. To open fdisk, left-click the Start menu, select Run or Hold, and
release the Windows button + R.
2. At the command line, type "fdisk" (without quotes) and hit Enter.
3. When fdisk opens you'll be asked if you'd like to enable large disk
support. "Y" should already be selected. Hit Enter.
4. Next, you need to set the current fixed disk drive to equal your newly
installed hard drive. To do this, select 5 from the list and press Enter.
5. Find the number next to your new drive, type it into Enter Fixed Disk
Drive Number, and hit Enter. (In most cases, if you just added a
second hard drive, the number from the list will equal 2. Before you
proceed, double-check that the current fixed hard drive is equal to
the new hard drive you just installed. If it is, you should see any
number other than 1 next to Current Fixed Drive.)
6. This will take you back to the beginning screen.
7. From here, select 1 to "Create DOS Partition or Logical DOS Drive"
and hit Enter.
8. Select 1 to "Create Primary DOS Partition" and hit Enter.
9. Your computer will begin to verify the new drive's integrity. This
process will only take few minutes to complete.
10. The next screen to appear will ask, "Do you wish to use the
maximum available size for a Primary DOS partition?" Press Y if you
only want to create one partition or N if you'd like to create multiple
partitions on the drive. Then hit Enter.
Create one partition
1. If you pressed Y, the computer will create the partition and then
transfer you back to the beginning screen. From here, select 4 to
inspect to new hard drive's partition.
Addonics Technologies
7
Create multiple partitions
1. If you pressed N, then you're going to create multiple partitions. To
do this, you'll need to set the size of the new partition. This is done
by entering a value next to "Enter partition size in Mbytes or percent
of disk space to create a Primary DOS Partition."
For example, if your new hard drive is 20GB and you'd like to create
two 10GB drives, entering 50% will do just fine. To enter a number in
Mbytes, take the total number in Mbytes and divide it in half to get
the correct number to input. To make things easier, just use a
percentage of the total hard drive and let your computer do the math
for you.
2. When you've finished entering the size of the new partition, hit Enter
to create it.
3. Press Esc to return to the new drives main menu.
4. From here, select 1 to "Create DOS Partition or Logical DOS Drive."
5. Now it's time to create the extended partition. To do this, select 2
from the menu and hit Enter.
6. A screen that says, "Enter partition size in Mbytes or percent of disk
space to create an Extended DOS Partition" will appear. You should
notice that the computer did the math for you and filled in the
remaining hard drive space to be partitioned. If this number is OK,
press Enter to complete the process. If it's not, and you plan on
creating additional partitions, lower the number accordingly and then
press Enter.
7. After fdisk creates the partition, press Esc to return to the new hard
drive's main menu.
8. Before the new extended partition will work, it needs to have a
Logical DOS Drive created on it. To do this, select 1 on the list to
"Create DOS Partition or Logical DOS Drive."
9. Select 3 from the list to "Create Logical DOS Drive(s) in the
Extended DOS Partition" and hit Enter.
10. Your computer will then verify drive integrity and automatically
deliver the size of the extended drive. You should see a number next
to "Enter logical drive size in Mbytes or percentage of drive." This
number should equal the size of the extended drive you created
earlier.
11. Press Enter to "Create Logical DOS Drive(s) in the Extended DOS
Partition."
12. After hitting Enter, you'll see a new letter assigned to the new
partition you just created.
13. Press Esc to exit this screen and return to main menu.
Addonics Technologies
8
How many partitions do you have?
1. To verify the two new partitions were created successfully, select 5
to "Change current fixed disk drive" and hit Enter.
2. You should see all the drives on your computer, including the two
you just created.
3. Hit Esc twice to exit fdisk.
4. You must restart your computer before the new partitions will be
recognized.
How to Format a Hard Disk
IMPORTANT: If you use the following steps on a hard disk that is not empty,
all of the data on that hard disk is permanently deleted.
1. After the partition there should now be a new drive letter under My
Computer.
2. Right click on the drive letter and left click Format. A new window will
show up. Select the Full Format option then click Start to continue.
3. When the Format is complete, you can now access the drive letter
assigned for the hard drive.
Addonics Technologies
9
How to Partition the Hard Disk under Windows 2000 & XP
How to use Disk Management
To start Disk Management:
1. Log on as administrator or as a member of the Administrators group.
2. Click Start, click Run, type compmgmt.msc, and then click OK. In the
console tree, click Disk Management. The Disk Management window
appears. Your disks and volumes appear in a graphical view and list
view.
3. To customize how you view your disks and volumes in the upper and
lower panes of the window, point to Top or Bottom on the View menu,
and then click the view that you want to use
How to create a new partition or a new logical drive
To create a new partition or logical drive on a basic disk:
1. In the Disk Management window, complete one of the following
procedures, and then continue to step 2:
• To create a new partition, right-click unallocated space on the basic
disk where you want to create the partition, and then click New
Partition.
• To create a new logical drive in an extended partition, right-click free
space on an extended partition where you want to create the logical
drive, and then click New Logical Drive.
2. In the New Partition Wizard, click Next.
3. Click the type of partition that you want to create (either Primary
partition, Extended partition, or Logical drive), and then click Next.
4. Specify the size of the partition in the Partition size in MB box, and then
click Next.
5. Decide whether to manually assign a drive letter, let the system
automatically enumerate the drive, or do not assign a drive letter to the
new partition or logical drive, and then click Next
6. Specify the formatting options you want to use by using one of the
following procedures:
• If you do not want to format the partition, click Do not format this
partition, and then click Next.
• If you want to format the partition, click Format this partition with
the following settings, and then complete the following procedure
in the Format dialog box:
a. Type a name for the volume in the Volume label box. This is an
optional step. Click the file system that you want to use in the
File system box.
b. You can change the disk allocation unit size, and then specify
whether to perform a quick format, or enable file and folder
compression on NTFS volumes.
Click Next.
7. Confirm that the options that selected are correct, and then click Finish.
Addonics Technologies
10
The new partition or logical drive is created and appears in the appropriate
basic disk in the Disk Management window. If you chose to format the
volume in step 6, the format process now starts.
How to format a basic volume
To format a partition, logical drive or basic volume:
1. In the Disk Management window, right-click the partition or logical drive
that you want to format (or reformat), and then click Format.
2. In the Format dialog box, type a name for the volume in the Volume
label box. This is an optional step.
3. Click the file system that you want to use in the File system box. If you
want, you can also change the disk allocation unit size, specify whether
you want to perform a quick format, or enable file and folder compression
on NTFS volumes.
4. Click OK.
5. Click OK when you are prompted to format the volume. The format
process starts.
Addonics Technologies
11
Technical Support
If you need assistance to get your unit functioning properly, please call
Addonics Technical Support. Our technical staff will be happy to assist you,
but they will need your help to do so. Calling the technical support staff
without all the proper information can be both time consuming and
frustrating. Here are some tips to help you out:
(1)
(2)
(3)
(4)
MODEL NUMBER – Please have this number on hand.
SYSTEM INFORMATION – Type of computer, peripherals, etc.
OPERATING SYSTEM – What version of DOS/Windows
WHAT’S THE TROUBLE? – Give enough information about your
problem so that we can recreate and diagnose it.
FREE Software Drivers for all Addonics Technologies
Products are available 24 hours per day at the
World Wide Web Site: www.addonics.com.
Contact Information
Addonics Technologies
2466 Kruse Drive
San Jose CA, 95131
Phone:
Fax:
Email:
Internet:
408-433-3899
408-433-3898
http://www.addonics.com/sales/query/
http://www.addonics.com
Technical Support
Phone:
408-433-3855
Hours:
8:30-6:00 PST
Email:
http://www.addonics.com/support/query/
Addonics Technologies
12