1
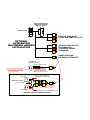
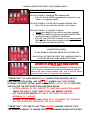
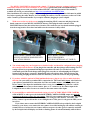
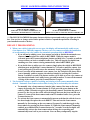
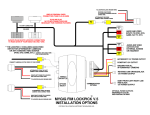
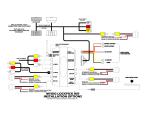
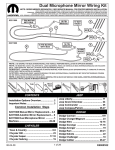
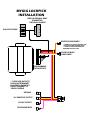
MYGIG LOCKPICK
INSTALLATION
UNPLUG ORIGINAL GRAY
CONNECTOR
THEN PLUG IN HERE
PLUG INTO RADIO
REVERSE CAM POWER
** CONNECT TO FACTORY REVERSE CAM
TO ALLOW VIEWING IN OTHER GEARS
** SEE INSTALLATION INSTRUCTIONS
REGARDING FACTORY CAM
FRONT OR BABY
CAM POWER
PROGRAMMING
DIP SWITCHES
** THESE ARE OUTPUTS
FOR AN AFTERMARKET
BLUETOOTH PHONE KIT
DO NOT CONNECT TO
VEHICLE WIRING
GROUND
12V CONSTANT OUTPUT
12V ACC OUTPUT
TELEPHONE MUTE
UNPLUG ORIGINAL WHITE
CONNECTOR IF PRESENT
THEN PLUG IN HERE
PLUG INTO RADIO
AUDIO
IN
AUDIO
IN
VIDEO
IN
OPTIONAL
AV9003MYGIG
MULTIMEDIA HARNESS
INSTALLATION
AUDIO
OUT
AUDIO
OUT
VIDEO
OUT
CAMERA
VIDEO IN
TO ADD A SINGLE
AFTERMARKET CAMERA
TO LOCKPICK HARNESS GROUND
NOTE: CAMERA WIRING COLORS AS SHOWN
ARE FOR COASTAL ELECTRONIC MODEL EL1CCDCAM
OTHER 12V CAMERAS MAY BE SUBSTITUTED
- CHECK OTHER CAMERA INSTRUCTIONS
FOR PROPER CONNECTIONS
FRONT CAMERA
AUDIO AND VIDEO INPUTS
TO IPOD, DVD, GAME, SAT TV, ETC.
CONNECT REAR CAM POWER TO
LOCKPICK ORANGE REVERSE 12V+
IF FOR FRONT CAM, CONNECT TO
ORANGE WITH STRIPE BABY CAM 12V+
CONNECT FRONT/BABY CAM POWER TO
LOCKPICK ORANGE W/STRIPE BABY CAM 12V+
CONNECT GREEN TO GROUND
IF MIRROR IMAGE IS NOT DESIRED
TO LOCKPICK GROUND
IF FRONT/BABY AND REAR CAMERAS ARE TO
BE INSTALLED AT THE SAME TIME,
USE A "Y" CONNECTOR AS SHOWN
REAR CAMERA
CONNECT REAR CAM POWER TO LOCKPICK ORANGE REVERSE 12V+
FRONT/BABY CAM WITH AFTERMARKET REAR CAM
AUDIO AND VIDEO OUTPUTS
FOR CONNECTION
TO EXTERNAL SCREEN
OR HEADREST
CAMERA VIDEO INPUT
FOR ADDING AFTERMARKET
Coastal Electronic Technologies, Inc.
Chrysler/Dodge/Jeep
MYGIG LOCKPICK V.2
Installation and Operation Instructions
Thank you for your purchase of the Coastal Electronic Technologies, Inc. MYGIG LOCKPICK V.2.
The MYGIG LOCKPICK V.2 has many features and capabilities to unlock and allow full use of your
Chrysler/Dodge/Jeep MYGIG radio. This can include:
• The ability to use your navigation system without restrictions including the ability to input
addresses, search points of interest, etc. while in motion.
• You can also enjoy full use and video viewing of your DVD player(s) and Rear Seat Entertainment
(VES) Aux input jacks (if equipped), while in motion if you desire.
• Even if your car does not already have rear seat entertainment with AUX input jacks, the Lockpick
can provide full multimedia audio/video inputs. With an optional cable harness you can plug in your
video iPOD, Zune, gaming or computer system and view them on demand and while in motion.
• The Lockpick interface will automatically or manually turn on the REAR VIEW CAMERA
function of your MYGIG radio. Plug in our AV9003MYGIG multimedia harness and an
aftermarket camera and automatic rear views are placed on your screen while in reverse. You can
also manually turn on the camera, even in Park or Drive !!
• Already have a FACTORY REAR VIEW CAMERA (PARKVIEW)? The Lockpick lets you add full
control of your factory camera. Now you can turn it on while in any gear and while in motion with a
single connection provided by the Lockpick . Monitor a trailer, car or anything behind you at any
time!!
• The Lockpick is Front camera ready and will allow activation manually or it can automatically
display a front camera view at low speeds to aid in parking.
• Accessory and power for 2 Cameras are built in to the Lockpick harness
• The MYGIG LOCKPICK will activate Uconnect and Voice modes in NAVIGATION radios where
the functions are currently blocked.
• The Lockpick will enable the use of an aftermarket Bluetooth handsfree kit in non-nav radios.
This manual will document in detail, the many functions of the MYGIG LOCKPICK v.2 and how to
properly set the programming switches to your desired operation. Installation diagrams are included to
guide you in various connection strategies. Please read this manual fully so that you can learn to take
advantage of all of the exciting features and capabilities of the MYGIG LOCKPICK v.2
The MYGIG LOCKPICK v.2 is plug and play for unblocking of DVD/AUX/NAV/ VIDEO/AUDIO
INPUT/FRONT AND REAR CAMERAS. Factory Rear View Cameras are fully supported for automatic
viewing while in reverse, but will require the connection of the REVERSE power source included in your
harness if you want to view them on demand such as when you are in DRIVE or Park.
For applications where the user will be adding a rear or front view camera, or for creating a multimedia
system complete with video/audio inputs and video/audio outputs, an optional cable (AV9003MYGIG) is
necessary. This cable contains the connections needed for aftermarket cameras and multimedia operations.
It can also provide headrest A/V outputs or multimedia inputs for creating aftermarket Rear Entertainment
systems or for simply connecting your video iPOD or gaming system etc.
At this time, Coastal Electronic Technologies, Inc. would like to recommend that you have this
installation completed by a certified mechanic or someone familiar with automotive electronics. This
installation, while not time consuming, does require careful attention to detail and precise following
of installation instructions.
Coastal Electronic Technologies, Inc. accepts no responsibility due to the improper installation or
use of this product. Installation and / or use of this product implies and signifies user acceptance of
this term of use. Please adhere to all driving laws in your state.
OK, let’s get started. On your MYGIG LOCKPICK control box are switch settings which allow you to program your Lockpick for the features
you would like to enable. The diagram below will detail the function of each. More than one switch may be turned on at a time to create the feature list
you desire. Default setting when shipped is 1, 2, and 3 down, the rest up. This turns on all options for high speed communications in vehicles with a
navigation radio. If your system is the low speed communication type, is not a navigation radio, or already has rear seat entertainment present, then
adjust the switches as shown in the following diagrams and photos. Improper switch settings will not damage anything however it could cause your
radio to fail to turn on or conflict with existing accessories.
5. BLOCK VIDEO IN
MOTION (DEALER MODE)
1. COMMUNICATION
TYPE **CHECK APP GUIDE**
Place switch 1 UP if your
vehicle uses LOW SPEED
communication
Place switch 1 DOWN if your
vehicle uses HIGH SPEED
communication
2. RADIO TYPE
Place switch 2 UP if your
MYGIG radio does not have
navigation (NAV) button
Place switch 2 DOWN if
your MYGIG radio does
have a NAV button
(navigation)
3. NON-NAV MYGIG
UCONNECT SETTING
Place switch 3 UP if you DO
NOT have the Uconnect
buttons active on your
non-nav MYGIG radio
Place switch 3 DOWN if you
DO have working Uconnect
buttons on your non-nav
MYGIG radio
**ALL NAVIGATION
EQUIPPED VEHICLES
WILL PLACE SWITCH 3
IN THE DOWN POSITION
Place switch 5 DOWN to
BLOCK all Video viewing
while in motion.
Navigation address input and
camera use while in motion is
not blocked.
4. VES MODE
Place switch 4 UP if you wish to
add the VES (rear entertainment
mode) to your radio to enable
VIDEO and AUDIO inputs
Place switch 4 DOWN if you
already have the factory rear
entertainment system
APPLICATION GUIDE
ADDITIONAL VEHICLES MAY APPLY OR BE ADDED LATER
IMPORTANT VEHICLE COMMUNICATION
PROGRAMMING SETTINGS
IDENTIFY YOUR VEHICLE FROM THE APPLICATION GUIDE BELOW AND
PLACE SWITCH 1 UP OR DOWN AS DIRECTED BEFORE PLUGGING IN THE LOCKPICK
LOW SPEED APPLICATIONS
SWITCH 1 UP
2007 – 2009
CHRYSLER SEBRING
2007 – 2009
DODGE AVENGER
2008-09
CHRYSLER 300 AND 300C
2008-09
DODGE DURANGO
2008-09
CHRYSLER ASPEN
2008-09
DODGE CHARGER
2008-09
DODGE DAKOTA
2008-09
JEEP GRAND CHEROKEE
2008-09
JEEP COMMANDER
2008-09
CHALLENGER
2009
PATRIOT/COMPASS
HIGH SPEED APPLICATIONS
SWITCH 1 DOWN
2008-09
CHRYSLER TOWN AND COUNTRY
2008-09
DODGE CARAVAN
2007 – 2009
DODGE NITRO
2008-09
JEEP LIBERTY
2007-2009
JEEP WRANGLER
2009
JOURNEY
2009
DODGE RAM
Vehicles can be engineered to operate with different types of communication systems.
Chrysler/Dodge/Jeep uses two types of systems in current year models. The MYGIG LOCKPICK is
designed and programmed to operate in any MYGIG capable vehicle regardless of communication
type, however switch 1 must be configured properly to identify the proper system before plugging in
the interface. Consult the list above and position switch 1 to the proper orientation before plugging
in the LOCKPICK module. Placing the switch in the wrong position will cause the radio to fail to
turn on. If you accidentally connect the interface with the wrong switch setting, it is recommended
that you turn the car off and completely unplug the interface and radio harness before properly
setting the programming switches on the interface.
NAVIGATION RADIO UPDATING
The MYGIG navigation radio can be updated by placing an update disk in the player. The
radio will recognize that the disk is an update disk and begin the process of loading automatically.
Radio updates are provided periodically by the radio manufacturer to address problems which
have been recognized in the normal operation of the radio and also to increase features which may
have been created since your vehicle was purchased. We have complimentary updates disks
available at no charge for the MYGIG navigation radio if you need or desire one. Demonstrations
are available on the website at http://www.coastaletech.com/MYGIG_SOFTWARE.htm
Very early versions of the MYGIG navigation radios may be unable to add the VES (rear
entertainment) mode created by the LOCKPICK without updating the radio software.
COMMON SWITCH SETTINGS AND COMBINATIONS
DEFAULT SHIPPED SETTING
SWITCH 1 DOWN - HIGH SPEED communication
• Place UP if LOW SPEED communication required for your
vehicle – see application guide
SWITCH 2 DOWN - NAVIGATION equipped MYGIG radio
• Place 2 UP if your radio does not have a NAV button
SWITCH 3 DOWN – UCONNECT function
• Always place DOWN if your radio is navigation equipped
• Always place DOWN if your non-navigation MYGIG radio
already has factory UCONNECT operational
• Place UP if the UCONNECT buttons on your non-navigation
MYGIG radio do not work or display a message that they
have not been activated when pressed
ADD SWITCH 4 DOWN
IF VES MODE IS ALREADY PRESENT IN YOUR CAR
*DO NOT LEAVE SWITCH 4 UP IF YOU ALREADY HAVE A
FACTORY REAR ENTERTAINMENT SYSTEM
ADD SWITCH 5 DOWN TO BLOCK VIDEO IN MOTION
(Dealer Mode)
The MYGIG LOCKPICK will still enable navigation use while in motion,
create VES mode and enable aftermarket camera installations with the
ability to view camera video on demand. DVD, SAT TV and VES video in
motion is blocked as may be required in some installations.
**IMPORTANT** IF YOUR RADIO IS NOT NAVIGATION EQUIPPED OR IS A
NON-NAVIGATION MODEL AND DOES NOT ALREADY HAS THE FACTORY
UCONNECT FEATURE ACTIVE, MAKE SURE SWITCH 3 IS IN THE UP POSITION
AND FOLLOW THE INITIALIZATION SEQUENCE BELOW.
• AFTER PLUGGING IN THE LOCKPICK TO YOUR NON NAVIGATION MYGIG,
CRANK THE CAR UP, THEN TURN IT OFF AND REMOVE THE KEY.
• LET THE VEHICLE REMAIN OFF WITH THE DOORS CLOSED FOR A
MINIMUM OF 1 MINUTE.
• RETURN TO THE VEHICLE AND CRANK IT UP TO ENABLE THE UCONNECT
BUTTON OPERATION NECESSARY FOR THE LOCKPICK
**IMPORTANT** SET SWITCH SETTINGS BEFORE PLUGGING LOCKPICK INTO
THE WIRING HARNESS TO INSURE PROPER PROGRAMMING WHEN INITIALIZED
The MYGIG LOCKPICK is designed with a simple “T” harness connector, equipped with factory male
and female connectors for direct connection to your screen. Specific links with videos demonstrating
methods of gaining access to the rear of the standard MYGIG radio and placement of the module is
available for viewing at various links at: http://www.coastaletech.com/MYGIG.htm
Most installations are relatively simple with just a single panel surrounding the radio which must be pulled
free before exposing the radio. Remove 4 screws holding the radio to view the connectors on the rear of the
radio. Consult a professional installer if you require assistance plugging in your Lockpick.
1.
With access to the rear of the screen, unplug the matching GRAY connector and plug it into the
female connector of your MYGIG LOCKPICK harness. Then plug the male connector of the
LOCKPICK harness into the earlier factory location. The connectors are keyed and cannot be plugged
in to the wrong location. Press hard and make sure the connector is fully seated.
PLUG GRAY CONNECTOR FROM
MYGIG LOCKPICK HARNESS INTO
LOCATION SHOWN
PLUG WHITE CONNECTOR INTO
LOCATION SHOWN
(IF USING OPTIONAL A/V CABLE)
2. The switch settings for your Lockpick were detailed earlier and should be configured before plugging
the controller into the harness. If you plug in the controller and then change switch settings, the new
settings will not be programmed and improper operation will result. To reset the box if you
accidentally perform switch changes while plugged in, turn the car off and unplug the Lockpick
harness from the factory connector. Momentarily place all switches down. Then set them to the
desired setting and plug the harness back in to the factory connector to lock in the programming.
3. If you have added the optional AV9003 multimedia harness, plug in any video or audio desired at
this time. On your cable are standard RCA connections for Video and Audio inputs. Also labeled on
your cable are standard RCA connections for Video and Audio outputs. Additionally there is an
RCA Camera Video input for installations where a rear view camera is being added to a vehicle
aftermarket. To also connect a front camera, place a “Y” connector on the camera input of the
Lockpick harness to allow 2 sources to connect to the same camera video input.
4. If you would like to enable full control and viewing of your FACTORY REAR VIEW CAMERA
while in DRIVE or other gears, the included REVERSE CAMERA POWER output wire must be
connected as the power source for your camera. This 12V power output will turn on when the vehicle
is placed in reverse and also when selected by the user using the radio buttons. Currently, your
factory camera is powered from the reverse taillight source. This power is only present while you are
in reverse.
If you choose not to connect the REVERSE CAMERA POWER wire provided by the Lockpick
harness to your factory rear camera, the rear camera view while backing up will continue working as
normal. However, because the rear camera will have no power in other gears, it cannot be activated
by the Lockpick and will display as a blank or flashing picture if activated manually while in Drive.
5.
6.
7.
8.
Installation of the REVERSE CAMERA POWER wire to enable factory camera operation in all
gears is simply a matter of running a wire to the factory camera and connecting it in place of the
original power wire. Remove any panels covering the rear hatch in your vehicle. Then use a meter or
indicator lamp to determine the reverse power connection on the factory camera connector. Make
sure you are measuring directly on the connector at the camera location and not further back in a
different location. This wire will switch to 12V while the vehicle is in REVERSE and will be zero at
other times. Then cut this wire and connect the REVERSE CAM 12V+ power connection from the
Lockpick to the camera directly. Do not reconnect the original camera power source wire or fail to
cut the wire at the camera. Instead tape it up and disregard it. The Lockpick will provide all
necessary power and timing for the factory camera. Failing to cut the wire or connecting the
Lockpick power and factory power at the same time could cause the reverse tail light to illuminate at
improper times. Also, cutting the wire at a different location other than directly on the camera
connector could possibly interrupt power to other functions such as the actual reverse taillights or
rear obstacle detection systems.
If you do not currently have a rear view camera and want to add one to your vehicle, the Lockpick
makes it easy. The REVERSE CAM 12V power output provided on the Lockpick will be your
source for powering the 12V needs of your aftermarket camera. Also, a GROUND connection is
already provided for you on the Lockpick harness to make powering your camera simple. For
aftermarket installations, the AV9003MYGIG multimedia harness is available to provide a common
RCA video input for your camera picture to plug into.
If you want to add a front camera to your vehicle, the Lockpick is prewired and programmed for
exciting options. The Lockpick harness has a 12V power output labeled BABY CAM POWER and is
specially designed to automatically provide the power needs of your front camera or to provide
power and control of an interior baby camera if desired. Connect the power needs of your front or
baby cam to the BABY CAM POWER output and attach the GROUND connection of your camera
to the GROUND connection provided for you on the Lockpick harness. Connect the front or baby
cam video to the camera input provided on the AV9003MYGIG multimedia harness. If you are
adding two aftermarket cameras (front and rear) to your vehicle, you will need to install a common
RCA “Y” cable to the camera video input of the AV9003MYGIG camera connection so that 2 videos
sources can connect to a single RCA video input.
Also present on your Lockpick harness is a 12V ACC output connection. This ACC output is created
by the Lockpick and can be used as a convenient 12V switched power source for many of your
accessories. It is rated for a constant 2.5 AMPs and will automatically turn on and off at the proper
times of your vehicle use. If your power needs are greater than 2.5 Amps, you may use the
CONSTANT 12V output conveniently provided by the Lockpick harness and switch it on and off
through a relay powered by the ACC power output of the Lockpick harness.
Your Lockpick harness also contains a telephone MUTE connection. If your radio is not a navigation
capable MYGIG, the MYGIG LOCKPICK can enable easy connection of an aftermarket Bluetooth
handsfree kit to your radio without relays or complicated wiring. Your aftermarket Bluetooth kit
requires connections for constant 12 power, acc switched power, ground, mute, and line level audio
inputs. The standard Lockpick harness already provides the power and mute connections needed for
your Bluetooth kit so hookups are quick and simple. A separate audio input cable with factory
connectors is available (MYGIGBLUE) to allow simple plug in connections for your Bluetooth audio.
**NOTE: The connections for 12V Constant Battery power (YELLOW), ACC Ignition power (RED), GROUND
(BLACK), Reverse power(ORANGE), Front/Baby cam power (ORANGE W/STRIPE), Mute (PINK) are
provided as a BONUS in your wiring harness for you to use when connecting additional accessories such as a
DVD player, Game, Cameras, Radar detector, Bluetooth handsfree kit etc., without worry that they might drain
your battery when the car is turned off. The ACC wire can power up to 2.5 Amps constant. Higher loads should
be connected with a relay.
** Do not attach the Constant or ACC wires directly to the vehicle wiring or ignition switch. The
Lockpick is plug and play for standard DVD/AUX/NAV/VIDEO/AUDIO/CAM unblocking and does
not require connections for power or ground. Connecting these Lockpick outputs to the vehicle wiring
can damage the unit and cause improper operations.
MYGIG LOCKPICK OPERATION INSTRUCTIONS
PRESS UCONNECT 2X:
TURN ON REAR CAMERA
TURN OFF ANY CAMERA CURRENTLY ON
HOLD TO CHANGE DEFAULT SETTINGS
AFTER REAR CAMERA IS ON
PRESS POWER 2X:
TURN ON BABY/FRONT CAMERA
PRESS 2X AGAIN TO TOGGLE BACK TO REAR CAM
***The MYGIG LOCKPICK has many features which are preset and ready to go right out of the
box. You are free to change each of these options to limit or expand the operations according to
your installation needs or desires.
DEFAULT PROGRAMMING:
1. When your vehicle is placed in reverse gear, the display will automatically enable a rear
view camera view. This fully supports a factory rear view camera or allows the installation
of an aftermarket rear view camera for automatic operation while in REVERSE.
• If you will not be adding a rear view camera and wish to disable the automatic rear
camera view, first place the vehicle in REVERSE. While the camera mode is
activated, press the Uconnect(telephone) button and hold it for 7 seconds or until the
screen returns you back to standard radio view. This will stop the Lockpick from
enabling rear view camera viewing automatically when in REVERSE gear.
• If you decide later to add a rear view camera, simply place the vehicle in REVERSE
and then press and hold the Uconnect button for 7 seconds or until the camera view
is activated again. This will restore the automatic viewing enabled by the Lockpick.
• Even if you turn off the automatic rear camera view, the Lockpick will always allow
you to manually enable a camera when desired simply by pressing the Uconnect
button 2x within 2 seconds. This feature enables you to turn on a rear view camera at
any time desired and view it while in any gear and in motion. To turn off the manual
viewing of the camera, press the Uconnect button 2x again.
2. The Lockpick is always capable of enabling and viewing a front camera manually when
desired. Automatic front camera action while slowing can be activated by the customer.
• To manually view a front camera or interior baby camera, first turn on the rear
camera by pressing the Uconnect button 2x. Then press the power button on the
radio 2x within 2 seconds to toggle to the front/baby camera. Each time the power is
pressed 2x, the view on the screen will switch/toggle between the front and the rear
camera. To turn off the front camera and return to standard radio views, press the
Uconnect button 2x.
• To activate the front camera to automatically turn on each time the vehicle slows to
less than 8 mph, first place the car in DRIVE. Then activate the front camera
manually by first turning on the rear camera (Uconnect 2x) and then toggle to the
front camera by pressing the Power button 2x. While the front camera is manually
enabled, press and hold the Uconnect button for 7 seconds. Now the Lockpick will
automatically activate the front camera when driving slow or parking and
automatically turn it off as you accelerate. You can always temporarily stop the
camera view and return to the standard radio view by pressing the Uconnect button
2x. The front camera will then stop displaying until the vehicle accelerates past 8 mph
and then slows to below 8 mph again.
• To stop the front camera from automatically activating while the vehicle is below
8mph and return to manual only activation, first place the vehicle in PARK and
activate the front camera manually. Then press and hold the Uconnect button for 7
seconds or until the front camera view is removed and the radio returns to its
standard view. You can restore the automatic front camera activation at any time you
desire by following the activation instructions in the section above.
3. The Lockpick will automatically enable DVD or AUX input VIDEO viewing while in any
gear or speed. Further, if your radio is equipped with Navigation capabilities, the Lockpick
will automatically enable address input, POI searches, etc. while the vehicle is in motion
without restriction.
• If your radio has never shown a VIEW VIDEO selection due to dealer prep, the
Lockpick will restore this function automatically the first time the vehicle is turned
on with the Lockpick installed.
• If you wish to require a button press to maintain discreet operations or to block
another driver from discovering the video in motion operations, the automatic
enabling can be stopped or restored very easily. While the radio is in the DVD mode,
press and hold the Uconnect button for more than 7 seconds and then release it. Now
if you place the vehicle in DRIVE, the VIEW VIDEO button is no longer
automatically enabled. To manually enable the VIEW VIDEO button while in Drive,
the user can simply press the radio power button 2x and the VIEW VIDEO button
will again appear and be available for selection. Double press the power button again
and the VIEW VIDEO button will disappear from sight. Also, while in the manual
activation mode, the navigation address input while in motion is blocked until the
user presses the power button 2x.
• To restore automatic VIDEO VIEWING and navigation radio address input without
any button presses, place the radio in DVD mode. Then press and hold the Uconnect
button for more than 7 seconds. Now all blocked functions are again enabled
automatically and fully selectable in any gear or at any speed.
4. The Lockpick is capable of creating a VES (rear entertainment) mode in vehicles which do
not already have a factory system.
• The VES mode created by the Lockpick is already configured as a full multimedia
source with Audio and Video inputs enabled. The video viewing of the VES video
input is automatically enabled or can be set for manual operation by following step 3
instructions.
• To operate the Lockpick VES mode, press the RADIO/MEDIA button until the mode
labeled VES is displayed at the top of the screen next to the AUX tag. If you press the
touch screen button for VES you will be shown an on screen button for VES MODES
at the bottom of the display. Press this button and touch screen buttons for AUX IN 1
will be displayed and can be selected. During VES mode, the Lockpick will activate
the VIDEO and AUDIO input provided on the AV9003 multimedia cable. Owners of
factory rear seat entertainment systems are familiar with these AUX inputs, but now
even vehicles without multimedia inputs can add this exciting addition and plug in
their AUDIO and VIDEO accessories. This can include a video iPOD, satellite TV,
gaming systems, extra DVD or other Audio/Video sources.
• If you wish to stop the Lockpick from creating the VES mode completely, unplug the
interface module while the radio is off, and set switch 4 on the interface to the down
position. When you plug the module back in and restart the car, the VES mode will
no longer be active. The VES mode can be restored by simply setting switch 4 back to
the UP position while the module is unplugged, and then plugging it back in and
restarting the car.
5. The Lockpick will support the installation of an aftermarket Bluetooth handsfree kit and
activate an audio input for phone conversations when the handsfree kit is engaged in a
phone call. This Lockpick feature is created in non-navigation model MYGIG radios when
switch 3 is in the UP position on the Lockpick module.
• When a call is in progress, the radio screen will switch to a phone view and display
“BLUETOOTH CALL ACTIVE” and when combined with the optional
MYGIGBLUE cable, the sound from the call will be heard through the sound system.
• When the phone call ends, the radio will seamlessly return to its prior function.
Thank you for your trust in Coastal Electronic Technologies, Inc.
Installation Q & A:
1.
I installed the Lockpick and now my radio does not turn on.
Check switch 1 on the interface and correctly set it for the vehicle type (see application chart).
Check to make sure you have fully inserted the Gray connectors behind the radio.
2.
I installed the Lockpick and now I want to add a rear/front/baby view camera to my car/SUV/van etc.
There is a separate harness available (AV9003MYGIG) for easy camera and aux video and audio input.
3.
When I put the car in Reverse, the radio screen blanks out. I do not have a rear view camera.
The Lockpick automatically activates a rear view camera input for your radio. If you do not intend to
install a rear view camera or do not want it activated automatically, refer to step 1 of the Operations
Instructions included in this document to disable the automatic function.
4.
I installed the Lockpick and now my factory VES rear entertainment is intermitting.
Check switch 4 on the interface and correctly set it to the DOWN position so it will not conflict with factory
VES.
5.
My radio does not have a VIDEO button viewable at any time. Will the Lockpick work for this car?
The Lockpick will enable the video function regardless of whether it is currently activated.
6.
I do not have a navigation radio. Will the Lockpick turn on the Uconnect and voice recognition functions?
No, these radios do not have the hardware internally to receive Bluetooth or provide support for voice
recognition. The Lockpick will remove the error message displayed when the buttons are pressed on these
radios, however the radio itself cannot perform Bluetooth functions or voice recognition. The Lockpick
allows simple installations of aftermarket Bluetooth kits or a factory kit can be purchased and added.
7.
I press the Uconnect button on my non-nav radio and I see an error message saying the feature is not active?
The Lockpick will remove the error message if switch 3 is in the UP position. If it was set down by
accident,, then unplug the module and set 3 to the UP position and reinstall the module. Follow the
initialization procedure described on the switch settings example page and let the vehicle remain
undisturbed for at least 1 minute with all the doors shut and the key out of the ignition. When the car is
restarted, the buttons will no longer show an error message.
8.
I turned on the VES AUX video or one of the Camera functions created by the Lockpick and all I see is a
flashing picture or blank screen when I try to look at the video.
This means you don’t have anything connected or do not have the device (cam, DVD, iPOD, etc.) turned on
to supply a video input. The radio screen will be blank or flash when there is no video from your connected
device. So, if you select the VES AUX or a front or rear camera, the screen will search for a picture and
may flash. Common solutions for camera pictures are normally resolved by rechecking the power
connections and insuring that all cameras are powered by the connections provided on the Lockpick
harness. This includes the factory rear view camera if you wish to view it while in a gear other than
Reverse. Also, check to make sure you have fully inserted the White connector on the optional AV9003
multimedia cable into its location on the radio and the video connections for your device are plugged in.
Connectors not fully inserted may create intermitting operations.