1
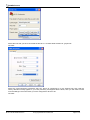
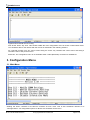
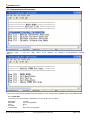
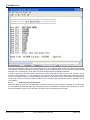
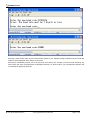
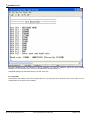
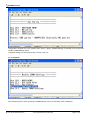
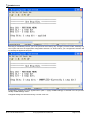
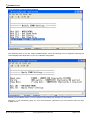
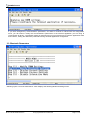
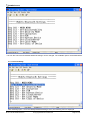
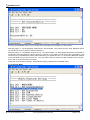
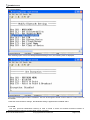
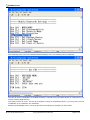
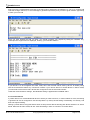
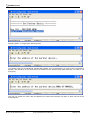
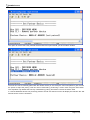
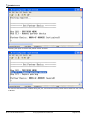
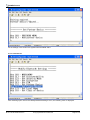
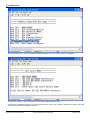
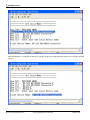
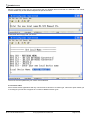
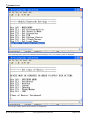
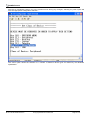
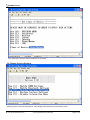
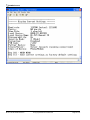
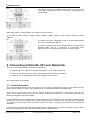
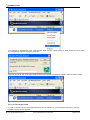
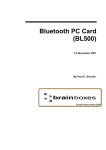
Print Date: 11.04.2003
Product Manual
BL-521 RS232 Bluetooth Converter
Version: 3.2
Brainboxes Limited, Unit 3C, Wavertree Boulevard South, Wavertree Technology Park, Liverpool, L7 9PF, UK
Tel: +44 (0)151 220 2500 Fax: +44 (0)151 252 0446 Web: www.brainboxes.com Email: [email protected]
Table of Contents
1. Introduction ...................................................................................................................................................3
2. Changing Settings ..........................................................................................................................................3
2.1. Configuration features at a glance.............................................................................................................3
2.2. Accessing the configuration menus. ..........................................................................................................3
3. Configuration Menu. .......................................................................................................................................6
3.1. Main Menu ..............................................................................................................................................6
3.2. Communications Parameters ....................................................................................................................7
3.2.1. Baud Rate.........................................................................................................................................7
3.2.2. Data bits.......................................................................................................................................... 12
3.2.3. Parity .............................................................................................................................................. 13
3.2.4. Stop Bits ......................................................................................................................................... 14
3.2.5. Applying Communications Settings ................................................................................................... 16
3.3. Bluetooth Parameters ............................................................................................................................. 17
3.3.1. Discoverability ................................................................................................................................. 18
3.3.2. Security Mode ................................................................................................................................. 19
3.3.3. Encryption ....................................................................................................................................... 21
3.3.4. PIN ................................................................................................................................................. 21
3.3.5. Partner Device................................................................................................................................. 24
3.3.6. Client Server ................................................................................................................................... 29
3.3.7. Local Device Name.......................................................................................................................... 30
3.3.8. Device Class ................................................................................................................................... 34
3.4. Display Factory Settings ......................................................................................................................... 37
3.4.1. Updating Factory Settings ................................................................................................................ 39
3.5. Restoring Factory Settings...................................................................................................................... 41
3.6. Disabling Interactive Menu...................................................................................................................... 42
3.7. Resetting BL-521 ................................................................................................................................... 43
3.8. Troubleshooting the configuration menu .................................................................................................. 43
4. Physically connecting BL-521 to your RS232 device....................................................................................... 43
4.1. Configuring the communications parameters............................................................................................ 43
4.2. Physically connecting your device to BL-521 via the RS232 connector ...................................................... 43
5. Connecting to/from BL-521 over Bluetooth. .................................................................................................... 44
5.1. “Cable Replacement” ............................................................................................................................. 44
5.2. Server : Connecting TO BL-521 from a remote Bluetooth device. .............................................................. 48
5.2.1. Discover the device.......................................................................................................................... 49
5.2.2. Secure the relationship .................................................................................................................... 49
5.2.3. Connect to the profile ....................................................................................................................... 50
5.2.4. Connect your application to the COM port ......................................................................................... 51
5.3. Client: BL-521 is the Bluetooth device which initiates the connection......................................................... 51
6. Upgrading.................................................................................................................................................... 52
7. Regulatory Information ................................................................................................................................. 52
7.1. Important Notice for use in France and Italy ............................................................................................. 52
7.2. Rest of World......................................................................................................................................... 52
8. Index ........................................................................................................................................................... 53
BL-521 manual Release Rev5.doc
© Copyright Brainboxes Limited 2003
Page 2 of 54
1. Introduction
Brainboxes BL-521 RS232 Bluetooth Adapter is a fully embedded, stand-alone Bluetooth solution, which will
Bluetooth enable any device with an RS232 port. Unlike many of Brain Boxes wide range of Bluetooth products, BL521 does not require any additional Bluetooth software.
For many applications BL-521, when used in combination with another Bluetooth product (e.g. Brain Boxes USB
adapter connected to a PC with Brain Boxes Bluetooth Software Suite) essentially replaces the cable, thus freeing
the device from the limits imposed by the cable specification. The connection uses Bluetooth security to ensure that
sensitive data is not “sniffed” by any unauthorised source, although this feature can be turned off.
BL-521 is designed as a cable replacement product. It’s primary function is to offer “point to point” Bluetooth
capabilities to devices which otherwise do not have the capacity for such behaviour. This capability is configured by
a “set and forget” interface, which is not designed to cater for multiple device connection scenarios. BL-521 is only
capable of connecting to one other Bluetooth device at a time.
It is user configurable to baud rates between 244 and 1.3Mbaud in steps of 244, with no, odd, or even parity, and
with 1 or 2 stop bits. Its default factory settings are 115,200 baud, no parity, 8 data bits and 1 stop bit.
A convenient hardware reset button can be used to reset various functionality of the device including a restore of
factory settings.
We trust that if you adhere to the following procedures you will enjoy many years of useful service from your
Brainboxes Bluetooth Converter.
2. Changing Settings
This device contains a comprehensive set of Bluetooth and COM port features which can be changed from an easy
to use “bulletin board” type configuration menu. This section gives full details about the changes that can be made,
how to make them, and the implications the changes will have on the manner in which your BL-521 behaves.
2.1. Configuration features at a glance
Below is a quick list of the configuration options that are available from the interactive menu. They will be covered in
more detail later in this section.
?? View/Set local COM port settings (baud rate, parity, stop bits)
?? View/Set Discoverability, Security mode and PIN number
?? View/Set Pairing options (including pairing to another BL-521)
?? View/Set Client/Server configuration (Client connects to Server – important if “pairing” 2 BL-521’s)
?? View/Set Local Device Name and Device Class
?? View all “factory” and modified settings plus local Bluetooth Address
?? Disable/enable configuration menu
?? Permanently update “factory” settings
2.2. Accessing the configuration menus.
The BL-521’s configuration menus are available at any time that there is no Bluetooth radio connection
established with another device. As soon as a Bluetooth connection is made, the data sent to BL-521 will be sent
over the radio link to the remote device. As soon as the Bluetooth connection is broken, the configuration menu’s
become available again.
Sending a single “Carriage Return” character to the BL-521 activates the initial main menu.
BL-521 manual Release Rev5.doc
© Copyright Brainboxes Limited 2003
Page 3 of 54
The example given below to connect to the configuration menus is performed in Windows using HyperTerminal, a
terminal application that ships with Windows. If you are using a different operating system, you will need a similar
“terminal” or “tty” type application (e.g. minicom), which talks directly to a serial port in that operating system.
First, connect BL-521, along with the supplied gender changer, to an available serial port on your computer. In
this example, we use COM1.
Ensure the power adapter is connected and switched on (the LED’s on the BL-521 should come on).
Start HyperTerminal by clicking “Start\All Programs\Accessories\Communications\HyperTerminal”. Some
versions of Windows have a slightly different sequence of clicks, or do not install HyperTerminal by default.
Please refer to your operating system instructions for more details.
If you are running HyperTerminal for the first time you will be prompted for information about your location. This
section must be filled in, but is not used for our purposes, so you are free to add anything here.
The next screen is just to name this instance of the connection. You are free to name this as anything except an
existing device name (e.g. COM1).
Click OK
BL-521 manual Release Rev5.doc
© Copyright Brainboxes Limited 2003
Page 4 of 54
Select the Port that you have connected the BL-521 to. All other fields will then be “greyed out”
Click OK
Select the communications parameters that your device is configured to. In this example we have used the
factory defaults normally applied. If you have previously reconfigured these values, then you will need to make
sure the settings here match those you have configured to device to be.
Click OK
BL-521 manual Release Rev5.doc
© Copyright Brainboxes Limited 2003
Page 5 of 54
HyperTerminal should now be running.
Now hit the “Enter” key once. This should activate the main configuration menu as shown in Main Menu below.
You should be able to now interact with the menus as described in the following sections.
As a general principle, from any menu screen hitting the “Enter” key refreshes the current menu and hitting 0
returns the user to the previous menu.
Reminder: The configuration menu is not available whilst a radio (Bluetooth) connection is established.
3. Configuration Menu.
3.1. Main Menu
Sending the “Enter” character to the BL-521 accesses its main menu. This is also sometimes referred to as
“Carriage Return”. All configuration options for BL-521 are accessed via this menu.
BL-521 manual Release Rev5.doc
© Copyright Brainboxes Limited 2003
Page 6 of 54
3.2. Communications Parameters
Selecting
menu.
option
1
from
the
“Main
Menu”
menu
displays
the
following
Communications
settings
It is from this menu that all available serial port settings can be changed. The available options are detailed below.
3.2.1. Baud Rate
The factory set communications parameters for your BL-521 are as follows…
Baud Rate:
Data Bits:
Parity:
Stop Bits:
Handshaking:
115,200
8 (non-configurable)
None
1
None (non-configurable)
BL-521 manual Release Rev5.doc
© Copyright Brainboxes Limited 2003
Page 7 of 54
You can alter these settings by using the configuration menu options shown below.
After selecting option 1 “Set Baud Rate” from the “Modify COMM Settings” menu, the following menu is
displayed.
BL-521 manual Release Rev5.doc
© Copyright Brainboxes Limited 2003
Page 8 of 54
Selecting 0 immediately returns you to the previous menu. Any changes made in this menu will be remembered
when leaving, and will be applied by selecting option 4 “Apply COMM Settings” from the previous “Modify COMM
Settings” menu. Selecting any other option will store the appropriate configuration selection.
A range of popular pre-set baud rates is offered in this menu along with an option for you to set your own. Due to
some technical limitations, it is not possible for us to achieve all of these baud rates exactly, although most of
them are available to within 1%. Normal RS232 operation is not affected by such small differences in data rates
unless long streams of continuous data are being used. The Actual baud rate achieved will be displayed next to
your selection.
4.2.1.1.
Entering your own baud rate
Selecting option (d) from the “Set Baud Menu” allows the user to configure BL-521 to operate at any baud rate
the user desires between 244 baud and 1.3M baud. BL-521 will calculate the nearest actual baud rate it is able to
achieve and display it next to your selection, as shown in the configuration menu’s below.
BL-521 manual Release Rev5.doc
© Copyright Brainboxes Limited 2003
Page 9 of 54
Enter the baud rate value you want, followed by “ENTER”
The value you enter must be between 244 and 1382400 otherwise an error will be shown. You will be given a
further opportunity to enter a valid value.
BL-521 manual Release Rev5.doc
© Copyright Brainboxes Limited 2003
Page 10 of 54
Entering a valid number here such as shown below results in your selection being accepted and your baud rate
selection being displayed at the bottom of the menu.
Selecting 0 immediately returns you to the previous menu storing any changes you have made; selecting any
other option will store the appropriate configuration selection. As shown below, your configuration selection will
not actually be applied at this point.
BL-521 manual Release Rev5.doc
© Copyright Brainboxes Limited 2003
Page 11 of 54
The Menu identifies this new selection as being unapplied. To apply this selection, select the “Apply COMM
Settings” from the previous menu. This can be reached by selecting option “0”.
Unapplied settings are discarded during a re-boot of BL-521.
3.2.2. Data bits.
Unfortunately this setting cannot be changed. BL-521 only supports the 8 data bit format. Thus there is not a
configuration menu option for this setting.
BL-521 manual Release Rev5.doc
© Copyright Brainboxes Limited 2003
Page 12 of 54
3.2.3. Parity
After selecting option 2 from the “Modify COMM Settings” menu, the following menu is displayed.
Selecting 0 immediately returns you to the previous menu storing any changes you have made; selecting any
other option will store the appropriate configuration selection. As shown below, your configuration selection will
not actually be applied at this point.
BL-521 manual Release Rev5.doc
© Copyright Brainboxes Limited 2003
Page 13 of 54
Configuration changes are only applied when option 4 (Apply COMM settings) is selected from the previous
“Modify COMM Settings” Menu.
Unapplied settings are discarded during a re-boot of BL-521.
3.2.4. Stop Bits
After selecting option 3 from the “Modify COMM Settings” menu, the following menu is displayed.
BL-521 manual Release Rev5.doc
© Copyright Brainboxes Limited 2003
Page 14 of 54
Selecting 0 immediately returns you to the previous menu storing any changes you have made; selecting any
other option will store the appropriate configuration selection. As shown below, your configuration selection will
not actually be applied at this point.
Configuration changes are only applied when option 4 (Apply COMM settings) is selected from the previous
“Modify COMM Settings” Menu.
Unapplied settings are discarded during a re-boot of BL-521.
BL-521 manual Release Rev5.doc
© Copyright Brainboxes Limited 2003
Page 15 of 54
3.2.5. Applying Communications Settings
After selecting option 3 from the “Modify COMM Settings” menu, the following menu is displayed. Obviously the
values displayed are dependant on your own individual configuration.
Selecting 0 immediately returns you to the previous menu storing any changes you have made.
Selecting “1” will immediately apply any new communications parameters you have selected from the other
COMM menu’s.
BL-521 manual Release Rev5.doc
© Copyright Brainboxes Limited 2003
Page 16 of 54
If you have changed any communications parameters, and wish to continue to interact with the configuration
menu, you will need to modify the communications parameters of the terminal application you are using to
communicate to BL-521. The easiest method of performing this in HyperTerminal is to close the application down
and re-start it, setting the alternative parameters during the initial application configuration.
3.3. Bluetooth Parameters
Selecting option 2 from the “Main Menu” menu displays the following Bluetooth settings menu.
BL-521 manual Release Rev5.doc
© Copyright Brainboxes Limited 2003
Page 17 of 54
It is from this menu that all available Bluetooth settings can be changed. The available options are detailed below.
3.3.1. Discoverability
After selecting option 1 from the “Modify Bluetooth Settings” menu, the following menu is displayed.
BL-521 manual Release Rev5.doc
© Copyright Brainboxes Limited 2003
Page 18 of 54
Selecting 0 immediately returns you to the previous menu storing any changes you have made.
Selecting option “1” will immediately render BL-521 “Discoverable”. This means that any other Bluetooth device
can see BL-521 when it performs a device discovery.
Selecting option “2” immediately renders BL-521 “non-discoverable”. No other Bluetooth devices will be able to
see BL-521 when they perform a device discovery. However, in this mode, your BL-521 is still “connectable”. This
means that any other Bluetooth device that knows about your specific BL-521 (i.e. it knows the Bluetooth address
of the individual unit) can still connect to it. You may wish to set this option to avoid confusion when many BL521’s exist in close proximity to each other.
Unlike the communications settings, this Bluetooth setting is applied with immediate effect.
3.3.2. Security Mode
BL-521 manual Release Rev5.doc
© Copyright Brainboxes Limited 2003
Page 19 of 54
After selecting option 2 from the “Modify Bluetooth Settings” menu, the following menu is displayed.
The factory set security mode is 3 (Highest)
Selecting 0 immediately returns you to the previous menu storing any changes you have made.
Selecting option “1” will immediately place your BL-521 into security mode 1. This is the lowest security mode
that the BL-521 can be configured to. Connections, including service discovery, can take place without the need
for “pairing” or “bonding”. In mode 1, the Security Manager automatically accepts all access requests without
initiating authentication, encryption, or authorization procedures. Any attempt by a remote application to perform
authentication or encryption procedures will be rejected.
Selecting option “2” will immediately place your BL-521 into security mode 2. This mode allows remote Bluetooth
devices to search for and retrieve the services on your BL-521, but will not allow them to connect unless the 2
devices are paired.
Selecting option “3” will immediately place your BL-521 into security mode 3. This is the highest security mode
available. Connections of any kind from a remote Bluetooth device are only allowed after a successful “pairing”
has been performed. No services will be shown to other Bluetooth devices unless the 2 devices are successfully
paired.
Unlike the communications settings, this Bluetooth setting is applied with immediate effect.
BL-521 manual Release Rev5.doc
© Copyright Brainboxes Limited 2003
Page 20 of 54
3.3.3. Encryption
After selecting option 3 from the “Modify Bluetooth Settings” menu, the following menu is displayed.
The factory set Encryption mode is “Disabled”. This can be changed to enable “Point to Point” or “Point to Point &
Broadcast”.
Unlike the communications settings, this Bluetooth setting is applied with immediate effect.
3.3.4. PIN
. The PIN (Personal Identification Number) is used to create a secure and trusted connection between 2
Bluetooth devices during a process called pairing or bonding.
BL-521 manual Release Rev5.doc
© Copyright Brainboxes Limited 2003
Page 21 of 54
After selecting option 4 from the “Modify Bluetooth Settings” menu, the following menu is displayed.
The PIN can be any combination of printable characters. The PIN is only used when BL-521 is configured to be in
security mode 3 (High security)
The factory set PIN is “1234”. This can be changed to a range of pre-selected values, or you may enter you own
combination up to a maximum of 8 characters.
Selecting 0 immediately returns you to the previous menu storing any changes you have made.
BL-521 manual Release Rev5.doc
© Copyright Brainboxes Limited 2003
Page 22 of 54
Selecting option 4 from the “Set PIN” menu will display the following.
In this field, you can enter your desired PIN code. This can be any printable alphanumeric character or symbol,
but you should take care to choose a PIN appropriately remembering that some Bluetooth devices (e.g. cell
phones) only have limited input mechanisms and may not have a full range of characters available.
BL-521 manual Release Rev5.doc
© Copyright Brainboxes Limited 2003
Page 23 of 54
Due to memory considerations the length of the PIN code is restricted to 8 characters. If you try to create a PIN
code that is larger than this, an error message is generated (as above) and you will be given another opportunity
to enter your own PIN
Once you have entered the PIN you want, you should complete your request by hitting the “ENTER” key,
whereupon the original menu is displayed, showing your new PIN selection.
If your BL-521 is to be configured into Client mode, this is the PIN that will be used by BL-521 to initiate pairing
with the remote device before any connection is made. If your remot e device is another BL-521 in Server mode,
you will need to ensure that “both” devices are configured to use the same PIN number.
Unlike the communications settings, this Bluetooth setting is applied with immediate effect.
3.3.5. Partner Device
A partner device is a remote Bluetooth device to which you wish to bond to, or have bonded. As such, this setting
is ignored if BL-521 is configured to use Security Mode 1 (Lowest) as this setting is essentially “no security” and
does not require bonding.
Adding a partner device using this feature does not stop remote devices bonding with BL-521 whilst it is in Server
Mode. When Set to Client mode, BL-521 uses this Setting in order to connect to a remote device.
BL-521 manual Release Rev5.doc
© Copyright Brainboxes Limited 2003
Page 24 of 54
Once a remote device has successfully partnered with BL-521, no other Bluetooth device will be able to connect
until the pairing has been cleared. The pairing can be expired either by interacting with this menu option, or by
invoking a “short” reset by pressing the reset button.
After selecting option 5 from the “Modify Bluetooth Settings” menu, the following menu is displayed.
Selecting 0 immediately returns you to the previous menu storing any changes you have made.
BL-521 manual Release Rev5.doc
© Copyright Brainboxes Limited 2003
Page 25 of 54
Selecting option “1” brings up the following menu.
You should enter here the Bluetooth Address (BD_ADDR) of the remote device you wish to pair to followed by
ENTER. This should be in the same format as indicated on the products label (NAP-UAP-LAP, for those of you
who know)
This will now refresh the menu with the address just entered and changes the option to allow removal of the
entered device
BL-521 manual Release Rev5.doc
© Copyright Brainboxes Limited 2003
Page 26 of 54
The option to remove this newly entered device exists at this point should you have made a mistake.
Once BL-521 has successfully paired with the remote device (or vice-versa) the menu will update to give the user
the option to expire the pairing. This can also be achieved by performing a “short” reset using the reset button.
This expiration only deletes the Link Key created during pairing and doesn’t remove the device itself
If a remote Bluetooth device has previously paired to the BL-521 then this menu will display the first time the “Set
Partner Device” menu is accessed.
BL-521 manual Release Rev5.doc
© Copyright Brainboxes Limited 2003
Page 27 of 54
Selecting the option to remove the partner device as below
will remove both the link key created during the pair, and it will remove the partner device itself from the memory
of BL-521.
BL-521 manual Release Rev5.doc
© Copyright Brainboxes Limited 2003
Page 28 of 54
All the settings in this section are applied with immediate effect.
3.3.6. Client Server
After selecting option 6 from the “Modify Bluetooth Settings” menu, the following menu is displayed.
BL-521 manual Release Rev5.doc
© Copyright Brainboxes Limited 2003
Page 29 of 54
Selecting 0 immediately returns you to the previous menu storing any changes; selecting any other option will
store the appropriate configuration selection.
The default configuration of your BL-521 is set to “Server” operation. This means that the BL-521 will wait for
devices to connect to it. Changing this setting to “Client ” will put the BL-521 into a state where it will attempt to
connect to the device contained in its internal database. This remote device is entered into BL-521 using the
previous menu option, or by pairing with BL-521 from the remote device whilst BL-521 is in server mode.
It is this option that requires interaction if you wish to configure 2 BL-521’s to communicate to each other to
create a “true” cable replacement scenario.
Unlike most other Bluetooth settings, the BL-521 requires re-booting before this option will be enabled.
3.3.7. Local Device Name
In scenario’s where more than 1 BL-521 are to be used in the same geographical location (i.e. they are all in
range of each other/the controlling device), it may be pertinent to change the name of each device to more easily
identify each individual device.
BL-521 manual Release Rev5.doc
© Copyright Brainboxes Limited 2003
Page 30 of 54
After selecting option 7 from the “Modify Bluetooth Settings” menu, the following menu is displayed.
The Factory setting for the local device name is “BL-521 BB RS232 Converter”.
Selecting 0 immediately returns you to the previous menu storing any changes; selecting any other option will
store the appropriate configuration selection.
BL-521 manual Release Rev5.doc
© Copyright Brainboxes Limited 2003
Page 31 of 54
Selecting options 1-4 configure the BL-521 to use one of the pre-configured name options. Our example chooses
option 1
BL-521 manual Release Rev5.doc
© Copyright Brainboxes Limited 2003
Page 32 of 54
If you wish to use a different name, you’ll need to select option 5
Enter the name you’d like your BL-521 to display
BL-521 manual Release Rev5.doc
© Copyright Brainboxes Limited 2003
Page 33 of 54
Memory constraints mean that you must ensure that your desired name is less than 31 characters. You cannot
use the “delete” key as this will be interpreted as part of the name.
Press Enter when Happy with your choice
The menu will now update with your chosen name selection.
3.3.8. Device Class
Some remote device applications will only communicate to devices of a certain type. This menu option allows you
to reconfigure your BL-521 to appear as a number of different device types.
BL-521 manual Release Rev5.doc
© Copyright Brainboxes Limited 2003
Page 34 of 54
After selecting option 8 from the “Modify Bluetooth Settings” menu, the following menu is displayed.
The Factory setting for the Class of device is “Peripheral”.
BL-521 manual Release Rev5.doc
© Copyright Brainboxes Limited 2003
Page 35 of 54
Selecting 0 immediately returns you to the previous menu storing any changes; selecting any other option will
store the appropriate configuration selection.
This menu option allows the selection of a number of different device types as defined by the Bluetooth
specification.
BL-521 manual Release Rev5.doc
© Copyright Brainboxes Limited 2003
Page 36 of 54
This option does not take effect until BL-521 is re-booted.
3.4. Display Factory Settings
Selecting option 3 from the “Main Menu” menu displays the following Current settings menu.
BL-521 manual Release Rev5.doc
© Copyright Brainboxes Limited 2003
Page 37 of 54
BL-521 manual Release Rev5.doc
© Copyright Brainboxes Limited 2003
Page 38 of 54
3.4.1.
Updating Factory Settings
Selecting option 1 from this Current settings menu allows any user settings to be used to update the “factory”
settings, providing some level of protection from losing application configuration settings during a device reset
when the reset button is activated.
This is not something you really want to do unless you’re sure you have the settings as you want them and are
sure you can remember them, as there is no way back from here…
BL-521 manual Release Rev5.doc
© Copyright Brainboxes Limited 2003
Page 39 of 54
Entering any character other than that required will abort the update. The PROCEED command is case sensitive
and must be followed by <ENTER>.
All the settings in this section are applied with immediate effect.
BL-521 manual Release Rev5.doc
© Copyright Brainboxes Limited 2003
Page 40 of 54
3.5. Restoring Factory Settings
Selecting option 4 from the main menu displays the following restore factory settings menu.
BL-521 manual Release Rev5.doc
© Copyright Brainboxes Limited 2003
Page 41 of 54
Be sure to take a note of these settings as you will need to ensure that the next time you attempt to communicate
with your BL-521 that you use these new settings.
Remember that the original factory settings may have been updated using the previous menu.
All the settings in this section are applied with immediate effect.
3.6. Disabling Interactive Menu
Selecting option 5 from the main menu displays the following Disable Interactive menu menu.
Selecting option 1 from this menu means that no further interaction with the menu will be possible until the device
has been completely reset to it’s factory defaults by performing a “long” reset from the reset button.
BL-521 manual Release Rev5.doc
© Copyright Brainboxes Limited 2003
Page 42 of 54
3.7. Resetting BL-521
The BL-521 has a “reset button” located on the side of the case. This button performs 2 different functions.
a) Resets Paired Devices.
A short press (less than 3 seconds) of the reset button causes any paired device information to be deleted.
When the device is in low security mode, this will not have any effect on the devices operation, but whilst in
high security mode, this will mean that another device can pair with BL-521, or that the original device must
expire its bond in order to reconnect.
b) Resets BL-521 to factory defaults.
A long press (more than 3 seconds) of the reset button causes all factory defaults to be restored. Care
should be taken here to remember that these “factory” settings can actually be updated via the interactive
menu and thus may not be the same as the device was shipped with. The user should also remember that
BL-521 is likely to need it’s parameters re-configuring to ensure communications can be re-established with
either the local serial device, or remote Bluetooth device.
3.8. Troubleshooting the configuration menu
If you are having difficulty connecting to the BL-521 configuration menu, follow these few simple steps…
a) Ensure the power adapter is plugged in and switched on – The LED’s will light up on the BL-521
b) Ensure the attached cable AND the gender converter are attached securely to an available RS232 port on
your PC. If you are using a terminal or other “peripheral” type device, you may not need the gender
converter attached.
c) Check that your terminal/application has the correct communications parameters set. As it leaves the
factory, the BL-521 is set to 115200 baud, no parity, 8 data bits, 1 stop bit.
d) If you are still unable to communicate to the device, it may need a reset. Follow the instructions for resetting
your device.
4. Physically connecting BL-521 to your RS232 device
4.1. Configuring the communications parameters.
Please refer to section 2 above for details on how to do this.
4.2. Physically connecting your device to BL-521 via the RS232 connector
Connector Pin-Outs for the enclosed cable are…
BL-521 manual Release Rev5.doc
© Copyright Brainboxes Limited 2003
Page 43 of 54
Your device may need an additional cable, such as a “cross-over” or
“null-modem” cable. Please refer to your device’s documentation for
further details.
When the enclosed “gender changer” is connected, the Pin-Outs are…
The Female to Male “Gender Changer” allows maximum cabling flexibility where existing cabling is already
attached.
The female connector is designed so that it can be plugged directly
into a PC’s motherboard COM port.
If you are connecting it directly to a different device you may need an
additional cable, such as a “cross-over” or “null-modem” cable.
Please refer to your device’s documentation for further details.
5. Connecting to/from BL-521 over Bluetooth.
There are 3 ways BL-521 can be connected vi a Bluetooth.
a) Client/Server Pair: 2 BL-521’s, configured to perform a “true” cable replacement.
b) Server: Connecting TO BL-521 from a remote Bluetooth device (Factory Default)
c) Client: BL-521 is the Bluetooth device which initiates the connection
This section details all 3 methods.
5.1. “Cable Replacement”
One of the strongest features of BL-521 is that 2 of them can be configured to connect to each other and thus
behave almost exactly as a cable. This configuration is very straightforward and is detailed below.
For BL-521’s to connect as a pair, one of the devices needs to be configured as a client device, and one as a
server. As the factory settings for BL-521 are “Server” it follows then that only 1 of the BL-521 pair needs any
alternate configuration from that supplied.
It is advisable that you first configure the communications settings for each BL-521 so that they are suitable for the
devices into which you are plugging them. When configuring a pair of BL-521’s the Communications parameters
(e.g. baud rate) of each BL-521 do not have to match each other’s, only that of the devices into which they are
connected.
Each BL-521 has a unique Bluetooth Address (BD_ADDR). This is printed on a label on the base of every product,
but is also accessible from the “View Current Settings” menu detailed above.
BL-521 manual Release Rev5.doc
© Copyright Brainboxes Limited 2003
Page 44 of 54
For our example here, we will use a BL-521 with a BD_ADDR of 000A -4F-00082D, which we’ll call the Server, and
a second, with a BD_ADDR of 000A-4F-0013BB, which we’ll call the Client. We’ll leave all other settings for this
example as factory defaults. As explained above we only need to change the settings of the Client device…
From the main menu select option 2 “modify Bluetooth settngs”.
The following menu is displayed
Select option 5 “set partner device”. This tells the Client BL-521 what remote device it is supposed to try to
connect to.
BL-521 manual Release Rev5.doc
© Copyright Brainboxes Limited 2003
Page 45 of 54
You’ll need to add the Server BL-521 into this menu option. Select option “1” which brings up the following menu.
You should enter here the Bluetooth Address (BD_ADDR) of the remote device you wish to pair (in our case this
is 000A-4F-00082D) followed by ENTER. This should be in the same format as indicated on the products label
(NAP-UAP-LAP, for those of you who know)
This will now refresh the menu with the address just entered.
BL-521 manual Release Rev5.doc
© Copyright Brainboxes Limited 2003
Page 46 of 54
Select 0 to return to the previous menu and select option 6 “Set Client/Server”
After selecting option 6 from the “Modify Bluetooth Settings” menu, the following menu is displayed.
BL-521 manual Release Rev5.doc
© Copyright Brainboxes Limited 2003
Page 47 of 54
Select the client option. This setting is stored immediately and is not discarded upon a reboot. In fact it requires a
re-boot in order to activate it.
Re-boot. When the Client B L-521 is switched on, it will connect to the Server device you have entered in the
menu above, assuming of course that the server device is also powered up.
That’s it - it really is that simple.
5.2. Server : Connecting TO BL-521 from a remote Bluetooth device.
Connecting to your BL-521 will vary depending on your application, but will usually consist of 3 Steps.
1 – Configuring the BL-521’s communications parameters.
2 – Physically connecting BL-521 to your device.
3 – Connecting to BL-521 from a remote device via Bluetooth and transferring data.
There are many different scenarios whereby a connection can be made to a BL-521 and consequently its attached
device. The application scenarios will also depend on what sort of device you have attached to the BL-521. One
worked example is shown here for illustrative purposes, but the principle will be the same regardless of the device
you are connecting to except perhaps the cabling
arrangements your device might require.
In this example we have connected a Tektronix
TDS220 Oscilloscope to a BL-521 and plugged in
the power adapter included. No additional cables or
gender changers were used in this application
scenario. In order to communicate to the scope/BL521 we have connected a Brainboxes USB adapter
(Order code BL-554) to a laptop with Brainboxes
Bluetooth software suite installed. If you are
connecting to BL-521 with a different manufacturers
Bluetooth product, please refer to the manufacturers
instructions for that product.
BL-521 manual Release Rev5.doc
© Copyright Brainboxes Limited 2003
Page 48 of 54
Broadly, this process requires the following steps that are detailed below.
a)
b)
c)
d)
Discover the device
Secure the relationship (unless you’ve set BL-521 to a low security setting)
Connect to the Serial Port Profile
Connect your application to the COM port.
5.2.1. Discover the device
This is performed in Brain Boxes Windows software by first opening the “My Bluetooth Devices” window and
clicking the discovery button. This sets the software to display all the Bluetooth devices it can find “in range”.
Assuming that your BL-521 is switched on and in range you should see it displayed (perhaps alongside other
Bluetooth devices in range) in the main screen.
5.2.2. Secure the relationship
This is where you must “Bond” or “Pair” with the device. This is a feature of Bluetooth, which allows secure
communications to take place. It is also used to stop other devices from performing unauthorised connections.
You can start the bonding process by selecting and right clicking on your BL-521 from the main screen. This
brings up a context menu from which you should select the “Bond” option.
If you have configured your BL-521 from the menu to use a low security mode (and thus not require bonding)
then this step can be skipped and you can jump straight to section “5.2.3 Connect to the profile”.
BL-521 manual Release Rev5.doc
© Copyright Brainboxes Limited 2003
Page 49 of 54
You will then be prompted to enter a PIN number. Enter the Pin number (which is 1234, unless you have used
the configuration menu to change it). Click OK
The Icon of your BL-521 in the main window should now change to indicate a “bonded” status as shown below.
5.2.3. Connect to the profile
In order to actually connect to the appropriate function on the BL-521 you will need to discover it’s services.
Double-Click the device selected.
BL-521 manual Release Rev5.doc
© Copyright Brainboxes Limited 2003
Page 50 of 54
This will display a serial port service called “Serial 01”
Double clicking this service (or right clicking and selecting the “connect” option), will create a COM port style
connection to the BL-521.
The screen shot below shows that the port in our example here is listed as COM25, although yours will most
likely be a much lower number than this.
This “COM” port is now available for any application to use to communicate with your device, or in our case, the
oscilloscope.
5.2.4. Connect your application to the COM port
In our initial testing at our labs, we used the HyperTerminal application included in Windows to open COM10.
Setting HyperTerminal to save data to a file called screen.bmp, and activating the hardcopy feature of the
oscilloscope, caused all data to be sent from the scope to the file as listed. This file could then be viewed using
any picture editing software and displays an exact screen copy of the oscilloscope. Instructions for using
HyperTerminal can be found in section 2.1 above
5.3. Client: BL-521 is the Bluetooth device which initiates the connection
The instructions in the above section for creating a “cable replacement” connection should be followed to place the
BL-521 into Client Mode in order to initiate a connection to a remote device.
BL-521 manual Release Rev5.doc
© Copyright Brainboxes Limited 2003
Page 51 of 54
6. Upgrading
This product is not field-upgradeable. Please contact your sales representative for further details on obtaining future
product upgrades.
7. Regulatory Information
Bluetooth product operating in 2.4GHz band for Home and Office use.
1. Europe - EU Declaration of Conformity
This device complies with the R&TTE Directive 1999/5/EC, and the following standards:
EN 60950: 1992; EN60335-1: 1994
Safety information Technology Equipment,
including Electrical Business Equipment
ETS 300 826; EN 301 489-1/-17: 2000;
EN50081 - 1: 1992; EN 50082 - 1: 1997
Electromagnetic compatibility
ETS 300 328-2:
2000 Radio Equipment and Systems (RES);
Wideband transmission systems; Technical
characteristics and test conditions for data
transmission equipment operating in the 2.4
GHz ISM band and using spread spectrum
modulation techniques.
7.1. Important Notice for use in France and Italy
Italy:
License required for use. Your reseller will tell you the procedure to follow.
E'necessaria la concessione ministeriale anche per l'uso. Verification con Irivenditori la procedura
da seguire.
France:
Low power device (1mW), there is no limitation for indoor or outdoor use.
Dispositif à faible uissance (1mW), pas de limitation pour son usage à l'intérieur ou a l'extérieur.
7.2. Rest of World
Country restrictions apply for home and office use.
BL-521 manual Release Rev5.doc
© Copyright Brainboxes Limited 2003
Page 52 of 54
8. Index
address, 19, 26, 46
factory settings, 3, 41, 42, 44
Address, 3, 26, 44, 46
Factory Settings, 2, 37, 39, 41
apply, 12, 16, 52
gender changer, 4, 44
Apply, 9, 12, 14, 15
HyperTerminal, 4, 6, 17, 51
baud, 3, 9, 10, 11, 43, 44
LED’s, 4, 43
BD_ADDR, 26, 44, 45, 46
Local Device Name, 2, 3, 30
BL-521, 1, 2, 3, 4, 5, 6, 7, 9, 12, 14, 15, 17, 19, 20,
22, 24, 25, 27, 28, 30, 31, 32, 33, 34, 37, 42, 43,
44, 45, 46, 48, 49, 50, 51
menu, 2, 3, 4, 6, 7, 8, 9, 11, 12, 13, 14, 15, 16, 17,
18, 19, 20, 21, 22, 23, 24, 25, 26, 27, 29, 30, 31,
34, 35, 36, 37, 39, 41, 42, 43, 44, 45, 46, 47, 48,
49, 50, 54
Bluetooth, 1, 2, 3, 4, 6, 17, 18, 19, 20, 21, 22, 23, 24,
25, 26, 27, 29, 30, 31, 35, 36, 43, 44, 45, 46, 47,
48, 49, 51, 52
bond, 24, 43
parameters, 2, 5, 7, 16, 17, 43, 44, 48
bonded, 24, 50
parity, 3, 43
Brainboxes, 3, 48
partner, 24, 28, 45
cable, 3, 30, 43, 44, 51
PIN, 2, 3, 21, 22, 23, 24, 50
changes, 3, 9, 11, 13, 14, 15, 16, 19, 20, 22, 25, 26,
30, 31, 36, 54
Client, 2, 3, 24, 29, 30, 44, 45, 47, 48, 51
communications, 2, 5, 7, 16, 17, 19, 20, 21, 24, 43,
44, 48, 49
configuration, 2, 3, 4, 6, 8, 9, 11, 12, 13, 15, 16, 17,
30, 31, 36, 39, 43, 44, 50, 54
connect, 4, 19, 20, 24, 25, 30, 44, 45, 48, 50, 51
Device Class, 2, 3, 34
Disable, 3, 42
Discover, 2, 49
Discoverability, 2, 3, 18
Discoverable, 19
Port, 5, 49
re-boot, 12, 14, 15, 48
Regulatory, 52
COM, 2, 3, 44, 49, 51
data, 3, 4, 9, 12, 43, 48, 51, 52
Pair, 44, 49
Pairing, 3
Bond, 49
connectable, 19
Menu, 2, 6, 7, 9, 12, 14, 15, 17, 37, 42
reset, 3, 25, 27, 39, 42, 43
reset button, 25, 27, 39, 42
Resets, 43
restore, 3, 41
RS232, 1, 2, 3, 9, 31, 43
secure, 21, 49
security, 3, 20, 22, 24, 43, 49
serial, 4, 7, 43, 51
Server, 2, 3, 24, 29, 30, 44, 45, 46, 47, 48
service, 3, 20, 51
services, 20, 50
Encryption, 2, 21
settings, 3, 5, 7, 8, 12, 14, 15, 17, 18, 19, 20, 21, 24,
29, 30, 37, 39, 40, 42, 43, 44, 45
error, 10, 24
stop bits, 3
BL-521 manual Release Rev5.doc
© Copyright Brainboxes Limited 2003
Page 53 of 54
Version History
Version
Date
Author
Checked By
Comments
1.0
dd/mm/yyyy
Name
Name
Initial version
2.0
10/01/2003
Gav
Added info for configuration menu options, changes in
pinouts, and other features along with minor formatting
changes.
2.1
14/01/2003
Gav
Minor formatting changes
3.0
03/04/2003
Gav
ETW;SE;DR;
MW;OS;NPJ;
PG
Updated to reflect changes on Rev7 Product PCB and
updates to product firmware (V2.10)
3.1
11/04/2003
Gav
ETW;SE;DR;
MW;OS;NPJ;
PG
Minor mods and clarifications following review. Creation of
index. Minor changes to device menu display updated.
3.2
11/04/2003
Gav
ETW;SE;DR;
MW;OS;NPJ;
PG
Section re-order, update tables.
BL-521 manual Release Rev5.doc
© Copyright Brainboxes Limited 2003
Page 54 of 54