1
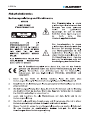
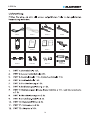
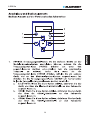
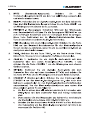
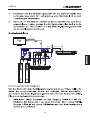
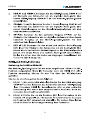
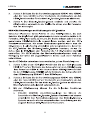
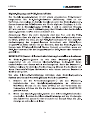
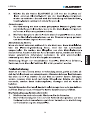
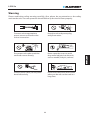
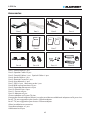
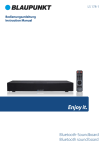
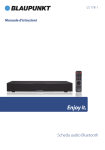
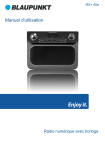
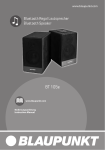
2.1 Modular Speaker System
Vertical speakers or sound bar
LS 215e
LS 215e
2
LS 215e
3
LS 215e
4
LS 215e
5
LS 215e
6
LS 215e
7
LS 215e
8
LS 215e
9
LS 215e
10
LS 215e
11
LS 215e
12
LS 215e
13
LS 215e
Part 1
Part 2
Part 3
Part 4
Part 5
Part 6
Part 7
Part 8
150mm
30mm
270mm
Part 9
Part 10
Part 11
14
Part 12
LS 215e
15
LS 215e
16
LS 215e
17
LS 215e
18
LS 215e
19
LS 215e
20
LS 215e
21
LS 215e
(ARC)
LS 215e
22
LS 215e
23
LS 215e
24
LS 215e
25
LS 215e
26
LS 215e
27
LS 215e
/
28
LS 215e
29
LS 215e
(ARC)
LS 215e
30
LS 215e
31
LS 215e
32
LS 215e
33
LS 215e
34
LS 215e
35
LS 215e
36
LS 215e
37
LS 215e
38
LS 215e
39
LS 215e
Important Safety Instructions
Important Safety Instructions
Caution:
To reduce the risk of electric shock, do not dismantle the product and do not expose the
apparatus to rain or moisture. No user-serviceable parts inside. Refer servicing to
qualified personnel only.
Explanation of Graphical Symbols:
The lightning flash within an equilateral triangle is intended to alert you to the
presence of uninsulated dangerous voltage within the product's enclosure that
may be of sufficient magnitude to constitute an electric shock to a person or
persons.
The exclamation point within an equilateral triangle is intended to alert you to
the presence of important operating and maintenance (servicing) instructions
in the literature accompanying the product.
40
LS 215e
Conformity
Model number: LS 215e
Description: 2.1ch Flexible Soundbar System with Bluetooth
Brand name: Blaupunkt
Responsible party: M3 Electronic GmbH
Gutenbergstrasse 5, D-65830 Kriftel. Germany
Hereby, Blaupunkt Competence Center Audio M3 Electronic GmbH, declares that this Class 1
equipment is in compliance with the essential requirement and other relevant provisions of
Directive 1999/5/EC.
Letter of conformity can be obtained from [email protected].
Safety Instructions
1. Read Instructions - All the safety and operating instructions must be read before the
product is operated.
2. Retain Instructions - The safety and operating instructions should be kept product for
future reference.
3. Heed warnings - All warnings on the product and in the operating instructions should
be adhered to.
4. Follow instructions - All operating and users’ instructions should be followed.
5. Installation - Install in accordance with the manufacturer's instructions.
6. Power sources - This product should be operated only from the type of power source
indicated by the marking adjacent to the power cord entry. If you are not sure of the type
of power supply to your home, consult your product dealer or local power company.
7. Grounding or polarization - the product is not required to be grounded. Ensure the
plug is fully inserted into the wall outlet or extension cord receptacle to prevent blade or
pin exposure. Some versions of the product are equipped with a power cord fitted with a
polarized alternating line plug (a plug having one blade wide than the other). This plug
will fit onto the power outlet only one way. This is a safety feature. If you are unable to
insert the plug fully into the outlet, try reversing the plug. If the plug should still fail to fit,
contact your electrician to replace your obsolete outlet. Do not defeat the safety purpose
of the polarized plug. When using an extension power-supply cord or a power-supply
cord other than that supplied with the appliance, it should be fitted with the appropriate
molded plugs and carr y safety approval appropriate to the countr y of use.
8. Power cord protection - Power-supply cords should be routed so that they are not
likely to be walked on, kinked or pinched by items placed on or against them, paying
particular attention to cords from plugs, receptacles and the point where they exit from
the product.
9. Overloading - Do not overload wall outlets, extension cords, or multiple sockets, as
this can result in a risk of fire or electric shock.
10. Ventilation - The product must be properly ventilated. Do not place the product on a
bed, sofa, or other similar surface. Do not cover the product with any items such as
tablecloths, newspapers, etc.
41
LS 215e
11. Heat - The product should be situated away from heat sources such as radiators, heat
registers, stoves, or other products, including amplifiers that produce heat. No naked
flame sources, such as lighted candles, should be placed on the apparatus.
12. Water and moisture - To reduce the risk of fire or electric shock, do not expose the
product to train, dripping, splashing or excessive moisture such as in a sauna or
bathroom. Do not use this product near waterfor example, near a bathtub, washbowl,
kitchen sink, laundry tub, in a wet basement, or near a swimming pool and the like.
13. Object and Liquid Entry - Never push objects of any kind into this product through
openings, as they may touch dangerous voltage points or short-circuit parts that could
result in a fire or electric shock. Never spill liquid of any kind on the product. Do not place
any object containing liquid on top of the product.
14. Cleaning - Unplug the product from the wall outlet before cleaning. The cabinet of
the subwoofer may be cleaned by dusting with a dry cloth. If you wish to use an aerosol
cleaning spray, do not spray directly on the cabinet; spray onto the cloth. Be careful not to
damage the drive units.
15. Attachments - Do not use attachments not recommended by the product
manufactures, as they may cause hazards.
16. Accessories - Do not place this product on an unstable cart, stand, tripod, bracket or
table. The product may fall, causing serious injury to a child or adult, and serious damage
to the product. Use only with a cart, stand, tripod, bracket or table recommended by the
manufacturer or sold with the product. Any mounting of the product should follow the
manufacturer’s instructions and should use a mounting accessory recommended by the
manufacturer.
17. Moving the product - A product and cart combination should be moved with care.
Quick stops, excessive force and uneven surfaces may cause the product and cart
combination to overturn.
18. Unused periods - The power cord of the appliance should be unplugged from the
outlet during lightning storms or when the apparatus is left unused for a long period of
time.
19. Servicing - Do not attempt to service this product yourself, as opening or removing
covers may expose you to dangerous voltage or other hazards. Refer all servicing to
qualified service personnel.
20. Please remove the power plug form the main power source or wall power source when
not in use. When plugged in to a power source, the system is in standby mode, so the
power is not entirely cut off.
21. Replacement parts - When replacement parts are required, ensure the service
technician has used replacement parts specified by the manufacturer or have the same
characteristics as the original part. Unauthorized substitutions may result in fire, electric
shock or other hazards.
22. Mains fuses - For continued protection against fire hazard, use fuses only of the
correct type and rating. The correct fuse specification for each voltage range is marked on
the product.
23. Do not turn up the volume while listening to a section with very low level inputs or no
audio signals. If you do, the speaker may be damaged when a peak level section is
suddenly played.
42
LS 215e
24. The only means of completely disconnecting the product from the power supply is by
removing the power cord from the wall outlet or the product. The wall outlet or the power
cord entry to the product must remain freely accessible at all times while the product is in
use.
25. Try to install the product near a wall socket or extension cord and shall be easily
accessible.
26. The highest environmental temperature suitable for this product is 35°C.
27. ESD hints - The product maybe reset or not reset to operation of control due to
electrostatic discharge, just switch off and reconnect again.
ERP2 - (Energy related products) note
This product complies with the European Commission on Ecodesign Directive and its
implementing Regulations - Energy related products. After 20 minutes without any audio
input, the system will automatically enter standby mode. Follow up the instrcution
manual to assume the function operation.
43
LS 215e
Warning
Please read below safety warning carefully. Also, please be pay attention to the safety
mark on the unit. The unit operation should follow up the instructions properly.
Connect unit to appropriate
power source as shown on the
unit or instruction.
Keep the unit and power plug
away from water.
Do not put unit under sunshine
and heat source directly.
Never open the cover to avoid
drop metal objects into the unit,
such as needle, hairpin, coin etc.
Protect power cable, do not pull &
bend excessively.
Disconnect the power from outlet
when you do not use the unit in a
long time.
44
LS 215e
Accessories
Part 1
Part 2
Part 3
Part 4
Part 5
Part 6
Part 7
Part 8
150mm
30mm
270mm
Part 9
Part 10
Part 11
Part 12
Part 1: Power cable x 1 pcs
Part 2: Speaker Cable x 2 pcs
Part 3: Coaxial Cable x 1 pcs Optical Cable x 1 pcs
Part 4: Audio Cable x 1 pcs
Part 5: Remote Control x 1 pcs
Part 6: User Manual x 1 pcs
Part 7: QSG x 1 pcs Warranty card x 1 pcs
Part 8: Wall mount brackets x 2 pcs
Part 9: Soundbar Basement x 2 pcs
Part 10: Plastic Feet x 2 pcs
Part 11: Screws x 8 pcs
Part 12: Adaptor x 3 pcs
Choose adaptor to fit your TV size.
Except the normal adaptor(30mm), we also provide two additional adaptors to fit your size.
for 42" TV, we suggestion you choose 150mm adaptor.
for 47" TV, we suggestion you choose 270mm adaptor.
Other installation accessories:
Soundbar adaptor x 1 pcs
AAA batteries x 2pcs
45
LS 215e
Install The Remote Control Battery
1. Remove the battery cover.
2. Insert the AAA batteries into the battery compartment. Make sure the polarity direction
of battery will follow up the symbols in the battery compartment.
3. Re-cover the battery.
Note:
1. Do not mix batteries of different type.
2. Do not mix old and new batteries.
3. If the leakage issue happened on the battery, please clean the battery compartment
with drought cloth. If the liquid touched your skin, please rush it with water immediately.
4. If the remote control is not going to use in a long term, please remember to remove the
battery.
46
LS 215e
Soundbar installation.
The Soundbar have detachable design, which means tabletop, floor-standing and wallmounting is available for playing.
Photo 1
Photo 2
1. Play the Soundbar on table.
A. Follow up the Photo 1 to assemble the left and right speaker of Soundbar with the
adaptor. Be sure the connection will joint firmly.
B. Tighten the connection by screws from rear side.
C. Mount the Soundbar feet carefully and put the Soundbar on the table. After you
connect the Soundbar with subwoofer and audio device per follow up instruction manual
page 12, then you can enjoy the music entertainment.
Note:
A.The Soundbar is super slim design that is suitable for most TV. Please try to adjust the
height to match your TV.
B. You also can vertical place the Soundbar on the table, please reference Photo 2 and
Photo 4 for connection.
Photo 3
Photo 4
2. Play the Soundbar on floor.
A. Follow up above instruction to vertical assemble the left and right speaker of Soundbar
with the basement separately. Please make sure the speaker joint with the basement
tightly.
B. Tighten Soundbar with screws from rear side. Then put the Soundbar on floor as
Photo 5 in next page.
C. Connect Soundbar with subwoofer with speaker cable, and adjust the speaker cable
properly. Then you can enjoy the music entertainment. Please reference page 50 for
connection.
47
LS 215e
Photo 5
Caution:
a. Before you put the Soundbar on the table, please make the tabletop can sustain the
weight of Soundbar.
b. Do not carry or drag the Soundbar with one hand to avoid damage issue happen.
c. When screwing down the parts, ensure that the screws are neither insufficiently
tightened nor over tightened.
d. Please do not connect the AC power before you complete the Soundbar assembly.
e. Keep the screws, wall mount brackets, and other accessories away from children to
avoid swallowing.
3. Wall-mounting Soundbar and play
Photo 6
Photo 7
The Soundbar can mount on wall in two ways. Please reference below:
a. Wall-mount the Soundbar as one piece.
Before mount the Soundbar on the wall, please reference last page (point 1: step A and B)
to assemble the Soundbar as one piece. Then assemble the wall mount bracket accord to
Photo 6. After connect the Soundbar with subwoofer, and then you can enjoy the music.
Please reference Photo 8 in next page.
b. Wall-mount the Soundbar separate.
Before mount the Soundbar on the wall, please follow up Photo 7 for the wall mount
bracket assemble. After connect the Soundbar with subwoofer, and then you can enjoy
the music. Please reference Photo 9 in next page.
48
LS 215e
Photo 8
Photo 9
Caution
a. Ensure that the installation location is strong enough to support Soundbar.
b. Check the material of the wall, if the wall is made of plaster board, marble, or iron board,
purchase and use the appropriate fixing screws.
c. Please keep the Soundbar away from wet, dust, smoke, stream, heat or under air
condition to avoid fire or electric shock happen.
d. When you install the mounting screws, please make sure the screw does not touch with
metal objects or wiring because of that may lead to electric shocks.
e. When you remove the Soundbar from wall, please remember to remove the wall
mounting screws as well.
f. Please do not connect the AC power and speaker cable when the wall-mounting does
not finish.
49
LS 215e
Panels
1. SOURCE BUTTON
2. VOLUME +
3. PREVIOUS BUTTON
4. DISPLAY SCREEN
5. INDICATOR LIGHT
6. REMOTE CONTROL SENSOR
7. STANDBY BUTTON
8. NEXT BUTTON
9. VOLUME -
(ARC)
LS 215e
1. POWER ON/OFF
2. POWER SUPPLY OUTPUT
3. L/R SPEAKER OUTPUT
4. L/R AUDIO INPUT
5. COAXIAL 2
6. OPTICAL
7. SERVICE PORT
8. COAXIAL 1
9. HDMI INPUT 1 & 2
10. HDMI OUTPUT
Note:
The USB port on the back panel is for software upgrading service only, cannot use for USB
playback and charging. For software upgrade please consult to the local service
department.
50
LS 215e
Remote Control
Usage
Before you use the remote controller, please check if you have installed battery inside.
The remote controller should direct to the remote sensor which is locate on the front
panel of subwoofer. If the remote controller does not work, please try to adjust the
direction angle and distance with subwoofer. The obstacle between the remote controller
and unit can impact the remote sensitive. If the function of remote control is weakness,
please try to replace the battery.
Remote Controller Graphics
51
LS 215e
Basic Operation
Preparation
1. Before you turn on the unit, please check whether all connections are connected
properly and safe.
2. Press the POWER ON/OFF button on the rear panel of subwoofer to turn on the main
power. Then the LED indicator on the front panel of subwoofer will light up.
Standby Mode
Press the button on front panel of subwoofer or STANDBY button on remote control to
switch ON/OFF the Standby mode.
Note: Make sure that the unit is connected to the power source.
Equalizer Adjustment
You can adjust the equalization setting during entertain the music. Press the “TONE”
button on remote controller to switch treble/bass/subwoofer setting. Press +/- button to
adjust the setting value.
Volume Setting
Press the VOL.+/- buttons to turn the volume up or down.
MUTE Button
If you press the MUTE button while playing, the sound output will be switch off. Press the
MUTE button again or the / (VOL+/-) buttons to resume the previous volume level.
Play/Pause Button
In playing status, press the (PLAY/PAUSE) button to pause, press the button again to
continue playing.
Note: These buttons can work on Bluetooth mode only, cannot support in other audio
mode.
Previous And Next
In play status, press the go to the previous audio file; press the go to the next audio file.
Note: These buttons can work on Bluetooth mode only, cannot support in other audio
mode.
Music Playing Mode Selection
There have built-in DSP for music style selection. Press DSP button on remote controller
in once for “Off, Rock, Jazz, Classic, Pop, Vocal, Dance, Party” recycle selection.
Play Source Selection
The Soundbar system has included analog & digital input for different audio device
connection. The Bluetooth, HDMI, optical and coaxial is for digital inputs. The AUX is for
L/R channel analog input. You can press relative button on remote controller for input
sourcing selection. Or press the source button on the front panel of subwoofer for
“Bluetooth>HDMI1>HDMI2>Coaxial1>Coaxial2>Optical>AUX” play mode selection
in recycle.
52
LS 215e
Audio Coperation
(ARC)
LS 215e
To entertain music with Soundbar system; Please choose correspond cables connect with
the soundbar.
You can connect the Soundbar with TV, DVD players or other audio devices.
1. HDMI OUT(ARC) connection
Using a HDMI cable connect the HDMI OUT jack on the rear panel of subwoofer to the
HDMI IN jack on your TV.
2. HDMI 1 & 2 connection
Using a HDMI cable connect the HDMI IN jack on the rear panel of subwoofer to the HDMI
OUT jack on your other audio devices.
3. COAXIAL 1 & 2 connection
Using a coaxial cable connect the coaxial input jack on the rear panel of subwoofer to the
coaxial output jack on your other audio device.
4. OPTICAL connection
Using an optical cable connect the optical input jack on the rear panel of subwoofer to the
Optical out jack on your other audio device.
5. AUX IN connection
Using a left and right channel audio cable connect the AUX IN jack on the rear panel of
subwoofer to the audio left & right audio output jack on your other audio device. Be sure
to connect the jack color math color on the cable. Then you can play and enjoy music.
53
LS 215e
HDMI & Audio Operation
1. HDMI ARC operation.
The Soundbar has built-in the HDMI V1.4 ARC function. If your TV can support HDMI V1.4
ARC as well, then you can entertain the music base on ARC connection.
Step1. Using a HDMI cable connects the HDMI out jack on the rear panel of subwoofer to
the HDMI IN jack on the TV. (Normally, there will have ” ARC” silkscreen printing next to the
jack if your TV support such function.)
Step2. Please check if your TV is setting the ARC function on the “ON” position. (Some TVs
need set up the ARC function first, details please reference the instruction manual of your
TV).
Step3. Press the HDMI 1 or HDMI 2 key on the remote controller, or press the MODE
button enters to HDMI mode for playing.
Step4. The Soundbar can detect and play the ARC function automatically. Please make
sure there is audio playing on your TV. Then you can enjoy the music.
2. HDMI CEC control operation.
Before you using the CEC function with Soundbar please check if the DVD and TV have
HDMI version 1.4 CEC function as well. The CEC function can achieve with other CEC
function ready device only.
Step1. Using a HDMI cable connects the HDMI OUT jack on the rear panel of subwoofer to
the HDMI IN jack on the TV; Using another HDMI cable connect the HDMI IN jack on the
rear panel of subwoofer the HDMI OUT jack of DVD play side.
Step2. To enter the HDMI model, please press the HDMI 1 or HDMI 2 button on the remote
controller or the mode key on the front panel of subwoofer. Then the CEC function will
work automatically.
The CEC control can achieve below functions:
a. Volume control.
You can adjust and control the volume of Soundbar using by any remote controller of
Soundbar, DVD or TV.
b. Mute function.
You can achieve the mute function or resume the sound when you just press the MUTE
button on Soundbar, DVD or TV's remote controller.
3. HDMI 1&2 operation.
Using a HDMI cable connect the HDMI input jack on the rear panel of subwoofer to the
HDMI output jack of your other audio device. Press the HDMI 1 or HDMI 2 key on the
remote controller enter to the HDMI play mode, then you can enjoy the music
entertainment.
4. COAXIAL 1&2 operation.
Using a coaxial cable connect the coaxial input jack on the rear panel of subwoofer to the
coaxial output jack of your other audio device. Press the COAX 1 or COAX 2 key on the
remote controller enter to the coaxial play mode, and then you can enjoy the music
entertainment.
54
LS 215e
5. OPTICAL operation.
Using an optical cable connect the optical input jack on the rear panel of subwoofer to the
optical output jack of your other audio device. Press the Opt key on the remote controller
enter to the optical play mode, and then you can enjoy the music entertainment.
6. Stereo input operation.
Using a stereo audio cable connects the left and right channel input jack on the rear panel
of subwoofer to the stereo output jack of your other audio device. Press the AUX key on
the remote controller enter to the AUX play mode.
Digital Input And PCM Sound Effect
The Soundbar has built-in PCM decoder. But that is for digital audio input only which
include coaxial 1 & 2, optical and HDMI 1 & 2 input. The PCM decoder of Soundbar can
work automatically.
Note: If you could not listen the sound and enjoy PCM sound effect from Soundbar via
digital input, Please check whether the PCM mode has been selected on the digital audio
output menu of your TV or DVD device. Please kindly note the Soundbar cannot support
DTS format signal if the RAW mode had been selected on your DVD and TV.
55
LS 215e
Bluetooth Operation
The Soundbar has included Bluetooth function. So we can wireless play the music with
your other Bluetooth device like mobile phone etc.. The operation step as below:
1. Press Bluetooth button on the remote control to enter the Bluetooth mode.
2. When the units enter into the Bluetooth mode, the blue LED light will flare per one
second at first, then the LED light will flare more faster.
3. Turn on the Bluetooth function on your other Bluetooth device (Like mobile phone
etc.), Then your Bluetooth device will search the Soundbar. Please select the
“BLAUPUNKT LS 215” on your Bluetooth searched list. Then your Bluetooth device will
pair with Soundbar automatically. If prompted and requested password, please input
“0000”.
4. When the Bluetooth was paired successfully, the blue light will remain lit on. At the
moment, you could select music and wireless play with Soundbar.
To pair another Bluetooth device with Soundbar, please turn off the Bluetooth on your
paired device first, then the Bluetooth will be disconnected and the blue LED light will
flare in slow. Please press the PAIR button on the remote controller, then the Bluetooth
will resume on the Soundbar. Follow up the above 4 steps to play the Bluetooth with other
device.
To reconnect Bluetooth with the last paired device, the Bluetooth function of the device
should be turn on, and turn on the Soundbar into Bluetooth mode. Please check the
Bluetooth list on your device and find “ BLAUPUNKT LS 215” for reconnection.
Note: For reconnection with Soundbar, that only can workable when you turn off the
Soundbar in a normal way. Also, you do not re-plug the power of Soundbar.
Incoming calls
When you enjoy the music and connect with mobile phone via Bluetooth, when there
have a call incoming, the audio will mute automatically and you will hear the ring tones
from the Soundbar. After you finish the phone call, the devices will reconnect with each
other. You may have to restart the playback probably.
Note: Due to the different device manufacturers, models, and software versions, a full
functionality cannot be guaranteed.
The Bluetooth ® word mark and logos are registered trademarks owned by Bluetooth SIG,
Inc. and any use of such marks by M3 Electronic GmbH is under license. Other trademarks
and trade names are those of their respective owners.
56
LS 215e
Trouble Shooting
Power supply cannot be turned on
Make sure that the power plug is full plug in the power outlet.
The remote control does not work
a. The Battery was used up, please replace the battery.
b. The remote controller does not aim to the remote sensor on the front panel of
subwoofer. Please try to adjust the direction.
No sound output
a. Check whether the audio cable is connected correctly.
b. Check whether the Soundbar is setting to the correct audio input mode.
c. Turn off the unit, and replay again.
The unit does not work at all
The embedded microcomputer may have been damaged because of a lightning strike,
static, or other interference.
Note: The unit will turn to standby mode when there is no music signal input within 20
minutes.
Specification
Input voltage: 220-240V~50Hz
Power consumption: 100W
Inputs:
USB port for software upgrade service only
Audio input connection(2×RCA)
Coaxial input x 2
OPTICAL x 1
HDMI input x 2
Output: HDMI output
Remote control batteries: 2×AAA/LR03
Note: Specifications subject to change without prior notice. Weight and dimensions are
approximate.
57
LS 215e
This symbol on the product or in the instructions means that your electrical and electronic
equipment should be disposed at the end of its life separately from your household waste.
There are separate collection systems for recycling in the EU.
For more information, please contact the local authority or your retailer where you purchased
the product.
All rights reserved by Blaupunkt Competence Center Audio M3 Electronic GmbH. This
material may be reproduced, copied or distributed for personal use only.
58