1
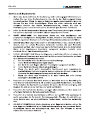
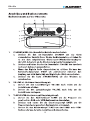
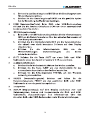
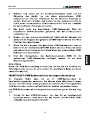
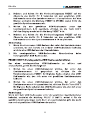
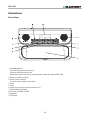
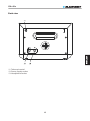
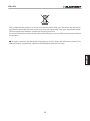
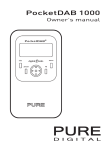
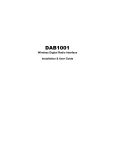
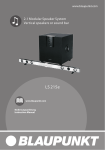
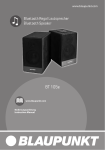
Digitales Radio mit Uhr
RX+45e
RX+45e
2
RX+45e
3
RX+45e
4
RX+45e
5
RX+45e
6
RX+45e
7
RX+45e
8
RX+45e
9
RX+45e
10
RX+45e
11
RX+45e
12
RX+45e
13
RX+45e
14
RX+45e
15
RX+45e
16
RX+45e
17
RX+45e
18
RX+45e
19
RX+45e
20
RX+45e
21
RX+45e
22
RX+45e
23
RX+45e
24
RX+45e
25
RX+45e
26
RX+45e
27
RX+45e
28
RX+45e
29
RX+45e
30
RX+45e
31
RX+45e
32
RX+45e
33
RX+45e
34
RX+45e
Important Safety Instructions
Important Safety Instructions
Caution:
To reduce the risk of electric shock, do not dismantle the product and do not expose the
apparatus to rain or moisture. No user-serviceable parts inside. Refer servicing to
qualified personnel only.
Explanation of Graphical Symbols:
The lightning flash within an equilateral triangle is intended to alert you to the
presence of uninsulated dangerous voltage within the product's enclosure that
may be of sufficient magnitude to constitute an electric shock to a person or
persons.
The exclamation point within an equilateral triangle is intended to alert you to
the presence of important operating and maintenance (servicing) instructions
in the literature accompanying the product.
35
RX+45e
Conformity
Model number: RX+45e
Description: Digital Radio with Clock
Brand name: Blaupunkt
Responsible party: M3 Electronic GmbH
Gutenbergstrasse 5, D-65830 Kriftel. Germany
Hereby, Blaupunkt Competence Center Audio M3 Electronic GmbH, declares that this Class 1
equipment is in compliance with the essential requirement and other relevant provisions of
Directive 1999/5/EC.
Letter of conformity can be obtained from [email protected].
Safety Instructions
1. Read Instructions - All the safety and operating instructions must be read before the
product is operated.
2. Retain Instructions - The safety and operating instructions should be kept product for
future reference.
3. Heed warnings - All warnings on the product and in the operating instructions should
be adhered to.
4. Follow instructions - All operating and users’ instructions should be followed.
5. Installation - Install in accordance with the manufacturer's instructions.
6. Power sources - This product should be operated only from the type of power source
indicated by the marking adjacent to the power cord entry. If you are not sure of the type
of power supply to your home, consult your product dealer or local power company.
7. Grounding or polarization - the product is not required to be grounded. Ensure the
plug is fully inserted into the wall outlet or extension cord receptacle to prevent blade or
pin exposure. Some versions of the product are equipped with a power cord fitted with a
polarized alternating line plug (a plug having one blade wide than the other). This plug
will fit onto the power outlet only one way. This is a safety feature. If you are unable to
insert the plug fully into the outlet, try reversing the plug. If the plug should still fail to fit,
contact your electrician to replace your obsolete outlet. Do not defeat the safety purpose
of the polarized plug. When using an extension power-supply cord or a power-supply
cord other than that supplied with the appliance, it should be fitted with the appropriate
molded plugs and carr y safety approval appropriate to the countr y of use.
8. Power cord protection - Power-supply cords should be routed so that they are not
likely to be walked on, kinked or pinched by items placed on or against them, paying
particular attention to cords from plugs, receptacles and the point where they exit from
the product.
9. Overloading - Do not overload wall outlets, extension cords, or multiple sockets, as
this can result in a risk of fire or electric shock.
10. Ventilation - The product must be properly ventilated. Do not place the product on a
bed, sofa, or other similar surface. Do not cover the product with any items such as
tablecloths, newspapers, etc.
36
RX+45e
11. Heat - The product should be situated away from heat sources such as radiators, heat
registers, stoves, or other products, including amplifiers that produce heat. No naked
flame sources, such as lighted candles, should be placed on the apparatus.
12. Water and moisture - To reduce the risk of fire or electric shock, do not expose the
product to train, dripping, splashing or excessive moisture such as in a sauna or
bathroom. Do not use this product near waterfor example, near a bathtub, washbowl,
kitchen sink, laundry tub, in a wet basement, or near a swimming pool and the like.
13. Object and Liquid Entry - Never push objects of any kind into this product through
openings, as they may touch dangerous voltage points or short-circuit parts that could
result in a fire or electric shock. Never spill liquid of any kind on the product. Do not place
any object containing liquid on top of the product.
14. Cleaning - Unplug the product from the wall outlet before cleaning. The cabinet of
the subwoofer may be cleaned by dusting with a dry cloth. If you wish to use an aerosol
cleaning spray, do not spray directly on the cabinet; spray onto the cloth. Be careful not to
damage the drive units.
15. Attachments - Do not use attachments not recommended by the product
manufactures, as they may cause hazards.
16. Accessories - Do not place this product on an unstable cart, stand, tripod, bracket or
table. The product may fall, causing serious injury to a child or adult, and serious damage
to the product. Use only with a cart, stand, tripod, bracket or table recommended by the
manufacturer or sold with the product. Any mounting of the product should follow the
manufacturer’s instructions and should use a mounting accessory recommended by the
manufacturer.
17. Moving the product - A product and cart combination should be moved with care.
Quick stops, excessive force and uneven surfaces may cause the product and cart
combination to overturn.
18. Unused periods - The power cord of the appliance should be unplugged from the
outlet during lightning storms or when the apparatus is left unused for a long period of
time.
19. Servicing - Do not attempt to service this product yourself, as opening or removing
covers may expose you to dangerous voltage or other hazards. Refer all servicing to
qualified service personnel.
20. Please remove the power plug form the main power source or wall power source when
not in use. When plugged in to a power source, the system is in standby mode, so the
power is not entirely cut off.
21. Replacement parts - When replacement parts are required, ensure the service
technician has used replacement parts specified by the manufacturer or have the same
characteristics as the original part. Unauthorized substitutions may result in fire, electric
shock or other hazards.
22. Mains fuses - For continued protection against fire hazard, use fuses only of the
correct type and rating. The correct fuse specification for each voltage range is marked on
the product.
23. Do not turn up the volume while listening to a section with very low level inputs or no
audio signals. If you do, the speaker may be damaged when a peak level section is
suddenly played.
37
RX+45e
24. The only means of completely disconnecting the product from the power supply is by
removing the power cord from the wall outlet or the product. The wall outlet or the power
cord entry to the product must remain freely accessible at all times while the product is in
use.
25. Try to install the product near a wall socket or extension cord and shall be easily
accessible.
26. The highest environmental temperature suitable for this product is 35°C.
27. ESD hints - The product maybe reset or not reset to operation of control due to
electrostatic discharge, just switch off and reconnect again.
ERP2 - (Energy related products) note
This product complies with the European Commission on Ecodesign Directive and its
implementing Regulations Energy related products because the unit works with low
voltage and current external power supplier. You can reference the regulation on EC No.
1275/2008 for details.
38
RX+45e
Illustrations
Front view
1. Standby/Mode
Press and release to power on
Press and hold to power off
When the radio is on, press and release to switch modes (DAB/FM)
2. Rotary volume control
3. Rotary tune control
Press to enter/make a selection
4. Scan
5. Info
6. Shift (use to store/recall Presets 6-10)
7. Alarm/Sleep/Snooze
8. Presets (10 DAB/10 FM)
9. Speaker
10. Display
39
RX+45e
Back view
11. Telescopic aerial
12. Power supply socket
13. Headphone socket
40
RX+45e
Instructions for use
Where to put your radio
It is important that you consider carefully in advance where your radio will be situated
and make sure that it is:
* on a flat and stable surface
Note: Never place your radio on antique or polished surfaces.
* within 1.4 metres of a power socket
* where you can fully extend the telescopic aerial
* away from bright sunlight or heat sources, such as a radiator
* not in a humid or very damp place such as a bathroom
Setting up
1. Connect the mains power lead into the socket on the back of the radio.
2. Fully extend the radio aerial in a vertical position to obtain the maximum signal
strength.
3. Plug the power adaptor into the mains power wall socket and switch on.
4. Your radio will switch on and ‘Welcome to Digital Radio’ will be displayed, followed by
time and your radio enters into standby mode. Press Standby/Mode button to switch on,if
it's the first time to power on,defaulted as DAB mode, your radio perform Autotune Full
Scan for DAB/DAB+ radio stations (if not the first time,it will enter mode of last use). A
progress bar will show the progress of the scan and the number of stations found during
the scan will also be displayed. When the scan is complete your radio will select the first
available station and begin to play.
Note: The DAB radio station list is stored in the memory and so the next time you switch
your radio on, the station search does not take place.
Switch on/off
Press and release the ‘Standby’ button on the top of the radio to switch the radio on.
Press and hold the ‘Standby’ button on the top of the radio to switch the radio off
(Standby mode).
Time and date
The first time you listen to DAB radio, the time and date of your product will be
synchronised automatically to that broadcast by the DAB service in 24 hour mode; which
is in line with daylight saving, so there is no need to set the time and date manually.
Changing modes (DAB/FM)
Briefly press the ‘Standby’ button on the top of the radio to switch between DAB and FM
mode.
Adjusting the volume
Use the left hand rotary control to adjust the volume. Turn clockwise to increase the
volume and anti-clockwise to decrease the volume.
Headphone socket
You can connect headphones (not included) to your radio. The headphone socket can be
found on the back of the radio. When you have headphones connected the radio speakers
are switched off and all sound is via the headphones.
Note: Headphones will need a 3.5mm stereo plug.
41
RX+45e
DAB Mode
What is DAB Digital Radio?
DAB means Digital Audio Broadcasting. The difference between a DAB radio and a
conventional AM/FM radio is that broadcasts are transmitted digitally resulting in a high
quality audio sound*, without any hiss, fading or crackles.
Your DAB radio will automatically scan and find all the available stations for you. Each
station name, is shown on the display; all you need to do is scroll through the station
names and select the one that you would like to listen to, so it’s very easy and quick to use.
For more information about DAB services and to find a list of stations available in your
area visit www.digitalradionow.com.
* Please note that the sound quality is dependent on a strong signal strength. Signal
strength can vary from area to area. To check the signal strength in your area visit
www.digitalradionow.com
Telescopic aerial
Please make sure that the aerial on the back of the radio is fully extended and adjusted
when you scan for DAB stations and listen to DAB radio (a vertical position is
recommended). This will ensure that the maximum signal strength is available as well as
the best possible sound quality.
Changing DAB/DAB+ stations
1. If you are not already in DAB mode, briefly press the ‘Standby’ button on the top of your
radio to go to DAB mode.
If you were listening to a DAB/DAB+ station when you switched the radio off then this
station will be automatically selected when you switch the radio back on.
2. Use the right hand rotary control on the top of the radio to scroll through the station
list.
3. When the station that you would like to listen to is displayed, wait for a few seconds
whilst your DAB radio tunes to that station.
Scanning for DAB/DAB+ stations
With DAB radio, additional stations and services regularly become available so it’s a good
idea to carry out a scan every now and then to make sure that you have the most up to
date station listing stored within the memory of your radio.
If you have moved your radio to another location, e.g. if you go on holiday, then it’s also a
good idea to carry out a scan.
1. If you are not already in DAB mode, briefly press the ‘Standby’ button to go to DAB
mode.
2. Briefly press the ‘Scan’ button on the top of your radio to carry out a auto full scan,
followed by ‘Searching... ’ will be displayed and a progress bar will show the progress of
the scan and number of stations found during the scan will also be displayed.
42
RX+45e
3. You can also do manual tune, firstly you have to know the frequency of the station you
would like to listen to, press and hold "Enter" knob for a few seconds, it will show "Manual
tune", then frequency will show up, e.g. 11B 218.64MHz. You can rotate Tune rotary
control knob to select frequency, your radio will auto scan all the stations in this
frequency and display the station name in lower line. After scan is complete, it will play
the first station in this frequency. To listen to next station, press and release "Enter" knob
to enter into station list, rotate Tune rotary control knob to select the station you
would like to listen to and press "Enter" knob to confirm.
Storing a DAB/DAB+ station preset
Your radio can store up to 10 DAB stations in its preset memories for instant access to your
favourite stations
Note: When you store DAB radio station presets, these do not overwrite your FM station
presets.
1. Tune your radio to the station that you wish to preset (see changing DAB stations on
page 7).
2. Press and hold the preset button on the top of your radio that you would like to store
the station to (1-5) for 3 seconds. ‘Preset X stored’, where ‘X’ is the number of the preset
location will be displayed.
3. To store a preset under preset locations 6-10, press and release ‘Shift’, ‘<Preset 6 - 10>’ is
displayed, then press and hold the preset button that you would like to store the station
to for 3 seconds.
Note: If there is already an existing DAB station stored under a preset, it will be over
written when you store the new station.
Tune to a DAB/DAB+ preset station
In DAB mode:
1. For presets 1-5, simply press the Preset location button and your radio will tune to the
station stored under that button.
2. For presets 6-10, press and release the ‘Shift’ button, then press the preset location
button. Your radio will then tune to the station stored under that button.
Note: If no DAB station has been stored under the preset button, ‘Preset X empty’ will be
displayed, where ‘X’ is the number of the preset location, then the radio will revert to the
previously selected radio station after a few seconds.
DAB display information
When listening to a DAB station you can change the information that will appear on the
second line of the display. There are several different types of information that are sent by
the broadcaster.
Dynamic Label Segment (DLS)
This is scrolling text information supplied by the broadcaster. Information could be the
name of an artist or music title, DJ’s name, contact details for the radio station etc.
Program Type (PTY)
Such as ‘Rock’, ‘Pop‘, Talk’ or ‘News’
43
RX+45e
Multiplex name
Displays the broadcasting area and collection of radio stations on this frequency e.g. BBC
National DAB, Digital 1 Network.
Signal strength
The information provided gives details of the signal strength you are receiving. An empty
” ” will appear on the second line of the display to indicate the minimum signal strength
for acceptable listening. The row of solid rectangles indicate the actual signal strength
that you are receiving. The stronger the signal, the further to the right the row of solid
rectangles will be.
Time and date
Supplied by the broadcaster.
Channel and Frequency - e.g.: 12B 225.648 MHz
Signal information
Stereo or Mono and the data rate at which the signal is being transmitted.
Repeatedly press the ‘Info’ button on the top of the radio to cycle through the different
information options.
44
RX+45e
FM mode
Briefly press the ‘Standby’ button on the top of your radio to go to FM mode.
When your radio is in FM mode it can receive Radio Data System or ‘RDS’ information if this
is being transmitted by the broadcaster. RDS information will often include the station
name, detail about the programme and the current time.
If you were listening to an FM station when you switched the radio off then this station
will be automatically selected when you switch the radio back on.
Telescopic aerial
Please make sure that the aerial on the back of the radio is fully extended and adjusted
before you attempt to tune to an FM station (a vertical position is recommended). This will
ensure that the maximum signal strength is available when the radio begins to scan.
Extending the aerial also ensures the best possible sound quality.
Tuning to an FM station
1. Press and release the ‘Scan’ button on the top of your radio to scan up the frequency
band. Press and hold ‘Scan’ to scan down the frequency band. Your radio will search for the
next available station and then stop on that station.
2. Use the right hand rotary tune control to fine tune each frequency in 0.05MHz steps.
You can also turn the rotary tune control quickly to go straight to a specific frequency.
The RDS information for each station will be displayed, if available.
Note: If reception is still poor adjust the position of the aerial or try moving the radio to
another location.
Storing an FM station preset
Your radio can store up to 10 FM stations in its preset memories for instant access to your
favourite stations.
Note: When you store FM radio station presets, these do not overwrite your DAB station
presets.
1. Tune your radio to the station that you wish to preset (see Tuning to an FM station on
this page).
2. Press and hold the preset button on the top of your radio that you would like to store
the station to (1-5) for 3 seconds. ‘Preset X stored’, where ‘X’ is the number of the preset
location will be displayed.
3. To store a preset under preset locations 6-10, press and release ‘Shift’, ‘<Preset 6 - 10>’ is
displayed, then press and hold the preset button that you would like to store the station
to for 3 seconds.
Note: If there is already an existing FM station stored under a preset, it will be over written
when you store the new station.
Tune to an FM preset station
In FM mode:
1. For presets 1-5, simply press the Preset location button and your radio will tune to the
station stored under that button.
2. For presets 6-10, press and release the ‘Shift’ button, then press the preset location
button. Your radio will then tune to the station stored under that button.
45
RX+45e
Note: If no FM station has been stored under the preset button, ‘Preset X empty’ will be
displayed, where ‘X’ is the number of the preset location, then the radio will revert to the
previously selected radio station after a few seconds.
FM display information
When listening to an FM station you can change the information that will appear on the
second line of the display. There are several different types of information that are sent by
the broadcaster.
Radiotext (RT)
This is scrolling text information supplied by the broadcaster. Information could be the
name of an artist or music title, Dj’s name, contact details for the radio station etc.
Program Type (PTY)
Such as ‘Rock’, ‘Pop‘, Talk’ or ‘News’
Signal strength
The information provided gives details of the signal strength you are receiving. An empty
will appear on the second line of the display to indicate the minimum signal strength for
acceptable listening. The row of solid rectangles indicate the actual signal strength that
you are receiving. The stronger the signal, the further to the right the row of solid
rectangles will be.
Time and date
Supplied by the broadcaster.
Frequency
Such as 93.30MHz
Audio mode
The radio will automatically switch between Stereo and Mono, depending on the quality
of the signal being received.
Repeatedly press the ‘Info’ button on the top of the radio to cycle through the different
information options.
46
RX+45e
Setting the Alarm
Note: Check that the radio has the correct time and date from the DAB signal before you
set an alarm.
1. Press and hold the ‘Alarm/Sleep/Snooze’ button to enter alarm mode.
2. ‘Alarm Status’ will be displayed and ‘ON’ or ‘OFF’ will flash on the second line of the
display. Use the right hand rotary control to change the display to ‘ON’ or ‘OFF’ as required
and press the right hand rotary control to confirm.
3. If you have selected ‘ON’ in step 2 above, the ‘Hour’ for the alarm will flash. Use the right
hand rotary control to display the correct hour for your alarm in 24 hour clock and press
the right hand rotary control to confirm.
4. The minutes for the alarm will flash. Use the right hand rotary control to display the
correct minutes for your alarm and press the right hand rotary control to confirm.
5. The alarm type will now flash. Use the right hand rotary control to choose from Beeper,
DAB and FM. Press the right hand rotary control to confirm.
6. The alarm volume will now be displayed. Use the right hand rotary control to set the
alarm volume and press the right hand rotary control to confirm.
7. The alarm mode will now flash. Use the right hand rotary control to choose from Once,
Daily, Weekdays or Weekends. Press the right hand rotary control to confirm.
In Standby mode a bell icon will be displayed on the bottom right of the display to
confirm that an alarm has been set.
Note: If you have selected ‘DAB’ or ‘FM’ for your alarm, please check that you have set an
alarm volume level that will wake you up.
Stop the Alarm
When the alarm sounds press the ‘Standby’ button on the top of the radio. Alternatively,
you can press ‘Alarm/Sleep/Snooze’ on the top of the radio.
Turn off the Alarm
Follow steps 1 and 2 in ‘Setting the Alarm’ and select ‘OFF’ in step 2.
Snooze function
When the alarm sounds, you can press the ‘Alarm/Sleep/Snooze’ button on the top of the
radio. ‘z’ will be displayed in the bottom right of the display and the alarm will sound
again in approximately 5 minutes.
Sleep timer
You can set your radio to turn off automatically using the sleep timer. You can choose from
15, 30, 45, 60 and 90 minutes or OFF.
1. Press the ‘Alarm/Sleep/Snooze’ button on the top of the radio.
2. Use the right hand rotary control on the top of the radio to scroll to the sleep time you
would like (15, 30, 45, 60 or 90 minutes). Press the right hand rotary control to confirm. An
‘S’ and the number of minutes you have set (eg: S15), will appear in the top right of the
display to confirm that your sleep timer has been set.
3. To cancel the sleep timer function, press the ‘Alarm/Sleep/Snooze’ button and use the
right hand rotary control to scroll to ‘OFF’ and press the right hand rotary control to
confirm.
47
RX+45e
Simple solutions
If you are experiencing problems with your radio, there are some quick and easy checks
that you can do, which may help to solve the problem.
Radio reception is poor
- Please check that the aerial is FULLY extended for the maximum signal strength and
improved reception.
- Try moving your radio to an alternative location to see if the reception improves. Please
remember to scan for DAB stations again once you have moved your radio. See page 42.
- Check that you do not have other electrical equipment too close to your radio, causing
interference.
- Visit www.digitalradionow.com for information about DAB reception in your area.
No sound
- Adjust the volume using the left hand rotary control on the top of your radio.
- Check that the mains power lead is connected at the back of the radio and the mains
power wall socket is switched on.
- You may need to re-scan if the station you last listened to is no longer available. See page
42.
The function buttons do not respond
- Check that the power lead is plugged into the back of the radio and that the mains
adaptor is plugged in and switched on. Press and release the ‘Standby’ button on the front
of the radio.
- Turn off the radio and unplug the mains power. Leave for one minute and then reconnect
your radio.
- Try a reset to factory defaults.
If you are experiencing any difficulty after making the above checks please call the
helpdesk for further assistance.
Software version
Asked for the software version of your radio.
1. Press and hold the ‘Info’ button on the top of the radio for 3 seconds.
2. The software version will be displayed and you may wish to make a note of it here.
48
RX+45e
Technical information
Technical specification
Power adaptor:
Output 5V/1A
Input 100-240V/50-60Hz
DAB frequency range:
Band III, 174 MHz - 240 Mhz
FM frequency range:
87.5 MHz to 108 MHz
Reset your radio
You can reset your radio and restore all of the original factory settings.
Note: If you reset your radio all of your DAB and FM station presets and alarm settings will
be deleted.
1. Press and hold the ‘Info’ button on the top of the radio until the software version is
displayed. Release and press the ‘Info’ button again. ‘System Reset’ is displayed.
2. Press the right hand rotary control to confirm. Press again when prompted to do so.
3. ‘System reset’ is displayed. After a few seconds your radio will begin an automatic scan
for DAB stations.
General information
Service
This product should only be repaired or serviced by an authorised Service Engineer and
only genuine approved spare parts should be used.
49
RX+45e
This symbol on the product or in the instructions means that your electrical and electronic
equipment should be disposed at the end of its life separately from your household waste.
There are separate collection systems for recycling in the EU.
For more information, please contact the local authority or your retailer where you purchased
the product.
All rights reserved by Blaupunkt Competence Center Audio M3 Electronic GmbH. This
material may be reproduced, copied or distributed for personal use only.
50