1
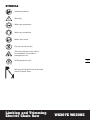
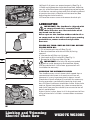
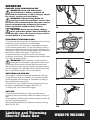
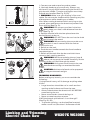
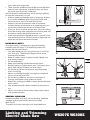
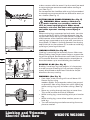
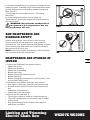
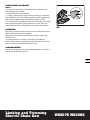
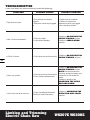
SAFETY AND OPERATING MANUAL
Limbing and Trimming
Electric Chain Saw
WG307E WG308E
General Power Tool
Safety Warnings
WARNING! Read all safety
warnings and all instructions.
Failure to follow the warnings and instructions
may result in electric shock, fire and/or serious
injury.
Save all warnings and instructions for
future reference.
The term “power tool” in the warnings refers
to your mains-operated (corded) power tool or
battery-operated (cordless) power tool.
1) Work area safety
a) Keep work area clean and well lit.
Cluttered or dark areas invite accidents.
b) Do not operate power tools in
explosive atmospheres, such as in
the presence of flammable liquids,
gases or dust. Power tools create sparks
which may ignite the dust or fumes.
c) Keep children and bystanders away
while operating a power tool.
Distractions can cause you to lose control.
2
2) Electrical safety
a) Power tool plugs must match the
outlet. Never modify the plug in any
way. Do not use any adapter plugs
with earthed (grounded) power tools.
Unmodified plugs and matching outlets
will reduce risk of electric shock.
b) Avoid body contact with earthed or
grounded surfaces, such as pipes,
radiators, ranges and refrigerators.
There is an increased risk of electric shock
if your body is earthed or grounded.
c) Do not expose power tools to rain or
wet conditions. Water entering a power
tool will increase the risk of electric shock.
d) Do not abuse the cord. Never use
the cord for carrying, pulling or
unplugging the power tool. Keep cord
away from heat, oil, sharp edges or
moving parts. Damaged or entangled
cords increase the risk of electric shock.
e) When operating a power tool
outdoors, use an extension cord
suitable for outdoor use. Use of a cord
suitable for outdoor use reduces the risk of
electric shock.
f) If operating a power tool in a damp
location is unavoidable, use a residual
current device (RCD) protected
supply. Use of an RCD reduces the risk of
electric shock.
3) Personal safety
a) Stay alert, watch what you are
doing and use common sense when
operating a power tool. Do not use
a power tool while you are tired or
under the influence of drugs, alcohol
or medication. A moment of inattention
while operating power tools may result in
serious personal injury.
b) Use personal protective equipment.
Always wear eye protection.
Protective equipment such as dust mask,
non-skid safety shoes, hard hat, or hearing
protection used for appropriate conditions
will reduce personal injuries.
c) Prevent unintentional starting. Ensure
the switch is in the off-position
before connecting to power source
and/or battery pack, picking up or
carrying the tool. Carrying power
tools with your finger on the switch or
energising power tools that have the
switch on invites accidents.
d) Remove any adjusting key or wrench
before turning the power tool on. A
wrench or a key left attached to a rotating
part of the power tool may result in
personal injury.
e) Do not overreach. Keep proper
footing and balance at all times. This
enables better control of the power tool in
unexpected situations.
f) Dress properly. Do not wear loose
clothing or jewellery. Keep your
hair, clothing and gloves away from
moving parts. Loose clothes, jewellery or
long hair can be caught in moving parts.
g) If devices are provided for the
connection of dust extraction and
collection facilities, ensure these are
connected and properly used. Use of
Limbing and Trimming
Electric Chain Saw
WG307E WG308E
a qualified repair person using only
identical replacement parts. This will
ensure that the safety of the power tool is
maintained.
dust collection can reduce dust-related
hazards.
4) Power tool use and care
a) Do not force the power tool. Use
the correct power tool for your
application. The correct power tool will
do the job better and safer at the rate for
which it was designed.
b) Do not use the power tool if the
switch does not turn it on and off.
Any power tool that cannot be controlled
with the switch is dangerous and must be
repaired.
c) Disconnect the plug from the power
source and/or the battery pack from
the power tool before making any
adjustments, changing accessories,
or storing power tools. Such preventive
safety measures reduce the risk of starting
the power tool accidentally.
d) Store idle power tools out of the
reach of children and do not allow
persons unfamiliar with the power
tool or these instructions to operate
the power tool. Power tools are
dangerous in the hands of untrained users.
e) Maintain power tools. Check for
misalignment or binding of moving
parts, breakage of parts and any other
condition that may affect the power
tool’s operation. If damaged, have the
power tool repaired before use. Many
accidents are caused by poorly maintained
power tools.
f) Keep cutting tools sharp and clean.
Properly maintained cutting tools with
sharp cutting edges are less likely to bind
and are easier to control.
g) Use the power tool, accessories
and tool bits etc. in accordance
with these instructions, taking into
account the working conditions and
the work to be performed. Use of the
power tool for operations different from
those intended could result in a hazardous
situation.
5) Service
a) Have your power tool serviced by
ADDITIONAL SAFETY
POINTS FOR YOUR
ELECTRIC JAW SAW
1.Keep all parts of the body away from
the saw chain when the jaw saw is
operating. Before you start the jaw
saw, make sure the saw chain is not
contacting anything. A moment of
inattention while operating jaw saws may
cause entanglement of your clothing or
body with the saw chain.
2. Always hold the jaw saw with your
right hand on the rear handle and
your left hand on the front handle.
Holding the jaw saw with a reversed hand
configuration increases the risk of personal
injury and should never be done.
3. Wear safety glasses and hearing
protection. Further protective
equipment for head, hands, legs
and feet is recommended. Adequate
protective clothing will reduce personal
injury by flying debris or accidental contact
with the saw chain.
4. Do not operate a jaw saw in a tree.
Operation of a jaw saw while up in a tree
may result in personal injury.
5. Always keep proper footing and
operate the jaw saw only when
standing on fixed, secure and level
surface. Slippery or unstable surfaces
such as ladders may cause a loss of
balance or control of the jaw saw.
6. When cutting a limb that is under
tension be alert for spring back. When
the tension in the wood fibres is released
the spring loaded limb may strike the
operator and/or throw the jaw saw out of
control.
7. Use extreme caution when cutting
brush and saplings. The slender material
may catch the saw chain and be whipped
toward you or pull you off balance.
Limbing and Trimming
Electric Chain Saw
WG307E WG308E
3
4
8.Carry the jaw saw by the front
handle with the jaw saw switched
off and away from your body. When
transporting or storing the jaw saw
always fit the guide bar cover. Proper
handling of the jaw saw will reduce the
likelihood of accidental contact with the
moving saw chain.
9.Follow instructions for lubricating,
chain tensioning and changing
accessories. Improperly tensioned
or lubricated chain may either break or
increase the chance for kickback.
10.Keep handles dry, clean, and free
from oil and grease. Greasy, oily handles
are slippery causing loss of control.
11.Cut wood only. Do not use jaw
saw for purposes not intended. For
example: do not use jaw saw for
cutting plastic, masonry or non-wood
building materials. Use of the jaw saw
for operations different than intended
could result in a hazardous situation.
12.Hold the power tool by insulated
gripping surfaces only, because the
saw chain may contact hidden wiring
or its own cord. Saw chains contacting a
“live” wire may make exposed metal parts
of the power tool “live” and could give the
operator an electric shock
Kickback is the result of tool misuse and/or
incorrect operating procedures or conditions
and can be avoided by taking proper
precautions as given below:
1.Maintain a firm grip, with thumbs and
fingers encircling the jaw saw handles,
with both hands on the saw and
position your body and arm to allow
you to resist kickback forces. Kickback
forces can be controlled by the operator, if
proper precautions are taken. Do not let go
of the jaw saw.
2.Only use replacement bars and chains
specified by the manufacturer. Incorrect
replacement bars and chains may cause
chain breakage and/or kickback.
3.Follow the manufacturer’s sharpening
and maintenance instructions for the
saw chain. Decreasing the depth gauge
height can lead to increased kickback
Causes and operator prevention
of kickback:
Kickback may occur when the nose or tip of
the guide bar touches an object, or when the
wood closes in and pinches the saw chain in
the cut.
Tip contact in some cases may cause a sudden
reverse reaction, kicking the guide bar up and
back towards the operator.
Pinching the saw chain along the top of the
guide bar may push the guide bar rapidly back
towards the operator.
Either of these reactions may cause you to
lose control of the saw which could result in
serious personal injury. Do not rely exclusively
upon the safety devices built into your saw. As
a jaw saw user, you should take several steps
to keep your cutting jobs free from accident or
injury.
Limbing and Trimming
Electric Chain Saw
WG307E WG308E
SYMBOLS
Read the manual
Warning
Wear eye protection
Wear ear protection
Wear dust mask
Do not expose to rain
Remove plug from the mains
immediately if the cable is
damaged or cut.
5
RCM approval mark
Warning of danger from overhead
electric-power lines
Limbing and Trimming
Electric Chain Saw
WG307E WG308E
8
6
9
5
10
11
12
13
7
14
6
2
17
4
3
2
1
21
16
15
19
Limbing and Trimming
Electric Chain Saw
WG307E WG308E
1.
Power cord
2.Lock out button
3. Rear handle
4.Trigger switch
5.Oil level window
6.Oil filler
7.Front handle
8. Motor
9. Jaw teeth
10.guide bar
11.Saw chain
12.Chain access cover
13.Chain access cover nut
14.Auxiliary position
15.Chain tensioner bolt
16.Sprocket
17.Lock pin
18.Lock pin receptacle (See Fig. B3)
19.Oil bottle
20.Extension pole (only for WG308E, See Fig. Z4)
21.Cable hook
Not all the accessories illustrated or described are included in standard delivery.
Limbing and Trimming
Electric Chain Saw
WG307E WG308E
7
TECHNICAL DATA
220-240V~50/60Hz
Voltage
600W
Rated power
3000/min
No load speed
Guide bar length
150mm
Oil tank capacity
30ml
Chain pitch
6.4mm
Chain gauge
1.3mm
Chain speed
5.5m/s
42
Number of chain links
Weight
WG307E
3.7kg (without pole)
WG308E
5.3kg (with pole)
ACCESSORIES
8
WG307E
WG308E
Wrench
1
1
Oil bottle
1
1
Lock pin
1
1
Cable hook
1
2
Chain oil (100ml)
1
1
Extension pole (WA0163)
/
1
We recommend that you purchase your accessories from the same store that sold you the tool.
Use good quality chain oil. Use only replacement bar and chain of the same specification. Your
retailer can advise the correct purchase.
Limbing and Trimming
Electric Chain Saw
WG307E WG308E
INTENDED USE
This JawSaw has been designed for pruning branches
and cutting small logs up to 100mm in diameter, not
for cutting metals (See Fig. A).
100mm
ADJUSTMENT AND ASSEMBLY
WARNING: Before touching the chain or
making any other adjustments, make sure
that the tool is switched off and unplugged.
All saw chains wear and become loose from
operation. Periodically check the chain, if there is any
visible gap between the chain and the guide bar, it
must be re-tensioned.
WARNING: Unplug JawSaw from power
source before adjusting saw chain
tension.
WARNING: Cutting edges on chain
are sharp. Use protective gloves when
handling chain.
This product comes fully assembled. However, we
recommend that you check the chain tension before
use and readjust if necessary.
A
17
B1
ADJUSTING THE CHAIN TENSION
1. Push the handle until the bar is in the middle of the
jaw opening as shown. Lock the bar in the middle
position by inserting the lock pin (17) found on the
power cord into the lock pin receptacle (18) located
under the handle (See Fig. B1-B3).
9
17
B2
18
B3
F
Limbing and Trimming
Electric Chain Saw
WG307E WG308E
2. Open the chain access cover (12) by using the
f To open turn the
supplied wrench.
access cover nut
front
1/4 turn anti-clockwise. (See Fig. C)
3. Release tension on the chain by loosening the chain
tensioner bolt (15). Turn the chain tensioner bolt antic
clockwise 2aor more times. (See Fig. D)
back
4. Re-tighten the chain tensioner bolt by turning the
chain tensioner bolt. When tightening the chain
tensioner bolt the automatic chain tensioning system
will set the tension
b to the chain at the same time.
5. Check that the correct chain tension has been set.
G1 be possible to pull the chain away from the
J
It should
side of the bar approximately 3mm and it should snap
back. (See Fig. E)
If tension is incorrect, repeat step 3, ensuring the bar
is free to move when the tensioner is released.
12
C
15
D
10
3mm
E
CHANGING THE GUIDE BAR AND CHAIN
WARNING: Laceration hazard. Always wear
protective gloves when installing or removing
the saw chain. The saw chain is sharp and can cut you
even when it is not running.
WARNING: Burn hazard. The chain guide bar
and chain may become hot during use. Allow to
G2 adjustment or removal.
K
cool before
1.Ensure the operation is carried out on a firm surface.
2.Disconnect the power, install the lock pin and open
the chain access cover as described in the previous
section.
11
3.Use only WORX replacement bar and chain.
10
4.Loosen and remove the chain tensioner
bolt.
5.Lift the guide bar (10) and chain (11) out through the
jaw, angling the bar to clear the two bar locating pins
(d) (see Fig. I).
6.If replacing the bar, remove the mounting plate (a),
which is retained by a single screw and fit to the new
bar. The bar is symmetrical and may be mounted
H
L
with either
face outward (can be reversed if the lower
working edge is worn) (See Fig. F).
e
16
a
F
d
I
Limbing and Trimming
Electric Chain Saw
M
WG307E WG308E
7.Before re-fitting the bar, check that the small oil
hole (b) and chain slot (c) are not
12blocked by dirt or
sawdust, use a small toothpick to clean if necessary
(See Fig. G1,G2).
8.Refit the chain to the bar. Note the correct direction
of the teeth (See Fig. H). The cutting direction is
100mm
inward on the lower cutting edge.
9.With the mounting plate (a) toward the motor and
holding the chain in place on the bar, feed bar and
chain into the jaw, angling over the bar locating pins
(d) and engaging the chain on the drive sprocket
(16) (See Fig. I). C
There is little excess chain length,
therefore, the chain must be properly fitted in the bar
slot to provide enough extra chain to be pulled over
the drive sprocket.
f
a
front
c
back
b
G1
15
D
G2
11
10
3mm
E
H
e
16
a
F
Limbing and Trimming
Electric Chain Saw
d
I
WG307E WG308E
11
10.Check if all parts are seated properly (See Fig J).
11.Refit and tighten the chain tensioner bolt. Note the
cam (e) of the tensioner will engage the projecting tab
(f) of the bar mounting plate and push the bar outward
to tension the chain, check for correct tension (See
Adjusting the chain tension).
12.Close the access cover and remove the lock pin.
LUBRICATION
J
N IMPORTANT: The JawSaw is shipped with
an empty oil tank. It is essential to fill
with chain oil before use. Bar and chain oil of
any brand can be used.
2
Never operate the JawSaw without chain oil or
an empty tank as this will result in poor cutting
performance, motor overloadI and possible
burn-out.
I
K
g
12
6
5
L
M
4
II
FILLING OIL TANK:
UNPLUG THE TOOL BEFORE
FILLING WITH OIL.
1. Fill oil bottle with bar oil.(See Fig. K)
2. Rest the JawSaw with the oil filler (6) facing
upward.
O
3. Uncrew the oil filler cap (g) open.
4. Use bottle to fill oil reservoir (See Fig. L).
5. Screw the oil filler cap (See Fig. M).
IMPORTANT: Use only the recommended
oil to avoid damage to the JawSaw. Never
use recycled/old oil. Use of non approved oil will
I
invalidate theIIwarranty.
CHECKING THE AUTOMATIC OILER
The JawSaw uses a much lower chain speed than a
conventional chainsaw so it needs much less oil.
However it is very important that it always has oil.
Check
P1 the oil level window (5) and refill as necessary.
During operation, periodically check the chain and
bar. A slight oil presence should be visible. If the chain
and bar appear completely dry, then remove the bar
and chain (see previous section) to ensure the bar oil
I
hole is not blocked.
If the oil hole is clear, there is oil in the tank and still no
oiling of the chainII is visible – contact Worx customer
service.
P2
Limbing and Trimming
Electric Chain Saw
WG307E WG308E
OPERATION
front
PREPARE YOUR JAWSAW FOR USE
WARNING: Read and understand
all instructions. Failure to follow all
instructions listed may result in electric shock,
back and/or serious personal injury.
fire
WARNING: Sharp moving blade. To
prevent accidental operation, ensure that
the tool is disconnected from the power source
before performing the following operations,
failure to do this could result in serious
J
personal injury.
CAUTION: Sharp moving blade. Always
wear protective gloves when installing or
removing the chain, the chain is sharp and can
cut you when it is not running.
ATTACHING EXTENSION CORD
1. To prevent disconnection of appliance cord, secure
extension cord to extension cord retainer.
2. An extension cord retainer is supplied to reduce
strain on the power cord. To use this feature, form a
loop at the end of the extension cable and bring this
through the opening at the cable hook and suspend in
the tension relief at
K the hook. (See Fig. N)
3. Keep extension cord clear of the saw and any
obstacles at all times. Do not expose the cord to heat,
oil, water, or sharp edges.
g
WARNING: Never operate a Jawsaw
6that is
11 damaged or improperly adjusted or that is not
completely and securely assembled. Be sure that
the10saw chain stops moving when the power control
system triggers are released. Never adjust the guide
bar or saw when power cord is connected.
SWITCHING ON AND OFF
The trigger is locked to prevent accidental5starting.
There are two lock out buttons (2), to allow upright
L the top) or inverted (cutting up
(cutting down from
from the bottom) operation.
To switch on, press either lock out button with your
thumb and squeeze the trigger (See Fig. O).
To switch off, just release the trigger.
CUTTING
Check oil level window (5) prior to starting and
regularly during operation. Refill oil when oil level is
low.
Check newly replaced chain tension approx. every 10
minutes during operation.
Always hold secondary handle firmly when cutting
(See Fig. P1, P2)
M
Limbing and Trimming
Electric Chain Saw
N
2
I
I
4
II
O
13
I
II
P1
I
II
P2
WG307E WG308E
Q
1
1/3
R1
14
1
1/3
2
2/3
2
2/3
1. Connect saw and extension cord to power.
2. Use both hands to grip saw firmly. Always use
left hand (I) to grip front handle and right hand (II) to
grip the rear handle. Thumbs and fingers must wrap
around saw handles (See Fig. P1,P2).
3. WARNING: Make sure your footing is firm and
stable. Do not use the JawSaw while standing on piles
of branches or while standing on a ladder.
Hint: When cutting branches which are lying on the
ground, place one foot on the branch to prevent limb
from moving (See Fig. Q).
TWARNING! Do not put your foot in the Jaw X
teeth, keep your foot a safe distance from the
tool. (See Fig. Q)
4. Position the tool with the Jaw placed over the
desired branch to be cut.
WARNING: DO NOT force the cut. Let the chain
pull through the wood.
WARNING: When starting the saw make sure
the chain is not in contact with the limb or
branch to be cut.
5. Switch on the tool.
6. Push the rear handle towards the front handle to
complete the cut.
U off the tool after the bar and chain have Y
7. Switch
return to their starting position.
WARNING: When completing the cut (step 6
Y
above) do not push
the handle forcefully, let the
spinning chain pull itself through the wood.
WARNING: Using too much force on the rear
Z
handle when cutting
can overload the tools
motor.
Z
kg
CAUTION: At the end of
each cut be prepared
to support the tools weight.
Y
R2
S
TRIMMING BRANCHES:
Before cutting any branch, you must consider the
V
Z1
following:
1.Is the branch heavy, will it damage anything when
it falls?
• Large branches should be cut in small sections
starting at the farthest end from the tree.
• Always check where the branch will fall BEFORE
commencing the cut.
• Never stand under a branch being cut.
• Never cut two branches at once.
2.Will the branch split before it is cut through?
(See Fig. R1, R2)
• To prevent splitting, use the JawSaw inverted,
make a small cut (less than 1/3 diameter of the
W
Limbing and Trimming
Electric Chain Saw
Z2
WG307E WG308E
R2
limb) from the underside.
• Then turn the JawSaw over to the normal position
and cut from top down, slightly further out from
the trunk than the initial undercut.
3.Is the branch under tension, will it spring suddenly
or trap the saw when it is cut?
• Always stand outside the path of a springy branch.
It can strike suddenly with surprising force and
cause injury or loss of control of the saw.
• Always cut from the tension side of a branch,
usually the top of a branch on a standing tree, but
can be any side of the branch of a fallen tree.
• If the cut starts to close on the saw, you are cutting
from the wrong side, keep the saw running and pull
the saw to retract the blade from the cut.
• If the saw becomes trapped do not try to pull it out
with excessive force, lift the branch to open the cut
while an assistant removes the saw.
KICKBACK SAFETY
This saws chain is covered by a guard however,
kickback can still occur. The following steps will
reduce the risk of kickback.
• Use both hands to grip saw while saw is running.
Use firm grip.QThumbs and fingers must wrap
around saw handles.
• Keep all safety items in place on saw. Make sure
they work properly.
• Do not overreach.
• Keep solid footing and balance at all times.
• Stand slightly to right side of saw. This keeps your
2
body from being
line with chain.
1 in direct
1/3
• Do not let guide bar nose touch anything when
2/3
chain is moving.
• Never try cutting through two logs at same time.
Only cut one log at a time.
• Do not bury guide bar nose or try plunge cut
R1 using guide bar nose).
(boring into wood
• Watch for shifting of wood or other forces that may
pinch chain.
• Use extreme caution when reentering a previous
cut.
1
1/3
• Never use a dull or loose chain. Keep chain sharp
with proper tension.
S
T
15
U
Y
Z
Z
2
GENERAL BEHAVIOR
2/3 secure footing. Hold the
Use the JawSaw only with
JawSaw at the right-hand side of your body.
(See Fig. S)
The chain must be running at full speed before it
R2
Limbing and Trimming
Electric Chain Saw
kg
Y
V
WG307E WG308E
V
Z1
Z5
makes contact with the wood. Use the metal jaw teeth
to secure the saw onto the wood before starting to
cut. (See Fig. T)
Do not operate the JawSaw with arms fully extended
or attempt to saw areas Iwhich areIIdifficult to reach, or
on a ladder. (See Fig. U)
CUTTING WOOD UNDER TENSION (See Fig. V)
WARNING: When cutting a limb that is
under tension, use extreme caution. Be
alert for wood springing back. When wood
Z2 is released, the limb could spring back
AA
tension
and strike operator causing severe injury or
death.
When sawing logs supported on both ends, start the
cut from above(Y) about 1/3 of the diameter into the
log and then finish the cut (Z) from below, in order to
avoid contact of the JawSaw with the ground. When
sawing logs supported on only one end, start the cut
from below (Y) about 1/3 of the diameter into the log
and finish the cut from above (Z) in order to avoid log
splitting or jamming of the tool.
W
LIMBING A TREE (See Fig. W)
Limbing
tree.
Z3 is removing the branches from a fallen AB1
When limbing leave larger lower limbs to support the
log off the ground. Remove the small limbs in one cut
as illustrated. Branches under tension should be cut
from the bottom up to avoid binding the JawSaw.
X
16
BUCKING A LOG (See Fig. X)
Bucking is cutting a log into lengths. It is important
to make sure your footing is firm and your weight is
evenly distributed on both feet. Follow the simple
20
1
directions for easy cutting.
WARNING: (See Fig. Y)
• If on slope, make sure log will not roll down hill.
Z4
AB2
Secure log by using
wooden stakes. Drive wooden stakes into ground
on downhill side of log. Stand on uphill side of log
while cutting. Log may roll after cutting. (See Fig.
Y)
• Never try cutting through two logs at same time.
This could increase the risk of kickback.
• While cutting log, never hold log with your hand or
leg.
• While cutting log, never allow another person to
hold log.
• Turn off and unplug saw before moving from one
place to another.
Y
Z1
Z5
Limbing and Trimming
Electric Chain
Saw
I
II
AB3
WG307E WG308E
V
Z1
ASSEMBLING THE EXTENSION
POLE (ONLY FOR MODEL
WG308E)
WARNING: Before attaching the extension
pole (20), make sure that the tool is
switched off and unplugged.
1. Turn the release lever to allow the handle clamp to
spring open (See Fig. Z1).
2. With the pole slightly angled away from the tool,
insert the steel tab
W into the slot behind the front
handle, then swing the pole towards the tool’s rear
handle. (See Fig. Z2).
3. Position the pole handle clamp inside the JawSaw’s
rear handle as shown in Fig Z3. To allow the clamp
to properly fit the handle, push lock out button and
depress the trigger.
4. Close the clamp, the locking lever will automatically
lock into place.
5. Check that the rear handle is properly fitted to the
clamp and check that the clamp is properly set in the
lock position.
6. Plug in the tools power cord to the extension pole
power cord . (See Fig. Z4)
X Before attaching the power
WARNING!
cord of the machine to the power cord of
the extension pole ( in Fig. Z4), make sure
that the tool is switched off and unplugged
from the power supply.
WARNING! When using this machine
with the extension pole, make sure that
attaching the power cord of the machine to
the power cord of the extension pole, and then
attach the power cord of the extension pole to
power supply.
WARNING! ELECTROCUTION HAZARD
Never useYthe JawSaw or extension pole
in an area with overhead power lines or where
the branch being cut can come into contact
with overhead power lines.
kg
Cutting with shoulder strap (WHEN USED
WITH OPTIONAL POLE ATTACHMENT)
(See Fig. Z5)
The Extension Pole is supplied with a shoulder strap
that gives extra support when hoisting the Jaw Saw in
the air. Hook the shoulder strap to the Extension Pole
and wrap around your shoulder. The shoulder strap
can also soften the impact if the JawSaw is dropped
after the completion
Z1 of a cut.
Limbing and Trimming
Electric Chain Saw
I
II
I
II
Z2
Z3
17
20
1
Z4
Z5
WG307E WG308E
Z5
AA
AB1
18
AB3
CUTTING WITH EXTENSION POLE (ONLY FOR
WG308E)
1. Attached the pole as described in ‘’Assembling the
extension pole’’.
2. Connect the JawSaw to extension cord. Connect
extension cord to power supply.
NOTE: The JawSaw is quite heavy on the end of the
extension pole.
Add the pole attachment when cutting limbs above
shoulder height and remove the pole saw when
cutting limbs at or below shoulder height.
AB4
3. Lift JawSaw with extension pole upward one step
by one step. (See Fig. AA) To raise to the vertical
position, lift by the Jawsaw first, then hand over hand
along the pole.
4. Before cutting a high branch, consider all the same
points detailed in the previous section “Trimming
Branches” but pay particular attention to the likely
path of the falling branch.
WARNING: Do not stand directly below
a branch being cut. Keep bystanders far
away. Do not stand on a ladder or other type
of unstable support while using the tool. Do
not use the tool near cable, electrical power or
telephone lines. Keep 3m away from all power
lines. (See Fig. AB1-AB4)
5. Position the Jaw perpendicularly on the branch
being cut.
NOTE: Maximum cutting capacity of JawSaw is
100mm.
AB2
AB3
Limbing and Trimming
Electric Chain Saw
WG307E WG308E
Z5
6. One hand should firmly grip the push handle of the
extension pole. The other hand should hold the metal
portion of the pole or the sliding handle on the pole
(See Fig. AC).
7.IIComplete the cut as described in “Trimming
Branches”.
8. At the completion of the cut, be ready to
immediately support the weight of the entire tool as
the branch falls.
WARNING: Do not let the JawSaw fall to
the ground at the completion of the cut,
AA
this may damage
the tool.
AB3
AB4
SAW MAINTENANCE AND
KICKBACK SAFETY
Follow maintenance instructions in this manual.
Proper cleaning of saw and chain, and guide bar
maintenance, can reduce chances of kickback. Inspect
and maintain saw after each use. This will increase
the service life of your saw.
NOTE: Even with proper sharpening, risk of kickback
can increase with each sharpening.
AC
MAINTENANCE AND STORAGE OF
JAWSAW
1. Unplug the JawSaw from power source:
• When not in use.
• When transporting.
• When left unattended.
• Before servicing.
• Before fitting the extension pole.
• Before cleaning.
• Before changing accessories or attachments, such
as saw chain and guard.
2. Inspect the saw before and after each use for:
• Any signs of damage, especially the power cord.
• Smooth action of push handle and movement of
bar.
• Adequate chain tension.
• Adequate chain lubrication.
3. Do not use the JawSaw, if:
• The trigger switch or lockout is malfunctioning.
• The push handle does not smoothly return under
spring force.
• Any other damage which affects the safety or
operation is evident.
Limbing and Trimming
Electric Chain Saw
19
i
h
AD
WG307E WG308E
4. Maintain the JawSaw with care and have any
damage or malfunction repaired by an authorized
service center:
• Never expose the JawSaw to rain.
• Keep chain sharp, clean, and lubricated for better
and safer performance.
• Follow steps outlined in this manual to sharpen
chain.
• Keep handles clean and free from oil.
• Keep all screws and nuts tight.
• Never carry the JawSaw by the power cord.
• Never yank the power cord to unplug it.
• Keep power cord away from heat, oil and sharp
edges.
• Inspect extension cords and do not use if
damaged.
5. When servicing, use only identical replacement
parts.
6. When not in use, always store JawSaw
• In a high or locked place, out of children’s reach.
• In a dry place.
20
REPLACING SAW CHAIN/CHAIN BAR
Replace chain when cutters are too worn to sharpen or
when chain breaks. Only use replacement chain noted
in this manual. Always include new drive sprocket
when replacing chain. This will maintain proper driving
of chain. Inspect guide bar before sharpening chain.
A worn or damaged guide bar is unsafe. A worn or
damaged guide bar will damage chain. It will also make
cutting harder.
To Replace the bar, remove the mounting plate (a),
which is retained by a single screw.
To fit to the new bar, fit the mounting plate (a) into
the new bar by tightening the screw clockwise. The
projecting tab (f) must be fitted through the bar slots
outwards. (See Fig. F&G1)
SHARPENING SAW CHAIN
WARNING: Unplug JawSaw from power
source before servicing. Severe injury or
death could occur from electrical shock or body
contact with moving chain.
WARNING: Cutting edges on chain are
sharp. Use protective gloves when handling
chain.
Keep chain sharp. Your saw will cut faster and more
safely. A dull chain will cause undue sprocket, guide
bar, chain, and motor wear. If you must force chain into
wood and cutting creates only sawdust with few large
chips, chain is dull.
Limbing and Trimming
Electric Chain Saw
WG307E WG308E
AC
LUBRICATING SPROCKET
Note:
It is not necessary to remove the chain or bar when
lubricating the sprocket
1. Clean the bar and sprocket.
2. Using a grease gun, insert the tip of the gun into the
lubrication hole (h) and inject grease until it appears at
the outside edge of the sprocket tip (See Fig. AD).
3. To rotate the sprocket and pull the chain by hand until
the ungreased side of the sprocket is in line with the
lubrication hole (h). Repeat the lubrication procedure.
i
h
AD
CLEANING
Regularly open the chain access cover and remove any
debris that has become trapped.
Regularly clean the ventilation slots with a clean, dry
paint brush.
To clean the tool, use only mild soap and a damp
cloth. Never let any liquid get inside the tool and never
immerse any part of the tool into liquid.
TRANSPORTING
Always transport the tool with the guide bar and chain
inside the protection guard.
21
Limbing and Trimming
Electric Chain Saw
WG307E WG308E
TROUBLESHOOTING
If your saw does not operate correctly check the following:
PROBLEMS
POSSIBLE CAUSES
POSSIBLE SOLUTION
• Tool will not start.
• Fuse blown or breaker tripped.
• Extension cord not plugged
in.
• Check fuse or breaker.
• Check to make sure
extension cord is plugged
into a working outlet.
• Bar / chain overheated.
• Chain too tight.
• Lubrication needed.
• Refer to Adjusting the
chain tension section.
• Refer to LUBRICATION
section.
• Chain is loose.
• Chain tension set incorrectly.
• Refer to Adjusting the
chain tension section.
• Poor cut quality.
• Chain tension set incorrectly.
• Chain needs replacement.
• Refer to Adjusting the
chain tension section.
NOTE: Excessive tension
leads to excessive wear and
reduction in life of bar &
chain.
• Refer to sections for
CHANGING THE GUIDE
BAR AND CHAIN.
• Unit runs but does not cut.
• Chain installed backwards.
See Fig H and illustration.
• Refer to CHANGING THE
GUIDE BAR AND CHAIN
section.
22
Limbing and Trimming
Electric Chain Saw
WG307E WG308E
Copyright © 2013, Positec. All Rights Reserved.