1
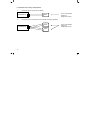
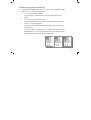
ERV-24-HC11
With FanCycler®
Technician
Settings
Cat. P048013
Rev. 2.1 12.04
Pipersville, PA 18947 USA
Phone: 215-766 1487 - Fax: 215-766 1493
Email: [email protected] - www.scillc.com
Please read this manual carefully before installation and use.
Index
Introduction
1
Options and Accessories
2
Installation Instructions
3
Wiring connections
4
DIP Switch and Jumpers explanation
5
Remote Sensor connections
6
Advanced Setup
7
Fan Cycling Configuration
8
Ventilation Damper Cycling
9
Fan over-run after cooling status
10
Fan cycling at night in heating mode status
11
Circulator pump status
12
Data Storage for System Diagnostics
13
Locking the thermostat’s buttons
14
Temperature Offset settings
15
Troubleshooting for the technician
16
2
1. Introduction
Advanced Ventilation Features of the ERV-24-HC11 thermostat with FanCycler®
Protected by one or more of the following patents:
US 5,547,017; 5,881,806; 6,431,268; CA 2,245,135
®
The ERV-24-HC11 thermostat with FanCycler has enhanced features to compliment controlled
mechanical ventilation systems. These features were configured for use by your installing technician.
(For more information please refer to the technician manual or visit www.scillc.com and
www.fancycler.com).
A brief description follows:
FAN CYCLING CONFIGURATION — The purpose of fan-cycling is to assure that the central air handler
fan will run just enough to distribute ventilation air and mix the air evenly throughout the house when
there is no demand for the heating or cooling operation to activate. Rather than cycle the fan
continuously, or intermittently by a timer (which doesn't consider prior operating conditions), the
FanCycler method saves energy, and wear and tear on equipment by operating the fan only when
necessary.
VENTILATION DAMPER CYCLING — The purpose of cycling the ventilation damper is to limit the
possibility of over-ventilation that would cause unnecessary space-conditioning energy to be used. The
damper will automatically close when the programmed ventilation requirement has been met.
3
2. Options and Accessories
Remote sensor option:
•
RS01: for remote temperature sensing (1 required); for averaging temperature at 4
locations (4 required) – the thermostat will control on the average temperature of all 4
locations
•
RS02: for averaging temperature at 2 locations (2 required) – the thermostat will
control on the average temperature of both locations
For details on where to purchase accessories, please contact SCI for your nearest
location or visit our web site at www.scillc.com
3. Installation Instructions
Separate the front panel from back panel by depressing the
tongue located in the top of the unit.
Pull the back panel out.
Line the back panel up against the wall or flat surface. Install
three screws as required.
4
Make electrical connections as shown on enclosed electrical
wiring diagram. (Next page) Verify that you have 24 VAC
between terminals C and Rh/Rc.
C ool
H eat
A u to
F an
O n /O ff
S e le c t
P ro g
Install the cover to the back panel; first the two tabs on the
bottom and then the top tongue.
Push until tight against the wall. Wait for 15 seconds for the LCD
display to appear (completion of power circuit charging and for
self-diagnostics).
S e ttin g
4. Wiring Connections
Switch
Rc
Rh
C
W1
Function
24 VAC RED
24 VAC RED (jumpered to Rc)
24 VAC Common from transformer
Heating (one stage)
Switch
T
T
FD
G
Y1
Function
Remote temperature sensor
Remote temperature sensor
Fresh air damper – power open
Fan
Cooling (one stage)
Please reference the stickers placed on top of screw terminal connectors on the wall plate when
wiring the unit (the designated terminals on the printed circuit board are for internal (factory) use
only).
“T” Terminals can be used in any system configuration when a SCI remote sensor is connected
and the DIP switch is correctly configured.
5
The Rc/Rh terminals are bridged at the factory for a one transformer application. In the case of
a two transformer application, you must remove the bridge and connect the individual
transformers to Rc (cool) and Rh (heat).
FD – Fresh-Air Damper connection - 24Vac/1Amp. The damper type must be Power Open,
Spring Close.
5. DIP Switch and Jumpers Configuration
5.1 The DIP switch is located in the middle of
the board as shown in the drawing. (Inside
the thermostat)
Y2
FD
1 2 3 4 5 6
DIP switch
Default DIP Switch setting from factory
JMP10
A
B
JMP10
AB
JMP1
JMP2
Default Jumpers position from factory
6
JMP 1
JMP 2
Table 5.1 – DIP switch selection
FUNCTION
1
Internal temp. sensor
Remote temp. sensor
1
Electric
Oil/Gas
1
3 min. compressor delay
No compressor delay
1
Programmable
Non-Programmable
1
ON
OFF
x
x
x
x
x
x
DIP Switch settings
2
3
4
5
x
x
x
OFF
x
x
x
ON
x
OFF
x
x
x
ON
x
x
x
x
OFF
x
2
x
x
ON
x
OFF
x
x
x
ON
x
x
x
6
ON
OFF
x
x
x
x
x
x
x = Disregard
1
= Factory Defaults
2
= FOR TEST ONLY
5.2 DIP Switch Operation
• The DIP switch has 6 pins.
• Each pin can be ON (top) or OFF (bottom). In the picture, pins 1 and 6 are ON, and pins 2 to 5 are OFF
5.3 Fan Explanation (DIP switch 3)
• Fan control "electric”
Fan will activate immediately with heating and cooling.
• Fan control "oil/gas”
Fan will activate immediately with cooling only. Fan will not be activated by the thermostat for heating.
Heating unit will activate the fan in AUTOFAN mode.
7
5.4 Jumpers explanation
Jumper 1: Complete Reset of the unit.
For complete reset:
•
Move JMP1 to position B.
•
Wait 15 seconds.
•
Return JMP1 to position A.
JMP1 Default from factory:
AB
Jumper 2: NOT IN USE.
JMP2 Default from factory:
Leave it closed!
Jumper 10: Enable or disable Auto change-over capability
•
•
Enable Auto change-over – JMP10 in position A (default from factory).
Disable Auto change-over – JMP10 in position B.
Default from factory:
8
A
B
6. Remote temperature sensor connections – (optional)
Important! The remote temperature sensor must be SCI type.
Table 6.1 - N.TC. Sensor: Temperature ~ Resistance Characteristics
Temp °C
Temp °F
Res. k
7.2
45
115.8
10.0
50
100.9
12.8
55
88.1
15.6
60
77.1
18.3
65
67.7
21.1
70
59.6
23.9
75
52.5
26.7
80
46.4
29.4
85
41.2
32.2
90
36.6
The default from factory is INTERNAL SENSOR.
6.1 Remote temperature sensor switch configuration
1.
Move DIP switches 1,5 and 6 as in the picture. (See Table 5.1 for setting
Switches 2,3 and 4.)
Switch 1 - OFF
Switch 5 - ON
Switch 6 – OFF
2.
3.
4.
1 2 3 4 5 6
Connect the temperature sensor leads to the T-T terminals.
Reconnect the front half of the thermostat to the base (applies 24Vac power).
Verify that the displayed temperature responds to the remote sensor.
The wire length for the remote sensor can be up to 100 feet (30 meters) with standard
thermostat cable (not less than 22 gauge).
If the distance is greater than 100 feet then the wire MUST be shielded type, 20-22 gauge,
twisted pair.
9
6.1.2 Remote sensor wiring configurations
1.
Connection of one remote sensor (RS01)
THERMOSTAT
2.
T
T
RS01
Connection of two remote sensors for average measuring (2XRS02)
RS02
T
THERMOSTAT
T
RS02
10
mount in acceptable
location for
temperature sensor
mount in acceptable
location for
temperature sensor
7. Advanced Setup
®
The ERV-24-HC11 thermostat with FanCycler has enhanced features to compliment
controlled mechanical ventilation systems and combination space and domestic hot water
heating systems.
Follow the steps below to set the unit’s advanced features:
7.1 Enter the Advanced Setup screens of the thermostat
a.
Press and hold (4 seconds) the On/Off button to turn
the thermostat OFF.
b.
Using the “+” and “-“ buttons, move the temperature
o
set-point to 50 F.
c.
Wait until the display stop flashing, then press and hold
(6 seconds) the Select button.
The Select button is used for navigation between options.
The “+” and “-“ buttons are used for setting the current feature.
11
8. Fan Cycling Configuration
The purpose of fan cycling is to assure that the central air handler fan will run enough to distribute
ventilation air and evenly mix air throughout the house, even when there is no demand for heating or
cooling. Rather than operate the fan continuously or by a simple timer that doesn’t consider prior
operation, the FanCycler method saves energy and wear and tear on equipment by only operating the
fan if it hasn’t already operated enough. You can set this up in either of two ways:
a.
Set the fan cycling ON time and OFF time (see 8.1); or
b.
Set the fan duty cycle percentage and the total period (see 8.2).
For example, setting a fan cycling ON time of 10 and a fan cycling OFF time of 20 will cause the fan to
operate for 10 minutes if it has not operated for 20 minutes. Or, setting the fan duty cycle for 33 percent
and the total period for 30 minutes will cause the fan to operate for at least 10 minutes out of every 30
minutes. (Using the duty cycle method, the thermostat will skip turning the fan on if the time would be
less than 2 minutes). The results are similar, but you can choose the path.
12
8.1 Set the fan cycling ON time and OFF time.
a.
b.
Press and hold the Select button until “LI” or ”UnLI” or ”CALC” appears on display.
Using the “+” and “-“ buttons select between:
•
“LI” – Fan cycling limited - default.
If “LI” is selected – no need to set “Fd” (Fan duty cycle) and “Ft” (Total
period).
•
“UnLI” – Fan cycling unlimited ON time.
Fan will be energized continuously after no fan activity for the fan OFF time.
•
“CALC” – Fan cycling calculated.
Fan cycling times will be calculated based on the fan duty cycle (“Fd”) and
total period (“Ft”).
If “CALC” is selected – go directly to 8.2 – no need to set “FO” (Fan cycling
limited ON time), “FF” (Fan cycling limited OFF time), “dO” (Damper cycling
OPEN time”) and “dC” (Damper cycling CLOSED time).
13
c.
Press the Select button again – four digits will appear on display.
d.
Using the “+” and “-“ buttons adjust the fan cycling limited ON time.
The number represents the number of minutes the fan will be energized after no
fan activity for the fan OFF time.
A value of 0 disables this option.
Range 0-480 minutes - Default 10 minutes.
e.
f.
Press the Select button again – “FF” will appear on display.
Using the “+” and “-“ buttons adjust the fan cycling limited OFF time.
The number represents the number of minutes the fan will be off before energizing
the fan again.
Range 1-480 minutes – Default 20 minutes.
g.
14
Go directly to 9.
8.2 Set the fan duty cycle percentage and the total period.
a.
Select “Calc” in 8.1.b
b.
Press the Select button once - “Fd” will appear on display.
c.
Using the “+” and “-“ buttons adjust the fan duty cycle.
The Number is the percent of time fan will be energized
during each total period (will be set later – “Ft”). 0 disables
this option.
Range 0-100% (0-100P) – Default 33% (33P).
d.
Press the Select button - “Ft” will appear on display.
e.
Using the “+” and “-“ buttons adjust the total period.
The Number is the time period that the fan duty cycle
pertains to.
Range 0-1440 minutes – Default 30 minutes.
15
9. Ventilation Damper Cycling
The purpose of cycling the ventilation damper is to limit the possibility of over-ventilating, which could
cause unnecessary space conditioning energy to be used. The damper will open when the fan comes
on, but if the fan stays on longer than needed for the introduction of ventilation air, the damper will
automatically close; it will then re-cycle for as long as the fan continues to operate. The damper
OPEN and CLOSED times are set in Steps 9.1 (“dO”) and 9.2 (“dC”). However, if “CALC” was
selected in Step 8, then Steps 9.1 (“dO”) and 9.2 (“dC”) will be skipped, and damper cycling times will
be automatically calculated according to the fan duty cycle and total period selected in Step 8.2 (“Fd”
and “Ft”).
9.1 Set the damper cycling OPEN time (“dO”).
a.
Press the Select button until “dO” appears on display.
b.
Using the “+” and “-“ buttons adjust the damper cycling
OPEN time.
The number is the maximum minutes the ventilation damper
will be open each time the fan is energized. 0 disables
damper cycling – meaning the damper will never open.
Range 0-480 minutes – Default 10 minutes.
16
9.2 Set the damper cycling CLOSE time (“dC”).
a.
b.
Press the Select button until “dC” appears on display.
Using the “+” and “-“ buttons adjust the damper cycling
CLOSE time.
The number is the minutes the ventilation damper will be
closed after the damper had been open and the fan is still
operating for any reason.
Range 1-480 minutes – Default 20 minutes.
10. Fan over-run after cooling status (“FC”)
The purpose of not allowing the fan to operate immediately after a cooling operation is to reduce
moisture re-evaporation from the cooling coil back into the living space. For climates where the
cooling coil generally remains dry, this option can be turned ON to cause the fan to operate for an
additional 60 seconds after a cooling operation to get more cooling effect.
a.
Press the Select button until “FC” appears on display.
b.
Using the “+” and “-“ buttons adjust the fan over-run after
cooling status – select ON or OFF.
ON causes the fan to continue to run for 60 sec after a
cooling operation has ended.
Default - OFF
17
11. Fan cycling at night in heating mode status (“Fn”)
Depending on the duct system design and the occupants, it may be desirable to not allow fan
cycling at night during the heating season. If this option is turned OFF fan cycling will be
disabled between the hours of 9 pm and 8 am while the thermostat system mode is HEAT.
a.
Press the Select button until “Fn” appears on display.
b.
Using the “+” and “-“ buttons adjust the fan cycling at night in
heating mode status – select ON or OFF.
OFF causes fan cycling to be inactive between the hours of
9 pm and 8 am while the system mode is HEAT.
Default – ON
18
12. Pump cycling for combination space and domestic hot water
heating systems (“FE”)
As building enclosures become more energy efficient and heating loads are small, a single hot
water heater can often supply hot water for both domestic use and space heating. This type of
heating system is especially popular in multi-family housing. For such systems, this option can
be turned ON to avoid potential microbial buildup in the space heating plumbing loop during
periods of inactivity. This feature assures that the heating circulator operates for at least one
minute out of every 24 hours.
a.
b.
Press the Select button until “FE” appears on display.
Using the “+” and “-“ buttons adjust the pump status – select
ON or OFF.
ON causes the circulator pump (W terminal) to be energized
for 1 minute if it has not been energized for 24 hours.
Default - OFF
c.
Press the Select button again to return to normal display
mode.
19
13. Data Storage for System Diagnostics
The following data is stored by the thermostat to allow advanced system diagnostics:
•
Average cooling set-point while cooling is active (“SC”)
•
Average heating set-point while heating is active (“SH”)
•
Average number of cooling cycles per day while in cooling mode (“CC”)
•
Average number of heating cycles per day while in heating mode (“CH”)
•
Average length of cooling cycle in minutes (“LC”)
•
Average length of heating cycle in minutes (“LH”)
These values are cumulative from the time the thermostat is placed into service.
To access these values follow these steps:
1.
Press and hold (6 seconds) the On/Off button to set the
system mode to OFF
2.
Using the “+” and “-“ buttons set the temperature set-point
to 55°F.
3.
When the display stops flashing, press and hold the Select
button.
4.
20
Use the Select button to advance through the steps.
To clear the average values follow these steps:
1.
Press and hold (6 seconds) the On/Off button to set the system mode to OFF
2.
Using the “+” and “-“ buttons set the temperature set-point to 90°F.
When the display stops
flashing, press and hold
(8 seconds) the Select
button until “Unlo”
disappears from the
display.
14. Lock the Thermostat’s Buttons
Lock the thermostat’s buttons to prevent any unwanted changes made by any unauthorized person.
Lock the thermostat
•
Press the On/Off button to turn the
thermostat ON
•
Press and hold (25 seconds) the Select
button until “LOC” appears on display.
Unlock the thermostat
•
Press and hold (25 seconds) the Select
button until “UnLO” appears on display.
•
Press the Select button 2 more times to return to normal display mode.
21
15. Offset Settings
The Offset is used for field calibration of the measured temperature if necessary.
•
Press and hold (6 seconds) the On/Off button to turn the thermostat OFF.
•
Using the “+” and “-“ buttons set the temperature set-point to 60°F, and wait
until the display stops flashing.
•
Press and hold the Select button (10 sec.) until “OFFS” and the Offset number
(a number between –6…+6) will appear (not flashing) on the display.
•
Change the Offset for ambient temperature using the “+” and “-“ buttons.
•
Press the Select button again to return to normal display mode.
The default offset is “0”
22
16. Troubleshooting for Technician
Problem
The display is blank
Cool does not switch on
Heat does not switch on
In heat mode, unit blows cool air
The unit displays low temperature
(32°F) all the time
The unit displays high temperature
(92°F) all the time
The display shows the word
"PROGRAM" without the name of
the program period (wake, sleep,
etc)
Solution
Check the thermostat for 24 VAC,
remove the front cover and test between Rc/Rh to C.
Check for good wiring connections at:
Rh (24 VAC for heat), Rc (24 VAC for cool), C (common).
If you are using one transformer for cool and heat, check that
the jumper is installed between Rc and Rh. Check that all
screws terminals are tight.
Check the Rc connection
Check the Y1 connection
Check the Rh connection
Check the W1 connection
Check the Auto Fan settings. The unit may be set to FAN
(shown in the display).
The unit is not sensing the remote sensor.
The unit is has a short circuit in the remote sensor.
The unit is in Override mode because the temperature set-point
was manually adjusted. The name of the program period will
reappear when the next program period starts.
The word “FAN” flashes without
Heat or Cool
This does not indicate a fault. It indicates that fan cycling is
active for ventilation and whole-house comfort mixing.
Displayed ambient temperature is
not accurate
Adjust the offset. See section 15. above.
23
SCI - Systems Controls & Instruments can offer a WIDE range of products for the
HVAC industry, Such as:
•
Flush Mount Thermostats - Programmable and Non-Programmable.
•
HVAC Analyzer that can measure BTU’s, for technicians.
•
Tamper proof thermostats that can be operated ONLY from the remote control, for
public places.
•
Thermostat with phone communication; listen to your thermostat from ANYWHERE
and change settings.
For a free demonstration please dial: 1-877-662-0660
Password 1,2,3,4,# For menu press *,0,#…
To obtain more information or technical support:
Tel : 1-800-663-8107.
E-mail : [email protected]
Web site: www.scillc.com
Your suggestions or comments regarding these units would be appreciated.
At our web site, you can find technical details regarding the units, as well as, operating
manuals, electrical drawings, Etc.
The company reserves the right to change the specifications any time without prior notice.
REV 2.1
24