1
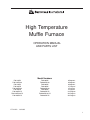
High Temperature
Muffle Furnace
OPERATION MANUAL
AND PARTS LIST
Model Numbers
F46110CM
F46110CM-33
F46118CM
F46120CM
F46120CM-33
F46128CM
F46120CM-75
F46120CM-33-75
F46128CM-75
F46230CM
F46230CM-33
F46238CM
F46240CM
F46240CM-33
F46248CM
F46240CM-75
F46240CM-33-75
F46248CM-75
8 Segment
8 Segment
8 Segment
4 Program
4 Program
4 Program
20 Program
20 Program
20 Program
LT1141X1 • 12/21/05
1
Table of Contents
Safety Information ..................................................................................................................................................................3
Alert Signals ....................................................................................................................................................................3
Warnings..........................................................................................................................................................................3
General Description ................................................................................................................................................................5
Intended Use ..................................................................................................................................................................5
General Usage .............................................................................................................................................................. 5
Principles of Operation ....................................................................................................................................................5
Types of Controllers ........................................................................................................................................................6
General Specifications............................................................................................................................................................8
Environmental Conditions ............................................................................................................................................10
Declaration of Conformity ............................................................................................................................................10
Unpacking ............................................................................................................................................................................11
Installation ............................................................................................................................................................................12
Site Selection ................................................................................................................................................................12
Furnace Connection ......................................................................................................................................................12
Initial Heat-up Procedure: ............................................................................................................................................12
General Operation of Furnace..............................................................................................................................................13
Power Switch ................................................................................................................................................................14
Cycle Indicator ..............................................................................................................................................................14
Circuit Breaker ..............................................................................................................................................................14
Fans ..............................................................................................................................................................................14
Controllers ....................................................................................................................................................................14
Accessing Controller Parameters ..................................................................................................................................15
Operation ...... ......................................................................................................................................................................16
Buttons and Indicators ..................................................................................................................................................16
Controller Parameters ..................................................................................................................................................17
Alarms ... ......................................................................................................................................................................20
Basic Operation ............................................................................................................................................................21
To Operate the Controller as a Single Setpoint Controller ............................................................................................21
Programming the Controller ................................................................................................................................................21
Creating a New Program or Editing an Existing Program ............................................................................................21
Holdback ...................................................................................................................................................................... 22
Setting Ramp Units ......................................................................................................................................................23
Setting Dwell Units ........................................................................................................................................................23
Setting the Number of Cycles ......................................................................................................................................24
Setting the Segment Number ........................................................................................................................................24
Setting the Segment Type ............................................................................................................................................24
Setting the Target Setpoint .......................................................................................................................................... 27
Running a Program ......................................................................................................................................................28
Holding a Program ........................................................................................................................................................28
Cancelling a Program .................................................................................................................................................. 28
Tuning Your Furnace .................................................................................................................................................. 28
Gain Scheduling ..........................................................................................................................................................28
Autotuning ....................................................................................................................................................................29
Adaptive Tuning............................................................................................................................................................ 30
Furnace Loading ................................................................................................................................................................ 31
Furnace Atmospheres ..................................................................................................................................................31
Preventive Maintenance ......................................................................................................................................................32
Warning .......................................................................................................................................................................32
General Cleaning Instructions .................................................................................................................. ....................32
Troubleshooting ..................................................................................................................................................................34
Maintenance and Servicing ................................................................................................................................................35
Warning ................................................................................................................................................................................35
To Replace a Heating Element ....................................................................................................................................36
To Replace a Thermocouple ........................................................................................................................................37
Wiring Diagrams ..................................................................................................................................................................38
Replacement Parts ..............................................................................................................................................................40
Ordering Procedures ............................................................................................................................................................41
One Year Limited Warranty ..................................................................................................................................................44
2
Safety Information
Alert Signals
Warning
Warnings alert you to a
possibility of personal injury.
Caution
Cautions alert you to a
possibility of damage to the equipment.
Note
Notes alert you to pertinent facts and
conditions.
Hot Surface
Hot surfaces alert you to a
possibility of personal injury if you
come in contact with a
surface during use or for a
period of time after use.
This manual contains important operating and safety
information. The user must carefully read and understand the contents of this manual prior to the use of
this equipment.
Your Barnstead Thermolyne furnace has been designed with function, reliability, and safety in mind. It is
the user’s responsibility to install it in conformance with
local electrical codes. For safe operation, please pay
attention to the alert signals throughout the manual.
Because of the nature of this product, considerably
more care is required in operating and servicing this
furnace than for lower temperature laboratory furnaces.
For maximum safety and longest furnace life, be sure
to observe the various cautions and warnings throughout this manual.
Warnings
To avoid electrical shock, this furnace must:
1. Be installed by a competent, qualified electrician who insures compatibility among furnace specifications, electrical source and
grounding code requirements.
2.
Always be disconnected from the electrical
supply prior to maintenance and servicing.
To avoid personal injury:
1. Do not stand directly in front of the chamber
without wearing a heat resistant face shield,
gloves and apron.
2.
Do not operate or clean furnace without
proper eye protection.
3.
Do not use in the presence of flammable or
combustible materials; fire or explosion may
result. This device contains components
which may ignite such materials.
4.
Refer servicing to qualified personnel.
5.
Caution: Hot Surface. Avoid Contact.
6.
To AVOID EYE DAMAGE in operating or
cleaning furnace, proper eye protection
must be worn.
3
SAFETY INFORMATION
7.
To AVOID BURNS, do not stand directly in
front of the chamber without wearing a heat
resistant face shield, gloves and apron.
8.
To AVOID FIRE, do not place combustible
materials where exposed to heat from open
door.
9.
Caution: Hot Surface. Avoid Contact.
Please note the following WARNINGS:
Warning
Refer servicing to qualified
personnel.
This warning is presented for compliance with California
Proposition 65 and other regulatory agencies and only
applies to the insulation in this product. This product contains refractory ceramic, refractory ceramic fiber or fiberglass insulation, which can produce respirable dust or
fibers during disassembly. Dust or fibers can cause irritation and can aggravate preexisting respiratory diseases.
Refractory ceramic and refractory ceramic fibers (after
reaching 1000°C) contain crystalline silica, which can
cause lung damage (silicosis). The International Agency
for Research on Cancer (IARC) has classified refractory
ceramic fiber and fiberglass as possibly carcinogenic
(Group 2B), and crystalline silica as carcinogenic to
humans (Group 1).
The insulating materials can be located in the door, the
hearth collar, in the chamber of the product or under the
hot plate top. Tests performed by the manufacturer indicate that there is no risk of exposure to dust or respirable
fibers resulting from operation of this product under normal conditions. However, there may be a risk of exposure
to respirable dust or fibers when repairing or maintaining
the insulating materials, or when otherwise disturbing
them in a manner which causes release of dust or fibers.
By using proper handling procedures and protective
equipment you can work safely with these insulating
materials and minimize any exposure. Refer to the appropriate Material Safety Data Sheets (MSDS) for information regarding proper handling and recommended protective equipment. For additional MSDS copies, or additional
information concerning the handling of refractory ceramic
products, please contact the Customer Service
Department at Barnstead International at
1-800-553-0039.
4
General Description
Intended Use
Types 461 and 462 are general purpose laboratory furnaces intended for applications requiring temperatures from
800-1700 degrees C.
General Usage
Do not use this product for anything other than its intended
usage.
Principles of Operation
The chamber section is heated by six (in type F46100 furnaces) or eight (in type F46200 furnaces) Super Kanthal
33 heating elements suspended in a chamber made of alumina and silica high temperature refractory fiber.
This high temperature refractory fiber is in the form of
blocks which line the inside of the chamber. Because of the
stresses caused by extremely high temperature operation,
these blocks will show some surface cracking. This cracking is not detrimental to the operation of the furnace.
A precious metal type B thermocouple senses the temperature in the chamber and transmits this information to the
temperature control in millivolts.
The control section consists of a temperature controller, a
current controller, a transformer, a contactor (relay), a
circuit breaker, and a pilot light.
The temperature controller senses the furnace temperature
(by means of the thermocouple) and adjusts electricity to
the heating elements by means of the current controller.
The current controller controls electricity to the heating
elements by adjusting the magnitude of the electrical current (rather than turning the electricity completely on or off).
This is the preferred method of controlling electricity to
molybdenum disilicide heating elements.
The transformer supplies the proper electrical voltage to
the heating elements.
5
GENERAL DESCRIPTION
The contactor removes electricity from the heating elements if the furnace temperature equals or exceeds the
high limit setpoint of the controller or when the door is
opened.
The circuit breaker is used to turn the furnace on and off
and also protects the electrical supply in the event that
the furnace draws too much electrical current.
The pilot light indicates that the circuit breaker is ON and
that the controller is being supplied with electricity.
Note
The fans operate continuously, even
when the circuit breaker is OFF, to
assure that the control section and
the terminals of the heating elements
are continuously ventilated. Without
ventilation, residual heat from the furnace chamber can cause overheating
after the furnace is turned off.
Caution
Do not completely remove electricity
from the furnace until chamber temperature falls below 500°C. Do not
touch exposed elements.
6
A fan is provided in each section of the furnace to provide
forced air cooling.
Types of Controllers
1.
The 8 segment digital model enables eight
segments of any type: end, ramp by rate, ramp
by time to target, dwell or step.
2.
The 4 program controller enables four 16 segment programs with 16 segments of any type:
end, ramp by rate, ramp by time to target,
dwell, step or call.
3.
The 20 program controller enables 20 16 segment programs with 16 segments of any type:
end, ramp by rate, ramp by time to target,
dwell, step or call.
GENERAL DESCRIPTION
Typical Profile for Programmable Models. (Other Profiles May Be Formed.)
Display Window
Output 1
Upper Display
Lower Display
RUN/HOLD Button
AUTO/MAN Button
UP ARROW Button
PAGE Button
DOWN ARROW Button
SCROLL Button
Programmable/Automatic Control
7
General Specifications
Model#
F46110CM,
F46110CM-33
F46118
F46120CM
F46120CM,-33
F46128
F46120CM-75
F46120CM-33-75
F46128CM-75
Width
28-1/8
(71.4)
28-1/8
(71.4)
28-1/8
(71.4)
28-1/8
(71.4)
28-1/8
(71.4)
28-1/8
(71.4)
Height
18-1/2
(47)
18-1/2
(47)
18-1/2
(47)
18-1/2
(47)
18-1/2
(47)
18-1/2
(47)
Depth
19
(48.3
19
(48.3)
19
(48.3)
19
(48.3)
19
(48.3
19
(48.3)
Width
6
(15.2)
6
(15.2)
6
(15.2)
6
(15.2)
6
(15.2)
6
(15.2)
Height
6-1/2
(16.5)
6-1/2
(16.5)
6-1/2
(16.5)
6-1/2
(16.5)
6-1/2
(16.5)
6-1/2
(16.5)
Depth
6-1/4
(15.9)
6-1/4
(15.9)
6-1/4
(15.9)
6-1/4
(15.9)
6-1/4
(15.9)
6-1/4
(15.9)
LBS.(kg)
152 (69.1)
152 (69.1)
152 (69.1)
152 (69.1)
152 (69.1)
152 (69.1)
Electrical
Volts
240
208
240
208
240
208
Rating
Amps
40*/10.4#
40*/12#
40*/10.4#
40*/12#
40*/10.4#
40*/12#
Watts
9600*
2500**
8320*
2500**
9600*
2500**
8320*
2500**
9600*
2500**
8320*
2500**
Phase
1
1
1
1
1
1
Cont.
1700°C
1700°C
1700°C
1700°C
1700°C
1700°C
8 Segment
8 Segment
4-Program
4-Program
20 Program
20 Program
Dimensions
Overall-in
(cm)
Chamberin (cm)
Weight
Temp. Range
Controller
Note
* Inrush power and current.
** Power and current required to maintain maximum temperature after stabilization.
The maximum current is determined by the limiting factor set by the current controller. In the event
that 40 amperes is not available, the current controller may be set to limit the current to some smaller value at the expense of a somewhat longer heatup time.
The variation in current is a result of molybdenum disilicide heating elements having a large
increase in resistance with increasing temperature.
The maximum ramp rates for this furnace for heatup are: 100° per minute from 25C-1000°C and
15°C per minute from 1000°C-1700°C.
8
GENERAL SPECIFICATIONS
Model#
F46230CM,
F46230CM-33
F46238
F46240CM
F46240CM,-33
F46248
F46240CM-75
F46240CM-33-75
F46248CM-75
Width
34-1/8
(86.7)
34-1/8
(86.7)
34-1/8
(86.7)
34-1/8
(86.7)
34-1/8
(86.7)
34-1/8
(86.7)
Height
22-1/2
(57.2)
22-1/2
(57.2)
22-1/2
(57.2)
22-1/2
(57.2)
22-1/2
(57.2)
22-1/2
(57.2)
Depth
23
(58.4)
23
(58.4)
23
(58.4)
23
(58.4)
23
(58.4)
23
(58.4)
Width
10
(25.4)
10
(25.4)
10
(25.4)
10
(25.4)
10
(25.4)
10
(25.4)
Height
10
(25.4)
10
(25.4)
10
(25.4)
10
(25.4)
10
(25.4)
10
(25.4)
Depth
10
(25.4)
10
(25.4)
10
(25.4)
10
(25.4)
10
(25.4)
10
(25.4)
LBS.(kg)
230(104.5)
230 (104.5)
230 (104.5)
230 (104.5)
230 (104.5)
230 (104.5)
Electrical
Volts
240
208
240
208
240
208
Rating
Amps
38*/20.8**
38*/24**
38*/20.8**
38*/24**
38*/20.8**
38*/24**
Watts
9600*
5000**
8320*
5000**
9600*
5000**
8320*
5000**
9600*
5000**
8320*
5000**
Phase
1
1
1
1
1
1
Cont.
1700°C
1700°C
1700°C
1700°C
1700°C
1700°C
8 Segment
8 Segment
4-Program
4-Program
20 Program
20 Program
Dimensions
Overall-in
(cm)
Chamberin (cm)
Weight
Temp. Range
Controller
Note
* Inrush power and current.
** Power and current required to maintain maximum temperature after stabilization.
The maximum current is determined by the limiting factor set by the current controller. In the event
that 40 amperes is not available, the current controller may be set to limit the current to some smaller value at the expense of a somewhat longer heatup time.
The variation in current is a result of molybdenum disilicide heating elements having a large
increase in resistance with increasing temperature.
The maximum ramp rates for this furnace for heatup are: 100° per minute from 25C-1000°C and
15°C per minute from 1000°C-1700°C.
9
GENERAL SPECIFICATIONS
Environmental Conditions
Operating: 17°C-27°C; 20% to 80% relative humidity,
non-condensing. Installation Category II (overvoltage) in accordance with IEC 664. Pollution
Degree 2 in accordance with IEC 664. Altitude
limit:
2,000 meters.
Storage: -25°C to 65°C; 20% to 80% relative humidity.
Declaration of Conformity
(-33 models only)
Barnstead International hereby declares under its sole
responsibility that this product conforms with the technical
requirements of the following standards:
EMC: EN 50081-1
EN 50082-1
EN 61326
Safety: EN 61010-1
EN 61010-2-010
per the provisions of the Electromagnetic Compatibility
Directive 89/336/EEC, as amended by 92/31/EEC and
93/68/EEC, and per the provisions of the Low Voltage
Directive 73/23/EEC, as amended by 93/68/EEC.
The authorized representative located within the European Community is:
Electrothermal Engineering, Ltd.
419 Sutton Road
Southend On Sea
Essex SS2 5PH
United Kingdom
Copies of the Declaration of Conformity are available
upon request.
10
Unpacking
Visually check for any physical damage to the shipping
container. Inspect the equipment surfaces that are
adjacent to any damaged area. Open the furnace door
and remove packing material from inside the furnace
chamber. Vacuum the chamber prior to use to remove
the insulation dust due to shipment. A hearth plate is
supplied with the furnace to be placed on bottom of furnace chamber.
Retain the original packaging material if reshipment is
foreseen or required.
11
Installation
Note
The type 41600 and 46200 furnaces
do not come with an electrical cord
because current requirements are too
great to be handled by ordinary electrical cords and standard wall electrical outlets.
Site Selection
Install furnace on a sturdy surface and allow space for
ventilation.
The electrical specifications are located on the specification plate on the back of the furnace. Consult Barnstead
International if your electrical service is different than
those listed on the specification plate. Prior to connecting
your Type 46100 or 46200 furnace to your electrical supply, be sure the front circuit breaker is in the OFF position.
Furnace Connection
Caution
Be sure ambient temperature does not
exceed 104°F (40°C). Ambient temperatures above 104°F (40°C) may result
in damage to the controller. Allow at
least six inches (15 cm) of space
between the furnace on all sides and
the top. This permits the heat from the
furnace case to escape.
Warning
To avoid electrical shock, this furnace
must be installed by a competent,
qualified electrician who ensures compatibility among furnace specifications,
electrical source and grounding code
requirements. Ensure unit is properly
grounded.
Caution
For supply connections, use AWG or
larger wires suitable for at least 90°C.
Failure to observe this caution could
result in damage to the furnace.
12
Remove cover plate for access to the electrical connections. Connect electricity to the three terminals found
behind this plate; one side of the 208 or 240 volt service
to the top terminal, L1; the other side of the 208 or 240
volt service to the bottom terminal, L2, and the ground
(usually green wire) to the center terminal marked GND.
For 220 volt service, connect the neutral to the top terminal (marked L2); the 220 volt line to the bottom terminal,
L1, and the ground to the center terminal marked GND.
Electricity must be brought to the furnace through an appropriate conduit system, through the hole in the back
panel at the bottom left rear of the furnace, and connected as described. Be sure to observe local wiring codes in
connecting.
Initial Heatup Procedure
The elements may bend slightly sideways due to electromagnetic forces generated between the element shanks.
To prevent this bending, heat the furnace up to 1650°C
for 10-20 minutes. Then let furnace cool to ambient temperature. See Operation for your particular controller for
information on setting temperature setpoints.
General Operation of Furnace
Observe the following warnings before operating your
furnace.
To avoid electrical shock, this furnace must:
1. Be installed by a competent, qualified electrician who insures compatibility among furnace specifications, electrical source and
grounding code requirements.
2.
Always be disconnected from the electrical
supply prior to maintenance and servicing.
To avoid personal injury:
1. Do not stand directly in front of the chamber
without wearing a heat resistant face shield,
gloves and apron.
Hot Surface
Caution: Hot Surface. Avoid contact.
2.
Do not operate or clean furnace without
proper eye protection.
3.
Do not use in the presence of flammable or
combustible materials; fire or explosion may
result. This device contains components
which may ignite such materials.
4.
Refer servicing to qualified personnel.
5.
Caution: Hot Surface. Avoid Contact.
6.
To AVOID EYE DAMAGE in operating or
cleaning furnace, proper eye protection
must be worn.
7.
To AVOID BURNS, do not stand directly in
front of the chamber without wearing a heat
resistant face shield, gloves and apron.
8.
To AVOID FIRE, do not place combustible
materials where exposed to heat from open
door.
13
GENERAL OPERATION
OF
FURNACE
Caution
Remember that when the power
switch is “ON,” the furnace will begin
to heat to the setpoint temperature that
was previously set in the controller.
Power Switch
Controls power to the furnace. Switch to the “ON” position
to energize the elements and the controller.
Cycle Indicator (OP1)
The amber cycle light will illuminate when electricity is
being supplied to the elements.
Circuit Breaker
A double pole circuit breaker is located at the bottom of
the control section. It serves to turn electricity ON and
OFF and to protect the electrical circuit.
Fans
Caution
If the electrical supply must be disconnected from the furnace at any time,
be sure the chamber temperature is
500°C or less before doing so.
Note
When performing operations on the
controller, remember that if you
depress and release either the PAGE,
SCROLL, UP or DOWN buttons and
more than 8 seconds elapse before
the buttons are used again, the display screen will automatically switch
back to displaying setpoint temperature. If this happens, you will have to
step through each parameter until
you reach the point at which the interruption occurred. The parameter values you adjusted earlier, however, will
not be lost or altered.
14
The fans, located in the rear of the heating section and
the control section, will run continuously as long as electricity is supplied to the furnace, even when the furnace
panel circuit breaker is OFF. This serves to remove residual heat after the furnace is turned OFF so the heat does
not cause damage to the controls.
Controllers
Your furnace’s controller consists of a microprocessor
based three-mode (Proportional, Integral, Derivative), programmable control with over temperature protection and
appropriate output switching devices to control the furnace. The digital readout continuously displays chamber
(upper display) and setpoint (lower display) temperatures
unless the SCROLL button or PAGE button is depressed.
GENERAL OPERATION
OF
FURNACE
Accessing Controller Parameters
To enter the main list of controller parameters, press and
release the PAGE button until you reach the desired parameter. To scroll through the desired parameter, press and
release the SCROLL button. within the main list, press and
release the SCROLL button. To quickly advance between
parameters, hold the PAGE or SCROLL button down.
15
Operation
8 Segment, 4-Program and 20-Program Models
Buttons and Indicators
OP1 (Output 1): illuminates when the heating output of the
temperature controller is on.
AUTO/MAN (Auto/Manual Mode): when the controller is in
the automatic mode the output automatically adjusts to keep
the temperature or process value at the setpoint. The “AUTO”
light will illuminate. The manual mode has been disabled
through factory configuration. Call Customer Service for further information.
RUN/HOLD (Run/Hold button):
•
Starts a program when pressed once—RUN light
illuminates.
•
Holds a program when pressed again—HOLD light
illuminates.
•
Cancels hold and continues running when pressed
again—HOLD light is off and RUN light illuminates.
•
Exits a program when the button is held down for
two seconds—RUN and HOLD lights are off.
•
At the end of a program the RUN light will flash.
•
During holdback the HOLD light will flash.
PAGE button: allows you to choose a parameter from a list
of parameters.
SCROLL button: allows you to choose a parameter within a
list of parameters.
UP button: allows you to raise a value in the lower display.
DOWN button: allows you to decrease the value in the lower
display.
16
OPERATION
Controller Parameters
Home Display
°C: measured temperature in Celsius. Temperature units
can not be changed without entering the configuration.
Contact Customer Service if a different temperature unit is
required.
OP: % output power demand; displayed in lower display
(cannot be changed).
C.id: Controller identification number.
PrG: Program number (displayed when a program is running.
IdHi: Deviation High Alarm
tunE: One-shot autotune enable.
run LiSt (Program Run List)
PrG: Currently running program (only used on multi-program models)
StAt: Displays the program status [OFF, run (running
active program), hoLd (program on hold), HbAc (waiting for
process to catch up), End (program completed)] in the
lower display. The controller will default to “OFF.”
PSP: Programmer setpoint temperature (displayed when a
program is running).
CYC: Number of cycles remaining in program (displayed
when a program is running).
SEG: Active segment number (displayed when a program
is running).
StYP: Active segment type (displayed when a program is
running).
SEG.t: Remaining segment time in segment units (displayed when a program is running).
tGt: Target setpoint.
rAtE: Ramp rate (only if rate segment).
PrG.t: Program time remaining in hours (displayed when a
program is running).
17
OPERATION
FASt: Fast run through program (no/YES). The controller will
default to “no.”
out.n: Even output states (OFF/ON), only used on multi-program models.
SYnc: Synchronization (no/YES), only used on multi-program
models.
SEG.d: Flash active segment type in the lower display of the
home display (no/YES). The controller will default to “no.”
ProG LiSt (Program Edit List)
PrG.n: Press the UP or DOWN ARROW to select the program number (program number will be displayed in lower display). Only used on multi-program models.
Hb: Press the UP or DOWN ARROW to select the holdback
type [OFF (disables holdback), Lo (deviation low holdback),
Hi (deviation high holdback) or bAnd (deviation band holdback)] for the entire program. The controller will default to
“OFF.”
Hb.U: Press the UP or DOWN ARROW to select the holdback value (in display units).
rmP.U: Press the UP or DOWN ARROW to toggle between
ramp units (SEc, min or Hour). Controller will default to “SEc.”
dwL.U: Press the UP or DOWN ARROW to toggle between
dwell units (SEc, min or Hour). Controller will default to “SEc.”
Cyc.n: Press the UP or DOWN ARROW to set the number of
program cycles (1 to 999 or cont). The controller will default to
“cont.”
SEG.n: Press the UP or DOWN ARROW to select the segment number (1 -16).
tYPE: Press the UP or DOWN ARROW to select the segment
type [End (end of program), rmP.r = ramp rate (ramp to a
specified setpoint at a set rate), rmp.t = ramp time (ramp to a
specified temperature in a set time), dwEll (to maintain a constant temperature for a set time), StEP (climb instantaneously
from current to specified temperature), cALL (to call a program as a subroutine, available only on multi-program models)]. The controller will default to “End.” Other parameters
18
OPERATION
used with tYPE include; tGt target setpoint), Rate (rate of
temperature increase) and dur (time to target setpoint or
time to dwell).
End.t: End of program.
AL LiSt (Alarm List)
IdHi: Deviation High Alarm.
Atun LiSt: (Autotune List)
tunE: One-shot autotune enable.
drA: Adaptive tune enable.
drA.t: Adaptive tune trigger level in display units. Range =
1 to 9999.
Pid LiSt
G.SP (Gain Setpoint): If gain scheduling has been
enabled this parameter sets the PV (process value) below
which Pid1 (proportional band/integral time/derivative time)
is active and above which Pid2 is active.
Pb: Proportional band in display units. (SEt 1)
ti: Integral time in seconds. (SEt 1)
td: Derivative time in seconds. (SEt 2)
Pb2: Proportional band. (SEt 2)
ti2: Integral time in seconds. (SEt 2)
td2: Derivative time in seconds. (SEt 2)
SP LiSt (Setpoint List)
SP 1: Setpoint one value.
cmS LiSt (Comms List)
Addr: Communications address.
ACCS LiSt (Access List)
codE: Access password. Not needed for
normal operation. Call Customer Service if configuration is
required.
19
OPERATION
Alarms
The controller will flash an alarm message in the home display if an alarm condition is detected.
FSL: PV full scale low alarm.
FSH: PV full scale high alarm.
dEv: PV deviation band alarm.
ldHi: PV deviation high alarm.
ldLo: PV deviation low alarm.
LCr: load current load alarm.
HCr: load current high alarm.
S.br: Sensor break: check that sensor is connected correctly.
L.br: Check that the heating circuits are working properly.
Ld.F: Load Failure: indication of either an open or short solid
sate relay, a blown fuse, missing supply or open circuit
heater.
SSr.F: Solid sate relay failure indications in a solid state relay:
indicates either an open or short circuit in the SSR.
Htr.F: Heater failure: Indication that there is a fault in the
heating circuit: indicates either a blown fuse, missing supply
or open circuit heater.
20
OPERATION
Basic Operation
Note
The controller will return to the HOME
display if left idle for more than a few
seconds.
Note
Once the desired parameter has been
selected, depressing either the UP or
DOWN button will cause the parameter
to be replaced with the new value. Any
further use of the UP or DOWN buttons
will change the parameter value. In all
cases, the value shown on the display
is the current working value of that
parameter.
When the controller is turned “ON,” it will perform a short
self-test and then change to the HOME DISPLAY. The
HOME DISPLAY shows the measured temperature
(process value) in the upper display and the desired value
(setpoint) in the lower display.
To Operate the Controller as a
Single Setpoint Controller
1.
Switch the circuit breaker to the “ON” position.
The setpoint temperature presently set in the controller will appear in the lower display. (The upper
display indicates the actual chamber temperature.)
2.
To change the setpoint, press the UP or DOWN
button until the desired setpoint value is displayed; then release the button.
3.
The furnace will begin to heat if the new setpoint
temperature is higher than the present chamber
temperature.
Programming the Controller
The controller is capable of varying temperature or process
value with time through programming. A program is stored
as a series of ramp and dwell segments and can be run
once, repeated a set number of times or run continuously.
To create a customized program using the controller
parameters listed under “Controller Parameters” beginning
of this section, follow the procedures outlined in the proceeding sections of this manual.
Creating a New Program or Editing an
Existing Program (Multi-program Models
Only)
The same steps are used when creating a new program
and editing an existing program with the exception being
that a new program starts with all its segments set to End
in the tYPE parameter. Temporary changes can be made
21
OPERATION
to these parameters when the program is in the hold state
but permanent changes must be made in the reset state.
Follow the steps below to create or edit a program.
1. Press the PAGE button until you reach the program list (ProG LiSt).
2.
Press the SCROLL button until display reads,
“PrG.n.”
3.
Press the UP or DOWN button to select a number for a new program or to edit an existing program.
Holdback
Holdback consists of a value and a type. If the measured
value lags behind the setpoint by an undesirable amount
during a ramp or dwell, the holdback feature can be used
to freeze the program at its current state (the HOLD light
will flash). The amount of the actual temperature may
vary from the setpoint before the holdback takes effect.
The program will resume when the error comes within the
holdback value.
Holdback Type
Note
The holdback type only appears
when holdback has been selected for
the entire program.
The holdback type is set when creating a new program.
Any of the four different holdback types listed below may
be chosen:
OFF: holdback is disabled.
Lo (Deviation Low Holdback): holds the program back
when process variable deviates below the setpoint by
more than the holdback value.
Hi (Deviation High Holdback): holds the program back
when process variable deviates above the setpoint by
more than the holdback value.
bAnd (Deviation Band Holdback): combines the features of the high and low deviation holdback in that it
holds the program back when the process variable deviates above or below the setpoint by more than the holdback value.
22
OPERATION
To set the holdback type:
1. Press the PAGE button until you reach the program list (ProG LiSt).
2.
Press the SCROLL button until display reads,
“Hb.”
3.
Press the UP or DOWN button to toggle between
“bAnd, Hi, Lo and OFF.”
Holdback Value
To set the holdback value:
1. Press the PAGE button until you reach the program list (ProG LiSt).
2.
Press the SCROLL button until display reads,
“Hb.U.”
3.
Press the UP or DOWN button to enter a holdback value.
Note
The value set in this parameter is
always for the entire program.
Setting Ramp Units
Ramp units are time units which are used in “rmP.r” segments (ramp to a setpoint at degrees per second, minute
or hour) and “rmP.t” segments (ramp to setpoint in a specific amount of time). See “Setting the Segment Type” for an
explanation on hoe to set a ramp segment.
1. Press the PAGE button until you reach the program list (ProG LiSt).
2.
Press the SCROLL button until display reads,
“rmP.U.”
3.
Press the UP or DOWN button to toggle between
seconds, minutes and hours.
Setting Dwell Units
Dwell units are time units which are used in “dwELL” segments (amount of time to remain at a specific temperature
). See “Setting the Segment Type” for an explanation on
how to set a dwell segment.
1. Press the PAGE button until you reach the program list (ProG LiSt).
2.
Press the SCROLL button until display reads,
“dwL.U.”
3.
Press the UP or DOWN button to toggle
between seconds, minutes and hours.
23
OPERATION
Setting the Number of Cycles
Set the number of times a group of segments or programs are to be repeated by following the steps listed
below.
1. Press the PAGE button until you reach the program list (ProG LiSt).
2.
Press the SCROLL button until display
reads,”CYC.n.”
3.
Press the UP or DOWN button to select the
number of cycles you want to run; or, press the
DOWN button to select “cont.” so the program
will run continuously.
Setting the Segment Number
A program is set up by defining the characteristics of each
individually selected number. To select a program number, follow the steps listed below.
1. Press the PAGE button until you reach the program list (ProG LiSt).
Note
The program ramp rate is designed to
reduce the heatup rate or cooling rate
that the furnace normally exhibits.
When not using this feature, the furnace will operate at its maximum
heating and cooling capability.
Note
When the program ramp has ended or
has been reset, the furnace will continue to maintain setpoint temperature. It
will not cool to ambient temperature
unless setpoint is set to ambient temperature by the program or by the
operator.
24
2.
Press the SCROLL button until display reads,
“SEG.n.”
3.
Press the UP or DOWN button to select the
segment number.
Setting the Segment Type
There are five segment types. Proceed with the following
steps according to the type of segment you have selected.
rmP.r (Ramp)
To ramp linearly at at set rate to a specified temperature:
1. Press the PAGE button until you reach the program list (ProG LiSt).
2.
Press the SCROLL button until display
reads,”tYPE.”
3.
Press the UP or DOWN button until display
reads, “rmP.r.”
OPERATION
4.
Press the SCROLL button until display reads
“Hb.”
5.
Press the UP or DOWN button to toggle between
“bAnd, Hi, Lo and OFF.”
6.
Press the SCROLL button until display reads,
“tGt.”
7.
Press the UP or DOWN button to set a target setpoint.
8.
Press the SCROLL button until display
reads,”rAtE.”
9.
Press the UP or DOWN button to select a value
in ramp units (seconds, minutes or hours; set in
the “rmP.U” parameter).
rmP.t
To ramp to a specified temperature at at set time:
1. Press the PAGE button until you reach the program list (ProG LiSt).
2.
Press the SCROLL button until display reads,
“tYPE.”
3.
Press the UP or DOWN button until display
reads, “rmP.t.”
4.
Press the SCROLL button until display reads,
“tGt.”
5.
Press the UP or DOWN button to set a target setpoint.
6.
Press the SCROLL button until display reads,
“dur.”
7.
Press the UP or DOWN button to select a time in
ramp units (seconds, minutes or hours; set in the
“rmP.U” parameter.
dwEll
To maintain a constant temperature for a specified time:
1. Press the PAGE button until you reach the program list (ProG LiSt).
2.
Press the SCROLL button until display reads,
“tYPE.”
25
OPERATION
3.
Press the UP or DOWN button until display
reads, “dwEll.”
4.
Press the SCROLL button until display reads,
“dur.”
5.
Press the UP or DOWN button to select a time
in dwell units (seconds, minutes or hours; set
in the “dwL.U” parameter).
StEP
To climb instantaneously from the current temperature to
a specified temperature.
1. Press the PAGE button until you reach the program list (ProG LiSt).
2.
Press the SCROLL button until display reads,
tYPE.”
3.
Press the UP or DOWN button until the display
reads, “StEP.”
4.
Press the SCROLL button until display reads,
“tGt.”
5.
Press the UP or DOWN button to set a target
setpoint.
cALL (Running Multiple Programs)
To call a program as a subroutine:
If you want to run multiple programs, you can program the
controller to “call” or link one program to another. This
makes it possible to run one program at any time during
another program and also return to the original program if
desired.
1. Press the PAGE button until you reach the program list (ProG LiSt).
26
2.
Press the SCROLL button until display reads,
“tYPE.”
3.
Press the UP or DOWN button until display
reads, “cALL.”
OPERATION
4.
Press the SCROLL button until display reads,
“PrG.n.”
5.
Press the UP or DOWN button to select a
program number to be linked.
6.
Press the SCROLL button until display reads,
“CYC.n.”
7.
Press the UP or DOWN button to select the
number of cycles the linked program is to be
run.
End
To end or repeat a program:
1. Press the PAGE button until you reach the
program list (ProG LiSt).
Caution
Minimize operation of furnace under
800°C. Element life is reduced when
operating below 800°C because the
protective layer of silica glass takes
longer to form.
2.
Press the SCROLL button until display reads,
“tYPE.”
3.
Press the UP or DOWN button until display
reads, “End.”
4.
Press the SCROLL button until display reads,
”End.t.”
5.
Press the UP or DOWN button to toggle
between “dwEll” (an indefinite dwell), “S OP”
(End Segment Output Power) and “rSET”
(reset).
Setting the Target Setpoint
1.
Press the PAGE button until you reach the
program list (ProG LiSt).
2.
Press the SCROLL button until display
reads, “tGt.”
3.
Press the UP or DOWN button to set the
target setpoint temperature.
27
OPERATION
Running a Program
1.
Press the PAGE button until you reach the run
list (run LiSt).
2.
Press the SCROLL button until display reads,
“PrG.”
3.
Press the UP or DOWN button to select the
program number you want to run.
4.
Press the RUN/HOLD button once to start the
program. (The RUN light will illuminate.)
Holding a Program
To put a running program on hold, press the RUN/HOLD
button. (The HOLD light will illuminate.)
Cancelling a Program
Note
All of the controllers have automatic
tuning features which install optimum
tuning parameters to give the best
temperature accuracy. No manual
loading of tuning parameters is needed. We recommend that you tune the
furnace to your specific application to
obtain the best results. To provide the
best temperature accuracy possible,
use these features when you install
your furnace and whenever you
change your application or procedure.
Note
Display will flash “tu.ER” if an error
occurs during tuning. To clear the
error and restart tuning, simultaneously press the PAGE and SCROLL
buttons and follow the steps outlined
in “Autotuning.”
28
To cancel a program, hold the RUN/HOLD button down
until the RUN and HOLD lights go off.
Tuning your Furnace
The purpose of tuning your furnace is to match the characteristics of your controller to the characteristics of the
process being controlled. Good control is evidenced by:
stable, straight-line control of the setpoint temperature
with no fluctuations; No overshoot or undershoot of the
setpoint temperature; Rapid restoration of the setpoint
temperature when external disturbances cause deviations
from the setpoint.
Gain Scheduling
Gain scheduling is the automatic transfer of control
between to sets of PID values. The 2408 controller does
this at a presettable process value. Gain scheduling is
used for difficult control processes which show large
changes in their response time or sensitivity at high or low
temperatures, or when heating or cooling.
OPERATION
Note
The B thermocouple will not read accurately below 250°C.
The G.SP gain schedule Setpoint) is factory set at
1210°C. If tuning within 200°C above or below the
G.SP. you must adjust your G.SP value up or down to
maintain at least a 200°C span between the G.SP and
the SP.
Setting the Transfer Point
Note
To stop the tuning function, simultaneously press the PAGE and SCROLL
buttons.
If gain scheduling has been enabled, “G.SP will appear
at the top of the PID list. This sets the value at which
the transfer will occur. When the process value is
below this level, PID1 will be active and when it is
above, Pid2 will be active. Set a value between the
control regions that show the greatest change to
achieve the best point of transfer.
Tuning
The two sets of PID values can be manually set or
automatically tuned. To tune automatically, you must
tune above and below the transfer point G.SP. If the
process value is below the transfer point G.SP, the calculated values will automatically be inserted into the
PID1 set and if the process value is above G.SP, the
calculated values will automatically be inserted into the
PID2 set.
Autotuning
The Autotune feature automatically sets up the initial
values in the control parameters to suit new process
conditions by putting the controller into a one time,
self-tuning mode. For successful tuning to occur, it is
best to preheat your furnace to 50°C before proceeding
with the following steps.
To tune your furnace using autotuning:
1. Load your furnace with a load similar to your
normal load and close the door.
2.
Set the setpoint temperature.
3.
Press the PAGE button until the display
reads, “Atun LiSt.”
4.
Press the SCROLL button until “tunE OFF”
is displayed.
5.
Press the UP or DOWN button to select
“on.”
29
OPERATION
6.
Simultaneously press the PAGE and SCROLL
buttons to return to the HOME DISPLAY. The
display will flash “tunE” while tuning is in
progress.
Adaptive Tuning
Adaptive tuning continuously evaluates tuning parameters. Adaptive tuning automatically installs new values if
better accuracy is possible. Adaptive tuning should be
used when the characteristics of a process change due to
load or setpoint changes or, in a process that can not
handle the oscillation caused by a one-shot tune.
To tune your furnace using adaptive tuning:
1. Load your furnace with a load characteristic of
those you intend to heat in it.
2. Press the PAGE button until display reads, “Atun
LiSt.”
3.
Press the SCROLL button until “drA OFF” is
displayed.
4. Press the UP or DOWN button to select “on.”
30
Furnace Loading
During tuning, the lower display flashes between “tunE”
and the setpoint temperature. The setpoint temperature
can be changed during tuning by pressing the UP or
DOWN buttons. The lower display will continue to flash
until the tuning is completed.
Be sure to use care in loading and unloading the furnace chamber. Molybdenum disilicide heating elements
are extremely fragile and can crack or break with just a
slight bump. Be sure not to block the flow of radiant
heat from the heating elements to the thermocouple.
The thermocouple must be able to respond directly to
the heating elements. Failure to observe this will permit
the heating elements to overheat and possibly burn
out. Poor temperature control can also result from
improper loading.
Because of the possibility of erosion of the insulation
on the floor of the furnace chamber, a separate hearth
plate should be used when possible.
In general, space should be left on all sides of a load
or on all sides of individual components of a load so
that heat can penetrate through the surfaces. The load
should not occupy more than two-thirds of the inside
dimensions of the chamber.
The extent to which a furnace may be loaded depends
upon such factors as operating temperature, desired
accuracy, and type of material. A furnace may be
loaded more heavily at lower temperatures, if highest
accuracy is not needed, and if the material of the load
absorbs heat easily.
Furnace Atmospheres
This furnace is designed to be used to 1700°C in pure
air only. It may be used with nitrogen, argon, or helium
atmospheres to 1600°C. Reducing atmospheres are
not recommended.
The heating elements in this furnace are attacked by
fluorine, chlorine, sodium and potassium compounds
and also by molten metals. This furnace may be used
for metal melting if care is taken not to splash molten
metal on the heating elements.
31
Preventive Maintenance
Warning
Warning
To avoid electrical shock, this furnace
must always be disconnected from the
electrical supply prior to maintenance
and servicing. Refer servicing to qualified personnel.
This warning is presented for compliance with California
Proposition 65 and other regulatory agencies and only
applies to the insulation in this product. This product contains refractory ceramic, refractory ceramic fiber or fiberglass insulation, which can produce respirable dust or
fibers during disassembly. Dust or fibers can cause irritation and can aggravate preexisting respiratory diseases.
Refractory ceramic and refractory ceramic fibers (after
reaching 1000°C) contain crystalline silica, which can
cause lung damage (silicosis). The International Agency
for Research on Cancer (IARC) has classified refractor
ceramic fiber and fiberglass as possibly carcinogenic
(Group 2B), and crystalline silica as carcinogenic to
humans (Group 1).
The insulating materials can be located in the door, the
hearth collar, in the chamber of the product or under the
hot plate top. Tests performed by the manufacturer indicate that there is no risk of exposure to dust or respirable
fibers resulting from operation of this product under normal conditions. However, there may be a risk of exposure
to respirable dust or fibers when repairing or maintaining
the insulating materials, or when otherwise disturbing
them in a manner which causes release of dust or fibers.
By using proper handling procedures and protective
equipment you can work safely with these insulating
materials and minimize any exposure. Refer to the appropriate Material Safety Data Sheets (MSDS) for information regarding proper handling and recommended protective equipment. For additional MSDS copies, or additional
information concerning the handling of refractory ceramic
products, please contact the Customer Service Department at Barnstead International at 1-800-553-0039.
General Cleaning Instructions
Wipe exterior surfaces with lightly dampened cloth containing mild soap solution.
A few simple procedures will help insure that your furnace
will give you long service.
1.
32
Keep the chamber clean; this furnace is capable of achieving temperatures which will cause
vaporization of many materials. In turn, these
vapors can react with the heating elements,
PREVENTIVE MAINTENANCE
the insulation, or other materials you have
placed in the chamber. In many instances
this reaction is detrimental to operation.
2.
Clean exterior surfaces with lightly dampened cloth containing mild soap solution
3. Occasionally check the electrical connections
in the control section. Repeated heating and
cooling can cause terminals to loosen.
4.
The type B thermocouple used in this furnace is matched to the temperature controller. It is possible that its calibration can
drift, particularly when operated near the
upper temperature limit, and especially in
the presence of contaminants. It is a good
idea to inspect it at regular intervals or when
its accuracy is suspect.
5.
Check the cooling fans at regular intervals
to be sure they are functioning properly and
are not obstructed.
The following pages are intended to help you resolve
functional problems with your furnace.
Barnstead International is always available to assist
you with problems. If this guide does not direct you to
your specific problem, call Barnstead International at
1-800-553-0039.
33
Troubleshooting
PROBLEM
POSSIBLE CAUSES
CORRECTIVE ACTION
Inaccurate temperatures.
Contaminated thermocouple.
Replace thermocouple.
Repeated element burnout.
Continuous operation
below 800°C.
Do not continuously
operate below 800°C.
Contact Barnstead International.
Heating element contamination.
“OR” displayed.
Open thermocouple.
Replace thermocouple.
Slow heatup.
Operating 240V furnace
on 208V supply.
Increase voltage to
proper level.
Furnace chamber overloaded.
Lighten load.
Fuses or breakers not
properly rated to
furnace electrical
requirements.
Install service line of sufficient
size to match furnace
electrical requirements. Contact
Barnstead International for
assistance.
Building or laboratory
main fuses blow or
circuit breakers trip.
Other errors displayed.
34
Contact Barnstead International.
Maintenance and Servicing
Warning
To avoid electrical shock, this furnace
must always be disconnected from the
electrical supply prior to maintenance and
servicing. Do not clean clean furnace
without proper eye protection. Refer servicing to qualified personnel.
Warning
This warning is presented for compliance with California Proposition 65 and other regulatory agencies and
only applies to the insulation in this product. This product contains refractory ceramic, refractory ceramic fiber
or fiberglass insulation, which can produce respirable
dust or fibers during disassembly. Dust or fibers can
cause irritation and can aggravate preexisting respiratory diseases. Refractory ceramic and refractory
ceramic
fibers (after reaching 1000°C) contain crystalline silica,
which can cause lung damage (silicosis). The International Agency for Research on Cancer (IARC) has classified refractory ceramic fiber and fiberglass as possibly carcinogenic (Group 2B), and crystalline silica as
carcinogenic to humans (Group 1).
The insulating materials can be located in the door, the
hearth collar, in the chamber of the product or under
the hot plate top. Tests performed by the manufacturer
indicate that there is no risk of exposure to dust or respirable fibers resulting from operation of this product
under normal conditions. However, there may be a risk
of exposure to respirable dust or fibers when repairing
or maintaining the insulating materials, or when otherwise disturbing them in a manner which causes
release of dust or fibers. By using proper handling procedures and protective equipment you can work safely
with these insulating materials and minimize any exposure.
Refer to the appropriate Material Safety Data Sheets
(MSDS) for information regarding proper handling and
recommended protective equipment. For additional
MSDS copies, or additional information concerning the
handling of refractory ceramic products, please contact
the Customer Service Department at Barnstead
International at 1-800-553-0039.
To avoid premature burnout of a replacement heating
element, be sure that the insulation tail supplied with
the replacement element is inserted between the two
legs of the element as shown in the drawing. Also be
sure that the heating element projects sufficiently into
the chamber. Insert element until welded portion
(where large diameter meets small diameter) projects
approximately 1/4" into inside of furnace chamber.
35
MAINTENANCE AND SERVICING
Caution
To avoid breakage of a replacement
heating element, be sure that the slot
into which the replacement heating
element slides is free of all debris so
that the element goes in very easily.
Forcing an element into a slot, however slightly, can result in its breakage.
36
To replace a heating element
(refer to Fig. 1A):
1.
Remove top cover from heating chamber side
of furnace.
2.
Remove the clips holding the connector cable
(4) to the defective heating element. Unwrap
the connector cable from the element.
3.
Slide the heating element with element ceramic holder attached upward, out of the slot in the
insulation. Save the blanket insulation for
reuse.
4.
Remove the element ceramic holder, noting its
exact position on the heating element.
5.
Fasten the element ceramic holder on the new
element in exactly the same position it was on
the old element.
6.
Begin inserting the new element with element
ceramic holder attached into the slot in the
insulation; stop when there is just enough room
left to insert the new element insulation.
7.
Continue sliding the element with the element
insulation tail into the slot. DO NOT FORCE even slight pressure can fracture the heating
element.
8.
When the element ceramic holder is nearly
seated against the main insulation, check the
top of the element insulation tail. In its final
position, the top should be about 1/8 inch
below the surface of the main insulation.
9.
Position the blanket insulation piece from step
c in the cavity over the insulation tail. Complete
insertion of the heating element until the element ceramic holder rests on top the main
insulation. Check the heating element on the
inside of the chamber. The large diameter section of the element must be flush with or slightly projecting from the surface of the insulation
MAINTENANCE AND SERVICING
(if not, reposition element ceramic holder).
Carefully wrap the connector cable around
the element ends; fasten with clips. Replace
top cover.
To replace thermocouple:
1. Remove top cover from the heating chamber side of furnace.
2.
Loosen diagonal screw holding ceramic connection block.
3.
Lift connection block.
4.
Loosen connection block screws holding
thermocouple; noting which side of block the
side of the thermocouple with the colored
bead is connected to.
5.
Remove thermocouple.
6.
Install new thermocouple with colored bead
in same position.
7.
With thermocouple through the hole in the
insulation, replace block in its holder and retighten diagonal screw.
8.
Turn furnace ON for a few minutes; check to
be sure the temperature displays upscale.
9.
Replace cover.
Figure 1A: Element Replacement
37
38
HR1
T1
HR2
...208 VOLTS
--- 240 VOLTS
RY1
SW1
5
6
+
7
I LIMIT
3
3
4
HR5
VI
AC
AB
AA
LC
RED
BLACK
HR6
CN2
TC1
DS1
CB1
M2
M1
ALL OTHER
MODELS
L1
L2
FAN
CONTACTOR, MECHANICAL
M2
RY1
DOOR SWITCH
TRANSFORMER
THERMOCOUPLE
FAN
SW1
T1
TC1
HEATING ELEMENT
M1
L1
TCX5
TCX5
L2
TNX79
TNX79
FL1
SWX163
RYX62
SWX163
RYX62
FAX7
FAX7
FAX7
EL461X1
PLX90
PLX90
FAX7
CN71X68
CN71X68
EL461X1
CN71X66
SWX54
TCX5
TNX79
SWX163
RYX62
FAX7
FAX7
EL461X1
PLX90
CN71X68
CN71X67
SWX54
F46128CM-75
F46120CM-75
TCX5
TNX79
SWX163
RYX62
FAX7
FAX7
TCX5
TNX79
SWX163
RYX62
FAX7
FAX7
EL461X1
CAX105
CAX105
EL461X1
PLX90
CN71X68
CN71X66
SWX54
TD 2
RD 3
SG 7
CONNECTOR
W
B
O
HF
HE
HD
CONTROLLER
TCX5
TNX79
SWX163
RYX62
FAX7
FAX7
EL461X1
CAX105
PLX90
CN71X68
CN71X67
SWX54
F46120CM-33 F46120CM-33-75
PLX90
CN71X68
CN71X65
SWX54
F46110CM-33
OUR PART NO. PER MODEL(S)
INTERNAL COMMUNICATION CABLE WIRING
F46128CM
F46120CM
CN71X65
SWX54
F46118CM
F46110CM
DIAGRAM COMPONENT LIST
-33 MODELS ONLY
CIRCUIT BREAKER
CONTROLLER, TEMPERATURE
CONTROLLER, CURRENT
INDICATOR LAMP
EMI LINE FILTER
DESCRIPTION
CN1
CN2
DS1
FL1
HR1 to
HR6
CB1
PART NO.
FUSE AND HOLDER ARE SUPPLIED WITH CURRENT CONTROLLER.
HR4
4
JF
3D
TE10 A
JE
3C
SERIES ELEMENTS
HR3
-
ON
JD
3B
2
JC
3A
1
JB
2D
EUROTHERM
JA
2C
2
V-
HF
2B
NOTES:
E
S
U
F
1
V+
HE
2A
LB
HD
LA
N
L
1D
HC
HB
1B
1C
HA
1A
CN1
Wiring Diagrams
HR2
-
JF
3D
6
JE
3C
5
JD
3B
+
7
I LIMIT
3
HR5
V-
V+
VI
AC
AB
AA
LC
LB
LA
N
L
RED
BLACK
HR6
CN2
TC1
HR7
DS1
CB1
HR8
M1
M2
CB1
CN1
CN2
DS1
FL1
HR1 to
HR8
M1
M2
M3
RY1
SW1
T1
TC1
PART NO.
FUSE AND HOLDER ARE SUPPLIED WITH CURRENT CONTROLLER.
NOTES:
HR4
3 4
JC
3A
4
JB
2D
TE10 A
JA
2C
ON
HF
2B
1 2
HE
2A
EUROTHERM
HD
1D
2
HC
1C
1
HB
1B
SERIES ELEMENTS
HR3
FUSE
HR1
T1
208 VOLTS
240 VOLTS
RY1
SW1
HA
1A
CN1
M3
ALL OTHER
MODELS
L2
L1
-33 MODELS ONLY
L2
SWX163
TNX80
TCX5
SWX163
TNX80
TCX5
DOOR SWITCH
TRANSFORMER
THERMOCOUPLE
L1
RYX62
RYX62
CONTACTOR, MECHANICAL
FAX7
SWX163
TNX80
TCX5
SWX163
TNX80
TCX5
SWX163
TNX80
TCX5
RYX62
FAX7
FAX7
FAX7
EL462X1
CAX105
PLX90
CN71X68
SWX54
CN71X66
F46240CM-33
TD 2
RD 3
SG 7
CONNECTOR
W
B
O
HF
HE
HD
CONTROLLER
SWX163
TNX80
TCX5
RYX62
FAX7
FAX7
FAX7
EL462X1
CAX105
PLX90
CN71X68
SWX54
CN71X67
F46240CM-33-75
INTERNAL COMMUNICATION CABLE WIRING
RYX62
FAX7
FAX7
FAX7
EL462X1
RYX62
FAX7
FAX7
FAX7
FAX7
FAN
FAX7
FAX7
FAX7
FAX7
FAN
EL462X1
EL462X1
EL462X1
FAN
PLX90
CAX105
CN71X68
CN71X68
SWX54
CN71X65
F46230CM-33
PLX90
SWX54
CN71X67
F46240CM-75
F46248CM-75
PART NO. PER MODEL(S)
HEATING ELEMENT
FL1
PLX90
PLX90
EMI LINE FILTER
CN71X68
CN71X68
SWX54
CN71X66
F46240CM
F46248CM
INDICATOR LAMP
SWX54
CN71X65
F46230CM
F46238CM
CONTROLLER, CURRENT
CIRCUIT BREAKER
CONTROLLER, TEMPERATURE
DESCRIPTION
DIAGRAM COMPONENT LIST
WIRING DIAGRAMS
39
Replacement Parts
Warning
Replace fuses with the same type and
rating.
Description
(Chamber)
Circuit breaker switch
Connector cable 30" long
Connector cable 36" long
Current controller
Controller (8 segment)
Controller (4 program)
Controller (20 Program)
Elements
Element ceramic holder
Element connector clips
Element connector cable 4" lg
Element connector cable 10" Ig
Element connector cable 14" lg
Element connector cable 19" lg
Element Insulation tail
Fans
Fuse, Thyristor, Fast Blow, 250V, 45 Amp
Fuse Holder
Hearth Plate
Injection Port w/plug
Insulation - door
Insulation Kit - chamber
Relay
Thermocouple
Thermocouple terminal block
Transformer
40
Note
Service on control units: contact
Barnstead International
(1-800-553-0039).
SERIES 1140
Small (Models)
(6"X6"X6")
SWX54
CE557X1 (2 req’d)
CN71X68
CN71X65 (F46110 types)
CN71X66 (F46120 types)
CN71X67 (F46120CM-75)
EL461X1 (6 req’d)
HRX2 (6 req’d)
CEX135 (12 req’d)
CE461X1 (4 req’d)
CE461X3
JN461X8 (6 req’d)
FAX7 (2 req’d)
FZX42
FZX62
PH461X1
JC633x1
& JC633X2 (plug)
JN461X3
JN461X9A
RYX62
TCX5
TRX137
TNX79
SERIES 1141
Large (Models)
(10"X10"X10")
SWX54
CE557X1 (1 req’d)
CE558X1 (1 req’d)
CN71X68
CN71X65 (F46230 types)
CN71X66 (F46240 types)
CN71X67 (F46240CM-75)
EL462X1 (8 req’d)
HRX2 (8 req’d)
CEX135 (16 req’d)
CE461X1 (6 req’d)
CE462X1
CE462X2
JN461X8 (8 req’d)
FAX7 (3 req’d)
FZX42
FZX62
PH462X1
JC633x1
& JC633X2 (plug)
JN462X4
JN462X7A
RYX62
TCX5
TRX137
TNX80
Ordering Procedures
Please refer to the Specification Plate for the complete
model number, serial number, and series number when
requesting service, replacement parts or in any correspondence concerning this unit. All parts listed herein
may be ordered from the Barnstead International dealer from whom you purchased this unit or can be
obtained promptly from the factory. When service or
replacement parts are needed we ask that you check
first with your dealer. If the dealer cannot handle your
request, then contact our Customer Service
Department at 563-556-2241 or 800-553-0039. Prior to
returning any materials to Barnstead International,
please contact our Customer Service Department for a
“Return Materials Authorization” number (RMA).
Material returned without an RMA number will be
refused.
41
42
43
One Year Limited Warranty
Barnstead International (“BARNSTEAD”) warrants that if a product manufactured by Barnstead shall be free of
defects in materials and workmanship for one (1) year from the first to occur of (i) the date the product is sold by
BARNSTEAD or (ii) the date the product is purchased by the original retail customer (the “Commencement
Date”). Except as expressly stated above, BARNSTEAD MAKES NO OTHER WARRANTY, EXPRESSED OR
IMPLIED, WITH RESPECT TO THE PRODUCTS AND EXPRESSLY DISCLAIMS ANY AND ALL WARRANTIES,
INCLUDING BUT NOT LIMITED TO, WARRANTIES OF DESIGN, MERCHANT ABILITY AND FITNESS FOR A
PARTICULAR PURPOSE.
An authorized representative of BARNSTEAD must perform all warranty inspections. In the event of a defect
covered by BARNSTEAD’s warranty, BARNSTEAD shall, as its sole obligation and exclusive remedy, provide free
replacement parts to remedy the defective product. In addition, for products sold by BARNSTEAD within the continental United States or Canada, BARNSTEAD shall provide provide free labor to repair the products with the
replacement parts, but only for a period of ninety (90) days from the Commencement Date.
BARNSTEAD’s warranty provided hereunder shall be null and void and without further force or effect if there is
any (i) repair made to the product by a party other than BARNSTEAD or its duly authorized service representative, (ii) misuse (including use inconsistent with written operating instructions for the product), mishandling, contamination, overheating, modification or alteration of the product by any customer or third party or (iii) use of
replacement parts that are obtained from a party who is not an authorized dealer of BARNSTEAD.
Heating elements, because of their susceptibility to overheating and contamination, must be returned to the
BARNSTEAD factory and if, upon inspection, it is concluded that failure is due to factors other than excessive
high temperature or contamination, BARNSTEAD will provide warranty replacement. As a condition to the return
of any product, or any constituent part thereof, to BARNSTEAD’s factory, it shall be sent prepaid and a prior written authorization from BARNSTEAD assigning a Return Materials Number to the product or part shall be
obtained.
IN NO EVENT SHALL BARNSTEAD BE LIABLE TO ANY PARTY FOR ANY DIRECT, INDIRECT, SPECIAL, INCIDENTAL, OR CONSEQUENTIAL DAMAGES, OR FOR ANY DAMAGES RESULTING FROM LOSS OF USE OR
PROFITS, ANTICIPATED OR OTHERWISE, ARISING OUT OF OR IN CONNECTION WITH THE SALE, USE
OR PERFORMANCE OF ANY PRODUCTS, WHETHER SUCH CLAIM IS BASED ON CONTRACT, TORT
(INCLUDING NEGLIGENCE), ANY THEORY OF STRICT LIABILITY OR REGULATORY ACTION.
The name of the authorized Barnstead International dealer nearest you may be obtained by calling
1-800-446-6060 (563-556-2241) or writing to:
2555 Kerper Boulevard
Dubuque, Iowa 52001-9918
Phone: 563-556-2241 or 800-553-0039
Fax: 563-589-0516
E-mail: [email protected]
www.barnstead.com