1
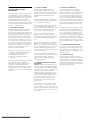
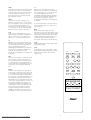
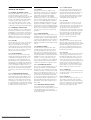
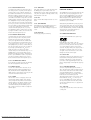
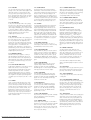
OWNER’S MANUAL
CD/DVD-1
High-End CD and
DVD Player
V1.0
Downloaded From Disc-Player.com Classe Audio Manuals
SAFETY INFORMATION
CE NOTICE
CAUTION: Please read and observe all warnings
and instructions in this owner’s manual and all
those marked on the unit. Retain this owner’s
manual for future reference.
All of us at Classé take extreme care to insure that
your purchase will remain a prized investment. We
are proud to inform you all Classé Audio
components have been officially approved for the
European Community (CE) mark under CE
Certificate Number C401CLA1.MGS granted on
18 July, 1996.
1. Do Not Open the CD/DVD-1 for any reason,
as there are no user serviceable parts inside.
An open unit, particularly if it is still connected
to an AC source, presents a potentially lethal
shock hazard. Refer all questions to authorized
service personnel only. Do not attempt to service
this product yourself.
2. Do Not Defeat AC ground. Do not remove any
of the connectors on the AC plug. Do not
attempt to defeat the ground connection with a
‘cheater plug’ or a 3-wire to 2-wire plug. If you
attempt to defeat the ground connection you
may cause a lethal injury to yourself or others.
3. To prevent fire or shock hazard, do not expose
the CD/DVD-1 to water or moisture.
4. Do not place the CD/DVD-1 close to any heatproducing device such as your audio amplifier(s),
and also keep it away from direct sunlight, a
radiator, stove, etc.
5. Connect the CD/DVD-1 only to an AC source of
the proper voltage. The shipping container and
the rear panel serial number tag will stipulate
the proper voltage. Use of any other voltage will
almost certainly damage the unit and will void
the warranty.
6. If the CD/DVD-1 will be out of use for an
extended period of time (vacation, etc.), you
may wish to unplug the power cord from the
AC source to prevent any chance of problems
from a voltage surge or lightning strike.
(See section 1.4).
7. Keep your fingers well clear of the disc tray as
it is closing. It may cause serious personal injury.
Do not place anything other than a CD or DVD
in the disc tray, as any other object may
permanently damage the mechanism.
8. This player contains a Laser: Do not look into
the opening of the disc tray or ventilation
opening of the product to see the source of the
laser beam, because the laser beam may cause
permanent damage to your eyes.
9. Do not place a heavy object on or step on the
player.
10.Do not use a cracked, deformed, or repaired
disc. CD and DVD discs are easily broken and
may cause serious personal injury and product
malfunction.
This means that your Classé product was subjected
to the most rigorous manufacturing and safety tests
in the world. The CE mark certifies that your
purchase meets or exceeds all European Community
requirements for unit-to-unit consistency and
consumer safety.
The CD/DVD-1 is manufactured under license from
Dolby Laboratories Licensing Corporation. It is
additionally licensed under one or more of the
following patents: U.S. number 3,959,950,
Canadian numbers 1,004,603 and 1,037,877.
Manufactured under license from Lucasfilm Ltd.
U.S. patent numbers 5,043,970; 5,189,703; and
5,222,059. European patent 0 323 830. Other
patents pending.
Additionally, the CD/DVD-1 is manufactured under
license from Digital Theater Systems, Inc.
Dolby® Pro Logic®, and Dolby Digital® are
registered trademarks of Dolby Laboratories
Licensing Corporation.
DTS® is a registered trademark of Digital Theater
Systems, Inc.
THANK YOU FROM EVERYONE AT
CLASSÉ
Thank you for purchasing the Classé Audio
CD/DVD-1 CD/DVD player.
We take great pride in offering components that
combine exceptional sonic performance and longterm reliability. To do that, we have invested in
extraordinary design and manufacturing facilities.
We trust that you will enjoy your purchase for many
years to come.
CLASSÉ DESIGN PHILOSOPHY
All of our components benefit from the same
rigorous design goal: All Classé products must
reproduce music with the harmonic and spatial
integrity typical of fine instruments heard in a live,
unamplified performance.
SINGLE CIRCUIT DESIGN
To this end, we make extensive use of carefully
optimized versions of the same basic circuit
precisely matched to specific power requirements.
This means that all Classé line level components
and power amplifiers benefit from years of
refinement. However, our efforts do not stop here.
Downloaded From Disc-Player.com Classe Audio Manuals
LISTENING: THE CRITICAL DESIGN ELEMENT
Once we determine general circuit values for a
particular application, we listen carefully while
exchanging and mixing different parts (transistors,
capacitors, wiring, PC boards, etc). and adjusting
specific operating voltages within proper
engineering ranges.
EXTENDED REAL-WORLD LIFESPAN
Every Classé component, even the most affordable,
benefits from our painstaking approach to design
parameters. The result is an optimum balance
between the often-conflicting demands of
exceptional performance and long-term reliability.
Our most expensive components gain from even
tighter tolerance parts and highly segmented and
exceptionally robust power supplies with large
reserve-current capabilities.
OUR PRIDE IN MANUFACTURING, YOUR PRIDE
IN OWNERSHIP.
We build all of our components to the highest
possible standards. From multi-layer glass-epoxy
circuit boards, the full sized power-supplies, and the
massive faceplates, every Classé product is a tribute
to both the science and art of sound reproduction.
We hope that you derive as much pleasure and
satisfaction in using your Classé as we did in
producing it.
The Classé CD/DVD-1 Compact Disc and Digital
Video (or Versatile) Disc Player and Transport is a
simple and intuitive piece which simultaneously
delivers analog and digital audio output, along with
Component Video, S-Video and Composite Video
output. It makes Music out of data. It makes
Movies out of data. The CD/DVD-1 is the high
quality Digital beginning of any audio and home
theater installation. It will sound and work best in
your system when used with other high end
products, such as those from Classé. Classé has a
powerful selection of Surround Sound Processors,
single, dual and multi channel Power Amplifiers,
and an equally strong selection of Tuners, CD
players, and SACD players (2001 release).
This owners manual will make it possible for you
to set up the CD/DVD-1 and begin using it only a
very few minutes after you take it out of the box.
The first section sets out the precautions which
should be taken when first setting it up, and the
second section details how to plug in the Digital,
Analog Audio and Video cables into your Surround
Processor and/or TV (Projector). The most difficult
part of the set-up will be attaching all the wires.
Classé recommends labeling each and every input
or output wire in your entire Music/Theater system,
including even the AC cables. When you’ve done
this you will know what equipment is connected at
each end. Labeling is a simple task which takes a
little extra time, but it can save hours of effort if
you ever want to change anything, even a single
piece of wire.
We feel it is a good idea to make a chart of all the
associated equipment and how you want to attach
everything together. Even a simple penciled flow
chart will make your task go faster with fewer hook
up errors. You can keep the chart for later reference
when you want to add or subtract equipment to
the system.
2
CONTENTS
SECTION 4.0
Introduction
Safety Information 2
CE Notice 2
Thank You 2
Classé Design Philosophy 2
About This Manual 2
SECTION 1.0
1.1
1.2
1.3
1.4
1.5
1.6
Getting Started, taking Precautions 4
Unpacking the CD/DVD-1 4
Optimal Placement 4
Ventilation and Proper Placement 4
Moisture Condensation 4
Placement Behind Cabinet Doors 4
Shipping or Moving 4
SECTION 2.0
2.1
2.1.1
2.1.2
2.1.3
2.2
2.2.1
2.2.2
2.2.3
2.3
2.3.1
2.3.2
2.4
2.4.1
Installation Overview 5
Video outputs 5
Component Video 5
S-Video 5
CVBS or Composite Video 5
Digital Audio Outputs 5
TOSlink 5
AES/EBU 5
Coaxial 5
Analog Audio Outputs 5
Balanced Connections 5
Coaxial Connections 5
A.C. Connections 5
AC Cable 5
SECTION 3.0
3.1
3.1.1
3.1.2
3.1.3
3.1.4
3.1.5
3.1.6
3.1.7
3.1.8
3.1.9
3.1.10
3.1.11
CD/DVD-1 Front Panel Controls
and Display 6
Front Panel Buttons 6
Load Button 6
Standby Light 6
Display 6
Power Button 6
Jump Buttons 6
HDCD light 6
Stop Button 6
Play Button 6
Pause Button 6
Fast Forward and Reverse 6
Waiting for Input 6
Downloaded From Disc-Player.com Classe Audio Manuals
4.1
4.1.1
4.1.2
4.1.3
4.1.4
4.1.5
4.1.6
4.1.6a
4.1.6b
4.1.7
4.1.8
4.1.9
4.1.10
4.1.11
4.1.12
4.1.13
4.1.14
4.1.15
4.1.16
4.1.17
4.1.18
4.1.19
4.1.20
4.1.21
4.1.22
4.1.23
4.1.24
4.1.25
CD/DVD-1 Panel Display Information 7
Display 7
Blinking Symbol 7
Shuffle 7
Pause 70
A-B 7
Repeat 7
Chapter 7
Title 7
Track 7
Title 7
Chapter 7
Track 7
Time 7
Track 7
Total 7
Close 7
Read 7
Open 7
Title number 7
Chapter Number 7
Track Number 7
DVD Symbol 7
CD Symbol 7
Track/Chapter Numbers 8
Info 8
Total Time 8
DVD Played Time 8
DVD Total Time 8
SECTION 5.0
CD/DVD-1 Remote Control Wand 8
SECTION 6.0
6.1
6.1.1
6.1.2
6.1.3
6.1.3.1
6.1.4
6.1.4.1
6.1.5
6.1.5.1
6.1.5.2
6.1.5.3
6.1.6
6.1.7
6.1.8
6.1.8.1
6.1.8.2
6.1.8.3
6.1.8.4
6.1.8.5
6.1.9
6.1.10
6.1.11
6.1.12
6.1.13
6.1.14
Setting Up the CD/DVD-1 10
Setting up the CD/DVD-1 Is easy 10
Powering up for first time 10
Setup Key 10
Choose Language 10
Spoken language Advisors 10
Subtitle 10
Subtitle Advisory 10
Parental Control 10
Authorization of Discs 10
Deactivate Parental Control 10
Forgotten PIN 10
TV Shape 10
Auto-play 10
Auto FTS 10
OSD and FTS 10
Start of FTS 10
Include Tracks on FTS 11
Exclude Tracks on FTS 11
Too many discs and FTS 11
Digital Output 11
Sound 11
Video Shift 11
PBC 11
OSD Language 11
Exit setup 11
SECTION 7.0
7.1
7.1.1
7.1.1.1
7.1.2
7.1.2.1
7.1.3
7.1.4
7.1.5
7.1.6
7.1.7
7.1.8
7.1.9
7.1.10
7.1.10.1
7.1.10.2
7.1.10.3
7.1.10.4
7.1.10.5
7.1.11
7.1.11.1
7.1.11.2
7.1.12
7.2
7.2.1
7.2.2
7.2.2.1
7.2.3
7.2.4
7.2.5
7.2.6
7.2.7
7.2.8
7.2.9
7.2.10
7.2.10.1
7.2.10.2
7.2.10.3
7.2.10.4
7.3
7.3.1
7.3.2
7.3.3
7.3.4
7.3.5
7.3.6
7.3.7
7.3.7.1
7.3.7.2
7.3.7.3
7.3.7.4
Using the CD/DVD-1 11
Playing a DVD Video Disc 11
Play a Title 11
Title Menu Advisory 11
Stop Play 11
Resume 12
Skip Chapter 12
Skip Title 12
Parental Control 12
Still Picture and Pause 12
Search 12
Slow Motion 12
Shuffle 12
Repeat a Portion 12
Repeat Methods 12
Chapter Repeat 12
Title Repeat 12
Repeat A-B 12
Turn off Repeat 12
Camera Angle 12
Camera Angle Icon 12
Camera Angle and OSD 12
DVD Menu of Titles 12
Playing a Video CD 12
Playing a Disc 12
Stop Playing Disc 12
Resume Playing a Video CD 12
Skip a Track 12
Skip to another index 13
Playback Control 13
Parental Control 13
Search 13
Slow Motion 13
Shuffle 13
Repeat 13
Repeat A-B 13
Repeat Track 13
Repeat Disc 13
Turn off Repeat 13
Playing an Audio CD 13
Insert and Play 13
Stop Playing CD 13
Pause CD 13
Search CD 13
Skip to another Track on CD 13
Shuffle 13
Repeat 13
Repeat A-B 13
Repeat Track 13
Repeat Disc 13
Stop Repeat 13
APPENDIX A
RC5 Codes for CD/DVD-1 and
Processors 14-15
3
SECTION 1.0:
GETTING STARTED, TAKING
PRECAUTIONS
This manual attempts to explain the full operation
of this CD/DVD player, but some DVD video discs
may have functions that may not be fully explained.
There may be extra instructions on the Disc or on
the packaging the Disc came in. Some Disc
instructions may be different from instructions in
this manual. To use the available functions it may be
necessary to follow the instructions displayed on the
TV screen or on the packaging.
1.1 UNPACKING THE CD/DVD-1
Your Classé CD/DVD-1 is packed in high-density
foam inside a special cardboard container. To
remove the unit, carefully open and spread the box
flaps. (There are heavy-duty staples under each end
of the lengthwise tape). Remove the top foam
piece(s) and then carefully remove the CD/DVD-1
itself. Be Careful with it while it is still covered in
the protective plastic, insuring that you do not rest
it on its front or rear, as possible damage to knobs
and connectors can occur. Put it down carefully on
a flat, soft surface. Take it out of the heavy plastic
bag and place the CD/DVD-1 on a sturdy surface.
Carefully inspect it and report any concealed
damage to your dealer immediately.
In addition, look for the following accessories:
1. The Owner’s Manual (which, because you’re
reading it now, you’ve already found!).
2. One detachable AC power cord.
3. One remote control handset (with two
AAA batteries).
We strongly recommend that you save the shipping
carton and foam inserts. The REQUIRED
Replacements are expensive to purchase from us.
The packaging was designed to protect the
CD/DVD-1 under almost all circumstances and will
be very useful in protecting the valuable electronic
instrument if you move or need to ship the unit for
any reason.
1.2 OPTIMAL PLACEMENT
Carefully locate the CD/DVD-1. Follow the
preceding Safety Precautions (Page 3 of this
manual) regarding exposure to heat and moisture.
(Also see 1.3, 1.4 and 1.5). In addition, we do not
recommend placing the CD/DVD-1 in direct
sunlight.
Stable, high-strength shelving or equipment racks
specifically designed for audio/video components
are best for safety and convenience.
Place the CD/DVD-1 close enough to a Surround
processor and/or preamplifier or DAC to allow
convenient connection. Shorter cable runs are best.
Do not ‘stretch’ or strain cables, as the cables or
connectors may be permanently damaged.
We do not recommend closely stacking the
CD/DVD-1 with other components, especially
tuners, which may be affected by radio-frequency
emissions from the CD/DVD-1’s microprocessor
array.
Allow at least four inches of free space behind the
CD/DVD-1 to accommodate interconnect cables,
power cords, etc. Four inches of unobstructed free
space above the CD/DVD-1’s chassis cover will allow
sufficient air circulation to dissipate the small
amount of heat. Do not put the player directly on a
rug or other soft surface.
Isolate power amplifiers from the CD/DVD-1 as
much as possible to avoid the excessive heat which
is produced by the amplifiers, and from the
magnetic fields often generated by their large
power-supply transformers.
1.3 VENTILATION AND PROPER OPERATING
ENVIRONMENT
CAUTION: Ventilation is very important. (Also see
1.4, below). We do not recommend attempting to
operate the CD/DVD-1 if the ambient temperature
exceeds 40°C (100°F). There are components inside
which produce heat. If there is insufficient
ventilation around the chassis the processors will
overheat and may act erratically until allowed to
cool. Any cabinet should have adequate airflow to
allow warm air to leave and cooler room air to
enter. Positive Ventilation is required in some
installations due to the heat generated by the
nearby electronics.
1.4 MOISTURE CONDENSATION
Do not use the DVD player when moisture
condensation may have occurred. Damaging
Moisture Condensation on the laser or mechanical
parts can occur when you use the DVD player in a
cool room where you just turned on the heat. It
may also occur if the air conditioning directly hits
the unit, or if when you attempt to use the DVD
player in a hot and humid room just after you move
the unit from the cold or from an air conditioned
room. Condensation may be present when you use
the DVD player in a damp place such as a cellar
room.
To dry any condensation which may have occurred,
connect the power cord of the DVD player to the
wall outlet, turn on the DVD player and leave it ON
for two or three hours. Do not attempt to insert a
disc. If a disc is already in the player, remove it at
once. After two or three hours, the DVD player will
have warmed up and evaporated any moisture. To
prevent moisture condensation Classé recommends
keeping the DVD player connected to a live wall
outlet and keeping the unit in a standby mode at all
times.
1.5 PLACEMENT BEHIND CABINET DOORS
Be sure there is enough space between the unit and
the cabinet doors when opening the disc carrier
when using the remote control. Damage to the
player may result if the disc carrier attempts to open
against a closed door.
1.6 SHIPPING OR MOVING
Remove any CD or DVD from the carrier when
moving the CD/DVD-1. Whether you are just sliding
it over, or putting it on another shelf or taking it to
a friend’s house, it is very important to remember to
remove any media which may be in the player. Also
do not under any circumstances leave a disc in the
player when shipping the player.
Do not attempt to use the player if it has been
stored at or below -20°C (0°F). Allow it to warm
up. Put the CD/DVD-1, uncovered, in a warm room
until it nears room temperature, then plug it in and
allow it to warm up further for two or more hours.
(See 1.4 below).
Downloaded From Disc-Player.com Classe Audio Manuals
4
SECTION 2.0:
CONNECTING THE CD/DVD-1
Following are the descriptions of the Outputs
available on the CD/DVD-1.
Use the diagram below to follow the discussion
regarding input and output connections.
2.1 VIDEO OUTPUTS
SAFETY NOTE: Before you begin work we very
strongly advise that all associated electronic
equipment be unplugged from the AC outlets.
They should at least be switched off with the AC
switch (NOT in Standby). Failure to follow the above
advice can (usually WILL) result in damage to
speakers and to electronics and perhaps to you.
(RCA-style cables should be rotated (twisted)
slightly as you insert them into (or remove them
from,) the appropriate jack. (Be careful: do not
accidentally attach a Video output to an Audio
input, or vice versa. Also be sure the Digital outputs
are connected only to Digital Inputs and that
Analog Outputs are only connected to Analog
Inputs.
The CD/DVD-1 has a complete and well-thoughtout panel of connections, enough for even a
complex audio and theater system. You can use
more than one Digital Audio Output at the same
time, and you can use Digital and Analog outputs
simultaneously. You also may use all three of the
Video outputs at the same time, if you wish to.
For the very best Video picture we recommend
you utilize the Component Video Outputs on the
CD/DVD-1 and the same high quality inputs on
you Monitor, Video Scaler or other Video processor.
S-Video will also give you an excellent picture,
especially if you keep the interconnect relatively
short. Component Video is best for long runs.
The best Audio connection, for both CD and DVD,
is likely to be one of the Digital Outputs. If,
however you have any doubts, it might be well
worth your time to listen to both the Digital
Outputs and the Analog outputs for listening to
CD. The Classé Design Team has worked very hard
to make the CD/DVD-1 a very High End CD Player,
as well as DVD player. The Analog Outputs may
have a higher quality signal than if you connect
digital to your Surround Processor.
Something to remember: DVD Video discs are
usually copy protected. Not only can you not copy a
DVD, you will get a distorted picture If you even
connect the DVD player to a VCR, and the VCR to a
TV Monitor.
NOTICE:
2.1.1 COMPONENT VIDEO
For best picture quality use the Component Video
Outputs and inputs on your Surround Processor,
especially if you will be switching pictures from this
and another Source which has Component Video
capability. (Be certain you correctly connect the
three different Component Video outputs to the
same labeled inputs; all manufacturers do not use
the same colour scheme). Requires a true 75Ω cable
and connector.
You may wish to utilize a ‘Line Doubler’ or Video
Scaler. The best picture is gained by making fewer
connections and inserting fewer switches in the
Video pathway. Classé generally recommends you
use the Doubler or Scaler as the switcher, and
connect from them directly to your video monitor,
bypassing the video switching in a Surround
Processor.
CB
2.1.3 CVBS OR COMPOSITE VIDEO
Composite Video is a straightforward coaxial
connector with a coaxial cable. Classé recommends
gold to gold connections and a true 75Ω connector
and cable. For best quality picture you should not
use cables intended for carrying analog audio
signals, although they will certainly work in a pinch.
2.2 DIGITAL AUDIO OUTPUTS
2.2.1 TOSLINK
WARNING: Do not look into the back panel TosLink
output connector, or into the TosLink cable output
end; high energy laser light is present and may
seriously damage your eyes. Toslink is a high quality
digital connection. Care is required with the cable
as the connectors and the cable between them are
plastic and may kink or break. Kinked or broken
cable should be discarded. Be sure to push the
connectors all the way into their sockets.
CR
Y
2.2.3 COAXIAL
This is a high quality and rugged connection.
Classé recommends making only gold to gold
connections, using true 75 ohm coaxial connectors
and cable. Much of the coaxial wire and connectors
available are actually 50 ohm cables, which can
prevent a perfect match between the Player and
the Processor. Be sure the cable is not kinked or
even bent sharply.
2.3 ANALOG AUDIO OUTPUTS
2.1.2 S-VIDEO
S-Video requires a special connector at each end of
the cable, and you get best picture quality from a
short run of cable. However, S-Video will provide a
very high quality picture. If you do not have a
Component Video capability on your current Video
Monitor and you are choosing between Composite
and S-Video, S-Video is well worth any extra
expense. Care is required when inserting the small
connectors; there are several small pins which can
be easily damaged.
COMPONENT VIDEO
THIS DEVICE COMPLIES WITH PART 15 OF FCC RULES.
OPERATION IS SUBJECT TO THE FOLLOWING TWO CONDITIONS
2.2.2 AES/EBU
This is generally recognized as providing the highest
quality Digital connection. It utilizes 110 ohm
shielded cables with a sturdy shielded and
grounded three pin XLR connector at each end. If
your Surround Processor is a Classé then you can
use this superior sounding connector. Be sure the
connectors are pushed all the way in and are
locked.
2.3.1 BALANCED CONNECTIONS
Like AES/EBU above, this connector is strong,
shielded and grounded. The connection is a push
pull design utilizing a twisted pair of wires (carrying
the audio signal) shielded inside a wrap of braided
wires which are drained to ground. This connection
prevents electrical interference from other
equipment. When properly made and used this
particular method of construction also prevents
‘ground looping’ between the connected pieces
of equipment.
2.3.2 COAXIAL CONNECTIONS
Coaxial connections for analog audio are very
popular. They provide an easy to use interface, and
when properly constructed, they provide an
excellent sounding and durable connection.
2.4 A.C. CONNECTIONS
2.4.1 AC CABLE
Many owners upgrade to Classé’s higher quality AC
Cables. No matter which AC cable you use, you
should be sure to use a three wire AC cable, and to
plug it into a properly grounded wall outlet. Also, It
never hurts to check the grounding and polarity of
the wall outlets you are using for your Audio/Video
system.
VIDEO OUT
S-VIDEO
CVBS
(1) THIS DEVICE MAY NOT CAUSE HARMFUL INTERFERENCE,
AND (2) THIS DEVICE MUST ACCEPT ANY ONTERFERENCE RECEIVED
INCLUDING INTERFERENCE THAT MAY CAUSE UNDESIRED OPERATION
COMPLIES WITH FDA RADIATION PERFORMANCE STANDARDS, 21 CFR SUBCHAPTER J.
TOSLINK
AES / EBU
ANALOG OUTPUTS
COAXIAL
NC3MAH
1
2
3
RIGHT
NC3MAH
1
1
3
WITH SAME TYPE AND RATING ONLY
DIGITAL OUT
DISCONNECT A.C. LINE BEFORE OPENING UNIT
Downloaded From Disc-Player.com Classe Audio Manuals
2
3
WARNING
REPLACE INTERNAL FUSE
LEFT
NC3MAH
2
5
SECTION 3.0:
CD/DVD-1 FRONT PANEL CONTROLS
AND DISPLAY
The CD/DVD-1 is easy and intuitive to operate.
The nine buttons on the Front Panel of the
Player/Transport give you the options you need to
generally turn it on and use it successfully day after
day. There are DVDs with multiple Audio Tracks
which will require the use of the remote, but usually
you only have to insert a CD or DVD and press play.
Using the pictures in this section and the
descriptions we will quickly outline the buttons
specific functions, beginning with the left-most
control.
3.1 FRONT PANEL BUTTONS
3.1.1 LOAD BUTTON
The LOAD button opens the Disc Carrier when it is
closed and closes it when it is open. Pressing LOAD
with a CD in the carrier closes the drawer and the
CD will begin playing from the first track. Pressing
LOAD with a DVD in the tray will close the drawer
and the DVD will begin playing from the beginning.
The player will pause and wait for user input if
there are Program material or Audio format choices
to be made. Choices must be made using the
Remote Wand. (Section 5.0) You may safely press
the LOAD button to eject a disc which is playing, as
it will stop spinning before the tray opens. Pressing
the LOAD button while the Player is in STANDBY
mode will turn on the player and open the drawer.
If the unit is fully off (after using the POWER
button) the drawer will not open. Also see POWER
and PLAY below.
3.1.2 STANDBY LIGHT
A green light is lit when the Player is in Standby
Mode. The light is out when it is fully on and
playing or ready to play. (The light is also off if the
POWER button has been used to turn off the
CD/DVD-1).
LOAD
3.1.3 DISPLAY
See section 3.2 below describing Display.
3.1.4 POWER BUTTON
The POWER button is an AC micro-switch which
turns the Player On when it is off and OFF when it
is on. If you use this button to turn the Player off
the POWER button on the Remote Wand will not
turn it on. We suggest you generally leave the unit
in STANDBY when you are not using it, to keep it
warmed up. If you wish to you may use this button
to turn it fully off when you will not be using it for
an extended time. Remove any CD or DVD before
turning off the player.
3.1.5 JUMP BUTTONS
The |<< and the >>| buttons are used to jump to the
previous |<< chapter in a DVD or the previous track
on a CD or to jump forward >>| to the next
chapter on a DVD or next track on a CD. You
usually can not jump past the ‘No Copying’ warning
when playing a DVD movie.
3.1.6 HDCD LIGHT
The HDCD Light automatically alerts you to the fact
the current CD is being played with HDCD
resolution. HDCD detection is always on.
3.1.7 STOP BUTTON
The STOP button stops the currently playing CD or
DVD. No picture appears. Pressing the STOP button
while the Player is in STANDBY mode will turn on
the player.
3.1.9 PAUSE BUTTON
The PAUSE button halts a CD in place. The music
will stop, but will restart at once where it left off
when PLAY is pressed. After pausing, pressing a
|<< or >>| button will jump back to the beginning
of the current track or forward to the beginning of
the next, but the player will remain Paused. Pressing
PAUSE while a movie is playing will cause the movie
to halt in place, leaving a Still picture on screen, and
there will be no audio playback. Pressing a |<< or
>>| button will jump back to the beginning of the
current chapter or forward to the beginning of the
next, but the movie will continue to be Paused.
Pressing the PAUSE button while the Player is in
STANDBY mode will turn on the player. Pressing
PAUSE while a disc is paused does not restart a disc.
3.1.10 FAST FORWARD AND REVERSE
The << and >> buttons control the fast reverse (<<)
or fast forward (>>) of the currently playing disc.
The first press causes the CD or DVD to reverse or
play forward at approximately four times normal
speed. A second press doubles the speed again. A
third press of the button slows to four times again.
You must press PLAY to resume normal play.
3.1.11 WAITING FOR INPUT
Only the LOAD and POWER buttons function if the
player is waiting for input from the remote wand to
select a particular audio format or specific title on a
DVD. All other commands must come from the
remote control wand.
3.1.8 PLAY BUTTON
The PLAY button starts a CD or DVD that has been
stopped or paused. You may press PLAY to close
the carrier tray and begin playing an inserted CD or
DVD. Pressing the PLAY button after pressing the
STOP button starts the CD or DVD over from the
beginning of the program material on the Disc.
Pressing PLAY after pausing a CD or DVD causes
the player to start playing from the point at which
PAUSE was pressed. Pressing the PLAY button while
the Player is in STANDBY mode will turn on the
player.
HDCD
STANDBY
STOP
PAUSE
PLAY
CD/DVD-1
Downloaded From Disc-Player.com Classe Audio Manuals
POWER
6
SECTION 4.0:
CD/DVD-1 PANEL DISPLAY
INFORMATION
4.1 DISPLAY
The Front Panel Display provides complete
information on the current operation of the
CD/DVD-1. Though you will likely find you rarely
use the information available on the front Panel
Display of the CD/DVD-1, the information displayed
there can be quite helpful in playing CDs and DVDs.
The description numbers on the drawing below are
fully described in the next few pages.
4.1.1 (((O
This symbol blinks when it is receiving properly
formatted IR commands from a remote control.
4.1.2 SHUFFLE
This is displayed when you have pressed the SCAN
key on the remote control to select random play of
on a CD using the REPEAT command on the remote
Wand. See SCAN and REPEAT in Section 4.0.
4.1.3 PAUSE
This is displayed any time PAUSE button is pressed
on the Front panel or the PAUSE key is pressed on
the remote control.
4.1.4 A-B
This appears when you are using the REPEAT key
on the remote control to select a short section of a
CD or DVD to repeat. See REPEAT in Section 4.0.
4.1.5 REPEAT
This is always present when you are Repeating a
short selection (A-B) or a CD Track, or a whole CD,
or when a Title or Chapter of a DVD has been
selected to be repeated.
4.1.6 CHAPTER
This is associated with REPEAT. You must be playing
a DVD. It will appear when you have selected a
Chapter to Repeat. The selected chapter number
appears on the display to the Left of the DVD
symbol in the display, under the word CHAPTER
(see 4.1.8 and 4.1.21).
4.1.6A TITLE
This is associated with REPEAT. You must be playing
a DVD. It will appear when you have selected a Title
on the DVD to repeat. The selected title number
appears on the display to the Left of the DVD
symbol in the display, under the word TITLE (see
4.1.7).
4.1.6B TRACK
This is associated with REPEAT. You must be playing
a CD. It will appear when you have selected a Track
on the CD to repeat. The selected track number
appears on the display to the Left of the DVD
symbol in the display, under the word TRACK (see
4.1.9 and 4.1.21).
4.1.13 CLOSE
This is displayed when you press a button on the
front panel or key on the remote control which
causes the CD/DVD drawer to close.
4.1.14 READ
This is displayed immediately after the CD/DVD
drawer closes. It indicates the CD/DVD-1 is reading
the disc you have inserted, and is processing the
gathered data to set itself up to properly play the
disc.
4.1.15 OPEN
This is displayed when the disc carrier drawer is
open or opening.
4.1.7 TITLE
This is displayed only when you are playing a DVD.
It appears above the Number of the Title that
is currently playing. DVDs often have more than one
Title.
4.1.16 A #
This is displayed under the word TITLE when you
are playing a DVD. This single digit number
indicates the number of the Title which is currently
playing. Many DVDs have two or more Titles.
4.1.8 CHAPTER
This is displayed only when you are playing a DVD.
It appears above the Number of the Chapter that is
currently playing. DVDs generally have several
chapters. (Also see 4.1.21 below).
4.1.17 A #
This is displayed under the word CHAPTER when
you are playing a DVD. This three-digit number
indicates the number of the currently playing
Chapter of the current Title that you are watching.
(See 4.1.21)
4.1.9 TRACK
This is displayed only when you are playing a CD.
The word appears above the Number of the Track
that is currently playing. CDs generally have several
tracks. (Also see 4.1.21 below).
4.1.10 TIME
This is displayed when you a playing a CD or DVD.
It is associated with the words to the left of it:
TOTAL (see 4.1.11), and TRACK (see 4.1.12).
4.1.11 TRACK
This is displayed when you are playing a CD. It is
associated with the word to its right: TIME. When
the two are displayed together the number
displayed below them indicates the time the current
Track of the CD has been playing.
4.1.12 TOTAL
This is displayed when you are playing a DVD. It is
associated with TIME to its right. When the two are
displayed together the number displayed below
them indicates the time to current Title of the DVD
has been playing.
SHUFFLE PAUSE A-B REPEAT CHAPTER TITLE TRACK
TITLE CHAPTER TRACK
TOTAL TRACK TIME
4.1.18 A #
This is displayed under the word TRACK when you
are playing a CD. This two-digit number indicates
the Track number of the currently playing CD.
4.1.19 DVD
This is displayed while you are playing a DVD.
TM
4.1.20 CD
This is displayed while you are playing a CD.
4.1.21 1 – 15+
These numbers running along the bottom of the
display indicate how many tracks are on the CD or
how many chapters are contained in the current
Title on the DVD. The lit numbers indicate the total
tracks or chapters (up to a maximum of 15). The
numbers count down, so that as each track/chapter
is completed, its number goes out and only the
remaining tracks/chapters are lit. If there are more
than 15 tracks/chapters all the numbers through
15+ light, and ‘15+’ will remain lit after the 15th
track or chapter has been played.
(10)
(11)
(12)
DVD
CLOSE
INFO
CD
1 . 2 . 3 . 4 . 5 . 6 . 7 . 8 . 9 . 10. 11. 12. 13. 14. 15+
(13)(14)(15)
(16)(17)(18)
(19)
(22)(23)(24)(25)
(21)
(20)
Downloaded From Disc-Player.com Classe Audio Manuals
7
4.1.22 INFO
This is displayed when you have first insert a DVD.
INFO indicates the CD/DVD-1 is waiting for input
from you. INFO indicates you must select which
Audio format (dts or Dolby Digital or another
format which may be available on the disc and/or a
particular Title.
4.1.23 A #
This is displayed when you first insert a CD and
TOTAL and TIME are lit on the line above, indicating
the Total Minutes and Seconds contained on the
CD. The same number will be displayed if you stop
the CD. TOTAL TIME is lit.
4.1.24 A #
This is displayed while a DVD is playing which
indicates the total number or Hours : Minutes :
Seconds which have played of the current Title.
TOTAL TIME is lit.
4.1.25 A #
This will be displayed when you Press STOP when
a DVD is playing. The number indicates the total
Hours : Minutes : Seconds in the Title which was
stopped. The Title number is also displayed under
TITLE. TOTAL TIME is lit.
SECTION 5.0:
CD/DVD-1 REMOTE CONTROL WAND
The keys on the CD/DVD-1 Remote Control Wand
are laid out in an easy to use pattern. The last three
rows of keys are the ones you will use most often.
When used in conjunction with a Classé Surround
Processor, the remote control will increase or
decrease the volume or mute the sound while
allowing the movie or CD to continue to play. On
the following two pages we have provided a list of
the functions and their actions. (See Appendix A for
a list of the remote control codes).
OSD
ON SCREEN DISPLAY. Allows you to turn off the
On Screen (Monitor) readout specific to operation
of the CD/DVD player.
T-C
TITLE – CHAPTER allows you to see which Title or
Chapter you are currently watching. Can be used
with the number keys to select a different Title or
Chapter to watch. Pressed once the number of the
current title appears and pressed twice causes the
number of the current chapter to appear on screen.
A third press will revert to Title. When the Title or
Chapter number is displayed press the number keys
to choose another Title or Chapter to watch.
STANDBY
STANDBY turns the CD/DVD-1 On and Off. ‘Off’ is a
standby mode. When in Standby the PLAY key will
also turn on the unit. Pressing the STANDBY key will
only turn on the unit, while PLAY will turn on the
player and begin playing any disc which may be
loaded.
ANGLE
ANGLE allows you to view the current scene on a
DVD from a different camera angle. Camera
angle(s) capability must be programmed into the
movie for this key to have any function.
SUB.T
SUB TITLE turns On or Off the available subtitle(s)
on a DVD. Subtitles must be programmed in the
movie for this key to have any function.
AUDIO
AUDIO temporarily prints a notice on screen
regarding the language and audio format currently
being played. Only includes information regarding
the operation of the DVD player.
SETUP
See section 6.0 for a full explanation.
1–0
1 – 0 NUMBERS are used to select a different Title
or Chapter from those currently playing. First press
T-C (One press selects Title, next selects Chapter
and next will again select Title, etc.) then press the
sequence of number keys of your choice of Title or
Chapter number.
Downloaded From Disc-Player.com Classe Audio Manuals
MENU
MENU selects the Chapter Menu which is available
as part of the program on the particular DVD you
are watching.
/\
UP ARROW moves the video cursor or highlight to
the previous available DVD Menu item, and jumps
the highlight from first to last Menu item.
OK
OK selects the action which is currently highlighted
on the DVD menu
<
LEFT ARROW moves the video cursor or highlight to
the left in a DVD menu which has more than one
column of selections. ALSO, while a DVD or CD is
playing, the Left Arrow will cause the player to Scan
backward through the program. One press scans
back at 4 times normal speed and two presses
scans back at 32 times normal speed.
RETURN
RETURN
>
RIGHT ARROW moves the video cursor or highlight
to the right in a DVD menu which has more than
one column of selections. ALSO, while a DVD or CD
is playing, the Right Arrow will cause the player to
Scan forward through the program. One press scans
forward at 4 times normal speed and two presses
scans forward at 32 times normal speed.
\/
DOWN ARROW moves the video cursor or highlight
to the next available DVD Menu item, and jumps
the highlight from last to first Menu item.
REPEAT
REPEAT has three functions:
1. A single short press of the key Marks the
beginning of a section to be repeated. appears
An ‘A to’ briefly on screen. When you reach the
end of the section you wish to repeat a single
short press Marks the end. An ‘A to B’ appears
briefly on screen. The section to be repeated
immediately begins over. The Marked section
will repeat until you stop it by holding the
Repeat key down.
2. A longer press on the key will allow you to
select repeating the Title (the complete
program). A ‘T’ with a circular arrow will appear.
Release the key and the program will repeat
after the program reaches its end.
3. Pressing the key for somewhat longer will allow
you to select repeating the Chapter (a portion of
a Title). A ‘C’ with a circular arrow will appear
on screen. Release the key immediately The
Chapter will begin repeating once it has
completed playing.
8
STOP
STOP causes the currently playing disc to cease
playing. A display of the number of available Titles
appears on screen, with a notice that pressing
either the < or > key will cause the Disc to eject.
|<<
PREVIOUS will cause the program to return to the
beginning of the current CD Track or DVD Chapter.
A second immediate press causes the program to
jump to the beginning of the previous
Track/Chapter. A third immediate press will jump to
the next previous Track/Chapter. Holding the key
down will cause the program to go back
Track/Chapter by Track/Chapter to the beginning of
the program.
The following three buttons control the volume of
only a Classé Surround Processor: SSP-50, SSP-25,
SSP-75 or SSP-30.
MUTE
MUTE mutes the audio output of the Classé
Surround Processor. Press the button again to return
to the previous listening level. Increasing the volume
with the VOL /\ (key immediately releases the Mute
condition, while reducing volume with the VOL \/
key maintains Mute until the Mute button is
pressed again. (Audio begins at the lowered level).
\/ VOL
DOWN VOLUME reduces the audio output of all the
playing speakers equally.
/\ VOL
UP VOLUME increases the audio output of all the
playing speakers equally. Pressing this key when the
Surround Processor is Muted causes the audio
output to begin.
OSD
T-C
ANGLE
PLAY
PLAY starts an inserted Disc, or restarts a Disc which
has been Paused or Stopped. It also returns play
back to normal speed from Slow Motion. You may
press PLAY with a Disc in the extended drawer to
close the drawer and start will playing the disc. You
may press PLAY to select and play a DVD Menu
item.
STANDBY
SUB. T
SETUP
1
2
3
4
5
6
7
8
9
0
MENU
V
V
PAUSE
PAUSE halts a CD or DVD in place. With a CD, the
music will stop, but will restart at once where it left
off when PLAY is pressed. After pausing, pressing a
|<< or >>| button will jump back to the beginning of
the current track or forward to the beginning of the
next, but the player will remain Paused. Pressing
PAUSE while a movie is playing will cause the movie
to halt in place, leaving a Still picture on screen, and
there will be no audio playback. Pressing a |<< or
>>| button will jump back to the beginning of the
current chapter or forward to the beginning of the
next, but the movie will continue to be Paused.
Pressing the PAUSE button while the Player is in
STANDBY mode will turn on the player. Pressing
PAUSE while a disc is Paused does not restart a disc.
AUDIO
RETURN
OK
V
REPEAT SCAN
SLOW
PLAY
PAUSE
MUTE
9
STOP
V VOL
RC MODEL - 17
Downloaded From Disc-Player.com Classe Audio Manuals
V
SLOW
SLOW turns on Slow Motion. First press slows
playback to 15 frames/second (1/2 speed), another
press causes playback to slow to 7.5 frames/second
(1/4 speed) and a third slows playback to 3.75
frames/second (1/8 speed). The fourth press returns
to 1/2 speed and so on. SLOW can be used during
REPEAT. Press PLAY to return to normal speed.
>>|
NEXT will cause the program to return to the
beginning of the current CD Track or DVD Chapter.
A second immediate press of (causes the program
to jump to the beginning of the previous
Track/Chapter. A third immediate press will jump to
the next previous Track/Chapter. Holding the key
down will cause the program to go back
Track/Chapter by Track/Chapter to the beginning of
the program.
V
SCAN
SCAN will cause the player to Fast Forward through
the program. One press scans forward at 4 times
normal speed and a second press Scans forward at
32 times normal speed. A third press slows to 4
times again. ALSO: Turns on Random play when
Repeat CD Track is selected.
SECTION 6.0:
SETTING UP THE CD/DVD-1
6.1 SETTING UP THE CD/DVD-1 IS EASY
Setting Up the CD/DVD-1 really is quite easy. There
are only few decisions to make, and all the
questions are quite straightforward. Once the player
is set up for use, of course, there will still be a
question or two relating to the program available
on a DVD you want to play. You may have to
choose which Audio format you prefer or which
screen shape you might want. You may exit Setup
at any point on the Menu by pressing SETUP again.
6.1.1 POWERING UP FOR FIRST TIME
Turn on the CD/DVD-1. If you are setting it up for
the first time you will have to turn it on with the
POWER button on the front panel, otherwise press
the STANDBY key on the remote control to wake it
up. Turn on the Video Monitor you use with the
CD/DVD-1 and also any processor (Video and/or
Surround), if the Player is not connected directly.
6.1.2 SETUP KEY
Press the SETUP key on the remote. The first of two
Setup Screens will appear. Scrolling down V will
take you to the next question on each page,
continuing down until you reach the last question,
where scrolling down will take you to the second
V
page. If you’re on the second page scrolling up
will take you to back to the first page.
6.1.3 CHOOSE LANGUAGE
The first choice is to choose the default spoken
language which the Player will attempt to detect
on the DVD. If the Language you pick is one of
the languages recorded on the DVD, when you
play the DVD the chosen language will be heard.
If the language is not available on the disk the first
available language on the DVD will play. There are
a total of 15 languages available. Press the < or >
key on the remote to view and select the language.
When you have selected the preferred language
press the V key on the remote select the next setup
item.
6.1.3.1 SPOKEN LANGUAGE ADVISORS
The spoken Language may be changed while you
are watching a movie. Press the AUDIO key twice
and the next available language will begin. Icons
will appear on screen letting you know what the
new language is. (The first press shows you what
the current language is). Often when the language
is changed the Audio Format changes also. You will
be notified of the new Format by an Icon.
Downloaded From Disc-Player.com Classe Audio Manuals
6.1.4 SUBTITLE
Subtitle is the second choice. Subtitles may be
preferable if you wish to listen to the language the
film was made in but still be able to understand
what is being said. Choosing which Subtitle
language you want played is easy. Highlight
Subtitle, then press the < or > key on the remote to
view and select the language. If the Language you
pick is one of the subtitle languages recorded on
the DVD it will display the dialogue in the chosen
language. If the Subtitle language is not available
the player will select the first available language on
the disc. There are a total of 15 languages available.
When you have selected the preferred language
press the V key on the remote to select the next
setup item.
6.1.4.1 SUBTITLE ADVISORY
Subtitle may be selected or changed while you are
watching a movie. Press the SUB.T key down until
the Subtitles appear. To pick the Subtitle language
you prefer, repeatedly briefly depress the SUB.T key
until you find the language you want. To turn off
Subtitles hold the SUB.T key down until the feature
turns off.
6.1.5 PARENTAL CONTROL
The third Setup item is Parental Control. When
activated, Parental Control allows you to ‘Mark’
up to fifty (50) DVDs that can be played at any
time, by anyone. This means also that to play any
other DVD you must temporarily authorized it by
entering a PIN number. To Activate Parental Control
highlight the selection on the setup Menu, then
press the < or > key on the remote to set your
choice to ON. You will asked to enter a 4 digit PIN
number, and then asked to renter the number to
confirm it. The numbers do not appear on screen.
6.1.5.1 AUTHORIZATION OF DISCS
Once you have activated Parental Control you can
authorize up to Fifty discs to be played without
entering a Pin code. To authorize a disc, insert it in
the drawer and load it. You will be asked for a PIN.
Enter the correct PIN, then press STOP. Press >. You
will be asked for the PIN again. After you have reentered it the disc will be playable without a PIN.
To remove the authorization repeat the above steps.
(If you attempt to Authorize a fifty-first disc the
least played authorized disc will be removed from
authorization, and you will be required to enter a
PIN to play it).
6.1.5.2 DEACTIVATE PARENTAL CONTROL
To de-activate Parental Control Highlight the
selection in the menu. You will be asked to re-enter
your PIN number. After you have entered the
correct number Parental Control will be turned off
and ALL discs will play.
6.1.5.3 FORGOTTEN PIN
If you forget your Parental Control PIN, you can
de-activate Parental Control completely. Insert a
disc that requires the PIN. When the OSD asks for
a PIN press the STOP key four times in quick
succession. All disks will play until you re-activate
the PIN number and re-mark the discs you wish
to be playable without entering a PIN.
6.1.6 TV SHAPE
Fourth on the first page is TV shape. Select the
shape with either the < or > key on the remote
control. There are three choices: 4:3 Pan and Scan.
4:3 Letterbox and 16:9. 4:3 is appropriate for all
TVs, but other choices may look better. 4:3
Letterbox allows a wide-screen image to be placed
on a normal 4:3 screen with bars above and below
the projected image. 16:9 is appropriate only for
16:9 screen TVs. When you have selected the
preferred screen shape press the V key on the
remote to select the next setup item.
6.1.7 AUTO-PLAY
Auto-Play is the next Setup item. Auto-Play ON
makes it possible to insert a disk and have it start
playing immediately after the drawer closes. Turning
the feature OFF means you must press PLAY for
most discs. (Some DVDs have Automatic start as
part of their programming, and will always start
immediately upon insertion).
6.1.8 AUTO FTS
Auto FTS (Favourite Track Selection) is the last item
on the first page. This Feature, which works on
both DVDs and Audio CDs, allows you to have at
least 100 discs that will play only the tracks you
have pre-selected. Once you have ‘Marked’ a disc
as one with Favourite Tracks Selected the player will
remember the disc and play only the tracks you
wish to play. It does not matter whether it is one
track or all but one, only your selections will play
until you change the selections or turn off FTS.
6.1.8.1 OSD AND FTS
You must use the OSD on your TV Monitor. If FTS is
not ON and you wish to use the feature, turn it on
in Setup. Exit Setup.
6.1.8.2 START OF FTS
Insert a disc and press STOP. Press either < or > to
start selecting your favourite Tracks. (Pressing <
allows to exclude tracks from play while pressing >
allows you to include tracks to play. The final result
is the same, except that you can add or subtract
tracks in a previous program selection).
10
6.1.8.3 INCLUDE TRACKS ON FTS
To Include Tracks (useful if you wish to play only a
few Tracks) press the > key after you have pressed
STOP. The OSD on your TV Monitor will show you
the available Track numbers in a lower band and a
band above with the selected tracks. Use the < or >
to move to and highlight tracks you wish to include.
(The numbers of the Tracks correspond to the Track
numbers printed on the CD case insert). When you
have highlighted a Track you want to play press the
V
key on the remote. If you change your mind press
the V key. If you wish to clear all the selected Tracks
press STOP. When you have finished selecting Tracks
on a disc, press either PLAY to memorize the
selections and start Playing the disc, or you may
press RETURN to return to STOP mode. If you want
to program a number of discs, remove the disc and
insert another and repeat the process.
6.1.8.4 EXCLUDE TRACKS ON FTS
To Exclude Tracks from play (Useful if you want to
play most Tracks) press the < key after you have
inserted a disc and pressed STOP. The OSD will
show you an upper Band with the available Tracks
and a lower Band which you will transfer tracks you
do not wish to listen to. Use the < or > to move to
and highlight tracks you wish to exclude. When you
have selected a Track, press the V key to exclude it.
V
If you change your mind press the key to reinclude the Track. If you wish to clear all the
selected Tracks press STOP. Continue using < or > to
highlight Tracks you don’t want. When you have
finished de-selecting press PLAY to start listening to
the disc or press RETURN to return to Stop mode. If
you want to program a number of discs, remove
the disc and insert another and repeat the process.
6.1.8.5 TOO MANY DISCS AND FTS
If you attempt to program more than One-hundred
discs the least played discs will be removed.
6.1.9 DIGITAL OUTPUT
You can choose between three selections; Off, no
digital output, PCM, which selects Digital out for
CDs, and All, which sends all digital data out the
SP/DIF outputs as well as analog. Most everyone will
select ALL. The default selection is ALL.
6.1.10 SOUND
The next choice on the second page, refers to the
Sound from the Analog Outputs. There are three
choices; Dolby Surround, which sends a mixed two
channel suitable for decoding by a Dolby Pro Logic
decoder, 3D which constructs a psycho-acoustic
sound field emulating surround utilizing only one
pair of speakers, and Stereo which is a straight two
channel output.
Downloaded From Disc-Player.com Classe Audio Manuals
6.1.11 VIDEO SHIFT
Video Shift enables you to center the picture (from
the DVD player) on your Monitor Screen. You
probably will not need to adjust it, but pressing the
> key moves the picture to the right, and the < key
shifts the picture to the left.
6.1.12 PBC
PBC on and off. PBC is Playback Control. See 7.2.5
below.
6.1.13 OSD LANGUAGE
OSD Language (On Screen Display) allows you to
choose between eight languages which the
CD/DVD-1 can use when it Displays messages On
Screen.
6.1.14 EXIT SETUP
Exit Setup by pressing the SETUP key.
SECTION 7.0:
USING THE CD/DVD-1
The POWER button on the Front Panel turns the AC
On and Off. If you have just plugged it in to the
wall or used the POWER button to turn it Off, the
remote control STANDBY key will Not turn it On.
When the Player has been turned Off (AC Off)
pressing the POWER button will turn on the Player
and wake it up out of Standby.
Although using the CD/DVD-1 is pretty easy; insert
a disc and press PLAY, there are a few other things
you will find you want to know. Read the following
sections about DVD Video, CD Video and CD Audio
and you’ll receive a thorough education on
operating and enjoying the player.
7.1 PLAYING A DVD VIDEO DISC
You will recognize DVD-Video discs by the Logo:
TM
Depending upon the material on the disc,
(a movie, a music video, a TV series, etc), there may
be one or more Titles, and each Title may contain
one or more Chapters. Play stops at the end of
each Title. The player allows you to play any Title or
any Chapter, or watch the same scene over and
over again. You can Slow Motion a scene or skim
through it at 32 times normal speed.
7.1.1 PLAY A TITLE
If Auto-play is turned on, play starts when you close
the disc drawer. If Auto-play is turned off merely
press Play on the Remote or on the Front Panel.
(Some discs contain programming that causes the
player to begin playing even though Auto-play may
be off).
7.1.1.1 TITLE MENU ADVISORY
Some discs may immediately present a Menu of
Titles. The player pauses until you pick the Title you
wish to watch. (If the disc has two Audio formats,
such as Dolby Digital and DTS, you will first be
prompted to choose the one you wish to listen to).
If the selections are numbered, press the
appropriate numerical key(s) on the remote control.
V
If not numbered, use the , V, < and > keys to
move to and highlight your selection, then press
OK. Play will stop at the end of the Title, and the
selection menu will return. Press > to play the next
Title in sequence.
7.1.2 STOP PLAY
To Stop Play at any time Press STOP on the remote
or front panel.
11
7.1.2.1 RESUME
You can resume Play at the point you Stopped by
pressing > twice. (The resume feature applies to the
current disc, and also to the previous Four discs.
You may re-insert a previously Stopped disc (up to
the 4th) and resume Play where you left off. Put the
disc in the player, press > if Auto-play is off, and
press > (again while the Resume Icon > is
on screen).
7.1.3 SKIP CHAPTER
To Skip to another Chapter while a disc is playing
press the > key to skip forward to the next chapter
or the < key to jump back to the beginning of the
current chapter, immediately press < again to return
to a previous chapter. To jump to any chapter
directly, forward or back, enter the chapter number
using the number keys on the remote. Enter
multiple digits in quick succession.
7.1.4 SKIP TITLE
To Skip to another title while a disc is playing, press
the T-C key, then press the > key to skip forward or
the < key to skip back to the beginning of the
previous Title. If you skip forward to the next Title
and decide to return to the Original Title, press the
T-C key again, then <. You will return to the
beginning of the original Title. To go directly to a
particular Title, press the T-C then the numeric keys
corresponding to the Title you wish to watch. Enter
multiple digits in quick succession.
7.1.5 PARENTAL CONTROL
Parental Control may be applied to as many as
Fifty (50) DVD-Video and CD-Video discs. If you
turn on ‘Parental Control’ in the Setup Menu you
will be required to enter a PIN for each DVD which
has not been pre-authorized for play. See Section
6.1.5 above.
7.1.6 STILL PICTURE AND PAUSE
A Still picture is displayed on screen when you press
PAUSE on the remote or on the front panel.
Repeated pressing of PAUSE will step the picture
forward a single frame at a time. To return to
normal viewing press PLAY. Press V to exit Pause
and begin playing with audio muted at half speed.
Press V again for one-quarter speed and again for
one-eighth speed. You may also press the > or the
< key.
7.1.7 SEARCH
Search, or Fast Forward and Fast Reverse, results
when you press the > key (forward) or the < key
(reverse). The first press Mutes the audio and play
forward or back is accelerated by 4 times. A second
press increases speed to 32 times normal, and a
third returns to 4 times normal speed. Speed is
indicated on the Video monitor for 2 seconds each
time the > key or the < key is pressed. Return to
normal play by pressing PLAY. You may also press
PAUSE or SLOW or STOP.
7.1.8 SLOW MOTION
Slow Motion may be achieved by pressing the
SLOW button on the remote wand. Slow motion
only works in forward mode. Audio is muted. The
first press results in a half speed display of the
movie. Second press gives a one-quarter speed, a
third press reduces playback to one-eighth speed.
A fourth press returns to half speed. You can return
to normal speed with normal audio by pressing
PLAY. You may also press PAUSE, STOP, > or <.
7.1.9 SHUFFLE
You may Shuffle the playing order of chapters in
a Title being played (if there is more than one
chapter) by pressing SCAN on the remote. The
player will immediately begin playing chapters in
random order. Though perhaps most useful with
CDs, it also produces good results with a Music
Video DVD, where separate chapters are usually
separate songs. The first press of SCAN turns the
effect on (Chapter shuffle appears on screen for 2
seconds) and the second turns it off, (> appears
on screen for two seconds).
7.1.10 REPEAT A PORTION
You may also Repeat a portion of a scene, or
whole chapter, a whole Title or a whole disc using
the REPEAT button on the remote control.
7.1.10.1 REPEAT METHODS
Press the REPEAT key briefly to select the start of a
portion of a movie you wish to repeat. REPEAT Awill appear for two seconds on screen. When you
reach the end of the portion you wish to repeat,
very briefly press REPEAT again, and the selection
will immediately begin playing at your starting point
again.
7.1.10.2 CHAPTER REPEAT
Hold the REPEAT key for about one second to
repeat the Chapter. REPEAT A-B will appear.
Continue to hold the key down until REPEAT
CHAPTER appears on screen. Chapter will REPEAT
when play reaches the end of the chapter.
7.1.10.3 TITLE REPEAT
Press the REPEAT key again for about another
second to repeat Title. REPEAT A-B will appear.
Continue to hold the key down until REPEAT TITLE
appears on screen. Title will repeat when play
reaches the end of the Title.
7.1.10.4 REPEAT A-B
Press the REPEAT key a third time for about a
second to repeat disc. REPEAT A-B will appear.
Continue to hold the key down until REPEAT
appears on screen. Disc will repeat when play
reaches the end of the disc. REPEAT A-B will
appear briefly on screen.
7.1.10.5 TURN OFF REPEAT
Any selection you wanted to repeat will continually
play over again until you turn it off by briefly
pressing the REPEAT key.
7.1.11 CAMERA ANGLE
Camera Angle can be changed on some DVDs. If
the function is not part of the program on the DVD
there is no way to change camera angle. If the
function exists for certain scenes the camera angle
icon will appear on screen. If you don’t wish to see
the icon press the OSD key.
Downloaded From Disc-Player.com Classe Audio Manuals
7.1.11.1 CAMERA ANGLE ICON
When you see the icon and wish to change camera
angles press the ANGLE key. Each press will change
the angle to the next available. You can go directly
to any of ten (0 – 9) angles by pressing the
corresponding number on the remote wand.
7.1.11.2 CAMERA ANGLE AND OSD
Press the OSD key to turn off the Angle feature
and return to the main camera angle. If there are
other camera angles available for a scene, you may
turn on the Angle feature by pressing the ANGLE
key again.
7.1.12 DVD MENU OF TITLE
Many DVDs have a Menu which may include
information on Titles, Chapters, Camera Angles,
Languages available. Press the MENU key to see
this menu. Once the Menu is available you may
V
navigate it by using the V, , > and < keys to
highlight a selection. To select it Press the OK key.
To merely exit this Menu, press MENU again. There
may also be a ‘Title Menu’ which can be accessed
by pressing T-C then MENU. Press T-C again to exit
this Menu, or navigate through the Menu as above
and select your choice of Titles by pressing the OK
key.
7.2 PLAYING A VIDEO CD
You will recognize a Video CD by the logo.
Depending on the material on the disc (a movie,
video clips, a drama series, etc). it may have one or
more tracks, and tracks may have one or more
indexes, as indicated on the disc case. To make
access easy and convenient, your player lets you
move between tracks, and between indexes.
Some Video CDs have Playback Control (PBC),
which is a predefined playback sequence stored on
the disc.
7.2.1 PLAY A DISC
If Auto-play is turned on, play starts when you close
the disc drawer. If Auto-play is turned off merely
press Play on the Remote or on the Front Panel.
7.2.2 STOP PLAYING DISC
To Stop Play at any time Press STOP on the remote
or front panel.
7.2.2.1 RESUME PLAYING A VIDEO CD
You can resume Play at the point you Stopped by
pressing > twice. (The resume feature applies to the
current disc, and also to the previous Four discs.
You may re-insert a previously Stopped disc (up to
the 4th) and resume Play where you left off. Put
the disc in the player, press > if Auto-play is off,
and press > again while the Resume Icon > is
on screen).
7.2.3 SKIP A TRACK
To Skip to another Track while a disc is playing press
T-C then the >>| key to skip forward to the next
Track or T-C then the |<< key to jump back to the
beginning of the current Track. Immediately press
|<< again to return to a previous Track. To jump to
any Track directly, forward or back, enter the Track
number using the number keys on the remote.
Enter multiple digits in quick succession. (Some
discs have only one Track).
12
7.2.4 SKIP TO ANOTHER INDEX
To Skip to another Index within a Track while a disc
is playing, press the >>| key to skip forward or the
|<< key to skip back to the beginning of the
previous index. If you skip forward to the next Index
and decide to return to the Original Title, press the
|<< key. You will return to the beginning of the
original index. To go directly to a particular index,
press the numeric keys corresponding to the Index
you wish to watch. Enter multiple digits in quick
succession.
7.2.5 PLAYBACK CONTROL (PBC)
Insert a Video CD with PBC and press PLAY. The
PBC menu will appear on your TV monitor. Go
through the menu with the keys indicated on the
monitor until your chosen passage starts to play. If
a PBC menu consists of a list of titles, you can
select a title directly. Enter your choice with the < or
> keys or the numerical keys.
7.2.6 PARENTAL CONTROL
Parental Control may be applied to as many as Fifty
(50) DVD-Video and CD-Video discs. If you turn on
‘Parental Control’ in the Setup Menu you will be
required to enter a PIN for each CD-Video disc
which has not been pre-authorized for play. See
Section 6.1.5 above.
A Still picture is displayed on screen when you press
PAUSE on the remote or on the front panel.
Repeated pressing of PAUSE will step the picture
forward a single frame at a time. To return to
normal viewing press PLAY.
7.2.7 SEARCH
Search, or Fast Forward and Fast Reverse, results
when you press the > key (forward) or the < key
(reverse). The first press Mutes the audio and play
forward or back is accelerated by 4 times. A second
press increases speed to 32 times normal, and a
third returns to 4 times normal speed. Speed is
indicated on the Video monitor for 2 seconds each
time the > key or the < key is pressed. Return to
normal play by pressing PLAY. You may also press
PAUSE or SLOW or STOP.
7.2.8 SLOW MOTION
Slow Motion may be achieved by pressing the
SLOW button on the remote wand. Slow motion
only works in forward mode. Audio is muted.
The first press results in a half speed display of the
movie. Second press gives a one-quarter speed, a
third press reduces playback to one-eighth speed.
A fourth press returns to half speed. You can return
to normal speed with normal audio by pressing
PLAY. You may also press PAUSE, STOP, > or <.
7.2.9 SHUFFLE
You may Shuffle the playing order of tracks being
played (if there is more than one track) by pressing
SCAN on the remote. The player will immediately
begin playing Tracks in random order. The first press
of SCAN turns the effect on (Shuffle appears
on screen for 2 seconds) and the second turns it off
> appears on screen for two seconds).
Downloaded From Disc-Player.com Classe Audio Manuals
7.2.10 REPEAT
You may also Repeat a portion of a scene, a whole
Track, or a whole disc using the REPEAT button on
the remote control.
7.2.10.1 REPEAT A-B
Press the REPEAT key briefly to select the start of a
portion of a movie you wish to repeat. REPEAT Awill appear for two seconds on screen. When you
reach the end of the portion you wish to repeat,
very briefly press REPEAT again, and the selection
will immediately begin playing at your starting point
again. REPEAT A-B will appear briefly on screen.
7.2.10.2 REPEAT TRACK
Hold the REPEAT key for about one second to
repeat the Track. REPEAT A-B will appear. Continue
to hold the key down until REPEAT TRACK appears
on screen. The Track will repeat when play reaches
the end of the Track.
7.2.10.3 REPEAT DISC
Press the REPEAT key a second time for about a
second to repeat the disc. REPEAT A-B will appear.
Continue to hold the key down until REPEAT
appears on screen. Disc will repeat when play
reaches the end of the disc.
7.2.10.4 TURN OFF REPEAT
Any selection you wanted to repeat will continually
play over again until you turn it off by briefly
pressing the REPEAT key.
7.3 PLAYING AN AUDIO CD
Audio CDs contain only Audio selections. There is
no need to have the Video Monitor turned on,
though if it is on, certain information about the
current CD will appear on screen. The information
will include the number of tracks, the total Time of
the CD, the total time of the current track and the
elapsed playing time of the current track.
7.3.1 INSERT AND PLAY
Insert the CD in the drawer and press LOAD. If
Auto-play is turned off, press PLAY. Play will
normally continue through to the end of the disc
and stop.
7.3.2 STOP PLAYING CD
To Stop Play at any time press STOP. To restart,
press PLAY.
7.3.5 SKIP TO ANOTHER TRACK ON CD
To Skip to another Track while a disc is playing press
the >>| key to skip forward to the next Track or the
|<< key to jump back to the beginning of the
current Track. Immediately press |<< again to return
to a previous Track. To jump to any Track directly,
forward or back, enter the Track number using the
number keys on the remote. Enter multiple digits in
quick succession. (Some discs have only one Track).
7.3.6 SHUFFLE
You may Shuffle the playing order of Tracks being
played (if there is more than one track) by pressing
SCAN on the remote. The player will immediately
begin playing Tracks in random order. The first press
of SCAN turns the effect on and the second turns
it off.
7.3.7 REPEAT
You may also Repeat a selected portion of a disc,
a whole Track, or a whole disc using the REPEAT
button on the remote control.
7.3.7.1 REPEAT A-B
Press the REPEAT key briefly to select the start of
a portion of a Track you wish to repeat.
REPEAT A-B will appear for two seconds on screen.
When you reach the end of the portion you wish to
repeat, very briefly press REPEAT again, and the
selection will immediately begin playing at your
starting point again.
7.3.7.2 REPEAT TRACK
Hold the REPEAT key for about one second to
repeat the Track. REPEAT A-B will appear. Continue
to hold the key down until ‘Repeat Track’ appears
on screen. The Track will repeat when play reaches
the end of the Track.
7.3.7.3 REPEAT DISC
Press the REPEAT key a second time for about a
second to repeat the disc. REPEAT A-B will appear.
Continue to hold the key down until ‘Repeat’
appears on screen. Disc will repeat when play
reaches the end of the disc.
7.3.7.4 STOP REPEAT
Any selection you wanted to repeat will continually
play over again until you turn it off by briefly
pressing the REPEAT key.
7.3.3 PAUSE CD
To Pause at any time press the PAUSE key. To
restart, press PLAY.
7.3.4 SEARCH CD
Search, or Fast Forward and Fast Reverse, results
when you press the > key (forward) or the < key
(reverse). The first press partially Mutes the audio
and play forward or back is accelerated by 4 times.
A second press increases speed to 8 times normal,
and a third returns to 4 times normal speed. Speed
is indicated on the Video monitor for 2 seconds
each time the > key or the < key is pressed. Return
to normal play by pressing PLAY. You may also press
PAUSE or STOP.
13
APPENDIX A, RC5 CODES FOR
CD/DVD-1 AND PROCESSORS
Below are the codes for programing programable
remote controls. The sequence of codes must
include all of the information, including defining
the code as RC5. Example: RC5 System 12 Code 53
for ‘PLAY’.
CODE
0
1
2
3
4
5
6
7
8
9
10
11
12
13
14
15
16
17
18
19
20
21
22
23
24
26
27
28
29
30
31
32
33
34
35
36
37
38
39
40
41
42
43
44
45
46
47
48
49
50
51
52
53
54
55
CD/DVD-1 (SYS 12)
0
1
2
3
4
5
6
7
8
9
STANDBY
MUTE
(System 25)
OSD / STATUS
VOL UP
(System 25)
VOL DOWN
(System25)
SSP25 (SYS 25)
SSP75 (SYS 25)
AUTO. CAL
POWER_OFF
POWER_ON
STANDBY
MUTE
(Toggle On/Off)
POWER_OFF
POWER_ON
STANDBY
MUTE
(Toggle On/Off)
DISPLAY
VOL UP
POWER_OFF
POWER_ON
STANDBY
MUTE
(Toggle On/Off)
SLEEP
DISPLAY
VOL UP
VOL DOWN
VOL DOWN
VOL DOWN
AUD1
AUD2
AUD3
AUD4
AUD5
AUD6
AUD1
AUD2
AUD3
AUD4
REPEAT
Title/Chapter
OK
MENU
ARROW UP
ARROW LEFT
ARROW RIGHT
ARROW DOWN
RETURN
SETUP
SCAN
ANGLE
SUBTITLE
AUDIO
PAUSE
PREVIOUS
NEXT
PLAY
STOP
SLOW
Downloaded From Disc-Player.com Classe Audio Manuals
SSP30 (SYS 25)
MODE UP
MENU
ARROW UP
ARROW LEFT
ARROW RIGHT
ARROW DOWN
ENTER
VIDEO LEFT
VIDEO RIGHT
AUDIO LEFT
AUDIO RIGHT
MASTER
LEFT
RIGHT
LEFT-SURR
RIGHT-SURR
AV1
AV2
AV3
AV4
AV5
AV6
DISPLAY
VOL UP
AUD1
AUD2
AUD3
AUD4
Ext7.1
TAPE Toggle
MUTE ON
MUTE OFF
TAPE ON
TAPE OFF
MODE UP
MENU (SETUP)
ARROW UP
ARROW LEFT
ARROW RIGHT
ARROW DOWN
ENTER
MODE UP
MENU (SETUP)
ARROW UP
ARROW LEFT
ARROW RIGHT
ARROW DOWN
ENTER
EXIT
AUDIO DOWN
AUDIO UP
SOURCE DOWN
SOURCE UP
AV1
AV2
AV3
AV4
AV5
AV6
AV1
AV2
AV3
AV4
AV5
AV6
TRIM (S)
ZONE
ZONE
14
CODE
56
57
58
59
60
61
CD/DVD-1 (SYS 12)
62
63
Downloaded From Disc-Player.com Classe Audio Manuals
SSP25 (SYS 25)
MODE DOWN
THX
SUB
CENTER
AUTO
COMPR
(Toggle On/Off)
TRIM
SSP75 (SYS 25)
MODE DOWN
THX
COMPR (DYN)
(Toggle On/Off)
TRIM
STATUS
SSP30 (SYS 25)
MODE DOWN
COMPR ON
COMPR OFF
COMPR (DYN)
(Toggle On/Off)
TRIM (L)
STATUS
15