1
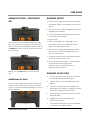
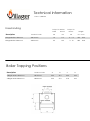
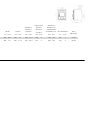
Boiler User Guide For stove ranges: Villager Boilers PLEASE RETAIN THIS GUIDE FOR FUTURE REFERENCE BK595 EN 13240:2001+ Amd. A2 September 2013 More than 20 years experience has been put into the development of our boiler stoves to ensure ultimate performance and years of trouble free use and enjoyment. Every detail of the stove has been carefully designed and engineered which is why we are so confident in the reliability of our products. Should you have any questions about our stoves that are not covered by this manual, please contact the Arada retailer in your area, or call our technical support department on 08448 567181 All Arada stoves are tested to European Standard EN 13240. WARNINGS Pure Petroleum coke or Bituminous house coal must not be burned in this appliance. The use of these fuels will invalidate the appliance guarantee. Arada recommends the use of HETAS approved smokeless fuels which have been deemed suitable for use on closed appliances, including multi fuel stoves. If in doubt, contact The Solid Fuel Association, telephone: 0845 601 4406 / 01773 835400 or visit www.solidfuel.co.uk It is a legal requirement that the installation of all new or replacement, wood or solid fuel heating appliances obtain building control approval from your local authority. This can be done by using a qualified heating engineer, affiliated to a government approved competent persons scheme such as operated by HETAS. If in doubt, contact HETAS limited, telephone: 0845 634 5626 or visit www.hetas.co.uk A fireguard conforming to BS 8423:2002 should be used in the presence of children and old or infirm people. Do not use aerosol sprays or any other flammable materials near the appliance when in use. Arada Ltd will not be responsible for any consequential or incidental loss or injury however caused. Arada has a policy of continuous product development and therefore we reserve the right to amend any product specification without prior notice. 2 Wet Stove User Guide USER GUIDE OPERATING YOUR STOVE SOLID FUEL Our boiler stoves are designed to be operated with the fire door(s) closed at all times, apart from refuelling (when alight) or cleaning (when cold). Arada recommends the use of HETAS approved smokeless fuels which have been deemed suitable for use on closed appliances, including multi fuel stoves. These include: Never leave the appliance unattended for an extended length of time with the door(s) open. Visit our YouTube channel for our ‘how-to’ series of videos: http://www.youtube.com/aradastoves FUEL TYPES WOOD Any type of wood is suitable provided it is well seasoned and has a moisture content below 20%. This usually implies that the timber has been suitably stored to allow moisture to evaporate for at least nine months in the case of soft woods, and at least twenty four months in the case of hard wood. We recommend that for general burning wood should be split into logs of no more than 100mm (4”) diameter. WARNING: Wet wood must not be used as this will greatly contribute to the creation of tar and creosote which may, in extreme cases, run down the chimney in liquid form. This will seriously damage both the chimney and the appliance and increase the risk of a chimney fire. Please Note: If you have sticky tar inside the appliance or chimney your wood is ‘green’ or too wet. PAPER – Paper will burn successfully. Burn dry paper only or chimney damage will occur. WARNING: NEVER BURN PLASTICS, HOUSEHOLD WASTE OR LIQUID FUELS IN YOUR STOVE. Wet Stove User Guide Homefire Ecoal Homefire Ecoal Instant Light Taybrite Homefire Newflame Homefire Ovals Maxibrite Supertherm Sunbrite Ancit Pureheat Phurnacite For additional advice on fuels, please refer to The Solid Fuel Association. LIGHTING THE FIRE Prior to lighting the stove for the first time, check with the installer that: Installation and all building work is complete. (Refer to the Installation Guide.) The chimney is sound, has been swept and is free from obstruction. Adequate provision for combustion air has been made. That Building Regulations and any local by-laws have been followed during installation. See separate installation guide. All firebed surrounds and FEDS are in place. That the chimney draw has been checked and is within specification. With the chimney warm, the draught should be between 1-2 mm water gauge or 0.1 to 0.2 mbar. Ensure the system is full of water and vented. That precautions have been taken to prevent corrosion. 3 USER GUIDE A Carbon Monoxide detector is correctly installed in the same room as the appliance. WARNING: An over drawing chimney can cause over firing, resulting in damage to the appliance. Ensure that you have read and understood these instructions before lighting the fire. Do not light the fire if it is suspected that any part of the system could be frozen. Always wear suitable protective fire gloves when refuelling your stove, such as the Arada glove supplied with your stove. PLEASE NOTE: We recommend that you light a small fire for the first few days of use to cure the paint and allow the castings to relax. It is normal to experience some odours whilst the paint cures. These are non-toxic and temporary. When lighting a cold boiler appliance it is not uncommon for condensation to form when the hot air makes contact with the cold boiler jacket. This is only temporary and no fault of the appliance, once the boiler water temperature rises the condensation will stop. system (secondary air) providing overdraught and the additional air inlets provide an on demand increase in air for combustion. PRIMARY AIR The primary air is supplied through the thermostatically controlled air inlet beneath an access cover on the left side of your stove. This should have been calibrated when the stove was installed. (See accompanying Installation Guide). It regulates the amount of under draught air entering the stove depending on the setting of the control knob. The control knob is numbered 0 to 5 relating to the nominal temperature of the water within the boiler jacket. With a correctly configured installation the water in the jacket should not exceed 80ºc when the knob is set to 5. Setting is indicated by screw Some models have holes in their bases to accommodate a heat shield. Condensation may pass through these during the initial lighting of the stove. Please ensure your hearth is protected from the possibility of being permeated/discoloured by condensation. AIR INLET CONTROLS Your stove has three air inlet controls. These are located either on the stove body or the door. If a lower radiator temperature is required a lower number should be selected. Some experimentation may be necessary to find the setting best suited to your requirements. The primary air inlet provides under draught to the base of the fire chamber, the airwash 4 Wet Stove User Guide USER GUIDE AIRWASH SYSTEM / SECONDARY AIR BURNING WOOD Set the fire by using scrunched up newspaper and place a layer of dry kindling wood on top of this. The use of two or three fire lighters may assist in lighting the kindling. Set the secondary and additional air inlets to the fully open position. Light the fire. The airwash has an internal sliding plate with slots, housed in a cover plate, and is located above the fire door. Sliding the control knob to the RIGHT as far as it will go, achieves the fully open position. After the kindling has caught light, you should leave the fire door ajar by about 20mm. This will aid flue draw. The flue draw should be established after five minutes, and the kindling reduced to form an ember bed. Carefully load the stove with well seasoned wood and close the fire door. After ten to fifteen minutes, close the additional air inlets and regulate the airwash control, typically reduce to approximately half way. Sliding it to the LEFT will shut off the air inlet slots. Additional Air Inlet Your stove has additional air inlets found at the bottom of the main fire doors. These should be used for a short period whilst lighting the stove or after re-fuelling. Wet Stove User Guide BURNING SOLID FUELS Set the airwash to one quarter open and the additional air inlets fully open. Light as with wood, with kindling and fire lighters. Once flue draw has been established, after about five minutes, carefully load the stove with fuel and close the door. After another five minutes close the additional air inlets. Regulate the burning rate by the thermostat control. The airwash should be opened sufficiently to keep the door glass clean. 5 USER GUIDE Whilst burning solid fuel it can be beneficial to occasionally riddle the grate bars so any burnt fuel will fall between the grate bars into the ash pan below. This will ensure a good under draught is maintained. This is done by pulling back and fourth the riddling lever on the front of the stove using the operating tool supplied with the stove. MULTI FUEL GRATE The grate in your stove comprises of a series of reciprocating cast iron bars seated on a pivoted comb. These should come pre-assembled in your new stove. All bars in the grate are identical, but every other bar is turned 180 degrees, with the ends of the bars marked ‘H’ sitting on the high sections of the comb, and the ends marked ‘L’ sitting on the low sections. The riddling lever on the front of the stove can be operated with the stove operating tool to riddle ash into the ash pan below. Only riddle the stove with the door closed and stop once red embers begin to fall into the ash pan. WARNING: Properly installed, with a suitable flue or chimney, operated and maintained correctly, this appliance will not emit fumes into the dwelling. Occasional fumes when de-ashing and refuelling may occur. However, persistent fume emission is potentially dangerous and must be investigated by a HETAS registered installer. Stop using the appliance if you smell fumes or see smoke escaping. If fume emission does persist, the following immediate actions should be taken: Open doors and windows to ventilate room. Let the fire die or extinguish and safely dispose of fuel from the appliance. Check for flue or chimney blockage, and clean if required. Seek expert advice from your HETAS registered installer. Do not attempt to re-light the fire until the cause of the fume emission has been identified and corrected. 6 After extended use it may be necessary to replace some of the grate bars. Periodic inspection of the bars is recommended and any damaged bars replaced. Also check for obstructions that may prevent the operation of the riddling mechanism. DOOR GLASS The door glass should remain clear during normal burning. However, under certain conditions, such as burning at a low rate, using damp wood or overnight burning, the glass may become somewhat blackened. To remedy this, operate the appliance at a fast rate. Alternatively when the stove is cold, open the door and clean the inside face of the glass with a damp cloth or with glass cleaner (available from stove stockists and online at www.aradastovesandspares.com). Wet Stove User Guide USER GUIDE REDUCED BURNING When wood is burnt slowly in a closed appliance, it produces moisture and tar, which will create condensation and deposits in the chimney. This effect can be minimised by burning hard for a short period, fifteen to twenty minutes, twice a day. The additional air inlets can be used to achieve this faster burn rate. Remember to close the air inlets again afterwards as this overrides the stoves automatic thermostatic control. Please Note: To avoid chimney problems your appliance should not be burnt at a reduced burn rate without a period of fast burning. OVER FIRING & CHIMNEY FIRES DO NOT over fire your appliance. Firing the stove at maximum for prolonged periods may result in over-firing. If the chimney connector or casing glows red the appliance is being over-fired and may result in a chimney fire. ASH REMOVAL The appliance will require ash to be removed periodically but an ash bed of approximately 20mm (3/4”) should be maintained. Care must be taken not to burn hands or household objects with falling embers. The ash pan should be emptied when the level of ash reaches the top of the ash pan. On no account should the ash be allowed to build up to touch the underside of the grate bars, as this will greatly reduce the life span of the grate. The ash will require less frequent removal when burning wood than solid fuels. prevent smoke from entering the room. Use the supplied multi-purpose operating tool to remove the ash tray. WARNING: The ash can be very hot. Empty only into a metal container. Even if the ash appears cold, red-hot embers may be concealed and could easily start a fire or cause an injury. FEDS INSPECTION (WHERE FITTED) The Flue Exhaust Diversion (FEDS) system needs to be checked regularly to ensure any build up of ash and other debris is removed. The Installation Guide contains details on how to remove and inspect the outer FEDS plate. This should be done only when the stove is unlit and cold. THERMOSTAT MAINTANENCE It is possible that over time, especially if ash is not removed regularly, the primary air inlet and its damper flap may become restricted / blocked by ash which may compromise the correct operation of the thermostat. The Installation Guide contains details on how to maintain the operation of the damper flap and thermostat housing. Pause with the fire door slightly ajar before you fully open it to remove ash. This will help Wet Stove User Guide 7 MAINTENANCE SUMMER STORAGE / NON USAGE Please ensure that your stove is left clean and moving components are well lubricated for the summer months (during periods of prolonged non-use). If possible store the FEDS plate outside of the stove. Check all moveable components at regular intervals, to ensure they are moving freely. Allow air movement through the stove, by opening the airwash and primary air inlet control(s) to about half way, open or leave the door ajar. This will allow a free flow of air through the appliance thus preventing moisture and condensation forming inside the stove and chimney. This preventative maintenance will ensure your stove stays in the best condition for the coming winter months. ADJUSTING THE DOOR HINGES Once the appliance has been under fire for a period of time the fire doors may appear to have moved out of alignment with relation to the door aperture or catch. This is quite normal and due to the settling of the casting. The fire door can be re-aligned as follows: When the appliance is cold, open the fire door so that it is at right angles to the front of the stove. Lift the fire door up off its hinges. Gently tap the hinge pins to compensate for the misalignment. Re-fit the door and check to ensure it now sits square to the body; if not repeat the above steps. If the fire door needs to be raised, please follow the instructions below: When the appliance is cold, open the fire door so that it is at right angles to the front of the stove. Lift the fire door up off the hinges. Drop one washer on the top and bottom hinge pins. Fit the door and check. REPLACEMENT PARTS As a leading manufacturer we are conscious of being able to support all our stove users with the supply of spare parts to ensure your continued enjoyment and warmth from your Arada stove. You can find a complete list of spares and consumables such as liners, grate bars and throat plates as well as items to enhance its visual appearance and efficiency such as Arada anthracite stove paint and rope kits. All the above can be ordered from your local stove dealer or online direct from Arada at: www.aradastovesandspares.com 8 Wet Stove User Guide GUARANTEE When you buy a Villager Boiler Stove, you are not only buying a first class appliance you are buying a commitment from us to look after you and your appliance for as long as you want. All Villager Boiler Stoves have a five year guarantee as standard on the condition that the stove was purchased through an official Villager dealer and installed by a suitably qualified engineer. This guarantee applies to stoves fitted in the same country as its purchase. Stoves bought through the internet in the UK and then taken abroad will not be eligible for any guarantee. All guarantees apply to the body of the fire, i.e. the steel carcass and items fixed immovably thereto. Arada Ltd cannot guarantee items which are susceptible to breakage or damage through careless handling, dropping etc., or through misuse of the appliance by over firing, burning petroleum coke, etc. Nor can the guarantee be extended to deterioration of parts through fair wear and tear. Firebox linings, grate bars, fuel retainer, FED (throat plate), gasket material and door glass are therefore not covered by the guarantee. The external paint finish and thermostat carry a one year guarantee only. The guarantee is conditional upon the appliance being installed, serviced and checked annually by a qualified heating engineer, with documentation to be retained and produced in the event of a claim being made. Claims are not valid where installation does not conform to appropriate building regulations. THE USE OF SPARES OTHER THAN THOSE SUPPLIED BY ARADA LTD WILL INVALIDATE THE GUARANTEE. If your appliance proves to be defective as a result of faulty materials or workmanship during the guarantee period, we will repair or replace it free of charge as long as the fire has been installed according to the manual instructions and the installation is signed by a suitably qualified engineer at the time of installation. All guarantee periods commence on the date of purchase and are non-transferable. Our guarantee is offered as an addition to your statutory rights. For users without access to the internet please call 01297 35700 for further assistance. If you think your fire is not working correctly or in the event of a breakdown, in the first instance contact your local retailer or installer for assistance. Wet Stove User Guide 9 Technical Information 1 kW = 3,420 BTU Freestanding Output to Water Solid Wood Description Product Code Villager Boiler 12kW Duo Villager Boiler 20kW Duo Output to Room Height kW mm inches kW kW VB12-DUO 12 9.5 2 - 7.5 590 23.2 VB20-DUO 20 14.5 3 - 10 680 26.8 Boiler Tapping Positions A B C D VB12-DUO 325 312 250 442 VB20-DUO 340 374 278 463 Description Product Code Villager Boiler 12kW Duo Villager Boiler 20kW Duo Depth from back to centre of top flue Minimum distance to combustible materials (mm) Flue Diameter Width Depth Height to centre of rear flue mm inches mm inches mm inches mm inches Rear 563 22.1 431 17 439 17.3 128 5 150 130 127 5 71.5% 634 25 490 19.3 521 20.5 154 6 200 150 152 6 70.5% Side mm inches Nett Efficiency Final Factory Checklist Quality / Finish Model: Flue Outlet Hot Plate Fuel Retainer Firebox Liners Throat Plate Door Catch / Door Handle Operating Tool Stove Glove Grate / Fuel Bed Installation Guide Assembled by……………………….... Checked by………………………………. We recommend recording where and when you purchased your stove for future reference: The Fireworks Weycroft Avenue Axminster Devon EX13 5HU www.aradastoves.com www.aradastovesandspares.com BK595