1
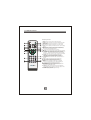
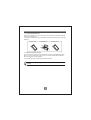
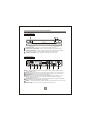
USER MANUAL
ATSC CONVERTER BOX
CHANNEL
ON
OFF
AT2016
AT2016
Please read this User Manual carefully to ensure proper use of this product and
keep this manual for future reference.
Table of Contents
Important Safety Instructions....................................................................1
1. Introduction.........................................................................................4
1.1 Remote control ..................................................................................5
1.1.1 Installing the batteries......................................................................6
1.1.2 Using the remote control ..................................................................6
1.2 Front Panel and Rear Panel Illustration ............................................... 7
1.2.1 Front Panel.....................................................................................7
1.2.2 Rear Panel .....................................................................................7
1.3 Connecting your Atsc Converter Box.................................................... 8
1.3.1 Connecting Antennas.......................................................................8
1.3.2 Connecting to a TV Set.....................................................................9
1.3.3 Connecting to an Audio System....................................................... 10
2.On-Screen Menus................................................................................11
2.1 Auto Program....................................................................................11
2.2 Manual Channel Set..........................................................................12
2.3 Password ........................................................................................ 12
2.4 Parental control ................................................................................ 12
2.5 Advanced Closed Caption.................................................................. 13
2.6 Language......................................................................................... 14
2.7 Auto Power Down Timer.................................................................... 14
2.8 Smart Antenna.................................................................................. 14
3. Troubleshooting ................................................................................ 15
4. Specifications ................................................................................... 16
5. Glossary............................................................................................ 17
Important Safety Instructions
1. The apparatus shall not be exposed to dripping
or Splashing and that no objects filled with liquids,
such as Vases, shall be placed the apparatus.
2. The mains plug is used as the disconnect device,
the disconnect device shall remain readily operable.
3. To be completely disconnect the power input,
the mains plug of apparatus shall be disconnected
from the mains.
4. The mains plug of apparatus should not be
obstructed or should be easily accessed during
intended use.
This symbol indicates that this product incorporates
double insulation between hazardous mains voltage
and user accessible parts. When servicing use only
identical replacement parts.
WARNING: To reduce the risk of fire or electric shock,
do not expose this apparatus to rain or cords.
5. The battery (battery or batteries or battery pack)
shall not be exposed to excessive heat such as
sunshine, fire or the like.
1
1. Read these Instructions.
2. Keep these Instructions.
3. Heed all Warnings.
4. Follow all instructions.
5. Do not use this apparatus near water.
6. Clean only with dry cloth.
7. Do not block any of the ventilation openings. Install in accordance with the
manufacturers instructions.
8. Do not install near any heat sources such as radiators, heat registers, stoves,
or other apparatus (including amplifiers) that produce heat.
9. Do not defeat the safety purpose of the polarized or grounding - type plug.
A polarized plug has two blades with one wider than the other. A grounding type
plug has two blades and a third grounding prong. The wide blade or the third
prong are provided for your safety. When the provided plug does not fit into your
outlet, consult an electrician for replacement of the obsolete outlet.
10. Protect the power cord from being walked on or pinched particularly at plugs,
convenience receptacles, and the point where they exit from the apparatus.
11. Only use attachments/accessories specified by the manufacturer.
12. Use only with a cart, stand, tripod, bracket, or table specified by the
manufacturer, or sold with the apparatus. When a cart is used, use caution when
moving the cart/apparatus combination to avoid injury from tip-over.
Portable Cart Warning
13. Unplug this apparatus during lightning storms or when unused for long
periods of time.
14. Refer all servicing to qualified service personnel. Servicing is required when
the apparatus has been damaged in any way, such as power-supply cord or plug
is damaged, liquid has been spilled or objects have fallen into the apparatus,
the apparatus has been exposed to rain or moisture , does not operate normally,
or has been dropped.
2
Note:
1. Important safety instructions shall be provide will each appliance.
These safety instructions may be in the form of a separate booklet, separate
sheet, or part of the instruction manual.
2. If included in the instruction manual, the safety instructions shall be located
before any operating instructions. 3. These instructions shall be entitled
IMPORTANT SAFETY INSTRUCTIONS .
4. The safety instructions shall include, as applicable to the particular apparatus,
the information and warnings listed before. The wording is capable of being
supplements, although not replaced, by drawing or cartoons.
5. The symbol shall be shown adjacent to the text of Important Safety Instructions
Warning: Changes or modifications to this unit not expressly approved by the
,
party responsible for compliance could void the users
authority to operate the
equipment.
NOTE: This equipment has been tested and found to comply with the limits for a
Class B digital device, pursuant to Part 15 of the FCC Rules. These limits are
designed to provide reasonable protection against harmful interference in a
residential installation. This equipment generates, uses, and can radiate radio
frequency energy and, if not installed and used in accordance with the
instructions, may cause harmful interference to radio communications. However,
there is no guarantee that interference will not occur in a particular installation.
If this equipment does cause harmful interference to radio or television reception,
which can be determined by turning the equipment off and on, the user is
encouraged to try to correct the interference by one or more of the following
measures:
- Reorient or relocate the receiving antenna,
- Increase the separation between the equipment and receiver.
- Connect the equipment into an outlet on a circuit different from that to
which the receiver is connected.
- Consult the dealer or an experienced radio TV technician for help.
3
Introduction
Thank you for purchasing this product which has been designed and manufactured
to give you many years of service.
About This User Guide
This user guide contains all the information you need to know about how to setup
and watch available digital TV channels using this ATSC Converter Box.
What's ATSC?
Advanced Television system committee, an international organization
establishing broadcasting standards for digital (including high-defimtion
and data broadcasting) television.
What's Digital Television?
Digital television (DTV) is a new way of transmitting high quality video and audio
to your TV set. Using DTV, broadcasters can transmit high definition TV (HDTV)
images, Dolby digital surround audio, and new services such as multiplexing
(transmitting more than one program on the same TV channel) and datacasting
(providing electronic program guides and interactive television). Several of these
services can be combined into a single digital broadcast.
How to View Digital Television?
DTV is broadcast from transmitters and received via a rooftop aerial. It works like
traditional TV, but because the signals are Digital you need an Atsc Converter Box
to convert them. There are three ways to watch DTV: an external DTV Atsc
Converter Box receiver to a DTV-ready television or an integrated digital TV with
a built-in digital television tuner or personal computer (PC) tuner cards and
computer monitors. An Atsc Converter Box receiver is the most popular case.
Look out for this symbol. It indicates useful and important tips
4
1.1 Remote Control
Remote Key Function:
AT2016
1. MUTE: Press to mute or unmute the audio output.
2. GUIDE: Press to display the on-screen Electronic Program
Guide (EPG).
3. CH+: Press to change the channels in non-menu state.
4. CH-: Press to change the channels in non-menu state.
5. INFO: Press to display information about the channel being
viewed.
6. EXIT: Press to completely exit from the on-screen menus.
7. OK: While using the on-screen menus, press ENTER to
activate (or change) a particular item.
8. : Press to move around the menu screens
9. PRE-CH: Press to return to the previous channel you viewed.
10. - : Press to input dash to select a channel, for example 14-1.
11. CAPTION: When a digital signal is received, Service1,
Service2,... or Service6 can be selected. When an analog
signal is received, CC1, CC2, CC3, or CC4 can be selected.
12. AUDIO: Press to select the available multi-tracks.
(Depending on the particular broadcast, one or more
foreign language translations might be available.)
13. STANDBY: Press to switch the Atsc Converter Box to on
and off.
14. VOL+: Press to increase the output volume level.
15. VOL-: Press to decrease the output volume level.
16. : Press to move around the menu screens
17. MENU: Press to display the main menu or to switch
back to the previous menu screen that was displayed.
18. : Press to move around the menu screens
19. : Press to move around the menu screens
20. NUMBER KEYS Press to directly tune to a particular
channel or input digits in menus.
21. ASPECT: Press to change the screen format (Normal/
Zoom/Wide/Cinema) according to the screen aspect ratio
and the input signal format.
22. SIGNAL: Press to show the signal strength.
5
1.1.1 Installing the Batteries
Remove the battery cover from the remote control and put 2xAAA size batteries
inside the compartment.
The diagram inside the battery compartment shows the correct way to install the
batteries.
1.Open the cover
O
PE
2.Install batteries
N
3.Close the cover
O
PE
N
1.1.2 Using the Remote Control
To use the remote control, point it towards the front of the digital Atsc Converter
Box. The remote control has a range of up to 7 metres from the Atsc Converter
Box at an angle of up to 60 degrees.
The remote control will not operate if its path is blocked.
Sunlight or very bright light will decrease the sensitivity of the remote
control.
6
1.2 Front Panel and Rear Panel Illustration
1.2.1 Front Panel
CHANNEL
ON
OFF
AT2016
1
2
3
POWER BUTTON: Used to turn on or off of the main power of the unit.
REMOTE CONTROL SENSOR: Used to receive the signal from the remote control.
STANDBY INDICATOR: Used to visually show power state of the Atsc Converter Box,
the red LED will be light if the Atsc Converter Box entered standby mode.
4. CHANNEL UP/DOWN: Used to change the channels in non-menu state.
1.2.2 Rear Panel
MODEL: AT2016
ATSC CONVERTER BOX
POWER SUPPLY: 100-240V~ 50/60Hz
MAX POWER CONSUMPTION: 8 WATTS
ATSC
NTSC
RF IN
RF OUT
1
Serial No.:
CONFORMS TO UL
STD.60065
CERTIFIED TO CSA
STD.C22.2 No. 60065
L
CH 3
2
CH 4
3
SMART ANT. I /F
This device complies with Part 15 of
the FCC Rules. Operation is subject
to the following two conditions:
(1) this device may not cause harmful
interference, and (2) this device must
accept any interference received,
including interference that may cause
undesired operation.
4
VIDEO
Video Out
R
Audio Out
5
SERVICE
6
7
100-240V~
50/60Hz
8
1 RF IN : Connect the AIR antenna or CATV cable here.(if the cable provider is passing
through 8VSB signal.)
2 RF OUT: This socket will transmit the NTSC CH3/4 RF signal to your TV ANT in socket.
3 CH3/4 SWITCH: Select NTSC channel (Channel3:61.25MHz, Channel4:67.25MHz).
4 SMART ANT I/F: Connect to an external smart antenna.
5 AUDIO L/R: Connect these terminals to the analog audio inputs of a TV set (i.e., to a
TV that has jacks for L/R inputs). Or connect these terminals to the L/R inputs of a
separate audio component.
6 Video output: Connect this jack to the Video Input jack on your TV using an Audio/Video
cable.This output port supports the only SD output..
7 SERVIC : This RS-232 PORT for software upgrade by manufacturer only and not for user.
8 MAIN POWER: Connect to main power supply using the power cord.
7
1.3 Connecting The Atsc Converter Box
The following diagrams are of typical configurations only, and may differ slightly
to your existing external equipment. If you are unsure how to connect to your
Atsc Converter Box, always consult your manufacturer's user manual supplied
with your equipment.
1.3.1 Connecting Antennas
This section tells how to connect an indoor or outdoor antenna to your Atsc
Converter Box. You may need a 75~ adaptor or a combiner.
NOTES:
A. If your antenna has separate leads for VHF/UHF signals, you will need
to purchase a combiner to combine it before connect to the receiver.
B.The Atsc Converter Box can receive DTV signals in the event that a local cable
provider is passing 8VSB through on their system. (8VSB is the RF modulation
format utilized by the DTV(ATSC) digital television standard to transmit digital
bits over the airwaves to the home consumer.)
C. When Receiving Digital Cable Signal : If your cable service signal does not
comply with the ATSC requirement, this product may not operate properly.
8
1.3.2 Connecting to a TV Set
TV Aerial
(For smart antenna only)
ATSC
RF IN
NTSC
L
RF OUT
R
Audio Out
CH 3
CH 4
SMART ANT. I /F
VIDEO
Video Out
SERVICE
100-240V~
50/60Hz
Composite Video
White
RED
Yellow
VIDEO IN
VIDEO
AUDIO IN
R
L
RFIN
9
1.3.3 Connecting to an Audio System
ATSC
NTSC
RF IN
RF OUT
VIDEO
Video Out
L
CH 3
CH 4
R
Audio Out
SMART ANT. I /F
SERVICE
Amplifier
VOLUME
INPUT SELECTOR
POWER
BYPASS
PRO LOGIC
3 STEREO
MODE
TEST
CHANNEL
KARAOKE
MUTE
UP
DOWN
BASS
1
MIC
2
1
MIC VOL
2
EXCITE
10
MIC
TREBLE
ECHO
100-240V~
50/60Hz
2. On-Screen Menus
Ensure all connections have been made following the diagrams on the previous
pages for reference.
When you plug the power cord of this set-top box into a power outlet and press
the POWER switch on the front panel, the box will be turn on for the first time.
Press STANDBY button on the remote control will switch the set-top box to or
from standby mode.
Turn on the TV set and switch it to external AV mode, you will see the picture
come from the box.
If it is the first time you use this device, an Auto Program menu appears to let
you to scan all the available channels in your area.
Initial Setup Menu
Menu Language
English
Auto Program
To Move OK To Select Exit To Exit
Main Menu
Press the MENU button on the remote control, the main menu will display as
below. the Auto Program focus is highlighted as default.
Main Menu
Auto Program
Manual Channel Set
Password
Parental Controls
Advanced Closed Caption
Language
English
Auto Power Down Timer
Off
Smart Antenna
To Move OK To Select Exit To Exit
2.1 Auto Program
If it's the first time you use the box, you should scan all the TV channels first,
press the arrow buttons to move the cursor to Auto Program in main menu,
press the OK button to confirm, you will see below menu which indicates auto
search is in process. After all channels in your area are found, you will see the
first found channel showing on the screen. Any time if you want to start auto
channel search again, you can follow the above procedure.
Autoprogram Menu
Autoprogram Menu
Scanning
Performing First Pass
Digital Channels Found
Progress(%)
Searching digital channels
0
Digital Channels Found
14
Progress(%)
11
69
Channel 17
0
2.2 Manual Channel Set
You can highlight this item and press OK button to confirm it, you will see below
menu showing on screen. You can specific the selected channel Viewable
or Not viewable , the not viewable channels will be skipped when you do
zapping next time.
Manual Channel Set Menu
Ch 14-1
ATSC-1
Viewable
Ch 14-2
ATSC-2
Viewable
Ch 14-3
ATSC-3
Viewable
To Move OK To Select Exit To Exit
2.3 Password
When this item is highlighted, press the OK button will enter the Enter Old
Password menu as below.
Enter Old Password
When you entered the correct password(the default password is 6666), the
Enter New Password and Confirm New Password will pop up sequentially,
if the new input passwords verified successfully, the Password Changed
message will pop up in the right up corner.
2.4 Parental Control
When this item is highlighted, press the OK button will enter the Enter Password
menu, you will enter the Parental Control Menu as below if the password you
entered is correct. This device support 2 rating systems used in the United States:
1),The Motion Picture Association of America's (MPAA) ratings include the
following ratings: G(General Audiences-All Ages Admitted), PG (Parental Guidance
Suggested. Some Material May Not Be Suitable For Children), PG-13(Parents
Strongly Cautioned. Some Material Maybe Inappropriate For Children Under 13),
R(Restricted, Under 17 Requires Accompanying Parent Or Adult Guardian),NC-17
(No One 17 And Under Admitted).
12
2),The TV Rating system include the following ratings: TV-Y(all children) and
TV-Y7(directed to older children),TV-G (general audience), TV-PG(parental
guidance suggested), TV-14(parents strongly cautioned), and TV-MA(mature
audiences only). The letters FV(Fantasy Violence),V(moderate Violence), S
(mild Sexual situations), L(mild coarse Language), D(mature themes suggestive
Dialogue) were added to indicate the presence of violence, sex, language,
suggestive dialogue respectively.
Parental Control Menu
MPAA
ALL
NONE
NONE
G
TV-Y
PG
TV RATING
FV
L
S
V
D
TV-Y7
PG-13
TV-G
R
TV-PG
NC-17
TV-14
X
TV-MA
To Move OK To Select Exit
2.5 Advanced Closed Caption
When this item is highlighted, press the OK button will enter the Advanced Closed
Caption menu as below.
Advanced Closed Caption
Style
Background Color
Custom
Normal
Default
White
Flashing
Black
Background Opacity
Solid
Edge Effect
None
Size
Font
Text Color
Text Opacity
Red
Edge Color
CLOSED CAPTION SAMPLE
To Move OK To Select Exit To Exit
If you choose the Style as Automatic, the caption Size/Font/Text Color/Text
Opacity/Background Color/Background Opacity/Edge Effect/Edge Color will
be set to Automatic also, and you will see help information DECIDED BY BROAD
CASTING at the bottom of the menu.
If you choose the Style as Custom, you will see help information CLOSED
CAPTION SAMPLE at the bottom of the menu, you can change all above caption
related parameters separately as you want.
13
2.6 Language
When this item is highlighted, you can press OK button to change the OSD menu
language as you want, there are 3 options: English, Spanish, French.
2.7 Auto Power Down Timer
When this item is highlighted, press the OK button you can choose the options:
Off, 2 hours, 4 hours. the receiver will enter standby mode according to
the specific setting if the latter 2 options chose.
2.8 Smart Antenna
When this item is highlighted, press the OK button you can enter the below menu
if a smart antenna is presented at the rear panel of your box,
Smart Antenna Menu
Change Antenna Position
1
Automatic Position Adjustmont
Save Now Position
To Move OK To Select Exit To Exit
If the smart antenna not presented you can not enter above menu, you will see
below No Smart Antenna Detected message.
No Smart Antenna Delected
14
3. Troubleshooting
Q: It takes a while to display picture on the screen after turning power on
or after changing channel.
A: It will take several seconds for this receiver to show the logo or picture after
power on sincee the system have to finished the initialization of the main chip
and demodulator. In case of digital broadcasting, it could take 1 to 2 seconds
to receive data. Therefore, it is not a faulty receiver if the picture display is
delayed.
Q: There is no picture on the screen.
A: Make sure the power is on.
Make sure the cable between the receiver and the TV is connected properly.
Make sure the TV's external video input mode is selected correctly.
Make sure the video output is selected correctly.
Make sure the antenna is positioned correctly.
Try turning the receiver off and then back on again.
Q: Poor video quality or screen flickering.
A. This is a result of a poor broadcast signal.
Rotate the antenna to a different direction.
Q: No Sound.
A: Make sure the cable between the receiver and the TV audio jack or your
audio system is connected properly.
Try pressing the MUTE button on the remote.
Try pressing the VOL+ button on the remote continuously.
Try turning the receiver off and then back on again.
Q: The remote control does not work.
A: Make sure there is no obstruction between the remote controller and the
remote sensor of the receiver.
Make sure the distance and degree is not out of range.
Check to insure the batteries are installed correctly.
Install a pair of new batteries.
15
4. Specification
Product Name
ATSC Converter Box Receiver
Power Supply
Input Voltage: 100 - 240V~ 50/60Hz
Power Consumption:Maximum 8W,Standby <1W.
Decoder
Video Format: Standard definition CVBS.
Audio Format: Dolby Digital audio
R F Signal Input/Output
ATSC Antenna/Cable RF In: F-Connector
NTSC Ch3/4 RF out: F-Connector
Antenna Impedance: 75 Ohms
Channels: VHF 2 -13 , UHF 14 - 69
Smart Antenna interface
Video Outputs
Composite Video Output for standard analog sets: RCA Connector
Audio Outputs
Analog Audio Outputs (L/R): RCA Connectors
Service
Software upgrade through RS-232 port: 9 pin D-Sub type
Remote Control format
NEC protocol (38KHz carrier pulse width modulation).
16
5. Glossary
ATSC:
Advanced Television Systems Committee. Formed to establish technical
standards for U.S. advanced television systems. Also, the name given to the
8-VSB transmission standard itself.
NTSC:
"National Television Systems Committee" and the name of the current analog
transmission standard used in the U.S., which the committee created in 1953.
Analog TV:
Analog technology has been in use for the past 50 years to transmit conventional
TV signals to consumers. "Standard" television broadcasts in analog TV. Analog
signals vary continuously, creating fluctuations in color, brightness and quality.
Digital Television (DTV):
Digital TV is the umbrella term encompassing High-definition Television and
several other applications, including Standard Definition Television.
SDTV:
"Standard Definition Television." Digital formats that do not achieve the video
quality of HDTV, but are at least equal, or superior to, NTSC pictures. SDTV may
have either 4:3 or 16:9 aspect ratios, and it includes surround sound. Variations
of fps (frames per second), lines of resolution, and other factors of 480p and
480i make up the 12 SDTV formats in the ATSC standard.
HDTV:
"High-definition Television." This is the most superior video picture available in
Digital TV. In the U.S., the 1080i and 720p formats in a 16:9 aspect ratio are the
two acceptable HDTV formats. HDTV is a component of DTV.
Dolby Digital:
This is a digital surround sound technology used in movie theaters and upscale
home theater systems that enhances audio. Home theater components with this
technology work in conjunction with a "5.1-speaker" system (five speakers plus a
low-frequency subwoofer) to produce true-to-life audio that draws the listener
into the onscreen action. Six discreet audio channels are used: Left, Center,
Right, Left Rear (or side), Right Rear (or side), and a subwoofer -- LFE, "low
frequency effects" -- (considered the ". 1 " as it is limited in bandwidth).
Smart Antenna:
A smart antenna system combines multiple antenna elements with a signal-processing
capability to optimize its radiation and/or reception pattern automatically in response
to the signal environment.
17