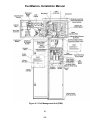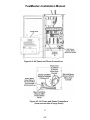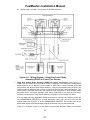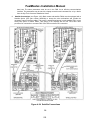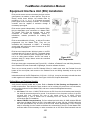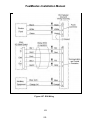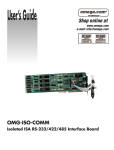
1
FuelMaster® Installation Manual
Table of Contents (con’t)
A/C Power ............................................................................................... 70
Telephone/Two-Way Ringdown Device ................................................... 70
Quick Stop Button as FMU Stop Switch ................................................... 70
Quick Stop Button as Auxiliary Emergency Stop Switch .......................... 72
On-Site/Transaction Printer ..................................................................... 72
Dispenser Control ................................................................................... 73
Controlling Reset................................................................................ 75
Controlling Motors .............................................................................. 75
Controlling Solenoid Valves ............................................................... 79
Using Dual Control Relay Assembly (DCRA)
to Control Two Devices ................................................................. 81
Two-Stage Valve Control ................................................................... 82
Controlling DC Devices (Hose Reels in Lube Bays/
Bulk Oil Dispensers) ...................................................................... 85
Controlling Carwashes, Gate Openers ............................................... 86
Monitor Mode ..................................................................................... 88
Pulse Inputs ............................................................................................ 89
Dual Output Pulsers ........................................................................... 93
Opto-Isolators .................................................................................... 93
Counts During Reset .......................................................................... 93
AC Bleedover to Pulse Inputs ............................................................. 93
One Pulser, Two FMUs ...................................................................... 94
Tank Monitor Interface ............................................................................ 97
Satellite Connections............................................................................... 98
Indoor Receipt Printer ............................................................................. 99
Equipment Interface Unit (EIU) Installation ...................................................................... 100
Pulling Wires and Finishing Conduit ............................................................ 100
AC Power ................................................................................................ 100
Master FMU/EIU Communications........................................................... 100
Control of Accessory Controller ............................................................... 101
Mounting the Pedestal .................................................................................. 101
Wire Connections at Master FMU ................................................................. 103
Wire Connections at Accessory Controller .................................................... 105
Configure Master FMU for EIU ..................................................................... 105
Section 5 – Initialization ......................................................................................... 107
Software Installation and Setup ....................................................................................... 107
Configure Master FMU for EIU Operation ........................................................................ 108
Post Installation Inspection and Test ............................................................................... 110
Acceptance Test Procedure (ATP) for Upgrades and
Installations of FuelMaster® Fuel Management Units ...................................................... 111
SITE EXAMINATION .................................................................................... 111
FMU UPGRADE (For Upgrades Only) .......................................................... 111
SOFTWARE UPGRADE (For Upgrades Only) .............................................. 112
FMU NEW INSTALLS ................................................................................... 112
EXAMINATION OF PRODUCT ................................................................ 112
PROVIDE TELEPROMPTING ................................................................. 112
7
183
FuelMaster® Installation Manual
Table of Contents (con’t)
VALIDATE FMU ACCESS WITH PROKEE®, SMARTCARD, CREDIT CARD,
AND/OR KEYPAD ................................................................................... 113
ACTIVATE PRODUCT DISPENSERS ..................................................... 113
VERIFY SINGLE HOSE AUTHORIZATION ............................................. 113
SIMULTANEOUS TRANSACTIONS ........................................................ 113
VERIFY NO COUNTS DURING DISPENSER RESET ............................. 113
ENCODE, VERIFY, AND REVISE PROKEE®S OR SMARTCARDS ....... 113
PROVIDE FOR MANUAL OPERATION ................................................... 113
TRANSACTION HANDLING .................................................................... 113
DISABLE DISPENSER AFTER TRANSACTION ..................................... 114
PROTECT DATA DURING POWER FAILURE ........................................ 114
PRICING ................................................................................................. 114
DISCOUNT CREDIT CARDS .................................................................. 114
PREPAID CARDS/KEYS ......................................................................... 114
RECORD TRANSACTION DATA ............................................................ 115
SAFETY .................................................................................................. 115
POST INSTALLATION INSPECTION ...................................................... 115
TRAINING .................................................................................................... 116
DATA ........................................................................................................... 116
Comments .................................................................................................... 117
SIGNATURE AND FINAL SIGN-OFF............................................................ 117
HOLD HARMLESS AGREEMENT ................................................................ 118
Appendices
Appendix A – Glossary ............................................................................................. 119
Appendix B – Dispenser Compatibility Listing.......................................................... 123
Appendix C – FMU & EIU Configurations ................................................................ 129
Appendix D – Laptop Direct Connect to FMU .......................................................... 131
Appendix E – Retail Applications ............................................................................. 137
Appendix F – Wiring Differences for Canadian and
European Certified FMUs .................................................................. 163
Appendix G – FMU Wire and Cable Connection Points .......................................... 165
Appendix H – Electronic Dispenser Interface (to be supplied at a later date) ......... TBD
Appendix I – Programming Credit Card Units (to be supplied at a later date) ......... TBD
8
184
FuelMaster® Installation Manual
Figures and Tables
Figure 1-1. Boundaries of a Flammable Liquid Hazardous ...........................................................16
Figure 1-2. FMU Electrical Safety Spacing ....................................................................................17
Figure 1-3. FMU ID Plates ............................................................................................................18
Table 1-1. FMU Door Key Reference ...........................................................................................19
Figure 1-4. Sample FMU Initialization Form .................................................................................21
Figure 2-1. Fuel Management Unit (FMU) .....................................................................................26
Figure 2-2. Prokee® .................................................................................................................................................................................... 28
Figure 2-3. Prokee® Encoder .........................................................................................................30
Figure 2-4. Two-Way Ringdown Device ........................................................................................31
Figure 2-5. Equipment Interface Unit (EIU) ...................................................................................31
Figure 3-1. FMU Dimensions (in inches) ......................................................................................38
Figure 3-2. EIU Dimensions (in inches) ........................................................................................39
Table 3-1. Rigid Metal Conduit Fill Capacity .................................................................................41
Table 3-2. Typical Wire/Cable Cross Sectional Area.....................................................................41
Figure 3-3. Sample Site Layout ....................................................................................................42
Figure 3-4. Satellite Option Installation .........................................................................................58
Figure 4-1. Two-Way Ringdown Device Connection .....................................................................65
Figure 4-2. FMU Footprint (in inches) ...........................................................................................67
Figure 4-3. Alternate Mounting Methods ......................................................................................67
Figure 4-4. AC Power and Phone Connections .............................................................................71
Figure 4-5. AC Power and Phone Connections (from reverse
side of Surge Panel) ................................................................................................................71
Table 4-1. Transaction Printer Cable Connection Points ..............................................................73
Figure 4-6. Pedestal I/O Board ......................................................................................................74
Figure 4-7. Wiring Diagram - Controlling Reset .............................................................................76
Figure 4-8. Wiring Diagram - Controlling Reset in Dual Hose Single
Product Dispenser without Backfeed (One Solution) ..............................................................77
Figure 4-9. Wiring Diagram - Controlling Motors ...........................................................................78
Figure 4-10. Wiring Diagram – Controlling Solenoid Valves ........................................................80
Figure 4-11. Wiring Diagram - Using Dual Control Relay Assembly (DCRA)
to Control Two Devices ...........................................................................................................81
Figure 4-12. Wiring Diagram – Two-Stage Valve Control ............................................................83
Table 4-2. Pedestal I/O Board Inputs/Outputs for AC and DC
Solid State Relays (SSRs) .......................................................................................................85
Figure 4-13. Location of 75K ohm Pump Handle Detect Resistors ...............................................86
Figure 4-14. Smart Relay Assembly ..............................................................................................87
Table 4-3. Wiring Smart Relay Assembly (SRA) to Pedestal I/O Board ........................................88
Figure 4-15. Connecting to Veeder-Root 1871 Pulser ..................................................................91
Figure 4-16. Connecting to Veeder-Root 7671 Pulser ..................................................................91
Figure 4-17. Connecting to ICS 12VDC Pulsers ...........................................................................91
Figure 4-18. Connecting to ICS 110 VAC Pulsers .........................................................................92
Figure 4-19. Connecting to OPW 12 VDC Pulsers ........................................................................92
Figure 4-20. Connecting to OPW 110 VAC Pulsers ......................................................................92
9
185
FuelMaster® Installation Manual
Figures and Tables (con’t)
Figure 4-21. Connecting to Open Collector Pulser (Gasboy 9800 Pump I/F shown) ....................93
Figure 4-22. I/O Silver Board ........................................................................................................95
Figure 4-23. Satellite I/O Control Board .......................................................................................96
Figure 4-24. Satellite Connections ...............................................................................................98
Table 4-4. Indoor Receipt Printer Cable Connections ...................................................................99
Figure 4-25. EIU Components .......................................................................................................100
Figure 4-26. EIU Footprint .............................................................................................................101
Figure 4-27. EIU Wiring .................................................................................................................102
Figure 4-28. Connecting Wire Harnesses .....................................................................................103
Attachments
Acceptance Test Procedure (ATP) for Upgrades and Installations of FuelMaster® Fuel
Management Units (back of manual; tear out, complete and return to Syn-Tech Systems, Inc., in
provided self-addressed, postage-paid envelope)
10
186
FuelMaster® Installation Manual
Introduction
Proprietary Information
Except as permitted under the United States Copyright Act of 1976, no part of this publication
may be reproduced, stored in a retrieval system, or transmitted in any form or by any means –
electronic, mechanical, photocopying, recording, or otherwise – without the prior written
permission of the publisher:
Syn-Tech Systems, Inc.
PO Box 5258
Tallahassee, Florida 32314
Phone:
(850)878-2558
Fax:
(850)877-9327
Support:
(800)888-9136, Ext. 1500
Copyright©Syn-Tech Systems, Inc. 1998-2010
All Rights Reserved. This Document was printed in the United States of America.
Trademark Acknowledgements
Trademarks of other products mentioned in this manual are held by the companies producing
them. Use of a term in this manual should not be regarded as affecting the validity of any
trademark. All other trademarks are acknowledged.
Purpose
This manual provides installation instructions for the Syn-Tech Systems, Inc., FuelMaster® Fuel
Management System (hereinafter referred to as FuelMaster® Fuel Management Unit (FMU) for fixed
fueling sites. These instructions have been prepared for use by technicians who are qualified to
complete electrical work in hazardous locations.
Though different systems have been developed for commercial (civilian) and DoD (Department of
Defense) applications, only one installation manual has been prepared to cover both applications.
Likewise, commercial systems are available as both Classic and Plus systems. Where distinctions
must be made between the different applications, notations (i.e., commercial, classic, Plus, or DoD)
will be added to identify the differences.
Reference is made herein to Product Bulletins. Product Bulletins have been prepared to cover
individual maintenance tasks, and are forwarded with each replacement part. There is no
maintenance manual encompassing all maintenance tasks.
Section/Appendix Layout
This manual is divided into six sections, and eight appendices. Appendices have been created to
provide special instructions for specific topics. Included are:
Section 1 - General Information
This section contains safety precautions, specifics about equipment safety certification, an
explanation of the system warranty, and a detailed definition of Initialization.
11
187
FuelMaster® Installation Manual
Section 2 - System Description
This section contains a description of all FuelMaster® standard and optional equipment
available at the time of publication of this manual.
Section 3 – Site Planning and Preparation
This section provides guidelines for preparing your site for a FuelMaster® installation.
Section 4 - Installation
This section provides guidelines for performing a FuelMaster® FMU and EIU installation.
Section 5 - Initialization
This section contains procedures for performing the post-installation inspections and tests,
and completing the final certification jointly with the customer to validate the system
warranty.
Appendix A – Glossary
An explanation of terms, abbreviations, and acronyms used in this manual.
Appendix B – Dispenser Compatibility Listing
A listing of known dispenser makes and models and how they interface with FuelMaster®.
Appendix C – FMU & EIU Configurations
A description of the various model numbers and configurations of Fuel Management Units
(FMUs) and Equipment Interface Units (EIUs).
Appendix D – Laptop Direct Connect To FMU
Instructions for direct connecting to an FMU with a laptop, to view or change FMU
programming information.
Appendix E – Retail Applications
Instructions for applying FuelMaster® to the special needs of small airports and marinas, and
other retail applications.
Appendix F – Wiring Differences for Canadian and European Certified FMUs
Explanation of differences between U.S. and Canadian and European certified FMUs
Appendix G – FMU Wire and Cable Connection Points
Listing of connection points for an unknown FMU wire or cable.
Appendix H - Electronic Dispenser Interface
Instructions for using FuelMaster® with electronic dispensers (to be supplied at a later date).
Appendix I – Programming Credit Card Units
Instructions for programming units to accept various credit cards (to be supplied at a later
date).
12
188
FuelMaster® Installation Manual
Section 1
General Information
Introduction
FuelMaster® consists of equipment developed to control access to, account for, and compile reports
for transactions from dispensing equipment. FuelMaster® accomplishes this with security from
unauthorized user access while maintaining complete accountability of each transaction as it
occurs.
FuelMaster® permits true self-service, automated, fuel dispensing for any application ranging from
small service stations to large-scale fleet operations, including retail sales. The FMUs (Fuel
Management Units) and Fuel Management Software are encoded by Syn-Tech Systems with
matching system designators (site signatures) to assure security and allow access only by the
customer to which the system designator is assigned. DoD systems may be utilized universally by
all DoD personnel; unauthorized users are “locked out”.
The FuelMaster® equipment can be integrated to extract accumulated transaction data from one
service station, or several far removed and isolated service stations that report to one central
accounting office. Transaction data is compiled after data communication to a central accounting
office which may be hundreds, or thousands of miles remote from the servicing operations.
The FuelMaster® equipment may be adapted to control dispensing equipment for any product (not
just fuel) that can be metered. Optional equipment are available to utilize the same system and
system access devices to activate electronic gate openers, door openers, and automated car
washes.
The FuelMaster® equipment for each installation is assembled to fulfill specific site requirements
and must be installed accordingly.
Safety Precautions
In addition to the safety precautions contained within this installation manual, the FuelMaster®
installer must be familiar with the guidelines contained within all other safety codes and standards
applicable to the installation and operation of electrical equipment, particularly within hazardous
locations. All FuelMaster® and non-FuelMaster® equipment supplied by Syn-Tech Systems, Inc.,
complies with all applicable federal, state, and local safety codes and standards.
References: The following references, as a minimum, and as they apply to the installation, must
be familiar to the technician performing a FuelMaster® installation:
•
NFPA Handbook 30, Flammable and Combustible Liquids Code, provides requirements for
the safe storage and handling of flammable and combustible liquids.
•
NFPA Handbook 30A, Code for Motor Fuel Dispensing Facilities and Repair Garages,
provides safeguards for dispensing liquid and gaseous motor fuels into the fuel tanks of
automotive vehicles and marine craft.
•
NFPA Handbook 70, National Electrical Code (NEC), contains guidelines for the installation
and operation of electrical equipment. Chapter 5 specifically addresses the installation of
electrical equipment in hazardous locations.
•
NFPA Handbook 407, Standard for Aircraft Fuel Servicing, provides minimum fire safety
requirements for procedures, equipment, and installations during ground fuel servicing of
aircraft using liquid petroleum fuels. Knowledge of this reference is necessary when performing
an installation in support of aircraft fuel servicing.
13
189
FuelMaster® Installation Manual
•
NIST Handbook 44, Specifications, Tolerances, and Other Technical Requirements for
Weighing and Measuring Devices, technical requirements for the purpose of eliminating from
use weights and measures and weighing and measuring devices that give readings that are
false, that are of such construction that they are faulty, or that facilitate the perpetration of fraud.
Section 3 contains most of the guidelines for retail self service fuel site inspection criteria.
Knowledge of this reference is necessary when performing an installation in support of retail
fuel sales.
Safety Guidelines: Use the following guidelines to help protect your FMU from potential
damage and ensure your own personal safety.
WARNING
Do not operate your FMU with any cover removed or door open.
AVERTISSEMENT
N'actionnez pas votre FMU quand aucune couverture est déplacée ou aucune porte est ouverte.
CAUTION
Do not open your FMU’s doors during wet weather.
ATTENTION
N'ouvrez pas les portes de Votre FMU par le temps de pluie.
As you use your FMU, observe the following safety guidelines:
•
To help avoid damaging your FMU, be sure the AC power available at your location is 110 volts,
60 hertz (Hz).
•
To help prevent electrical shock, connect the FMU into properly grounded sources.
•
To help avoid possible damage to the FMU and or other interfacing equipment, wait 5 seconds
after turning off all interfacing equipment before disconnecting any interconnecting cables.
•
To help protect your FMU from sudden, transient electrical increases, your FMU is equipped
with Surge Protection. All equipment interfacing your FMU needs to use a surge suppressor,
line conditioner, or un-interruptible power supply (UPS).
•
Be sure nothing rests on your FMU’s cables and that the cables are not located where they can
be stepped on or tripped over.
•
Do not spill food or liquids on your FMU or interfacing equipment.
•
Do not push any objects into the openings of your FMU. Doing so can cause fire or electrical
shock by shorting-out internal components.
•
Keep your FMU away from radiators and heat sources.
WARNING
Do not attempt to service the FMU yourself, except as explained in this manual. Always follow
installation and service instructions closely.
AVERTISSEMENT
N'essayez pas d'entretenir le FMU vous-même, excepté comme expliqué en ce manuel. Suivez
toujours les instructions d'installation et de maintenance précisément.
Before you open the door or remove any FMU covers, perform the following steps in the sequence
indicated:
•
Turn off/unplug your FMU and any devices. Certain system board components continue to
receive power anytime the FMU is connected to AC power.
•
Disconnect your FMU and devices from their sources. Also disconnect any telephone or
telecommunication lines from the FMU to reduce the potential for personal injury or shock.
14
190
FuelMaster® Installation Manual
•
Wear a wrist grounding strap or touch an unpainted metal surface on the chassis, such as the
back panel, before touching anything inside your FMU.
•
While you work, periodically touch an unpainted metal surface on the FMU chassis to dissipate
any static electricity that might harm internal components.
In addition, take note of these safety guidelines when appropriate:
•
When you disconnect a cable, pull on its connector or on its strain-relief loop, not on the cable
itself. Some cables have a connector with locking tabs. To disconnect this type cable, press in
the locking tabs before disconnecting the cable. As you pull connectors apart, keep them evenly
aligned to avoid bending any connector pins. Also, before you connect a cable, make sure both
connectors are correctly oriented and aligned.
•
Handle components and Prokee®s with care. Don’t touch the contacts on a Prokee®
•
Hold components by their edges or by their metal mounting bracket.
Protecting Against Electrostatic Discharge: static electricity can harm delicate
components inside your FuelMaster® FMU. To prevent static damage, discharge static electricity
from your body before you touch any of your FuelMaster ® FMU’s electronic components. You can
do so by touching an unpainted metal surface on the FuelMaster® FMU chassis.
As you continue to work inside your FuelMaster® FMU, periodically touch an unpainted metal
surface to remove any static charge your body may have accumulated. Use of a wrist-grounding
strap is highly recommended.
You can also take the following steps to prevent damage from electrostatic discharge (ESD):
•
Keep a static-sensitive component in its antistatic packing material until you are ready to install
the component in your FuelMaster® FMU. Just before unwrapping the antistatic packaging,
discharge electricity from your body.
•
Transport sensitive components in antistatic containers or packaging.
•
Handle all sensitive components in a static-safe area. If possible, use antistatic floor pads and
workbench pads.
Protecting Against Radio Interference: this equipment has been tested and found to
comply with the limits for a Class A digital device, pursuant to Part 15 of the FCC Rules. These
limits are designed to provide reasonable protection against harmful interference in a commercial
installation. This equipment generates, uses and can radiate radio frequency energy and, if not
installed and used in accordance with the instructions, may cause harmful interference to radio
communications. If this equipment does cause harmful interference to radio or television reception,
which can be determined by turning off and on the equipment, the user is encouraged to try to
correct the interference by one or more of the following measures:
•
Reorient or relocate the radio/TV’s receiving antenna;
•
Increase the separation between the equipment and the radio/TV’s receiver;
•
Connect the equipment into an outlet on a circuit different from that to which the radio/TV’s
receiver is connected; and,
•
Consult the dealer or an experienced radio/TV technician for help.
Wireless Network Security
The means exists for wireless network communications between your Central Controller and FMU.
As the technology and equipment becomes more available and affordable, the options make it
easier for wireless connectivity. In addition to the ease afforded you, easy connectivity is also
available to those you may not wish to share your information with. The information gathered and
15
191
FuelMaster® Installation Manual
stored by FuelMaster® need not be secure, but your Central Controller and FMU may be connected
to a network containing private information you want to be secure.
Syn-Tech cannot emphasize enough the potential ramifications of breached network security.
Without proper wireless network security, outside users can access your network to attain
information such as social security numbers, credit card numbers, bank account numbers, and
countless other very valuable and private information sources stored on your network. In planning
your wireless network, ensure you purchase the right equipment and plan for a secure network that
won’t allow outsiders access to your information.
Certifications/Approvals
FuelMaster® FMUs have been tested and safety certified by the ETL SEMKO division of Intertek to
ANSI/UL Specification 1238 for connection to UL-certified dispensers in NEC Class 1, Division 2,
Group D locations. Equipment versions certified by ETL are identified by the ETL logo imprinted on
the ID plate riveted to the FMU pedestal.
Figure 1-1 illustrates the boundaries of a hazardous location which dispenses flammable liquids
such as gasoline and E85.
Figure 1-1. Boundaries of a Flammable Liquid Hazardous Location
The boundary area around a compressed natural gas (CNG) dispenser is different. It extends 5 feet
from, and above, the dispenser. Any electrical device installed within these boundaries must be
16
192
FuelMaster® Installation Manual
intrinsically safe or must be enclosed within an explosion-proof enclosure. Intrinsically safe devices
are generally limited to very low voltage and low current devices, such as that portion of a pulser
before the barrier. Examples of explosion-proof enclosures are rigid metal conduit, and junction
boxes and conduit fittings approved for use in hazardous locations. If the electrical device is not
intrinsically safe, or is not explosion-proof, then it must be installed outside the hazardous area.
Figure 1-2 illustrates an FMU and the distance from its mounting surface to where electrical
components are installed. All internal electrical components are 28 inches above the mounting
surface. This places all electrical components in the FMU a full 10 inches outside the hazardous
location. This 10 inch separation provides additional spacing for the installation of outlet boxes or
other nonexplosion-proof devices which cannot be installed in hazardous locations.
Figure 1-2. FMU Electrical Safety Spacing
FuelMaster® has been certified for use in electrical installations in Canada and Europe. FMUs
certified for use in Canada and Europe may be identified through the ID plate riveted to the FMU
pedestal. See Figure 1-3 for examples of FMU ID plates for Canadian and European certification.
FuelMaster® has also been certified by the National Conference on Weights and Measures, and has
NTEP (National Type Evaluation Program) Certificate 02-115. The NTEP certificate applies to the
FMU-2500 and FMU-3000 series, and is referenced on the FMU ID plate. The series covers FMU2500 classic and Plus FMUs, and FMU-3000 and FMU-3500 passive FMUs.
17
193
FuelMaster® Installation Manual
Figure 1-3. FMU ID Plates
18
194
FuelMaster® Installation Manual
ID Plates
An ID plate (see Figure 1-3) is affixed to the side of the FMU pedestal closest to the pedestal door locks.
The ID plate contains the serial number of the unit as well as certification information, and a code to
cross reference the key number used in the door locks (see Table 1-1). If a pedestal is replaced due to
an upgrade or damage, the new pedestal will not have an ID plate installed. Remove the ID plate from
the older unit and install it on the newer unit using pop-rivets. Pop-rivets 1/8 inch wide x 1/4 inch long
should be used to secure the ID plates to the pedestal.
The ID plate is affixed to the FMU pedestal. The FMU is shipped in two pieces, in two separate shipping
containers. The upper cabinet has no ID plate linking it to the pedestal. Pedestals and upper cabinets
are built and tested as a single unit. Attention must be given to the markings on shipping containers to
ensure pedestals and upper cabinets are matched when installed.
Key Number
ID Plate Code
300
325
350
375
400
425
450
475
500
523
333
0
1
2
3
4
5
6
7
8
9
10
Table 1-1. FMU Door Key Reference
WARNINGS, CAUTIONS and NOTES
This manual emphasizes special operations with Warnings, Cautions, or Notes preceding the applicable
procedure:
•
A WARNING indicates a safety precaution that, if not followed, could result in personal injury;
•
A CAUTION indicates a safety precaution that, if not followed, could result in damage to
equipment; and,
•
A NOTE indicates a procedure requiring special emphasis for the proper installation and
operation of FuelMaster® equipment.
Warnings and Cautions in this manual are provided in both English and French to meet the needs of our
French speaking customers in Canada.
Basic FuelMaster® FMU Warranty
The basic warranty for each FuelMaster® FMU provides coverage for parts and telephonic labor for
a period of one year from date of start-up or fifteen months from date of shipment, whichever occurs
19
195
FuelMaster® Installation Manual
first. Each Prokee® is warranted against defects in material and workmanship for a period of five
years. A toll-free number for technical assistance is also included. This line affords the customer
access to product support personnel who will answer questions regarding operation of FuelMaster®
hardware or software, and provide diagnostic capabilities when necessary.
Under terms of this agreement, FuelMaster® technicians will telephonically diagnose problems, with
the assistance of the customer, to determine warrantable conditions, and possible problem
solutions. Syn-Tech Systems, Inc. will replace all defective parts and provide assistance to the
customer in installation of replacement parts to allow the unit to be repaired as expeditiously as
possible. Please note that the FuelMaster® was designed in a modular manner to provide easy and
rapid exchange of parts, even by non-technical personnel. Other systems are not designed this way
and consequently; do not offer warranties comparable to FuelMaster®. This warranty does not cover
site visits by FuelMaster® technicians for repair.
Please note that damage resulting from acts of God, user abuse, accidents, faulty installation or
operation is not covered under the warranty. This warranty specifically excludes any indirect,
special, or consequential damages to include, but not limited to, loss of product, profit, or litigation
fees. Additionally, associated equipment including printers, personal computers, and other items not
manufactured by Syn-Tech Systems, Inc. are warranted only to the extent covered by the original
manufacturer. Additionally, this warranty is limited to approved locations (generally the continental
United States) and is not transferable except by written permission of Syn-Tech Systems, Inc.
Initialization Requirement
All FuelMaster® Fuel Management Systems must be initialized to validate the warranty of the
equipment. Initialization is the startup, inspection, and tests performed to certify the installation.
Initialization can be completed only by a Syn-Tech FuelMaster® technician, or a technician who has
completed the Syn-Tech FuelMaster® Installation School. Final certification must be accomplished
jointly by the Customer and Syn-Tech factory trained personnel.
NOTE
The prompt for the initialization code may not appear if a credit card is inserted. If a newly installed
FMU is being setup, insert a Prokee® or smartcard to bring up the prompt for the initialization code.
An initialization code must be entered to begin normal FMU operation.
When a Prokee® or smartcard is inserted after initial power-up, FMUs will prompt the initializing
technician to call 1-800-888-9136, ext. 1500, for an initialization code. This number connects to
Syn-Tech’s Customer Satisfaction Center (Help Desk). The caller will be forwarded to a Customer
Satisfaction Center (CSC) technician who has a 1-page form (see Figure 1-4) to complete before
he/she can provide the initialization code. The caller will be asked pertinent questions about the site
and FMU. The CSC technician will need the FMU serial number to generate an initialization code. It
is very important the FMU is assembled with the correct upper cabinet which matches the pedestal
with the serialized ID plate. If not, the initialization code will not initialize the FMU.
20
196
FuelMaster® Installation Manual
Figure 1-4. Sample FMU Initialization Form
21
197
FuelMaster® Installation Manual
FuelMaster® Equipment Specifications
Rated Supply Voltage Limits
Rated Supply Frequency
Rated Supply Current
Heaters (2 each)
Other electronics
Operating Altitude, Max
Max Operating Relative Humidity
Installation Category (surge arrestor)
Installation Category (after surge arrestor)
Pollution Degree
120VAC +/- 15% (upper limit)
75 +/- 10% (lower limit)
50 or 60 Hz
2.4 amps Max operating
1.0 amps (each)
0.4 amps
2000 meters
100%
III
II
2
Safety Related Inspections & Preventive Maintenance
FMUs require no preventive maintenance to retain its user safety features. Whenever an FMU is updated or
repaired, a safety inspection should be performed including wiring integrity (power and grounds), board
retention, and safety covers.
Cleaning Instructions
The FuelMaster® chassis, keypad & LCD glass should be washed with a mild detergent diluted with water. A
soft sponge or cloth is recommended. Rinse and dry with a soft dry cloth. The FuelMaster® FMU works well
and presents no safety problems when dirty. Frequency of cleaning is left to the user’s discretion.
The FMU Prokee® and card receptacles will require cleaning when Prokee®s, smartcards, or credit cards are
not being read correctly. Some products used by Syn-Tech in these applications are (follow the
manufacturer’s instructions):
•
Prokee®: RadioShack 64-4345 Precision Electronics Cleaner
•
Smartcard: KIC Products K2-HSCB50 Smartcard cleaner
•
Mag-stripe card: KIC Products KW3-H19B40
Fuse Reference
Every fuse application in the FMU has a fuse description silk-screened next to the fuse holder. All fuses are
rated for 250 VAC. Listed below are the fuses used in an FMU:
Location
Description
AC Surge Panel
4 amp fast blo, 3AG
Phone Surge Panel
Quantity
Manufacturer
Part #
2
Littelfuse
312004
½ amp fast blo, 5x20mm
2
Littelfuse
216.500
FMU-2500 Modem
¼ amp fast blo, 5x20mm
2
Littelfuse
216.250
FMU-2000 Modem
¼ amp fast blo, 2AG
2
Radio Shack
270-1046
Power Mgmt Board
½ amp fast blo, 2AG
1
Littelfuse
225.500
Pedestal I/O Board
¼ amp slo blo, 2AG
1
Littelfuse
229.250
Power Fuse
4 amp slo blo, 3AB
1
Littelfuse
325004
22
198
FuelMaster® Installation Manual
Battery Reference
There are batteries on the mainboard, card reader board, and data logger. All applications use the same
battery. All batteries are lithium 3V with Syn-Tech part number 180181, and Rayovac part number BR2325-B
3V. The classic FMU-2500 mainboard and card reader board each use two batteries. The FMU-2500Plus
mainboard uses one battery. The data logger uses one battery.
Switch Ratings
The main power toggle switch and manual/automatic pump toggle switches are general purpose switches,
rated for 15A @ 125VAC, 10A @ 250VAC, 3/4 hp @ 125VAC - 250VAC.
The optional FMU quick stop switch is a heavy duty, oil and watertight switch, rated for 1.0A/300VAC CSA,
0.5A/220VDC, and 1.0A/24VDC.
Terminal Ratings (For External Component Connections)
CAUTION
The following terminal ratings are as suggested by the component manufacturer as the maximum voltage
and current the component is designed to accept. These ratings do not necessarily correspond to the
voltages normally applied to the component when integrated into FuelMaster® as part of a complete
system.
ATTENTION
Les cotes de terminaux suivants sont comme suggéré par le fabricant de composants comme la tension
maximale et le courant le composant est conçu pour accepter. Ces notes ne correspondent pas
nécessairement aux tensions normalement appliqué à l'élément lorsqu'ils sont intégrés dans Fuelmaster ®
dans le cadre d'un système complet.
P_ (J4-J7 on PEDESTAL I/O BOARD): 12 VDC
LN_ (TB 1, TB2 on PEDESTAL I/O BOARD): 300 V, 25 A
PHS_ (TB3 on PEDESTAL I/O BOARD): 300 V, 25 A
ON-SITE PRINTER (J2 on PEDESTAL I/O BOARD): 300 V, 10 A
TANK MONITOR UNIT (JP13 on I/O SILVER BOARD): 300 V, 10 A
INDOOR RECEIPT PRINTER (JP11 on I/O SILVER BOARD): 300 V, 10 A
PHONE (931C0110): 125 VAC, 500 mA
Parts Substitution and Modification
Modification of the equipment provided, substitution of any material requirements, or any deviation from these
installation instructions must comply with all applicable safety codes and standards.
23
199
FuelMaster® Installation Manual
Commercially Available Products
This FuelMaster® Installation Manual makes reference to commercially available equipment and materials
that are required to complete an installation. Trade names and part numbers are also referenced to cite
products that have been tested and known to be serviceable with FuelMaster® equipment. These references
should not be construed as restrictions only to those referenced products. There may be other products
which have not yet been tested, but may be equally suitable.
Syn-Tech Systems inventories commercially available products necessary to complete a FuelMaster®
installation. When these products are purchased from Syn-Tech Systems, the manufacturer’s warranty is
honored and administered by Syn-Tech Systems.
Support
Syn-Tech Systems strives to provide the best customer and distributor support possible. Free on-site
distributor and customer training is provided quarterly (or more often as needed) at the Fuelmaster® factory in
Tallahassee, Florida. Training at the distributor’s location is available where it may be more cost effective to
send a trainer(s) from Syn-Tech rather than send several technicians to Tallahassee for factory training.
Webinars are available through the internet for training sessions between a Syn-Tech trainer in Tallahassee,
Florida, and customer representative(s) anywhere there is internet access. See the FuelMaster® website at
http://www.syntech-fuelmaster.com/ for assistance scheduling training.
Syn-Tech offers a well staffed Customer Satisfaction Center (CSC) to take questions and calls from
FuelMaster® customers. In addition, a Distributor Support Center provides answers from experienced field
technicians for distributors needing installation, startup, training, or troubleshooting assistance. Questions for
the CSC should be called in to 800-888-9136, ext. 1500, or e-mailed to [email protected].
Syn-Tech maintains an e-mail database of all FuelMaster® distributors. Whenever a new publication or other
pertinent information is published it is forwarded to all distributors on the mailing list. If your e-mail address
changes, or other e-mail addresses are added, forward the new address to [email protected].
Improvements
Recommendations for improvement or corrections to this manual may be reported to Syn-Tech's Customer
Satisfaction Center at [email protected] or by mailing to:
SYN-TECH SYSTEMS, INC.
Attn: Customer Satisfaction Center
P.O. Box 5258
Tallahassee, FL 32314
24
200
FuelMaster® Installation Manual
Section 2
System Description
Introduction
Components. The FuelMaster® Fuel Management System consists of equipment designed to
automate control and accountability of any metered liquid or gas. It is not limited only to fuels
applications. The base system contains all equipment necessary to accomplish these tasks and
consists of:
•
Fuel Management Unit with controls for two hoses
•
Prokee®s or Smartcards
•
Fuel Management Software
•
Prokee® or Smartcard Encoder
•
Installation and Operation Manuals
Version Differences. FuelMaster® Fuel Management Systems may be Classic or Plus. The
major differences between the two are: 1) the older Classic systems have an EPROM on the
mainboard and four expansion slots, 2) the newer Plus series contains the latest configurations
and options, has a flash loader and compact flash card on the mainboard, and six expansion
slots. Classic and Plus series FMUs may be intermixed only if the Plus series software is being
used to communicate with the Fuel Management Units (FMUs). Interconnected Master and
Satellite FMUs must be from the same (Classic or Plus) series, using the same firmware. See
Appendix C for a complete listing of the entire Classic and Plus lines of systems and options.
Unless otherwise specified, where instructions reference the FMU-2500, the same instructions
apply to the FMU-2500 Classic and Plus, the FMU-3000 (classic AIM), and the FMU-3500 (Plus
AIM2™).
Equipment Description and Location
Fuel Management Unit (FMU)
Description. (See Figure 2-1) The primary function of FMUs is to control access to connected product
dispensers, and accumulate data for each automated transaction. FMUs may also be used to control and
report access to carwashes, gate openers, or other restricted access devices, and to interface with tank
monitors/tank gauges to receive a variety of reports. FMUs may be Fixed or Mobile (Mobile FMUs are
covered in the Mobile Installation Manual). Fixed FMUs are permanently mounted on or near the service
island, and may be a Master or Satellite. A Master FMU communicates with the Central Controller, and
controls all connected Satellite FMUs and EIUs (Equipment Interface Units). Master FMUs and Satellite
FMUs are identical in external physical appearance. A Satellite FMU or EIU must be connected to a Master
FMU for proper operation.
Each fixed FMU can control up to eight dispenser hoses. A Master FMU can also control up to
eight Satellite FMUs and/or EIUs. Control of Satellite FMUs/EIUs is through an RS-422 or wireless
connection to the Master FMU. The base FMU (fixed Master or Satellite) is provided with hose
controls for two hoses. Additional hose controllers, up to a total of 8, may be purchased in the
equipment order. An EIU will control only one device.
25
201
FuelMaster® Installation Manual
Figure 2-1. Fuel Management Unit (FMU)
26
202
FuelMaster® Installation Manual
All current versions of the standard FMU are delivered with an alpha-numeric keypad, a 33.6 baud
modem, a Type II compact flash memory card (for current and future memory requirements),
weatherproof Prokee®, Smartcard, and/or magnetic stripe card receptacles, and a backlit display
for visibility at night. A 4x4 keypad with 10 digits, 4 letters, ENTER/YES, and CLEAR/NO keys is
available, if desired.
Automatic/Manual (Bypass) Operation. Automatic/Manual Mode Switches are provided
in the FMU behind a locked door to individually select automated or bypass operation of each
controlled dispensing hose. Normal, automated operation requires authorization from the FMU to
activate a dispensing hose.
Hose Control. Controlled hoses may be connected mechanically or electronically. Mechanical
hoses connect directly to an FMU. Electronic hoses require intermediate equipment between the
FMU and dispensing equipment to gain control of the hoses. Electronic hose control is made
possible through the use of an Electronic Dispenser Interface (see Appendix G).
FMU Power Requirements. FMUs are available for connection to 110 VAC or 220 VAC, and
configured for U.S., Canadian, or European certification. They may be used to control DC as well
as AC devices. The base configuration is 110 VAC operation and U.S. certification. Any deviations
from the standard configuration must be stated in the equipment order.
Surge Protection. AC power and telephone line surge protection is standard equipment on
every FMU. Additional surge protection is available, where needed, for connected transaction
printers, satellite FMUs, and tank monitors.
Communications with Central Controller. Master FMUs communicate with the Central
Controller to download transaction data and upload authorization and configuration information.
Communications with the Central Controller may be through a telephone (hard wire, telephone
line extender, or digital cell phone signal), network (hard wire or wireless), or direct (RS-232)
connection.
Integral Heater Pads. FMUs have integral heater pads in the upper cabinet and lower
pedestal to maintain a safe operating temperature and remove moisture. The heater pads are
thermostat controlled and begin to apply heat at approximately 70 degrees F. As the temperature
decreases, more power is applied and more heat results. The heater pads only function when
power is applied to the FMU and the FMU power switch is turned on. For best operating
efficiency, leave the FMU powered after installation.
Program Memory. Classic FMUs use EPROMs to store the operating program. Updates to
the programming of classic FMUs are made by replacing the EPROM. Plus FMUs have a flash
mainboard. Program updates may be made by either of two methods: 1) by uploading a new
firmware program to the FMU through a communications connection, or 2) by transferring a new
program to the FMU from a flashloader board plugged into the FMU mainboard.
Counting Rapid Pulse Inputs. There are some dispenser interfaces which generate a very
large quantity of pulses due to a combination of high flow rates, high divide rates, wide pulse
widths, etc. The dispenser may not have the ability to deliver the pulses as fast as they may be
generated. The FMU will continue to count pulses up to 10 seconds after the transaction is
completed to ensure all pulses are delivered to the FMU.
27
203
FuelMaster® Installation Manual
Relay Options. An FMU may be thought of as a switch installed in a control circuit of a
dispensing device. It is installed where it can interrupt flow to each dispensing hose. When
authorization is provided, the FMU “closes the switch” to complete the circuit. Relays are used to
“close the switch”. FMUs may be ordered with 50 amp solid state relay assemblies or with dual
control relay assemblies. If a preference is not indicated on the sales order, most FMUs are
provided with the solid state relay assemblies. FMUs for small airport or marina self-serve retail
applications are provided with dual control relay assemblies to better accommodate two-stage valve
control for credit card presets.
•
Solid State Relay Assemblies. The basic FMU contains a solid state relay assembly with two
relays. Additional relays are provided when additional hose controllers are purchased.
Though the solid state relay assemblies are rated for 50 amp current loads, other factors limit
their application. When used to control motors, the startup current load of a motor may be
significantly greater than the run current. 50 amp solid state relays should not be used to directly
control motors which exceed 1 hp 110 VAC or 1-1/2 hp 220 VAC.
When used to control other solid state devices, RC networks (sometimes referred to as
snubbers or spark quenchers) may be needed to remove transient voltages that provide false
indications of pump handle detection. If the solid state relay assembly is needed for other than
AC control, the voltage requirement must be specified. The relays must be changed for DC
voltages. Solid state relay assemblies are available with either AC (240VAC) or DC (24VDC)
relays, and relays of both types may be mixed within a single relay assembly.
24 VDC relay assemblies will have a 24 VDC ONLY label applied to the surface of the circuit
board, and will control any DC voltage from 3.5 to 32 VDC.
•
Dual Control Relay Assemblies. Dual control relay assemblies were designed to control two
devices (i.e., solenoid valve and motor contactor) from a single control output. The dual control
relay assembly cannot directly control devices or circuits drawing more than 2 amps. If the
current draw exceeds 2 amps, contact starters must be installed to control the device (or circuit).
Dual control relay assemblies can control devices of any voltage, and a combination of such
devices may be mixed in a single relay assembly. The dual control relay assembly has four
relays in its standard configuration, but the basic FMU possesses only two hose switches.
•
Automatic/Manual Mode Switch Differences. The automatic/manual mode switches for solid
state relay assemblies are not the same as for dual control relay assemblies. If a change is
made from one type of relay assembly to the other, the hose switches should also be changed.
Since the current carrying capacity of the solid state relay assembly is much greater than that of
the dual control relay assembly, the wires from the switches are of different wire gauge to
accommodate the greater current carrying capacity. Additional hose switches are provided when
additional hose controllers are purchased.
Prokee®
The Prokee® is the FuelMaster® patented access device used to initiate a
transaction at the FMU. All Prokee®s are constructed alike with an eight-pin
read/write memory chip housed in a composite holder. Prokee®s attain their
identity as a Vehicle Key, User Key, Supervisor Key, Manual Issue Key, Lube
Truck Key or AIM2™ Programmer Key as they are encoded with the software
and encoder. For visual identification, Prokee®s are available in black, orange,
red, blue, and green.
• Vehicle Keys are encoded with a vehicle identification number and are
assigned to a vehicle.
28
204
Figure 2-2.
Prokee®
FuelMaster® Installation Manual
•
•
•
•
•
User Keys are encoded with a user identification number and are assigned to a user
Supervisor Keys are authorized special access to reconfigure the FMU, run built-in tests of the
FMU, issue fuel to operators without a Prokee®, and enter inventory-tracking information.
Manual Issue Keys are used to issue fuel to individuals or vehicles that do not have a
Prokee®.
Lube Truck Keys are used to fill the storage tank of a mobile fueling truck at a dispenser
connected to an FMU, and to configure the operating parameters of a Mobile FMU. A Lube
Truck Key effects a transfer of fuel from a fixed fueling site to a mobile fueling site.
AIM2™ Programmer Keys are Supervisor Keys with all functions except AIM2™ programming
functions removed.
Smartcards
Smartcards are a credit card sized plastic card with a read/write memory chip embedded in its
face. The read/write memory chip stores the same information and functions as a Prokee®. Any
Prokee® application may be applied to Smartcards.
A separate encoder is needed to encode Smartcards, and a separate reader must be installed in
the FMU to read Smartcards.
Fuel Management Software
The Fuel Management Software is loaded in a personal computer to build an operating program
for control of the FMUs. The operating program can be setup in four basic configurations:
Verifiable Miscellaneous Number (VMN), Verifiable Vehicle Identifier (VVI), Commercial (COM), or
Keyless.
•
The VMN version utilizes Vehicle Keys, and rejects the input of an incorrect user identification
number.
•
The VVI version utilizes User Keys, and rejects the input of an incorrect vehicle identification
number.
•
The COM version utilizes Vehicle and/or User Keys and records the input of a vehicle and/or
user identification number, but does not refuse the transaction if the number entered is
incorrect.
•
The Keyless option provides for starting transactions at the FMU without the need of any access
device such as a Prokee®, smartcard, or mag-stripe card. Keypad entries alone initiate fueling
transactions.
A database containing site, user, vehicle, customer, and transaction information is built as the
program is set up and operated. Multiple copies of the FuelMaster® software may be loaded on
networked computers sharing a common database.
Central Controller
The Central Controller is the personal computer used to run the Fuel Management Software. The
Central Controller communicates with the Master FMU to download transaction data, upload
authorizations, or to change FMU configuration. Refer to the FMPlus User Guide for minimum PC
requirements and detailed operating instructions.
29
205
FuelMaster® Installation Manual
Prokee®/Smartcard Encoder
The Encoder uses data entered in the Fuel Management
Software to encode, re-encode, or read Prokee® and Smartcard
data, and to update Preventive Maintenance or odometer
mileage. The Encoder is available for either USB or parallel
connection to the Central Controller. The parallel connected
Encoder requires a 115 VAC connection for its power supply
where the USB encoder draws its power through the USB
connection. If not otherwise specified, a USB connected encoder
is provided.
Figure 2-3.
Prokee® Encoder
Optional Equipment and Taskings
The following optional equipment and taskings (in alphabetic
order) are available for use with FuelMaster®, or as a future upgrade:
AIM2™: AIM2™ is a passive system; FMU activation does not require direct user interface.
Under this system, when a fuel nozzle is inserted into an authorized vehicle’s filler neck, the FMU
receives an RF (radio frequency) authorization signal from an AIM (Automotive Information
Module) in the vehicle. The passive FMU then turns on the applicable dispenser hose. The
passive FMUs are distinguished by two antennas attached to the upper cabinet for communication
to the vehicle AIM. A thorough explanation of AIM2™ is covered in the AIM2™ Installation
Manual.
Americans with Disabilities Act (ADA): Syn-Tech Systems has provided and installed
FMUs for compliance with the requirements of the Americans with Disabilities Act. If you have a
need for an FMU with ADA compliance, speak to your distributor or FuelMaster® Regional Sales
Manager.
Automatic Call Processor: an Automatic Call Processor (sometimes also referred to as a
comshare device) may be used to share analog phone lines between several devices when only one
analog phone line is available. The Automatic Call Processor receives an input from one analog phone
line. It has a default output which is usually used with a fax machine. Additional outputs are available
and use switching commands to switch the output from the fax machine output to other ports for an
FMU, tank monitor, or any other device requiring an analog phone line.
Credit Card Access: fixed Master FMUs may be equipped with magnetic stripe credit card
readers which are accessible with most credit and gas cards. An active analog phone line must be
used to acquire credit card authorization for most credit card types (see Local Authorization FMU
Access for other options).
Data Logger: the Data Logger is an accessory circuit board that plugs into one of the mainboard
expansion slots, and captures the print text normally sent to a Transaction Printer. The Data Logger
captures the print text on a socketed SD (Secure Digital) memory card. The SD card provided with
the system has a 1 GB capacity and provides storage for over 900,000 transactions and messages.
Transactions may be downloaded direct to the FuelMaster ® software, or by reading memory on the
SD card.
30
206
FuelMaster® Installation Manual
Digital Cell Modem:
a digital cell modem may be installed in an FMU to facilitate
communications to the FMU through a digital cell phone. Syn-Tech builds a kit designed to accept
cell modems from several different vendors. The cell modem is not supplied with the kit.
Direct Connect Cable: some customers may choose
to use a laptop for a Central Controller. Technicians may
use a laptop to direct connect with an FMU via
Hyperterminal or Procomm to set options or change FMU
configuration values. Both these options are possible with an
RS-232 direct connect cable. See Appendix D for
instructions in the use and manufacture or purchase of a
laptop direct connect cable.
Direct Connect Through a Two-Way Ringdown
Device: Central Controller communications to the FMU
from a desktop PC may be direct-connected. A
communications cable is routed in conduit from the Central
Figure 2-4.
Controller modem through a Two-Way Ringdown Device
Two-Way Ringdown Device
(Figure 2-4) to the FMU. This precludes the need for
separate phone lines for both the FMU and Central Controller. The Two-Way Ringdown Device
converts inputs from a modem into a ring signal recognizable by the FMU. Direct-connections may
be made to multiple onsite FMUs. If more than one FMU is direct connected to the Central
Controller, an automatic call processor will be necessary to change connections between FMUs. A
system may combine onsite direct-connect FMUs, and offsite modem connect
FMUs. A phone line simulator cannot be used in conjunction with a credit card
system. Credit card systems require an active analog phone line for credit
card authorization.
Direct connections do not permit Syn-Tech’s Help Desk to modem connect
and troubleshoot the FMU. To acquire this option, the cable routed from the
two-way ring down device to the FMU must be disconnected from the twoway ring down device and plugged into the wall jack of an analog telephone
line such as used for a fax machine. When asking for Help Desk support,
make this connection and provide the Help Desk the telephone number for
the line at the wall jack.
Electronic Dispenser Interface: some electronic fuel dispensers may
only be controlled through a two-wire RS-232 connection to the dispenser
CPU. Proprietary commands are sent through this communications connection
to initiate CPU actions. For these dispensers, an Electronic Dispenser
Interface must be installed between the FMU and dispenser distribution box.
See Appendix H for details on the use of the Electronic Dispenser Interface.
Equipment Interface Unit (EIU): an EIU (Figure 2-5) is a low-cost
Satellite FMU installed to control activation of ancillary fuel site equipment
(i.e., gate opener, door opener, car wash, vacuum cleaner, etc.) with a
Prokee® and/or keypad inputs. The EIU cannot replace a Satellite FMU for
dispenser hose control.
31
207
Figure 2-5.
Equipment
Interface Unit
(EIU)
FuelMaster® Installation Manual
Keyless FMU Access: FMUs may be selected for keyless access. Users do not need Prokee®s,
Smartcards, or credit cards to access keyless FMUs. Users depress the FMU keypad Enter key to
bring up the first question to start a transaction.
Large Remote Display: the Large Remote Display is available to display the quantity or price
of fuel pumped in four inch numbers on a large display mounted anywhere outside a hazardous
area. This display can be particularly valuable to aircraft fueling operations where a hose may have
to be extended 40-50 feet to the aircraft being fueled. The large display is preprogrammed at the
FuelMaster® factory for the correct pulser divide rate.
Local Authorization FMU Access: Local Authorization provides for the use of a proprietary
credit card without the need for an active analog phone line and off-site card authorization. Account
numbers are stored in FMU memory and compared to the account number on the card when inserted
into the credit card reader. Some examples of credit cards which may be used for local authorization
are ComData, INS MasterCard, T-Chek, Voyager, and Wright Express. Some of these cards may also
be used for dial-out authorization.
Monitor Mode: Monitor Mode provides for continually recording product use without initiating a
transaction. Utilized where product must continually feed such as with a furnace. Records transactions
once a day or every 10,000 pulses, whichever occurs first.
OTR (Over the Road): OTR is a software/firmware option used by trucking fleets. Its primary use
is to provide for one Prokee® or Smartcard to record transactions for refrigeration (reefer) units in
addition to the parent truck.
Proximity Card Reader: a Proximity Card Reader is available for installation in an FMU for
reading 26 or 34 bit proximity cards. The Proximity Card Reader reads proximity cards in lieu of
User ID entries in VMN or Keyless systems (to include FMU-3500 AIM2™ FMUs).
Pulsers: pulsers output electronic pulses in a ratio proportionate to the quantity of product
pumped. A 10:1 pulser will, for example, output 10 pulses for every gallon of product pumped. The
more pulses, the greater the accuracy. FMUs can interpret pulses sent from a wide variety of
accessory pulsers and flowmeters as well as most factory pulse output boards installed in electronic
dispensing equipment. Syn-Tech carries the full line of Integrated Control Systems (ICS) pulsers.
There are pulsers for all applications which may be added to any new order, or purchased
separately as an add-on or replacement part.
Pulse Delay Circuits: small airport and marina applications use long fueling hoses with high
pressure fuel pumps. When the pump is turned on quantity may register on the dispenser quantity
indicator before any fuel is delivered to the customer. Weights and Measures inspectors will not
allow this to occur at retail self-service fueling sites. Pulse Delay Circuits were designed to delay
counting the quantity pulses until the hose is fully pressurized. The delay is adjustable to fit differing
applications.
Quick Stop Button: fixed FMUs may be equipped with a resettable external quick stop button to
quickly remove or restore power for the FMU. If wired into a controlling contact starter, the Quick
Stop Button may also be used to remove power from the entire service island.
32
208
FuelMaster® Installation Manual
Receipt Printer: two Receipt Printer options are available: FMU pedestal mount or indoor. Both
Receipt Printer options print a receipt for automated transactions. The receipts print system owner
name, date, time, User ID, Vehicle ID, hose, product, and quantity. Additional custom information
may be programmed for receipt printing.
The pedestal receipt printer cuts off receipts after printing and deposits them in a chute with a clear
plastic access door. The door is manually lifted to remove the printed receipt. The pedestal receipt
printer utilizes a thermal printer, and contains a thermostatically controlled heater to keep its
electronics warm and the printer paper dry.
Retail Applications: considerable research and field testing has been completed to ensure
compliance with Weights and Measures requirements. Filling long fueling hoses at small airports
and marinas can result in quantity differences between what the dispensing device displays and the
amount of fuel actually delivered to the customer. Delay devices have been developed to delay the
counting of pulses until the dispensing hose is fully pressurized. Large remote displays with four
inch quantity figures programmable to match the divide rate of the pulsers have been developed for
use at small airports and marinas. Firmware and software modifications have been made to comply
with Weights and Measures, and provide an export interface to FBO Manager. See Appendix E for
more details.
RS-232/RS-422 Mini Converter and Short-Haul Modem: the RS-232/RS-422 Mini
Converter and Short-Haul Modem is used to attain the greater communications distance possible
with RS-422, and step down to an RS-232 termination at a printer or tank monitor. When used in
pairs, the converter may function as a short haul modem to extend the working length of an RS-232
printer cable. Syn-Tech stocks a version with a DB25 connector. Other versions with DB9, RJ-11,
and RJ-45 connectors plus surge protection are available from the manufacturer, Patton Electronics.
Satellite FMUs: satellite FMUs are lower cost FMUs which may be added to a fueling site when
there is a need for more than one FMU. Each satellite FMU must be connected to a master FMU
through either RS-422 cable or via a wireless connection. Satellite FMUs control dispensing hoses
the same as master FMUs. Satellite FMUs are physically identical to master FMUs, but cannot
accept connections to the Central Controller, tank monitors, transaction printers, receipt printers, or
accept credit cards which require dial-out for authorization. Satellite FMUs may be easily converted
to master FMUs.
Security Cameras: security cameras and digital video recorders (DVR) have been integrated
with FuelMaster® to monitor activity at fueling sites. If desired, speak to your distributor or Regional
Sales Manager for guidance. Syn-Tech does not manufacture or stock this equipment, but can refer
you to a source of supply for compatible systems.
Semi-Manual Mode: option created for rapidly filling and refilling emergency response vehicles.
The mode is initiated at a specific fueling hose with a Supervisor Key. All subsequent transactions
through that hose are recorded without the need for user entry at the FMU. All transactions in SemiManual Mode are charged to the Supervisor Key used to initiate the mode of operation.
Special Applications: FMUs can be wired to control a variety of special applications to include,
but not limited to, hose reels, car washes, gate openers, fill stands, security cameras, PRIST
injectors, etc. Speak to your distributor or Regional Sales Manager, or call Syn-Tech’s Customer
Satisfaction Center for guidance.
33
209
FuelMaster® Installation Manual
Specialty Equipment: Syn-Tech may be tasked to supply an assortment of specialty
equipment with your order. We have supplied such things as solenoid valves, pulse output boards
for dispensers, computers, monitors, tank monitor RS-232 boards, etc. If you are having difficulty
locating what you need, call us. We may have the part on our shelf, or a convenient source of
supply.
Tank Monitor/Tank Gauge Interface: Tank monitors may be interfaced to FMUs through a
communications connection to download reports. An RS-232 input is standard equipment with some
tank monitors, and an option with others. When communications to the FMU have been established
through the software program, the option for “TMU Interface” may be selected to download tank
monitor reports. The reports may be collected at the same time fuel transaction information is
downloaded. This will ensure the best possible accuracy for reconciliation between FuelMaster® and
the tank monitor.
For distances in excess of the manufacturer’s recommendation, communications may originate at
the FMU as RS-422 and step down to RS-232 at the tank monitor using an RS-232/RS-422
converter. An RS-232 cable pre-configured with a DB-25 connector is available in 25 and 50 foot
lengths for making connections to tank monitors using pins 2, 3, 5 for the RS-232 connection.
Tank monitor interfaces currently available in the software are: Autostik, Autostik II/Jr., Emco TLM-II,
Emco Wheaton, Gilbarco TM2/TM3, Gilbarco ATS, Gilbarco EMC, Incon TS-1000/TS-2000, L&J
1100/8100, Omntech, Petrosonic III, Pneumercator LMS-750, Pneumercator LDE-700,
Pneumercator E-700-1, Pneumercator LDE-740, Pneumercator TMS 3000, Red Jacket 5000/5001,
Ronan X76, Soil Sentry, Veeder-Root TLS 250, Veeder-Root TLS-250i, Veeder-Root TLS-300,
Veeder-Root TLS-300i, Veeder-Root TLS-350. Other tank monitors not listed here may be
interfaced if they support Veeder-Root emulation, and offer an RS-232 interface.
Telephone Line Extender: this is not an option offered by Syn-Tech Systems, Inc., but an
option available through vendors to enable telephone communications to the FMU through RF (radio
frequency) transmitters and receivers. Credit card authorization may not be possible through other
wireless means. Use of the Phone Line Extender precludes the need for conduit to carry a
telephone line to the FMU. Call your FuelMaster® salesman or the Customer Satisfaction Center for
the name of a vendor with proven equipment.
Transaction Printer: an on-site, real-time serial printer may be connected to the Master FMU
to print a record of each transaction as it occurs as well as historical data of FMU operation (i.e., every
power fail, every modem logon, every Supervisor Key insertion, etc). Transaction printers are hardwired to the Master FMU. As such, the printer must be located close enough to the FMU to permit the
hardwire connection. If the hardwire connection requires more than 300 feet of cable, short haul
modems should be used to boost the print signal. RS-232/RS-422 converters at both ends of the
printer cable will perform the same function as a short haul modem.
Transaction printers purchased from Syn-Tech Systems include a 25 or 50 foot serial cable with an
attached DB-25 connector, and printer surge protection. The cable or surge protection may also be
purchased separately.
Wired and Wireless Network Communications: an FMU network card is available to
facilitate network communications between the Central Controller and Master FMU. The network
card will support copper cable or fiber optic connections. If it is desired to interface the network
interface card directly with fiber optics, it must be specified when requesting the card as an option or
34
210
FuelMaster® Installation Manual
as a replacement part. The fiber optic transceiver accepts only MT-RJ fiber optic connectors.
Options exist for wireless network communications, an option that could eliminate the need for a
communications conduit to the FMU, and minimize the surge potential otherwise present with a
cable or phone line communications connection.
When network communications are established to a master FMU, communications to satellite FMUs
continue to be through RS-422 communications cable.
Wireless RS-232/422 Communications: the Zlinx Radio Modem (B&B Electronics) has
been tested and proven to provide satisfactory 2.4GHz wireless communications between Master
and Satellite FMUs, between a Master FMU and tank monitor, or between a Master FMU and
transaction printer. The maximum range advertised by the manufacturer is 300 feet indoors and one
mile outdoors.
35
211
FuelMaster® Installation Manual
36
212
FuelMaster® Installation Manual
Section 3
Site Planning and Preparation
Introduction
This section includes considerations which must be given to planning and preparation for FuelMaster®
servicing and Central Accounting Office sites. Each servicing site identified in the Fuel Management
Software will contain, as a minimum, one master FMU, one product dispenser, and one product tank.
Additional satellite FMUs, product dispensers, product tanks, tank monitors, transaction printers, and
associated communications equipment may also be located at the servicing site. The Central Accounting
Office will contain the Central Controller and associated communication and office equipment. Servicing
sites and the Central Accounting Office may be combined at one location, or they may be at two or more
separate locations. A Central Accounting Office may support hundreds of servicing sites.
The goal when planning a FuelMaster® installation is to have and maintain a totally automated fueling site.
When planning an installation with multiple FMUs, consider distributing products over multiple FMUs rather
than connecting all products to one FMU. If all hoses of one product are connected to one FMU, and that
FMU becomes non-operational, automation for that product has stopped. But, if two FMUs each have an
unleaded and a diesel hose connection and one FMU becomes unserviceable, the other FMU still has an
automated unleaded and diesel hose.
FMU Dimensions
Figure 3-1 is an illustration of an FMU with dimensions. The FMU footprint is illustrated in Section 4,
Installation. Consider these dimensions when selecting a mount location. These dimensions apply to
FMU-2000, FMU-2500, FMU-3000, and FMU-3500 series FMUs.
Since the FMU must be accessed to start a transaction from a dispenser (except with AIM2™),
consideration should be given to mounting the FMU(s) for convenient access to the dispensers.
Consideration should also be given to mounting a Satellite FMU on additional service islands to
preclude users from walking across traffic lanes to start a transaction.
The sunscreen overlaps the front and sides of the FMU upper cabinet, but is flush with the back.
Where applicable, AIM2™ antenna housings are attached to the back of the FMU cabinet. Other
applications requiring antennas may also use the AIM2™ antenna housings. AIM2™ antenna
housings are 2 inches wide x 2 inches deep x 3-1/2 inches high.
Unlike the illustration, the upper cabinet door will open only as wide as the fully opened pedestal
door.
The FMU upper cabinet may be reversed so the pedestal door will open to the rear of the FMU. This
will permit FMU installation inside a kiosk where the upper cabinet door accessories (keypad,
display, etc.) are accessible from outside the building while the pedestal is accessible from inside the
building. If considering this application, leave some work space between the FMU pedestal and kiosk
wall for removing mount screws for the relay assemblies and pedestal I/O board.
EIU Dimensions
Figure 3-2 is an illustration of the EIU with dimensions. These dimensions are applicable for all
existing versions of the EIU. The EIU footprint is illustrated in Section 4, Installation.
37
213
FuelMaster® Installation Manual
Figure 3-1. FMU Dimensions (in inches)
38
214
FuelMaster® Installation Manual
Figure 3-2. EIU Dimensions (in inches)
Figure 3-2 does not illustrate the interface between the EIU pedestal and EIU cabinet. From the rear
of the EIU pedestal to the rear of the EIU cabinet is 4-1/4 inches. Overall front to rear distance
including the extension of the visor over the Prokee receptacle is 11-5/8 inches. The EIU base plate
is 3/16 inch thick and 10 inches square.
Design of the EIU considered accessing the keypad and/or Prokee® receptacle through the open
window of a vehicle. If site layout permits, mount the EIU where vehicle operators can access it
through a window without leaving their vehicle. Consideration should also be given to the installation
of bollards (guard rails) for protection from vehicles driven in close proximity to the EIU.
39
215
FuelMaster® Installation Manual
Conduit Requirements
CAUTION
Although PVC conduit is allowed by the NEC, only metal conduit will be used for FuelMaster®
applications. Syn-Tech insists upon this because of non-metal conduit’s higher susceptibility to surge
(lightning) damage. Failure to use metal conduit and the recommended shielded cables voids all
warranties.
ATTENTION
Bien que le conduit de PVC soit permis par NEC, seulement le conduit en métal sera utilisé pour
l'équipement de FuelMaster®. Syn-Tech exige cela pour raison d'une susceptibilité plus élevée des
conduits non-métalliques aux dégâts causés par vague de courent (coup de foudre). Défaut
d'employer le conduit en métal et les câbles protégés recommandés vide toutes les garanties.
Many fuel distributors and electrical contractors prefer to use PVC conduit due to its cost, ease of
installation, and resistance to corrosion. There are several factors to be considered when using PVC
conduit. First the National Electric Code, Article 514 (Gasoline Dispensing and Service Stations)
states that if PVC is used in a hazardous location it must be at least 2 feet below surface and metal
conduit must be used to surface from the 2 foot depth. It is possible to meet NEC requirements
using PVC when the correct type of conduit is used in emergence.
The main problem with PVC is that the ground plain of wiring inside PVC goes up and down based
on the adjacent ground, and is not protected as is wire inside metal conduit. Wire inside PVC that
receives a surge or ground differential will transmit that in both directions, first to the FMU and
secondly to whatever is connected to the other end of the wire.
All wires and cables used by the FuelMaster® equipment must be routed through rigid metal conduit
approved by, and installed in accordance with, the National Electric Codes (NEC), NFPA 70. This is
a common requirement among reputable manufacturers of fuel management systems and fuel
dispensing equipment. The requirement to use metal conduit is for the customer's benefit.
FuelMaster® will warrant your FMU in accordance with its stated warranty which covers defective
parts, telephonic support, etc., but not Acts of God. Lightning strikes/surges are considered Acts of
God, and are not warranted.
If it is not possible to comply with the requirement for rigid metal conduit, contact Syn-Tech Systems.
Acceptable workarounds may be available.
Conduit Size. The recommended conduit size is 3/4 inch. Wire sizes and quantities permitting, a
limited number of 1/2 inch conduit may be used. The FMU pedestal bulkhead can accept up to ten
3/4-inch conduits and four 1/2-inch conduits. Larger and smaller conduit may be adapted to fit the
FMU pedestal bulkhead.
The number of required conduit will be dependent upon the application, and the number of connected
Satellite FMUs, EIUs, fuel dispensers, and options. If the number of conductors exceeds the conduit
fill capacity, additional conduit must be used.
Conduit Fill Capacity. The NEC states conduit will not be filled to greater than 40% fill capacity.
If the conduit terminates in a seal-off, seal-offs cannot exceed 25% fill capacity. Table 1 shows the
available area within different size rigid metal conduit at full, 40%, and 25% capacity. Table 2 shows
the cross sectional area of different wire sizes used with an FMU or EIU installation. You can
estimate the NEC requirement by adding the cross sectional area of all the wires you intend to pull
through a conduit, then comparing it to the maximum (40% or 25%) fill capacity of the conduit being
used. If you are exceeding the fill capacity, additional or larger conduit will be necessary.
40
216
FuelMaster® Installation Manual
Conduit
Size
1/2
3/4
1
1-1/4
1-1/2
2
Total
Inside
Area
0.314
0.549
0.887
1.526
2.071
3.408
40%
Area
0.1256
0.2196
0.3548
0.6104
0.8284
1.3632
25%
Area
0.0785
0.1373
0.2218
0.3815
0.5178
0.8520
Table 3-1. Rigid Metal Conduit Fill Capacity
Wire/Cable
18 AWG TFFN
16 AWG TFFN
14 AWG THHN
12 AWG THHN
10 AWG THHN
Belden 8723
Belden 9552
Diameter
0.0841
0.096
0.111
0.130
0.164
0.160
0.368
Area
0.0055
0.0072
0.0097
0.0133
0.0211
0.0201
0.1064
Table 3-2. Typical Wire/Cable Cross Sectional Area
Conduit Applications. See Figure 3-3 for a sample site layout containing a Master FMU on one
island, a Satellite FMU on another island, an oil dispenser on a third island, and an EIU and gate
controller on a fourth island. The sample site layout includes conduit requirements that have been
projected in accordance with the NEC. Be sure to check local codes for compliance.
•
•
NOTE
Conduit will not be necessary in all applications. Wireless communications are possible
between the Central Controller and Master FMU, between Master and Satellite FMUs,
between Master FMUs and tank monitors, and between Master FMUs and transaction
printers. Use of a Data Logger can also eliminate the need for a conduit to an onsite
transaction printer.
If there is only one conduit to the FMU, and it has power wires in it, the power wires
may be eliminated to make room for a communications cable by obtaining power from
another source. Examine the possibility of pulling power wires through a pulse/control
wire conduit from a nearby dispenser.
FMU’s require, as a minimum, a conduit for power and one conduit to each dispenser for control and
pulse wiring. Where wireless communications are not used, Master FMU’s will require a conduit for
communications with the Central Controller as well as a conduit for communications to each Satellite
FMU and tank monitor. These conduit cannot also contain AC power wires. Transaction printer and
tank monitor communications wiring is low voltage and may be routed in the same conduit as Central
Controller communications wiring.
41
217
FuelMaster® Installation Manual
Figure 3-3. Sample Site Layout
42
218
FuelMaster® Installation Manual
Conduit entering an FMU typically enter the FMU through the opening in the base of the pedestal. If
conduit enter the FMU through holes punched/drilled through its exterior, the holes must be sealed to
prevent water intrusion into the FMU. Keep in mind, conduit entering the FMU through holes
punched/drilled through its exterior will make it more difficult to move the FMU should it need to be
moved or relocated. When the additional height will not hinder access to the FMU, the FMU may be
mounted on two pieces of C-channel to elevate it enough for surface mount conduit to enter from
underneath.
EIU's require three conduit: one for AC power, one for EIU/Master FMU communications, and one to
carry an activation signal to the controlling device (i.e., gate, door, or carwash controller). Since the
EIU pedestal has a 3-1/2 x 3-1/2 inch conduit opening, the three conduit must exit the ground
vertically and be tied together to fit inside the Pedestal. Conduit terminating in the EIU should be cut
to a stub-off height of 24 to 30 inches and fitted with plastic insulating bushings for cable protection.
When an FMU is installed in a hazardous location, each conduit run that originates or terminates on
the service island is required by the NEC to have an approved conduit seal on each end (including
conduit routed to EIUs from a Master FMU). These seals must be installed in accordance with NEC
guidelines. In addition, sheathed cables are required to be cable sealed in accordance with NEC
guidelines.
Where flexibility is needed, approved explosion-proof flexible conduit may be used inside the
dispenser housing between the conduit seal and dispenser junction box to make conduit
connections.
Servicing Site Requirements
NOTE
Sites may be arranged with any combination of one Master FMU and up to eight Satellite FMUs
and/or EIUs. Master FMUs and Satellite FMUs can control up to eight hoses each. EIUs can control only
one ancillary equipment item (door/gate opener, car wash, etc.) each.
Servicing site equipment includes all equipment mounted on the service island and in the station
house.
NOTE
Custom applications have been developed for the FMUs to operate from 220 VAC. If such an
application is desired, Syn-Tech must be informed when the order is placed to accomplish the
necessary equipment alterations.
AC Power
FMUs and EIUs have minimum power requirements that must be met for satisfactory operation, and
should be powered from a separate power source with a dedicated circuit breaker rated no less than
15 amps. If site construction does not permit a separate FMU power source, power may be derived
from other service island equipment. When a separate power source is not used, the FMU is
susceptible to resets should the input power drop below the minimum requirement. Careful
consideration should be given to the choice of the power source to ensure FMU operation under all
operating conditions. If powered from the same circuit as equipment with high power loads (i.e.,
dispensers with, or directly powering, pump motors), input power to the FMU and/or EIU may drop
below the minimum power requirement. FMUs will shut down when input power drops below the
minimum required for operation (approximately 75 VAC), and will not resume operation until input
power is great enough (reaching approximately 95 VAC) to support normal operation.
Heater pads in the upper and lower cabinets (behind the Backplate Assembly and Pedestal I/O
Board) are thermostatically controlled to apply heat as temperatures drop. The heaters start to draw
power to generate heat and remove moisture at approximately 70 degrees F. As temperatures fall,
the heaters draw more power to generate more heat. At full output the heaters draw approximately 1
amp each for a total of 2 amps for both heaters. The other electronics in the FMU draw
43
219
FuelMaster® Installation Manual
approximately 400 milliamps. The total current draw will be less than 3 amps.
Errors on Power-Up: an FMU newly installed in a cool, damp environment may display errors
after power-up until the electronics dry out and warm up. Let the FMU run for a couple hours before
assuming there are non-recoverable errors.
NOTE
While voltage regulators and power conditioners both offer protection, they do not perform the
same functions. It is recommended the specifications of the device be compared to the need
before making a purchase.
Power Conditioners/Voltage Regulators.
In locales where power sources fluctuate
significantly and overvoltages or brownouts occur, power conditioners or voltage regulators may be
installed between the FMU and its power source for protection against high or low power inputs.
These devices condition or regulate power to a constant or maximum output. Power conditioners
maintain a constant power input when voltage may otherwise fluctuate between highs and lows
which may not be acceptable to FuelMaster®. Voltage regulators protect FuelMaster from high
voltage inputs similar to what may occur when an unregulated generator is initially turned on. Power
conditioners are more complex and substantially more expensive to purchase. A power conditioner
previously tested with FuelMaster® is the Sola Electric constant velocity transformer, model 23-23150-8. In 2010, price was approximately $1000 each. A voltage regulator previously tested with
FuelMaster® is the APC Line-R LE-1200 (LE-1200I for international use). In 2010, the price was
approximately $50.
Surge Protection
Standard Protection: every FMU is provided with protection against surges from incoming
power and telephone lines. Optional transaction printers purchased from Syn-Tech Systems are also
provided with surge protection against surges which may enter through the input cable from the
FMU. In addition, circuit protection is built into most FMU devices receiving inputs from external wire
or cable connections. Such protection is not all encompassing. If the FMU is to be installed in an
area susceptible to frequent electrical storms or lightning strikes, additional surge protection should
be considered. A National Weather Service map showing the frequency of lightning strikes in the
United States is available at the following link:
http://www.lightningsafety.noaa.gov/lightning_map.htm.
Optional Protection: Isocomm Surge Protection has been developed for added protection of
transaction printers, satellite FMUs (including EIUs), and tank monitors; devices which may have
long runs of communications cable to a master FMU. It does not afford added protection to
standalone master FMUs. If the added protection is needed, request Isocomm from the Customer
Satisfaction Center or your FuelMaster® regional sales manager or distributor.
There are businesses which specialize in surge protection. If the fuel site is in a high frequency
lightning strike area, one of these businesses might be consulted.
Backup Power Sources
Backup Generators: some facilities are equipped with backup generators to supply AC power
when the regular power supply goes down. During startup of the backup generator the initial power
surge may be extremely high until all connected equipment is restored to operation. This power
surge has the same potential for damage to the FuelMaster® equipment as a lightning strike. Ensure
the installed equipment is protected (regulated) from current surges during startup of the backup
power source. If possible, turn off FMU power until non-regulated generator power stabilizes.
44
220
FuelMaster® Installation Manual
Uninterruptible Power Supply (UPS): Weights & Measures requirements call for a backup
power source for retail fueling operations. The customer who starts a transaction with a credit card
must be provided a receipt should there be a power failure while a retail transaction is in progress. A
UPS may be installed between the FMU and its power source (i.e., breaker panel) as a backup
power source. A 500 volt-amp UPS will provide the required 15 minutes of backup power to the FMU
under its greatest power draw (all internal heaters operating). FMUs equipped with receipt printers should
print a receipt when power is removed from the dispensing device it is controlling. The FMU reads the
power removal the same as if the pump handle switch is being turned off to end the transaction.
Of those UPS’s tested, all provided power instantaneously after a power failure. There was no delay
between the power failure and resumption of power by the UPS. The FMU did not reset. This may
not be true in all cases. If the FMU does reset, an FMU operating option (command 5b; RCPTS
PRINT ON PWR UP) must be enabled to ensure a receipt for the last transaction is printed after
power resumes.
Communications with Central Controller
•
•
•
NOTE
Communications connections with the Central Controller must be made from a Master
FMU.
Communications for the purpose of authorizing credit cards may only be accomplished
through an active phone line (analog, phone line extender, or cell modem) connection.
The NEC states, “Communication conductors shall not be placed in any raceway,
compartment, outlet box, junction box, or similar fitting with conductors of electric light,
power, Class 1, non-power-limited fire alarm or medium power network-powered
broadband communications circuits.” Ref: NFPA 70, para 800.133(A)(1)(c).
Available options for communications with the Central Controller include: a) by phone, b) by network,
or c) by direct connect to a master FMU with a laptop.
FMU and Central Controller communications are not continually active. Except for credit card
authorization from the FMU, connection must be initiated by the Central Controller operator. When the
desired communications are complete, the connection is disconnected. Transaction downloads may be
programmed to occur automatically when the Central Controller operator is not present. Communications
to credit card networks are initiated by the FMU whenever a credit card is inserted to start a retail
transaction.
Wireless communications are becoming more practical and reliable. In many applications an FMU may be
installed and connected to nearby fuel dispensers for power, pulse, and control without trenching to add
underground conduit. Hard wire communications drive the need for a communications conduit. The
advent of wireless communications eliminates the need for trenching altogether. Wireless
communications is possible with a phone line extender or wireless networking. Whereas wireless RS-232
is a viable option for Master to Satellite FMU (and EIU) communications, and Master FMU to tank monitor
communications, it is not presently an acceptable means of communicating to the Central Controller or for
credit card authorization.
Phone/Modem Communications
Central Controller phone/modem communications with a master FMU may be through 1) analog phone
lines, 2) with a two-way ringdown device, 3) in conjunction with a phone line extender, or 4) through a cell
modem. In all cases, the FMU and Central Controller must be equipped with a modem.
Most credit card networks require a phone connection to authorize credit cards. If retail (credit card) sales
are being conducted through the FMU, an analog phone line connection will be necessary.
45
221
FuelMaster® Installation Manual
•
Through analog phone lines: download through phone lines will require access to an analog,
data-grade, USA telephone line. A telephone line in use by a fax machine may be shared for this
purpose.
Previous versions of this install manual specified a voice-grade analog telephone line. When it
became necessary to troubleshoot telephone line problems, the line was tested for its ability to
transmit voice signals. A phone line may transmit voice communications when it is not capable of
transmitting data. The requirement was changed from a voice-grade to data-grade to ensure effective
data transmission.
Automatic call processors are available for automatic sharing of a phone line with multiple devices
without manually switching cables or switches. Automatic call processors may be installed to operate
as receivers or transmitters. In addition to the capability to split an incoming phone line to multiple
devices, they can also receive inputs from multiple master FMUs to send signals through a single
phone line (i.e., a retail operation with multiple FMUs but one phone line can use an automatic call
processor to request credit card authorization through a single analog phone line). Automatic call
processors are available from a number of sources. A reliable call processor used by Syn-Tech
Systems is The Stick made by Multi-Link, Inc. Retail price is approximately $95.
•
Through a two-way ringdown device: this communication method is very similar to
standard phone line communications except for the addition of the two-way ringdown device to
simulate a phone line. An active analog phone line is not required. A two conductor communications
cable is routed from the phone jack in the Central Controller modem to either of the phone jacks in
the two-way ringdown device. The other phone jack in the two-way ringdown device accepts an
incoming communications cable from the master FMU. Once connected, the Central Controller
communicates with the master FMU to upload or download information, as needed. Syn-Tech
Systems uses a DLE-200B two-way ringdown device made by Viking Electronics. Retail price is
approximately $135.
Since it does not use an active analog phone line, installation of a two-way ringdown device may
preclude support from Syn-Tech’s Customer Satisfaction Center if the device is not positioned close
to an analog phone jack. Typically the two-way ringdown device is positioned close to the analog
phone jack used by the fax machine. When it is desired to attain support from Syn-Tech’s Customer
Satisfaction Center, the communications line from the two-way ringdown device to the FMU is
disconnected from the two-way ringdown device and plugged into the analog phone jack. The line
may be returned to its normal position after the assistance from the Customer Satisfaction Center is
no longer needed.
•
Through a phone line extender: download through a phone line extender is another option. A
phone line extender transmits a wireless phone signal up to 14 miles to a line-of-sight receiver. Phone
line extenders are not a FuelMaster® product and must be purchased by the customer. The
Trailblazer phone line extender from Carlson Wireless has proven to be a reliable phone line
extender. At the time of this writing, the Teletics Zipline phone line extender was in test and proving to
be another option.
•
Through a cell modem: a kit is available to adapt a cell modem to a master FMU. The cell
modem must be purchased by the customer. Different locations may have different preferred
providers. Though not very reliable in its earliest form, this interface is a high priority with Syn-Tech
Engineering. A reliable cell modem interface is expected to be available in the near future.
Network Communications
Download by network may be through a Cat 5 (or equivalent) cable, a fiber optic cable, or wireless. All
options require the FMU to be equipped with the optional network interface card. The network interface
card supports 10/100 Ethernet communications. Any speeds greater than 100 Mbps must be stepped
down to be compatible. When the network interface card option is purchased, a modem card is provided
as part of the package. If a network firewall cannot be taken down to acquire support from Syn-Tech’s
Customer Satisfaction Center, an analog phone line may be run to the FMU to attain phone line support.
46
222
FuelMaster® Installation Manual
If a device is mounted in the FMU which requires connection to an electrical outlet, an outlet box must be
installed. Installation of an outlet box is covered in Section 4, Installation.
•
Through a network cable: download through a network cable will require a Cat 5 (or
equivalent) network cable routed from the nearest network connection to the master FMU. For
maximum reliability, it is not recommended that any single run of network cable be greater than 200
feet. If more than one run of network cable must be used, a network switch should be placed at the
juncture of the cables.
•
Through a fiber optic cable: additional range may be achieved through the use of fiber optic
cable. Two strands of fiber optic are needed (preferably more as spares), one for transmit and one for
receive. A transceiver must be installed in the FMU to convert fiber to cable to interface with the FMU
network interface card. The converter installed at the originating end of the fiber optic needs to be
compatible with 100 base network communications.
•
Through a wireless network: communications through a wireless network is a very practical
communications option where the FMU and Central Controller are located within range of the wireless
equipment. The wireless equipment may be tied into an existing network, or added as a point-to-point
network.
The FMU and Central Controller should not contain any secure information. A point-to-point wireless
application connects the FMU to the Central Controller without interfacing your network. Use of such
an interface prevents access by hackers to secure information contained within your network. When
tied into an existing network, consideration must be given to effective wireless network security to
prevent outside access to any secure information contained on your network.
Direct Connect
Direct connect is an RS-232 connection between a PC (normally a laptop) and the FMU. This is a
practical option for communications to the FMU where communications conduit are not available, or
wireless communications are not practical. See Appendix D for instructions in making a direct connection
to an FMU with a laptop. Connection with a desktop may be made following the same guidance. The PC
used to direct connect to the FMU to download transaction data or upload authorization data must use the
FuelMaster® software instead of Hyperterminal or Procomm Plus.
Direct connections between a laptop and an FMU is not possible with DoD software. Direct connections
using Hyperterminal or Procomm is possible between a laptop and FMU. DoD customers desiring direct
connect capability must use a two-way ringdown device between a laptop and FMU, and configure the
software to assume an analog phone line connection.
Though effective communications between the Central Controller and FMU are an option with a direct
connection, FMU communications to a credit card network is not possible by extending an RS-232
connection to a building where it is converted to an analog phone line.
Credit Card Authorization
Credit card authorization for retail operations is through a wired or wireless phone line connection to the
FMU. Reference Through analog phone lines or Through a phone line extender, above, for a
description of the communication methods used for credit card authorization.
Dispenser Compatibility
Dispensers are of two basic types: mechanical and electronic. Mechanical dispensers may be controlled
directly by FuelMaster® through a hardwire or cable interface. Sometimes a pulse output option or pulser
must be added to acquire quantity pulses from the dispenser. The dispenser must have a pulse output
accessible by FuelMaster®.
47
223
FuelMaster® Installation Manual
Electronic dispensers have an internal CPU (central processing unit) which controls dispenser functions. The
CPU typically requires two-wire communications inputs from a proprietary device (OEM control box) to initiate
dispensing functions and extract quantity information. FuelMaster® uses an Electronic Dispenser Interface Kit
to make the required connection and communicate with the dispenser CPU. Appendix H explains the
application and installation of the Electronic Dispenser Interface Kit.
Appendix B contains a sample Dispenser Compatibility List with instructions for making the FMU interface
with a majority of commercially available domestic and international fuel dispensers. This listing is updated
periodically to include any new information acquired by Syn-Tech Systems relating to dispenser interfaces.
Request the lastest Dispenser Compatiblity List from Syn-Tech Systems’ Customer Satisfaction Center for
FuelMaster® compatibility with the dispenser of choice.
Dispenser Control
Dispenser Control is the term used to describe how FuelMaster® controls the output of product from a
dispensing hose. FMUs must be installed to attain individual control of each dispensing hose. Dispensers
with multiple hoses must have a means for individually controlling each dispensing hose. In some cases
this may require the installation of solenoid valves; one per dispensing hose. The base FMU provides for
control of two dispensing hoses. Additional hose controls are optional.
Syn-Tech Systems will not dictate a control method which must be used for all situations. Instead, the
pros/cons of each control method will be explained so the installer and customer may select the
control method that best suits the application. Site layout and construction, pump handle detection,
and economics must be considered when selecting an appropriate control method. Detailed wiring
instructions will be found in the Installation section of this manual.
Dispenser control by FuelMaster® may best be simplified by considering the FMU a switching device
for dispenser control circuits. The FMU does not provide power for the device being controlled. It
switches existing power. The FMU installer must find a circuit in the dispenser that interrupts the flow
of fuel. This may be an interruption of power to the dispenser reset mechanism, or a solenoid valve, or
a pump motor. The interrupted circuit must be a circuit which individually controls each hose offered
by the dispenser. To gain control, the FMU is inserted as a switch for that circuit. When the FMU is not
providing authorization, the circuit is open and fuel cannot flow.
The contacts of the switch are the LN and LD positions on terminal strips TB1 and TB2 of the Pedestal
I/O Board. The LN positions are the power-in (line) positions. The LD positions are the power-out or
authorization (load) positions. There are eight positions of LN (LN1, LN2, LN3, etc.) and LD (LD1,
LD2, LD3, etc.) for control of up to eight hoses per FMU.
FMUs have timers (No Pulse and Pump Finish) which will end a fueling transaction if not otherwise
ended by pump handle detection. If the pump motor is not using a conventional fuel dispenser with a
pump handle switch,
Dispenser installation manuals may provide wiring diagrams which illustrate dispensers being
powered through multiple circuit breakers. Up to four separate circuit breakers have been noted in
manufacturer’s wiring diagrams for a dual hose dispenser. There were separate breakers for each
hose, the dispenser CPU, and the dispenser light circuit. Actual installations may have all these power
sources originating from a single circuit breaker. This means the original installer jumped power to the
applicable circuits after power arrived at the dispenser. To gain control of each dispensing hose while
maintaining constant power to the light circuit and CPU, the jumpers must be found and repositioned.
Otherwise, power may be sent to an unauthorized dispensing hose when another hose is authorized.
Whatever control method is selected, it must effectively prevent the flow of product out to the
dispensing nozzle when authorization isn’t present.
Pump Handle/Switch Detection
When choosing the best control option, consideration must be given to the use of pump handle
detection. Pump handle detection is optional on non-DoD systems, but required on all DoD FMU
installations.
48
224
FuelMaster® Installation Manual
What it does: if pump handle detection is not turned on and used to end a transaction, timers (No
Pulse Timeout and Pump Finish Timer) must be set to end the transaction. When timers are used to
end a transaction, they must be set to accommodate the longest fueling scenario to ensure the
transaction is completed before authorization is removed. The transaction remains authorized until the
timeout occurs. If someone finishes their transaction early and hangs the nozzle up when using timers
to end the transaction, some authorization time may be remaining for someone else to take the nozzle
down and pump fuel. The fuel pumped by the second person is incorrectly recorded against the
authorization started by the first person.
Another problem with timers ending transactions is the printing of receipts. If a customer finishes a
transaction quickly, the receipt won’t print until the timers end the transaction.
These issues may be overcome by using pump handle (or switch) detection to end the transaction.
When wired into the dispenser connection, and turned on in the FMU configuration, pump handle
detection will end the transaction as soon as the pump handle is turned off. The next person fueling
has to start their own transaction. Receipts print as soon as the handle is turned off. Hoses become
available for new transactions more quickly.
How to get it: pump handle detection for the FMU is attained from a source which provides power
when the pump handle or switch is turned on, and removes power when the pump handle is turned
off. The most common sources are a RESET COMPLETE signal in a dispenser, or the output side of a
pump switch. If the power source is 110 VAC, pump handle detection must be connected to either LN
or PHS (differences are explained below) on the Pedestal I/O Board. If the power source is 12 VDC, it
must be connected to the OK positions on the pulser connectors J4-J7 on the Pedestal I/O Board.
After a wiring connection is made, an FMU configuration setting must be made to turn on pump handle
detection. Pump handle detection settings differ between FuelMaster® classic and Plus FMUs. Pump
handle detection in DoD systems functions the same as in classic systems. In classic and DoD
systems, pump handle detection has two settings, YES and NO. When set to YES, detection must be
present when the handle is turned on and must go away when the pump handle is turned off. For a
YES setting, pump handle detection must be wired into the appropriate LN position: LN1 for hose 1,
LN2 for hose 2, etc. The NO setting has no detection at any time.
In the FuelMaster® Plus systems, there are four pump handle detect settings: START ONLY, START
AND END, END ONLY, and NONE. START ONLY detects the pump handle or switch only when it is
turned on. It disregards the turn off at the end of the transaction. START AND END is the same as
YES in the classic and DoD systems. It detects the pump handle being turned on at the beginning of
the transaction, and turned off at the end of the transaction.
YES, START ONLY, and START AND END pump handle detect settings require the pump handle to
be off with no power to the FMU LN positions when the transaction is started. The user is prompted to
TURN ON PUMP HANDLE TO DISPENSE THE SELECTED PRODUCT after responding to the FMU
prompts. When the pump handle is turned on, power is applied to LN, the applicable relay is
energized, then authorization power is sent from LD to the dispenser. YES and START AND END will
end the transaction when the pump handle is turned off.
What if I have a constant hot or neutral on LN?: if there is a constant hot or neutral on LN, LN
cannot be used for pump handle detection. This does not mean pump handle detection must be
turned off. It just means pump handle detection cannot be detected on LN.
Pump handle detection may be transferred to a PHS position on terminal strip TB3 on the Pedestal I/O
Board for pump handle detection only at the end of a transaction. PHS is only used for pump handle
detection. It cannot be used as an input to the relay assemblies, and a subsequent output from LD.
Pump handle detection is transferred from LN to PHS by wiring pump handle detection into the
appropriate PHS position (PHS1 for hose 1, PHS2 for hose 2, etc.), and cutting one leg of the resistor
at R92 (for hose 1, R93 for hose 2, R94 for hose 3, etc.) between the automatic/manual mode switch
receptacles on the Pedestal I/O Board. One leg only is cut so the resistor remains available should it
be necessary to reuse it.
This is a situation where END ONLY is used. The END ONLY setting disregards the pump handle at
49
225
FuelMaster® Installation Manual
the beginning of the transaction but detects the turn off at the end of the transaction.
AIM2™ scenario: an AIM2™ passive transaction does not require someone to start their
transaction at the FMU. Instead, they park their vehicle next to the dispenser, take the fuel nozzle
down, turn on the pump handle, insert the fuel nozzle into the fuel tank filler neck, and pump fuel.
AIM2™ fueling scenarios ignore pump handle detection. Something which must be kept in mind is the
backup scenario should AIM2™ not be installed on all vehicles in the fleet. Those vehicles will still
need the FMU configured as it should be for a vehicle using an access method other than AIM2™.
What about the NO or NONE settings?: pump handle detection, except in DoD systems, is
not always required. There may not be any receipt printer, and the layout of the servicing site may not
lend itself to passing off an active fuel nozzle to another customer. If this is the case, pump handle
detection need not be wired and the FMU may be configured with NONE (in Plus systems) or NO (in
Classic systems). In either case, there is no pump handle detection at the beginning or end of the
transaction.
Controlling counts during reset: the +12V pulser power positions on J4 through J7 of the
Pedestal I/O Board are powered whenever the FMU has its power switch turned on. As a result, some
mechanical dispensers with mechanical pulsers may generate pulses as the meter resets to zero.
Over several transactions this could result in recording a significant quantity of non-existent fuel. In a
retail operation the fueling customer could be charged for fuel he/she didn’t receive. This can be
avoided through pump handle detection. If YES (with Classic systems) or START ONLY or START
AND END (with Plus systems) is used, any pulses generated during the dispenser reset cycle will be
thrown out in the transaction recorded by the FMU. All other pump handle detection options (NO,
NONE, or END ONLY) will save those unwanted pulses.
When it is not possible to make a YES, START ONLY, or START AND END pump handle detect
setting to remove unwanted pulses during reset, other options may be used to achieve the same
results. Pulsers such as the Integrated Control Systems (ICS) SP1 110 VAC pulser, or OPW Model
500 with 110 VAC switching circuits in them will not allow pulses to return to the FMU until an
authorization signal is sent to the dispenser. Authorization is not sent until dispenser reset is
complete.
Another option is to install a relay to interrupt the +12V output to the pulser. Install a relay to interrupt
the +12V output and use the authorization output from LD to activate the relay. In this instance, +12V
to the pulser is not provided until authorization power has been sent from LD. Authorization is not sent
until dispenser reset is complete.
Control Methods
CAUTION
If constant AC dispenser reset power is delivered to the FMU, the Automatic/Manual Mode Switches in
the FMU should be placed in Manual only for the duration of the transaction, then returned to
Automatic. Failure to remove the Automatic/Manual Mode Switch from Manual will result in constant 110
VAC power delivery to the solenoid valve/pump motor, and potential for early burnout of the solenoid
valve/pump motor.
ATTENTION
Quand le FMU reçoit constantement des impulses interrompés du courant alternatif, les commutateurs de
mode d'Automatic/Manuel du FMU devrait être mises en manuel seulement pour la durée de l'opération,
alors retournée à automatique. Défaut de retourner le commutateur de mode d'Automatic/Manual à
automatic aurá comme conséquence l'alimentation de courant alternatif de 110 V constante à la valve
solénoïde/moteur de la pompe, et le potentiel du grillage rapide de la valve solénoïde/moteur de la
pompe
50
226
FuelMaster® Installation Manual
NOTE
It is recommended dispenser reset power be obtained from a separate power source, and not the same
power source as the FMU. If constant AC pump reset power is derived from the FMU power source,
current spikes or low FMU voltage may occur when the solenoid valve/pump motor is activated which
may generate power resets in the FMU.
Controlling Dispenser Reset Power:
CAUTION
When controlling dispenser reset, a specific dispensing application has been detected which could result
in a giveaway fuel situation. If controlling dispenser reset power on a dual hose single product dispenser
(two hoses with one pump motor feeding both hoses), output power from an authorized hose feeding the
single pump motor can backfeed to the reset mechanism of the unauthorized hose. If the pump handle for
the unauthorized hose was left on during a previous fueling transaction, the power from the authorized
hose will backfeed to the unauthorized hose, through the reset mechanism and out to the solenoid valve.
Once the solenoid valve is powered, all conditions necessary to pump fuel have been met, and fuel may
be dispensed from an unauthorized hose. Fuel dispensed from unauthorized hoses will not be accounted
for.
ATTENTION
Lorsqu'il est réarmé distributeur de contrôle, une application spécifique de distribution a été détecté ce qui
pourrait entraîner une situation de carburant cadeau. Si le contrôle du distributeur de puissance de
réinitialisation sur un tuyau à double distributeur de produit unique (deux manches avec un moteur de la
pompe d'alimentation à la fois les tuyaux), la puissance de sortie à partir d'un tuyau d'alimentation a
autorisé le moteur de la pompe seule peut remontées au mécanisme de remise à zéro du tuyau non
autorisée. Si la poignée de la pompe pour le tuyau non autorisée a été laissé en place durant une
opération de ravitaillement précédent, la puissance du tuyau autorisés seront remontées au tuyau non
autorisée, par l'intermédiaire du mécanisme de réarmement et à la sortie de l'électrovanne. Une fois que
l'électrovanne est alimentée, toutes les conditions nécessaires à la pompe à carburant ont été remplies,
et le carburant peut être distribué à partir d'un tuyau non autorisée. Carburant distribué des tuyaux non
autorisées ne seront pas pris en compte.
Fuel dispensers and dispensing systems are designed to internally control fuel flow and turn on or off
pump motors. One of the easiest and safest control methods is control of dispenser reset power. This
method controls the input of power to the dispenser so nothing can happen within the dispenser until
authorization is received from the FMU. It is also one of the easiest methods to wire as control is
provided by simply interrupting power to the dispenser from its circuit breaker. Internal circuits in the
dispenser don’t have to be separated to attain control of a solenoid valve or pump motor.
If pump handle detection is desired, it may only be attained to indicate when the transaction ends.
This control method typically has a constant hot (from the circuit breaker) on LN. Pump handle
detection is attained by 1) wiring a dispenser RESET COMPLETE or pump switch HOT input into PHS
(PHS1 for hose 1, PHS2 for hose 2, etc.) on the Pedestal I/O Board, 2) cutting one leg of a resistor at
R92 (for hose 1, R93 for hose 2, R94 for hose 3, etc.) to transfer pump handle detect from LN to PHS,
and 3) setting pump handle detection to END ONLY.
The only drawback to this control method occurs as noted in the CAUTION above, plus in
circumstances where pulse counts are received during dispenser reset. Pulse counts received during
dispenser reset are counted when END ONLY or NONE or NO is set in pump handle detection. This
may be remedied by using a pulser with 110 VAC control, or by installing a small relay to control the
output of +12V from the pulser connectors.
Controlling Solenoid Valves and/or Pump Motors: (see separate heading Controlling
Two-Stage Valves for controlling two-stage valves.) Some dispensing equipment may have solenoid
valves or pump motors (submersible or suction type) or a combination of both. The pump motor is
typically delivering the product to the dispenser whereas the valve is releasing it to the nozzle. One or
both may be controlled. It is important the control method selected provides for control of each
individual dispensing hose.
To provide control, the input power to the valve or motor must be found. This power shouldn’t be
51
227
FuelMaster® Installation Manual
constant. It should be power applied when a pump handle or pump switch is turned on. When this
power source is found, find a convenient place to break the connection. There will usually be a wirenut
connection that may be separated. Use the FMU LN and LD positions as switch contacts to control
power to the valve or motor. Attach the incoming power for the valve or motor to a wire routed to an
FMU LN position (LN1 for hose 1, LN2 for hose 2, LN3 for hose 3, etc.). Run a wire from the
corresponding FMU LD position back to the valve or motor. The end result should provide for a
switched power line in the dispenser routed to an FMU LN position, and an FMU authorization output
from LD routed back to the valve or motor. When an authorization signal is sent from the FMU, the
valve or motor is turned on.
If the wire routed to LN carries power that gets hot when the pump handle or pump switch is turned
on, that power source may be used for pump handle detection on LN.
CAUTION
Dual Control Relay Assemblies cannot handle current loads in excess of 2 amps. Motors may not be
controlled directly. Use relays/motor contactors to control motors with Dual Control Relay Assemblies.
ATTENTION
Dual Control assemblées relais ne peut pas manipuler des charges en cours de plus de 2 ampères.
Motors ne peut pas être contrôlée directement. contacteurs relais usage mécanique / moteur pour
commander les moteurs lors de l'utilisation Dual Control assemblées relais.
If desired, both solenoid valves and pump motors may be controlled by the FMU. The most practical
application is through the dual control relay assembly. The LN and LD positions on the Pedestal I/O
Board may be used to control the solenoid valves, and the A and B positions (1 through 4) of the
terminal strip on the dual control relay assembly may be used to control the pump motor. Although it is
possible to use solid state relay assemblies to control both solenoid valves and pump motors through
the LN and LD positions of the Pedestal I/O Board, use caution when selecting your application.
Where the dual control relay assembly has separate outputs for the pump motors (A and B positions),
a solid state relay assembly has to share the LN and LD positions. If a dual hose single product
dispenser is being controlled, there will be a single pump motor. If you wired an output from LD1 and
LD2 to a single pump motor, and started a transaction by selecting only hose 1, the output from LD1
to the pump motor would backfeed to LD2 and authorize hose 2. Product could then be pumped from
hose 2 without selecting it, and without accountability of the product being dispensed.
Controlling Two-Stage Valves: when a credit card transaction is “preset” with a specified quantity
or cost total, the fast and slow segments of two-stage valves are separately controlled to ensure the
transaction ends at the specified quantity or cost amount. This is accomplished by using two relay
assemblies: the first to control the slow valve, the second to control the fast valve. Both valves are
opened simultaneously. The fast valve is turned off at the “setpoint”. The slow valve is used to finish the
transaction.
Because two relay assemblies are used, the maximum number of hoses which may be controlled are
reduced to four. Options in the FMU firmware must be set to enable two-stage valve operation, and to set
the “setpoint”. More detailed information for retail self-service operations monitored by Weights and
Measures may be found in Appendix E.
Using the FMU to automatically remove pump power: there are some fueling systems or
scenarios that do not require the fueling customer to turn off a pump handle to hang the fuel nozzle
back up. As such, the pump motor may not get turned off when the transaction is finished. Some
pump motors may be damaged if left to run for extended periods, particularly motors on aboveground
tanks exposed to direct summer sunlight. This may be prevented by planning control wiring so the
FMU automatically removes pump power if the fueling customer does not turn off the pump handle or
pump switch.
Authorization power from the FMU LD positions will time out if the pump handle or pump switch is not
turned off. If motor power is derived from the LD positions, the power will time out and turn off at the
end of the Pump Finish Timer setting. This is regardless of whether pump handle detection is wired in
or not. Give careful consideration to wiring pump power to FMU LD positions.
52
228
FuelMaster® Installation Manual
Controlling Lube Bay Hose Reels: control of lube bay hose reels is very similar to the control of
other types of dispensing equipment with the exception of the power source. Equipment designed for
controlling lube bay hose reels is typically 12 or 24 VDC, and an added power supply may be necessary
to power the equipment. A DC power supply may be installed in the FMU to minimize the number of wires
needed to control each hose reel.
Each hose reel will require a solenoid valve and pulser or flowmeter. Depending upon the product in the
hose reel, the valve and pulser may be designed to match the product. Antifreeze and motor oil generally
require two different types of solenoid valves and pulsers. Grease requires equipment which can
withstand high pressures, and is much more costly than similar equipment for lower viscosity liquids.
If mixed voltages (110 VAC and 12 VDC) are being used in the same FMU, the use of dual control relay
assemblies is recommended. They can control any voltage type where solid state relay assemblies must
be equipped with different relays when controlling DC voltages.
Some manufacturers who supply equipment to control hose reels are Alemite, Balcrank, Graco, and
Lincoln. Its recommended this equipment be sourced from a local distributor who can also install it. Quite
possibly the company who installed the hose reels will have a solution for the parts necessary to
automate the hose reels.
RC Networks (Snubbers/Spark Quenchers)
There are wiring situations which may provide the FMU false indications of pump handle detection. RC
networks may be used to remove these false indications. RC networks are a small cube shaped device
with two wires leading into it.
Most of these false indications occur with the use of solid state relays in the FMU. Solid state relays
restrict the flow of power in the normal direction, from LN to LD, but allow it in the reverse direction, from
LD to LN. When power is being fed to LD it will pass through a solid state relay to LN. These problems
don’t occur when using dual control relay assemblies.
When solid state relays are used in the FMU, and the dispenser is also using solid state relays to activate
solenoid valves or pump motors, voltage feedback to LD may occur after a transaction is completed. This
voltage will pass through the FMU solid state relays from LD to LN resulting in a false indication of pump
handle detection. This voltage can be detected by measuring the voltage at both LD and LN. If the
voltage is greater at LD than LN, then the voltage is feedback from the dispenser. Common occurrences
are with Gasboy 9800 series dispensers being controlled by solid state relays in the FMU. A 0.2
microfarad RC network installed between LD and neutral will remove the false indication. The RC network
should be installed as close to the controlled device (solenoid valve or suction pump motor) as possible.
A common source for a 0.2 microfarad RC network is Okaya part number XEB1202. Retail price is
approximately $1.70.
Similar problems may occur when directly controlling 230 VAC suction pump motors. A 230 VAC pump
motor requires two inputs of 115 VAC each. Some dispenser installation manuals depict one input being
a constant 115 VAC from a circuit breaker, and the other input controlled by the dispenser reset
mechanism. Problems arise when the input from the FMU is not being applied. The other 115 VAC input
from the circuit breaker passes through the coil windings of the pump motor and feeds back to the FMU
LD position. This situation also provides a false indication of pump handle detection, but with a higher
current input. Voltage comes into LD and feeds through the solid state relay to LN. The false indication is
removed by installing a 1.0 microfarad RC network between LD and neutral, as close to the motor as
possible. A common source for a 1.0 microfarad RC network is Okaya part number XEB01010. Retail
price is approximately $4.25 each.
53
229
FuelMaster® Installation Manual
Pulsers
NOTE
In accordance with the NEC, “Class 1 circuits shall be permitted to occupy the same cable, enclosure, or
raceway without regard to whether the individual circuits are alternating current or direct current, provided
all conductors are insulated for the maximum voltage of any conductor in the cable, enclosure, or
raceway.” Ref: NFPA 70, para 725.26(A).
The FMU obtains quantity information from pulse output devices in the dispensing equipment.
These devices may be mechanical or electronic, depending upon the application. Usually one
pulse output device is required for each controlled hose. Some pulse output devices will provide outputs
for multiple hoses. In most cases the pulse output devices are optional equipment which must be
purchased separately. Syn-Tech carries a wide assortment of aftermarket pulsers which may be
purchased with your FuelMaster® order. Pulse options may also be purchased when placing the order for
the dispensing equipment.
Pulsers may provide quantity information in common increments referred to as divide rates. The most
common divide rates are: 1:1 (one pulse per gallon), 10:1 (10 pulses per gallon), and 100:1 (100 pulses
per gallon). The unit of measure may be something other than gallons. The FMU and FuelMaster®
software may be programmed to record units of measure other than gallons, and any divide rate.
CAUTION
Do not wire 110 VAC into pulse return in the FMU. Pulse return is designed for a 12 VDC input.
Wiring 110 VAC into pulse return will damage the Pedestal I/O Board beyond repair.
ATTENTION
Ne câblez pas 110 V courant alternatif dans le retour d'impulsion dans FMU. Le retour d'impulsion
est conçu pour une entrée de 12 volts. Le câblage de 110 courant alternatif dans le retour
d'impulsion endommagerá le tableau Dedans/Déhors (I/O) du piédestal irréparablement.
FMUs provide a 12 VDC feed to pulsers, and are designed to receive a 12 VDC pulse return. Any voltage
greater than 12 VDC may damage the FMU, and any voltage less than 12 VDC may not return pulses
recognizable by the FMU.
The 12 VDC feed to pulsers is constant whenever AC power is being applied to the FMU. It is not
switched on and off with authorization. As such, it is possible to receive false “counts during reset”, pulses
generated and counted when a mechanical dispenser is resetting. See Pump Handle/Switch Detection,
Controlling counts during reset, in this section to remove or control counts during reset.
Pulse Filtering: DC pulser wires and AC control wires may be routed through the same conduit
providing all wires are insulated for the maximum voltage routed through the conduit. When routed
through the same conduit, the pulser wires should also be shielded to prevent bleedover from AC control
wires into the DC pulser wires/cable. Should bleedover occur, the FMU has provisions for removing the
bleedover. The FMU Satellite I/O Control Board has a bank of eight PULSE FILTERING dipswitches, one
for each of eight hose positions. When these dipswitches are turned on, they filter bleedover from AC
wires into DC pulser wires/cables. The maximum number of pulses the FMU can interpret when these
dipswitches are turned on is 9000 per minute.
If it is necessary to turn on these dipswitches, give careful consideration to the flow rate of the pump, and
the divide rate of the pulser being used. A 1000:1 divide rate will only allow for a 9 gallon per minute flow
rate (1000:1 divide rate x 9 gallons per minute = 9000 pulses per minute) while maintaining a maximum of
9000 pulses per minute.
It should not be necessary to turn on these dipswitches if 1) the pulser wires are shielded and insulated
for the maximum power carried through the conduit, or 2) the pulser wires are in a separate conduit from
any AC power wires. If the dipswitches are not turned on, the FMU can interpret 120,000 or more pulses
54
230
FuelMaster® Installation Manual
per minute. This would equate to using a 1000:1 divide rate pulse output with a hose pumping 120
gallons per minute.
Dual Output Pulsers: dispensers may be tasked to provide pulse outputs to both a fuel
management system such as FuelMaster®, and a tank monitor/tank gauge system such as the VeederRoot TLS-350R. Dispensers may be equipped with pulsers with dual outputs, when necessary. Tests
have been conducted where pulses from a single output pulser in a Gasboy 9800 dispenser were shared
by both FuelMaster® and a Veeder-Root TLS-350R. Where this has been satisfactory with short runs of
pulser cable, it may not be satisfactory with longer runs or different pulser applications. It may be
necessary to use dual output pulsers when pulses from a single dispensing hose have to be shared with
two devices.
Opto-Isolators: prior to the availability of the Electronic Dispenser Interface Kits, Opto-Isolators were
developed to obtain pulse outputs from electronic retail dispensers. These devices were built on a small
circuit board approximately 1 inch x 2.5 inch, and sealed in heat-shrink tubing. Wires exited the heatshrink to make the necessary interface between the dispenser pulse circuit and the FMU. In addition to
providing a workable pulse input, these Opto-Isolators also offered a divide factor to reduce the pulse
input to a factor more workable when pulse filtering was enabled.
Where the Opto-Isolators provided sufficient accuracy for fleet operations, they were not accurate enough
for retail operations regulated by Weights and Measures. In addition, dispenser manufacturers would no
longer warrant that portion of the pulse circuit tapped into to add the Opto-Isolators. Opto-Isolators are
available for fleet (commercial) interfaces with some older Gilbarco, Tokheim, Wayne, Schlumberger, and
a few other older electronic retail dispensers. Opto-Isolators have not been developed to interface
electronic retail dispensers since the Electronic Dispenser Interface Kits have become available.
Applications for the Opto-Isolators may be found in the Dispenser Compatibility List in Appendix B.
Opto-Isolators have also been developed to improve accountability through long fueling hoses at small
airports and marinas. These devices have adjustable delays to permit the fuel hose to fully pressurize
before pulses are recorded. More details of their application are provided in Appendix E, Retail
Applications.
Quick Stop Button
Although it was more prevalent with older models of the FMU, some problems that effect FMU
operation may be remedied by merely resetting (turning off, then back on) AC power to the FMU. Since
the power switch is behind a locked FMU pedestal door, access is not available to the average fueling
customer. To provide a means for resetting FMU power, an optional Quick Stop Button may be installed.
The Quick Stop Button consists of an external red mushroom-shaped button attached to a two-position onoff switch. Depressing the red mushroom-shaped button removes power. Turning the button clockwise 1/8
turn resets power. When purchased preinstalled from Syn-Tech Systems, the Quick Stop Button is installed
on the FMU pedestal approximately 14 inches above the ID plate.
The Quick Stop Button is not prewired. When used as an external on/off switch, it should be wired to
interrupt power after the surge protection, but before the Pedestal I/O Board.
CAUTION
Under no circumstances should power lines for other service island equipment be brought into the
FMU for use with the Quick Stop Button. The proximity of extraneous power lines to the FMU is in
violation of FCC regulations and will significantly reduce the reliability of FMU/Central Controller
communications.
ATTENTION
Dans aucunes circonstances doît-on introduire des câbles éléctriques d'autre îlots de service dans
le FMU pour l'usage avec le bouton "arrêt"rapide (Quick Stop Button). La proximité des câbles
étrangères au FMU viole les directives de FCC et réduirà de manière significative la fiabilité des
communications entre FMU et Côntrolleur Central.
55
231
FuelMaster® Installation Manual
Some customers have asked to use the Quick Stop Button as an emergency stop switch. In most locations
it cannot be legally used as an emergency stop switch because it is too close to the fueling equipment. If it is
used as an emergency stop switch, it is supposed to remove power from all fuel island equipment. If used
for this purpose, it should only control a remote emergency stop switch. Under no circumstances should all
fuel island equipment power lines be brought into the FMU pedestal.
Data Logger/On-Site Printer
•
•
NOTE
Data Logger and On-Site Printer connections must be made to a Master FMU.
The NEC states, “Communication conductors shall not be placed in any raceway, compartment,
outlet box, junction box, or similar fitting with conductors of electric light, power, Class 1, non-powerlimited fire alarm or medium power network-powered broadband communications circuits.” Ref: NFPA
70, para 800.133(A)(1)(c).
An On-Site Printer or Data Logger will capture copies of transactions and messages generated by the FMU.
On-Site Printers print these copies in hardcopy on printer paper. Data Loggers capture the copies and store
them in electronic format on an SD card. On-Site Printers must be set to the same data transfer parameters
as a Master FMU: 4800 baud, no parity, 8 data bits, 1 stop bit.
A Data Logger is installed in a master FMU and requires no outside connection. An On-Site Printer must be
connected to a Master FMU through an RS-232 or RS-422 cable connection. If connected via RS-232, the
maximum cable length should not exceed 300 feet. If the distance to the printer is greater than 300 feet, the
connection must be made using RS-422, and short-haul modems must be installed to make the conversion
from RS-232 to RS-422 first at the FMU then, finally, from RS-422 to RS-232 in a DB25 connection at the
printer.
When purchased from Syn-Tech, On-Site Printers are provided with a 25 or 50 foot serial printer cable, and
a data surge suppressor, and are pre-configured for connection to an FMU. The surge suppressor is
destructive and must be replaced if it receives a surge. 2009 replacement cost is $80 MSRP. If not
purchased from Syn-Tech, ensure the printer has a serial interface. A serial interface is optional equipment
with some printers.
Tank Monitor Interface
•
•
•
•
•
•
NOTE
Tank Monitor communications cable connections must be made to a Master FMU.
Tank Monitor interfaces may be through wireless communications. Product Bulletin 133 describes a
wireless communications option.
The NEC states, “Communication conductors shall not be placed in any raceway, compartment,
outlet box, junction box, or similar fitting with conductors of electric light, power, Class 1, non-powerlimited fire alarm or medium power network-powered broadband communications circuits.” Ref:
NFPA 70, para 800.133(A)(1)(c).
Communications with a Tank Monitor Unit (TMU) are not real-time. TMU inputs are received when
communications is established between the master FMU and Central Controller and the TMU
Interface option in the FuelMaster® software is selected. As such, alarms generated by the TMU are
not automatically sent to the master FMU as they occur.
Follow the manufacturer’s recommendations for cable lengths. Most manufacturer’s won’t warrant
RS-232 communications beyond 50 feet. Additional distance is possible with larger cable conductors
or RS-422.
If a Tank Monitor Interface is added to an existing master FMU, and that FMU already has an I/O
Silver Board installed, be sure to specify the current application (i.e., two Satellite FMU connections)
of the I/O Silver Board when placing an order for a Tank Monitor Interface Kit.
A communications cable may be routed between a Master FMU and the control box of a Tank Monitor Unit
(TMU) to extract reports data generated by the TMU. When the TMU report data is brought into the
56
232
FuelMaster® Installation Manual
FuelMaster® software program, the TMU reported quantity can be used to reconcile FuelMaster® reported
quantity. An optional Tank Monitor Interface Kit must be added to the Master FMU to provide for the TMU
interface.
Most TMUs receive communication inputs via RS-232. If a TMU will accept an RS-232 input, an interface to
FuelMaster® is possible. An RS-232 connection will be standard in some TMUs, and an extra cost option in
others. Verify an RS-232 connection is available when planning the communications interface to
FuelMaster®.
Communications to a TMU may originate in a Master FMU with either RS-232 or RS-422 communications. If
the TMU is located beyond the range of RS-232 communications, and the TMU will not accept an RS-422
input, an RS-422 cable may be routed from the Master FMU to the TMU control box, then an RS-422 to RS232 converter can be used to step the RS-422 signal down to RS-232. Syn-Tech uses a Patton Electronics
222N Converter which has a DB25 connector to interface with a TMU. These converters are also available
with a DB9 connector, and models are available with 600W of surge protection. Retail prices from the
manufacturer start at approximately $50.
Communications parameters in the FMU must match those programmed into the TMU for successful data
exchange. Available communications options in the FMU are:
•
Baud Rates: 300, 1200, 2400, 4800, 9600, 19200
•
Data Bits, Parity, Stop Bits: 7Even1, 7Odd1, 8None1
Baud rate settings may be changed with a Supervisor Key or laptop connection. All other settings must be
made with a laptop connection.
Satellite/EIU Communications
•
•
•
•
NOTE
Satellite communications must be to a Master FMU. Satellite communications cannot be “daisychained” from one Satellite FMU to another.
Satellite interfaces to a master FMU may be through wireless communications. Product Bulletin 133
describes a wireless communications option.
The NEC states, “Communication conductors shall not be placed in any raceway, compartment,
outlet box, junction box, or similar fitting with conductors of electric light, power, Class 1, non-powerlimited fire alarm or medium power network-powered broadband communications circuits.” Ref:
NFPA 70, para 800.133(A)(1)(c).
If a Satellite connection is added to an existing master FMU, and that FMU already has an I/O Silver
Board installed, be sure to specify the current application (i.e., Tank Monitor Interface) of the I/O
Silver Board when placing an order for a Satellite Option.
Satellite FMUs and EIUs are controlled by Master FMUs; they cannot operate independent of a Master
FMU. [Exception: DoD Satellite FMUs can operate independent of a Master FMU if the Master FMU
becomes unserviceable after initially installed and configured]. Control is attained through RS-422 (or
wireless) communications between a master FMU and controlled satellite FMUs, to include EIUs. Both
master and satellite FMUs must be equipped with a Satellite Option (STS part number 200034A) to accept
the wire terminations and provide the necessary internal interface cables. This option is not required with an
EIU. EIUs have other provisions for connection to a master FMU.
See Figure 3-4. When satellite FMUs or EIUs are connected to a master FMU, the interface is detected by
the installation of jumpers on the SATELLITES INSTALLED JUMPERS on position S1 of the Satellite I/O
Control Board. Eight jumper positions are provided, and they are numbered 1 through 8. Jumpers must be
installed to correspond with the RS-422 cable connection to the I/O Silver Board (a component of the
Satellite Option). The I/O Silver Board may have up to eight RS-422 cable connections corresponding to
eight satellite connector receptacles. These receptacles are labeled 1 through 8. A jumper must be installed
57
233
FuelMaster® Installation Manual
in each jumper position of the Satellite I/O Control Board which corresponds with a receptacle position on
the I/O Silver Board. Example: if satellite connectors are plugged into positions 1, 2, 3, and 4 of the I/O
Silver Board, jumpers must be installed in jumper positions 1, 2, 3, and 4 of the SATELLITES INSTALLED
JUMPERS. This applies to both master and satellite FMUs. Master FMUs may have multiple connections
for multiple satellites. Satellites will only have one connection. If a position on the I/O Silver Board becomes
non-operational, and the connection is moved to another receptacle,the corresponding jumper must also be
moved on the Satellite I/O Control Board. Jumpers are not installed in EIUs.
Temporary Conversion of Satellite FMU to Master FMU: should a master FMU become
unserviceable (other than DoD), all connected satellite FMUs will also become unserviceable. Operation of
a satellite FMU may be restored by temporarily converting it to a master FMU. This may be done by 1)
moving a serviceable modem (or network card) from the master FMU to the satellite FMU, 2) routing a
temporary communications link (phone line or network cable) to the satellite FMU, then 3) sending the
applicable authorization list to the converted satellite FMU from the Central Controller. The communications
link may be disconnected after the authorization list is sent, and may be reconnected when choosing to
download transaction data.
Figure 3-4. Satellite Option Installation
58
234
FuelMaster® Installation Manual
EIU Control
EIUs may be programmed for Prokee® and/or keypad input through a laptop or Customer Satisfaction
Center connection to the controlling master FMU. Activation options are: 1) through use of a Prokee® only,
2) through use of an ID number only, or 3) through use of both a Prokee® and an ID number. Since it can be
programmed for ID number only input, a vehicle operator can activate the EIU without a Prokee® (that may
be on a key ring with his ignition keys). As such, it would be convenient to mount the EIU where vehicle
operators may roll down a window and activate it without leaving the vehicle (like a drive-thru ATM). Like the
FMUs,the option to input P.I.N. numbers may also be selected.
EIUs have a red LED over the Prokee® receptacle. If the EIU has power and is communicating to a
controlling master FMU, the red LED is constant on. If the EIU has power but has lost communications to
the controlling master FMU, the red LED is flashing. When the EIU is activated with a Prokee® and/or
keypad input, the red LED flashes for the duration of the momentary output to the controlled device, then
returns to constant on.
Accessory (Gate/Door/Carwash) Control through an EIU. The EIU does not power the
device (i.e., gate, door, carwash, etc.) it is connected to for full activation. The EIU provides a momentary
activation signal to another controlling device (i.e., gate controller). This activation signal can be set to: 1, 5,
8, 11, 14, 17, and 20 seconds. Ensure the controller can be set to receive a momentary input for activation.
The EIU controls accessory equipment in much the same manner as the FMUs control dispensers. The
accessory controller has a power lead to a momentary closed relay which when closed supplies power to
the accessory controller. The momentary closed relay may otherwise be activated by a push-button,
pressure sensor, motion sensor, remote controller, etc. This circuit is broken so the power lead to the
momentary close relay is brought to the EIU. When the EIU is activated, it sends a power signal to the
momentary closed relay to activate the accessory controller.
Redundant FMUs
There have been some requests to install two FMUs for redundant (duplicate) control of fuel dispensers.
This way either FMU can control all dispensers if one of the FMUs fails for any reason. This is not a good
plan. Maintaining inventory can become very confusing when transactions for each fueling hose are mixed
between two FMUs.
If redundancy is desired, and two FMUs are in the plans, then it is suggested redundancy be planned for by
duplicating products for each FMU. Then, if one FMU should fail, the other FMU will provide the same
products. Such an application might have an unleaded and diesel dispenser connected to FMU #1, and
another unleaded and diesel dispenser connected to FMU #2.
Central Accounting Office Requirements
The Central Accounting Office contains the equipment necessary to load the FuelMaster® Fuel
Management Software and administer a software operating program to manage an automated fueling site.
The same operating program created with the FuelMaster® Fuel Management Software can be used to
manage fixed and mobile, and passive and non-passive FMUs.
The Central Accounting Office will contain a Central Controller (a personal computer for running the Fuel
Management Software) and the peripherals such as the Prokee®/Smartcard Encoder, reports printer, and
equipment necessary to establish communications with the FMUs. The Central Controller need not be a PC
dedicated to the management of the fueling site. It may be a shared PC used by the Central Controller
operator for other applications.
All Central Accounting Office equipment may be positioned at a single computer workstation. The
equipment should be located where it can be easily accessed without interfering with other daily duties of
office personnel. The computer workstation should have access to AC power receptacles and a compatible
59
235
FuelMaster® Installation Manual
communications medium for communications with the FMUs.
Refer to the FuelMaster® Plus User Manual for minimum PC requirements, and installation and operation
of the Fuel Management Software.
Central Controller
The Central Controller must be capable of interfacing with the Master FMU(s) to send and receive
data, and the Prokee®/Smartcard Encoder to encode and read Prokee®s/Smartcards. It may also be
desirable to interface with a printer to print reports generated by the FuelMaster® software program.
The Central Controller need not be a desktop PC. Some have found a laptop to be more ideal to carry to
the FMU for direct connection with the FMU.
The Central Controller must conform to the Minimum PC Requirements specified in the FuelMaster®
Plus User Manual. It may be more functional with future software upgrades, and faster operating, if it
meets the Recommended PC Requirements.
After installation and setup, day-to-day use of the Central Controller and its attachments will require
minimal equipment use. As such, the FuelMaster® role of the Central Controller equipment can be
considered secondary to some other primary application that may need more equipment time.
Consideration for the required interfaces and equipment use must be made when selecting a location for
the Central Controller.
Communications to FMU(s)
The means must exist for the Central Controller to communicate with each master FMU. The
communications medium for the master FMUs must be compatible with the communications medium
installed/connected to the Central Controller whether it be phone, two way ringdown device, direct
connect, or wired or wireless network.
Network Communications: if network communications are used, the network administrator must
be involved. The PC and FMU must have IP addresses to be functional with each other, and the existing
network. FuelMaster® software setup will require an IP address be entered in the software for the Central
Controller to communicate with the master FMU(s).
Wireless communications will be dependent upon distance and line-of-sight between the Central
Accounting Office and the FMU. If the distance is too great, other options must be pursued. If line-of-sight
is not possible, repeaters may be installed to carry the wireless signal around or over any obstacles.
If an FMU is ordered with a network card, a modem is also provided. As desired, this permits a firewall to
stay active for the network for normal day-to-day FMU communications, and a phone line to be present to
attain support from Syn-Tech’s Customer Satisfaction Center (CSC).
Telephone Line Communications: if telephone lines are used, the phone line must be an
analog, data-grade, USA telephone line. Digital phone lines will not work. With telephone lines or a twoway ringdown device, a 100% Hayes-compatible modem must be available, and either connected to
(external) or installed in (internal) the Central Controller.
Two-Way Ringdown Device: if a two-way ringdown device is used, consideration should be given
to placing the two-way ringdown device where an analog phone line (such as from a fax machine) may be
plugged into it. This will permit Syn-Tech’s CSC the option of modem connecting to the FMU for
troubleshooting and support.
60
236
FuelMaster® Installation Manual
Wireless Phone Lines: wireless phone line connections should only be considered when other
mediums are not an option. Digital cell modem communications between analog devices is not reliable.
Phone line extenders are considerably more expensive than wireless networking equipment, but may be
considerably cheaper than trenching to install conduit.
Direct Connect: the Central Controller may direct connect to an FMU either from the Central
Accounting Office, or at the service island. Such an interface will require an RS-232 connection between
a serial/USB port in the Central Controller, and a connection to the mainboard in the FMU.
Report Printer
A printer may be connected to the Central Controller to print reports generated by the Fuel Management
Software. The Central Controller may be configured for either a USB or parallel printer. If a parallel printer
is used, and there are multiple parallel ports, it should be connected to parallel port 1.
If the FuelMaster® software program does not detect a printer connection when it sends a print command,
the Central Controller operator will be informed that the printer is not responding and will be prompted to
retry the printer or send the printout to a file.
Prokee®/Smartcard Encoder
NOTE
USB Smartcard Encoders will only read Smartcards when the Smartcard is inserted in the Encoder with
the memory chip facing down (on the underside of the Smartcard). Parallel Smartcard Encoders will only
read Smartcards when the Smartcard is inserted in the Encoder with the memory chip facing up (on the
topside of the Smartcard).
Prokee®/Smartcard Encoders are connected to the Central Controller to encode and read Prokee®s or
Smartcards. Encoders are not interchangeable for both Prokee®s and Smartcards. Each application
requires its own encoder.
CAUTION
A parallel Prokee® Encoder may be damaged if an AC converter other than the one designed for the
Encoder is used. The AC converter must be supplying 9 VDC, 300 mA.
ATTENTION
L'encodeur Prokee ® peut être endommagé si un convertisseur autre que celui développé pour
l'encodeur est utilisé. Le convertisseur courant alternatif. doit fournir 9 volts courant continu, 300 mA.
Encoders are available with either a USB or parallel connection. A parallel encoder utilizes a DC power
supply and requires connection to an AC electrical outlet. USB encoders are powered through the
interface connection.
If both a parallel printer and parallel encoder are being connected to the Central Controller, connect the
encoder to parallel port 2 (LPT2). The software program permits the encoder to be configured for parallel
port 2, but the printer defaults to parallel port 1 (LPT1).
Prokee® encoders do not use the same Prokee® board as the FMU. The encoder cannot be repaired by
replacing the Prokee® board with a board from the FMU.
61
237
FuelMaster® Installation Manual
Surge Protection
The Central Controller is susceptible to surge damage through its AC power source and/or
communication lines. The use of surge protection is highly recommended.
File Backups
The Central Controller contains transaction and database information peculiar to each customer that
cannot be duplicated by Syn-Tech Systems. Loss of this information will eliminate all stored
transaction and inventory data, and require manual input of all database information and re-encoding
of each Prokee® or Smartcard. Transaction or authorization information retained in the FMU cannot be
used to restore the software database. Planning for a backup of the database, as often as possible, is
strongly recommended.
62
238
FuelMaster® Installation Manual
Section 4
FMU Installation
Introduction
Following are procedures for installing a complete FuelMaster® Fuel Management System including
optional equipment. Detailed planning and preparation for these procedures was covered in Section 3,
Site Planning and Preparation.
All the following procedures may not have to be performed, nor may they have to be performed in the
order shown. It is recommended that these procedures be read and applied to each application before
proceeding with any work. If questions arise, contact Syn-Tech's Customer Satisfaction Center (800-8889136, ext. 1500) for assistance.
Initialization may be performed in conjunction with Installation. When both operations are being performed
by the same installer, it is recommended the installer spend some time with the customer to setup the
Central Controller, load the software, and perform some Central Controller training prior to progressing to
the other hardware installations. This will permit the customer time to develop the necessary databases
and encode Prokee®s or Smartcards that may be required to test the hardware after installation.
Unpacking and Inspection
NOTE
Vibration and rough handling could cause attaching parts to work loose during shipment. Do not
dispose of packing materials until all components listed on the packing list are accounted for.
The FMU is disassembled before shipment and packed in two boxes. The FMU pedestal is packed in a
54" x 18" x 12-1/2" box, and the upper cabinet and accessory materials (i.e., software, encoder, manuals,
Prokee®s, Smartcards, etc.) are packed in a 26" x 19" x 18" box. The components are packed in plastic
bags then placed in the shipping box where a liquid packing foam is injected to protect the components in
shipment. The EIU is shipped in one box 66” x 14” x 14”. The EIU Cabinet is separated from the EIU
Pedestal.
The serial number of the components which make up each FMU is written on the outside of the shipping
containers. Example: “3469, 1 of 2”; “3469, 2 of 2”. Keep the upper cabinet matched to the pedestal. This
will be necessary to apply an FMU activation code after the installation is completed and power is applied.
There is no other method of matching the FMU upper cabinet to the pedestal.
Unpack the boxes and inspect the contents against the packing list. The FMU and accessory material
packing list is affixed to the FMU pedestal box. The EIU packing list is affixed to the single EIU shipping
box. Check for any missing equipment or signs of damage from shipment. Verify the components shown
on the packing list match the customer’s requirements. If anything is not correct, it should be noted and
corrected before the installation proceeds. Contact Syn-Tech Systems’ Customer Satisfaction Center
(800-888-9136, ext. 1500) as soon as possible if any damage is noted or anything is missing.
63
239
FuelMaster® Installation Manual
Central Controller Installation
For the purposes of this manual, Central Controller installation includes only hardware installation. The
FuelMaster® Plus User Manual must be referred to for software setup and operation.
Positioning the Central Controller
NOTE
The Central Controller need not be a desktop PC. A Central Controller may be developed from a
laptop computer.
In most cases the Central Controller will be developed from an existing, in-use office PC, and setup will
only consist of loading the software and connecting the Prokee®/Smartcard Encoder.
Where it may be necessary to install a Central Controller, the PC must be positioned where it can
interface surge protection, AC power outlets, the applicable communications medium and devices, the
Prokee®/Smartcard Encoder, and a report printer. Position the Central Controller CPU, monitor, keyboard
and, if applicable, mouse. Make all necessary connections to the CPU in accordance with the
manufacturer's recommendations. Do not connect the Prokee®/Smartcard Encoder to the CPU until after
software installation. See Connecting the Prokee®/Smartcard Encoder, below.
Connecting the Communications Medium/Devices
The necessary communications medium/devices must be installed in accordance with the manufacturer’s
recommendations. Phone or network cable connections may be made directly into the Central Controller,
or into an external device such as a modem, router, network switch, etc.
If the FMU was purchased with a network card for network connection, it may also be provided with a
modem. Where it may not be possible to remove the firewall from the network for Syn-Tech Customer
Satisfaction Center (CSC) support, a phone line may be routed to the FMU to attain support from SynTech’s CSC.
Be sure power supplies are correctly matched to their intended device. Devices will not perform correctly,
or will be damaged, if connected to an incorrect power supply.
Loading the Software
NOTE
The Prokee®/Smartcard Encoder cannot be connected to the Central Controller until the software is
loaded. The software must detect the encoder connection.
Load the Fuel Management Software in accordance with the FuelMaster® Plus User Manual, and
perform System Configuration before connecting the Prokee®/Smartcard Encoder. The appropriate
selections for Encoder Port and Encoder Type must be made.
Connecting the Prokee®/Smartcard Encoder
Before connecting the encoder, exit the FuelMaster® software program and shutdown the Central
Controller. As necessary, connect a USB encoder to an existing USB port, or connect a parallel encoder
to parallel port 1 (LPT1) or parallel port 2 (LPT2). If a parallel printer is being used, connect the parallel
encoder to LPT2. If a parallel encoder was connected, connect the power supply to the encoder then plug
it into an AC power outlet.
After the Prokee®/Smartcard Encoder is connected, re-enter the FuelMaster® software program and
ensure the encoder is detected.
64
240
FuelMaster® Installation Manual
Connecting a Two-Way Ring-Down Device
If a Two-Way Ring-Down Device is to be used, see Figure 4-1 and position the Two-Way Ringdown
Device where the necessary connections may be made. A two conductor communications cable from the
FMU must be routed to the Two-Way Ringdown Device, then an RJ-11 jack must be installed on the end
of the communications cable for connection into the Device. The two conductors in the cable must be
installed in the two middle positions of the RJ-11 jack. Either conductor may be positioned in either of the
two middle positions. Plug the RJ-11 jack into either receptacle on the face of the Device. The two RJ-11
jacks labeled 1 and 2 on the face of the device are not polarity sensitive. Either cable may be plugged into
either jack. Software setup is the same as for a telephone line connection except the phone number
entered in the software is any two digit (minimum) number.
If at least one data-grade analog USA telephone line is available (possibly to a fax machine), the TwoWay Ringdown Device should be positioned where a cable may be connected between a jack for the
telephone line and the Two-Way Ringdown Device. This will permit Syn-Tech's Product Support to
modem connect with either the FMU or Central Controller, if necessary. The Two-Way Ringdown Device
uses an AC power adapter much the same as the one used by external modems.
Figure 4-1. Two-Way Ringdown
Device Connection
FMU Installation
Mounting the FMU Pedestal
NOTE
Very Important! Leave adequate clearance for parts replacement when selecting a mounting location. The
upper cabinet and pedestal doors must open fully, and any attach screws (Pedestal I/O Board, Relay
Assembly) which enter from outside the FMU must remain accessible.
Figure 4-2 illustrates the FMU footprint. The FMU must be mounted on a rigid surface. Asphalt is not a
satisfactory mounting surface. The FMU upper cabinet should not be installed until the pedestal mount is
complete. If desired for a particular application such as an installation in a kiosk, the FMU upper cabinet
may be rotated 180 degrees to permit the pedestal door to open to the inside of the kiosk while the upper
cabinet door faces outside. When using this mount method, leave sufficient work space between the back
of the pedestal and the kiosk wall to permit removal of the screws that retain the relay assemblies and
Pedestal I/O Board.
65
241
FuelMaster® Installation Manual
The FMU pedestal will not always be mounted directly over conduit. Figure 4-3 illustrates some alternate
mounting methods. Installations have been performed where conduit entered the pedestal through holes
punched/drilled through the pedestal. Such holes must be sealed watertight. In some instances, other
automated systems have been removed and their pedestal has been retained for use as a junction box.
Aluminum C-channel has been used to elevate FMUs for entry of surface mount conduit under the
pedestal. Adapter plates have been developed to cover holes in the fuel island which are larger than the
opening in the FMU pedestal. When developed from sheet aluminum, such adapter plates should utilize ¼
inch or larger sheet stock. The following procedures cover mounting the pedestal over conduit entering
the pedestal base, but may be altered to allow for other mounting methods:
1. Verify that all required conduit are in place (except surface mount conduit that may be installed after
FMU mounting). Refer to Section 3 for conduit requirements.
2. Position the pedestal for mounting on the service island:
a. Unlock and open the pedestal door.
b. Position the pedestal over the conduit.
c. If applicable, align the pedestal so the conduit are centered within the pedestal, and check that
the pedestal door will close without conduit interference.
CAUTION
If the pedestal is mounted on an uneven surface and the screw anchors are tightened, the welds at
the base of the pedestal may be cracked. Washers, as spacers, can be installed on the screw
anchors under the corners of the pedestal to account for minor irregularities in the concrete surface
of the service island, or to level the pedestal.
ATTENTION
Si le piédestal est monté sur une surface raboteuse et les ancres de vis sont serrées, les soudures
à la base du piédestal peuvent être rompues. Des écrous, comme mettredistance, peuvent être
installées sur les ancrages de vis sous les coins du piédestal pour compenser des irrégularités
mineures dans la surface de montage concrète, ou pour niveler le piédestal.
d. Check the pedestal mounts flush to the service island and is level.
e. Check all conduit seal-off plugs are accessible. They must be accessible after pedestal mounting,
or they will have to be sealed before mounting the pedestal.
f. Check the conduit are not too long to be routed through the conduit openings in the bottom of the
FMU pedestal electrical access (liquid-tight flex conduit may be used between seal-offs and
electrical access if minimum height of conduit is in accordance with NEC).
CAUTION
If drilling screw anchor holes through the mount holes in the base of the FMU, protect the corners
of the pedestal closest to the mount holes from the drill chuck. The drill chuck can remove paint
and metal from the aluminum pedestal corners if allowed to contact the Pedestal.
ATTENTION
En forant des forures de vis par les trous de montage dans la base du FMU, protégez les coins du
piédestal les plus proches des trous de montage du mandrin du foret. Le mandrin du foret peut
enlever la peinture et le métal des coins de piédestal d'aluminium si touche le piédestal.
•
•
NOTE
Screw anchors installed on both front (door-side) corners of the pedestal must be seated deep
enough to permit door opening after installation.
The pedestal has been designed to accept 3/8 inch screw anchors. Use of stainless steel screw
anchors, nuts, and washers will prevent corrosion and permit the pedestal to be removed and
replaced, if necessary, at any time during the life of the FMU.
3. Drill screw anchor holes for all four corners of the pedestal, then seat the screw anchors.
66
242
FuelMaster® Installation Manual
Figure 4-2. FMU Footprint (in inches)
Figure 4-3. Alternate Mounting Methods
67
243
FuelMaster® Installation Manual
NOTE
Screw anchor nuts may be left loose in step 4 to assist with the installation of conduit or liquid-tight
flex up to the FMU pedestal electrical access panel. If additional conduit or liquid-tight flex are not
being installed, the screw anchor nuts should be tightened when initially installed.
4. Mount the pedestal on the screw anchors, and install the screw anchor nuts and washers. If
additional conduit or liquid-tight flex are to be installed, loosely attach the four screw anchor nuts and
washers. Use additional washers for leveling, as required.
Finishing Conduit Connections to FMU Pedestal
If the conduit entering the FMU are installed in accordance with the NEC, there is no code requirement to
enclose the exposed wires. There is, however, a DoD requirement to install liquid-tight non-metallic flex
conduit over all exposed wires between the rigid metal conduit and FMU pedestal electrical enclosure. If
the installation is performed at a DoD site, liquid-tight must be installed to cover/protect all exposed wires
exiting the rigid conduit. Syn-Tech installers install liquid-tight over exposed wires at all installations
regardless if DoD or civilian.
1. Unlock and open the FMU pedestal door.
2. Remove both electrical access cover panels from the pedestal.
3. As required, install any surface mount conduit that may be needed. If holes are cut or punched in the
pedestal to introduce conduit, ensure the entry point is sealed watertight.
4. Pop out the plastic conduit plugs, as required, in the bottom of the pedestal electrical access to
permit entry of the needed conduit.
5. As required/desired, use any approved method (rigid conduit, liquid-tight flex, etc.) to route all
conduit in the pedestal to the conduit openings in the bottom of the electrical access, and secure
with locknuts or liquid-tight couplings.
6. If not previously accomplished, tighten the screw anchor nuts.
Wire/Cable Connections at the Dispensers
NOTE
The use of explosion-proof conduit and fittings may not be necessary if not working with flammable
fuels dispensers, or outside a hazardous location.
All wire/cable connections terminating at the dispenser must be enclosed in explosion-proof junction
boxes. Wires/cables routed to the FMU from the dispenser must be routed through explosion-proof and
sealed conduit and terminate in the FMU pedestal electrical access enclosure. If the necessary conduit,
seals, and junction boxes are not in place to accommodate the wires/cables and their connections, they
must be added during the installation.
Add fittings, as necessary, to enclose the wires/cables and their connections in explosion-proof
components, and to seal the ends of conduit that surface at the dispenser. Do not seal conduit seal-offs
until all wires/cables have been pulled, and all wire connections are complete.
Pulling Wires/Cables
Section 3 defines wire/cable requirements. Use the following wire/cable recommendations and pull all
necessary wire/cables. Do not make any connections at this time. All wires/cables except network cable
and fiber optic are terminated on the Surge Protection Panel, the Pedestal I/O Board, or the I/O Silver
Board in the FMU pedestal. Network cable and fiber optic are terminated at the network card in the FMU
upper cabinet. Allow for sufficient length to make these connections when pulling wires/cables.
68
244
FuelMaster® Installation Manual
Wire/Cable Recommendations. Where wire/cable sizes are listed, larger conductors may be used
to gain additional range:
1. AC Power to FMU(s). Three conductors; 12 AWG THHN (increase to 10 AWG if length exceeds 400
feet) stranded; black for hot, white for neutral, green for ground; should be derived from separate 15
amp circuit breaker. Minimum power requirements may not be met at all times if derived from
another source (dispenser). If an uninterruptible power supply (UPS) is installed, install UPS inline
between circuit breaker and FMU.
2. Communications Line to Master FMU. Fiber optic network cable is the only communications line
which may be run in the same conduit as AC power. Mixed low voltage DC cables may be routed
through the same conduit when permitted by the manufacturer of the connected device. All other
communications mediums must be routed through separate conduit.
a. Telephone/Two-Way Ringdown Device. Two conductors; 20-24 AWG CMX shielded
communications cable. Manufacturer of Two-Way Ringdown Device claims range of 2.6 miles
with 24 AWG twisted pair. Wireless communications are possible with phone line extenders and
cell modems.
b. Network cable. Cat 5e/6 CMX; use shielded cable if other low voltage conductors are routed
through the same conduit. Maximum recommended length is 250 feet. If the distance exceeds
100 meters (330 feet), it is recommended fiber optic cable be used. Wireless network
communications are possible.
c. Network fiber optic. Fiber optic cable may be pulled to the FMU and converted to cable with a
transceiver. It is recommended spare fiber optic strands be pulled for backup purposes should
the originals become damaged.
3. Printer Cable to Master FMU (On-Site or Transaction Printer). Three conductor; 22 AWG CMX
shielded RS-232 communications cable. Maximum length with RS-232 is 300 feet. Distance may be
extended by using two twisted pair 22 AWG CMX RS-422 communications cable and short haul
modems as illustrated in Product Bulletin 126. Wireless communications are possible through an RS232 radio modem as illustrated in Product Bulletin 133.
4. Dispenser Hose Control. 14 AWG THHN. If controlling a valve, motor, or contact starter pull two
wires for each hose to be controlled. If accessing dispenser reset, pull one hot wire from the breaker
panel (which may be jumped to multiple hose positions), one wire for each hose to power dispenser
reset and, if pump handle sensing is desired, pull a hot wire from pump handle reset (see Section 3
for hose control options). Some unique control options are described in Product Bulletins 122 for the
Gasboy 9800, 141 for the Bennett 3K, 142 for the Wayne Select, 152 for the Liquid Controls LCR
3
and LCR II, and 159 for the Veeder-Root EMR .
5. Dispenser Pulse. 22 AWG; shielded and insulated to maximum voltage in conduit if run with AC
power or control. The number of conductors will be dependent upon the requirements of the pulser
used. Some unique pulse pickups are addressed in the product bulletins referenced in step 4, above.
6. Satellite/EIU Communications. Within 300 feet use two twisted pair 22 AWG shielded with a drain.
Over 300 feet use two twisted pair 18 AWG shielded with a drain. This is a communications cable
that cannot be routed in the same conduit with AC power or dispenser control, but can be routed in
the same conduit with other communications cables. Wireless Satellite/EIU communications are
possible with an RS-232 radio modem.
7. Tank Monitor. This is a communications cable that cannot be routed in the same conduit with AC
power or dispenser control, but can be routed in the same conduit with other communications cables.
Use a 3-conductor shielded cable if using RS-232. Use two twisted pair shielded with a drain if using
RS-422.
8. Indoor Receipt Printer. This is a communications cable that cannot be routed in the same conduit
with AC power or dispenser control, but can be routed in the same conduit with other low voltage
communications cables. Maximum length with RS-232 is 300 feet. Distance may be extended by
using two twisted pair 22 AWG CMX RS-422 communications cable and short haul modems as
illustrated in Product Bulletin 126. Wireless communications are possible through an RS-232 radio
modem as illustrated in Product Bulletin 133.
69
245
FuelMaster® Installation Manual
Wire/Cable Connections at FMU
Make the following wire/cable connections at the FMU:
NOTE
Many wire/cable connections are made to Phoenix-style pluggable printed circuit board connectors
with terminals closed by turning a screw. Continuity will not exist if insulation is not stripped from the wires
before insertion into the terminal.
1.
A/C Power (see Figures 4-4 and 4-5)
CAUTION
Although the output side of the surge protection is a good source of protected power for many
devices, it is protected by a 4 amp fast-blo fuse. The FMU uses 2.4 amps when both heaters are
powered. If the device receiving the power is drawing more than 1.6 amps, it will blow the fuses.
ATTENTION
Bien que la sortie de la protection surtension FMU est une bonne source d'énergie protégé pour de
nombreux appareils, il est protégé par un fusible 4 ampères rapide blo. L'FMU utilise 2,4 ampères
lorsque les deux appareils de chauffage sont alimentés. Si le dispositif de réception est la puissance
en tirant plus de 1,6 ampères, ce sera une charge supérieure peut être pris en charge par le fusible
de 4 ampères.
a. Connect the AC hot (black) and neutral (white) wires from the conduit to the corresponding black
and white wires of the Surge Panel 3-wire harness.
b. Connect the ground (green) wire from the conduit, and the green wire of the Surge Panel 3-wire
harness to the ground lug in the bottom right of the FMU pedestal electrical access.
c. Connect the black and white wires of the Surge Panel 2-wire harness to the corresponding black
and white wires from the FMU power switch.
2. Telephone/Two-Way Ringdown Device (see Figures 4-4 and 4-5; not applicable to Satellite FMUs)
a. Connect the two incoming leads of the phone/communications cable to the red and black wires
of the 4-wire harness for the Surge Protection panel.
b. Connect the orange and blue wires of the 4-wire harness for the Surge Protection panel to pins 4
and 5 of the 5-pin plug in location J3 EXTERNAL of the Pedestal I/O Board.
3. Quick Stop Button as FMU Stop Switch. The Quick Stop Button has two terminals to receive wire
connections. It removes power by depressing the red mushroom-shaped button. Power is restored
by turning the button clockwise a partial turn until it pops back out to the reset position.
a. Connect the black wire from the FMU power switch to one contact of the Quick Stop Button.
b. Connect the black wire of the Surge Panel 2-wire harness to the other contact of the Quick Stop
Button. It may be necessary to splice some additional 12 AWG THHN stranded wire to this wire
to make it reach the Quick Stop Button.
70
246
FuelMaster® Installation Manual
Figure 4-4. AC Power and Phone Connections
Figure 4-5. AC Power and Phone Connections
(from reverse side of Surge Panel)
71
247
FuelMaster® Installation Manual
4. Quick Stop Button as Auxiliary Emergency Stop Switch. The Quick Stop Button has two
terminals to receive wire connections. It removes power by depressing the red mushroom-shaped
button. Power is restored by turning the button clockwise a partial turn until it pops back out to the
reset position.
Check local requirements for an Emergency Stop Switch. Most regulations require an Emergency
Stop Switch to be remotely located at least 20 feet from the fuel island.
•
•
•
•
CAUTION
If wired as a service island emergency stop switch for all service island equipment, the Quick
Stop Button must be used only to control a contact starter controlling power to the service
island. Under no circumstances will power wires for other service island equipment be brought
into the FMU for control by the Quick Stop Button.
To be in compliance with the requirements for a service island emergency stop switch, all power
to the service island must be removed when the emergency stop switch is activated. This must
also include the 110 VAC carried to the Quick Stop Button.
ATTENTION
Si le bouton d'arrêt rapide (Quick Stop Button) est câblé comme commutateur d'arrêt d'urgence
d'îlot de service pour tout l'équipement d'îlot de service, le bouton d'arrêt rapide doit être utilisée
seulement pour côntroller un interrupteur de secours côntrollant le courant pour l'îlot de service.
Dans aucunes circonstances doit-on introduir des câbles pour des autres îlots de service dans le
FMU pour être controllé par le bouton d'arrêt rapide.
Pour être conformément aux conditions pour un commutateur d'arrêt d'urgence d'îlots de service,
tout courant à l'îlot de service doit être coupé quand le commutateur d'arrêt d'urgence est
actionné. Ceci doit également incluir les 110 V de courant alternatif fournis au bouton d'arrêt
rapide.
a. Check that power is removed from the emergency stop switch contact starter and all service
island equipment.
b. Route two 12 AWG THHN wires through approved conduit from the emergency stop switch
contact starter to the FMU: one for incoming power to the contact starter, and another for
switched power from the Quick Stop Button back to the contact starter.
c. Connect one 12 AWG wire to one contact of the Quick Stop Button.
d. Connect the other 12 AWG wire to the other contact of the Quick Stop Button.
e. Restore power to the contact starter and all service island equipment.
5. On-Site/Transaction Printer (see Figure 4-6 for Pedestal I/O Board connections). Transaction
printers are connected to the FMU via a serial connection with an RS-232 cable. Cable length may
be extended to 4000 feet using RS-422 and short haul modems. See Product Bulletin 126 for use of
the Patton Electronics RS-232/422 converter in this application. Transaction printers may also be
connected to the FMU via a wireless connection. See Product Bulletin 133 for use of the Zlinx Radio
Modems for wireless transmission of RS-232.
Transaction printers must have a serial connection capable of being set to 4800 baud, 8 data bits, no
parity, and 1 stop bit. Serial connections are sometimes optional when purchasing printers. Ensure
the printer being purchased has a serial connection.
If the transaction printer is purchased from Syn-Tech Systems, Inc, it is preconfigured to the correct
communications parameters, and a surge protector and interfacing cable are provided. The surge
protector (part number 201421) and interfacing cable (part number 201669) may be purchased
separately by addressing the applicable part number.
Transaction printer connections are made to J3 EXTERNAL on the Pedestal I/O Board. See below
for the relationships between the connection points. If a connection is being made directly to the
printer, use the connection points listed under “Printer DB25 Pin”. If a connection is being made to
the optional 201669 printer cable, use the connections shown under “201669 Cable Color”.
72
248
FuelMaster® Installation Manual
Table 4-1. Transaction Printer Cable Connection Points
J3
EXTERNAL
Pin
YEL (TX)
BLU (RX)
ORG (GND)
Printer
DB25
Pin
3
2
7
201669
Cable
Color
RED
BLACK
CLEAR
6. Dispenser Control (see Figure 4-6 for connection points on the Pedestal I/O Board). These
procedures only cover dispenser control. Additional connections from the FMU to the dispenser will
be required for pulser connections.
CAUTION
FMUs with 50 amp Solid State Relay Assemblies (SSRA) are designed to control dispensers with
pump motors at or below 3/4 horsepower, 110 VAC, or 1 horsepower, 220 VAC. FMUs with Dual
Control Relay Assemblies cannot handle loads in excess of 2 amps. Loads in excess of 2 amps
require mechanical relays or contact starters.
ATTENTION
FMU avec 50 ampères Solid State Relay assemblées (APSR) sont conçus pour le contrôle des
distributeurs avec les moteurs de pompe égal ou inférieur à 3 / 4 chevaux, 110 VAC ou 1 chevalvapeur, 220 VAC. FMU avec deux ensembles de commande de relais ne peut pas manipuler des
charges de plus de 2 ampères. Des charges de plus d'un ampli 2 exigent relais mécaniques ou les
démarreurs de contact.
There are several options for dispenser control. It’s important to remember the FMU is not a power
source. It should be treated as a switching device with the Pedestal I/O Board LN and LD positions
acting as the switch contacts: LN being incoming power, and LD being outgoing authorization power.
Look for a circuit in the dispensing equipment that may be interrupted by the addition of a “switch” to
prevent the flow of fuel.
Also remember, there must be a means to control each individual product hose. A dual hose
dispenser must have separate solenoid valves for each hose, or a separate pump motor input for
each hose. In some cases it may be necessary to add solenoid valves.
Compare the dispensing equipment being used to the manufacturer’s wiring diagram. It may be
discovered the installer took some liberties when installing the dispenser. Where a dispenser wiring
diagram may reference power coming from multiple circuit breakers, the installer may have sourced
all the power requirements from a single circuit breaker. Something was done in the dispenser to get
the single power source to power multiple circuits. These actions must be identified to ensure
separate control of each product hose is attained while keeping constant power on circuits which
require it.
Procedures and diagrams follow for various methods of dispenser control. The diagrams contain
broken lines to signify field wiring which must be added to gain control of the applicable dispenser
circuit. Dispenser covers and junction boxes, and the FMU pedestal door and electrical access
panels must be opened to wire all control options. If installed, I/O Silver Boards must be removed to
gain access to terminal strips TB1, TB2, and TB3 on the Pedestal I/O Board. DCRA is used to
abbreviate Dual Control Relay Assembly. SSRA is used to abbreviate Solid State Relay Assembly.
Select the control method best suited for the application:
73
249
FuelMaster® Installation Manual
Figure 4-6. Pedestal I/O Board
74
250
FuelMaster® Installation Manual
NOTE
Whenever pump handle detection is wired into the PHS positions of the Pedestal I/O Board, one leg
of the resistor at positions R92 for hose 1, R93 for hose 2, etc., must be cut to transfer pump handle
detection from LN to PHS.
a. Controlling Reset. See Figure 4-7. This control method interrupts power from the circuit breaker
to each dispenser reset mechanism. Quick and easy; there is no power present if a solenoid
valve sticks open or a reset mechanism or contact starter fails. Figure 4-7 illustrates controlling
reset in a dispenser using two circuit breakers, one per hose. Some arrangements may only be
using one breaker. The power from one breaker may be brought into LN1, then jumped to LN2.
The diagram also illustrates wiring pump handle detection into the FMU. Pump handle detection
is only possible through an END ONLY pump handle configuration, and only with FuelMaster®
Plus FMUs. If pump handle detection is not needed, or not possible, omit those wires connected
to the PHS positions on TB3. Control will still be attained, but pump handle detection will not be
present.
Some distributors/customers prefer to control reset power by running power from the breaker to
the FMU, then running authorization power from the FMU to the dispenser. This precludes
someone from breaking into the dispenser and bypassing the FMU with a simple jumper wire:
WARNING
Each dispensing device must be provided with a means to remove all external voltage sources
during periods of maintenance and service of the dispensing equipment. Ref: NFPA 70 (2008
edition), para 514.13. When two or more dispensers utilize the same STP (submersible turbine
pump) control relay/contact starter, power supplied by one dispenser to activate a control relay must
be isolated to prevent feed back to another dispenser. Failure to do so may result in electrical shock
while performing dispenser maintenance.
AVERTISSEMENT
Chaque dispositif de distribution doit être muni d'un moyen de supprimer toutes les sources de
tension externe pendant les périodes de maintenance et de service de l'équipement de distribution.
Ref: NFPA 70 (édition 2008), par 514,13. Lorsque deux ou plusieurs distributeurs utilisent la même
STP (pompe à turbine submersible) relais de commande / contact démarreur, puissance fournie par
un distributeur pour activer un relais de contrôle doivent être isolés pour empêcher l'alimentation de
retour à un autre distributeur. Ne pas le faire peut entraîner un choc électrique pendant que la
maintenance du distributeur de la scène.
NOTE
When controlling reset in a dual hose, single product application, inputs to the STP control
relay/contact starter must be isolated to prevent feedback to an unauthorized hose. If the inputs are
not isolated, feedback may activate the unauthorized solenoid valve and permit fueling through an
unauthorized hose. Figure 4-8 illustrates one solution to prevent feedback. Other solutions using
STP isolation relays, or a different control method, are possible.
1) Find the incoming power to the dispenser reset mechanism for hose 1. It is most likely a wire
routed directly from the circuit breaker panel. Remove power at the circuit breaker.
2) Run a wire from the power source to LN1. This wire does not need to be routed from the
dispenser to the FMU. It may be routed directly to the FMU from the power source without
passing through the dispenser. If a dual hose dispenser is being wired, and there is only one
power source, run a jumper wire from LN1 to LN2.
3) If pump handle detection will be wired, run two wires per hose from the FMU to the
dispenser. If pump handle detection will not be wired, run one wire per hose from the FMU to
the dispenser.
75
251
FuelMaster® Installation Manual
Figure 4-7. Wiring Diagram - Controlling Reset
4) Connect one end of one wire to LD1 at the FMU, and the other end to hose 1 RESET FEED
in the dispenser.
5) (Using pump handle detection) Connect one end of the second wire to PHS1 at the FMU,
and the other end to hose 1 RESET COMPLETE in the dispenser.
6) (Using pump handle detection) Refer to Figure 4-6. Clip one leg of the resistor at R92 so
power cannot travel through the resistor. This action transfers pump handle detection from
LN1 to PHS1. If only one leg of the resistor is clipped, the resistor may be soldered back in
place, if needed.
7) Repeat steps 1 through 6, as required, for all additional hoses. When performing step 6, clip
one leg of the next resistor (R93 for hose 2, R94 for hose 3, etc.) for the next hose.
76
252
FuelMaster® Installation Manual
Figure 4-8. Wiring Diagram - Controlling Reset in Dual Hose
Single Product Dispenser without Backfeed (One Solution)
b. Controlling Motors. See Figure 4-9. When controlling a classic or DoD FMU, and pump handle
detection is needed, the control method most likely used will be controlling motors or solenoid
valves. If solenoid valves are not present, motors must be controlled. There must be one motor
feed per hose. Motor control interrupts power from the dispenser reset mechanism to a suction
pump motor or contact starter for a submersible pump motor. Siphoning from aboveground tanks
is possible if solenoid valves or anti-siphon valves are not present. Pump handle detection is
possible from all variations of FMUs.
Motors may be suction pump or submersible. Suction pump motors will most likely be wired
directly to the dispenser reset mechanism. Submersible motors will most likely be controlled by a
contact starter being powered through the dispenser reset mechanism. The contact starter will
be remotely located away from the dispenser.
77
253
FuelMaster® Installation Manual
Figure 4-9. Wiring Diagram - Controlling Motors
If the dispenser is being fed from the top of an aboveground tank, there must be an anti-siphon
valve on the tank, or inline between the dispenser and tank. Without an anti-siphon valve, the
siphon effect created when a previous transaction was performed will permit fuel to siphon
through the dispenser and pump motor to the dispenser nozzle after the pump motor is turned
off. Product may then be obtained without authorization.
If the motor is powered by 220 VAC, the second motor feed may be from another power source.
This may be evident by power being present on RESET COMPLETE when the pump handle is
turned off. When the pump handle is turned off, power from the second power source will
backfeed through the motor coil windings to RESET COMPLETE. To determine if this is
occurring, disconnect and check the second motor feed line. A 110 VAC pump motor will have
the second motor feed line connected to neutral. A 220 VAC pump motor will have the second
motor feed line connected to 110 VAC.
Perform the following:
1) Inside the dispenser junction box, locate the wire feeding the pump motor for hose 1. It is
78
254
FuelMaster® Installation Manual
most likely a red or orange wire from the dispenser reset mechanism wire-nutted to one of
the motor leads (or contact starter). There should be power present when the dispenser
pump handle is turned on, and power should be removed when the pump handle is turned
off. If the motor is powered by 220 VAC, the second motor feed will be from another power
source, and power may be present on the RESET COMPLETE line when the pump handle is
turned off.
WARNING
To avoid electrical shock, remove dispenser and motor power at the circuit breaker panel. If the motor is
powered by 220 VAC there may be a second motor power wire from a second circuit breaker. Use a
multimeter to verify power is removed from all motor power wires before proceeding.
AVERTISSEMENT
Pour éviter tout choc électrique, enlever le distributeur et la puissance du moteur au panneau de
disjoncteurs. Si le moteur est alimenté par 220 VAC il peut y avoir un fil second moteur électrique à partir
d'un deuxième disjoncteur. Utiliser un multimètre pour vérifier l'alimentation est coupée de tous les fils
d'alimentation du moteur avant de procéder.
2)
3)
4)
5)
6)
7)
8)
c.
Remove dispenser and motor power.
Run two wires from the FMU to the dispenser junction box.
In the FMU, connect one wire to LN1, and the second to LD1.
In the dispenser, disconnect the pump motor feed wire found in step 1).
Connect the wire running from LN1 to the red or orange RESET COMPLETE wire.
Connect the wire running from LD1 to the MOTOR FEED wire. This is usually a black wire.
Repeat steps 1 through 7, as required, for all additional hoses.
Controlling Solenoid Valves. See Figure 4-10. When controlling a classic or DoD FMU, and
pump handle detection is needed, the control method most likely used will be controlling motors
or controlling solenoid valves. When solenoid valves are present, they should be controlled.
There must be one solenoid valve per hose. Solenoid control interrupts power from the
dispenser reset mechanism to a solenoid valve. This control method has a drawback. It will
permit dispenser reset and pump motor activation without authorization. If a user does not turn
off the pump handle when the transaction is complete, the reset and pump motor will continue to
run. This can result in a pump motor overheating. Pump handle detection is possible from all
variations of FMUs.
Solenoid valves may be single or two-stage. A two-stage valve is illustrated in Figure 4-10.
Single stage valves will have two wire leads which are not polarity sensitive, usually both black.
Power is wired to one lead, and neutral to the other. Two-stage valves have three leads: a
neutral and separate inputs for the fast and slow side of the valve. Presets for retail transactions
will make use of two-stage valves to ensure credit card payments by retail customers don’t
exceed the requested amount. When the two-stages do not need to be separately controlled,
they may be tied together as shown in Figure 4-10.
Hose reels in a garage may use this control method. The major difference will be the power
source. Hose reels are not typically tied to a power source, so one must be added. The power
source will be dependent upon the requirements of the solenoid valve used to control the hose
reel. A power supply may be installed in the FMU pedestal to provide power to the solenoid
valve.
79
255
FuelMaster® Installation Manual
Figure 4-10. Wiring Diagram – Controlling Solenoid Valves
Perform the following to control solenoid valves:
1) Inside the dispenser junction box, locate the RESET COMPLETE wire feeding the solenoid
valve for hose 1. It is most likely an orange wire from the dispenser reset mechanism wirenutted to an AC input to the solenoid valve. There should be power present when the
dispenser pump handle is turned on, and power should be removed when the pump handle
is turned off.
2) Remove dispenser power at the circuit breaker panel.
3) Run two wires from the FMU to the dispenser junction box.
4) In the FMU, connect one wire to LN1, and the second to LD1.
5) In the dispenser, disconnect the RESET COMPLETE wire found in step 1) from the solenoid
valve.
6) Connect the wire running from LN1 to the orange RESET COMPLETE wire.
7) Connect the wire running from LD1 to the VALVE HOT wire.
80
256
FuelMaster® Installation Manual
8)
Repeat steps 1 through 7, as required, for all additional hoses.
Figure 4-11. Wiring Diagram - Using Dual Control Relay
Assembly (DCRA) to Control Two Devices
f.
Using Dual Control Relay Assembly (DCRA) to Control Two Devices. See Figure 4-11.
Classic and DoD FMUs do not provide for control of dispenser reset while also providing pump
handle detection. If it is desired to use a classic or DoD FMU to control solenoid valves and
pump motors, and still have pump handle detection, it may be accomplished using a DCRA. The
DCRA provides an additional set of relays to control two devices with each hose selection. This
control method interrupts power from the dispenser reset mechanism to both solenoid valves
and pump motors, and allows dispenser reset without authorization, but prevents pump motor
activation until authorized. Pump handle detection is possible from all variations of FMUs.
If 50 amp solid state relay assemblies (SSRA) were used to control the two solenoid valves and
one SUBMERSIBLE STARTER (or a single anti-siphon valve), LD1 and LD2 would be tied
together either with a jumper, or at the SUBMERSIBLE STARTER. This wouldn’t work as an
authorization signal would activate both solenoid valves when only one was authorized.
Figure 4-11 illustrates control of a dual hose, single product dispenser having two solenoid
81
257
FuelMaster® Installation Manual
valves and one SUBMERSIBLE STARTER. If the dispenser had two SUBMERSIBLE
STARTERs, there would be individual wires from the DCRA to each starter. A wire would be run
from 1B to hose 1 SUBMERSIBLE STARTER, and another wire from 2B to hose 2
SUBMERSIBLE STARTER.
This application may also be used to control a dual hose dispenser with two suction pump
motors (no internal solenoid valves) and a solenoid controlled anti-siphon valve which must be
activated when either motor is turned on. In Figure 4-11, this would be illustrated by substituting
suction pump motors where the solenoid valves are, and a solenoid controlled anti-siphon valve
where the SUBMERSIBLE STARTER is shown.
Perform the following:
1) Inside the dispenser junction box, locate the RESET COMPLETE wire feeding the solenoid
valve for hose 1, and the SUBMERSIBLE STARTER. The wire to the solenoid valve is most
likely an orange wire. The wire to the starter is most likely a red wire. These wires will be
wire-nutted to an AC input to the solenoid valve and starter, respectively. There should be
power present on both wires when the dispenser pump handle is turned on, and power
should be removed when the pump handle is turned off.
2) Remove dispenser power at the circuit breaker panel.
3) Run three wires from the FMU to the dispenser junction box.
4) In the FMU, connect one wire to LN1, the second to LD1, and the third to 1B on the terminal
strip on the DCRA.
5) Run a jumper wire from LD1 to 1A on the terminal strip on the DCRA.
6) In the dispenser, disconnect the RESET COMPLETE wirew found in step 1) from the
solenoid valve and starter.
7) Connect the wire running from LN1 to the orange RESET COMPLETE wire.
8) Connect the wire running from LD1 to the VALVE HOT wire.
9) Connect the wire running from 1B to the L1 contact of the SUBMERSIBLE STARTER.
10) Repeat steps 1 through 9, as required, for all additional hoses. For the wiring diagram
shown in Figure 4-11, with one starter, run a jumper wire from 1B to 2B. This will provide
for an output to the starter when an input is received on 2A.
g. Two-Stage Valve Control. See Figure 4-12. Two-stage valve control is a control method for
separately controlling the fast and slow stages of a two-stage valve. Two-stage valve control is
used 1) to ensure preset quantities or costs are not exceeded, and 2) to reduce shutdown
pressure at the end of the transaction in systems with high flow rates.
Control is accomplished by turning on both the fast and slow valves at the same time, then
turning off the fast valve and ending the transaction with the slow valve. This significantly
reduces the flow rate and allows for the transaction to end without overrunning the preset
amount, and without a high pressure shock to the mechanical pumping components.
82
258
FuelMaster® Installation Manual
Figure 4-12. Wiring Diagram – Two-Stage Valve Control
Two relay assemblies are used to accomplish two-stage valve control. This limits the maximum
number of possible hose controls to four. An option in the firmware must be turned on to enable
two-stage valve control. The point at which the fast valve turns off before the slow valve is called
the setpoint. The setpoint may be set to any value between 0.1 and 10.0 units (dollars or
gallons). Additional explanation for retail functions associated with two-stage valve control are
covered in Appendix E.
83
259
FuelMaster® Installation Manual
Preset quantities or costs may only be set with credit card transactions. The transaction is
started with both the fast and slow valves turned on. When the setpoint is reached, the fast valve
shuts off and the transaction is finished on the slow valve.
With Prokee®s and smartcards, the transaction is also started with both the fast and slow valves
turned on, but the transaction ends with the transaction limit encoded into the Prokee® or
smartcard. When the setpoint is reached, the fast valve shuts off and the transaction is finished
on the slow valve.
The relay assemblies may be 50 amp solid state or dual control, and they may be mixed (one 50
amp solid state, and one dual control relay assembly). Unless specified otherwise, all FMUs built
for small airport or marina applications have two dual control relay assemblies installed.
This control method does not prevent dispenser reset and pump motor activation before
authorization. Pump handle detection is possible from all FMU models.
Perform the following:
1) Verify two relay assemblies are installed in the FMU, and corresponding auto/manual
switches are installed for all hoses to be controlled on both relay assemblies.
WARNING
Failure to remove dispenser power at the circuit breaker panel may result in electrical shock.
AVERTISSEMENT
Omettre d'enlever un distributeur de courant au panneau de disjoncteurs peut entraîner un choc électrique.
2)
Remove dispenser power at the circuit breaker panel.
NOTE
Figure 4-12 shows one output from the dispenser reset mechanism powering both valves. Some
dispensers/dispensing systems will have two outputs, one for each stage of the valve. Dispensers with
separate outputs to each valve stage may be influenced by CPU programming. If possible, use the output to
the slow stage. The slow stage remains active from start to finish in each transaction. The FMU will use its
programming to shut off the fast stage.
3) A two-stage valve will have two electrical inputs, one for the slow side of the valve (usually a
yellow wire) and one for the fast side of the valve (usually a black wire), plus a neutral
(usually a red wire). Locate the two valve inputs and identify them as slow or fast.
4) Run three wires from the FMU to the dispenser junction box: one for a dispenser reset
complete input, one for VALVE HOT (SLOW), and one for VALVE HOT (FAST).
5) In the FMU, connect one wire to LN1, one wire to LD1, and one wire to LD5.
6) Connect a jumper wire from LN1 to LN5.
7) In the dispenser, disconnect the inputs to the fast and slow side of the two-stage valve.
8) Connect the wire running from LN1 to dispenser RESET COMPLETE.
9) Connect the wire running from LD1 to the VALVE HOT (SLOW) wire (usually a yellow wire).
10) Connect the wire running from LD5 to the VALVE HOT (FAST) wire (usually a black wire).
11) Repeat steps 2 through 10, as required, for all additional hoses.
12) Using a laptop or Customer Satisfaction Center connection via Procomm or Hyperterminal to
the FMU (see Appendix D):
a) Enable the TWO RELAYS PER PUMP option using the 59 command.
b) Set the setpoint for each hose using the 57 command.
c) (Optional) Enable DISPLAY PUMP PRICING using 59 command. This will display price
per gallon for each configured hose when the A key on the keypad is depressed.
d) (Optional) Enable PRINT DOLLAR FOR PROKEE RECEIPTS using 5B command. This
will display hose position, product, sale amount (in dollars), and quantity of last fuel
transaction on the FMU display.
e) (Optional) Set duration of display for PRINT DOLLAR FOR PROKEE RECEIPTS using
84
260
FuelMaster® Installation Manual
7D command. Default is 3 minutes.
h. Controlling DC Devices (Hose Reels in Lube Bays/Bulk Oil Dispensers).
NOTE
Whenever a part is field modified, mark/label it to inform others of the modification so a replacement
part may be modified in the same manner. Make Syn-Tech aware of the modification when ordering
a replacement part.
Some minor modifications are necessary when controlling DC devices such as solenoid valves for
hose reels in lube bays, or bulk oil dispensers. Control is similar to the method described in
Controlling Valves. Power to the solenoid valves is switched. These applications often do not
contain their own power source. A power supply must be added to power the solenoid valve, and
pulsers or flowmeters must be added to receive quantity outputs from the device.
If the added power supply is DC voltage, it is recommended a Dual Control Relay Assembly (DCRA)
be used. DCRA can switch high or low, and AC or DC voltages. Use caution in selecting the
application. DCRA cannot work with loads in excess of 2 amps.
If a Solid State Relay Assembly (SSRA) is used, it must have AC solid state relays (SSRs) replaced
with DC solid state relays. In addition, the polarity of the DC solid state relay switch contacts varies
from that of the AC solid state relays. LN inputs and LD outputs are reversed to LD inputs and LN
outputs on hose positions A, D, E, and H. See the table below:
Table 4-2. Pedestal I/O Board Inputs/Outputs
for AC and DC Solid State Relays (SSRs)
Hose
Position
A In
A Out
B In
B Out
C In
C Out
D In
D Out
AC
SSR
LN
LD
LN
LD
LN
LD
LN
LD
DC
SSR
LD
LN
LN
LD
LN
LD
LD
LN
Hose
Position
E In
E Out
F In
F Out
G In
G Out
H In
H Out
AC
SSR
LN
LD
LN
LD
LN
LD
LN
LD
DC
SSR
LD
LN
LN
LD
LN
LD
LD
LN
NOTE
Cutting just one leg of the 75K ohm resistors at positions R92-R99, and positions R80-R87,
retains the resistor for reconnection should it become necessary. Only cut the resistors in the
positions being used for DC control. Example: if DC control is being used only in hose position A,
cut the resistors at R92 and R80.
In all cases of DC control, AC pump handle detection must be disabled, and may be disabled for
individual hose positions. This is done by cutting one leg of the 75K ohm resistors at applicable
positions R92-R99, and R80-R87 on the Pedestal I/O Board (see Figure 4-13 for resistor
locations). When the AC pump handle detect resistors are cut, the PHS positions on terminal
TB3 may be used to land DC common (ground). A single DC common input may be attached to
one of the altered PHS positions, and jumpers may be added to connect DC common to other
altered PHS positions.
85
261
FuelMaster® Installation Manual
Figure 4-13. Location of 75K ohm Pump Handle Detect Resistors
i.
Controlling Carwashes, Gate Openers. There are some devices which may be controlled by
simple contact closure switching, but do not have pulse emitters. Under normal operating
conditions, if an FMU provides an authorization signal but does not receive pulses, it will shut the
hose position down through Zero Quantity Transaction Limits, a safety feature built into the FMU
to prevent continual authorization when no pulses are received.
Carwashes, gate openers, and similar devices do not (and cannot) generate pulses. They cannot
be controlled like a typical dispensing device which is expected to send pulses to the FMU.
Except for AIM2™, carwashes and gate openers are activated through the use of a Smart Relay
Assembly. The Smart Relay Assembly provides a programmable momentary activation signal,
and generates pulses to prevent zero quantity shutdowns. AIM2™ FMUs do not require a Smart
Relay Assembly to activate a carwash or gate opener.
Devices which do not have pulse emitters may be controlled by either of two methods: 1) with a
Smart Relay Assembly, or 2) with an AIM2™ controlling access point. In the absence of an FMU3500 access point, control must be through a Smart Relay Assembly. The AIM2™ access point
is covered in the AIM2™ Installation Manual.
The Smart Relay Assembly (see Figure 4-11) is an option purchased for the purpose of using an
FMU to control carwashes, gate openers, and other similar devices which do not generate
pulses. The Smart Relay Assembly may be added as a first or second relay assembly in an
FMU. A Smart Relay Assembly may control a maximum of three devices. Where it has four
relays, three relays are used for control and the fourth relay is used to generate pulses. Each
relay activation generates 10 pulses, which is translated to one transaction.
Smart Relay Assemblies have Programmable Interface Controllers (PICs) programmed for the
86
262
FuelMaster® Installation Manual
application. A Smart Relay Assembly originally purchased to control one device may not control
three devices without reprogramming the PIC. The PIC will have a label imprinted with
SIMPLE1, SIMPLE2, or SIMPLE3 to indicate whether it is programmed to control 1, 2, or 3
devices.
Smart Relay Assemblies do not utilize the Pedestal I/O Board and FMU Auto/Manual Switches
when controlling devices. Control wires are wired direct into the Smart Relay Assembly.
Auto/manual switches specifically for use with the Smart Relay Assembly are installed on the
board.
To
J4 on
Pedestal I/O
Board
J2
Not
Used
J4
To
Satellite I/O
Control
Board
PRB1 or PRB2
Indicator
Lights
(L1,L2,L3, L4)
Indicator
Lights
(K1,K2,K3,K4)
Programmable
Interface
Controller
(PIC)
Relays
(4 places)
J5
Not
Used
Dip
Switches
Auto/
Manual
Switches
(4 places)
J3
Control Wiring
Inputs
Figure 4-14. Smart Relay Assembly
(“as installed” orientation)
87
263
FuelMaster® Installation Manual
Smart Relay Assemblies produce a momentary contact closure adjustable for 1 to 16 seconds
through dip switches located on the board. The dip switches are numbered 1-4 and provide the
following momentary settings:
All Off = 1 second
1 On = 4 seconds
1 and 2 On = 8 seconds
1, 2, and 3 On = 12 seconds
All On = 16 seconds
The J3 receptacle is fitted with a 7-pin terminal plug for control wiring inputs. Control wiring to J3
is matched as follows: hose 1 = pins 2 and 3, hose 2 = pins 4 and 5, and hose 3 = pins 6 and 7.
Use one pin of each pair to receive input, and the other to send an output. It doesn’t matter
which is used for the input, or which is used for the output.
NOTE
If the part number 233129 cable is not connected between J1 on the Smart Relay Assembly and
a Pedestal I/O Board pulser connector (J4-J7), the Smart Relay Assembly will not function. It
needs both the 12VDC and 0V from the Pedestal I/O Board for power and ground.
The J1 receptacle is fitted with a 5-pin terminal plug for pulse outputs. Positions in J1 are +12
(pins 1 and 2), 0V (pins 3 and 4), and PLS OUT (pin 5). A cable (part number 233129) is
provided with the Smart Relay Assembly which connects J1 on the Smart Relay Assembly to the
Pedestal I/O Board and any applicable pulser connector (J4, J5, J6, J7). Connectivity is as
follows:
Table 4-3. Wiring Smart Relay Assembly (SRA) to Pedestal I/O Board
SRA
J1
1 (+12)
3 (0V)
5 (PLS OUT)
Wire
Color
White
Black
Green
Pedestal I/O Board
J4
1 (+12V)
6 (P1)
2 (0V)
Each Smart Relay Assembly can control up to a maximum of three devices. If more than one
device is being controlled, a jumper wire must be added for each additional pulser input. If two
devices are installed and connected to hose positions A and B, install a jumper between pins 2
(P1) and 4 (P2) of J4. If three devices are installed and connected to hose positions A, B, and C,
install a jumper between pins 2 (P1) and 4 (P2) of J4, and another jumper between pin 4 (P2) of
J4, and pin 2 (P3) of J6. One pulse output from the Smart Relay Assembly is used as a pulse
input for three positions on the Pedestal I/O Board.
When a Smart Relay Assembly is installed, the Divide Rate for the applicable hose position is set
to 10:1, the Pump Finish Timer is to 10 seconds, and the No Pulse Timeout is set to 10 seconds.
The indicator lights L1, L2, and L3 illuminate when a signal is sent to the Smart Relay Assembly.
The light stays on until the relay turns off and the 10 second Pump Finish Timer expires. The
indicator lights K1, K2, and K3 illuminate when the corresponding relay is activated, and stays on
for the duration set by the dip switches. The indicator light K4 illuminates when the relay is
generating pulses, and flashes until enough pulses are generated to create a transaction.
j.
Monitor Mode. There are applications which may require FuelMaster® to continuously monitor
the flow of fuel, but not through individual transactions. Such would be the flow of fuel to a
furnace or some other device which is continually operating. One application uses it to monitor
the continuing flow of water and glycol into a deicing fluid blender. This can be accomplished
through the use of the Monitor Mode.
88
264
FuelMaster® Installation Manual
In the Monitor Mode, no authorization signal is required so nothing needs to be connected to the
Pedestal I/O Board LN and LD positions. FMU firmware activates the relay for the hose put in
Monitor Mode. An LED on the Relay Assembly corresponding to the activated relay will
illuminate steady while in Monitor Mode.
Pulses from a pulser or flowmeter are needed, so connections are made to the Pedestal I/O
Board pulser connectors on J4, J5, J6, and/or J7, as needed. The Monitor Mode monitors
incoming pulses and records a transaction after 10,000 pulses or once per day, whichever
occurs first.
Any of the eight hose positions in the FMU can be configured for the Monitor Mode. Monitor
Mode may be turned on through the use of a laptop connection, or with a Supervisor Prokee® or
Smartcard. If a Supervisor Prokee® or Smartcard are used to configure Monitor Mode, the only
option is to enable all hoses with Monitor Mode. If performed with a laptop connection (or by the
Customer Satisfaction Center), individual hoses may be configured.
Perform the following to configure Monitor Mode:
1) With a laptop connection:
a) Make a laptop connection in accordance with Product Bulletin 111.
b) Use the 54 command to display the Pump Mode Menu.
c) Select the hose position (A-H) to modify by typing the hose letter and depressing Enter.
The Pump Mode Configuration Menu will be displayed.
d) Depress 5. Enable Monitor Mode. The Pump Mode Menu will be displayed and show
the selection of Monitor Mode.
e) Depress <ESC>=Exit. The prompt CONFIGURATION HAS CHANGED. WOULD YOU
LIKE TO SAVE IT? (Y/N) will appear.
f) Depress Y to save the configuration change. The prompt Saving Configuration
Changes… PUMP #__ -> MONITOR MODE ENABLED Save Complete! will be
displayed.
g) Use the 07 command to exit the laptop connection.
2) With a Supervisor Prokee® or Smartcard:
a) Insert a Supervisor Prokee® or Smartcard. The SUPV: menu will appear.
b) Select B=ISSUES. The SUPERVISOR ISSUES MENU will appear.
c) Select B=MODE. The MODE MENU will appear.
d) Select B=MONITOR. The SUPERVISOR MONITOR MODE MENU will appear.
e) Select A=TURN ON. The prompt ALL ACTIVE PUMPS IN SEMI MANUAL MODE –ORMONITOR MODE! will appear.
f) Depress D=EXIT to exit the Supervisor menus.
7. Pulse Inputs
NOTE
AC ground cannot be substituted for 0V in pulser applications.
Pulse inputs are necessary to register quantity. Pulse inputs are made to receptacles J4 (hoses A
and B), J6 (hoses C and D), J5 (hoses E and F), and J7 (hoses G and H) located at left center on the
Pedestal I/O Board. The +12V positions are sending 12 VDC to the pulsers. This 12 VDC is constant
whenever power is applied to the FMU, and the FMU power switch is on. The P_ (P1 for hose A, P2
for hose B, etc.) positions are receiving pulses from the pulsers. The 0V positions are common or
ground. The OK_ (OK1 for hose A, OK2 for hose B, etc.) positions are for 12 VDC pump handle or
switch detection.
The +12V and 0V positions are not tied to a specific P_ position. Any +12V or 0V position may be
used with any P_ position. Since there is only one 0V position for every two P_ positions, two
conductors must be connected to each 0V position when 0V connections are required.
See Figures 4-15 through 4-21 for pulser connection diagrams. Typical connections to mechanical
89
265
FuelMaster® Installation Manual
pulsers are with two or three conductors. All mechanical pulsers will require a 12 VDC input to return
a 12 VDC pulse for the FMU. Many will also require a third conductor connection to 0V ground, or
common.
CAUTION
Some open collector pulse generators such as the Gasboy Pump I/F Board cannot accept a direct 12 VDC
input. Applying 12 VDC directly to the Pump I/F Board will damage it.
ATTENTION
Certains générateurs d'impulsions collecteur ouvert comme la pompe, je Gasboy Conseil / F n'acceptera
pas une entrée 12 VDC directe. Application 12 VDC directement à la pompe, je / F Conseil sera
l'endommager.
Some pulse generators are open collector. They require a power input on the pulse return line before
a pulse may be generated. Open collector pulsers will also require a pull-up resistor. The pull-up
resistor carries a reduced voltage from the 12 VDC output to the pulse return line. The size of the
pull-up resistor will vary depending on the amount of power needed to generate a pulse. Figure 4-21
is an example of a connection to an open collector pulse transmitter using a pull-up resistor. The
Dispenser Compatibility List in Appendix B identifies the correct applications for pullup resistors.
CAUTION
Do not connect more than 12 VDC to J4, J5, J6, or J7. Voltages greater than 12 VDC will damage the
Pedestal I/O Board.
ATTENTION
Ne connectez pas plus de 12 volts courant continu à J4, J5, J6, ou J7. Plus de 12 volts courant continu
endommageront le tableau Dedans/Déhors du piédestal.
a. Determine the pulser wiring requirements by comparing the selected pulser with wiring diagrams
4-12 through 4-18.
b. Pull a cable with enough conductors to make the necessary pulser connections.
c. Connect the 12 VDC pulser power feed to the +12V pin closest to the applicable P_ (P1 for hose
A, P2 for hose B, etc.) pin. If a pullup resistor is required, install the pullup resistor between +12V
and P_.
d. Connect the 12 VDC pulse return to P1 for hose A, P2 for hose B, etc.
e. Where required, connect the pulser common to 0V.
NOTE
The maximum number of pulses that may be counted by the FMU when a PULSE FILTERING dipswitch is
turned on is 9000 per minute. Determine the number of pulses by multiplying the flow rate (i.e., 10
gallons/minute) times the divide rate (i.e., 100:1). If PULSE FILTERING is not turned on, the maximum
number of pulses increases to 120,000+ per minute.
f.
If the pulser wires are pulled in the same conduit with AC control wires, and the pulser wires are
not shielded, turn on the applicable PULSE FILTERING dipswitch on the Satellite I/O Control
Board to prevent AC bleedover into the pulser wires.
g. Repeat steps a through f for each additional pulser to be installed.
90
266
FuelMaster® Installation Manual
Figure 4-15. Connecting to Veeder-Root 1871 Pulser
Figure 4-16. Connecting to Veeder-Root 7671 Pulser
Figure 4-17. Connecting to ICS 12VDC Pulsers
91
267
FuelMaster® Installation Manual
Figure 4-18. Connecting to ICS 110 VAC Pulsers
Figure 4-19. Connecting to OPW 12 VDC Pulsers
Figure 4-20. Connecting to OPW 110 VAC Pulsers
92
268
FuelMaster® Installation Manual
Figure 4-21. Connecting to Open Collector Pulser
(Gasboy 9800 Pump I/F shown)
a. Dual Output Pulsers. Pulsers are available with dual outputs; pulsers which provide outputs to
two different devices such as an FMU and a tank monitor. An application which may require a
dual output pulser is a system having both an FMU and a TLS-350R Veeder-Root tank monitor.
Pulses from the fuel dispenser are needed by both the FMU and the TLS-350R. Single output
pulsers have supported some similar applications, but may not under all circumstances. If
working with existing equipment with single output pulsers, test the outputs from the single
output pulsers first. If the single output pulser won’t support both applications, switch to a dual
output pulser.
b. Opto-Isolators. Before electronic dispenser interfaces were adapted to FuelMaster®, several
different optical isolators were developed to receive pulses from some older electronic dispenser
applications such as the Gilbarco Advantage and Legacy, the Tokheim 262, the Wayne 360/370
series dispensers, and some Schlumberger models. These optical isolators were designed to
support commercial fleet operations and did not attain the accuracy required by Weights and
Measures for retail operations. The optical isolators also provided for a reduction of pulses
through “divide by” circuitry which could divide the number of pulses received by 1 (no
reduction), 2, 4, or 8.
c.
Counts During Reset. 12 VDC pulser power from the FMU to a pulser is constant whenever the
FMU power switch is on. This can result in “counts during reset”; pulse counts generated when a
mechanical dispenser resets. If this occurs, it may be eliminated by wiring pump handle
detection and setting the USE PUMP HANDLE setting in the FMU to START or START AND
END (Plus systems), or YES (Classic systems). If pump handle detection may not be wired or
set to these configuration options, two other methods are available to eliminate counts during
reset. One option is to install pulsers with 110 VAC connections. The other option is to install
mechanical relays to control the 12 VDC pulser power. Relays with 110 VAC coils and 12 VDC
switching are necessary. Install the relays so the 12 VDC power to the pulser is interrupted by
the relay, and controlled by a 110 VAC input from FMU authorization (LD_).
d. AC Bleedover to Pulse Inputs. AC control wires and DC pulser cables may be pulled within the
same conduit if the DC pulser cables are shielded and insulated to the maximum voltage in the
conduit. The NEC allows for this and specifies the requirement for cable insulation in NFPA 70,
para 522.24(A). Syn-Tech Systems further specifies the pulser cable be shielded. Bleedover
from AC control wires to DC pulser wires should not occur when these conditions are met. If it
does, ensure the PULSE FILTERING dip switches on the Satellite I/O Control Board are turned
on for each applicable hose position (read the hose positions from the silkscreen on the board,
not the dip switch block). When the PULSE FILTERING dip switches are turned on, the pulse
93
269
FuelMaster® Installation Manual
count cannot exceed 9000 pulses per minute. The pulse count is determined by multiplying the
flow rate (i.e., 9 gallons per minute) times the divide rate (i.e., 100 pulses per gallon). This
example would be 900 pulses per minute. Separating the AC control wires and DC pulser cables
in separate conduit will also eliminate any bleedover.
e. One Pulser, Two FMUs.
CAUTION
Power inputs (+12V) from two different FMUs or power sources to a single pulser can result in
damage to both FMUs and, possibly, the pulser. If possible, power the pulser from only one
power source. DC grounds (0V) from both sources must be joined (made common) for pulses to
be detected by both FMUs. Grounds must not be joined (made common) unless both power
sources are 12 VDC. AC grounds are not the same as DC commons/grounds.
ATTENTION
Des entrées d'alimentation (+12 V) de deux FMU différentes sources ou de la puissance d'un
émetteur unique peut entraîner des dommages aux deux FMU et, éventuellement, le générateur
d'impulsions. Si possible, le pouvoir du pulseur d'une seule source d'alimentation. motifs DC
(0V) à partir de deux sources doivent être rejoint (en commun) pour les légumineuses à détecter
par les deux FMU. Motifs ne doit pas être rejoint (en commun) à moins que les sources
d'énergie sont de 12 VDC. AC motifs ne sont pas les mêmes que Commons CC / motifs.
Applications have been requested for one pulser in one dispenser to provide outputs to two
FMUs. When doing so, caution must be used in making pulser connections. Power inputs (+12V)
from two different FMUs or power sources to a single pulser may result in damage to the FMUs
and pulser. Power from either source will feed back to the other source and may result in
damage to both FMUs and, possibly, the pulser. DC commons/grounds (0V) from both sources
must be joined (common) for pulses to be detected by both FMUs. Grounds must not be joined
(made common) unless both power sources are 12 VDC. If the power sources are not both 12
VDC, and the grounds are not joined (common), pulses from a single pulser to two FMUs will not
be detected. AC grounds are not the same as DC commons/grounds.
94
270
FuelMaster® Installation Manual
Index
A
B
C
D
E
F
G
H
I
J
K
Description
Satellite Position Number
Electronic Dispenser Interface or Indoor
Receipt Printer Ribbon Cable
Connector, JP12 (see Note)
Electronic Dispenser Interface or Indoor
Receipt Printer RS-232 Connector,
JP11 (see Note)
Attach Screws Over Standoffs (6 places)
Satellite Ribbon Cable Connector for Satellites 5-8, JP10
Board Part Number and Revision Level Marking
Cut E1-E2 Trace for RS-232 (Do Not Cut for RS-422)
Tank Monitor RS-232/RS-422 Cable Connector, JP13
Tank Monitor Ribbon Cable Connector, JP14
Satellite Ribbon Cable Connector for Satellites 1-4, JP9
Satellite RS-422 Connector, JP1-JP8 (8 places)
Note: the part number 221813 I/O Silver Board will work with both the Electronic
Dispenser Interface and the Indoor Receipt Printer. The 203610 or 203629 I/O Silver
Board will work with the Indoor Receipt Printer, but not the Electronic Dispenser
Interface.
Figure 4-22. I/O Silver Board
95
271
FuelMaster® Installation Manual
Figure 4-23. Satellite I/O Control Board
Index
Description
Index
Description
A
B
C
D
E
F
G
Mainboard Connector (J1)
Attach Screws (7 places)
Board Revision Level
SATELLITES INSTALLED JUMPERS (S1)
TMU SELECT JUMPERS (S2/S3)
RECEIPT PRINTER (J2)
ON SITE PRINTER (J3)
H
I
J
K
L
M
N
TANK MONITOR (J4)
SATELLITE CONNECTORS (J5/J6)
PULSE FILTERING (DS1)
Ribbon cable to Pedestal I/O Board (J7)
Ribbon cable to Relay Assy 1 (PRB1)
Ribbon cable to Relay Assy 2 (PRB2)
+12V GOOD (LED1)
96
272
FuelMaster® Installation Manual
8. Tank Monitor Interface (see Figures 4-22 and 4-23). Tank monitor interfaces are only possible to a
Master FMU equipped with a Tank Monitor Interface Kit, part number 202002A. Interface cable
connections at the FMU will be dependent upon the use of RS-232 (3-conductor) or RS-422 (2-pair
with drain) cable. In either case, connections will be made to a 5-pin connector in JP13 on the I/O
Silver Board. RS-422 may be necessitated by the length of the cable run. Many tank monitors do not
recommend RS-232 cable lengths in excess of 50 feet. Where excessive distances dictate the use of
RS-422, an RS-232/422 converter such as the Patton Electronics 222N (Syn-Tech part number
219517) may be used to step down RS-422 to RS-232 with a DB25 connector for connection to the
tank monitor. Patton also makes an RS-422/232 converter with DB9, RJ-11, or RJ-45 connectors for
connection to the tank monitor. Syn-Tech does not inventory converters other than with a DB25
connector. Patton advises the separation distance is extended to 4000 feet with their RS-422/232
converters.
Tank monitors use differing connectors. Most receive inputs through a DB25 connector. Some
receive inputs through a DB9 serial connector, and others use RJ-11 or RJ-45 connectors. Some
tank monitors have a built-in RS-232 connection. Others require the purchase of an RS-232 option.
If communications are not achieved after making these connections, try reversing transmit and
receive connections.
Wireless communications are possible. The use of B&B Electronics Zlinx Radio Modems is
described in Product Bulletin 133. A kit including a pair of Zlinx Radio Modems is available from SynTech under part number 249912.
Perform the following:
a. If RS-232 cable is used, the circuit board trace between E1 and E2 at the bottom of the I/O Silver
Board must be cut to create an open. If RS-422 cable is used, the circuit board trace between
E2 and E1 at the bottom of the I/O Silver Board must be intact.
b. Two TMU SELECT jumpers must be installed on S2 and S3 of the Satellite I/O Control Board.
Positions are dependent upon the use of RS-232 (upper two pins) or RS-422 (lower two pins).
c. A 201839 ribbon cable must be connected between J4 on the Satellite I/O Control Board, and
JP14 on the I/O Silver Board.
d. For RS-232:
1) Pull an RS-232 cable from the tank monitor to the FMU. If pulled in a conduit with other low
voltage cables, it is recommended the cable be shielded.
2) At the FMU, connect the cable to pins 1 (IN+), 3 (GND), and 5 (OUT-). Note the color coding
to correctly match the connections to the tank monitor.
3) At the tank monitor the appropriate connector must be installed to make the connection. The
conductor routed from pin 1 should connect to transmit (TX). The conductor from pin 3 should
connect to ground (GND). The conductor from pin 5 should connect to receive (RX).
e. For RS-422:
1) Pull an RS-422 cable from the tank monitor to the FMU. If pulled in a conduit with other low
voltage cables, it is recommended the cable be shielded.
NOTE
The GND pin is for connection of a cable drain. It is connected only on one end (either end). The other end is
bent back over the cable and taped (not connected).
f.
2) At the FMU, connect the cable to pins 1 (IN+), 2 (IN-), 3 (GND), 4 (OUT+), and 5 (OUT-).
Note the color coding to correctly match the connections to the tank monitor.
3) At the tank monitor the appropriate connector must be installed to make the connection. If the
tank monitor will accept RS-422, the conductor routed from pin 1 should connect to OUT+.
The conductor from pin 2 should connect to OUT-. The conductor from pin 3 should be bent
back over the cable and taped. The conductor from pin 4 should connect to IN+. The
conductor from pin 5 should connect to IN-. If the tank monitor will not accept RS-422, an RS422/232 converter will be needed. Follow the manufacturer’s recommendations for attaching
the converter. Product Bulletin 69 describes the connection of a Patton Electronics 222N.
Check the communications parameters set in the tank monitor: data bits, stop bits, parity, and
97
273
FuelMaster® Installation Manual
baud rate. The same parameters must be set in the FMU for an effective communications
interface. The parameters may be set with a laptop connection and command 5a, or by a dial-in
from the Syn-Tech Customer Satisfaction Center.
9.
Satellite Connections (see Figure 4-24). Both master and satellite FMUs must be equipped with a
Satellite Option (STS part number 200034A) to accept the wire terminations and provide the
necessary internal interface cables. This option is standard equipment in each satellite FMU, but an
extra price option in master FMUs. This option is not required with an EIU. EIUs have other
provisions for connection to a master FMU. See TBD to make an EIU connection.
Figure 4-24. Satellite Connections
98
274
FuelMaster® Installation Manual
Master-satellite connections are hardwired with RS-422, or wireless connected. The use of B&B
Electronics Zlinx Radio Modems for a wireless connection is described in Product Bulletin 133. A kit
including a pair of Zlinx Radio Modems is available from Syn-Tech under part number 249912.
Perform the following to make a hardwire master-satellite connection:
a. Jumpers must be installed on S1, SATELLITES INSTALLED JUMPERS, in the upper right
corner of the Satellite I/O Control Board. Jumper positions are numbered 1 through 8. The
master FMU must have a jumper installed in each position which corresponds to the satellite
connectors in use on the I/O Silver Board. Example: if satellites are connected to positions 1, 2,
and 3 of the master FMU I/O Silver Board, jumpers must be installed in positions 1, 2, and 3 of
S1. The satellite must have one jumper installed in the position corresponding to the position in
use on the I/O Silver Board. In most cases, this will be position 1.
b. An I/O Silver Board must be installed in each FMU, and contain the appropriate number of
connectors JP1 through JP8, and 5-pin terminal plugs, to make the required master-satellite RS422 cable connections.
c. Ribbon cable part number 209023 is connected between SATELLITE CONNECTORS J5 and/or
J6 on the Satellite I/O Control Board, and JP9 and/or JP10 of the I/O Silver Board. On the
Satellite I/O Control Board, use J6 for satellites 1 through 4, and J5 for satellites 5 through 8. On
the I/O Silver Board use JP9 for satellites 1 through 4, and JP10 for satellites 5 through 8.
d. Pull an RS-422 cable from the master to each satellite to be connected. Cables cannot be daisychained from one satellite to the next. Each satellite must have an RS-422 cable routed to the
master FMU.
e. Note the RS-422 COMMUNICATIONS WIRING chart at the bottom of Figure 4-24, and make the
cable connections in both FMUs leaving the cable drain disconnected at one end.
10. Indoor Receipt Printer (see Figures 4-22 and 4-23 for connections). The indoor receipt printer
requires connection to an I/O Silver Board having part numbers 203610, 203629, or 221813. A part
number 972A0102 cable is connected between J2 RECEIPT PRINTER on the Satellite I/O Control
Board, and JP11 DIRECT CONNECT on the I/O Silver Board.
The printer used for the application is an Epson TM-U200D serial printer. It is programmed with
dipswitches to XON/XOFF, 8 data bits, odd parity, and 9600 baud. If the printer is purchased from
Syn-Tech Systems, a printer cable with part number 201669 will be shipped with the printer. An RS232 cable is pulled from the FMU to the receipt printer location. If a cable is developed for the
interface, a DB25 connector will be required for connection to the printer.
A cable with 3 conductors must be used. If the cable is pulled in a conduit with other low voltage
conductors, the cable should be shielded. If the distance is under 300 feet, a cable with 22 AWG
conductors will perform satisfactory. If the distance is greater than 300 feet, increase the size of the
conductors to 18 AWG.
Use Table 4-4 for connection points. If a cable is manufactured to make the printer connection, use
the column “Receipt Printer DB25 Pin” to make the printer DB25 connections. If the 201669 printer
cable is connected to the printer, use the column “201669 Cable Color” to determine connection
points for the RS-232 cable pulled to the FMU.
Table 4-4. Indoor Receipt Printer Cable Connections
I/O Silver
Board
JP11
Pin
1 (IN+)
3 (GND)
5 (OUT-)
Receipt
Printer
DB25
Pin
2
7
3
99
275
201669
Cable
Color
BLACK
CLEAR
RED
FuelMaster® Installation Manual
Equipment Interface Unit (EIU) Installation
EIUs provide secure access to accessory devices such as
gate openers, car washes, or door openers. They do not
directly control these devices, but activate them by
providing a 1, 5, 8, 11, 14, 17, or 20 second momentary
power signal to the accessory controller. The accessory
controller must be capable of activation through a
momentary input signal.
EIUs cannot operate independently. Like Satellite FMUs,
they are dependent upon connection to a Master FMU.
The Master FMU must be accessed with a serial
connection to enable EIU operation. Section V,
Initialization, contains procedures for enabling EIU
operation.
EIUs are accessible with a Prokee®, or with an ID number
programmed into the Master FMU. They are not
accessible with Smartcards or AIM2™. A controlling
access point will perform the same functions as an EIU
through AIM2™ activation.
EIUs have an internal heater. With the heater on, an EIU
consumes about 0.15 amp at 120 VAC. The heater draws
over 75% of the maximum power consumption, and will
not be on during warm weather. An EIU can control a
maximum load of 5 amps. Motors cannot be controlled
directly by the EIU.
Figure 4-25.
EIU Components
EIUs have three major components (see Figure 4-25): a Cabinet, a Pedestal Cover and Wiring Assembly,
and a Pedestal. EIUs are constructed of lightweight, corrosion resistant aluminum.
There are no access panels in the EIU Pedestal. Wires in conduit must enter the Pedestal from the
bottom of the mount plate, and connect to the Pedestal Cover and Wiring Assembly at the top of the
Pedestal.
Inside dimensions of the EIU Pedestal are 3-1/2 inch x 3-1/2 inch. It may be necessary to bundle the three
conduit together to fit inside the Pedestal. See Figure 4-26 for EIU footprint dimensions.
Pulling Wires and Finishing Conduit
Verify that all required conduit are in place. Refer to Section III, Site Planning and Preparation, for
conduit requirements. There should be three conduit: one for incoming AC power from a circuit breaker,
one for communications from the Master FMU, and one to control the designated accessory.
1. Pull all wires:
a. AC Power. Pull three 12 AWG THHN wires to the EIU from the circuit breaker panel; black for
hot, white for neutral, and green for ground. If the distance from the power source to the EIU
exceeds 400 feet, increase the size of the power wires to 10 AWG. Ensure
approximately 3 feet of excess wire is extending from the conduit to facilitate wire
connections after EIU installation.
b. Master FMU/EIU Communications. Pull two twisted pair with drain 18 AWG shielded RS-422
cable from the Master FMU to the EIU. If the cable length is under 150 feet, 22 AWG cable with
the same specifications may be used. At the EIU end, ensure approximately 3 feet of excess
cable is extending from the conduit to facilitate wire connections to the EIU. At the Master FMU
sufficient cable will be necessary to make connections to an I/O Silver Board mounted over the
100
276
FuelMaster® Installation Manual
c.
Pedestal I/O Board. Master FMU/EIU communications cables cannot be “daisy-chained” between
EIUs. Individual communications cables are necessary from the Master FMU to each EIU.
Control of Accessory Controller. Pull two 14 AWG THHN wires from the EIU to the accessory
controller. The wiring diagram in Figure 4-27 calls out blue and orange, but any color may be
used which are easily identifiable when making the wire connections. Ensure approximately 3 feet
of excess wire is extending from the conduit to facilitate wire connections after EIU installation.
NOTE
The seal-offs cannot be accessed after the EIU is mounted over the conduit.
2. As required, pour seal-offs on any conduit routed from/to a hazardous location.
Mounting the Pedestal (see Figure 4-26).
A rigid base is necessary for mounting the EIU. Asphalt is not a satisfactory mounting surface. Perform
the following to mount the Pedestal:
1. Position the Pedestal centered over the conduit.
Figure 4-26. EIU Footprint NOTE
The Pedestal is made to accept 3/8 inch screw anchors. Use of stainless steel screw anchors, nuts, and
washers will prevent corrosion and permit the pedestal to be removed and replaced, if necessary, at any time
during the life of the EIU.
2. Mark screw anchor holes for all four corners of the Pedestal.
3. Remove the Pedestal and drill screw anchor holes.
NOTE
There are no side access panels. The wires exiting from the three conduit must be routed up through the
Pedestal and out the cabinet mounting plate hole before the Pedestal is anchored.
4. Attach a pull string to the wires.
5. While repositioning the Pedestal over the conduit, pull the pull string and wires up through the
Pedestal and out the top of the Pedestal.
101
277
FuelMaster® Installation Manual
Figure 4-27. EIU Wiring
102
278
FuelMaster® Installation Manual
CAUTION
If the Pedestal is mounted on an uneven surface and the screw
anchors are tightened, the welds at the base of the Pedestal may
be cracked. Washers, as spacers, should be installed on the screw
anchors under the corners of the Pedestal to account for minor
irregularities in the mounting surface, or to level the Pedestal.
ATTENTION
Si le piédestal est monté sur une surface raboteuse et les ancres
de vis sont serrées, les soudures à la base du piédestal peuvent
être rompues. Des écrous, comme mettredistance, peuvent être
installées sur les ancrages de vis sous les coins du piédestal pour
compenser des irrégularités mineures dans la surface de montage
concrète, ou pour niveler le piédestal.
6. Check the Pedestal mounts flush to the mounting surface
and is level. As required, install washers as needed under
the Pedestal for leveling.
7. Insert the screw anchors through the Pedestal mount holes
(and leveling washers) into the holes drilled into the
mounting surface.
8. Secure the Pedestal on the screw anchors with four screw
anchor nuts and washers.
9. Position the Pedestal Cover and Wiring Assembly up to the
Pedestal, then make the wire/cable connections with wire
nuts in accordance with Figure 4-27. Figure 4-27 depicts
wire colors that may not match the wire/cable in use. Note
the wire colors connected to J2, pins 1, 2, 4, and 5. These
wires must make specific pin connections to the I/O Silver
Board in the Master FMU.
10. Secure the Pedestal Cover and Wiring Assembly to the
Pedestal with four screws.
11. Attach the ground (green) lead to the Pedestal Cover and
Wiring Assembly ground screw.
12. Position the Cabinet up to the Pedestal Cover and Wiring
Assembly, and connect the Communication and Control
Harness connector and Power Harness connector to the
Cabinet Power Supply Board.
NOTE
If a gasket is not available, silicon sealant (RTV) may be used to
seal the Cabinet to the Pedestal. The Cabinet interface must be
sealed to prevent water intrusion.
13. Verify a gasket is installed between the Cabinet and
Pedestal, and attach the Cabinet to the Pedestal with fifteen
screws.
Figure 4-28.
Connecting Wire
Harnesses
Wire Connections at Master FMU
The EIU is connected to the Master FMU the same as any
Satellite FMU connection. The Master FMU must be equipped
with a Satellite Option (STS part number 200034A) to accept the wire terminations and provide the
necessary internal interface cables. Master FMU-EIU connections may be hardwired with RS-422, or
wireless connected. The use of B&B Electronics Zlinx Radio Modems for a wireless connection is
103
279
FuelMaster® Installation Manual
described in Product Bulletin 133. A kit including a pair of Zlinx Radio Modems is available from Syn-Tech
under part number 249912.
Perform the following to make the wire connections at the Master FMU:
WARNING
Removing power from the Master FMU at the FMU power switch does not remove incoming AC power. To
prevent personal injury, ensure power is removed by turning off the circuit breaker for the Master FMU
and each connected dispenser.
AVERTISSEMENT
Couper le courant du maître FMU au interrupteur de FMU ne coupe pas le courant alternatif entrant. Pour
prévenir des blessures, assurez que le courant est coupé par couper le fusible pour le maître FMU et
chaque distributeur connecté.
1. Remove power from the Master FMU at the circuit breaker panel.
2. If dispensers are connected to the Master FMU, remove power from each connected dispenser at the
circuit breaker panel.
3. Unlock and open the Master FMU upper cabinet and pedestal access doors.
4. Remove both electrical access covers in the pedestal.
NOTE
There are several variations of the I/O Silver Board. If an I/O Silver Board was previously installed for
another application, verify compatibility for Satellite communications: an unused receptacle and connector
in any position JP1 through JP8 for RS-422, and a ribbon cable receptacle in corresponding positions JP9
and/or JP10 are needed for Master FMU/EIU communications.
5. An I/O Silver Board must be installed in the Master FMU, and contain the appropriate number of
connectors JP1 through JP8, and 5-pin terminal plugs, to make the required Master FMU-EIU RS-422
cable connections. Perform the following to install an I/O Silver Board, or remove and replace an
existing I/O Silver Board:
a. If an existing I/O Silver Board is installed and is not compatible with the EIU interface, perform the
following to remove the I/O Silver Board:
1) Note the locations and disconnect all ribbon cables and plugs from the existing I/O Silver
Board.
2) Remove the existing I/O Silver Board mounted over the Pedestal I/O Board on six
standoffs.
b. If an existing I/O Silver Board is not installed, remove six screws from the Pedestal I/O Board
(above and below TB1, TB2, and TB3, see Figure 4-6) and install six aluminum standoffs.
c. Position the new I/O Silver Board over the Pedestal I/O Board, and attach to the standoffs with six
screws.
d. Reconnect any ribbon cables and plugs removed from a previously installed I/O Silver Board.
6. Select an unused receptacle, JP1 through JP8, to receive the Master FMU/EIU communications cable
connection.
7. As required, attach one end of the 20-pin ribbon cable to the applicable I/O Silver Board receptacle
JP9 or JP10:
a. If a receptacle in position JP1 through JP4 is to be used, the ribbon cable connector should be
plugged into JP9.
b. If a receptacle in position JP5 through JP8 is to be used, the ribbon cable connector should be
plugged into JP10.
8. If applicable, route the other end of the Satellite Ribbon Cable up through the Cabinet bulkhead thruhole and connect the 20-pin connector to J5 or J6 on the Satellite - I/O Control Board:
a. If the ribbon cable is connected to JP9 on the I/O Silver Board, connect the other end to J6 on
the Satellite - I/O Control Board.
b. If the ribbon cable is connected to JP10 on the I/O Silver Board, connect the other end to J5 on
the Satellite - I/O Control Board.
104
280
FuelMaster® Installation Manual
9. Refer to the wiring diagram in Figure 4-27, and the wire connections noted in step 9 under Mounting
the Pedestal. Connect the Master FMU/EIU communications cable routed from the EIU Pedestal
Cover and Wiring Assembly to a 5-pin connector of the I/O Silver Board receptacle selected in step 6:
a. Connect the wire from J2, pin 1 (Brn), to IN+.
b. Connect the wire from J2, pin 2 (Red), to IN-.
NOTE
The GND pin is for connection of a cable drain. It is connected on one end (either end) only. The other end is
bent back over the cable and taped (not connected).
10.
11.
12.
13.
c. Connect the drain to GND on one end only.
d. Connect the wire from J2, pin 4 (Yel) to OUT+.
e. Connect the wire from J2, pin 5 (Gray) to OUT-.
Plug the 5-pin connector into the receptacle selected in step 6.
Verify jumpers are installed on S1, SATELLITES INSTALLED JUMPERS, in the upper right corner of
the Satellite I/O Control Board for each corresponding RS-422 connection to the I/O Silver Board.
Re-install both electrical access covers in the Master FMU pedestal.
Close and lock the Master FMU pedestal and upper cabinet doors.
Wire Connections at Accessory Controller
NOTE
Selecting a 0 second momentary will result in no momentary being applied. Any other selection will
provide a momentary equal to the duration selected.
The EIU activates the accessory controller by providing a momentary power signal to the circuit that
normally activates a starter relay. This is sometimes illustrated as the contacts for a momentary
pushbutton switch. The momentary is selectable in the length of time it is applied to the starter relay.
Selectable lengths of time are: 0, 1, 5, 8, 11, 14, 17, and 20 seconds. Selecting a 0 second momentary
will result in no signal.
Two 14-AWG THHN wires were routed to the accessory controller from the EIU in Pulling Wires and
Finishing Conduit. One of these wires (orange) is constantly hot. The other (blue) is the switched wire
that carries the activation signal to the accessory controller after EIU activation. Perform the following:
1. Connect the orange 14-AWG wire from the EIU to a power junction in the accessory controller.
2. Connect the blue 14-AWG wire from the EIU to the accessory controller starter relay input.
Configure Master FMU for EIU
The EIU will not function until the Master FMU is configured to control it. Configuring the Master FMU is a
startup function covered in Section V, Initialization.
105
281
FuelMaster® Installation Manual
106
282
FuelMaster® Installation Manual
Section 5
Initialization
CAUTION
STOP! Initialization may only be completed by a technician who has completed the Syn-Tech
FuelMaster® installation training course. If power is applied by unqualified personnel damage to the
system will be the liability of the installer.
ATTENTION
STOP! Initialisation ne peut être remplie par un technicien qui a terminé le cours de Syn-Tech ®
FuelMaster formation sur l'installation. Si la tension est appliquée par du personnel non qualifié des
dommages au système seront la responsabilité de l'installateur.
Installation is complete, Initialization is performed. Initialization is performed to verify the FMU has
been correctly installed, to train the customer in the use of the equipment and software, and to
prepare the system for day-to-day operation.
Initialization may be performed in conjunction with the Installation, or separately by another person.
When performed by another person, it is generally because the installer was not factory trained and
certified. As such, all post installation tests and inspections, and customer training, are performed by
the person performing the Initialization.
An Acceptance Test Procedure (ATP) for Installations and Upgrades of FuelMaster® Fuel
Management Units, and a prepaid, preaddressed mailing envelope are attached to the end of this
manual. The ATP is to be completed by the technician completing the Initialization, and signed by a
customer’s representative. The technician should leave the original with the customer, and make a
copy for himself and Syn-Tech Systems, Inc. The Syn-Tech copy should be forwarded in the included
prepaid, preaddressed envelope.
A Hold Harmless Agreement is at the last page of the ATP. The Hold Harmless Agreement is
provided to inform the customer of the dangers of unsecured wireless networks, and to remove
liability from Syn-Tech Systems, Inc., and the individual completing Initialization. Complete the form
only when a wireless network is set up for communications to the FMU.
Software Installation and Setup
The physical act of installation does not fully prepare an FMU for operation. The software must be
installed in the Central Controller, and a database must be created to identify the site, vehicles,
users, customers, products, etc. Prokee®s or Smartcards may need to be encoded. The FMU must
be configured to prepare it for operation in the installed environment, and so it may communicate with
the Central Controller.
If Initialization is being performed in conjunction with the Installation, it is recommended the
installation technician assist and train the customer with loading the software and developing the
required user, vehicle, and customer database before beginning the Installation. This will permit the
customer to encode Prokee®s or Smartcards, as required, to test the system after the Installation is
complete.
The software has its own user manual. Refer to the FuelMaster® Plus User Manual and perform the
following:
1. Software installation (Chapter 2: Installation and Startup).
2. Software and hardware configuration (Chapter 3: System Configuration).
3. Identification of the products in use, and the pricing that applies to those who use the system
(Chapter 4: Products and Pricing).
4. Individual site and FMU configuration, and communication options (Chapter 5: Site
Configuration).
107
283
FuelMaster® Installation Manual
5. Defining customers, vehicles, and users who will be using the system (Chapter 6: Customers,
Vehicles, and Users).
6. Setup prepaid Prokee®s or Smartcards, and discounted pricing for specific credit cards. Not
required for all customers (Chapter 7: Prepaid and Discount Cards)
7. Develop and encode Supervisor, Manual Issue, and Tanker Truck utility keys or Smartcards
(Chapter 8: Utility Keys).
8. AIM2 software operations: making Programmer Prokee® or Smartcard, making AIM2 vehicle
record, defining chronometers, viewing OBD trouble codes. Not required for all customers
(Chapter 9: AIM2™ Software Operations).
9. For customer training, description of the tasks which may be completed when a communications
link is established between the FMU and Central Controller (Chapter 10: Communication with
the FMU).
10. For customer training, explanation of the various reports and how to generate them (Chapter 11:
FuelMaster® Reports).
11. For customer training, description of export function and how to set it up. Not required for all
customers (Chapter 12: Exporting Options).
12. For customer training - administrative operations: setting up passwords, users, and user access
(Chapter 13: Administration).
13. For customer training - software tools: using Console, query Polling Reports, Batch Encoding,
Manual Entry Transactions, Inventory Editor, Archive, Adjust Price Levels, Database Manager
setup (Chapter 14: FuelMaster® Tools).
14. For customer training, database maintenance and utilities: delete records, recover transactions,
transaction lookup tool, modify transactions, recover export transactions (Chapter 15: Database
Utilities).
Configure Master FMU for EIU Operation
When an EIU is installed, it is connected to a master FMU via RS-422 the same as other satellite
FMUs. The master FMU defaults to satellite FMU operation. It must be programmed for EIU
operation. Make a laptop connection in accordance with Appendix D, and perform the following:
1. Enter a 3d command. The following will be displayed (TES is the FMU name stored in memory):
TES>3d
CURRENT EIU CONFIGURATION:
----------------------------------------------SAT#1: SATELLITE OPERATION.
SAT#2: SATELLITE OPERATION.
SAT#3: SATELLITE OPERATION.
SAT#4: SATELLITE OPERATION.
SAT#5: SATELLITE OPERATION.
SAT#6: SATELLITE OPERATION.
SAT#7: SATELLITE OPERATION.
SAT#8: SATELLITE OPERATION.
EIU SATELLITES ACTIVE – NONE!
ENTER SATELLITE # FOR EIU CONFIGURATION [1-8, <ESC> to EXIT]:
2. At the cursor, enter the satellite number to configure as an EIU (example: 1):
USAGE - <SPACE>=CHANGE VALUE, <ENTER>=NEXT FIELD, <ESC>=EXIT
---------------------------------------------------------------------------------------------------------EIU SETUP FOR SAT#1:
SATELLITE
108
284
FuelMaster® Installation Manual
3. To change the satellite configuration to an EIU, depress the space bar until GATE MASTER is
displayed, then depress ENTER:
USAGE - <SPACE>=CHANGE VALUE, <ENTER>=NEXT FIELD, <ESC>=EXIT
---------------------------------------------------------------------------------------------------------EIU SETUP FOR SAT#1:
GATE MASTER
USING PROKEES!
4. If USING PROKEES! is not desired, depress the space bar to change to NOT USING
PROKEES!:
USAGE - <SPACE>=CHANGE VALUE, <ENTER>=NEXT FIELD, <ESC>=EXIT
---------------------------------------------------------------------------------------------------------EIU SETUP FOR SAT#1:
GATE MASTER
NOT USING PROKEES!
•
•
NOTE
If an invalid EIU configuration is selected, the prompt INVALID EIU OPERATION SELECTED –
PLEASE TRY AGAIN! will appear. If NOT USING PROKEES! is selected, 9 CHAR VMN ID
ENTRY RQD! (or 8 CHAR VVI ENTRY RQD!) must be selected.
PIN (Prokee® Internal Number) is not user selectable. It is a number generated by the
FuelMaster® software.
5. PIN is only available for use when using Prokee®s:
USAGE - <SPACE>=CHANGE VALUE, <ENTER>=NEXT FIELD, <ESC>=EXIT
---------------------------------------------------------------------------------------------------------EIU SETUP FOR SAT#1:
GATE MASTER
USING PROKEES!
PIN ENTRY REQUIRED!
•
•
NOTE
A 9 CHAR VMN ID ENTRY RQD! means User IDs with up to 9 characters may be used. As few
as 1 character may be used. An ID entry of 4 will appear in the software database as 000000004.
If a VVI system is in use, the following prompt will show 8 CHAR VVI ENTRY RQD!, and a
Vehicle ID entry of 4 will appear in the software database as 00000004.
6. Press Enter:
USAGE - <SPACE>=CHANGE VALUE, <ENTER>=NEXT FIELD, <ESC>=EXIT
---------------------------------------------------------------------------------------------------------EIU SETUP FOR SAT#1:
GATE MASTER
USING PROKEES!
PIN ENTRY REQUIRED!
9 CHAR VMN ID ENTRY RQD!
7. Pressing the space bar will change 9 CHAR VMN ENTRY RQD! to ID ENTRY NOT RQD!. Press
Enter:
USAGE - <SPACE>=CHANGE VALUE, <ENTER>=NEXT FIELD, <ESC>=EXIT
---------------------------------------------------------------------------------------------------------EIU SETUP FOR SAT#1:
GATE MASTER
USING PROKEES!
109
285
FuelMaster® Installation Manual
PIN ENTRY REQUIRED!
9 CHAR VMN ID ENTRY RQD!
RELAY DELAY = 5 sec.
NOTE
A 0 (zero) second relay setting will result in no delay and no momentary activation of the relay. Select
any other setting to attain a momentary relay activation.
8. The relay setting may be set to 0, 1, 5, 8, 11, 14, 17, or 20 seconds. Press the space bar to
change the relay setting, then press Enter:
USAGE - <SPACE>=CHANGE VALUE, <ENTER>=NEXT FIELD, <ESC>=EXIT
---------------------------------------------------------------------------------------------------------EIU SETUP FOR SAT#1:
GATE MASTER
USING PROKEES!
PIN ENTRY REQUIRED!
9 CHAR VMN ID ENTRY RQD!
RELAY DELAY = 5 sec.
EIU SATELLITES ACTIVE – 1,
ENTER SATELLITE # FOR EIU CONFIGURATION [1-8, <ESC> to EXIT]:
9. The EIU has been configured as a GATE MASTER instead of a normal satellite. It is configured
for maximum security. It requires the use of Prokee®s. A pin entry is required. A 9 character
VMN/User ID entry is required. The relay momentary will be 5 seconds in duration. EIU satellite
number 1 is active. Configuration changes are automatically saved to FMU memory when exiting.
Post Installation Inspection and Test
An Acceptance Test Procedure (ATP) for Upgrades and Installations of FuelMaster® Fuel
Management Units is attached to the end of this installation manual. This acceptance test is to be
performed by the technician completing the initialization, and signed by the customer’s
representative. A copy of the completed ATP should be left with the customer. Another copy must be
forwarded in the included prepaid, pre-addressed envelope to Syn-Tech Systems, Inc.
This ATP is a comprehensive inspection and test of the installed equipment. There are many
inspections and tests in this ATP which are not applicable to every installation. It is recommended
this ATP be read for application, and the inspections and tests which are not applicable be marked
NA in advance of the physical inspection and test. This will minimize the time and effort needed to
complete the ATP.
Separate ATPs for AIM2™ and Aviation sites are to be used when performing initialization in
conjunction with AIM2™ or aviation site installations. The AIM2™ ATP may be found in the AIM2™
Installation Manual. The Aviation ATP may be found in Appendix E of this manual.
Following is an expanded version of the Acceptance Test Procedure to be used as a guide for
completing the abbreviated ATP attached to the end of this manual. An ATP should be completed for
each installation site containing a master FMU. Complete the Hold Harmless Agreement on the last
page only when a wireless network is used to communicate between the Central Controller and FMU.
In the following breakdown of the Acceptance Test Procedure, the abbreviated ATP is bold and
italicized. The explanation is standard print:
110
286
FuelMaster® Installation Manual
Acceptance Test Procedure (ATP)
for Upgrades and Installations of
FuelMaster® Fuel Management Units
This ATP applies to upgrades and installations of all FMU-2500, 3000, and 3500 series Classic
and Plus Fuel Management Units (FMUs), except aviation sites (a separate Aviation ATP is
available). Complete an ATP for each site. Place a check mark (√) in the space provided for
each step performed. Some procedures will not be applicable to all installations. Mark NA for
those procedures which are not applicable. Some procedures may be repeated for multiple
FMUs. Add comments and explain any deviations on page 5.
SITE: Enter the site name used by the Customer
LOCATION: Enter the address
1. SITE EXAMINATION
All site equipment is operational, and installed in accordance with the NEC (if not,
explain in Comments on page 5). This check is to protect the organization and individual
performing the installation and/or initialization from being accountable for pre-existing site
problems.
2. FMU UPGRADE (For Upgrades Only). Repeat for multiple FMUs. Note any deviations on
page 5.
a. Verify the FMU to be upgraded is operational. The FMU must be operational to be
upgraded. Otherwise, the upgrade must include repairs.
b. Retrieve transactions, unit configuration, and options from FMU to be upgraded.
Provides a means for getting all transactions into software database, and allows for a
copy of the existing site configuration and options to be reloaded into the upgraded FMU.
c. Upgrade the FMU. Perform the upgrade.
d. Use a laptop connection to:
1) Initialize FMU (commands 02, FF, 1A, 28, FE). Cleans FMU memory for a fresh
start.
2) Set/verify site signature (command 38). Ensures the FMU will accept users, access
devices, and connections to the software.
3) Set system type and, if necessary, lock baud rate down (command 59).
Configure for correct system type (VMN, VVI, Commercial, Keyless, etc) and, if
necessary, lower baud rate when higher baud rates do not provide a good phone line
connection.
4) Restore options (various commands). A 61 command is used to restore the option
bytes, two digits per option. A CC command is used to restore credit card and local
authorization options.
e. Using the customer’s computer, upload the site configuration, authorization list,
and send pricing, as required. Restores the previous site configuration, authorization
list, and product/hose pricing.
111
287
FuelMaster® Installation Manual
3. SOFTWARE UPGRADE (For Upgrades Only)
a. Verify tasking is an upgrade. Customer must have an operational copy of
FuelMaster® software with an existing FuelMaster® database. If an existing database
does not exist, software must be a new install.
b. Disable any auto download settings and stop all services. Some services may
prevent proper setup and operation of the FuelMaster® software. After the software is
loaded and verified it functions properly, restore the services one at a time to determine
any effect they may have on software operation.
c. Retrieve transactions from all FMUs. This is to pull the transactions from the FMUs as
insurance against possible download problems after the upgrade. FMUs will have more
memory to operate longer.
d. Retrieve and record unit configuration and options. This will ensure the database has
the current unit configuration and options if they need to be reloaded after the upgrade.
e. Make a copy of the customer’s existing software database and save to the desktop.
Insurance against the database being damaged during the upgrade.
f.
Upgrade the customer’s existing software using a local computer administrator log
on. Software upgrades require computer connections with an administrator password.
NOTE
In step g, if not prompted “Database Conversion Finished”, or if other errors occurred,
discontinue upgrade and call Syn-Tech’s Customer Satisfaction Center (CSC) at 800-888-9136,
ext. 1500, for assistance.
g. When the upgrade is complete, restart the customer’s computer and verify the
database opens with the new software. From the main menu, open the vehicle, user,
customer databases. Verify the information is accurate.
4. FMU NEW INSTALLS. Repeat for each FMU. Note any deviations on page 5.
a. EXAMINATION OF PRODUCT
1) All equipment on packing list is accounted for. Insurance against something which
may have been omitted or backordered. Need to know before the work begins.
2) Equipment matches customer requirement. Customer requirements may have
changed since equipment was ordered.
3) FMU is configured with correct number of hose positions and correct
communications boards are installed. Master FMU has internal communications
cable. Received equipment is complete and will match site requirements.
4) FMU upper cabinet is correctly matched to pedestal. Pedestal has serial number on
ID plate. Upper cabinet has no ID plate. Parts have to be matched as they are removed
from shipping boxes or activation code from Syn-Tech’s Customer Satisfaction Center
will not work.
5) Doors and locks operate freely. Operational check of doors and locks.
6) No visible shipping damage. Visual inspection for damage.
b. PROVIDE TELEPROMPTING
1) Turn on FMU power switch. FMU initializes without error, and prompts the user to
INSERT KEY OR CARD TO BEGIN. Operational check that FMU completes initialization
without errors. NOTE: when first powered, new FMUs in cold, damp environments may
display error messages until warmed up and dried out. Let the FMU run a couple hours
before assuming there are parts problems.
112
288
FuelMaster® Installation Manual
2) All FMU’s displayed an asterisk (*) to the left of the hose number and prompted,
“HOSE BUSY, SELECT ANOTHER…” when dispenser in use was selected from the
FMU keypad. Indicator to users starting a transaction that a hose cannot be selected
because it is in use.
c. VALIDATE FMU ACCESS WITH PROKEE®, SMARTCARD, CREDIT CARD, AND/OR
KEYPAD
1) FMU’s validated authorized access by stepping to next menu prompt. Authorized
Prokee®, Smartcard, credit card, or keyless access will allow user to continue after
initially accessing system. Keyless access requires users to press Enter on FMU keypad
to begin access, and then prompts for vehicle or user ID.
2) FMU’s rejected unauthorized access. Unauthorized Prokee, Smartcard, credit card, or
keyless access is rejected.
d. ACTIVATE PRODUCT DISPENSERS. All FMU’s successfully activate appropriate
dispensing hoses after authorized access. When a hose number is offered, then selected,
the appropriate hose is activated.
e. VERIFY SINGLE HOSE AUTHORIZATION. Activate each hose (one hose at a time) in
automatic mode and verify no other hoses will dispense. Insurance against jumper wires
in dispenser carrying power from authorized hose to unauthorized hose. When only one hose
has been selected, only one hose should activate.
f.
SIMULTANEOUS TRANSACTIONS. Each FMU allowed simultaneous operation of each
connected dispensing hose. Verification that all connected dispensing hoses are being
separately controlled.
g. VERIFY NO COUNTS DURING DISPENSER RESET. Select COUNT TEST from the
Configuration Menu. Move Automatic/Manual Mode switches to Manual. Verify counts
do not register after the dispenser reset handle is activated. If counts do register,
perform an automated transaction for the applicable hose then query the FMU. Verify
the quantity observed in the query matches the quantity recorded at the dispenser. If
quantities do not match, a pulser with AC control must be installed. Repeat for each
connected hose. 12VDC feed to pulsers is constant. If pump handle detect is set and
configured for START ONLY or START AND END, counts during reset should be thrown out.
If not configured to throw out, other options to prevent pulses during reset must be used.
h. ENCODE, VERIFY, AND REVISE PROKEE®S OR SMARTCARDS
1) Prokee® or Smartcard for test (if applicable), one for each available product, were
encoded and read data back correctly. Software/encoder transferred database
information into key, then correctly displayed data when read.
2) The Prokee®/Smartcard Encoder (if applicable) revised data and read data back
correctly. Prokee®/Smartcard containing previously encoded data could be revised with
software and encoder.
i.
PROVIDE FOR MANUAL OPERATION. Each FMU functioned normally while selected
dispensers were switched to manual operation. Dispensers switched to the manual
position did not show on the display as being available. Verification that wiring was
landed correctly, and FMU is operating correctly for manual operation.
j.
TRANSACTION HANDLING. Transactions for each hose, each day were assigned a
sequential four digit number starting with 0001. Function of FMU firmware to mark each
transaction with a different sequence number. Will identify duplicate transactions if two
transactions have same sequence number.
113
289
FuelMaster® Installation Manual
k. DISABLE DISPENSER AFTER TRANSACTION. Repeat for multiple FMUs. Note any
deviations on page 5.
1) Each FMU disabled the applicable dispensers connected to it within the specified
time limits after dispensing was complete. Verification that PUMP FINISH TIMER is
functioning according to its setting to terminate the transaction. Only necessary to
perform this check on one hose.
2) If a solenoid valve is not installed, verify fuel stops flowing when the transaction is
ended by squeezing the nozzle trigger after the pump handle switch is turned off.
Fuel should not flow. Verification that valve isn’t needed to stop fuel flow. Depending
upon tank location and plumbing, siphon effect could apply suction to fuel to allow it to
pass through suction pump.
l.
PROTECT DATA DURING POWER FAILURE. Repeat for multiple FMUs. Note any
deviations on page 5.
1) In automatic mode, when power was removed from each FMU the applicable
dispensers connected to that FMU were disabled. Verification that FMU (in auto)
interrupts fuel flow. Will make no difference if power is removed when in manual mode.
2) Transactions in progress during power failure were recorded. No transaction data
was lost. Could indicate a bad backup battery on FMU mainboard. If power is removed,
backup battery should retain transactions and configuration information.
3) When power was restored to each FMU the applicable dispensers connected to
that FMU did not activate without initiating a new transaction. Verification that relays
release when power is removed, and do not re-activate when power is reapplied.
4) Manual intervention was not required to bring the system to full operation after
power failure. FMU should initialize to prompt “INSERT KEY OR CARD TO BEGIN”
when power is turned on.
m. PRICING. Repeat for multiple FMUs. Note any deviations on page 5. (NOTE: Syn-Tech
does not enter or change pricing for customers without their concurrence/approval,
and a written request.)
1) Check all price levels stored at the FMU. Individual products and tanks can be
configured for different price levels. Verify price levels stored at FMU match prices as
requested by customer.
2) If PRINT DOLLAR FOR PROKEE RECEIPTS is turned on verify that the price on the
receipt is correct. Run a Prokee®/Smartcard transaction. Verify receipt reflects accurate
price per gallon.
3) If credit card, run a few transactions verify pricing and functionality. Selfexplanatory. NOTE: credit card will be billed for amount of transaction.
n. DISCOUNT CREDIT CARDS. Repeat for multiple FMUs. Note any deviations on page 5.
1) Set up a discount credit card in software and send to FMU. Mark NA if not used.
Verifies software and firmware are set up correctly for customer.
2) Run a test transaction and verify that proper price level appear. Mark NA if not used.
Verifies software and firmware are set up correctly for customer.
o. PREPAID CARDS/KEYS. Repeat for multiple FMUs. Note any deviations on page 5.
1) Set up a pre-paid record in the software, encode and send it to the FMU. Mark NA if
not used. Verifies software and firmware are set up correctly for customer.
2) Run a test transaction and verify functionality. Mark NA if not used. Verifies prepaid
card/key functions.
114
290
FuelMaster® Installation Manual
3) Download transactions and make sure that card record reflects transaction. Mark
NA if not used. Prepaid Prokee record should reflect balance after transaction is
deducted.
p. RECORD TRANSACTION DATA. Perform automated test transactions on each hose.
Record the quantity displayed on the dispenser as DISPENSER QTY. Go to the Central
Controller and download the test transactions and record them under POLLED QTY.
Perform a test transaction and anotate under DISPENSER QTY. Every hose for every FMU
must be tested. Go to Central Controller and either download or query. Compare POLLED
QTY to DISPENSER QTY. Quantities should match.
HOSE
#
DISPENSER
QTY
POLLED
QTY
HOSE
#
1
9
2
10
3
11
4
12
5
13
6
14
7
15
8
16
DISPENSER
QTY
POLLED
QTY
q. SAFETY. Repeat for multiple FMUs. Note any deviations on page 5.
1) FMUs are installed in accordance with the NEC. If mounted in a Class I, Div 2,
location, all electronic components, switches, and relays are located over 18
inches above grade level, and FMU is not installed within 18 inches of a gasoline or
E85 dispenser (or 5 feet from a CNG dispenser). Explain any deviations on page 5.
Any safety or operational deviation must be corrected. Minor (non-safety or operational
related) deviations must be anotated on page 5.
2) All connections at the FMU which are a potential shock hazard are covered and
labeled with appropriate warnings, and located within a locked enclosure. All
standard connection points within the FMU and as directed by this installation manual are
covered, labeled, and within a locked enclosure.
3) An emergency stop switch is present, not within 20 feet nor greater than 100 feet
from the fuel island. When activated, the emergency stop switch removes power
from all fueling site equipment. NEC requirement.
r.
POST INSTALLATION INSPECTION. Repeat for multiple FMUs. Note any deviations on
page 5.
1) FMU is securely mounted with four 3/8 inch (minimum) screw anchors/attach bolts.
Pedestal is predrilled for 3/8 inch screw anchors/attach bolts. Syn-Tech uses stainless
steel screw anchors, nuts, and washers.
2) Any entry holes drilled/punched in FMU are sealed. Requirement of equipment
certification.
3) FMU upper cabinet and pedestal door gaskets provide weatherproof seal of
internal components. Required for protection of internal electronic components.
4) FMU upper cabinet is secured to pedestal with six screws. Less than six screws will
not properly seal interface/gasket area.
115
291
FuelMaster® Installation Manual
5) FMU board/backplate attach screws are secure. Screws holding mainboard and
Satellite I/O Control Board to backplate are secure, and four screws holding backplate
assembly into FMU are secure. Screws (from outside FMU) holding relay assemblies and
Pedestal I/O Board in pedestal are secure.
6) Wire/cable connections are correct and secure. Self-explanatory.
7) Board retainer for mainboard expansion cards is installed and secure. Star washers
have been added to some to keep board retainer screws tight.
5. TRAINING. User was provided training for:
a. How to start a transaction at the FMU, access is dependent upon type of system; may
require Prokee®, Smartcard, credit card, keyless, or AIM2™
b. How to use a Supervisor Prokee® or Smartcard, Prokee® must be pushed against
spring-loaded contacts; Smartcard must have chip oriented to right
c. How to load and open the software program, doubleclick on icon, enter Operator
Name and Password, click on OK
d. (Software Upgrades Only) New features of upgraded software and/or FMU, explain
differences between old and new software
e. How to download transactions from the FMU to the computer, from main page of
software program, click on Online icon, select Download Options, select site IDs to
download, select Normal Download, click on Connect
f.
How to encode a Prokee® or Smartcard using the Encoder, verify Encoder is
properly connected, verify correct information in database, click on Prokee® icon, insert
Prokee® or Smartcard in Encoder
g. How to de-authorize a Prokee® or Smartcard, in software program, go to Vehicle or
User icon, find vehicle or user to de-authorize, unclick Authorized box, send Authorization
List
h. How to re-enable a locked-out hose, from Console, select site, click on Dial, from
Remote Command Menu select 2. Reenable a Pump
i.
How to use Price Levels, from Tables, click on Products, open a product from Product
List, cover Base Cost and Price Levels
j.
How to use Discount Credit cards and a prepaid Prokee®/Smartcard, if applicable,
reference software User Manual
k. Who to call for troubleshooting/training assistance 800-888-9136, ext. 1500
6. DATA
a. Site Signature: Can be found on Packing List, or by clicking on Help/?/System Info in software
b. FMU telephone number: Phone number for FMU modem (if applicable)
c. FMU IP Address: IP address of FMU Network Interface Card (NIC)
d. Network is Cable, Fiber, Wireless (circle one) Circle Cable, Fiber, or Wireless
e. Zlinx Baud Rate/Data Bits/Stop Bits/Parity/Channel: Information needed to be able to send
replacement Zlinx to customer
f.
Number of Master FMU’s: Self-explanatory
116
292
FuelMaster® Installation Manual
g. Number of Satellite FMU’s: Self-explanatory
h. FMU Firmware version: Can be found by watching FMU display after power is turned on.
i.
Dispenser control method: Reset, solenoid valves, or suction pump motors.
j.
Pulser type/divide ratio: Examples are: 1:1, 10:1, 100:1, 1000:1
k. Computer operating system: Examples are Vista Business 32 bit, Windows 7 64 Bit
l.
FuelMaster® software version: Can be found by clicking on Help/? in software.
m. Site Contact: Name of customer representative responsible for fuel site.
n. Site Contact telephone number and e-mail: Phone number and e-mail address of customer
representative responsible for fuel site.
Comments (use reverse if additional space is needed):
Explain any deviations, or non-compliance with the NEC, if not safety or operational related. The
customer may also use this area to enter comments or suggestions for product improvement, or
recommended changes to the upgrade/installation process.
SIGNATURE AND FINAL SIGN-OFF
Customer Representative (print): Printed name
Customer Representative (signature): Signature
Date: Date initialization completed
Certified Startup Technician (print): Printed name
Certified Startup Technician (signature): Signature
Organization: or Company
ASR (Authorized Service Representative) Number: Number from ASR Card
Date:
Date initialization completed
117
293
FuelMaster® Installation Manual
HOLD HARMLESS AGREEMENT (to be completed when installing wireless networking equipment)
TO: Customer’s name and organization
SUBJECT: Potential Security Breaches Through Wireless Network Connections to FuelMaster®
FuelMaster® Fuel Management Units (FMUs) and software do not contain personal information
subject to the Privacy Act of 1974. However, when added to a network the FMU may provide a link
to other resources which do contain personal or privileged information. Cable or fiber optic
network connections are not easily accessible. Wireless networks operate on radio waves that
can be intercepted by anyone with the right equipment and within range of the transmitter.
Without proper wireless network security, outside users can access your network to attain such
valuable information as social security numbers, credit card numbers, bank account numbers,
and countless other private information sources stored on your network. If accessibility is
achieved, outside users can access anything stored in your network, not just FuelMaster® related
information.
Though the physical installation of the equipment may be accomplished by anybody with the
knowledge and experience, the responsibility for the network, IP addresses, wireless components
and devices, access points and network configuration rests entirely on the customer and, where
applicable, his/her Information Technology (IT) person(s) or Network Administrator(s) for that site.
Syn-Tech Systems, Inc., cannot emphasize enough the potential damage that may result from a
breach in network security. When a wireless network connection to FuelMaster® is established,
Syn-Tech Systems, Inc, cannot prevent accessibility by outside users. As such, this HOLD
HARMLESS AGREEMENT is prepared to remove liability from Syn-Tech Systems, Inc., for any
breach of security resulting from the development of a wireless network connection to
FuelMaster®. Please acknowledge receipt and concurrence with the terms of this agreement by
signing below. Thank you.
ACKNOWLEDGEMENT:
I acknowledge receipt and concurrence with the terms of this agreement:
Signature of customer’s representative
(Signature of Authorized Representative)
118
294
FuelMaster® Installation Manual
Appendix A
Glossary
This Appendix provides definitions for the most common terms, acronyms, and abbreviations referred to
in this FuelMaster® Installation Manual.
AIM2™ - trademarked name for Syn-Tech’s second generation passive fueling system. AIM is an
abbreviation for Automotive Information Module.
AIM2™ Installation Training – instruction to the customer in the installation of AIM2™ modules in
vehicles. FMU Installation/Startup/Training should be complete before AIM2™ Installation Training
commences. AIM2™ installation tests cannot be completed until FMU Installation/Startup/Training is
complete.
Central Accounting Office – location where the Central Controller and other FuelMaster® -related office
equipment are located; may be at the fueling site or remotely located.
Central Controller – PC with FuelMaster® software loaded on it.
Central Controller Operator – person who normally operates the Central Controller
Commercial Dispensers – dispensers which read quantity only; no cost reading.
Customer Satisfaction Center (CSC) – Syn-Tech’s help desk available at 800-888-9136, ext. 1500, or
at [email protected]
DCRA – Dual Control Relay Assembly
Dispenser – device through which a product is dispensed; a dispenser typically does not contain its own
pump motor.
Dispensing Site – site where dispensing equipment and FuelMaster® are located
Distributor Support Center (DSC) – Syn-Tech’s distributor help desk available at 866-359-8857 for
technicians who have an ASR (Authorized Service Representative) ID number
DoD – Department of Defense
Download – the act of transferring information from the FMU to the Central Controller
Electronic Dispenser – normally a fuel dispenser at a retail operation. Has a CPU (central processing
unit) with proprietary computer language unique to the manufacturer. Responds to commands input from
a controller through a two-wire (send/receive) communications line. FuelMaster® presently controls
electronic dispensers through an Electronic Dispenser Interface Kit.
FBO – fixed base operator. Primary provider of services to general aviation aircraft and operators located
at, or adjacent to an airport.
Firmware – operating program in the FMU
FMU – Fuel Management Unit
119
295
FuelMaster® Installation Manual
Initialization (aka Startup) – initialization and startup are the same. Initialization includes inspection and
testing of an installed FMU and loading the software. Initialization does not include the installation or
pricing of any installation materials, but may include the termination of wires/cables. Training the
customer is normally included in Initialization, but may be performed as a separate function and at a
different time.
Installation – the physical act of mounting the FMU where the customer desires and providing the proper
interfaces to the fuel dispensers, electrical power, communications, transaction printer, and tank monitor.
Installation may include removal of another automated system, but should be specified by quoter/seller.
Fuel dispensers should be pumping fuel before the installation commences. Pulser installation in fuel
dispensers is a function of installation, but pulser pricing is additive to installation labor costs. Cable/fiber
optic network connections may be a function of installation, but wireless network setup is not. Tank
monitors must be installed, operational, and clear of alarms when interfaced to FuelMaster by the
installation technician. Wires, cables, and conduit fittings will be provided, and sealoffs poured as a
function of installation. Post-installation tests cannot be performed on unserviceable interfacing
equipment. All equipment interfacing to FuelMaster® must be operational prior to installation, or noted by
the customer and accepted as is. Return trips after installation will be separately billed.
NEC – National Electric Codes; the title for NFPA (National Fire Protection Association) 70
PC – personal computer (desktop or laptop)
Poll – connection from the Central Controller to an FMU to upload or download transactions or other
information
Prokee® - patented access device for initiating transactions in FMU. Contains EEPROM (read/write/erase
memory chip) programmable through Prokee® encoder with connection to Central Controller running
FuelMaster® software.
Pump – dispenser with built-in (suction) pump motor
Qualified Installer – tech who has attended the FuelMaster factory installation training course and has
been assigned an ASR (authorized service representative) number. Tech should have an ID card issued
by Syn-Tech Systems, Inc.
Quart Board: quad UART board; board that plugs into an expansion slot in the mainboard
Retail Dispensers – dispensers which display both cost and quantity
Service Island – location at a fueling site where the dispensers and FMU(s) are located; may also
include other servicing equipment such as hose reels for oil, air, water, transmission fluid, and antifreeze.
Site Preparation – includes everything necessary to prepare the site for a fixed FMU installation. Will
include installation of underground conduit (conduit should have pull strings installed), concrete pad(s) to
mount FMU(s) on, wiring of fuel dispensers, and existence of AC power, phone, network terminal, as
necessary, to support communications from FMU to Central Controller. Surface mount conduit may be
part of the installation, but must be specified as an installation function by the quoter/seller. Emergency
stop switch installation is a function of site preparation. Someone who comes in to perform an installation
should have all the necessary conduit (except surface mount conduit, as noted), a concrete mount pad for
each FMU, dispensers that are pumping fuel, operational tank monitors, and access to electrical and
communications connections.
Smartcard – access device similar in appearance to a credit card with memory chip imbedded in face of
card. Can receive same inputs as Prokee® from Central Controller through a smartcard encoder
120
296
FuelMaster® Installation Manual
Software – in this context, the FuelMaster® operating program which is loaded on the Central Controller
SSRA – Solid State Relay Assembly
Startup – see Initialization
Station House – location at a fueling site where the office equipment (Central Controller, phones, printer,
fax machine) may be located
Training – instruction to the customer in the proper operation of the FMU and software. When performed
in conjunction with an installation or startup, software database entry and encoding of
Prokees/smartcards may occur before other work commences so the system may be put to use soon
after installation or startup is completed.
Upload - the act of transferring information from the Central Controller to the FMU
Webinar – sometimes referred to as Web Conferencing. A highly desirable training concept to familiarize
customers with the FuelMaster® software. A Syn-Tech trainer connects their PC to the customer’s PC,
then communicates with the customer via speakerphone to cover key points of the software. Usually a
webinar is scheduled two weeks after the installation is complete to give the Central Controller operator
some time to see the software and develop some questions for the Syn-Tech trainer.
Weights and Measures – a generic term which may apply to the agency within state or county
government responsible for the accuracy of fuel dispensers and fuel management systems; may also
apply to National Institute of Standards and Technology (NIST) Handbook 44.
121
297
FuelMaster® Installation Manual
122
298
FuelMaster® Installation Manual
Appendix B
Dispenser Compatibility
Following this description is a sample FuelMaster® Dispenser Compatibility listing. This listing
was compiled, and is periodically updated, to keep our customer’s (users and technicians)
informed of the interface capabilities of FuelMaster® FMUs. The listing is an Adobe Acrobat file
with an integrated date: Dispenser_Compatibility_090310.pdf. The listing contains the manufacturer
and model of many fuel dispensers which have been interfaced to FuelMaster® fixed site FMUs. It
identifies whether the dispenser may be directly connected to an FMU, or if it must be connected with an
Electronic Dispenser Interface Kit. If you want the most up-to-date information from the dispenser
compatibility listing, call Syn-Tech’s Customer Satisfaction Center at 800-888-9136, ext. 1500, and ask
for the latest copy to be e-mailed or fax’d to you.
The opening paragraph is a disclaimer. Although we have established a good raphor with most of the
dispenser manufacturers, they are not obligated to inform us when a change or new product is
introduced. As such, changes to fuel dispensers may occur before they show in the listing. Do not
assume this listing will always provide the most current information regarding newly introduced or
changed dispensing equipment.
Dispensers which have more than one fueling hose must have a means for controlling individual fueling
hoses. For example, hoses cannot be individually controlled in a dual hose single product dispenser with
no solenoid valves. In this example, solenoid valves would have to be added to the dispenser.
The first column in the listing is the Manufacturer/Model of the dispenser. Every specific model number
may not be listed if all models within a series are compatible (example: Bennett 3911 is included in a
3900 series listing).
The second column, Mechanical/Electronic, is a simple description of the display. Mechanical would be
on a mechanical dispenser where the quantity or cost is shown on revolving wheels. Electronic would be
a digital LED or LCD display.
The third column, Commercial/Retail, identifies whether the dispenser has a cost display. A Commercial
dispenser will only display quantity. A Retail dispenser will display quantity and cost.
The fourth column, Direct Interface, will have a check mark (√) in it if the FMU may be connected directly
to the fuel dispenser to attain individual hose control and pulses.
The fifth column, Electronic Dispenser Interface*, will have a check mark (√) in it if an Electronic
Dispenser Interface Kit must be used to interface the FMU to the dispenser. Usually this only applies to
retail fuel dispensers subject to periodic Weights & Measures inspections. The asterisk (*) is there to bring
attention to a note. OINKs (abbreviation for Opto-Isolators) were developed by Syn-Tech Systems several
years ago to interface electronic dispensers (for commercial/fleet purposes) when there was no Electronic
Dispenser Interface Kit. Where the OINKs provide an interface sufficient for commercial or fleet
applications, they do not possess the accuracy necessary for retail (Weights & Measures) applications.
DoD and Classic FMUs will not interface electronic dispensers.
The sixth column, Require Pulse Option, has a check mark (√) if the manufacturers literature identifies
pulsers as optional equipment. Every dispenser interfaced to an FMU must deliver pulses.
The seventh column, Require OINK*, will have a check mark if an Opto-Isolator has been developed for
the application. The asterisk (*) brings attention to the note stating OINKs do not have sufficient accuracy
for retail applications.
123
299
FuelMaster® Installation Manual
The eight column, Note, contains a number corresponding to a note on the last page of the listing. These
Notes should be followed to correctly interface an FMU to the dispenser make and model shown on that
line of the listing.
The last column, Compatible with DoD, was added to make it easier for our DoD customers to quickly
determine if a direct interface is possible between a DoD FMU, and a specific make and model of a fuel
dispenser. DoD FMUs will not presently interface electronic dispensers.
If you have questions after reviewing the FuelMaster® Dispenser Compatibility listing, please call our
Customer Satisfaction Center at 800-888-9136, ext. 1500, for assistance. Technicians with knowledge of
commercial and DoD fuel management systems are available to assist you.
124
300
FUELMASTER® DISPENSER COMPATIBILITY
03-Sep-10
IMPORTANT DISCLAIMER!
This list is compiled from the best information available from the various dispenser manufacturers, their websites, or field experience
developing the interfaces. Although this list is the most current as of the date shown above, you should call Syn-Tech Systems' Customer
Satisfaction Center at 800-888-9136, ext. 1500, to confirm the most current compatible dispenser listing.
NOTE: Dispensers having more than one fueling hose must have individual means (i.e., solenoid valves, suction pump motors) for
controlling each fueling hose.
Below under Manufacturer/Model is a listing of fuel dispensers Fuelmaster may be tasked to interface. Where a "Series" may be listed, all models
covered under that series (i.e., Bennett 3911 is included in 3900 Series) are compatible unless otherwise specified. Mechanical/Electronic denotes
the computer type. Commercial/Retail identifies the dispenser type: commercial with only a quantity display, or retail with both gallons and dollar
displays. Direct Interface identifies an interface possible without proprietary interfacing equipment. Electronic Dispenser Interface indicates a
proprietary intermediate device is required to interface the programmer of certain electronic dispensers; not compatible with DoD firmware. DoD
applications must use a dispenser application which does not require an Electronic Dispenser Interface . Require Pulse Option means an
optional device or circuit board must be purchased from the dispenser manufacturer to obtain quantity pulses from the dispenser. Any dispenser being
interfaced to FuelMaster ® must have a pulse output or pulser installed. Require OINK means a device manufactured by Syn-Tech Systems must be
installed to adapt the dispenser pulse circuit to Fuelmaster. Do not use oinks in retail applications. Sufficient accuracy to pass Weights &
Measures inspections is not possible. Notes in the last column are for additional guidance when making the interface. See an explanation for
Notes at the end of this chart.
Compatible
Electronic
Require
with
Mechanical/ Commercial/
Direct
Dispenser
Pulse
Require
DoD
Manufacturer/Model
Electronic
Retail
Interface Interface*
Option
OINK*
Note
(see Notes)
Bennett
3788, 3789, 3900 Series, 4000 Series
Mechanical Commercial
√
√
3K Fleetmaster (3100/3200 series)
Mechanical Commercial
√
√
3K Heritage (3300/3400/3500/3600 series)
Mechanical Retail
√
√
3K (3700S, 3700H) Go Pump Series
Electronic
Commercial
√
√
21
√
3K (3800S, 3800H) Go Pump Series
Electronic
Retail
√
√
17,21
√
3K (3700B) Big Squirt Series
Electronic
Commercial
√
√
19,21
√
3K (3800B) Big Squirt Series
Electronic
Retail
√
√
17,19,21
√
3K (3700L) Little Squirt Series
Electronic
Commercial
√
√
19,21
√
3K (3800L) Little Squirt Series
Electronic
Retail
√
√
17,19,21
√
3K Big/Little Squirt Companion Satellite Series
2
√
2300/2400 Horizon 2 Series
Electronic
Retail
√
Electronic
Retail
√
√
√
12
Dresser Wayne
360/370 Series
G5200 Reliant Series
G6100 Reliant S1 (Shelf Mount)
G6100/G6200 Reliant Series
3/G7200 Select Series
3/G7230 Select Ultra High Capacity Series
3/G2000 Century, Global Century Series (old)
Rxx/x, Bxx/x Ovation Series
3/V Series Vista
(H/W) Global Vista Series
11-XX, 22-XX Global Century Series (new)
3/G3000 Global Century Series
Electronic
Mechanical
Mechanical
Mechanical
Electronic
Electronic
Electronic
Electronic
Electronic
Electronic
Electronic
Electronic
Retail
Retail
Commercial
Commercial
Commercial
Commercial
Retail
Retail
Retail
Retail
Retail
Retail
√
√
√
√
√
√
√
√
1
Dresser Wayne Pignone
H, HH, LHR, SCR, LPG Global Star
DPX-A (light, CNG, LPG)
DPX-F CNG
DPBA-L01 LPG
Electronic
Electronic
Electronic
Electronic
Retail
Retail
Retail
Retail
Mechanical
Commercial
√
Electronic
Electronic
Commercial
Retail
√
√
Mechanical
Electronic
Mechanical
Electronic
Mechanical
Electronic
Retail
Retail
Commercial
Commercial
Commercial
Commercial
√
√
√
√
√
√
Clean Fueling Technologies (CFT)
Made from converted Gilbarco Advantage
Fillrite
Any dispenser (AC or DC) with 800, 800C,
820, or 900 series meter
FR307, FR712
UL307
Gasboy
8700K Atlas Series
8800K Atlas Series
9100 All Series
9800 All Series
9120 Astra Series
9820 Astra Series
215A High Speed Satellite
216A Super Speed Satellite
125
301
√
√
√
√
15,19,22
19,22
√
√
√
√
√
√
√
√
√
√
√
√
√
√
√
√
√
6
6
√
√
√
16
√
7,23
√
7,23
2
2
√
√
√
√
√
√
Electronic
Mechanical/ Commercial/
Direct
Dispenser
Electronic
Retail
Interface Interface*
Require
Pulse
Option
Require
OINK*
Manufacturer/Model
Gasboy (con't)
1820 Consumer Pump
72S Consumer Pump
Split 70 Series Transfer Pump
25/26 Consumer Pump
67/68 Consumer Pump
3460/4460/4860 Meter Registers
Mechanical
Mechanical
Mechanical
Mechanical
Mechanical
Mechanical
Commercial
Commercial
Commercial
Commercial
Commercial
Commercial
√
√
√
√
√
√
Gilbarco
Legacy (JC/JCA Series)
Legacy (JM/JMA Series)
Legacy (JH/JHA, JHB, JHC, JHD Series)
Encore (All)
Eclipse Series
Endeavor (JT/JTA Series)
SK-700 Series
Performer (JE/JEA Series)
Advantage (RB Series Remanufactured)
Highline Series
Trimline
MPD-3
109
397
112
Enterprise
Mechanical
Mechanical
Electronic
Electronic
Electronic
Electronic
Electronic
Electronic
Electronic
Electronic
Mechanical
Electronic
Mechanical
Electronic
Mechanical
Electronic
Commercial
Retail
Retail
Retail
Retail
Retail
Retail
Retail
Retail
Retail
Retail
Retail
Commercial
Retail
Commercial
Retail
√
√
√
GreenField Compression CNG
Made from converted Gilbarco Advantage
Electronic
Retail
√
Electronic
Retail
√
Electronic
Commercial
√
7,20,24
√
Electronic
Retail
√
3
√
Micom (South Korea)
Plus (only model interfaced)
Electronic
Retail
√
4
√
PMC
Superflow, Dualflow, Commander, Fuelhouse
Mech/Elec
Comm/Retail
√
8
√
Schlumberger
4330-2A-V
Electronic
Retail
√
√
√
14
Tokheim
262
785, 793
1150/1250 Series
7500 Series
8700 Series
2600 Series
Premier Series
Quantium Series
Electronic
Mechanical
Mechanical
Mechanical
Mechanical
Electronic
Electronic
Electronic
Retail
Commercial
Retail
Commercial
Retail
Commercial
Retail
Comm/Retail
√
√
√
√
√
√
√
√
18
13
11
Tokico (Japan)
Interfaced one model; model number unknown
Electronic
Retail
√
Tulsa Gas Technology
K-62, K-322
T-7000 Series
Electronic
Electronic
Retail
Retail
√
√
Kraus
Retrofits to various Bennett, Gilbarco, and
Tokheim dispensers. Pulses are obainable
from Kraus flowmeters. Refer to dispenser info
for control compatibility.
Liquid Controls
LCR and LCR II
Maser (Italy)
363M (only model interfaced; other models
available in commercial and retail
applications)
√
√
√
Note
Compatible
with
DoD
(see Notes)
9
√
√
√
√
√
√
√
√
√
12
√
12
10
√
√
√
√
√
√
√
√
√
√
√
√
√
√
√
√
√
√
√
√
12
√
√
Scully
Interfaces to various equipment.
126
302
√
√
√
√
√
√
√
√
√
5
√
√
√
Electronic
Mechanical/ Commercial/
Direct
Dispenser
Electronic
Retail
Interface Interface*
Require
Pulse
Option
Compatible
with
DoD
(see Notes)
Require
Manufacturer/Model
OINK*
Note
Veeder-Root
EMR 3 Electronic Register Series
Electronic
Commercial
√
8,20
√
Notes:
* Do not use OINKs in retail applications. Use the Electronic Dispenser Interface.
1. Requires two OINKs per hose: part number 226165 (divide by 4) or 226165A (divide by 1) for pulse and part number 226157 for control (used at Fort
Lewis, WA, with OINKS).
2. Controlled by master dispenser
3. Interfaced with 363M; required mod to dispenser by Maser to receive pulses.
4. Flowmeter has output shaft suitable for attaching mechanical pulser; problems with accuracy in a retail application at Chinhae, South Korea.
5. Attached mechanical pulser to totalizer shaft.
6. Requires 470 ohm, 1 watt, pull-up resistor for pulse connections.
7. Requires 330 ohm, 1 watt, pull-up resistor for pulse connections.
8. Requires 220 ohm, 1 watt, pull-up resistor for pulse connections.
9. Cannot fit pulser to any model other than 1820R
10. Some older models can be interfaced with OINK; newer models require PIE.
11. 785 may have to control neutral (w/o pump handle detection), or add 1/4 inch solenoid valves for pump handle detection. Have very little info on 793.
12. Requires part number 226521 (divide by 4) or 226521A (divide by 1) oink. Use Electronic Dispenser Interface in retail applications.
13. Requires part number 228648 (divide by 4) oink for commercial applications. Use Electronic Dispenser Interface in retail applications.
14. Requires part number 200158 oink. Use Electronic Dispenser Interface in retail applications.
15. Retail versions available as an optional upgrade.
16. Direct interface hasn't been tested; Gasboy specifies wiring option for E models. Not sure if available on other models of 8800. List of interface parts
provided by Gasboy for K models; list includes 12 required parts (14 for dual hose) not provided with dispensers without pulse option. Also learned there
is no Electronic Dispenser Interface Kit available.
17. Cannot separately control fast and slow valves for preset options; attempts to separately control will void warranty of new dispenser and result in
overrun.
18. Tokheim service and parts in the U.S. provided by Dresser Wayne.
19. END ONLY option necessary for pump handle detection; not presently available with DoD and classic systems.DoD and classic systems must
have pump handle detect set to NO.
20. Contact Syn-Tech Customer Satisfaction Center for pulser wiring instructions.
21. Wiring/setup instructions available in Product Bulletin 141.
22. Wiring/setup instructions available in Product Bulletin 142.
23. Wiring/setup instructions available in Product Bulletin 122.
24. Single hose applications only.
127
303
128
304
FuelMaster® Installation Manual
Appendix C
FMU/EIU Configurations
Following is a listing of FMU and EIU configurations, by model number, available at the time of printing of
this manual. Check with your FuelMaster® sales person for availability of other/newer configurations.
•
•
NOTE
Classic and Plus series equipment are compatible with Plus series software, but Plus series
equipment is not compatible with Classic software.
Model numbers for DoD series FMUs may be found under the listing for Plus Series (current
production). All DoD FMUs are Plus Series FMU-2550 or FMU-2551.
Plus Series (current production)
Units are available with grey finish with blue and black markings, or tan finish with black and gold
markings. Grey units will have a G after the model number (example: FMU-2500PLUSG). Tan units will
have a T after the model number. If a color is not specified, units will be supplied with a grey finish.
FMU-2500PLUS Master
FMU-2501PLUS Satellite
- Units are configured for use with Prokee®s, only
FMU-2540PLUS Master
FMU-2541PLUS Satellite
- Units are configured for use with Smartcards, only
FMU-2550PLUS Master
FMU-2551PLUS Satellite (DoD only)
- Units are configured for use with Prokee®s and Credit Cards
FMU-2560PLUS Master
FMU-2561PLUS Satellite (DoD only)
- Units are configured for use with Smartcards and Credit Cards
FMU-2570PLUS Master
FMU-2571PLUS Satellite
- Units are configured for Keypad only use with a backup Prokee® reader
FMU-2580PLUS Master
FMU-2581PLUS Satellite
- Units are configured for use with Prokee®s and Smartcards
FMU-2590PLUS Master
- Units are configured for use with Prokee®s, Smartcards, and Credit Cards
FMU-3500PLUS Master
FMU-3501PLUS Satellite
- Passive AIM2™ unit with backup Prokee® reader
FMU-3540PLUS Master
FMU-3541PLUS Satellite
- Passive AIM2™ unit with backup Smartcard reader
129
305
FuelMaster® Installation Manual
FMU-3550PLUS Master
- Passive AIM2™ unit with Prokee® and Credit Card readers
FMU-3560PLUS Master
- Passive AIM2™ unit with Smartcard and Credit Card readers
EIU-2530PLUS Plus EIU
Classic Series
Units are available only with tan finish with black and gold markings
FMU-2500 Prokee® (only) Master
FMU-2501 Satellite
- Units are configured for use with Prokee®s, only
FMU-2520 OTR (Over The Road) Master
FMU-2501 OTR (Over The Road) Satellite
- Units are configured for use with Prokee®s, only
FMU-2525 Mobile – with one hose control and modem, includes telephone download box, cable, barrier,
and standard pulser; valve extra
- Maximum of four hose control
- Longer cables available for longer trucks or applications
FMU-2540 Smartcard Master
FMU-2541 Satellite
- Units are configured for use with Smartcards, only
FMU-2550 Prokee®/Credit Card Master
FMU-2551 Satellite
- Units are configured for use with Prokee®s and Credit Cards
FMU-2560 Smartcard/Credit Card Master
FMU-2561 Satellite
- Units are configured for use with Smartcards and Credit Cards
FMU-2570 Keypad Entry Master (no Satellite option)
- Keyless unit with Prokee® backup
FMU-2575 Keypad Entry Master (no Satellite option)
- Keyless unit with Smartcard backup
FMU-3000 Prokee®/RF Tag Master
FMU-3001 Satellite
- Passive unit with backup Prokee® reader
FMU-3040 Smartcard/RF Tag Master
FMU-3041 Satellite
- Passive unit with backup Smartcard reader
FMU-3050 Prokee®/Credit Card/RF Tag Master (no Satellite option)
- Passive unit with Prokee® and Credit Card readers
FMU-3060 Smartcard/Credit Card/RF Tag Master (no Satellite option)
- Passive unit with Smartcard and Credit Card readers
EIU-2530 Classic EIU
130
306
FuelMaster® Installation Manual
Appendix D
Laptop Direct Connect to FMU
The information herein may also be found in Product Bulletin 111, dated 7/25/2007. If any information
changes, a revision to the product bulletin will reflect the change.
Several programming and troubleshooting options are possible by direct connecting to the FMU
mainboard with a laptop and direct connect cable (Syn-Tech part number 941C0105, or local
manufactured). This appendix is presented as guidance for direct connecting to the FMU mainboard. Its
recommended some practice be applied to this procedure before executing it for necessity.
A direct connect cable may be purchased from Syn-Tech by ordering part number 941C0105, or you can
make your own. If you choose to make your own cable, you will need approximately 20 feet (length
needed to get your laptop out of direct sunlight for easier viewing) of small gauge shielded three
conductor cable. A good example is Belden 8771. It uses 22 AWG conductors. The cable will need a
female DB9 serial port connector on one end and a Tyco Electronics part number 102241-3 five-pin
connector on the other end. Three each 1-87309-4 contacts are needed to plug the three wires into the
102241-3 connector. The DB9 connector may be of any manufacture.
The pinout for cable wiring is as follows:
102241-3
3
4
1
DB9
2
3
5
If your laptop has a USB port and no DB9 serial port, you will need a USB/serial adapter. An adapter we
have found to work satisfactorily is a USB/serial adapter made by IOGear having part number
GUC232A. We buy them through CDW. CDW's part number is 261218.
Note
Hyperterminal is not provided on PCs with Windows Vista operating systems. A free copy for personal
use may be downloaded from the internet, or another similar program (i.e., Procomm Plus) may be used.
Hyperterminal must be run in the laptop to access the FMU. To set up Hyperterminal, perform the
following:
1. Connect the direct connect cable to the laptop DB9 serial connector (or USB/serial adapter)
and FMU “SERIAL PORT” in the upper left corner of the mainboard.
2. Open the Hyperterminal program on your laptop.
3. When the “Connection Description” window appears, select a name and icon for the new
connection, then click OK. Once this has been done, you can return to the same file for future
uses without repeating some of these steps.
4. In the “Connect To” window, change “Connect using:” to one of the COM ports listed (i.e.,
COM1), then click OK.
5. In the “COM1 Properties” window, change the “Port Settings” to 19,200 bits per second, 8
data bits, no parity, 1 stop bit, and Xon/Xoff flow control, then click Apply, and OK.
131
307
FuelMaster® Installation Manual
6. Save the file you created so the settings you entered will be available the next time you use
Hyperterminal.
When Hyperterminal is opened, and the saved file is opened, a blank window should be showing with a
flashing cursor in the upper left corner of the window. Press Ctrl D to log on to the FMU. An abbreviation
of the FMU’s site name should appear. From this point, commands may be entered to view or program
information into the FMU.
Use command 00 (zero zero) to display a command summary of the commands applicable to the version
of firmware loaded in the FMU. NOTE: command summaries may not be the same in two different
firmware versions. Use the commands in the command summary to view or program information into the
FMU.
To save information displayed on your laptop screen to a file, you must begin the “capture” before the text
is displayed. Click on “Transfer” and “Capture Text” from Hyperterminal. A “Capture Text” window will
open with prompts to enter a file name. Use “Browse” as necessary to name the file and its location. Click
“Start” to begin capturing text. To complete the screen capture, return to “Transfer” and “Capture Text”
and click on “Stop”. All screen text displayed between “Start” and “Stop” will be saved to the file
previously named. This file can be opened with Word or Notepad to view or print.
Use command 07 to log off, then exit Hyperterminal and disconnect the direct connect cable.
Sample Command Summary Listing for firmware v3.65 NBS:
NOTE
These commands apply to firmware version 3.65 NBS. If you are using other firmware in your FMU, these
commands may not be the same.
00
01
02
03
04
05
07
08
09
0A
0B
0C
0D
0E
0F,ARG1,ARG2
10
Xmodem.
11
12
13
14
15
16
17
18,ARG1
19
1A
1B
DISPLAY COMMAND SUMMARY.
DISPLAY COMMAND AVAILABILITY INFO.
Initialize FMU to default settings.
Set FMU time.
Set FMU date.
Display receipt printer status.
EXIT - Hang up FMU/go offline.
Upload USER KEY LIST or USER LOCK-IN LIST (VMN) to FMU.
Clear FMU's USER KEY LIST or USER LOCK-IN LIST (VMN).
List users in USER KEY LIST.
Inquire if user in USER KEY LIST.
Inquire if vehicle in VEHICLE KEY LIST.
Dump System Errors.
Display Print Buffer Contents.
Max Connect Speed: ARG1=0:Display, ARG1=1:Set to ARG 2.
Upload VEH KEY LIST or VEH LOCK-IN LIST (VVI) to FMUList vehicles in VEHICLE KEY LIST.
Download all transactions from FMU (MASTER and SATELLITES).
View FMU configuration on screen.
Set site name.
Display site name.
Send text messages to On-Site printer.
Clear FMU's VEHICLE KEY LIST.
Memory dump of address ARG1 (hex), press ESC to cancel.
Display FMU EPROM version.
Set 'InitArchOk'- enables marking or deleting transactions.
Watch LCD.
132
308
FuelMaster® Installation Manual
1C
1D,ARG1,ARG2
1E,ARG1,ARG2
1F,ARG1,ARG2
20,ARG1
21,ARG1
22
23
26
27,ARG1
28
29
2A
2B
2C,ARG1
2D
2F,ARG1
reset.
30
31
33,ARG1
34,ARG1,ARG2,ARG3
ARG2.
35
36,ARG1
37
38
39
3A
3B
3C
3D
3E
3F
40
41,ARG1
42
43
44
45
46
47
48
49
4A,ARG1
4B
4C
4D
4E
50,ARG1
51,ARG1
52,ARG1
pumps.
53,ARG1
54
56
57
Send message to LCD, wait for user response, or 45 sec..
Same as 1F, also include out of range but don't rollover.
List ARG2 transactions (in HEX) starting from tx. #ARG1.
List ARG2 transactions (decoded) starting from tx. #ARG1.
Send config to CC {ARG1=0, Master | ARG1=1-8, Satellite}.
Get config from CC {ARG1=0, Master | ARG1=1-8, Satellite}.
Set FMU's main prompt message.
Reset main prompt message.
Display number of satellites (output is binary data).
Get Pricing From CC {ARG1=0, Master | ARG1=1-8, Satellite}.
Mark FMU transactions as downloaded.
Display system time (computer format).
Display system time/date.
Set location name (like site name).
Display Config Audit Trail.
Initialize Config Audit Trail.
Trnsxn Num Operations: ARG1=1 disp, ARG1=2 set, ARG1=3
Store clock
Store clock
Modify ARG1
Modify ARG3
time.
date.
transaction (#-decimal).
number of bytes starting at ARG1 mem loc to
List FMU's verified transactions.
List the count of FMU's verified transactions.
Reset hose totals.
Set site signature.
Write configuration to RTC RAM.
Set pump cumulative totalizers.
Set Product Prices.
Clear pump cumulative totalizers.
Setup PIC EIU configuration.
Reset PIC EIU configuration to default.
Display PIC EIU configuration.
List memory addresses.
Pass through to satellite FMU number ARG1.
Set custom miscellaneous prompt.
Reset miscellaneous prompt back to default.
Set receipt header message.
Reset receipt header message to default.
Set receipt footer message.
Reset receipt footer message to default.
Set custom vehicle prompt.
Reset vehicle prompt back to default.
Reset OIL ASK prompt, 1=ConnDOT, other=default.
Set custom Odometer prompt.
Reset Odometer prompt back to default.
Set custom Agency prompt.
Reset Agency prompt back to default.
Shut down hose number ARG1 (Hex) ARG1=0, all pumps.
Re-enable hose number ARG1 (Hex) ARG1=0, all pumps.
Put hose ARG1 (Hex) into semi-manual mode ARG1=0, all
Take hose ARG1 (Hex) out of semi-manual ARG1=0, all pumps.
Moniter Mode and Semi-Manul Mode Configuration Menu.
Set Prokee Tax Rates.
Set High Flow Setpoint (for 2 relays per hose).
133
309
FuelMaster® Installation Manual
58
59
5A
5B
5C
5D
5E
5F
60
61,ARG1,ARG2,ARG3
63
64
66
67,ARG1
Sat}.
68,ARG1,ARG2
69,ARG1
Sat}.
6A
6B,ARG1
6C,ARG1
6F
70,ARG1
71,ARG1,ARG2
72,ARG1,ARG2
Logger).
73,ARG1,ARG2
74
75,ARG1
76
77
78,ARG1
79,ARG1
7A,ARG1,ARG2
7B,ARG1
7C,ARG1,ARG2
7D,ARG1,ARG2
7E
7F
80
87
88,ARG1
89,ARG1
8B,ARG1,ARG2
8F
93
94,ARG1
95
96
97
98
99
9C,ARG1
9D,ARG1
9E,ARG1
9F,ARG1
A0
Set System Configuration parameters.
Set System Option (Menu 1) parameters.
Set Tank Monitor Option parameters.
Set Receipt Printer Option parameters.
Set Odometer Option parameters.
Set Credit Card Option parameters.
Set Data Entry Option parameters.
Set More System Option (Menu 2) parameters.
Pump Configuration Menu.
Set option bytes directly in Hex.
Display Accepted Products.
Initialize Prices.
View Product Pricing on Screen.
Get extended config from CC {ARG1=0, Master | ARG1=1-8,
Pricing Transfer {ARG1=Unit Id, ARG2=Operation}.
Send extended config to CC {ARG1=0, Master | ARG1=1-8,
Display Transactions in Real Time.
Display transaction download history. ARG1=1 to clear all.
Receive and Print transaction download history.
Configure KEYLESS options (KEYLESS SYSTEMS ONLY!).
Site Authorization Setup (0=Act Number, 1=Serial Number).
AIM2 List file transfer (ARG1=List Type, ARG2=Operation).
Filesystem shell(0=Normal,1=Diag Modem Logger,2=Data
AIM2 Configure Programming Unit status.
AIM2 Toggle list file debug mode.
AIM2 Firmware Log Interface (ARG1=Operation).
AIM2 Configure Batch Firmware Update Mode.
Wait for the user to press any key.
AIM2 Toggle Radio Communication Log.
Display File Version Number (ARG1=File ID).
Zmodem File Transfer (ARG1=File ID, ARG2=Direction).
Process File (ARG1=FileID).
File Menu (ARG1=File ID, ARG2=Operation).
Weights & Measures: Display Last Transaction Details.
Display Current Connection Info.
Keyword Search.
Electronic Pump Diagnostic Menu.
Totalizers Report.
(PERMANENTLY RESERVED!).
List Hose Totals {ARG1=0, Master | ARG1=1-8, Satellite}.
Send Pump Prices to CC {ARG1=Unit #, ARG2=pricelevel}.
Proximity Card Configuration Menu.
Display OUT index, IN index, and tx count of FMU's.
Unmark FMU Transactions (ARG1=Start index).
Display VERIFIABLE ID LIST (VVI=VEHICLE,VMN=USER).
Add ID to VERIFIABLE ID LIST (VVI=VEHICLE,VMN=USER).
Find end of VERIFIABLE ID LIST (VVI=VEHICLE,VMN=USER).
Check for ID in VERIFIABLE ID LIST (VVI=VEHICLE,VMN=USER).
Enter Tank Monitor Unit Interface pass-thru.
Auxiliary List 1 Operations (EPROM dependent).
Auxiliary List 2 Operations (EPROM dependent).
Prepaid Card List Operations.
Discounted Card List Operations.
Clear prompt storage.
134
310
FuelMaster® Installation Manual
A1,ARG1,ARG2
ARG1.
A2,ARG1,ARG2
A3,ARG1
A4,ARG1
A5,ARG1
AA
AB
AF
B4,ARG1,ARG2
B5,ARG1,ARG2
B9
BA
BB
BC
C0
C1
C2
C3
C5
C6
C7
CA
CC,ARG1,ARG2,ARG3
CD,ARG1
DB,ARG1,ARG2,ARG3
DC
DE,ARG1
DF,ARG1
E5,ARG1
E6,ARG1,ARG2
1=ONLINE.
E7
E8
E9
EA
it.
EB
code.
EC
ED
EE
EF
F1,ARG1
F2
F3
F4
F5,ARG1
F6
F7
F8
FB
FC
FD
FE
FF
List 284 saved LCD prompts/list ARG2 prompt(s) start at
List saved LCD prompts from ARG1 through ARG2.
Second Verified List Operations.
Vehicle Key/ID List Operations.
User Key/ID List Operations.
Modem pass-thru (Ctrl-Z to exit).
Advanced Modem Pass-thru (Ctrl-Z to exit).
Remote Command Menu.
Command Line Zmodem.
Command Line Xmodem.
AIM2 Display current operation stats.
Current access point configuration.
AIM2 Display Message Info (like from console port).
AIM2 Pass-Thru.
RTXCBUG (doesn't block tasks).
Display current siglist[].
Display saved siglist[].
Display saved semat[].
Display saved TASK info.
Display saved QUEUE info.
Display some saved variables.
MOBILE download command.
Credit Card operations menu.
CC Captured Batch Report operations.
FMU Data Log Interface.
Check RAM Battery status.
Copy Last Transaction onto end of Archive (ARG1=count).
Fill Transaction Array (ARG1=count).
Bring Master ON or OFF LINE, ARG1 0=OFF/1=ON LINE.
Bring SAT ON or OFF LINE, ARG1=SAT#, ARG2 0=OFFLINE
Take the site OFFLINE.
Bring site ONLINE.
Display the current site status.
Download new FMU code, but do not write it, just download
Prompt And Update Code From Ram, after sending FMU new
Current SAT update progress.
Check Status of all SAT units, for code updating.
Display SAT FMU version information.
Display Update Menu for SAT units.
Networking Menu (ARG1: FF = Set new MAC Address).
Generate FTP Session.
Download transactions to a file.
Ping.
Copy image file to update memory.
Program MIB with 'KEYPAD.HEX' (must be uploaded already).
Get version info from MIB.
Main board CPLD version.
Download Memory Menu.
Reset FMU.
Release Configuration Lock.
Clear FMU's transaction memory.
Clear all FMU variables and initialize unit.
135
311
FuelMaster® Installation Manual
136
312
FuelMaster® Installation Manual
Appendix E
Retail Applications
This appendix has been prepared to describe the setup of systems developed for retail applications. At
this point, our primary retail customers are small airports. Considerable development work has been
accomplished to meet the needs of small airport owners. Many of the references are to small airports, but
may be related to other retail applications.
Aviation Fueling Site
This appendix contains considerations for Weights and Measures compliance, and for increasing system
reliability. It also contains setup procedures which must be taken to enable self-serve retail operations.
Attached to the end of this appendix is an Acceptance Test Procedure (ATP) for Upgrades and
Installations of FuelMaster® Fuel Management Units At Retail Sites. This ATP is very similar to the
test procedure attached to the end of this manual except for additional procedures applicable to retail
sites. Tear out and ue this procedure for retail sites.
Firmware is available specifically for retail applications, and the software can be tailored by the installer to
incorporate features needed for those applications. Transaction information may be exported to FBO
Manager or other fleet management software for accountability of fuel in conjunction with other business
costs.
137
313
FuelMaster® Installation Manual
Setup Considerations for Weights and Measures Compliance
Self-serve retail fueling applications are obligated to meet the compliance requirements of their local
Department of Agriculture, Weights and Measures (W&M) department to sell fuel to the public. Even
though one document (NIST Handbook 44) is usually referenced for requirements, local regulations may
be tailored by location. The considerations mentioned herein may not apply to every application. Action or
expense should not be obligated to meet the requirements mentioned herein unless specifically
addressed by your local W&M inspector. These considerations are provided to inform you of the
assistance which is available from Syn-Tech Systems, Inc., to meet your W&M requirements. Some
locales have more stringent requirements than others.
Pulsers: W&M inspectors will look for fuel quantity and pricing accuracy to 0.01. In order to attain this
level of accuracy, pulser divide rates should be no less than 100 pulses per gallon (100:1).
NTEP C.O.C.: a National Type Evaluation Program (NTEP) Certificate of Conformance (C.O.C.) label
is required. FuelMaster® has met the requirements of the NTEP (awarded NTEP Certificate of
Conformance 02-115 in 2002), and this information is documented on the FMU ID plate. The dispensing
equipment may require the same certification.
Receipts: Handbook 44 requires a printed ticket displaying, as a minimum, the total price, the total
volume, and the price per gallon. FMUs provided for retail operations will have a receipt printer. Most
common is the pedestal receipt printer attached to the FMU so the fueling customer may receive a receipt
at the FMU. An indoor receipt printer is also available.
Installation techs who install FMUs at retail sites will attempt to wire pump handle detection for the
dispensing equipment. The presence of pump handle detection will ensure a receipt is printed as soon as
the pump handle (or switch) is turned off. Without pump handle detection, a receipt will not print until the
pump finish timer times out. If the pump finish timer has a long delay, the customer may have a long wait
until the receipt prints.
Check Valves: fuel hoses at small airports may be 50 feet long and hold over 2 gallons of fuel. If there
isn’t a uniform method for controlling the fuel in the hose, some customers could drain the hose and get
fuel from the previous customer’s transaction. There should be check valves at both ends of the hose to
prevent it from being drained. This ensures a uniform starting and ending point for fuel flowing from the
fueling hose. Many W&M inspectors will look for the presence of check valves.
Delaying Counts During Hose Pressurization: check valves will not hold fuel at the same
high pressure applied by the pump motor. If they did, the hoses and pump seals would have very short
lives. When the fueling hose has been at rest for several minutes and the pump motor is turned on, some
additional quantity of fuel will pass through the metering device as the hose is pressurized. This quantity
may be recorded and billed without being delivered to the fueling customer. W&M inspectors will not
approve this. FuelMaster® has a solution to prevent billing the customer for this fuel he/she did not
receive. Some electronic fuel dispensers have provisions for this. Others do not.
For those systems which do not have these provisions, the solution is to delay counting fuel until the hose
is fully pressurized. This is accomplished by placing an adjustable delay in line with the pulser, and an
electronic counter to work in conjunction with the delay. The delay is an Opto-Isolator. The electronic
counter is the Large Remote Display. Quantity is not recorded as the fueling hose is pressurized.
Counting of fuel quantity begins when fuel is delivered from the fuel nozzle. The large remote display, the
receipt from the receipt printer, and the FMU displayed quantity all agree.
Unit Cost Display: a Unit Cost Display must be available for customers. There is an option to turn on
pump pricing in the FMU. When set, the first depression of the FMU “A” key on the keypad will display
pump pricing for the first hose. Depressing “A” again will display pump pricing for the second hose, etc.
138
314
FuelMaster® Installation Manual
Presets: when the FMU is accessed with a credit card (presets do not apply to Prokee® or Smartcard
transactions) to start a transaction, the customer is afforded the opportunity to preset a dollar or gallon
limit (the preset question may be turned off in newer firmware, if desired, or if equipment to support
presets is not installed). If a preset dollar or gallon limit is set, the transaction must end exactly at that
preset amount. The fueling customer is prompted by the FMU to select an authorization method of dollars
or gallons, then a preset quantity limit based on the authorization method selected (example: customer
selects dollars, then 35. The preset is $35).
To make the transaction end exactly at the preset amount, the dispensing equipment must be equipped
with a two-stage valve, and the FMU must be configured accordingly with a setpoint setting. The setpoint
is the point at which the fast valve shuts off before the slow valve finishes the transaction. The setpoint
may be set differently for each hose. Section 4, Installation, paragraph 6g, and Figure 4-12 describe
wiring two-stage valve control.
Two stage valve control reduces the number of hoses which may be controlled to four. The FMU uses two
relay assemblies to effect two-stage valve control. The left relay assembly controls the slow valve, and
the right relay assembly controls the fast valve. Both valves open at the same time. The fast valve shuts
off at the setpoint setting, and the transaction ends with the slow valve.
Uninterruptible Power Supply (UPS): a retail fueling operation must be capable of completing
the transaction in the event of a power loss after the transaction is started. Handbook 44 requires the
FMU maintain power for 15 minutes after a power failure to complete the transaction and provide the
customer a receipt. This may be accomplished through the use of an uninterruptible power supply (UPS).
A UPS with a 500VA (or higher) output will maintain power on the FMU for 15 minutes. If the FMU is
wired for pump handle detection, a receipt will be printed as soon as the power fails. The FMU sees the
power failure as an end to the fueling transaction.
NOTE
In addition to the connections in the UPS that offer uninterruptible power, most have additional plugs
which are merely a pass-through; they require power to be applied to the UPS for power to be available
on those plugs. Ensure the FMU is plugged into an uninterruptible receptacle rather than a pass-through
receptacle, or power will go off at the FMU when power is removed from the UPS. After the UPS has
been charged, this may be tested by disconnecting power to the UPS and ensuring power remains on the
FMU.
In tests we have performed, the FMU never reset when powered through a UPS. If the FMU does reset, it
will be necessary to enable RCPTS PRINT ON PWR UP in the FMU to ensure a receipt is printed.
Setup Considerations for System Reliability
The fueling equipment at many small airports may not include an automotive type fuel dispenser with a
pump handle switch that has to be turned off before the fueling nozzle can be hung up. Even if it does
include an automotive type fuel dispenser, the long fueling hose required for this application is most likely
on a hose reel, and the nozzle is not hung up on the dispenser. As such, it is very easy for a fueling
customer to forget to turn the pump switch off. The pump switch should be wired in such a way if the
customer forgets to turn the switch off, power to the switch will still timeout when the pump finish timer
times out. This will preclude a pump motor from being left on too long and burning out. Wiring power to
the pump or pump switch from LD will ensure power turns off when the pump finish timer times out.
139
315
FuelMaster® Installation Manual
Firmware Setup:
•
•
NOTE
When an FMU is purchased for the TWO RELAYS PER PUMP option, there is no additional charge
for the additional hardware. If the option is added at a later date, the additional hardware must be
purchased at the current selling price.
Preset transaction limits may only be initiated in credit card transactions. Presets cannot be initiated
with a Prokee® or smartcard transaction.
To enable presets and W&M compliance, TWO RELAYS PER PUMP, SETPOINT, and PRINT DOLLAR
FOR PROKEE RECEIPTS must be enabled. Additional options which may be applicable for some are
DISPLAY PUMP PRICING, and RCPTS PRINT ON PWR UP. All options require either a laptop
connection to the FMU, or assistance from Syn-Tech’s Customer Satisfaction Center to enable the
necessary options. Perform the following when making a laptop connection:
Enable TWO RELAYS PER PUMP (required to enable presets):
1. After the abbreviation of the site name (e.g, FMU>), type a 59 command and press Enter. A display
similar to the following should appear:
CURRENT SYSTEM OPTIONS (MENU 1) CONFIGURATION
----------------------------------------------------------------------------------A. SYSTEM INPUT TYPE
: VMN - VEH. KEY
B. CUSTOM SYSTEM OPTION
: DISABLED
C. ENTERED VEHICLE IDs ARE
: ALPHANUMERIC
D. SEMI MANUAL MODE
: DISABLED
E. REAL GATE TXN
: DISABLED
F. POWER FAIL CHECK
: ENABLED
G. ENTERED USER IDs ARE
: ALPHANUMERIC
H. FURNACE LOGGING
: DISABLED
I. USING OLD PROKEES
: DISABLED
J. SHOW PROKEE/SMARTCARD ID
: DISABLED
K. CONFIRM PROKEE/SMARTCARD ID
: DISABLED
L. DISPLAY PUMP PRICING
: DISABLED
M. EIU PROKEE/SMARTCARD WHICH KEYS
: NO KEYS!!!
N. TWO RELAYS PER PUMP
: DISABLED
O. AUTO ACTIVATE SINGLE PUMP
: DISABLED
P. MODEM CONNECT UPPER SPEED LIMIT
: MAXIMUM
Q. RESTORE DEFAULT VALUES
USAGE - <LETTER>=CHANGE VALUE, <ESC>=EXIT
2. Press N. TWO RELAYS PER PUMP: DISABLED should reset to TWO RELAYS PER PUMP:
ENABLED.
3. Press Esc to exit. A display similar to the following should appear:
CONFIGURATION HAS CHANGED!
WOULD YOU LIKE TO SAVE IT ? (Y/N)
4. Press Y to save the configuration change. The following prompt will appear:
SAVING SYSTEM CONFIGURATION…
CONFIGURATION RECORDED.
140
316
FuelMaster® Installation Manual
Setting the Setpoint:
1. Type a 57 command and press Enter. A display similar to the following should appear:
CURRENT HIGH FLOW SETPOINTS:
PUMP A: 0.0
PUMP B: 0.0
PUMP C: 0.0
PUMP D: 0.0
ENTER PUMP POSITION TO MODIFY [A-D,<ESC> to EXIT]:
2. At the prompt ENTER PUMP POSITION TO MODIFY [A-H,<ESC> to EXIT]:, enter A to modify the
setpoint for pump position A. A display similar to the following should appear:
CURRENT HIGH FLOW SETPOINTS:
PUMP A: 0.0
PUMP B: 0.0
PUMP C: 0.0
PUMP D: 0.0
ENTER PUMP POSITION TO MODIFY [A-H,<ESC> to EXIT]: A
ENTER NEW HIGH FLOW SETPOINT FOR PUMP A: ____
NOTE
When the transaction quantity reaches the setpoint value, the fast valve will close and the slow valve will
finish the transaction. Recommend a small value (i.e., 0.2 or 0.3) be tested. Most systems pump very
slow through the slow valve. Some customers may not have the patience to wait through a large setpoint
value.
3. Enter a small setpoint value for pump A and press Enter. A display similar to the following should
appear:
ENTER NEW HIGH FLOW SETPOINT FOR PUMP A: 0.3
HIGH FLOW SETPOINT FOR PUMP A SET TO: 0.3
CURRENT HIGH FLOW SETPOINTS:
PUMP A: 0.3
PUMP B: 0.0
PUMP C: 0.0
PUMP D: 0.0
ENTER PUMP POSITION TO MODIFY [A-H,<ESC> to EXIT]: _
4. Repeat steps 2 and 3 for all additional hoses. When complete, press Esc and a display similar to the
following should appear:
CONFIGURATION HAS CHANGED!
WOULD YOU LIKE TO SAVE IT ? (Y/N)
141
317
FuelMaster® Installation Manual
5. Press Y to save the configuration changes. The configuration changes will be recorded and a display
similar to the following should appear:
SAVING SYSTEM CONFIGURATION…
CONFIGURATION RECORDED.
Enter Pump Pricing: for pump pricing for a credit card transaction to be effective, it must be sent to
the FMU. Very Important! Refer to the FMPlus User Manual to enter pump pricing. It is highly
recommended pump pricing be sent from the FuelMaster® software. If pump pricing is entered with a
laptop, and similar pricing is not loaded in the FuelMaster® software, credit card pricing may differ from
the cost reflected when transactions are downloaded to the Central Controller. Regardless of the pricing
entered at the FMU, the software will calculate pricing based on the pricing in the software. If a customer
asks our Customer Satisfaction Center (CSC) to enter pricing with a Procomm connection to their FMU,
the CSC must have a written request from the customer. When referring to the software manual, note
also pricing for Discount Credit Cards.
Display Last Transaction: It is a W&M requirement to display the total sale and quantity of the last
fueling transaction for at least 5 minutes (300 seconds), or until the next transaction is initiated. Where
needed or desired, FuelMaster® may be enabled to automatically show the last transaction on the display
of the FMU similar to the following example:
HOSE: 1 – 100LL
SALE: $51.60
17.20 GL
NOTE
The last transaction will display $0.00 until a 59 command and PRINT DOLLAR FOR PROKEE
RECEIPTS is ENABLED.
Perform the following to display the last transaction:
1. Type a 7D (or 7d) command, and press Enter. A display similar to the following should appear:
Weights & Measures: Display Last TX Configuration
---------------------------------------------------------------------Command Interface: 7D, ARG1, #ARG2
ARG1 – Display Last TX: 0 Disable, 1 Enable
ARG2 – Timeout in Seconds (Optional: Default=300, 0=Indefinitely)
Current Configuration
Display Last Transaction: Disabled
2. ARG = argument. To enable the display of the last transaction, 7D, 1 must be entered (7D,0 would
disable the display). If the default 5 minutes (300 seconds) is desired, do not enter the second
argument. Enter only 7D, 1. A display similar to the following should appear:
CONFIGURATION HAS CHANGED!
WOULD YOU LIKE TO SAVE IT ? (Y/N)
3. Press Y to save the configuration changes. The configuration changes will be recorded and a display
similar to the following should appear:
SAVING SYSTEM CONFIGURATION…
CONFIGURATION RECORDED.
142
318
FuelMaster® Installation Manual
4. To verify the desired configuration change was recorded, enter 7D. A display similar to the following
should appear:
Weights & Measures: Display Last TX Configuration
---------------------------------------------------------------------Command Interface: 7D, ARG1, #ARG2
ARG1 – Display Last TX: 0 Disable, 1 Enable
ARG2 – Timeout in Seconds (Optional: Default=300, 0=Indefinitely)
Current Configuration
Display Last Transaction: Enabled
Duration: 300 secs
5. Using 0 in the second argument would display the last transaction indefinitely (or until the next
transaction is started). If a different duration is desired (e.g., 600 secs), it may be changed by entering
the 7D command with the duration in seconds as follows: 7D, 1, #600
6. To verify the desired configuration change was recorded, enter 7D. A display similar to the following
should appear:
Weights & Measures: Display Last TX Configuration
---------------------------------------------------------------------Command Interface: 7D, ARG1, #ARG2
ARG1 – Display Last TX: 0 Disable, 1 Enable
ARG2 – Timeout in Seconds (Optional: Default=300, 0=Indefinitely)
Current Configuration
Display Last Transaction: Enabled
Duration: 600 secs
Print Dollar for Prokee Receipts:
•
•
NOTE
The 7D command must also be enabled to post the display.
If a new transaction is started while the last transaction is displayed, the last transaction display will
be cleared and prompts for the new transaction will appear.
This option has more than one application. In this application the purpose is to display the total sale of the
last fueling transaction, a W&M requirement. If this option is disabled, the total sale will be reflected as
$0.00.
Perform the following to display the total sale of the last transaction:
1. Type a 5b command, and press Enter. A display similar to the following should appear:
CURRENT RECEIPT PRINTER CONFIGURATION
---------------------------------------------------------------------A. RECEIPT PRINTER
: DISABLED
B. RCPTS PRINT ON PWR UP
: DISABLED
C. RECEIPT ALWAYS
: DISABLED
D. RECEIPT PRINTER TYPE
: PEDESTAL
E. PEDESTAL RCPT PAPER CUT
: FULL
F. RECEIPT PRINTER BAUDRATE
: 2400
G. PRINT DOLLAR FOR PROKEE RECEIPTS : DISABLED
H. PRINT DUPLICATE RECEIPTS
: DISABLED
I. PRINT RECEIPT DATE/TIME STAMP
: ENABLED
143
319
FuelMaster® Installation Manual
J.
K.
L.
M.
N.
PRINT MASTER PRODUCT DESCRIPTION: DISABLED
PRINT RECEIPTS FOR AIM
: DISABLED
PROMPT FOR AIM RECEIPTS
: DISABLED
ALLOW $0.00 FOR PROKEE PRICING
: ENABLED
RESTORE DEFAULT VALUES
USAGE - <LETTER>=CHANGE VALUE, <ESC>=EXIT
2. Press G. PRINT DOLLAR FOR PROKEE RECEIPTS: DISABLED should change to PRINT
DOLLAR FOR PROKEE RECEIPTS: ENABLED.
3. Press Esc to exit. A display similar to the following should appear:
CONFIGURATION HAS CHANGED!
WOULD YOU LIKE TO SAVE IT ? (Y/N)
4. Press Y to save the configuration change. A display similar to the following should appear:
SAVING SYSTEM CONFIGURATION…
CONFIGURATION RECORDED.
Display Pump Pricing: the FMU may be configured to display to the user the unit price of each
product offered at the FMU. Once configured, “A” as a hot key may be depressed to show the unit price
of the first product offered. Depressing “A” again will show the price of the second product, and so on for
each additional product.
Perform the following to display pump pricing:
1. Type a 59 command and press Enter. A display similar to the following should appear:
CURRENT SYSTEM OPTIONS (MENU 1) CONFIGURATION
----------------------------------------------------------------------------------A. SYSTEM INPUT TYPE
: VMN - VEH. KEY
B. CUSTOM SYSTEM OPTION
: DISABLED
C. ENTERED VEHICLE IDs ARE
: ALPHANUMERIC
D. SEMI MANUAL MODE
: DISABLED
E. REAL GATE TXN
: DISABLED
F. POWER FAIL CHECK
: ENABLED
G. ENTERED USER IDs ARE
: ALPHANUMERIC
H. FURNACE LOGGING
: DISABLED
I. USING OLD PROKEES
: DISABLED
J. SHOW PROKEE/SMARTCARD ID
: DISABLED
K. CONFIRM PROKEE/SMARTCARD ID
: DISABLED
L. DISPLAY PUMP PRICING
: DISABLED
M. EIU PROKEE/SMARTCARD WHICH KEYS
: NO KEYS!!!
N. TWO RELAYS PER PUMP
: DISABLED
O. AUTO ACTIVATE SINGLE PUMP
: DISABLED
P. MODEM CONNECT UPPER SPEED LIMIT
: MAXIMUM
Q. RESTORE DEFAULT VALUES
USAGE - <LETTER>=CHANGE VALUE, <ESC>=EXIT
2. Depress L. DISPLAY PUMP PRICING :DISABLED should reset to DISPLAY PUMP PRICING
:ENABLED.
144
320
FuelMaster® Installation Manual
3. Press Esc to exit. A display similar to the following should appear:
CONFIGURATION HAS CHANGED!
WOULD YOU LIKE TO SAVE IT ? (Y/N)
4. Press Y to save the configuration change. The following prompt will appear:
SAVING SYSTEM CONFIGURATION…
CONFIGURATION RECORDED.
Receipts Print on Power UP: if the FMU resets during a power failure, and it reverts to UPS
power, a firmware option must be turned on to ensure the FMU prints a receipt for the customer. This is
only necessary when the FMU resets after reverting to UPS power. In most instances the FMU will not
reset, and the option need not be enabled.
Perform the following for receipts to print on power up:
1. Type a 5b command, and press Enter. A display similar to the following should appear:
CURRENT RECEIPT PRINTER CONFIGURATION
---------------------------------------------------------------------A. RECEIPT PRINTER
: DISABLED
B. RCPTS PRINT ON PWR UP
: DISABLED
C. RECEIPT ALWAYS
: DISABLED
D. RECEIPT PRINTER TYPE
: PEDESTAL
E. PEDESTAL RCPT PAPER CUT
: FULL
F. RECEIPT PRINTER BAUDRATE
: 2400
G. PRINT DOLLAR FOR PROKEE RECEIPTS : DISABLED
H. PRINT DUPLICATE RECEIPTS
: DISABLED
I. PRINT RECEIPT DATE/TIME STAMP
: ENABLED
J. PRINT MASTER PRODUCT DESCRIPTION: DISABLED
K. PRINT RECEIPTS FOR AIM
: DISABLED
L. PROMPT FOR AIM RECEIPTS
: DISABLED
M. ALLOW $0.00 FOR PROKEE PRICING
: ENABLED
N. RESTORE DEFAULT VALUES
USAGE - <LETTER>=CHANGE VALUE, <ESC>=EXIT
2. Press B. RECPTS PRINT ON PWR UP : DISABLED should reset to RECPTS PRINT ON PWR UP :
ENABLED.
3. Press Esc to exit. A display similar to the following should appear:
CONFIGURATION HAS CHANGED!
WOULD YOU LIKE TO SAVE IT ? (Y/N)
4. Press Y to save the configuration change. A display similar to the following should appear:
SAVING SYSTEM CONFIGURATION…
CONFIGURATION RECORDED.
145
321
FuelMaster® Installation Manual
Large Remote Display:
An optional Large Remote Display provides a quantity display with four inch LED digits visible up to 150
feet. The Large Remote Display is wired into the pulser circuit which provides quantity information to the
FMU. The display is preprogrammed at the factory to match the pulser divide rate. As such, the quantity
shown on the display is identical to the quantity recorded by the FMU.
Large Remote Display on FMU
Detailed installation procedures for the Large Remote Display may be found in Product Bulletin 125. If
two fueling points such as AVGAS and Jet A are close together, and not subject to simultaneous
operation, one Large Remote Display may be installed in accordance with the Product Bulletin to support
both fueling points.
The Large Remote Display is not explosion-proof and must be installed outside and above the hazardous
area. It is provided with two removable mount brackets attached to the center top and bottom. There is no
access hole drilled into the aluminum housing for incoming conduit/wires. The installer selects the most
ideal location, and drills/punches a hole for the connecting conduit. The Large Remote Display is
available in the same colors as the FMU.
A Reset Oink is mounted inside the Large Remote Display. The Reset Oink uses a 110 VAC input from
the authorization signal to reset the display each time a new transaction is started. The Large Remote
Display requires AC power to run it, and a 12 VDC pulse input to increment the digits on the display as
fuel is pumped.
146
322
Acceptance Test Procedure (ATP)
for Upgrades and Installations of
FuelMaster® Fuel Management Units
At Retail Sites
This ATP applies to upgrades and installations of Classic and Plus Fuel Management Units (FMUs)
installed at retail sites. Complete an ATP for each site. Place a check mark (√) in the space provided for
each step performed. Some procedures will not be applicable to all installations. Mark NA for those
procedures which are not applicable. Some procedures may be repeated for multiple FMUs. Add
comments and explain any deviations on page 6.
SITE:
LOCATION:
1. SITE EXAMINATION
a. All site equipment is operational, and installed in accordance with the NEC (if not, explain in
Comments on page 6).
b. Dispensing equipment has minimum of 100:1 pulser, or is capable of being set to 100:1.
c.
Dispensing equipment has check valves to prevent draining hose.
d. Reset quantity counter on dispensing equipment, then turn on pump to fill hose. Does
quantity register on dispensing equipment before delivering fuel?
YES / NO (circle one). If YES, perform step 4q.
e. A dedicated phone line is available for credit card authorization at the FMU.
2. FMU UPGRADE (For FMU Upgrades Only). Repeat for multiple FMUs. Note deviations on page 6.
a. Verify the FMU to be upgraded is operational.
b. Retrieve transactions, unit configuration, and options from FMU to be upgraded.
c.
Use a laptop connection with command cc to determine credit card setup so it may be
restored after upgrade.
d. Upgrade the FMU.
e. Use a laptop connection to:
1) Initialize FMU (commands 02, FF, 1A, 28, FE).
2) Set/verify site signature (command 38).
3) Set system type and, if necessary, lock baud rate down (command 59).
4) Restore options (various commands).
5) Restore credit card configuration (command cc).
f.
Using the customer’s computer, upload the site configuration, authorization list, and send
pricing, as required. Set PUMP HANDLE to START AND END, END ONLY, or YES to print
receipt as soon as pump handle/switch is turned off.
1 of 7
323
324
3. SOFTWARE UPGRADE (For Software Upgrades Only)
a. Verify tasking is an upgrade. Customer must have an operational copy of FuelMaster®
software with an existing FuelMaster® database.
b. Disable any auto download settings and stop all services.
c.
Retrieve transactions from all FMUs.
d. Retrieve and record unit configuration and options.
e. Make a copy of the customer’s existing software database and save to the desktop.
f.
Upgrade the customer’s existing software using a local computer administrator log on.
NOTE
In step g, if not prompted “Database Conversion Finished”, or if other errors occurred, discontinue
upgrade and call Syn-Tech’s Customer Satisfaction Center (CSC) at 800-888-9136, ext. 1500, for
assistance.
g. When the upgrade is complete, restart the customer’s computer and verify the database
opens with the new software.
4. FMU NEW INSTALLS. Repeat for each FMU. Note any deviations on page 6.
a. EXAMINATION OF PRODUCT
1) All equipment on packing list is accounted for.
2) Equipment matches customer requirement.
3) FMU is configured with correct number of hose positions and correct communications
boards are installed. Master FMU has internal communications cable.
4) FMU upper cabinet is correctly matched to pedestal.
5) Doors and locks operate freely.
6) FMU for two-stage valve operation has two dual control relay assemblies.
7) FMU has a credit card reader.
8) FMU has receipt printer (pedestal or indoor).
9) No visible shipping damage.
b. PROVIDE TELEPROMPTING
1) Turn on FMU power switch. FMU initializes without error, and prompts the user to
INSERT KEY OR CARD TO BEGIN.
2) As requested by customer, reset top line of default display: FuelMaster FUELS
ACCOUNTING SYSTEM, to phrase of customer’s choosing (e.g.: Welcome to
____________ Airport) with laptop and command 22.
3) All FMU’s displayed an asterisk (*) to the left of the hose number and prompted, “HOSE
BUSY, SELECT ANOTHER…” when dispenser in use was selected from the FMU
keypad.
c. VALIDATE FMU ACCESS WITH PROKEE®, SMARTCARD, CREDIT CARD, AND/OR
KEYPAD
1) FMU’s validated authorized access by stepping to next menu prompt.
2) FMU’s rejected unauthorized access.
2 of 7
325
326
d. ACTIVATE PRODUCT DISPENSERS. All FMU’s successfully activate appropriate
dispensing hoses after authorized access.
e. VERIFY SINGLE HOSE AUTHORIZATION. Activate each hose (one hose at a time) in
automatic mode and verify no other hoses will dispense.
f.
SIMULTANEOUS TRANSACTIONS. Each FMU allowed simultaneous operation of each
connected dispensing hose.
g. VERIFY NO COUNTS DURING DISPENSER RESET. Select COUNT TEST from the
Configuration Menu. Move Automatic/Manual Mode switches to Manual. Verify counts do not
register after the dispenser reset handle is activated. If counts do register, perform an
automated transaction for the applicable hose then query the FMU. Verify the quantity
observed in the query matches the quantity recorded at the dispenser. If quantities do not
match, a pulser with AC control must be installed. Repeat for each connected hose.
h. ENCODE, VERIFY, AND REVISE PROKEE®S OR SMARTCARDS
1) Prokee®s or Smartcards for test (if applicable), one for each available product, were
encoded and read data back correctly.
2) The Prokee®/Smartcard Encoder (if applicable) revised data and read data back
correctly.
i.
PROVIDE FOR MANUAL OPERATION. Each FMU functioned normally while selected
dispensers were switched to manual operation. Dispensers switched to the manual position
did not show on the display as being available.
j.
TRANSACTION HANDLING. Transactions for each hose, each day were assigned a
sequential four digit number starting with 0001.
k.
DISABLE DISPENSER AFTER TRANSACTION. Repeat for multiple FMUs. Note any
deviations on page 6.
1) Each FMU disabled the applicable dispensers connected to it within the specified time
limits after dispensing was complete.
2) As required, timers (No Pulse, Pump Finish) are set long enough to accommodate
multiple fuel tanks.
3) If a solenoid valve is not installed, verify fuel stops flowing when the transaction is ended
by squeezing the nozzle trigger after the pump handle switch is turned off. Fuel should
not flow.
l.
PROTECT DATA DURING POWER FAILURE. Repeat for multiple FMUs. Note any
deviations on page 6.
1) Uninterruptible Power Supply (UPS) is installed inline with power to FMU so customer
may receive receipt in event of power failure.
2) In automatic mode, when power was removed from each FMU the applicable dispensers
connected to that FMU were disabled.
3) Transactions in progress during power failure were recorded. No transaction data was
lost.
4) When power was restored to each FMU the applicable dispensers connected to that FMU
did not activate without initiating a new transaction.
5) Manual intervention was not required to bring the system to full operation after power
failure.
3 of 7
327
328
m. PRICING. Repeat for multiple FMUs. Note any deviations on page 6.
1) Check all price levels stored at the FMU
2) If receipts for ProKee is turned on verify that the price on the receipt is correct
3) If credit card, run a few transactions verify pricing and functionality
n. DISCOUNT CREDIT CARDS. Repeat for multiple FMUs. Note any deviations on page 6.
1) Set up discount credit card in software and send to FMU
2) Run a test transaction and verify that proper price level appear
o. PREPAID CARDS/KEYS. Repeat for multiple FMUs. Note any deviations on page 6.
1) Set up a pre-paid record in the software, encode and send it to the FMU
2) Run a test transaction and verify functionality
3) Download transactions and make sure that card record reflects transaction
p. RECORD TRANSACTION DATA. Perform automated test transactions on each hose.
Record the quantity displayed on the dispenser as DISPENSER QTY. Go to the Central
Controller and download the test transactions and record them under POLLED QTY.
HOSE
#
DISPENSER
QTY
POLLED
QTY
HOSE
#
1
9
2
10
3
11
4
12
5
13
6
14
7
15
8
16
DISPENSER
QTY
POLLED
QTY
q. DELAY COUNTS. In step 1d, a test was performed to determine if the dispensing equipment
registered quantity before any fuel was delivered. If the answer was NO, omit this step. If the
answer was YES, counts (pulses) must be delayed until the dispensing hoses are fully
pressurized, and the counter must be capable of being reset to 0 (zero), or replaced with a
counter that starts counting after the hose is pressurized. The visible counter and pulse
delivery must both be delayed.
1) Is the dispenser capable of being programmed to delay visible counts and pulse delivery?
YES / NO (circle one) If YES, determine how much delay (in seconds) is needed, and
program the delay into the dispensing equipment. Delay Length:
2) If the answer to q1, above, is NO because visible counts are displayed, can the
dispensing equipment counter be reset to 0 (zero) after the hose is pressurized?
YES / NO (circle one) If NO, a substitute counter must be installed that starts counting
after the hose is fully pressurized. Substitute counter:
If YES, self serve procedures must inform customer to reset counter to 0 (zero) after the
hose pressurizes.
4 of 7
329
330
3) If the dispensing equipment counter may be reset to 0 (zero) after the hose is
pressurized, has a pulse delay been installed?
YES / NO (circle one). A pulse delay must be installed that starts counting after the hose
is fully pressurized. Delay Type and Length:
r.
Use cc command to set applicable credit card configuration.
s.
Using cc command, enable Auto End of Day to ensure transaction batches are settled each
night at midnight. Ensure auto download is not set for same time (midnight).
t.
Use 44 and 46 commands, respectively, to set receipt header and footer.
u. (Aviation) Use 5c command to disable ASK ODOM QUESTION.
v.
Use 59L command to enable DISPLAY PUMP PRICING.
w. Use 7d command to enable Display Last Transaction.
x.
SAFETY. Repeat for multiple FMUs. Note any deviations on page 6.
1) FMUs are installed in accordance with the NEC. If mounted in a Class I, Div 2, location,
all electronic components, switches, and relays are located over 18 inches above grade
level, and FMU is not installed within 18 inches of a gasoline or E85 dispenser (or 5 feet
of a CNG dispenser). Explain any deviations on page 6.
2) All connections at the FMU which are a potential shock hazard are covered and labeled
with appropriate warnings, and located within a locked enclosure.
3) An emergency stop switch is present, not within 20 feet nor greater than 100 feet from
the fuel island. When activated, the emergency stop switch removes power from all
fueling site equipment.
y.
POST INSTALLATION INSPECTION. Repeat for multiple FMUs. Note any deviations on
page 6.
1) FMU is securely mounted with four 3/8 inch (minimum) screw anchors/attach bolts.
2) Any entry holes drilled/punched in FMU are sealed.
3) FMU upper cabinet and pedestal door gaskets provide weatherproof seal of internal
components.
4) FMU upper cabinet is secured to pedestal with six screws.
5) FMU board/backplate attach screws are secure.
6) Wire/cable connections are correct and secure.
7) Board retainer for mainboard expansion cards is installed and secure.
5. TRAINING. User was provided training for:
a. How to start a transaction at the FMU,
b. How to use a Supervisor Prokee® or Smartcard,
c.
How to load and open the software program,
d. New features of upgraded software and/or FMU,
e. How to download transactions from the FMU to the computer,
f.
How to encode a Prokee® or Smartcard using the Encoder,
g. How to de-authorize a Prokee® or Smartcard,
h. How to re-enable a locked-out hose,
5 of 7
331
332
i.
How to use Price Levels,
j.
How to send pricing changes to FMU,
k.
How to use Discount Credit cards and a prepaid Prokee®/Smartcard,
l.
How to settle transaction batches with a Supervisor Key,
m. Who to call for troubleshooting/training assistance.
6. DATA
a. Site Signature:
b. FMU telephone number:
c.
FMU IP Address:
d. Network is Cable, Fiber, Wireless, No Network (circle one)
e. Zlinx Baud Rate/Data Bits/Stop Bits/Parity/Channel:
f.
Number of Master FMU’s:
g. Number of Satellite FMU’s:
h. FMU Firmware version:
i.
Dispenser control method:
j.
Pulser type/divide ratio:
k.
Computer operating system:
l.
FuelMaster® software version:
m. Site Contact:
n. Site Contact telephone number and e-mail:
Comments (use reverse if additional space is needed):
6 of 7
333
334
SIGNATURE AND FINAL SIGN-OFF
Customer Representative (print):
Customer Representative (signature):
Date:
Certified Startup Technician (print):
Certified Startup Technician (signature):
ASR Number:
Organization:
Date:
7 of 7
335
336
HOLD HARMLESS AGREEMENT (to be completed when installing wireless networking equipment)
TO: _________________________________________________
SUBJECT: Potential Security Breaches Through Wireless Network Connections to FuelMaster®
FuelMaster® Fuel Management Units (FMUs) and software do not contain personal information subject to
the Privacy Act of 1974. However, when added to a network the FMU may provide a link to other
resources which do contain personal or privileged information. Cable or fiber optic network connections
are not easily accessible. Wireless networks operate on radio waves that can be intercepted by anyone
with the right equipment and within range of the transmitter. Without proper wireless network security,
outside users can access your network to attain such valuable information as social security numbers,
credit card numbers, bank account numbers, and countless other private information sources stored on
your network. If accessibility is achieved, outside users can access anything stored in your network, not
just FuelMaster® related information.
Though the physical installation of the equipment may be accomplished by anybody with the knowledge
and experience, the responsibility for the network, IP addresses, wireless components and devices,
access points and network configuration rests entirely on the customer and, where applicable, his/her
Information Technology (IT) person(s) or Network Administrator(s) for that site.
Syn-Tech Systems, Inc., cannot emphasize enough the potential damage that may result from a breach
in network security. When a wireless network connection to FuelMaster® is established, Syn-Tech
Systems, Inc, cannot prevent accessibility by outside users. As such, this HOLD HARMLESS
AGREEMENT is prepared to remove liability from Syn-Tech Systems, Inc., for any breach of security
resulting from the development of a wireless network connection to FuelMaster®. Please acknowledge
receipt and concurrence with the terms of this agreement by signing below. Thank you.
ACKNOWLEDGEMENT:
I acknowledge receipt and concurrence with the terms of this agreement:
(Signature of Authorized Representative)
337
338
FuelMaster® Installation Manual
Appendix F
Wiring Differences for
Canadian and European Certified FMUs
Fuel Management Units (FMUs) manufactured for use in Canada and Europe are configured differently
than FMUs designed for U.S. operation. Syn-Tech researched the requirements for Canadian and
European certification, designed and manufactured the required equipment, then subjected FuelMaster®
to tests necessary to achieve certification. Should you need an FMU for installation in Canada or Europe,
be sure you specify your needs when placing your order as there are equipment differences. Skilled
inspectors in Canada or Europe will reject equipment not correctly identified for the application.
Canadian Certification
The basic differences with the Canadian certified FMU are the French translation labels added to the
surge protection panel and upper cover plate for the pedestal electrical access. French translations are
also incorporated into the WARNINGS and CAUTIONS in this manual. In addition, the existing DB25
connectors and pins for the standard 25 and 50 foot transaction printer cables were not acceptable for
Canadian use, so any transaction printer cables supplied with Canadian certified FMUs will have a
different DB25 connector and pin configuration.
The ID plate has a C stamp on it to identify Canadian certification, as shown below in Figure 1.
C Stamp
Figure 1. Canadian Certification Identification
163
339
FuelMaster® Installation Manual
European Certification
There are significant differences between a U.S. certified FMU and a European (CE) certified FMU. The
CE unit has a transformer mounted in a “backpack” housing on the back of the FMU pedestal which
converts 230 VAC, 50 Hz power to 110 VAC, 60 Hz. In addition, other components are configured
differently to comply with European standards.
A European certified FMU can be identified by an ID plate with a CE stamp, as shown in Figure 2.
Figure 2. European Certification Identification
The FMU is fully assembled for testing at Syn-Tech’s assembly facility, then disassembled for shipment.
The transformer is disconnected and removed. It must be reassembled during FMU assembly. Detailed
assembly procedures may be found in Product Bulletin 129.
164
340
FuelMaster® Installation Manual
Appendix G
FMU Wire and Cable Connection Points
Use the following to locate connection points for an unknown wire or cable. Part
Number is the wire or cable. Component 1 is one connection point. Component 2
is the other connection point.:
Component 1
Part Number
Component 2
Solid State Relay Assy
Auto/Manual Switch 1-8 ............. 198455 ............................Pedestal I/O Board J11-J18
Dual Control Relay Assy
Auto/Manual Switch 1-8 ............. 234397 ............................Pedestal I/O Board J11-J18
Backplate Assembly .................. 941C0103A .....................Main Board J1
Cable Interface Plate ................. 178802 ............................Backplate Assembly
Cable Interface Plate ................. 200077 ............................Phone/Printer Inputs
Card Reader .............................. 981B0114........................MIB Board J4
Card Reader (prior to MIB) ........ 952B0101........................Card Reader Board J2
Control (Hoses 1-4) ................... 14-AWG ..........................Pedestal I/O Board TB1 (LN/LD1-4)
Control (Hoses 5-8) ................... 14-AWG ..........................Pedestal I/O Board TB2 (LN/LD5-8)
Data Logger J7 .......................... 941B0432........................Sat I/O Control Board J3
Data Logger J7 .......................... 941B0432A .....................Sat I/O Control Board J3 and
200077 DB9
Data Logger J2 .......................... 941B0434........................941B0431 (Rev F or earlier
Mainboard)
FMU Power Switch .................... 198439 ............................Cable Interface Plate
FMU Power Switch .................... 2 Wire..............................Pedestal I/O Board J10
I/O Silver JP9 ............................. 209023 ............................Sat I/O Control Board J6
I/O Silver JP10 ........................... 209023 ............................Sat I/O Control Board J5
I/O Silver JP12 ........................... Custom............................Sat I/O Control Board J2
I/O Silver JP14 ........................... 201839 ............................Sat I/O Control Board J4
Keypad....................................... 941B0110........................Main Board J8
LCD ............................................ 941B0110........................Main Board J8
Pedestal I/O Backplate .............. 236764 ............................Pedestal I/O Board J19
Pedestal I/O Board J1 ............... 194735 ............................Sat I/O Control Board J7
Pedestal I/O Board J2 ............... 200085 ............................Cable Interface Plate
Pedestal Receipt Printer ............ 933C0112 .......................FMU Power Switch (933C01 11)
Pedestal Receipt Printer ............ 972A0102........................Sat I/O Control Board J2
Prokee® Board ........................... 941B0431........................941B0434
Prokee® Board ........................... 941B0110-10 ..................Main Board J8
Electronic Dispenser Interface
Quad UART ............................... 941B0107........................I/O Silver Board (221813)
I/O Silver Board (221813) .......... 941B0244........................PIE Controller
Surge Panel,
2 Wire Harness .......................... 215945 ............................FMU Power Switch
Surge Panel,
3 Wire Harness .......................... 215953 ............................Incoming AC Power
Surge Panel,
4 Wire Harness .......................... 215961 ............................Incoming/Outgoing Phone
165
341
FuelMaster® Installation Manual
166
342
Acceptance Test Procedure (ATP)
for Upgrades and Installations of
FuelMaster® Fuel Management Units
This ATP applies to upgrades and installations of all FMU-2500, 3000, and 3500 series Classic and Plus
Fuel Management Units (FMUs), except aviation sites (a separate Aviation ATP is available). Complete
an ATP for each site. Place a check mark (√) in the space provided for each step performed. Some
procedures will not be applicable to all installations. Mark NA for those procedures which are not
applicable. Some procedures may be repeated for multiple FMUs. Add comments and explain any
deviations on page 5.
SITE:
LOCATION:
1. SITE EXAMINATION
All site equipment is operational, and installed in accordance with the NEC (if not, explain in
Comments on page 5).
2. FMU UPGRADE (For FMU Upgrades Only). Repeat for multiple FMUs. Note deviations on page 5.
a. Verify the FMU to be upgraded is operational.
b. Retrieve transactions, unit configuration, and options from FMU to be upgraded.
c.
Upgrade the FMU.
d. Use a laptop connection to:
1) Initialize FMU (commands 02, FF, 1A, 28, FE).
2) Set/verify site signature (command 38).
3) Set system type and, if necessary, lock baud rate down (command 59).
4) Restore options (various commands).
e. Using the customer’s computer, upload the site configuration, authorization list, and send
pricing, as required.
3. SOFTWARE UPGRADE (For Software Upgrades Only)
a. Verify tasking is an upgrade. Customer must have an operational copy of FuelMaster®
software with an existing FuelMaster® database.
b. Disable any auto download settings and stop all services.
c.
Retrieve transactions from all FMUs.
d. Retrieve and record unit configuration and options.
e. Make a copy of the customer’s existing software database and save to the desktop.
f.
Upgrade the customer’s existing software using a local computer administrator log on.
NOTE
In step g, if not prompted “Database Conversion Finished”, or if other errors occurred, discontinue
upgrade and call Syn-Tech’s Customer Satisfaction Center (CSC) at 800-888-9136, ext. 1500, for
assistance.
g. When the upgrade is complete, restart the customer’s computer and verify the database
opens with the new software.
10/22/10
Page 1 of 5
343
344
4. FMU NEW INSTALLS. Repeat for each FMU. Note any deviations on page 5.
a. EXAMINATION OF PRODUCT
1) All equipment on packing list is accounted for.
2) Equipment matches customer requirement.
3) FMU is configured with correct number of hose positions and correct communications
boards are installed. Master FMU has internal communications cable.
4) FMU upper cabinet is correctly matched to pedestal.
5) Doors and locks operate freely.
6) No visible shipping damage.
b. PROVIDE TELEPROMPTING
1) Turn on FMU power switch. FMU initializes without error, and prompts the user to
INSERT KEY OR CARD TO BEGIN.
2) All FMU’s displayed an asterisk (*) to the left of the hose number and prompted, “HOSE
BUSY, SELECT ANOTHER…” when dispenser in use was selected from the FMU
keypad.
c. VALIDATE FMU ACCESS WITH PROKEE®, SMARTCARD, CREDIT CARD, AND/OR
KEYPAD
1) FMU’s validated authorized access by stepping to next menu prompt.
2) FMU’s rejected unauthorized access.
d. ACTIVATE PRODUCT DISPENSERS. All FMU’s successfully activate appropriate
dispensing hoses after authorized access.
e. VERIFY SINGLE HOSE AUTHORIZATION. Activate each hose (one hose at a time) in
automatic mode and verify no other hoses will dispense.
f.
SIMULTANEOUS TRANSACTIONS. Each FMU allowed simultaneous operation of each
connected dispensing hose.
g. VERIFY NO COUNTS DURING DISPENSER RESET. Select COUNT TEST from the
Configuration Menu. Move Automatic/Manual Mode switches to Manual. Verify counts do not
register after the dispenser reset handle is activated. If counts do register, perform an
automated transaction for the applicable hose then query the FMU. Verify the quantity
observed in the query matches the quantity recorded at the dispenser. If quantities do not
match, a pulser with AC control must be installed. Repeat for each connected hose.
h. ENCODE, VERIFY, AND REVISE PROKEE®S OR SMARTCARDS
1) Prokee®s or Smartcards for test (if applicable), one for each available product, were
encoded and read data back correctly.
2) The Prokee®/Smartcard Encoder (if applicable) revised data and read data back
correctly.
i.
PROVIDE FOR MANUAL OPERATION. Each FMU functioned normally while selected
dispensers were switched to manual operation. Dispensers switched to the manual position
did not show on the display as being available.
j.
TRANSACTION HANDLING. Transactions for each hose, each day were assigned a
sequential four digit number starting with 0001.
k.
DISABLE DISPENSER AFTER TRANSACTION. Repeat for multiple FMUs. Note any
deviations on page 5.
1) Each FMU disabled the applicable dispensers connected to it within the specified time
limits after dispensing was complete.
Page 2 of 5
345
346
2) If a solenoid valve is not installed, verify fuel stops flowing when the transaction is ended
by squeezing the nozzle trigger after the pump handle switch is turned off. Fuel should
not flow.
l.
PROTECT DATA DURING POWER FAILURE. Repeat for multiple FMUs. Note any
deviations on page 5.
1) In automatic mode, when power was removed from each FMU the applicable dispensers
connected to that FMU were disabled.
2) Transactions in progress during power failure were recorded. No transaction data was
lost.
3) When power was restored to each FMU the applicable dispensers connected to that FMU
did not activate without initiating a new transaction.
4) Manual intervention was not required to bring the system to full operation after power
failure.
m. PRICING. Repeat for multiple FMUs. Note any deviations on page 5.
1) Check all price levels stored at the FMU
2) If receipts for ProKee is turned on verify that the price on the receipt is correct
3) If credit card, run a few transactions verify pricing and functionality
n. DISCOUNT CREDIT CARDS. Repeat for multiple FMUs. Note any deviations on page 5.
1) Set up discount credit card in software and send to FMU
2) Run a test transaction and verify that proper price level appear
o. PREPAID CARDS/KEYS. Repeat for multiple FMUs. Note any deviations on page 5.
1) Set up a pre-paid record in the software, encode and send it to the FMU
2) Run a test transaction and verify functionality
3) Download transactions and make sure that card record reflects transaction
p. RECORD TRANSACTION DATA. Perform automated test transactions on each hose.
Record the quantity displayed on the dispenser as DISPENSER QTY. Go to the Central
Controller and download the test transactions and record them under POLLED QTY.
HOSE
#
DISPENSER
QTY
POLLED
QTY
HOSE
#
1
9
2
10
3
11
4
12
5
13
6
14
7
15
8
16
Page 3 of 5
347
DISPENSER
QTY
POLLED
QTY
348
q. SAFETY. Repeat for multiple FMUs. Note any deviations on page 5.
1) FMUs are installed in accordance with the NEC. If mounted in a Class I, Div 2, location,
all electronic components, switches, and relays are located over 18 inches above grade
level, and FMU is not installed within 18 inches of a gasoline or E85 dispenser (or 5 feet
of a CNG dispenser). Explain any deviations on page 5.
2) All connections at the FMU which are a potential shock hazard are covered and labeled
with appropriate warnings, and located within a locked enclosure.
3) An emergency stop switch is present, not within 20 feet nor greater than 100 feet from
the fuel island. When activated, the emergency stop switch removes power from all
fueling site equipment.
r.
POST INSTALLATION INSPECTION. Repeat for multiple FMUs. Note any deviations on
page 5.
1) FMU is securely mounted with four 3/8 inch (minimum) screw anchors/attach bolts.
2) Any entry holes drilled/punched in FMU are sealed.
3) FMU upper cabinet and pedestal door gaskets provide weatherproof seal of internal
components.
4) FMU upper cabinet is secured to pedestal with six screws.
5) FMU board/backplate attach screws are secure.
6) Wire/cable connections are correct and secure.
7) Board retainer for mainboard expansion cards is installed and secure.
5. TRAINING. User was provided training for:
a. How to start a transaction at the FMU,
b. How to use a Supervisor Prokee® or Smartcard,
c.
How to load and open the software program,
d. New features of upgraded software and/or FMU,
e. How to download transactions from the FMU to the computer,
f.
How to encode a Prokee® or Smartcard using the Encoder,
g. How to de-authorize a Prokee® or Smartcard,
h. How to re-enable a locked-out hose,
i.
How to use Price Levels,
j.
How to use Discount Credit cards and a prepaid Prokee®/Smartcard,
k.
Who to call for troubleshooting/training assistance.
6. DATA
a. Site Signature:
b. FMU telephone number:
c.
FMU IP Address:
d. Network is Cable, Fiber, Wireless (circle one)
e. Zlinx Baud Rate/Data Bits/Stop Bits/Parity/Channel:
Page 4 of 5
349
350
f.
Number of Master FMU’s:
g. Number of Satellite FMU’s:
h. FMU Firmware version:
i.
Dispenser control method:
j.
Pulser type/divide ratio:
k.
Computer operating system:
l.
FuelMaster® software version:
m. Site Contact:
n. Site Contact telephone number and e-mail:
Comments (use reverse if additional space is needed):
SIGNATURE AND FINAL SIGN-OFF
Customer Representative (print):
Customer Representative (signature):
Date:
Certified Startup Technician (print):
Certified Startup Technician (signature):
Organization:
Date:
Page 5 of 5
351
352
HOLD HARMLESS AGREEMENT (to be completed when installing wireless networking equipment)
TO: _________________________________________________
SUBJECT: Potential Security Breaches Through Wireless Network Connections to FuelMaster®
FuelMaster® Fuel Management Units (FMUs) and software do not contain personal information subject to
the Privacy Act of 1974. However, when added to a network the FMU may provide a link to other
resources which do contain personal or privileged information. Cable or fiber optic network connections
are not easily accessible. Wireless networks operate on radio waves that can be intercepted by anyone
with the right equipment and within range of the transmitter. Without proper wireless network security,
outside users can access your network to attain such valuable information as social security numbers,
credit card numbers, bank account numbers, and countless other private information sources stored on
your network. If accessibility is achieved, outside users can access anything stored in your network, not
just FuelMaster® related information.
Though the physical installation of the equipment may be accomplished by anybody with the knowledge
and experience, the responsibility for the network, IP addresses, wireless components and devices,
access points and network configuration rests entirely on the customer and, where applicable, his/her
Information Technology (IT) person(s) or Network Administrator(s) for that site.
Syn-Tech Systems, Inc., cannot emphasize enough the potential damage that may result from a breach
in network security. When a wireless network connection to FuelMaster® is established, Syn-Tech
Systems, Inc, cannot prevent accessibility by outside users. As such, this HOLD HARMLESS
AGREEMENT is prepared to remove liability from Syn-Tech Systems, Inc., for any breach of security
resulting from the development of a wireless network connection to FuelMaster®. Please acknowledge
receipt and concurrence with the terms of this agreement by signing below. Thank you.
ACKNOWLEDGEMENT:
I acknowledge receipt and concurrence with the terms of this agreement:
(Signature of Authorized Representative)
353
Syn-Tech Systems, Inc.
Home of the FuelMaster®
FuelMaster® Plus
User Manual
Version 5.1
354
Table of Contents
Copyright© Syn-Tech Systems, Inc. 1998-2010
Publish Date: 4/29/2010
All Rights Reserved. This Document was printed in the United States of America.
Except as permitted under the United States Copyright Act of 1976, no part of this
publication may be reproduced, stored in a retrieval system, or transmitted in any form or
by any means – electronic, mechanical, photocopying, recording or otherwise – without
the prior written permission of the publisher:
Syn-Tech Systems, Inc.
PO Box 5258
Tallahassee, Florida 32314
Phone:
(850) 878-2558
Fax:
(850) 877-9327
Support:
(800) 888-9136 Ext. 1500
Trademark Acknowledgements
Trademarks of other products mentioned in this manual are held by the companies
producing them. Use of a term in this manual should not be regarded as affecting the
validity of any trademark. All other trademarks are acknowledged.
2
355
Table of Contents
FuelMaster® Plus System Overview......................................... 13
System Components.................................................................... 13
Central Controller .................................................................. 13
FMU ......................................................................................... 13
TMU ......................................................................................... 13
Access Devices ......................................................................... 13
PROKEE®........................................................................... 13
SMART CARD ................................................................... 13
AIM ...................................................................................... 13
AIM2™ ................................................................................ 14
CREDIT CARD .................................................................. 14
Communication Options ............................................................ 14
Phone........................................................................................ 14
Network Card.......................................................................... 14
Direct Connect......................................................................... 14
System Types ............................................................................... 15
Verified Miscellaneous Number (VMN) ............................... 15
Verified Vehicle ID (VVI) ...................................................... 15
Commercial Vehicle Key Only (VKO).................................. 15
Commercial User Key Only (UKO) ...................................... 15
Commercial Either Key (EK) ................................................ 15
Commercial Both Key (2K) ................................................... 15
Keyless (Keyless) ..................................................................... 15
Over The Road (OTR)............................................................ 15
Chapter 2: Installation and Startup.......................................... 16
Recommended PC Requirements.............................................. 17
Minimum PC Requirements ...................................................... 17
Upgrade.................................................................................... 23
Uninstall................................................................................... 28
Initial Startup.............................................................................. 30
Chapter 3: System Configuration ............................................. 33
System Configuration ................................................................. 34
Information.............................................................................. 34
System ...................................................................................... 34
Misc Fields 1-5: ................................................................... 34
System Key Information & System Type ......................... 35
Vehicle and User PROKEE® Option Defaults ................ 35
7 Digit Odometer................................................................. 35
Passive System Type ........................................................... 35
Allow transaction export .................................................... 35
Require Customer ID ......................................................... 35
Allow TMU Deliveries ........................................................ 35
Hardware Options .................................................................. 36
Modem Options................................................................... 36
Redial Options..................................................................... 36
3
356
Table of Contents
Wait for Tone Option ......................................................... 36
Dial Method Options .......................................................... 36
Encoder Options ..................................................................... 37
AIM Options............................................................................ 37
Odometer ............................................................................. 37
Receipt.................................................................................. 37
User ID ................................................................................. 37
Chapter 4: Products and Pricing............................................... 38
Products ....................................................................................... 39
Pre-Programmed Products .................................................... 39
Creating/Editing a Product.................................................... 39
Description........................................................................... 39
Maximum Product Allotment............................................ 40
Transaction Limit ............................................................... 40
Base Cost.............................................................................. 40
Price Level ........................................................................... 40
Adjustments......................................................................... 40
Map To................................................................................. 40
Chapter 5: Site Configuration ................................................... 41
Site Configuration....................................................................... 42
Site information....................................................................... 42
Tank Listing ............................................................................ 42
FMU Listing ............................................................................ 42
Site Configuration options ..................................................... 42
Site Configuration Options ........................................................ 43
Connection type....................................................................... 43
Tank Monitor .......................................................................... 43
Type.......................................................................................... 43
FMU ......................................................................................... 43
Local Authorization Options ................................................. 43
Phone Connection ................................................................... 44
LAN Connection ..................................................................... 44
Direct Connection ................................................................... 44
Tank Configuration .................................................................... 45
Tank Capacity ......................................................................... 45
Reorder Limit.......................................................................... 45
Product..................................................................................... 45
Blended .................................................................................... 45
Maintain Inventory................................................................. 45
Enable Pricing Per Tank........................................................ 45
Vendor...................................................................................... 45
Tank Information ................................................................... 45
Deliveries, Adjustments, Transfers, Stick Reads, and Auto
Adjust....................................................................................... 45
Inventory Editor ......................................................................... 46
FMU Configuration .................................................................... 47
4
357
Table of Contents
FMU Name .............................................................................. 47
Modem Hours.......................................................................... 47
Totalizer Digits ........................................................................ 47
Valid Key Timeout.................................................................. 47
Message Duration ................................................................... 47
Decimal Digits for Onsite ....................................................... 47
Zero Quantity Shutdown........................................................ 47
Julian Date Rollover Hour ..................................................... 47
Hose Configuration..................................................................... 49
Mech - Mechanical Hoses....................................................... 49
MPD/Electronic Hoses............................................................ 49
PHL (Pump Handle Sensing)................................................. 49
Div Ratio .................................................................................. 49
NPT (No Pulse Timeout) ........................................................ 49
PFT (Pump Finish Timeout) .................................................. 49
Type - Configure ..................................................................... 49
Mechanical Grade Positions .................................................. 50
MPD Grade Positions ............................................................. 50
Site Configuration Walkthrough............................................... 51
Chapter 6: Customers, Vehicles and Users .............................. 61
CUSTOMERS ............................................................................. 62
Customer ID ................................................................................ 62
Customer ID ............................................................................ 62
Customer Information............................................................ 63
Price Level ............................................................................... 63
Customer Configuration Walkthrough .................................... 64
VEHICLES.............................................................................. 6666
Vehicle General Tab ............................................................... 67
Vehicle ID ............................................................................ 67
Vehicle Description ............................................................. 67
Encoded................................................................................ 67
Customer ID ........................................................................ 67
Customer Name................................................................... 67
Vehicle Year ........................................................................ 67
Vehicle Odometer Tab............................................................ 68
Current Odometer .............................................................. 68
Date Odometer Read .......................................................... 68
Miles/Hour Range ............................................................... 68
PM Range ............................................................................ 68
Next PM Mileage................................................................. 68
Encoded................................................................................ 68
Vehicle Products Tab.............................................................. 69
Product................................................................................. 69
Product Description............................................................ 69
Daily Product Allotted........................................................ 69
Transaction Limit ............................................................... 69
5
358
Table of Contents
Price Level ........................................................................... 69
Match Customer Price Level ............................................. 69
Vehicle PROKEE®/Smart Card Tab ................................... 70
Odometer ............................................................................. 70
PIN........................................................................................ 70
User ID ................................................................................. 70
Receipt.................................................................................. 70
Status Fields......................................................................... 70
Reissue Count...................................................................... 70
PIN Number & Internal Key Number .............................. 70
Vehicle Misc Tab..................................................................... 71
Agency.................................................................................. 71
Organization........................................................................ 71
Usage .................................................................................... 71
Date Service Began ............................................................. 71
Miscellaneous Fields ........................................................... 71
Vehicle Configuration Walkthrough ........................................ 72
Users ............................................................................................. 75
User ID ......................................................................................... 75
Users General Tab .................................................................. 76
User ID ................................................................................. 76
Last, First, SSN #, Middle Initial....................................... 76
Agency & Department........................................................ 76
Customer ID & Customer Name ....................................... 76
Chapter 7: Prepaid and Discount Cards .................................. 78
Card Owners ............................................................................... 79
Card Owner List ..................................................................... 79
Card Owner Info..................................................................... 80
Discount Cards............................................................................ 81
Owner ID ................................................................................. 81
Beginning Date ........................................................................ 81
Already Encrypted.................................................................. 81
Card ID .................................................................................... 81
CC Expiration Date ................................................................ 81
Partial ID ................................................................................. 81
Authorized ............................................................................... 81
Price Level ............................................................................... 81
Brand........................................................................................ 81
Prepaid Keys ............................................................................... 82
PROKEE® ID ......................................................................... 82
Price Level ............................................................................... 82
PIN............................................................................................ 82
Authorized ............................................................................... 82
Encoded.................................................................................... 82
Internal Key Number ............................................................. 82
Owner ID ................................................................................. 82
6
359
Table of Contents
Creation Date .......................................................................... 82
Balances Tab ............................................................................... 83
PROKEE® Balance in Database........................................... 83
Unclaimed outstanding credit................................................ 83
Credit Card Configuration Walkthrough ................................ 84
Chapter 8: Utility Keys............................................................... 89
Tanker Truck Keys..................................................................... 90
Tanker Truck List ...................................................................... 90
General Tab............................................................................. 90
Tanker Truck ID................................................................. 91
Description........................................................................... 91
Truck Year .......................................................................... 91
Site ID................................................................................... 91
Site Name ............................................................................. 91
Customer ID ........................................................................ 91
Customer Name................................................................... 91
Encoded................................................................................ 91
Authorized ........................................................................... 91
Tanker Products Tab.............................................................. 92
Product................................................................................. 92
Product Description............................................................ 92
Daily Product Allotted........................................................ 92
Transaction Limit ............................................................... 92
Price Level ........................................................................... 92
Match Customer Price Level ............................................. 92
Tanker PROKEE®/Smart Card Tab ................................... 93
User ID ................................................................................. 93
PIN........................................................................................ 93
Receipt.................................................................................. 93
Status Fields......................................................................... 93
Reissue Count...................................................................... 93
PIN Number & Internal Key Number .............................. 93
Tanker Misc Tab..................................................................... 94
Agency.................................................................................. 94
Organization........................................................................ 94
Usage .................................................................................... 94
Date Service Began ............................................................. 94
Miscellaneous Fields ........................................................... 94
Tanker Truck Key Walkthrough .............................................. 95
Supervisor Keys .......................................................................... 98
Supervisor General Tab ......................................................... 99
Supervisor ID ...................................................................... 99
Customer ID ........................................................................ 99
PROKEE® Options ............................................................ 99
Status Fields......................................................................... 99
Authorized ........................................................................... 99
7
360
Table of Contents
Supervisor Misc Tab............................................................. 100
Agency................................................................................ 100
Organization...................................................................... 100
Usage .................................................................................. 100
Date Service Began ........................................................... 100
Miscellaneous Fields ......................................................... 100
Supervisor Key Walkthrough.................................................. 101
Manual Issue Keys .................................................................... 103
Manual Issue General Tab................................................... 104
Manual Issue ID ................................................................ 104
Customer ID ...................................................................... 104
PROKEE® Options .......................................................... 104
Status Fields....................................................................... 104
Authorized ......................................................................... 104
Manual Issue Misc Tab ........................................................ 104
Organization...................................................................... 105
Usage .................................................................................. 105
Date Service Began ........................................................... 105
Miscellaneous Fields ......................................................... 105
Manual Issue Key Walkthrough ............................................. 106
Chapter 9: AIM2™ Software Operations .............................. 108
AIM2™ Programmer ............................................................... 109
AIM2™ Programmer List ................................................... 109
AIM2™ Programmer General Tab ................................ 110
AIM2™ Programmer PROKEE® Tab .......................... 110
AIM2™ Vehicle Record ........................................................... 111
AIM2™ Tab .......................................................................... 111
AIM2™ Chronometers Tabs ............................................... 112
AIM2™ Programmer Key Setup Walkthrough .................... 114
Chapter 10: Communication with the FMU .......................... 116
Online Communications........................................................... 117
Online General Tab .................................................................. 117
Online Types and Download Options ................................. 117
Normal Download ............................................................. 117
Auto Download.................................................................. 117
Query.................................................................................. 117
Send Auth Lists/Discount List/Pre Paid List.................. 117
TMU Interface................................................................... 117
Send Pricing....................................................................... 117
Batch Report ..................................................................... 117
Check Online Sites ................................................................ 118
Online Buttons....................................................................... 118
Save Options...................................................................... 118
Close ................................................................................... 118
Disconnect.......................................................................... 118
Auto Download.......................................................................... 119
8
361
Table of Contents
Polling Report ........................................................................... 119
Pump Prices Report.............................................................. 120
Message Reports ................................................................... 120
Misc Tab .................................................................................... 120
Chapter 11: FuelMaster® Reports......................................... 121
Report Configuration ............................................................... 122
FuelMaster® Standard Reports .............................................. 123
FMU Activity Report............................................................ 123
Transaction Reports ............................................................. 123
Invoice Reports ..................................................................... 124
Site Reports ........................................................................... 124
Vehicle Reports ..................................................................... 125
User Reports .......................................................................... 126
Customer Reports ................................................................. 126
Utility Key Reports ............................................................... 126
Prepaid Cards ....................................................................... 127
Chapter 12: Exporting Options ............................................... 128
Export Configuration ............................................................... 129
Export Configuration Tool .................................................. 129
Transaction Export................................................................... 130
Export Interface.................................................................... 130
Chapter 13: Administration..................................................... 132
Security Configuration ............................................................. 133
Security Settings Tab............................................................ 133
Login Name ....................................................................... 133
Exclude Words .................................................................. 133
Exclude Substring ............................................................. 133
Restrict Password Reverse............................................... 133
Restricted Password Shift Characters ............................ 133
Password Fail Lockout ..................................................... 133
Minimum Length .............................................................. 133
Minimum Numeric Character......................................... 134
Minimum Alpha Character ............................................. 134
Minimum Special Character............................................ 134
Characters New Password Differs from Old Password 134
Days Until Password Expires........................................... 134
Expiration Warning Days ................................................ 134
Passwords until able to Repeat ........................................ 134
Days until Password able to Repeat ................................ 134
Log Events ............................................................................. 134
Operator Options...................................................................... 135
Operator List......................................................................... 135
General Tab....................................................................... 136
Operator & Security Tab ................................................. 136
System & Operations Tab................................................ 137
Site Tab .............................................................................. 137
9
362
Table of Contents
Transactions Tab .............................................................. 138
Supervisor and Manual Issue Tab .................................. 138
Vehicle and User Tabs...................................................... 139
Tanker Truck Tab ............................................................ 139
AIM2™ Tab ...................................................................... 140
Card Owners Tab ............................................................. 140
New User Setup ......................................................................... 141
New User Login......................................................................... 142
Chapter 14: FuelMaster® Tools.............................................. 143
FMU Console............................................................................. 144
Polling Report Query................................................................ 145
Polling Report Query Engine............................................... 145
Select Special ..................................................................... 145
Select Range....................................................................... 145
Polling Report Options..................................................... 145
Print Options ..................................................................... 145
Batch Encoding ......................................................................... 146
Batch Encoding Tool ............................................................ 146
Manual Entry Transactions..................................................... 147
Manual Entry Transaction List........................................... 147
Manual Entry Walkthrough ................................................ 148
Inventory Editor ....................................................................... 149
Inventory Editor Interface................................................... 149
Transaction Archive and Archive Query ............................... 150
Archive Transactions Tool................................................... 150
Archive Transactions History Query ...................................... 151
Archive Transaction Query Engine .................................... 151
Command Line Setup & Helper.............................................. 153
Setup Command Line Options ............................................ 153
Database Manager .................................................................... 154
Database Manager Interface................................................ 154
Database Maintenance ............................................................. 156
Pack Database ....................................................................... 156
Delete Records....................................................................... 157
Process Info Tab.................................................................... 157
Recover Transactions ............................................................... 158
Recover Transaction Interface ............................................ 158
Transaction Lookup ................................................................. 159
Transaction lookup Tool ...................................................... 159
Modify Transactions................................................................. 160
Modify Transaction Engine ................................................. 160
Modify Transaction .......................................................... 161
Recover Export Transactions .................................................. 162
Recover Export Transactions Engine ................................. 162
Chapter 16: COMM ADC........................................................ 163
Service Configuration............................................................... 164
10
363
Table of Contents
COMM ADC Field Names Selector ........................................ 165
COMM ADC PDA Diagnostics ............................................... 166
Current ADC Transactions...................................................... 167
11
364