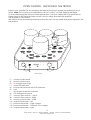
1
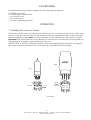
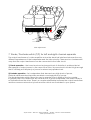
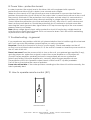
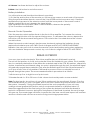
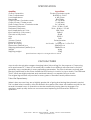
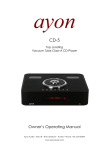
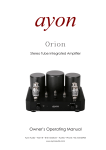
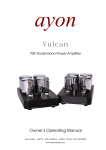
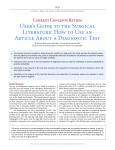
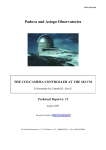
Triton
Stereo Tube Integrated Amplifier
Owner’s Operating Manual
Ayon Audio – Hart 18 – 8101 Gratkorn – Austria – Phone: +43 3124 24954
www.ayonaudio.com
WARNING
PRECAUTION AND SAFETY
To prevent shock or fire hazard do not open the unit or expose to rain or moisture. Refer all
service to Ayon Audio Company or an Ayon authorized service facility. There are no user
serviceable parts inside the Triton. Refer all internal service, updates, or modifications to
qualified service personnel.
High voltage is present inside operating Triton.
Do not remove bottom plate or insert any objects through openings in the case.
OPERATING VOLTAGE
The operating voltage is factory set for the destination country and is not user adjustable.
Unauthorized attempts to modify the operating voltage may damage the unit and will void the
manufacturer warranty.
FUSE
The AC power line fuse is located in a snap-out receptacle on the underside of the power inlet
(rear panel). The correct value of Slow-Blow fuse is 5A. Do not replace the fuse with a higher
than indicated. Disconnect the power cord before changing fuse. A blown fuse in your unit
can be an indication of a serious problem. If a replacement fuse fails as well, no further
attempts should be undertaken. Please contact the factory for professional service.
Serial Number:
Voltage:
Distributor:
2
Ayon Audio – Hart 18 – 8101 Gratkorn – Austria – Phone: +43 3124 24954
www.ayonaudio.com
INTRODUCTION
Thank you for your purchase of the Ayon Triton power amplifier.
Please read this owner’s manual to obtain the full benefit of the Triton amplifier in your system.
This manual provides you with necessary safety information and operation procedures for this
unit. With this amplifier, you have entered into the world of exclusive design which will give you
great satisfaction and privilege of enjoying the advanced technology of Ayon Audio products.
It is designed to serve as a high standard of truthful real musical performance. The care in
engineering and manufacturing of this product anticipates a long time of enjoyment.
We also encourage you to enlist the aid of the dealer from whom you purchased this Ayon
Triton amplifier. Your dealer is an excellent source of information on compatibility, installation,
and troubleshooting, and should be capable of helping ensure that your overall music system
provides you with maximum performance and satisfaction.
WHY VACUUM TUBES
The output level of studio microphones under typical recording conditions contain peaks far in
excess of what VU meters display. Everyone knows that, but the peaks, as measured with an
oscilloscope, are really quite high, easily exceeding 1 volt! The tube or transistor used in a
condenser microphone, or in a microphone preamplifier, often will be driven into severe
overload by these peaks. The peaks are short, so the sound isn't grossly distorted-sounding; but
the distorted peaks do affect what we hear. All preamps (and condenser microphone
electronics) are overloaded by these peaks, but tubes handle it differently than solid-state
devices. When transistors overload (in a discrete circuit or in an OP amp), the dominant
distortion product is the third harmonic. The third harmonic "produces a sound many musicians
refer to as blanketed”. Instead of making the tone fuller, a strong third actually makes the tone
thin and hard. On the other hand, with tubes (particularly triodes) the dominant distortion
product is the second harmonic: “Musically the second is an octave above the fundamental
and is almost inaudible, yet it adds body to the sound, making it fuller”. Tubes sound better
because their distortion products are more musical. Tubes provide a more appropriate load to
transducers. Those are the fundamental reasons why tubes simply sound better.
CAUTION & HANDLING TIPS
1. Always be sure your hands are clean and free of any dirt or oil before carrying
your Ayon Triton. Carry the amplifier with both hands by gripping its side.
2. Never hold the face plate against your clothing as coarse materials, stitching, belts
and the rivets from denim pants can mar the surfaces.
3. Never put any objects directly on top of the unit.
4. Use a soft cloth with non-abrasive cleaning product to clean your amplifier.
5. Gloves or a soft cloth will prevent "fingerprinting" of the tubes during their installation.
Do not touch the tubes without the use of a cotton glove or soft cloth.
6. Take care of the precision toggle switch selectors on the rear when moving or transporting
the Triton.
7. When the unit is on, be careful not to touch the vacuum tubes. Vacuum tubes get HOT.
8. The unit should be put on an adequate ventilated place; Allow clearance of a couple
inches in all directions so as to allow air to flow. Do not place the amplifier directly on a
carpet or any surface that will block air circulation under the amp.
9. Avoid placing the unit indirect sunlight or near sources of damp.
10. Never touch power plug with wet hands.
11. Disconnect from power before removing bottom plate is mandatory.
12. Please pull out the AC power cord by the plug instead of dragging it.
13. For best performance, place the Triton on a solid, non-resonant shelf that will minimize
vibration.
3
Ayon Audio – Hart 18 – 8101 Gratkorn – Austria – Phone: +43 3124 24954
www.ayonaudio.com
CONTENTS
OPEN CARTON – UNPACKING THE TRITON
ACCESSORIES
OPERATION YOUR NEW TRITON
1. Installation of tubes
2. Connecting
3. Turn ON procedure
4. Turn OFF procedure
5. Security caution in operation
6. Bias adjustment
7. Triode / Pentode switch
8. Power tube – protection board
9. Troubleshooting
10. How to operate remote control
BREAK-IN PERIOD
SPECIFICATION
VACUUM TUBES
WARRANTY AND SERVICE
4
Ayon Audio – Hart 18 – 8101 Gratkorn – Austria – Phone: +43 3124 24954
www.ayonaudio.com
OPEN CARTON - UNPACKING THE TRITON
Inspect your amplifier for any shipping damage and call your dealer immediately if any is
found. Note: Do not plug your amplifier into an AC outlet if you find shipping damage.
To avoid damaging the vacuum tubes please don’t turn the cardboard box upside down.
Open the box and carefully take out the vacuum tubes and then the amplifier.
The amplifier is very heavy!
We advise saving all packing materials so that the unit can be easily and safely shipped if the
need arises.
KT88
9
13
11
10
12
V2
V3
V6
V7
KT88
KT88
KT88
KT88
8
V1
KT88
T
V4
V5
KT88
KT88
V8
T
P
12AU7
6
Left
7
KT88
P
12AU7
Right
12AU7
12AU7
12AU7
12AU7
Volume
Input Selector
ayon
2
1
Triode L
Triode R
Line 1
Line 2
Line 3
Line 4
Direct
Mute
3
4
Stereo Integrated Amplifier
5
front view
(1) volume control knob
(2) remote window eye
(3) red backlit ayon logo
(-) mute LED indicator
(4) source selector knob with LED indicator
(5) feet
(-) left & right triode LED indicator
(6) T/P changeover switch
(7) vacuum tube socket – 12AU7
(8) vacuum tube socket – KT88
(9) vacuum power tube – KT88
(10)output transformer – left
(11)power transformer – high voltage
(12)power transformer – filament, low voltage
(13)output transformer – right
5
Ayon Audio – Hart 18 – 8101 Gratkorn – Austria – Phone: +43 3124 24954
www.ayonaudio.com
ACCESSORIES
Provided with the Ayon Triton amplifier are the following accessories:
8 x KT88 power tubes,
6 x 12AU7 signal - driver tubes,
1 x AC power cord,
1 x remote control,
1 x owner’s operating manual,
OPERATION
1. Installing the vacuum tubes
Please remove the vacuum tubes and the Triton from box and place the Triton on a firm, level
surface. Insert the vacuum tubes in accordance with the designated tube numbers into their
relative assigned sockets. Note: It is very important to insert the tubes in the correct location.
Important: Pay close attention to the direction of socket pins. If the direction is wrong and you
force the tube, damage to the socket pins will occur.
NEVER FORCE A VACUUM TUBE INTO PLACE. Tube should glide right in and have to fit tighten
(good pin contact). Ensure that all of the tubes are fully seated in their sockets.
KT88
KT88
12AU7
ECC82
1Pins
in all 9 pins
1st pin
in all 8 pins
the tubes
6
Ayon Audio – Hart 18 – 8101 Gratkorn – Austria – Phone: +43 3124 24954
www.ayonaudio.com
2. Connecting
To assure reliable operation always turn the Triton OFF while making or changing input or
speaker connections. No connections should be made while the amplifier is ON.
Rear panel
All input and output connectors are clearly marked on the rear panel.
LOUDSPEAKER: There are three sets of gold speaker output terminals at the rear panel: Left out,
common, 4, 8, ohm, Right out, common, 4, 8, ohm. Connect the speaker input terminals to
corresponding speaker output terminals at the rear panel according to the impedance of the
speaker with high quality audio cord. Pay close attention to proper matching of positive and
negative and left and right channels.
a.) INPUT: LINE1, LINE2, LINE3 and LINE4 connect your device with a high quality RCA lead.
You can then select any source input for LINE1, LINE2, LINE3 & LINE4.
Rotate input selector accordingly.
b.) The Triton is equipped with a Direct In. This connection allows the Triton to be used as
a stereo amplifier connected to a separate Pre-Amplifier.
c.) The Triton is also equipped with a source output (Pre-Out), an output for connection to a
sub-woofer, headphone or other device.
d.) TP: Test points for bias
e.) Bias: Regulation of static working point bias current
Line 1
Line 2
Line 3
Line 4
Pre Out Direct In
8 Ohm
4 Ohm
Common
Bias 5
Bias 6
Bias 1
Bias 2
Left
TP 5
TP 1
Source
TP 6
TP 2
TP 7
TP 3
TP 8
TP 4
Right
Ayon - Austria
ayonaudio.com
Bias 8
Serial No. 0
Bias 7
Bias 4
Bias 3
rear panel
(1)source input (4x line & direct in ) and source output (Pre out)
(2)speaker out ( Common, 4 Ohm or 8 Ohm )
(3)potentiometer for bias adjustment
(4)test point for bias check
(5)power inlet - with fuse
(6)power switch
(7)phase indicating lamp – 230V Schuko only
(8)ground switch – for power amp operation only
7
Ayon Audio – Hart 18 – 8101 Gratkorn – Austria – Phone: +43 3124 24954
www.ayonaudio.com
Power
Phase
~AC In
Ground
The power connection is located at the rear panel. Plug the AC power cord into receptacle.
Power switch off = “0” - Power switch on = “|”.
Note: In case the Triton is used as a pure power amplifier and there is a hum loop (hum audible
from more than a few inches from the loudspeakers) flip the grounded/ungrounded switch.
It is recommended that you do not use a power conditioner as it may limit the current
available to the amplifier.
Note: when the phase control indicator glows red the Phase polarity is wrong. Reverse the AC
plug! (This function applies for 230V and Schuko plug version only)
3. Turn ON procedure
When all sources are connected properly, turn down the volume to minimum, switch on the
power - the Ayon-logo glows; it will go through a gentle power-on sequence first.
Please wait for min. 60 seconds before turning the volume up. After 60 seconds, the unit is
operational. Now you can increase the volume via the volume control.
Follow this procedure each time you turn your Triton on.
Some preamplifiers and sources can generate dangerous transients that can damage
loudspeakers. To avoid letting dangerous transients reach your loudspeakers turn your system
on in the following order:
1) Turn on all sources (CD, tuner, etc.) that you will be using.
2) Turn on the preamplifier. (If you use your Triton as a pure power amp)
3) Wait until preamp has stabilized.
4) Power up Triton amplifier.
5) Select listening source and play music.
Note: The Triton is using a big power supply with large high voltage capacitor storage, during
power ON an electrical capacitor charging noise – hum may be heard especially when the
amp was turn off for a while. This is not cause for alarm, it is normal.
4. Turn OFF procedure
When powering down your system, always turn the amplifier off first.
The unit can be turned off at any time (even while playing).
Imortant: If the Triton was turned OFF even for a short period of time, you should wait at least
2 minutes before turning it back ON. Do not turn it ON then OFF and then ON again in quick
succession. This precaution will minimize the stress (high voltages) on internal components.
Follow this procedure each time you turn your Triton OFF / ON.
5. Security caution in operation
A. Handle the Triton with respect, it is heavy.
B. Insert the vacuum tubes in accordance with the designated tube numbers into their relative
assigned sockets. Important: Pay close attention to the direction of socket pins NEVER FORCE A
VACUUM TUBE INTO PLACE. Tube should glide right in. If the direction is wrong and you force the
tube, damage to the socket pins will occur.
C. Turn volume control down to the minimum position.
Rotate input selector knob to the corresponding position for input device connected.
D. Check your speaker connections! DO NOT OPERATE AMPLIFIER WITHOUT INSURING THAT
SPEAKERS ARE CONNECTED TO THE AMPLIFIER. DAMAGE WILL OCCUR.
E. Do not switch from Pentode to Triode mode during operation of the amplifier. Turn amplifier
off and then perform the switch!
8
Ayon Audio – Hart 18 – 8101 Gratkorn – Austria – Phone: +43 3124 24954
www.ayonaudio.com
F. Insure that the Ayon logo, located on the front panel of the Triton, illuminates .
G. The Triton amplifier SHOULD NOT BE LEFT RUNNING WHEN NOT IN USE.
If you will not be listening to the amplifier for more than an hour, it is advised that the amplifier
be turned off. Unlike solid state amplifiers, tube amplifiers should be shut down when not being
used. This will greatly prolong tube life.
H. It is normal for vacuum tube equipment to runs very warm if used for prolonged periods.
I. Do not use a speaker with impedance lower than 2 ohms on either of the outputs.
Note: NEVER REMOVE THE BOTTOM PLATE OF THE TRITON BEFORE UNPLUGGING THE UNIT FROM
THE WALL!
6. Bias adjustment – important!
The output power tubes need to be “biased” with a grid voltage that controls the flow of
electrical current through the tube. Tube biasing on the amplifier has been designed to be
both simple and effective. The bias is set individually for each tube so that the correct
operating point is assured. An added benefit to this approach is that, should a tube fail
prematurely, the single tube can be replaced without having to purchase a matched set.
Use the following procedure to set the tube bias:
Adjust the Bias via potentiometer: Bias1, Bias2, Bias3, Bias4, Bias5, Bias6, Bias7 and Bias8.
Place the red terminal of the digital multi-meter to the corresponding TP1, TP2, TP3, TP4, TP5, TP6,
TP7 and TP8. Place the black terminal of the digital multi-meter to the Common (negative)
terminal - ohm speaker-out of the amplifier. The current value will be displayed of the electrical
current running through the KT88 tube. The correct value should be approximately 450mV.
Important: Please check the bias voltage several times during the first 20 minutes of warm up
and adjust if necessary to the recommended value.
Important notice for new tubes or new amplifier: When using the amplifier for the first time or
after any exchange of the KT88 tubes, the bias voltage for the KT88 tubes should be set to
around 250mV and the amplifier should be run with this value for some hours to allow for a
smooth initial run-in of the tubes. After completion of this "warm up" phase, the bias should be
slowly increased towards the optimal value of 450mV. A new KT88 tube is known for its
tendency to let the bias rise slowly but continuously.
9
Ayon Audio – Hart 18 – 8101 Gratkorn – Austria – Phone: +43 3124 24954
www.ayonaudio.com
KT88
KT88
KT88
KT88
KT88
KT88
KT88
KT88
OFF
ON
Line 1
Line 2
Line 3
Line 4 Pre Out Direct In
8 Ohm
4 Ohm
Common
Bias 5
Bias 6
Bias 1
Bias 2
Left
TP 5
TP 1
Source
TP 6
TP 2
Power
Phase
~AC In
Ground
¦?
TP 7
TP 3
TP 8
TP 4
2 00K
20K
2K
Right
2M
20M
2 00
200M
DC A
200m
2m
Ayon - Austria
ayonaudio.com
Serial No. 0
Bias 8
Bias 7
Bias 4
Bias 3
DC
2
20m
V
20
200m
200
20
10 00
20
750
200m
200
20m
20
2m
AC
A
2
2 0¦?
AC
V
200m
2 ¦?
hFE
2 00n
2n
20n
F
CX
P NP
F USE D
UNFUSE D
E
B
NPN
C
E
E
B
C
E
DC100 0V
AC75 0V
MAX
0.2 A
MAX
!
MAX
20A
A
MAX
500V
C OM
V¦?
bias adjustment
7. Triode / Pentode switch (T/P) for left and right channel separate
The output transformer of a tube amplifier acts as the electrical interface between the very
different impedances of the loudspeaker and the tube circuitry. There are two fundamental
ways that the output transformer can be connected to the tube circuit.
1) Triode operation – the lowest and most advanced level of distortion is achieved but at
the expense of output power. In the case of the Triton, its power level in triode is high enough
that it will likely provide plenty of power for almost any speaker load.
2) Pentode operation – for loudspeakers that demand very high levels of power,
Pentode-ultralinear should provide excellent sound and plenty of power.
The triode/pentode switch allows the user to operate Triton in either of the two modes.
In general, the sonic differences are subtle but for a given loudspeaker one mode is likely to
sound better than the other. There is a complex relationship between the output transformer
and the crossover network so try both and see which one works best in your system.
10
Ayon Audio – Hart 18 – 8101 Gratkorn – Austria – Phone: +43 3124 24954
www.ayonaudio.com
8. Power tube – protection board
In order to protect the output level to the tubes, this unit is equipped with a special
protection power tube circuit to detect over currents and voltages.
When an over current or DC-input from the sources is detected or a power tube itself has a
problem, the protection circuit will shut off the output tube’s current and continue to do so until
the power is switched off. The protection circuit may also activate when it is connected to a
speaker with lower impedance than allowed, resulting in a large input that creates an over
current. When the protection circuit has activated (cut off), then turn off, wait 2 minutes and
then turn the power back on. Should the protection circuit continue to activate even after
removing the cause (power tubes, signal tubes or DC input source signal) of the over current,
please contact your dealer.
Note: When a large signal is input while a protection circuit is functioning, a slight electrical
noise from the current may be heard. This is not cause for alarm. This is the circuit maintaining
its protection of the output tubes.
9. Troubleshooting – in general
If you experience any problem with this unit, please take the time to look through this chart and
see if you can solve the problem yourself before you call your dealer.
No power: Check the connection to the AC power supply. Check and make sure the AC
source is not a switched outlet and that, if it is, the switch is turned on. Insert the power cord into
the AC inlet of this unit.
There is no sound: Press the power switch to turn on the unit, your external pre-amplifier (if any),
and disc player etc. Make sure a signal is output from a pre-amplifier or a CD-player etc.
Check if the pre-amplifier, speakers and source components are secure connected.
Select input setting of the pre-amplifier etc. correctly. Adjust the pre-amplifier volume.
The protection circuit is in operation when there is no Bias on all TP’s (tubes) readable.
Turn off the unit and solve the cause of problem.
Power tube will not bias: If the meter provides a reading but the tube will not bias correctly, the
tube is probably bad.
10. How to operate remote control ( RC )
ayon
remote control
11
Ayon Audio – Hart 18 – 8101 Gratkorn – Austria – Phone: +43 3124 24954
www.ayonaudio.com
A. Volume: Use these buttons to adjust the volume.
B. Mute: Use this button to mute the sound.
Battery Installation
You will require a small size Allen Hex Wrench, provided.
1) On the top and bottom of the remote you will see 4 hex screws on each end of the remote.
Using the provided Allen Wrench, remove the 2 top UPPER section hex screws only. Carefully
separate the top panel of the remote control from the lower panel of the remote control.
Handle carefully as do not damage the signal diode.
After separation the top panel, insert 2 x AAA batteries, observes the polarity!
2) Test it and then re-assemble.
Remote Control Operation
Point the remote control emitter diode to the front of the amplifier. To increase the volume,
depress the right button with the upward facing arrow. To decrease the volume, depress the
left button with the downward facing arrow. The mute button is located above the volume
control buttons.
When the remote control range is has become shortened, replace the batteries. Always
replace the batteries as a new PAIR! Check Voltages and DO NOT USE RECHARGEABLE
Batteries. Use a dry soft cloth to clean the remote control and battery spring when replacing
with new batteries. Keep remote control, dry, out of direct sunlight or heat. DO NOT DROP!
BREAK-IN PERIOD
Your new Ayon Audio electronics Triton tube amplifier has an initial break–in period.
The unit will not perform to its full sonic potential when first installed in your system. This is partially
due to a residual polarization of the dielectric materials used in the PCB, like resistors, capacitors,
chokes, transformers and internal wiring. As music is played through the unit, the electrical signal
will gradually anneal these materials. Only after the break-in period will the full performance of
your Ayon Audio Triton is fully realized. The break-in process will occur naturally as music is
played through the system. The recommended break-in procedure is as follows:
° Initial warm-up: five to eight hours of quiet music.
° Extended break- in: 30 to 50 hours of mid volume level and dynamic source material.
Note: For best results, do not burn–in your Triton continuously for more than 6- 8 hours. Give the
unit a break before you turn it on again. Burn-in the Triton without any stress and be sure to use
the system, “Normally”. During the break-in period, the sonic properties of your unit may
undergo several gradual shifts as the various components break–in at different rates. It is
therefore suggested that the fine tuning of the system be delayed until after the break–in
period is completed. However, during the final phases of the break–in period, the sonic image
will open up, the sound stage will bloom to perfection, the bass control and impact will increase
and the overall sound will have a more involving sound stage presentation.
12
Ayon Audio – Hart 18 – 8101 Gratkorn – Austria – Phone: +43 3124 24954
www.ayonaudio.com
SPECIFICATION
Amplifier
Class of Operation
Tube Complement
Load Impedance
Bandwidth
Output Power / Pentode mode
Output Power / Triode mode
Peak Output Power / Pentode mode
Frequency Response
Frequency Response
Input Impedance at 1 kHz
Input sensitivity ( full power )
S/N ratio at full power
Hum
NFB
Volume Control
Remote Control
Inputs & Outputs
Dimensions (WxDxH) cm
Shipping dimensions (WxDxH) cm
Weight
Shipping weight
Ayon Triton
Triode or Pentode mode
8x KT88, 6x 12AU7
4 & 8 Ohms
8Hz-70kHz
2 x 100 Watt
2 x 60 Watt
2 x 140 Watt
15 Hz - 35 kHz / 0 dB
10 Hz - 60 kHz / -2.5 dB
100K Ohm
260mV
98 dB
0,003 V
0dB
Potentiometer
Yes
4 x Line IN, 1 x Direct IN, 1 x Pre Out
50x40x25 cm
78x68x53 cm
44 kg
55 kg
Specifications subject to change without notice
VACUUM TUBES
Ayon Audio strongly discourages changing tubes (tube rolling) for the purpose of “improving
sonic performance”. Tubes of the same part number from different manufacturer’s and lots
generally vary considerably in many operating parameters. The Triton has been sonically and
precisely optimized for the tubes installed at the factory in Austria, by Ayon Audio. The KT88 and
12AU7 tubes are highly selected and matched tubes by our experts at Ayon Audio.
The original signal tubes will provide for many years of excellent audio performance.
Tube Life Expectancy
When tubes are new they are at slightly greater risk of going bad during there break in period.
This is called infant mortality. After the break in time period the tubes will stabilize and last for the
several thousand hours of operation unless traumatized by being jarred or dropped. For
maximum audio quality however we recommend replacing the tubes after 3000 hrs of
operation.
13
Ayon Audio – Hart 18 – 8101 Gratkorn – Austria – Phone: +43 3124 24954
www.ayonaudio.com
WARRANTY AND SERVICE
LIMITED WARRANTY
Ayon Audio electronic components are warranted by the manufacturer to be free of defects in
materials production for a period of 3 years (except all kinds of signal, rectifier and power tubes)
from the date of purchase. Under this warranty defects are repaired free of charge. The
purchaser is responsible for transportation from his location to the original sales agent, national
distributor, or international distributor, whoever is closest. This warranty applies to the original
purchaser only, and it is non-transferable to subsequent purchasers within the original 3 year
period. Contact your dealer or Ayon Audio for commercial warranty policies. Requests for
repair under this warranty must be accompanied by an unaltered copy of the original
purchase receipt.
IN THE EVENT OF A PROBLEM
In the unlikely event of a problem with Ayon electronic, if any replacement part is required first
contact your Ayon dealer. He will ensure continuous operation at the highest level of
performance. The defective parts must then be returned to the factory for inspection to
determine the status of the warranty claim. This on-site replacement of the parts eliminates the
time and expense of shipping the entire Amplifiers to the factory for repair. All warranty claims
must be made through an authorized Ayon dealer or distributor.
CONDITIONS
This warranty is subject to the following conditions and limitations. The warranty is void and
inapplicable if the product has been used or handled other than in accordance with the
instructions in the owner’s manual, abused or misused, electric shorts from lightings or
overloaded wall power outlet, the serial identification plate and serial number has been
removed from the Amplifiers, damaged by accident or neglect or in being transported or the
defect is due to the product being repaired or tampered with by anyone other than Ayon
Audio, or an authorized party.
Ayon reserves the right to modify the design of any product without obligation to purchasers of
previously manufactured products and to change the price or specifications of any product
without notice or obligation to any person.
ayon®
is a registered trademark
14
Ayon Audio – Hart 18 – 8101 Gratkorn – Austria – Phone: +43 3124 24954
www.ayonaudio.com