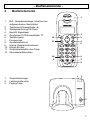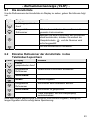
1
Schnurloses digitales DECT-Telefon
Cordless digital DECT telephone
Bedienungsanleitung
Operating Instructions
DECT 4500
DECT4500
Bedienungsanleitung _______3
User Instructions _________45
2
- Inhaltsverzeichnis 1
2
3
3.1
3.2
3.3
3.4
3.5
4
4.1
4.2
4.3
4.4
4.5
4.6
4.7
4.8
4.9
4.10
4.11
4.12
4.13
4.14
5
5.1
5.2
5.3
5.4
5.5
5.6
5.7
5.8
Allgemeine Hinweise ................................................................. 5
Bedienelemente ......................................................................... 7
Inbetriebnahme .......................................................................... 8
Sicherheitshinweise...............................................................................8
Verpackungsinhalt prüfen......................................................................8
Basisstation anschließen.......................................................................8
Standard-Akkus einbauen .....................................................................9
Aufladen der Standard-Akkus................................................................9
Bedienung ................................................................................ 10
Das Display .........................................................................................10
Anrufe entgegennehmen .....................................................................10
Anrufe führen .......................................................................................11
Einstellung der Hörer- und Freisprechlautstärke .................................11
Freisprechen........................................................................................11
Wahlwiederholung ...............................................................................12
4.6.1 Einzelne Rufnummer der Wahlwiederholung in das
Telefonbuch speichern ............................................................12
4.6.2 Einzelne Rufnummer der Wahlwiederholung löschen.............12
Handapparat ein-/ausschalten.............................................................13
Stummtaste .........................................................................................13
Tastatursperre .....................................................................................13
Klingelmelodie ausschalten .................................................................14
Temporäre Tonwahl ............................................................................14
Babyruf ................................................................................................15
Hinweise zur Reichweite .....................................................................15
Paging von der Basisstation zum Handapparat ..................................15
Das Telefonbuch...................................................................... 16
Rufnummern und Namen in das Telefonbuch eingeben .....................16
Gespeicherte Rufnummern aus dem Telefonbuch anwählen .............17
Telefonbucheintrag ändern..................................................................17
Direktwahltasten ..................................................................................17
5.4.1 Direktwahltasten belegen ........................................................18
5.4.2 Direktwahltasten benutzen ......................................................18
Gespeicherte Rufnummern aus dem Telefonbuch löschen ................19
Telefonbucheinträge kontrollieren .......................................................19
Telefonbucheinträgen spezielle Klingelmelodien zuordnen
(VIP-Klingelmelodie)............................................................................20
Sondertelefonbuch einrichten..............................................................21
5.8.1 Gespeicherte Rufnummern aus dem
Sondertelefonbuch anwählen..................................................21
3
- Inhaltsverzeichnis 6
6.1
6.2
6.3
7
7.1
7.2
7.3
8
8.1
8.2
8.3
8.4
8.5
8.6
8.7
8.8
8.9
8.10
8.11
8.12
8.13
9
9.1
9.2
9.3
9.4
9.5
9.6
Rufnummernanzeige (CLIP) ....................................................22
Die Anruferliste.................................................................................... 23
Einzelne Rufnummer der Anruferliste in das Telefonbuch
speichern............................................................................................. 23
Einzelne Rufnummer aus der Anruferliste löschen ............................. 24
Nebenstellenanlagen/T-NET....................................................25
“R” Taste an Nebenstellenanlagen ..................................................... 25
“R” Taste und das T-Net der DEUTSCHEN TELEKOM..................... 25
Automatische Pause einfügen ............................................................ 25
Sonderfunktionen ....................................................................26
Displaynamen ändern ......................................................................... 26
Einstellen von Klingelmelodien und Klingellautstärken ....................... 27
Wahlsperren einrichten ....................................................................... 28
Automatische Vorwahl ........................................................................ 29
Signaltöne ein- oder ausschalten........................................................ 31
Anrufe automatisch entgegennehmen ................................................ 32
Flashzeit einstellen.............................................................................. 32
Ton (MFV)- oder Impuls (IWV) – Wahlverfahren ................................ 33
Displaysprache einstellen ................................................................... 33
Anzeige der Gesprächszeit ändern..................................................... 34
PIN-Code der Basisstation ändern..................................................... 34
Alle Listen löschen .............................................................................. 35
Werkseinstellungen............................................................................. 35
Mehrere Handapparate ............................................................36
Intern telefonieren ............................................................................... 36
Externe Gespräche auf einen anderen Handapparat verbinden ........ 36
Konferenzgespräche führen................................................................ 37
Raumüberwachung ............................................................................. 37
An- und Abmelden von Handapparaten.............................................. 38
9.5.1 Anmelden von DECT4500 Handapparaten ........................... 38
9.5.2 Anmelden von anderen DECT-GAP Telefonen an die
Basisstation............................................................................. 38
9.5.3 Abmelden von Handapparaten ............................................... 38
Zusätzliche Basisstationen.................................................................. 39
10 Fehlerbeseitigung ....................................................................41
11 Wichtige Informationen ...........................................................42
11.1
11.2
11.3
11.4
4
Technische Daten ............................................................................... 42
Telefonkabel austauschen .................................................................. 42
Garantie .............................................................................................. 43
Konformitätserklärung ......................................................................... 44
- Allgemeine Hinweise -
1
Allgemeine Hinweise
Bitte lesen Sie diese Bedienungsanleitung sorgfältig durch. Bei eventuell
auftretenden Fragen, wenden Sie sich bitte an unseren Service unter der ServiceHotline 0180 5 00 13 88. Öffnen Sie das Gerät in keinem Fall selbst und führen Sie
keine eigenen Reparaturversuche aus. Bei Gewährleistungsansprüchen wenden
Sie sich bitte an Ihren Fachhändler.
Bestimmungsgemäße Verwendung - Dieses Telefon ist für den Betrieb an einem
analogen Telefonanschluss (PSTN) innerhalb Deutschlands entwickelt worden.
Allerdings kann, wegen der Unterschiede zwischen den verschiedenen TelekomNetzbetreibern, keine Garantie für einwandfreie Funktion an jedem TelekomEndgeräteanschluss übernommen werden. Das Telefon besitzt die Voraussetzung
an einer TAE-Steckdose mit F/N-Codierung gemeinsam mit anderen
Anschlussgeräten wie Fax, Anrufbeantworter oder einem Modem benutzt zu
werden. Schließen Sie das Anschlusskabel des Telefons nur an die dafür
bestimmten Telefonsteckdosen an. Wechseln Sie den Stecker des Anschlusskabels
nicht aus.
Stromausfall - Bei einem eventuellen Stromausfall kann mit dem Telefon nicht
telefoniert werden. Halten Sie für eventuelle Notfälle ein schnurgebundenes Telefon
bereit, welches ohne eine externe Stromversorgung arbeitet.
Aufladbare Standard-Akkus- Keine anderen aufladbaren Batterien oder
Akkupacks verwenden. Diese können möglicherweise einen Kurzschluss
verursachen. Verwenden Sie beim Austauschen immer nur Standard-Akkus des
Typs AAA 1,2V 650mA. Standard-Akkus nicht ins Feuer werfen oder ins Wasser
tauchen. Alte oder defekte Standard-Akkus nicht mit dem normalen Hausmüll
entsorgen.
Die angegebenen maximalen Standby- und Gesprächszeiten gelten für die
mitgelieferten wiederaufladbaren Standard-Akkus bei optimalen Bedingungen.
Umgebungstemperatur, Aufladezyklus und weitere äußere Einflussfaktoren, wie
z.B. Funkbelastung an der Einsatzumgebung können die Leistungszeiten erheblich
verringern. Die Ladekapazität reduziert sich darüber hinaus technisch bedingt im
Verlauf der Nutzung oder durch Lagerung bei sehr hohen oder niedrigen
Temperaturen.
Laden des Handapparates - Sollte sich der Handapparat beim Laden erwärmen,
so ist dies normal und ungefährlich. Laden Sie den Handapparat nicht mit fremden
Aufladegeräten, da sonst Beschädigungen auftreten können.
Nebenstellenanlagen - Das Telefon kann auch an einer Nebenstellenanlage
angeschlossen werden. Ob Ihr Telefon an Ihrer Nebenstellenanlage einwandfrei
funktioniert, erfahren Sie bei dem Händler, bei dem die Anlage gekauft wurde.
Durch die große Anzahl verschiedener Nebenstellenanlagen kann eine
Funktionsgarantie nicht übernommen werden.
Netzteil - Verwenden Sie nur das mitgelieferte AUDIOLINE Steckernetzteil, da
andere Netzteile das Telefon zerstören können. Es besteht Lebensgefahr, wenn
das Steckernetzteil geöffnet und nicht vom Stromnetz getrennt wird.
5
- Allgemeine Hinweise Aufstellort - Am Aufstellort muss sich eine Netzsteckdose 230Volt befinden.
Stellen Sie die Basisstation nicht in die unmittelbare Umgebung von anderen
elektronischen Geräten wie z. B. Mikrowellen oder HIFI-Geräten, da es sonst zu
gegenseitiger Beeinflussung kommen kann. Der Aufstellort hat einen
entscheidenden Einfluss auf einen einwandfreien Betrieb des Telefons.
Stellen Sie die Basisstation auf eine ebene und rutschfeste Fläche. Normalerweise
hinterlassen die Füße der Basisstation keine Spuren auf der Aufstellfläche. Wegen
der Vielzahl der verwendeten Lacke und Oberflächen kann es jedoch nicht
ausgeschlossen werden, dass durch die Gerätefüße Spuren auf der Abstellfläche
entstehen.
Verwenden Sie den Handapparat nicht in explosionsgefährdeten Bereichen.
Übermäßige Belastungen durch Rauch, Staub, Erschütterungen, Chemikalien,
Feuchtigkeit, Hitze oder direkte Sonneneinstrahlung müssen vermieden werden.
Hinweis für medizinische Geräte - Das Telefon arbeitet mit einer sehr geringen
Sendeleistung. Diese geringe Sendeleistung schließt eine gesundheitliche
Gefährdung nach dem derzeitigen Stand von Forschung und Technik aus. Es hat
sich aber gezeigt, dass eingeschaltete tragbare Telefone medizinische Geräte
beeinflussen können. Halten Sie deshalb bei medizinischen Geräten einen Abstand
von mindestens einem Meter ein.
Entsorgung - Ist die Gebrauchszeit der Standard-Akkus oder der gesamten
Anlage abgelaufen, entsorgen Sie diese bitte umweltfreundlich gemäß den
gesetzlichen Bestimmungen.
Temperatur und Umgebungsbedingungen - Das Telefon ist für den Betrieb in
geschützten Räumen mit einem Temperaturbereich von 10 °C bis 30 °C ausgelegt.
Die Basisstation darf nicht in Feuchträumen wie Bad oder Waschküche aufgestellt
werden. Vermeiden Sie die Nähe zu Wärmequellen wie Heizkörpern und setzen Sie
das Gerät keiner direkten Sonnenbestrahlung aus.
Reinigung und Pflege - Die Gehäuseoberflächen können mit einem trockenen,
weichen und fusselfreien Tuch gereinigt werden. Niemals Reinigungsmittel oder gar
aggressive Lösungsmittel verwenden. Außer einer gelegentlichen
Gehäusereinigung ist keine weitere Pflege erforderlich. Die Gummifüße der
Basisstation sind nicht gegen alle Reinigungsmittel beständig. Der Hersteller kann
daher nicht für evtl. Schäden an Möbeln o. ä. haftbar gemacht werden.
CE-Zeichen- Das Telefon stimmt mit den grundlegenden Anforderungen der
R&TTE-Directive überein. Dies wird durch das CE-Zeichen bestätigt.
6
- Bedienelemente -
2
Bedienelemente
1
DECT4500
1.
Ruf-, Gesprächsanzeige, blinkt bei neu
aufgezeichneten Nachrichten
2. Telefonbuch/Auswahltaste 3. Wahlwiederholung/OK-Taste
4. Menü/R-Signaltaste
5. Anruferliste CLIP/Auswahltaste 6. Tastatursperre
7. Freisprechen
8. Sondertelefonbuch
9. Interne Gespräche/Konferenz
10. Klingel Ein-Aus
11. Gesprächstaste/Ein-Aus-Taste
12. Stummtaste/Abbrechen
2
12
3
4
11
5
10
6
9
7
8
1
1.
2.
3.
2
Gesprächsanzeige
Ladekontrollleuchte
Paging-Taste
DECT4500
3
7
- Inbetriebnahme -
3
Inbetriebnahme
3.1
Sicherheitshinweise
ACHTUNG! Lesen Sie vor der Inbetriebnahme unbedingt die allgemeinen Hinweise
am Anfang dieser Anleitung.
3.2
Verpackungsinhalt prüfen
Zum Lieferumfang gehören:
eine Basisstation
ein Handapparat mit Gürtelclip
ein Telefonanschlusskabel
3.3
ein Steckernetzteil
zwei Standard-Akkus
eine Bedienungsanleitung
Basisstation anschließen
Stellen Sie die Basisstation in die Nähe Ihrer Telefonanschlussdose und einer
Netzsteckdose auf.
1.
Stecken Sie den Stecker des Netzteils in die Buchse auf der Rückseite der
Basisstation und das Steckernetzteil in eine vorschriftsmäßig installierte
Netzsteckdose mit 230V. Das Steckernetzteil der Basisstation muss immer
angeschlossen sein. Verwenden Sie aus Sicherheitsgründen nur das
mitgelieferte Steckernetzteil.
2.
Verbinden Sie das beiliegende Telefonkabel mit der Telefonsteckdose und der
Telefonbuchse auf der Rückseite der Basisstation. Verwenden Sie nur das
neue beiliegende Telefonkabel.
3.
Wenn gewünscht, klemmen Sie die beiden Kabel in den Kabelkanal unter der
Fußstütze der Basisstation und verlegen diese dann durch die beiden
Öffnungen nach hinten.
Hinweis: Die beiden Stecker müssen hörbar einrasten, damit diese nicht wieder
herausrutschen.
8
- Inbetriebnahme Standard-Akkus einbauen
AAA
+
AAA
Um die mitgelieferten wiederaufladbaren Standard-Akkus in
den Handapparat einzulegen, drücken Sie auf den
Batteriefachdeckel am oberen Rand und schieben Sie ihn
nach unten. Legen Sie nun die Batterien ein und achten Sie
auf die richtige Polung. Schließen Sie den
Batteriefachdeckel.
+
3.4
Wichtiger Hinweis: Stellen Sie den Handapparat mit dem Display nach vorne für
mindestens 16 Stunden auf die Basisstation. Bei nicht richtig geladenen
Batterien kann es zu Fehlfunktionen des Telefons kommen. An der Basisstation
leuchtet die Ladekontrollleuchte.
3.5
Aufladen der Standard-Akkus
Die wiederaufladbaren Standard-Akkus des Handapparates besitzen eine StandbyZeit bei Zimmertemperatur von max. 144 Stunden und eine maximale
Gesprächsdauer von 12 Stunden. Zum Laden stellen Sie den Handapparat mit
dem Display nach vorne auf die Basisstation.
Die aktuelle Batteriekapazität wird im Display angezeigt:
Voll
Halb Voll
Entladen.
Hinweis: Die aufladbaren Standard-Akkus unterliegen genau wie Ihre Autobatterie
unvermeidlich einer gewissen Alterung. Allerdings können Sie auf diesen
Alterungsprozess Einfluss nehmen, indem Sie die Standard-Akkus gewissermaßen
"trainieren". Wenn Sie bei regelmäßiger Benutzung Ihres Telefons die StandardAkkus zyklisch aufladen und dann wieder "leer" telefonieren, bis die Anzeige
im Display blinkt, werden die Standard-Akkus gefordert und danken dies durch volle
Leistungsfähigkeit und eine lange Lebensdauer. Dauerladung und Dauerentladung
schaden dagegen sowohl der Kapazität wie auch der Lebensdauer der StandardAkkus.
9
- Bedienung -
4
Bedienung
4.1
Das Display
1 2 3 4 5
6
7 8
9
9
1
2
=>
=>
Entladen.
6
Blinkt: Sie erhalten ein externes Gespräch.
Leuchtet: Sie führen ein externes Gespräch.
Blinkt: Sie erhalten ein internes Gespräch.
Leuchtet: Sie führen ein internes Gespräch.
(Nur bei mehreren Handapparaten)
Eine neue Rufnummer wurde in der Anruferliste CLIP gespeichert
oder Sie befinden sich gerade in der Anruferliste.
Die Klingelmelodie ist ausgeschaltet.
7
Das Mikrofon ist ausgeschaltet.
8
Erscheint, wenn der Handapparat sich innerhalb der Reichweite
der Basisstation befinden.
Die Rufnummer wird nicht komplett im Display angezeigt.
3
4
5
9
4.2
=>
=>
Voll
Sie führen ein Gespräch.
Anrufe entgegennehmen
Erreicht Sie ein externer Anruf, ertönt der Tonruf am Handapparat. Im Display
blinkt die Anzeige
. Nehmen Sie den Handapparat von der Basisstation oder
am Handapparat und die Verbindung wird
drücken Sie die Gesprächstaste
hergestellt. Um das Gespräch zu beenden, stellen Sie den Handapparat zurück in
am Handapparat.
die Basisstation oder drücken Sie die Gesprächstaste
10
- Bedienung 4.3
1.
2.
3.
Anrufe führen
Geben Sie die gewünschte Telefonnummer mit max. 18 Stellen über das
Tastenfeld ein. Die gedrückten Zahlen werden im Display angezeigt.
Werden mehr als 16 Zahlen gedrückt, erscheint die Anzeige am linken
Displayrand und es werden die letzten 16 Zahlen angezeigt.
Drücken Sie die Gesprächstaste
und die gewünschte Verbindung wird
hergestellt.
Während eines Gesprächs wird die Gesprächszeit im Display in Minuten und
Sekunden angezeigt. 10 Sekunden nach dem Wählen wird im Display von
der Anzeige der gewählten Nummer auf die Anzeige der
Gesprächsdauer umgeschaltet. Nach Beendigung des Gesprächs bleibt die
Anzeige noch für einige Sekunden im Display erhalten.
Um das Gespräch zu beenden, drücken Sie die Gesprächstaste
stellen Sie den Handapparat auf die Basisstation.
oder
Hinweis: Haben Sie eine falsche Zahl eingegeben, können Sie durch mehrmaliges
Drücken der Taste
die Telefonnummer löschen. Durch langes Drücken der
Taste
wird die Rufnummer komplett gelöscht.
Sie können auch zuerst die Gesprächstaste
drücken und erhalten damit das
Freizeichen. Durch Eingabe der Zahlen Ihrer gewünschten Rufnummer wählt Ihr
Telefon die Rufnummer direkt an. Eine Korrektur einzelner Zahlen der Rufnummer,
wie oben erwähnt, ist bei dieser Form des Gesprächsaufbaus nicht möglich.
4.4
Einstellung der Hörer- und Freisprechlautstärke
Möchten Sie die Hörer- und Freisprechlautstärke am Handapparat ändern, stehen
Ihnen drei Lautstärkestufen zur Verfügung.
Drücken Sie während eines Gesprächs die Auswahltasten um die
Lautstärke zu verändern. Im Display wird die gewählte Lautstärke
angezeigt.
= Laut
4.5
= Mittel
= Leise
Freisprechen
Drücken Sie während eines Gesprächs die Freisprechtaste
. Nun hören Sie
den Gesprächspartner über den Lautsprecher des Handapparates.
Drücken Sie erneut die Freisprechtaste
abzuschalten.
, um das Freisprechen wieder
11
- Bedienung 4.6
Wahlwiederholung
Die Wahlwiederholung nutzen Sie, wenn der angerufene Teilnehmer besetzt ist
oder sich nicht meldet. Ihr Telefon speichert die letzten 10 Rufnummern mit max.
jeweils 18 Zahlen. Sobald die Liste voll ist, wird immer die älteste Rufnummer aus
der Liste gelöscht.
1.
2.
und die zuletzt gewählte Telefonnummer wird im
Drücken Sie die Taste
Display angezeigt.
Wählen Sie mit den Auswahltasten die gewünschte Rufnummer und drücken
Sie die Gesprächstaste
4.6.1 Einzelne Rufnummer der Wahlwiederholung in das
Telefonbuch speichern
Taste
Display
Zuletzt gewählte
Rufnummer
Ausgewählte
Rufnummer
Hinweis
Gewünschte Rufnummer auswählen.
SPEICHERN
NAME?
Ausgewählte
Rufnummer
SPEICHERN
Namen eingeben. Weitere Hinweise zur
Namenseingabe finden Sie unter Kapitel 5.1.
Rufnummer kann bearbeitet werden.
Rufnummer ist gespeichert.
Taste festhalten, um zum Hauptdisplay
zurückzukehren.
4.6.2 Einzelne Rufnummer der Wahlwiederholung löschen
Taste
Display
Zuletzt gewählte
Rufnummer
Ausgewählte
Rufnummer
SPEICHERN
1x
12
LÖSCHEN
Hinweis
Gewünschte Rufnummer auswählen.
- Bedienung LÖSCHEN?
Sicherheitsabfrage
Weitere Rufnummer
der
Wahlwiederholung
Rufnummer ist gelöscht.
Taste festhalten, um zum Hauptdisplay
zurückzukehren.
4.7
Handapparat ein-/ausschalten
Handapparat ausschalten: Halten Sie die Taste
für 2 Sekunden gedrückt.
für 2 Sekunden
Handapparat wieder einschalten: Halten Sie die Taste
gedrückt. Sobald Sie den Handapparat wieder auf die Basisstation stellen, schaltet
sich dieser automatisch ein.
4.8
Stummtaste
Mit der Stummtaste können Sie das Mikrofon im Handapparat ausschalten. So
können Sie sprechen, ohne dass der Gesprächspartner Sie hört.
Mikrofon ausschalten: Drücken Sie die Taste
Symbol
. Im Display erscheint das
.
Mikrofon wieder einsschalten: Drücken Sie erneut die Taste
erlischt das Symbol
sprechen.
4.9
. Im Display
und Sie können wieder mit Ihrem Gesprächpartner
Tastatursperre
Mit der Tastatursperre können Sie verhindern, dass unbeabsichtigt eine Taste am
Handapparat gedrückt wird. Eingehende Gespräche können auch bei
eingeschalteter Tastatursperre normal entgegengenommen werden.
Tastatursperre einschalten
Halten Sie die Taste
die Meldung HALTEN #.
bis zu einem Signalton gedrückt. Im Display erscheint
Tastatursperre ausschalten
wieder bis zu einem Signalton gedrückt. Die Meldung im
Halten Sie die Taste
Display erlischt und Sie können den Handapparat wieder normal bedienen.
13
- Bedienung 4.10 Klingelmelodie ausschalten
Möchten Sie einmal nicht gestört werden, können Sie die Klingelmelodie am
Handapparat ausschalten.
Klingelmelodie ausschalten
Halten Sie die Taste
für 2 Sekunden gedrückt. Im Display erscheint das
Symbol
. Eingehende Gespräche werden nun nur noch über die Basisstation
und nicht mehr über den Handapparat signalisiert.
Klingelmelodie wieder einschalten
Halten Sie die Taste
Symbol
wieder für 2 Sekunden gedrückt. Im Display erlischt das
.
4.11 Temporäre Tonwahl
Ist der verwendete Telefonanschluss nicht tonwahlfähig, brauchen Sie nicht auf die
Vorteile des TON-Wahlverfahren (z.B: Abfrage eines Anrufbeantworters) zu
(Taste bis
verzichten. Während eines Gesprächs können Sie mit der Taste
zu einem Signalton gedrückt halten) vorübergehend zum TON-Wahlverfahren
wechseln.
Nach Gesprächsende wird wieder auf das PULS-Wahlverfahren zurückgeschaltet.
14
- Bedienung 4.12 Babyruf
Mit dem Babyruf können kleinere
Kinder oder auch Senioren einfach
eine vorher bestimmte
Telefonnummer wählen. Der Druck
auf eine beliebige Taste des
Handapparates (außer der Menütaste
Display
FUNKTIONEN
Taste
MONITOR
BABYRUF
1x
AUS
).
EIN auswählen
1x
Rufnummer eingeben,
vorhandene Zahlen
werden mit der Taste
einzeln gelöscht.
BABYRUF
Festhalten
Im Display blinkt
BABYRUF
Babyruf ausschalten
Mit der Taste
dann
gelangen Sie direkt in die richtige Menüebene. Drücken Sie
und wählen Sie mit der Auswahltaste
Bestätigen Sie mit
Festhalten der Taste
die Einstellung AUS.
und verlassen Sie die Programmierung durch das
.
4.13 Hinweise zur Reichweite
Die Reichweite des Handapparates beträgt ca. 50 Meter in geschlossenen Räumen
und ca. 300 Meter im Freien. Bei einer guten Verbindung zur Basisstation leuchtet
im Display das Symbol . Haben Sie sich zu weit von der Basisstation entfernt,
verschwindet das Symbol und es erscheint die Meldung BS SUCHEN.
4.14 Paging von der Basisstation zum Handapparat
Wenn Sie sich nicht mehr erinnern können, wo Sie Ihren Handapparat liegen
gelassen haben, drücken Sie für die Pagingtaste
der Basisstation. Sie werden
nun 30 Sekunden lang Tonsignale des Handapparates hören und ihn so leicht
wieder finden. Mit einer beliebigen Taste am Handapparat können Sie die
Tonsignale beenden.
15
- Das Telefonbuch -
5
Das Telefonbuch
Im Telefonbuch Ihres Handapparates können Sie 50 Rufnummern mit jeweils 18
Stellen und einem zugehörigen Namen mit bis zu 10 Buchstaben speichern.
5.1
Rufnummern und Namen in das Telefonbuch eingeben
Taste
1x
Display
HINZUFÜGEN
Hinweis
NAME?
Namen eingeben.
NUMMER?
Rufnummer eingeben.
HINZUFÜGEN
Rufnummer ist gespeichert.
Taste festhalten, um zum Hauptdisplay
zurückzukehren.
Hinweise:
Durch das Festhalten der Taste
Mit der Taste
Mit der Taste
können Sie den Vorgang jederzeit abbrechen.
können einzelne Zahlen oder Buchstaben gelöscht werden.
können die Sonderzeichen „* - _ : /“ eingegeben werden.
Ist das Telefonbuch voll, erscheint eine entsprechende Meldung und es muss
zuerst eine Rufnummer gelöscht werden, bevor Sie mit der Eingabe der neuen
Rufnummer fortfahren können.
Erreicht Sie während der Abspeicherung ein Anruf, wird die Eingabe abgebrochen
und muss wiederholt werden.
Wird eine bereits gespeicherte Rufnummer noch einmal eingegeben, erklingt ein
langer Signalton und es erfolgt keine Speicherung.
16
- Das Telefonbuch 5.2
Taste
1x
Gespeicherte Rufnummern aus dem Telefonbuch
anwählen
Display
HINZUFÜGEN
Hinweis
Ausgewählter
Telefonbucheintrag
Gewünschten Telefonbucheintrag auswählen.
Die Rufnummer wird gewählt.
Um einen Telefonbucheintrag direkt alphabetisch anzuwählen, drücken Sie den
entsprechenden Buchstaben.
5.3
Taste
1x
Telefonbucheintrag ändern
Display
HINZUFÜGEN
Hinweis
Ausgewählter
Telefonbucheintrag
Gewünschten Telefonbucheintrag auswählen.
ÄNDERN
Name
Rufnummer
ÄNDERN
5.4
Der Name kann mit der Taste
neu eingegeben werden.
gelöscht und
Die Rufnummer kann mit der Taste
gelöscht und neu eingegeben werden.
Der Telefonbucheintrag wurde wieder
gespeichert.
Taste festhalten, um zum Hauptdisplay
zurückzukehren.
Direktwahltasten
Die Zahlen 1 bis 9 können jeweils mit einer Rufnummer aus dem Telefonbuch
belegt werden. Durch das Festhalten einer dieser Tasten wird die gespeicherte
Rufnummer dann direkt angewählt.
17
- Das Telefonbuch 5.4.1 Direktwahltasten belegen
Taste
Display
FUNKTIONEN
Hinweis
MONITOR
2x
DIREKTWAHL
TASTE 1
Wählen Sie mit den Auswahltasten die
gewünschte Taste 1 bis 9.
Taste 1 bis 9
AUS
1x
EIN
Telefonbuch
Telefonbuch
Rufnummer
Es wird der erste Telefonbucheintrag
angezeigt.
Wählen Sie mit den Auswahltasten den
gewünschten Telefonbucheintrag.
Die entsprechende Rufnummer wird noch
einmal angezeigt.
DIREKTWAHL
Taste festhalten, um zum Hauptdisplay
zurückzukehren.
5.4.2 Direktwahltasten benutzen
Halten Sie die entsprechende Direktwahltaste 1 bis 9 für 2 Sekunden gedrückt. Die
entsprechende Rufnummer wird im Display angezeigt und die Verbindung wird
hergestellt.
18
- Das Telefonbuch 5.5
Taste
1x
Gespeicherte Rufnummern aus dem Telefonbuch
löschen
Display
HINZUFÜGEN
Hinweis
Ausgewählter
Telefonbucheintrag
Gewünschten Telefonbucheintrag auswählen.
ÄNDERN
1x
LÖSCHEN
LÖSCHEN?
Sicherheitsabfrage
HINZUFÜGEN
Telefonbucheintrag ist gelöscht.
Taste festhalten, um zum Hauptdisplay
zurückzukehren.
5.6
Taste
1x
Telefonbucheinträge kontrollieren
Display
HINZUFÜGEN
Hinweis
Ausgewählter
Telefonbucheintrag
Gewünschten Telefonbucheintrag auswählen.
Rufnummer wird
angezeigt.
Ausgewählter
Telefonbucheintrag
Mit den Auswahltasten können andere
Telefonbucheinträge angewählt und mit der
kontrolliert werden.
Taste
Taste festhalten, um zum Hauptdisplay
zurückzukehren.
19
- Das Telefonbuch 5.7
Telefonbucheinträgen spezielle Klingelmelodien
zuordnen (VIP-Klingelmelodie)
Sollten Sie an Ihrem Telefonanschluss über die Rufnummernanzeige CLIP
verfügen, können Sie jedem Telefonbucheintrag eine spezielle Klingelmelodie
zuordnen. So können Sie schon an der Klingelmelodie erkennen, wer Sie gerade
anruft. Weitere allgemeine Informationen über die Übertragung von Rufnummern
erfahren Sie im Kapitel 6.
Taste
1x
Display
HINZUFÜGEN
Hinweis
Ausgewählter
Telefonbucheintrag
Gewünschten Telefonbucheintrag auswählen.
ÄNDERN
2x
VIP MELOD.
AUS
1x
Die VIP-Klingelmelodie für diese Rufnummer
ist ausgeschaltet
EIN
MELODIE 1 - 10
MELDODIE 1 - 10
Wählen Sie die gewünschte Melodie aus.
VIP MELOD.
Der Telefonbucheintrag wurde wieder
gespeichert.
Taste festhalten, um zum Hauptdisplay
zurückzukehren.
Um die VIP-Melodie für eine Rufnummer wieder auszuschalten, folgen Sie dem
Eingabeablauf und wählen Sie für die entsprechende Rufnummer die Einstellung
AUS.
20
- Das Telefonbuch 5.8
Sondertelefonbuch einrichten
Im Sondertelefonbuch Ihres Telefons können Sie weitere 7 Rufnummern speichern.
Das Sondertelefonbuch dient zur Speicherung wichtiger Rufnummern, von z.B:
Ärzten, Feuerwehr oder Polizei. Rufnummern die bereits im normalen Telefonbuch
gespeichert sind, können nicht noch einmal in das Sondertelefonbuch eingegeben
werden.
Taste
Display
HINZUFÜGEN
Hinweis
NAME?
Namen eingeben.
NUMMER?
Rufnummer eingeben.
HINZUFÜGEN
Rufnummer ist gespeichert.
Taste festhalten, um zum Hauptdisplay
zurückzukehren.
Weitere Hinweise zur Eingabe der Namen erhalten Sie im Kapitel 5.1.
5.8.1 Gespeicherte Rufnummern aus dem Sondertelefonbuch
anwählen
Taste
Display
HINZUFÜGEN
Hinweis
Ausgewählter
Telefonbucheintrag
Gewünschten Telefonbucheintrag auswählen.
Die Rufnummer wird gewählt.
Um einen Telefonbucheintrag direkt alphabetisch anzuwählen, drücken Sie den
entsprechenden Buchstaben.
Möchten Sie einen Eintrag im Sondertelefonbuch ändern oder löschen, wählen Sie
den Eintrag aus und folgen dann den Hinweisen im Kapitel 5.3 (ab 3. Bedienschritt)
und Kapitel 5.5 (ab 3. Bedienschritt).
21
- Rufnummernanzeige (CLIP) -
6
Rufnummernanzeige (CLIP)
Mit der Rufnummernanzeige können Sie bei eingehenden Gesprächen erkennen,
wer Sie anruft. Wenn diese Funktion an Ihrer Telefonleitung zur Verfügung steht,
zeigt Ihnen das Display bereits die Rufnummer des Anrufers, wenn das Telefon
klingelt. Ist diese Rufnummer bereits im Telefonbuch gespeichert, wird direkt der
Name des Anrufers angezeigt.
Erscheint die Meldung PRIVAT anstatt einer Rufnummer, handelt es sich um einen
Anruf, bei dem das Senden der Rufnummer vom Anrufer unterdrückt wurde.
Erscheint die Meldung XXXX kann die Rufnummer aus technischen Gründen nicht
angezeigt werden kann.
Alle Anrufe werden in einer Anruferliste gespeichert, so dass Sie auch während
Ihrer Abwesenheit keinen Anruf verpassen werden. Insgesamt können 20
Rufnummern in der Liste gespeichert werden. Sobald die Liste voll ist, wird immer
die älteste Rufnummer aus der Liste gelöscht.
Wurden während Ihrer Abwesenheit neue Rufnummern in der Anruferliste
gespeichert, zeigt das Display das Symbol
.
Achtung!
Die Rufnummernanzeige ist ein optionaler Service Ihres
Telefonproviders. Ihr Telefon zeigt die Rufnummern im Display,
wenn Ihr Telefonprovider diesen Service anbietet. Die Anzeige des
Datums und der Uhrzeit wird nicht von allen Telefonprovidern
übertragen. Bitte fragen Sie Ihren Telefonprovider für weitere
Informationen. Auch bei manchen Nebenstellenanlagen ist eine
Übertragung der Rufnummer nicht möglich.
22
- Rufnummernanzeige (CLIP) 6.1
Die Anruferliste
Um die Rufnummern der Anruferliste im Display zu sehen, gehen Sie bitte wie folgt
vor:
Taste
1x
Display
Letzter gespeicherter
Anruf
Hinweis
Ausgewählte
Rufnummer
Mit den Auswahltasten können Sie nun die
gesamte Liste einsehen.
Möchten Sie eine Rufnummer der Anruferliste
direkt zurückrufen, drücken Sie einfach die
Gesprächstaste
und die Nummer wird
sofort angewählt.
Um die Anruferliste zu verlassen.
6.2
Taste
1x
Einzelne Rufnummer der Anruferliste in das
Telefonbuch speichern
Display
Letzter
gespeicherter Anruf
Hinweis
Ausgewählte
Rufnummer
Gewünschte Rufnummer auswählen.
SPEICHERN
NAME?
Namen eingeben.
Ausgewählte
Rufnummer
SPEICHERN
Rufnummer kann bearbeitet werden.
Rufnummer ist gespeichert.
Taste festhalten, um zum Hauptdisplay
zurückzukehren.
Wird eine bereits gespeicherte Rufnummer noch einmal eingeben, erklingt ein
langer Signalton und es erfolgt keine Speicherung.
23
- Rufnummernanzeige (CLIP) 6.3
Taste
1x
Einzelne Rufnummer aus der Anruferliste löschen
Display
Letzter
gespeicherter Anruf
Hinweis
Ausgewählte
Rufnummer
Gewünschte Rufnummer auswählen.
SPEICHERN
1x
LÖSCHEN
LÖSCHEN?
Sicherheitsabfrage
Weitere
Rufnummer der
Anruferliste
Rufnummer ist gelöscht.
Taste festhalten, um zum Hauptdisplay
zurückzukehren.
.
24
- Nebenstellenanlagen/T-NET -
7
Nebenstellenanlagen/T-NET
Die "R" Signaltaste
Ihres Telefons können Sie an Nebenstellenanlagen und bei
der Verwendung der T-Net Funktionen der DEUTSCHEN TELEKOM nutzen.
7.1
“R” Taste an Nebenstellenanlagen
Haben Sie Ihr Telefon mit einer Nebenstellenanlage verbunden, können Sie alle
Möglichkeiten, wie z.B. Anrufe weiterleiten, automatischen Rückruf usw. nutzen. Die
„R“ Signaltaste verschafft Ihnen den Zugang zu diesen Möglichkeiten. An einer
Nebenstellenanlage wird die FLASH-Zeit "100ms" benötigt (Einstellung siehe 8.7).
Ob Ihr Telefon an Ihrer Nebenstellenanlage einwandfrei funktioniert, erfahren Sie
bei dem Händler, bei dem die Anlage gekauft wurde.
7.2
“R” Taste und das T-Net der DEUTSCHEN TELEKOM
Ihr Telefon unterstützt die wichtigsten Mehrwertdienste der DEUTSCHEN
TELEKOM (z.B.: Makeln, Anklopfen, Dreierkonferenz, u.a.). Das T-Net arbeitet mit
der Einstellung "FLASH 300ms" (Einstellung siehe 8.7). Zur Freischaltung der T-Net
Funktionen wenden Sie sich bitte an die DEUTSCHE TELEKOM.
7.3
Automatische Pause einfügen
Bei einigen Nebenstellenanlagen ist es erforderlich, eine bestimmte Nummer zu
wählen (z. B. “9” oder “0”), um nach einer kurzen Pause ein Freizeichen für eine
Amtsleitung auf den Apparat zu bekommen.
Eine automatische Wahlpause von ca. 3 Sekunden kann in die Rufnummer
eingefügt werden. Halten Sie bei der Eingabe der Rufnummer an gewünschter
gedrückt, bis im Display die Anzeige d erscheint. Geben Sie
Stelle die Taste
dann die restlichen Zahlen der Rufnummer ein. Natürlich können Sie diese Pause
auch mit in die Rufnummern des Telefonbuches speichern.
25
- Sonderfunktionen -
8
Sonderfunktionen
Alle weiteren Einstellmöglichkeiten werden in den folgenden Abschnitten erklärt.
Mit der Taste
wird die Programmierung gestartet.
Mit den Auswahltasten
können Sie sich im Menü bewegen.
Mit der Taste
gelangen Sie in die nächste Menüebene.
Mit der Taste
höher.
verlassen Sie die aktuelle Menüebene und gelangen eine Stufe
Durch das Festhalten der Taste
können Sie die Programmierung verlassen.
Bei den folgenden Beschreibungen ist jeder Programmiervorgang komplett
beschrieben, so dass Sie ohne Kenntnisse der Menüstruktur jede Programmierung
durchführen können. Erfahrene Benutzer können sich auch anhand des
Menübaums frei im Menü bewegen.
8.1
Displaynamen ändern
Im normalen Betrieb erscheint im
Display die Anzeige „DECT4500 1“.
Haben Sie mehrere Handapparate
an einer Basisstation angemeldet,
kann es nützlich sein, jedem
Handapparat einen eigenen Namen
zu geben. Die Nummer hinter dem
Namen zeigt, mit welcher Nummer
der Handapparat intern zu
erreichen ist.
Taste
3x
Display
FUNKTIONEN
DISPLAY
SPRACHE
1x
NAME
DECT4500
Vorhandene Buchstaben mit
löschen und neuen
Namen eingeben
NAME
Taste festhalten
26
- Sonderfunktionen 8.2
Einstellen von Klingelmelodien und Klingellautstärken
Am Handapparat stehen 10 unterschiedliche Melodien als Klingelzeichen für den
Handapparat und die Basisstation zur Verfügung. Die Klingellautstärke kann
separat für den Handapparat und die Basisstation in 5 Stufen eingestellt werden.
Klingelmelodie am Handapparat
für externe Gespräche
Taste
1x
1x
Display
FUNKTIONEN
RUFTÖNE
Klingelmelodie am Handapparat
für interne Gespräche
Taste
1x
Display
FUNKTIONEN
RUFTÖNE
HAND MEL.
HAND MEL.
LAUTSTÄRKE
LAUTSTÄRKE
EXT MELOD.
2x
INT MELOD.
MELODIE 1 bis 10
MELODIE 1 bis 10
Melodie aussuchen
Melodie aussuchen
EXT MELOD.
INT MELOD.
Taste festhalten
Taste festhalten
Klingellautstärke am Handapparat
Taste
1x
Display
FUNKTIONEN
RUFTÖNE
HAND MEL.
LAUTSTÄRKE
Lautstärke 1 bis
5 und LAUT. AUS.
Lautstärke oder LAUT
AUS auswählen
Hinweis: Bei der Einstellung LAUT AUS
werden eingehende Gespräche nicht
mehr akustisch am Handapparat
sondern nur noch an der Basisstation
signalisiert!
LAUTSTÄRKE
Taste festhalten
27
- Sonderfunktionen Klingelmelodie an der Basisstation
Taste
Display
FUNKTIONEN
Klingellautstärke an der Basisstation
Taste
RUFTÖNE
1x
1x
BASIS MEL.
1x
RUFTÖNE
HAND MEL.
HAND MEL.
1x
Display
FUNKTIONEN
1x
BASIS MEL.
LAUTSTÄRKE
LAUTSTÄRKE
MELODIE
Lautstärke 1 bis
5 und LAUT. AUS..
Lautstärke oder LAUT.
AUS. auswählen
MELODIE 1 bis 10
Melodie aussuchen
LAUTSTÄRKE
MELODIE
Taste festhalten
Taste festhalten
8.3
Wahlsperren einrichten
Mit den Wahlsperren können Sie bestimmte Rufnummern sperren. Die Wahlsperren
lassen sich für jeden Handapparat separat einstellen.
AUS
Alle Rufnummern sind erlaubt
ALLE
Alle Rufnummern außer den Notrufnummern 110 und 112 sind
gesperrt.
AUSNAHME
Alle Rufnummern sind gesperrt, außer einer frei programmierbaren
Vorwahl und den Notrufnummern 110 und 112.
SPERRE
Hier können Sie eine ganz bestimmte Vorwahl z. B. 0190 sperren.
28
- Sonderfunktionen Taste
Display
FUNKTIONEN
Hinweis
MONITOR
4x
WAHLSPERRE
PIN ?
PIN-Code der Basisstation eingeben
(Werkseinstellung 0 0 0 0)
HAND 1
HAND 1 bis 5
Gewünschten Handapparat auswählen, für den
die Wahlsperren eingerichtet werden sollen.
Aktuelle Einstellung
AUS
ALLE
AUSSER
SPERREN
Wählen Sie die gewünschte Option.
Bei AUSSER und SPERREN bestätigen Sie
und geben Sie die gewünschte
mit
Vorwahl mit max. 5 Stellen ein. Bereits
eingegebene Zahlen können mit der Taste
einzeln gelöscht werden.
WAHLSPERRE
Taste festhalten, um zum Hauptdisplay
zurückzukehren.
Hinweis: Werden bei den Optionen AUSSER und SPERREN keine Zahlen
eingegeben, wird die Wahlsperre nach der Bestätigung mit
ausgeschaltet.
8.4
automatisch
Automatische Vorwahl
Ihr Telefon verfügt über die Funktion automatische Vorwahl. Hierbei wird beim
Wählen einer bestimmten Rufnummer automatisch eine vorher bereits gespeicherte
Rufnummer vor die eigentliche Rufnummer gesetzt.
So können Sie z.B. beim Wählen einer bestimmten Vorwahl automatisch eine
gewünschte Call-by-Call Nummer vor diese Rufnummer setzen. Oder ordnen Sie
einer Auslandsrufnummer automatisch die gewünschte Auslandsvorwahl hinzu.
29
- Sonderfunktionen Beispiel: Der Rufnummer 0221 (in diesem Fall eine Ortsvorwahl) wird die Call-byCall Nummer 0xxxx zugeordnet. Hier wird bei jeder gewählten Rufnummer, die mit
0221 beginnt, automatisch die Call-by-Call vorangestellt. Haben Sie die Rufnummer
0221-987654321 gewählt, erkennt das Telefon die 0221 und wählt 0xxxx-0221987654321.
Es können drei Rufnummern mit jeweils 5 Stellen gespeichert und zugeordnet
werden. Die vorangestellten Zahlen werden nicht im Display angezeigt. Auch die
Rufnummer der Telefonbücher und Anruferliste werden überwacht.
Taste
Display
FUNKTIONEN
MONITOR
3x
VORWAHL
PIN?
Zahlenfeld
PIN-Code der Basisstation eingeben (Werkseinstellung 0 0 0 0)
VORWAHL 1
Vorwahl 1 - 3 auswählen
AUS oder EIN
EIN oder AUS auswählen
und geben Sie gewünschte
Bei EIN bestätigen Sie mit
Vorwahl mit max. 5 Stellen ein, die automatisch vorangestellt
werden soll (Beispiel 0xxxx). Bereits eingegebene Zahlen
können mit der Taste
einzeln gelöscht werden.
und geben dann die
Bestätigen Sie wieder mit
Zahlenkombination ein, bei der die zuerst eingegebene
Rufnummer automatisch mitgewählt werden soll (Beispiel 0221)
und bestätigen Sie mit
VORWAHL
Taste festhalten
30
.
- Sonderfunktionen 8.5
Signaltöne ein- oder ausschalten
Ihr Telefon verfügt über drei Signaltöne, die ein- oder ausgeschaltet werden
können.
Tastenklick:
Jeder Tastendruck am Handapparat wird mit einem kurzen
Signalton bestätigt.
Bestätigungston:
Signalton, wenn eine Einstellung erfolgreich durchgeführt
wurde.
Ladekontrolle:
Signalton, sobald der Handapparat auf die Basisstation gestellt
wird und der Ladevorgang beginnt.
Taste
1x
Display
FUNKTIONEN
RUFTÖNE
HAND MEL.
2x
TON
TAST-KLICK
TAST-KLICK, HINWEISTON
oder LADEN auswählen
EIN oder AUS
EIN oder AUS auswählen
TAST-KLICK, HINWEISTON
oder LADEN
Taste festhalten
31
- Sonderfunktionen 8.6
Anrufe automatisch entgegennehmen
Eingehende Anrufe werden
automatisch entgegengenommen,
wenn Sie den Handapparat von
der Basisstation nehmen. Möchten
Sie, dass Anrufe nur über die
Gesprächstaste
entgegengenommen werden,
können Sie die automatische
Annahme ausschalten.
Taste
2x
Display
FUNKTIONEN
BASIS
AUTO ANTW.
EIN oder AUS
EIN oder AUS auswählen
AUTO ANTW.
Taste festhalten
8.7
Flashzeit einstellen
Taste
Mit der R-Signaltaste können zwei
unterschiedliche Flashzeiten
eingestellt werden.
2x
BASIS
AUTO ANN.
FLASH 1 = 100ms
FLASH 2 = 300ms
Display
FUNKTIONEN
1x
FLASH TIME
FLASH 1 oder FLASH 2
FLASH 1 oder FLASH 2
auswählen
FLASH TIME
Taste festhalten
32
- Sonderfunktionen 8.8
Ton (MFV)- oder Impuls (IWV) – Wahlverfahren
Dieses Merkmal ermöglicht Ihnen
Ihr Telefon sowohl an den
analogen Vermittlungsstellen
(IWV/IMPULS) als auch an den
neuen digitalen Vermittlungsstellen
(MFV/TON) zu betreiben. Als
Werkseinstellung ist das
MFV/TON-Wahlverfahren
eingestellt.
Taste
2x
Display
FUNKTIONEN
BASIS
AUTO ANN.
2x
WAHLMODUS
TON (MFV) oder IMPULS
TON (MFV) oder IMPULS
auswählen
WAHLMODUS
Taste festhalten
8.9
Displaysprache einstellen
Die Displayanzeigen sind in den
Sprachen Deutsch und Englisch
einstellbar.
Taste
3x
Display
FUNKTIONEN
DISPLAY
SPRACHE
DEUTSCH oder ENGLISCH
DEUTSCH oder ENGLISCH
auswählen
33
- Sonderfunktionen 8.10 Anzeige der Gesprächszeit ändern
Während eine Gesprächs
erscheint im Display die aktuelle
Gesprächszeit.
Ob die Gesprächszeit angezeigt
wird, können Sie ein- oder
ausschalten.
Taste
3x
Display
FUNKTIONEN
DISPLAY
SPRACHE
2x
GESPR-ZEIT
EIN oder AUS
EIN oder AUS auswählen
GESPR-ZEIT
Taste festhalten
8.11 PIN-Code der
Basisstation ändern
Einige Funktionen des
Telefonsystems werden mit einem
PIN Code vor unerlaubter
Benutzung geschützt. Der PINCode besteht aus bis zu acht
Zahlen. Im Lieferzustand wurde
der PIN-Code „0000“ eingestellt.
Taste
4x
Display
FUNKTIONEN
SYSTEM
ANMELDEN
3x
PIN ÄNDERN
PIN?
Zahlenfeld
Alten PIN-Code eingeben.
NEUE PIN ?
Zahlenfeld
Neuen PIN-Code eingeben.
WIEDERHOL.
Zahlenfeld
Neuen PIN-Code erneut
eingeben.
PIN ÄNDERN
Taste festhalten
34
- Sonderfunktionen 8.12 Alle Listen löschen
Taste
Die Inhalte des Telefonbuches, der
Wahlwiederholung und der
Anruferliste können mit einem
Vorgang gelöscht werden.
5x
Display
FUNKTIONEN
RESET
LISTEN
RESET ?
RESET
Der Reset wird ausgeführt.
Taste festhalten
8.13 Werkseinstellungen
Taste
Mit der Funktion
Werkseinstellungen können Sie
die Einstellungen des
Handapparates wieder auf die
Werkseinstellungen zurücksetzen.
5x
Display
FUNKTIONEN
RESET
LISTEN
1x
EINSTELL.
PIN ?
Zahlenfeld
PIN der Basisstation
eingeben.
RESET ?
Die Werkseinstellungen
werden eingestellt.
Klingelmelodie extern 1
Klingelmelodie extern 2
Klingellautstärke Handapp. 3
Klingellautstärke Basis 3
Gesprächszeit ein
Direktwahl aus
PIN 0 0 0 0
Hörerlautstärke Med
Flashzeit 1
Bestätigungston ein
Ton-Wahlverfahren
Sprache Deutsch
Babyruf aus
Tastenklick ein
Aut. Rufannahme ein
Tastenklick ein
Ladekontrolle ein
Monitor aus
Wahlsperren aus
35
- Mehrere Handapparate -
9
Mehrere Handapparate
Es können bis zu vier weitere Handapparate an Ihre Basisstation angemeldet
werden.
Hinweis: Über den international genormten GAP Standard können Handapparate
von AUDIOLINE und auch Fremdherstellern in das Telefonsystem integriert
werden. Genauso können Sie einen AUDIOLINE Handapparat an Basisstationen
anderer Hersteller anschließen, sofern diese Geräte mit dem GAP Standard
arbeiten.
Bei der Benutzung von mehreren Handapparaten erhalten Sie folgende
Möglichkeiten:
Interne Gespräche zwischen den Handapparaten.
Externe Gespräche können zwischen den Handapparaten weitergeleitet
werden.
Eingehende externe Gespräche werden an allen Handapparaten signalisiert.
Raumüberwachung
Hinweis: Benutzt bereits ein anderer Handapparat die externe Leitung, erscheint
an allen Handapparaten die Anzeige EXT. Ein weiteres externes Gespräch ist in
diesem Fall nicht möglich.
9.1
Intern telefonieren
Sobald Sie mehrere Handapparate an eine Basisstation angeschlossen haben,
und dann
können Sie interne Gespräche führen. Drücken Sie dazu die Taste
die Nummer des gewünschten Handapparates. Das Gespräch wird mit der
Gesprächstaste
am gerufenen Handapparat entgegengenommen.
Erreicht Sie während eines internen Gesprächs ein externer Anruf, hören Sie kurze
Signaltöne und die Anzeige EXT im Display blinkt. Um das externe Gespräch
entgegenzunehmen, beenden Sie die interne Verbindung mit der Gesprächstaste
und nehmen das externe Gespräch mit der Gesprächstaste
an.
9.2
Externe Gespräche auf einen anderen Handapparat
verbinden
Haben Sie ein externes Gespräch an einem Handapparat entgegengenommen,
können Sie das externe Gespräch auf einen anderen Handapparat weiterverbinden.
und dann die Nummer des gewünschten
Drücken Sie dazu die Taste
Handapparates. Nachdem das interne Gespräch an dem anderen Handapparat
entgegengenommen wurde, haben Sie folgende Möglichkeiten:
36
- Mehrere Handapparate A. Rücksprache / Makeln: Sie können nun mit dem internen Teilnehmer
zum externen Gesprächspartner
sprechen, und durch das Drücken der Taste
zurückkehren. Sie können so beliebig oft, zwischen dem externen und internen
Gespräch wechseln.
am ersten
B. Gespräch weiterleiten: Durch das Drücken der Gesprächstaste
Handapparat, wird das externe Gespräch an den gerufenen Handapparat
weitergeleitet.
9.3
Konferenzgespräche führen
Ein externes Gespräch kann mit einem weiteren internen Teilnehmer zum
Konferenzgespräch geschaltet werden. So können zwei Handapparate gleichzeitig
mit dem externen Teilnehmer sprechen. Stellen Sie die gewünschte Verbindung zu
und die interne
dem externen Teilnehmer her. Drücken Sie dann die Taste
Nummer des gewünschten zweiten Handapparates. Hat der zweite, interne
für 2
Teilnehmer das Gespräch entgegengenommen, halten Sie die Taste
Sekunden und alle drei Teilnehmer sind zu einer Konferenz zusammengeschaltet.
Im Display erscheinen die Meldungen INT und EXT. Die Konferenz wird durch das
Auflegen eines der internen Gesprächspartner beendet.
9.4
Raumüberwachung
Mit der Raumüberwachung
legen Sie einen Handapparat in
den gewünschten Raum und
aktivieren die Monitor-Funktion.
Dann können Sie auf diesen
Handapparat anrufen und in den
Raum hineinhören, ohne dass
der Handapparat klingelt. Auch
bei externen Gesprächen
klingelt der betreffende
Handapparat nicht mit.
Taste
Display
FUNKTIONEN
MONITOR
AUS oder EIN
AUS oder EIN aussuchen
MONITOR
Festhalten
Im Display blinkt die
Anzeige MONITOR.
Raumüberwachung ausschalten
Mit der Taste
dann
gelangen Sie direkt in die richtige Menüebene. Drücken Sie
und wählen Sie AUS. Bestätigen Sie mit
Programmierung durch das Festhalten der Taste
und verlassen Sie die
.
37
- Mehrere Handapparate 9.5
An- und Abmelden von Handapparaten
9.5.1 Anmelden von DECT4500 Handapparaten
Taste
4x
Display
FUNKTIONEN
SYSTEM
ANMELDEN
Zahlenfeld
Zahlenfeld
BS 1 2 3 4
Ist der Handapparat bereits mit einer Basisstation verbunden,
blinken die entsprechenden Nummern.
Wählen Sie die Basisstation auf dem Zahlenfeld.
PIN ?
PIN-Code eingeben (Werkseinstellung 0 0 0 0).
Taste an der Basisstation für 2 Sekunden drücken
SUCHEN BS 1
Nach einiger Zeit ist der Handapparat angemeldet. Im Display
erscheint die interne Rufnummer des neuen Handapparates.
9.5.2 Anmelden von anderen DECT-GAP Telefonen an die
Basisstation
Um einen DECT-GAP Handapparat anzumelden, folgen Sie den Hinweisen in der
Bedienungsanleitung des Fremdherstellers und drücken dann die Taste
an der
Basisstation für 2 Sekunden. Benutzen Sie zur Anmeldung den PIN-Code 0 0 0 0.
9.5.3 Abmelden von Handapparaten
Ein Handapparat kann nur über einen anderen, noch angemeldeten Handapparat
abgemeldet werden. Es ist also nicht möglich diese Abmeldung mit dem
Handapparat durchzuführen, der abgemeldet werden soll.
38
- Mehrere Handapparate Taste
Display
FUNKTIONEN
SYSTEM
4x
ANMELDEN
HAND LÖSCH.
2x
HAND 1
Wählen Sie, welchen Handapparat Sie anmelden möchten.
PIN ?
Zahlenfeld
9.6
PIN-Code eingeben (Werkseinstellung 0 0 0 0).
Nach einiger Zeit ist der Handapparat abgemeldet.
Zusätzliche Basisstationen
Bei der Verwendung von mehreren Basisstationen können Sie die Reichweite der
Handapparate vergrößern. Um diesen Effekt zu nutzen, müssen alle Basisstationen
mit einem Telefonanschluss verbunden sein. Je nach Verwendungszweck können
Sie jede Basisstation mit der gleichen Telefonnummer belegen oder geben Sie den
Basisstationen unterschiedliche Rufnummern.
Achten Sie darauf, dass sich alle Basisstationen in ihrer Reichweite überschneiden.
Bitte testen Sie vor jeder Inbetriebnahme einer neuen Basisstation die Reichweite
der Handapparate.
Ist ein Handapparat an den Basisstationen angemeldet, und wurde die
automatische Wahl der Basisstation eingeschaltet (weitere Informationen in diesem
Kapitel), wird der Handapparat immer automatisch an die nächste Basisstation
weitergeleitet. Laufende Gespräche können nicht von einer zur anderen
Basisstation übertragen werden.
39
- Mehrere Handapparate Taste
4x
Display
FUNKTIONEN
SYSTEM
ANMELDEN
1x
BS WÄHLEN
AUTO oder FEST
Wählen Sie, ob Sie den Handapparat automatisch oder fest mit
einer Basisstation verbinden möchten. Bei der Auswahl FEST
und wählen dann die gewünschte
bestätigen Sie mit
Basisstation über das Zahlenfeld. Ist der Handapparat an
verschiedenen Basisstationen angemeldet, blinken die
entsprechenden Nummern.
40
- Fehlerbeseitigung -
10
Fehlerbeseitigung
Haben Sie Probleme mit Ihrem Telefon, kontrollieren Sie bitte zuerst die folgenden
Hinweise. Bei technischen Problemen können Sie sich auch an unsere Hotline
unter Tel. 0180 5 00 13 88 wenden. Bei Garantieansprüchen wenden Sie sich bitte
an Ihren Fachhändler. Die Garantiezeit beträgt 2 Jahre.
Kein Telefongespräch
möglich
Verbindung abgehackt,
fällt aus
Das Ladesymbol
leuchtet nicht, während
der Handapparat auf
der Basisstation steht.
Die Standard-Akkus
sind sehr schnell
entladen.
Display-Anzeige dunkel
o Die Telefonleitung ist nicht korrekt
angeschlossen oder gestört.
o Verwenden Sie nur das mitgelieferte
Telefonkabel.
o Testen Sie mit einem anderen Telefon, ob Ihr
Telefonanschluss in Ordnung ist.
o Das Steckernetzteil ist nicht eingesteckt oder
es liegt ein totaler Stromausfall vor.
o Die aufladbaren Standard-Akkus sind leer oder
defekt.
o Sie haben sich zu weit von der Basisstation
entfernt.
o Sie haben sich zu weit von der Basisstation
entfernt oder falscher Aufstellungsort der
Basisstation.
o Stellen Sie den Handapparat richtig auf die
Basisstation, reinigen Sie die Kontaktflächen
am Handapparat und an der Basisstation mit
einem weichen, trockenen Tuch.
o Laden Sie den Handapparat. Hilft dies nicht,
erneuern Sie die Standard-Akkus.
o Verursacht durch direkte Sonnenbestrahlung,
Handapparat abkühlen lassen.
41
- Wichtige Informationen -
11
Wichtige Informationen
11.1 Technische Daten
Standard
Stromversorgung
Reichweite
Reichweite
Standby
Max. Gesprächsdauer
Aufladbare Standard-Akkus
Wählverfahren
Zulässige Umgebungstemperatur
Zulässige relative Luftfeuchtigkeit
Signaltastenfunktion
DECT-GAP
Basisstation 220/230V, 50 Hz
Innen bis zu 50m
Außen bis zu 300m
bis zu 144 Stunden
über 12 Stunden
Typ AAA 1,2V 650mAh
MFV (Tonwahl)
10°C bis 30°C
20 bis 75%
100ms und 300ms
11.2 Telefonkabel austauschen
Müssen Sie Ihr Telefonkabel austauschen, finden Sie anhand der folgenden
Zeichnung das passende Kabel bei Ihrem Händler.
F-Codierung - IMPORT Standard
TAE-F
1
2
3
4
5
6
42
Rj11 6/4
1
2
3
4
5
6
12 3 4 5 6
- Wichtige Informationen 11.3 Garantie
AUDIOLINE - Geräte werden nach den modernsten Produktionsverfahren
hergestellt und geprüft. Ausgesuchte Materialien und hochentwickelte Technologien
sorgen für einwandfreie Funktion und lange Lebensdauer. Sollte Ihr Gerät dennoch
einen Defekt innerhalb der Garantiezeit aufweisen, wenden Sie sich bitte unter
Vorlage Ihrer Kaufquittung ausschließlich an das Geschäft, in dem Sie Ihr
AUDIOLINE - Gerät gekauft haben. Die Garantiezeit beträgt 24 Monate, gerechnet
vom Tage des Kaufs. Diese Garantie gilt nicht für die in den Produkten
verwendeten Batterien oder Akkupacks.
Garantiebedingungen:
Innerhalb der Garantiezeit werden alle Mängel, die auf Material- oder
Herstellungsfehler zurückzuführen sind, kostenlos beseitigt. Der Garantieanspruch
erlischt bei Eingriffen durch den Käufer oder durch Dritte. Schäden, die durch
unsachgemäße Behandlung oder Bedienung, durch falsches Aufstellen oder
Aufbewahren, durch unsachgemäßen Anschluss oder Installation sowie durch
höhere Gewalt oder sonstige äußere Einflüsse entstehen, fallen nicht unter die
Garantieleistung. Wir behalten uns vor, bei Reklamationen die defekten Teile
auszubessern oder zu ersetzen oder das Gerät auszutauschen. Ausgetauschte
Teile oder ausgetauschte Geräte gehen in unser Eigentum über.
Schadenersatzansprüche sind ausgeschlossen, soweit sie nicht auf Vorsatz oder
grober Fahrlässigkeit des Herstellers beruhen. Alle Gewährleistungsansprüche
nach diesen Bestimmungen sind ausschließlich gegenüber Ihrem Fachhändler
geltend zu machen. Nach Ablauf von zwei Jahren nach Kauf und Übergabe unserer
Produkte können Gewährleistungsrechte nicht mehr geltend gemacht werden.
43
- Wichtige Informationen 11.4 Konformitätserklärung
WIR
IN
AUDIOLINE GmbH
Hellersbergstr. 2a
D-41460 Neuss
ALS INVERKEHRBRINGER IN DER EU ERKLÄREN VOLLVERANTWORTLICH,
DASS DAS PRODUKT
MODELL:
BESCHREIBUNG:
DECT4500
Schnurlostelefon DECT-Standard
KONFORM IST MIT DEN GRUNDLIEGENDEN ANFORDERUNGEN DER
RICHTLINIE: 1999/5/EC
BEVOLLMÄCHTIGTER:
Unterschrift:
Name:
Position in der Firma:
Datum der Ausstellung:
________________________________
MANFRED ZINNOW
GESCHÄFTSFÜHRER
20.07.2003
Eine Kopie dieser Erklärung wird bis 10 Jahre nach der letzten Produktion
aufbewahrt.
LIEFERANT:
PRODUKT:
AUDIOLINE GmbH, Hellersbergstr. 2a,
D-41460 Neuss
DECT4500
Dieses Produkt ist für den Betrieb an einem analogen Telefonanschluss (PSTN) innerhalb
Deutschlands entwickelt worden. Allerdings kann, wegen der Unterschiede zwischen den
verschiedenen Telekom-Netzbetreibern, keine Garantie für einwandfreie Funktion an jedem TelekomEndgeräteanschluss übernommen werden.
44
- Contents 1
2
3
3.1
3.2
3.3
3.4
3.5
4
4.1
4.2
4.3
4.4
4.5
4.6
4.7
4.8
4.9
4.10
4.11
4.12
4.13
4.14
5
5.1
5.2
5.3
5.4
5.5
5.6
5.7
5.8
6
6.1
6.2
6.3
General Information................................................................. 47
User controls............................................................................ 49
Setting up ................................................................................. 50
Safety Information ...............................................................................50
Check contents of pack .......................................................................50
Connecting the base station ................................................................50
Fitting standard batteries .....................................................................51
Charging the standard batteries ..........................................................51
Operation.................................................................................. 52
The display ..........................................................................................52
Receiving calls.....................................................................................52
Making calls.........................................................................................53
Adjusting the receiver volume .............................................................53
Handsfree facility .................................................................................53
Redial facility .......................................................................................54
4.6.1 Storing individual redial numbers in the phone book...............54
4.6.2 Deleting individual redial numbers ..........................................54
Switching the handset on and off ........................................................55
Mute button..........................................................................................55
Keypad lock .........................................................................................55
Switching off the ring tone ...................................................................56
Temporary tone dialling .......................................................................56
Baby call ..............................................................................................57
Range information ...............................................................................57
Paging from the base station to the handset .......................................57
The phone book ....................................................................... 58
Entering numbers and names in the phone book................................58
Dialling stored numbers from the phone book.....................................59
Changing a phone book entry .............................................................59
Direct dial buttons ................................................................................59
5.4.1 Allocating direct dial buttons....................................................60
5.4.2 Using the direct dial buttons ....................................................60
Deleting stored numbers from the phone book ...................................61
Checking phone book entries ..............................................................61
Assigning special ring tones to phone book entries (VIP ring
tone) ....................................................................................................62
Setting up the special phone book ......................................................63
5.8.1 Dialling stored numbers from the special phone book ............63
Caller display (CLID)................................................................ 64
The caller list .......................................................................................65
Storing individual numbers on the caller list in the phone book...........65
Deleting individual telephone numbers from the caller list ..................66
45
- Contents 7
7.1
7.2
7.3
8
8.1
8.2
8.3
8.4
8.5
8.6
8.7
8.8
8.9
8.10
8.11
8.12
8.13
9
9.1
9.2
9.3
9.4
9.5
9.6
Private exchanges/T-NET ........................................................67
"R" Button on private exchanges ........................................................ 67
"R" Button and the DEUTSCHE TELEKOM T-Net.............................. 67
Inserting an automatic pause .............................................................. 67
Special functions .....................................................................68
Changing display names..................................................................... 68
Setting ring tones and ringer volumes................................................. 69
Setting up dialling blocks..................................................................... 70
Automatic dialling code ....................................................................... 71
Turning signal tones on or off.............................................................. 73
Accepting calls automatically .............................................................. 74
Setting the flash time........................................................................... 74
Touch-tone (TTD) or pulse (PD) dialling ............................................. 75
Setting the display language ............................................................... 75
Changing the call duration display ...................................................... 76
Changing the PIN code on the base station........................................ 76
Deleting all lists ................................................................................... 77
Factory settings................................................................................... 77
Multiple handsets.....................................................................78
Making an internal call ........................................................................ 78
Connecting external calls to another handset ..................................... 78
Holding conference calls ..................................................................... 79
Room monitoring................................................................................. 79
Logging on and logging off handsets .................................................. 80
9.5.1 Logging on DECT4500/4501 handsets................................... 80
9.5.2 Logging on other DECT-GAP telephones to the base
station ..................................................................................... 80
9.5.3 Logging off handsets............................................................... 80
Additional base stations ...................................................................... 81
10 Troubleshooting.......................................................................83
11 Important information..............................................................84
11.1
11.2
11.3
11.4
46
Technical data..................................................................................... 84
Changing the telephone cable ............................................................ 84
Warranty.............................................................................................. 85
Declaration of conformity .................................................................... 86
- General information -
1
General Information
Please read these operating instructions carefully. If you should have any
questions, please contact our Service Department on the Hotline number 0180 5 00
13 88. Under no circumstances open the unit yourself and do not try to carry out
your own repairs. For any claims under the warranty, please refer to your dealer.
Intended use - This telephone has been designed for use on an analogue
telephone line (PSTN) within Germany. However, no guarantee can be accepted for
trouble-free operation on all telecommunications terminal equipment connections
due to the differences between the different telecommunications network operators.
The telephone requires a TAE socket with F/N coding in common with other plug-in
units such as fax machines, answering machines or modems. Connect the
telephone cable to the phone socket intended for the purpose only. Do not change
the plug on the connecting cable.
Power failure - If the power should fail, it will not be possible to make calls using
the telephone. Keep a cord-connected phone handy, which works without an
external power supply, for possible emergencies.
Standard rechargeable batteries - do not use any other rechargeable batteries or
battery packs. These could possibly cause a short circuit. When changing batteries,
always use standard batteries, Type AAA 1.2V 650mA. Do not throw standard
batteries into the fire or immerse in water. Do not dispose of old or defective
standard batteries with the normal household waste.
The maximum standby and talk times quoted are applicable for the standard
rechargeable batteries supplied under optimum conditions. Ambient temperature,
charging cycle and other external factors, such as the radio loading in the area of
use, can considerably reduce the operating times. Furthermore, the charging
capacity is reduced for technical reasons during use or when stored at very high or
low temperatures.
Charging the handset - It is normal for the handset to become warm when
charging and is not dangerous. Do not use other manufacturer's charging
equipment for charging the handset, as otherwise damage could occur.
Private exchanges - The telephone can also be connected to a private exchange.
You can find out from the dealer from whom the equipment was purchased whether
your telephone will work on your private exchange without any problems. Due to the
large number of different private exchanges, it is not possible to guarantee this
function.
Power supply - Use only the AUDIOLINE plug-in power supply provided, as other
power supplies could damage the telephone. There is a risk to life if the power
supply is opened and not disconnected from the mains.
47
- General information Position - There must be a 230 Volt mains socket near to where the telephone is
positioned. Do not set up the base station in the immediate vicinity of other electrical
equipment such as microwaves or hi-fi systems, as this may result in mutual
interference. The location has a decisive influence on the trouble-free operation of
the telephone.
Place the base station on a flat and non-slip surface. The feet of the base station do
not normally leave any marks on the surface. However, due to the large number of
varnishes and surfaces in use, it may not be possible to prevent marks occurring on
the surface due to the feet of the unit.
Do not use the handset in areas where there is a risk of explosion.
Excessive exposure to smoke, dust, vibrations, chemicals, moisture, heat or the
direct rays of the sun must be avoided.
Information regarding medical equipment - The telephone works with a very low
transmission power. This low transmission power prevents any risk to health
according to the current state of research and technology. However, it has been
shown that portable telephones can interfere with medical equipment when
switched on. Therefore, please maintain a distance of at least one metre from
medical equipment.
Disposal - If the useful life of the standard batteries or the complete equipment has
expired, please dispose of these carefully in accordance with the statutory
requirements and in a manner friendly to the environment.
Temperature and Ambient Conditions - The telephone is designed for use in
protected rooms with a temperature range of 10 °C to 30 °C. The base station must
not be installed in damp rooms such as a bathroom or laundry room. Avoid
proximity to sources of heat such as radiators and do not expose the unit to direct
sunlight.
Cleaning and care - The surface of the case can be cleaned with a soft, dry, lintfree cloth. Never use cleaning agents, particularly aggressive solvents. No attention
is necessary apart from cleaning the case occasionally. The rubber feet of the base
station are not resistant to all cleaning agents. The manufacturer can therefore not
accept any liability for possible damage to furniture or the like.
CE mark - The telephone complies with the basic requirements of the R&TTE
Directive This is confirmed by the CE mark.
48
- User controls -
2
User controls
1
DECT4500
1.
Call indicator, flashes for newly recorded
messages
2. Phone book/Selection button 3. Redial/OK button
4. Menu/R signal button
5. Caller list CLID/Selection button 6. Keypad lock
7. Handsfree
8. Special phone book
9. Internal calls/Conference
10. Ringer On-Off
11. Call button/On-Off button
12. Mute button/Cancel
2
12
3
4
11
5
10
6
9
7
8
1
1.
2.
3.
2
Call indicator
Charge monitoring lamp
Paging button.
DECT4500
3
49
- Setting up -
3
Setting up
3.1
Safety Information
NOTE Before setting-up, it is essential that you read the General Information at the
beginning of this manual.
3.2
Check contents of pack
The following items are supplied:
one base station
one handset with belt clip
one telephone connecting cable
3.3
one mains power supply
two standard batteries
one instruction manual
Connecting the base station
Position the base station near to your telephone connection socket and to a mains
socket. Your telephone works using Touch-Tone Dialling.
1.
2.
3.
Insert the plug of the power supply into the socket on the rear of the base
station and plug the power supply into a properly installed 230 V mains socket.
The plug-in power supply for the base station must always be connected. For
safety reasons, use only the plug-in mains power supply provided.
Connect the telephone cable supplied to the telephone socket and the
telephone jack on the rear of the base station. Use only the new telephone
cable provided.
If required, clamp the two cables in the cable channel underneath the foot
support and then run these through the two openings towards the rear.
Note: The two plugs must audibly click into place so that they do not fall out again.
50
- Setting up Fitting standard batteries
AAA
+
AAA
To fit the standard rechargeable batteries supplied into the
handset, press on the upper edge of the battery compartment
and slide it downwards. Now insert the batteries taking care
to ensure that the polarity is correct. Close the battery
compartment cover.
+
3.4
Important note: Place the handset in the base station with the display to the front
for at least 16 hours. The telephone may malfunction if the batteries are not
properly charged. The charging light on the base station will come on.
3.5
Charging the standard batteries
The standard rechargeable batteries for the handset have a stand-by time of max.
144 hours at room temperature and a maximum talk time of 12 hours. To charge
the batteries, place the handset in the base station with the display to the front.
The current battery capacity is shown in the display.
Full
Half full
Discharged.
Note: Exactly like your car battery, the standard rechargeable batteries are
unavoidably subject to a certain ageing. However, you can have an influence on this
ageing process by "training" the standard batteries to a certain extent. In regular
use of the phone, if you cyclically charge and fully discharge the standard batteries
by using the telephone until the
symbol flashes in the display, a demand is
placed on the batteries and they will repay you by giving maximum performance
and a long life. Extended charging and extended discharging on the other hand will
both degrade the capacity and shorten the life of the standard batteries.
51
- Operation -
4
Operation
4.1
The display
1 2 3 4 5
6
7 8
9
9
1
2
=>
=>
Discharged.
6
Flashing: You are receiving an external call.
Lit: You are making an external call.
Flashing: You are receiving an internal call.
Lit: You are making an internal call.
(with multiple handsets only)
A new phone number has been stored in the caller list CLID or you
are currently in the caller list.
The ring tone is switched off.
7
The microphone is switched off.
8
Appears when the handset is within range of the base station.
9
The phone number is not fully shown in the display.
3
4
5
4.2
=>
=>
Full
You are making a call.
Receiving calls
When an external call arrives, the ringing tone sounds on the handset. The
symbol will flash in the display. Lift the handset from the base station or press the
call button
on the handset and the connection will be made. To end the call,
replace the handset in the base station or press the call button
on the handset.
52
- Operation 4.3
Making calls
1.
Enter the required telephone number with a maximum of 18 digits using the
number pad. The numbers pressed are shown in the display. If more than
16 digits are pressed, the indicator on the left-hand edge of the display will
appear and the last 16 digits will be shown.
2.
Press the call button
and the required connection will be made.
The call duration in minutes and seconds is shown in the display during a call.
Ten seconds after dialling, the display will switch from showing the number
dialled to showing the duration of the call. The call duration will still be
retained in the display for a few seconds after the call has been ended.
3.
To end the call, press the call button
station.
or replace the handset on the base
Note: If you have entered a number incorrectly, you can delete the number by
repeatedly pressing the
button. The number is completely deleted by pressing
the
button for a long time.
You can also get a dialling tone by first pressing the call button . On entering the
digits of your required phone number, your telephone will dial the number directly.
With this method of making a call, it is not possible to correct individual digits in the
number in the manner described above.
4.4
Adjusting the receiver volume
There are three volume levels available to you if you should want to change the
receiver volume on the handset.
Press the selection buttons during a call to change the receiver volume.
The selected volume will be shown in the display.
= Loud
4.5
= Medium
= Soft
Handsfree facility
Press the handsfree button
during a call. You will now hear the person you
are speaking to over the loudspeaker in the handset.
Press the handsfree button
again to switch off the handsfree facility.
53
- Operation 4.6
Redial facility
Use Redial if the person called is engaged or does not reply. Your telephone
remembers the last ten numbers, each with a maximum of 18 digits. When the list is
full, the oldest number is always deleted from the list.
1.
2.
button and the last phone number dialled will be shown in the
Press the
display.
Select the required number using the selection buttons and press the call
button.
4.6.1 Storing individual redial numbers in the phone book
Button
Display
Last number dialled
Comment
Selected number
Select required telephone number.
SAVE
NAME?
Selected number
Enter name. You will find further information on
entering names in Chapter 5.1.
Number can be edited.
SAVE
Number is saved.
Hold button pressed to return to main display.
4.6.2 Deleting individual redial numbers
Button
Display
Last number dialled
Comment
Selected number
Select required telephone number.
SAVE
1x
DELETE
DELETE?
54
Safety prompt
- Operation Further redial
number
Number is deleted.
Hold button pressed to return to main display.
4.7
Switching the handset on and off
Switching the handset off: Press and hold the
button for 2 seconds.
button for 2 seconds.
Switching the handset on again: Press and hold the
The handset will switch itself on automatically as soon as you replace it on the base
station.
4.8
Mute button
You can turn off the microphone in the handset by using the mute button. In this
way, you will be able to speak without the other person hearing you.
Switching off the microphone: Press the
in the display.
button. The
symbol will appear
Switching on the microphone again: Press the
button again. The
symbol
in the display will go off and you will be able to speak to the other person once
more.
4.9
Keypad lock
With the keypad lock, you can prevent a button on the handset being pressed
accidentally. Incoming calls can be received as normal even when the keypad lock
is switched on.
Activating the keypad lock
button pressed until you hear a signal tone. The message
Hold the
ENABLE # will appear in the display.
Deactivating the keypad lock
button pressed again until you hear a signal tone. The message in
Hold the
the display will go off and you will be able to use the handset normally once more.
55
- Operation 4.10 Switching off the ring tone
If at any time you do not want to be disturbed, you can turn off the ring tone on the
handset.
Switching off the ring tone
Press and hold the
button for 2 seconds. The
symbol will appear in the
display. Incoming calls will now only be signalled at the base station and no longer
at the handset.
Switching on the ring tone again
Press and hold the
will go off.
button again for 2 seconds. The
symbol in the display
4.11 Temporary tone dialling
If you can only use your telephone in Pulse Dialling mode, you do not have to
forego the facilities of Tone Dialling (e.g. interrogating an answering machine). You
can change temporarily to Tone Dialling during a call by means of the
the button until you hear a beep) button.
PULSE dialling will be reselected at the end of the call.
56
(press
- Operation 4.12 Baby call
Small children or even older people
can easily dial a previously defined
telephone number using the baby call
feature. Press any button on the
handset (with the exception of the
menu button
).
Button
Display
FEATURES
MONITOR
1x
DIR DIAL
OFF
1x
Select ON
Enter the number. Existing
numbers can be deleted
individually with the
button.
DIR DIAL
Hold
DIR DIAL will flash in the
display.
Deactivating baby call
Press the
button to enter the right menu level directly. Then press
choose the OFF setting by means of the selection buttons
and exit programming by holding the
and
. Confirm with
button pressed.
4.13 Range information
The range of the handset is ca. 50 metres in closed rooms and ca. 300 metres
outdoors. When there is a good contact with the base station, the symbol will
come on in the display. If you are too far away from the base station, the symbol
will disappear and the message SEEK BS will appear.
4.14 Paging from the base station to the handset
If you cannot remember where you have left the handset, press the paging button
on the base station. You will now hear the handset audible signal for 30
seconds and thus be easily able to find it again. You can cancel the audible signal
by pressing any button on the handset.
57
- The phone book -
5
The phone book
You can store 50 phone numbers, each with 18 digits, and an associated name,
with up to 10 letters, in the phone book of your handset.
5.1
Entering numbers and names in the phone book
Button
1x
Display
ADD ENTRY
Comment
NAME?
Enter name.
NUMBER?
Enter number.
ADD ENTRY
Number is saved.
Hold button pressed to return to main display.
Notes:
You can terminate the process at any time by pressing and holding the
Individual numbers or letters can be deleted with the
button.
button.
The special characters "* - _ : /" can be entered with the
button.
When the phone book is full, an appropriate message will appear and a number
must be deleted before you can continue entering new phone numbers.
If a call is received during the storing process, entry of the number is interrupted
and will have to be repeated.
If a number that has already been stored is entered again, a long signal tone will
sound and the number will not be stored.
58
- The phone book 5.2
Dialling stored numbers from the phone book
Button
1x
Display
ADD ENTRY
Comment
Selected phone book
entry
Select required phone book entry.
The phone number will be dialled.
Press the appropriate letter to directly choose an entry from the phone book
alphabetically.
5.3
Changing a phone book entry
Button
1x
Display
ADD ENTRY
Comment
Selected phone book
entry
Select required phone book entry.
EDIT ENTRY
Name
Number
EDIT ENTRY
The name can be deleted with the
and then re-entered.
button
button
The number can be deleted with the
and then re-entered.
The phonebook entry has been re-saved.
Hold button pressed to return to main display.
5.4
Direct dial buttons
A phone number from the phone book can be allocated to each of the numbers 1 to
9. The stored number is then dialled directly by pressing one of these buttons.
59
- The phone book 5.4.1
Button
Allocating direct dial buttons
Display
FEATURES
Comment
MONITOR
2x
QUICK DIAL
KEY 1
Select the required button 1 to 9 using the
selection buttons.
Key 1 to 9
OFF
1x
ON
Phone book
Phone book
Number
The first entry in the phone book will be
displayed.
Select the required phone book entry using the
selection buttons.
The corresponding phone number will be
displayed again.
QUICK DIAL
Hold button pressed to return to main display.
5.4.2
Using the direct dial buttons
Hold the appropriate direct dial button 1 to 9 pressed for 2 seconds. The
corresponding phone number will be shown in the display and the connection will be
made.
60
- The phone book 5.5
Deleting stored numbers from the phone book
Button
1x
Display
ADD ENTRY
Comment
Selected phone
book entry
Select required phone book entry.
EDIT ENTRY
1x
DELETE
DELETE?
Safety prompt
ADD ENTRY
Phone book entry is deleted.
Hold button pressed to return to main display.
5.6
Checking phone book entries
Button
1x
Display
ADD ENTRY
Comment
Selected phone book
entry
Select required phone book entry.
Number will be
displayed.
Selected phone book
entry
Other phonebook entries can be selected using
the selection buttons and checked with the
button.
Hold button pressed to return to main display.
61
- The phone book 5.7
Assigning special ring tones to phone book entries (VIP
ring tone)
If your phone line has the caller display feature CLID, you can assign a special ring
tone to each phone book entry. You will thus be able to tell who is calling you as
soon as you hear the ring tone. You will find further general information on
transmitting phone numbers in Chapter 6.
Button
1x
Display
ADD ENTRY
Comment
Selected phone book
entry
Select required phone book entry.
EDIT ENTRY
2x
VIP MELODY
OFF
1x
The VIP ring tone for this number is switched
off.
ON
MELODY 1 - 10
MELODY 1 - 10
Select the required tone.
VIP MELODY
The phonebook entry has been re-saved.
Hold button pressed to return to main display.
To switch off the VIP tone for a particular number, follow the entering procedure and
select the OFF setting for the appropriate number.
62
- The phone book 5.8
Setting up the special phone book
You can store a further 7 numbers in your telephone's special phone book. The
special phone book can be used to store important numbers such as those of
doctors, fire brigade or police. Phone numbers that are already stored in the normal
phone book cannot be entered again into the special phone book.
Button
Display
ADD ENTRY
Comment
NAME?
Enter name.
NUMBER?
Enter number.
ADD ENTRY
Number is saved.
Hold button pressed to return to main display.
You will find further information on entering names in Chapter 5.1.
5.8.1
Button
Dialling stored numbers from the special phone book
Display
ADD ENTRY
Comment
Selected phone book
entry
Select required phone book entry.
The phone number will be dialled.
Press the appropriate letter to directly choose an entry from the phone book
alphabetically.
If you want to change or delete an entry in the special phone book, select the entry
and then follow the instructions in Chapter 5.3 (from the third step) and Chapter 5.5
(from the third step).
63
- Caller display (CLID) -
6
Caller display (CLID)
Using caller display, you can see with incoming calls who is calling you. If this
function is available on your telephone, the display will show you the caller's
telephone number when the telephone rings. If this number has already been saved
in the phone book, the name of the caller will be displayed directly.
If the message PRIVATE appears instead of a phone number, the call is one where
the caller has suppressed the transmission of the phone number. If the message
XXXX appears, the phone number cannot be displayed for technical reasons.
All calls are stored in a caller list so that you will not miss any calls even in your
absence. A total of 20 phone numbers can be stored in the list. When the list is full,
the oldest number is always deleted from the list.
If new numbers are stored in the list during your absence, the display will show the
symbol.
NOTE
Caller display is an optional service from your telephone provider.
Your telephone will show the number in the display if your
telephone provider offers this service. The display of date and time
is not transmitted by all telephone service providers. Please ask
your telephone provider for further information. Furthermore,
transmission of the phone number is not possible with many private
exchanges.
64
- Caller display (CLID) 6.1
The caller list
To view the phone numbers on the caller list, please proceed as follows:
Button
1x
Display
Last call saved
Comment
Selected number
You can now view the whole list using the
selection buttons.
If you want to call back a number on the caller
and
list directly, simply press the call button
the number will be dialled immediately.
To exit the caller list.
6.2
Storing individual numbers on the caller list in the phone
book
Button
1x
Display
Last call saved
Comment
Selected number
Select required telephone number.
SAVE ENTRY
NAME?
Enter name.
Selected number
Number can be edited.
SAVE ENTRY
Number is saved.
Hold button pressed to return to main display.
If a number that has already been stored is entered again, a long signal tone will
sound and the number will not be stored.
65
- Caller display (CLID) 6.3
Deleting individual telephone numbers from the caller
list
Button
1x
Display
Last call saved
Comment
Selected number
Select required telephone number.
SAVE ENTRY
1x
DELETE
DELETE?
Safety prompt
Further numbers
on the caller list
Number is deleted.
Hold button pressed to return to main display.
.
66
- Private exchanges /T-NET -
7
Private exchanges/T-NET
You can use the "R" signal button
on your telephone on private exchanges and
when using DEUTSCHE TELEKOM's T-Net functions.
7.1
"R" Button on private exchanges
If you have connected your telephone to a private exchange, you can use all the
facilities such as call transfer, automatic recall, etc. The "R" signal button gives you
access to these facilities. The FLASH time "100ms" will be required on a private
exchange (Adjustment, see 8.7). You can find out from the dealer from whom the
equipment was purchased whether your telephone will work on your private
exchange without any problems.
7.2
"R" Button and the DEUTSCHE TELEKOM T-Net
Your telephone supports the most important DEUTSCHE TELEKOM added value
functions (e.g. brokering, call waiting, three-way conference, etc.). The T-Net works
using the "FLASH 300ms" setting. (Adjustment, see 8.7). Please contact
DEUTSCHE TELEKOM to gain access to T-Net functions.
7.3
Inserting an automatic pause
With some private exchanges, it is necessary to dial a certain number (e.g. "9" or
"0") in order, after a short pause, to obtain a dialling tone for an outside line on the
extension.
An automatic dialling pause of ca. 3 seconds can be incorporated into the number.
button pressed at the required point until
When entering the number, hold the
the d indicator appears in the display. Then enter the remaining digits of the phone
number. You can, of course, also store this pause with numbers in the phone book.
67
- Special functions -
8
Special functions
All further setting options are described in the following sections.
Programming is started by means of the
button.
You can scroll through the menu using the selection buttons
.
Press the
button to move to the next menu level.
Press the
button to exit the current menu level and to move one step higher.
You can exit programming by holding the
button pressed.
In the following descriptions, each programming procedure is described in full so
that you can program any feature without knowledge of the menu structure.
Experienced users can move freely within the menu with the help of the menu tree.
8.1
Changing display names
In normal operation, the message
"DECT4500 1" appears in the
display. If you have logged on
several handsets to one base
station, it can be useful to give each
handset its own name. The number
after the name shows with which
number the handset can be called
internally.
Button
3x
Display
FEATURES
DISPLAY
LANGUAGE
1x
LABEL
DECT4500
Delete existing letters with
and enter new name.
LABEL
Press and hold button
68
- Special functions 8.2
Setting ring tones and ringer volumes
10 different tunes are available on the handset as ring tones for the handset and the
base station. The ringer volume can be adjusted separately for the handset and the
base station in 5 steps.
Handset ring tone for external calls
Button
Display
FEATURES
1x
Handset ring tone for internal calls
Button
SOUNDS
HS RINGER
1x
VOLUME
EXT MELODY
MELODY 1 to 10
Select tune
EXT MELODY
Press and hold
button
SOUNDS
HS RINGER
VOLUME
1x
Display
FEATURES
2x
INT MELODY
MELODY 1 to 10
Select tune
INT MELODY
Press and hold
button
Handset ringer volume
Button
1x
Display
FEATURES
SOUNDS
HS RINGER
VOLUME
Volume 1 to 5
and Vol Off.
Select volume level or
OFF
Note: With the setting VOL OFF,
incoming calls are no longer audibly
signalled at the handset but only at the
base station.
VOLUME
Press and hold button
69
- Special functions Base station ring tone
Display
FEATURES
Button
Base station ringer volume
Button
SOUNDS
1x
HS RINGER
VOLUME
MELODY
1x
MELODY 1 to 10
Select tune
MELODY
Press and hold
button
SOUNDS
HS RINGER
BS RINGER
1x
8.3
1x
Display
FEATURES
1x
BS RINGER
VOLUME
Volume 1 to 5
and Vol Off.
Select volume level or
OFF
VOLUME
Press and hold button
Setting up dialling blocks
You can block specific phone numbers by using the dialling blocks. The dialling
blocks can be set up separately for each handset.
OFF
All phone numbers are allowed
ALL
All numbers are blocked except the emergency numbers 110 and
112.
EXEMPT
All numbers are blocked except a freely programmable dialling code
and the emergency numbers 110 and 112.
BAR
Here, you can block a specific dialling code, e.g. 0190.
70
- Special functions Button
Display
FEATURES
Comment
MONITOR
4x
CALL BAR
PIN?
Enter the PIN Code for the base station (factory
setting 0 0 0 0).
HANDSET 1
HANDSET 1 to 5
Select the required handset for which the
dialling blocks are to be set up.
Current setting
OFF
ALL
EXEMPT
BAR
Select the required option.
and
With EXEMPT and BAR, confirm with
enter the required dialling code with max. 5
digits. Numbers already entered can be deleted
individually with the
button.
CALL BAR
Hold button pressed to return to main display.
Note: If no numbers are entered when the options EXEMPT and BAR are chosen,
the dialling block will be automatically switched off after confirming with
8.4
.
Automatic dialling code
Your telephone has an automatic dialling code function. With this function, when
dialling a particular phone number, a previously stored number is inserted in front of
the actual phone number.
In this way, when dialling a particular dialling code for example, you can
automatically insert a required call-by-call number in front of this phone number. Or,
you can automatically add the required country code to an international number.
71
- Special functions Example: The number 0221 (in this case, an area dialling code) has the number
0xxxx assigned to it. Here, the call-by-call will automatically be placed in front of
every number dialled that begins with 0221. If you have dialled the number 0221987654321, the telephone will recognise the 0221 and will dial 0xxxx-0221987654321.
Three phone numbers, each with 5 digits, can be stored and assigned. The prefixed
numbers will not be shown in the display. The phone numbers in the phone books
and the caller list are also monitored.
Button
Display
FEATURES
MONITOR
3x
PREFIX
PIN?
Number
pad
Enter the PIN Code for the base station (factory setting 0 0 0 0).
PREFIX 1
Select dialling code 1 - 3
OFF or ON
Select OFF or ON
When ON is selected, confirm with
and enter the required
dialling code, which is to be automatically prefixed, with max. 5
digits (Example 0xxxx). Numbers already entered can be
deleted individually with the
button.
Confirm again with
and then enter the number combination
with which the number you entered first is to be automatically
dialled (Example 0221) and confirm with
PREFIX
Press and hold button
72
.
- Special functions 8.5
Turning signal tones on or off.
Your telephone has three signal tones that can be turned on or off.
Kev Beep:
Each time a button on the handset is pressed, this is confirmed with
a short signal tone.
Confirm:
Signal tone when a setting has been successfully completed.
Charging:
Signal tone when the handset is placed on the base station and the
charging process starts.
Button
1x
Display
FEATURES
SOUNDS
HS RINGER
2x
TONES
KEY BEEP
Select KEY BEEP, CONFIRM
or CHARGING
ON or OFF
Select ON or OFF
Select KEY BEEP, CONFIRM
or CHARGING
Press and hold button
73
- Special functions 8.6
Accepting calls automatically
Incoming calls are accepted automatically when you lift the receiver from the base
station. If you only want calls to be
Button
Display
accepted by means of the
FEATURES
button, you can deactivate the
automatic acceptance facility.
SETTINGS
2x
AUTO ANS.
ON or OFF
Select ON or OFF
AUTO ANS.
Press and hold button
8.7
Setting the flash
time
Two different flash times can be
set by means of the R-signal
button.
Button
2x
SETTINGS
AUTO ANS.
FLASH 1 = 100ms
FLASH 2 = 300ms
Display
FEATURES
1x
FLASH TIME
FLASH 1 or FLASH 2
Select FLASH 1 or FLASH 2
FLASH TIME
Press and hold button
74
- Special functions 8.8
Touch-tone (TTD) or pulse (PD) dialling
This feature enables you to use
your telephone both on analogue
exchanges (PD) and on the new
digital exchanges (TTD). The
factory setting is TONE dialling.
Button
2x
Display
FEATURES
SETTINGS
AUTO ANS.
2x
DIAL MODE
TONE or PULSE
Select TONE or PULS
DIAL MODE
Press and hold button
8.9
Setting the display
language
Button
The display messages can be set
up in German and English.
3x
Display
FEATURES
DISPLAY
LANGUAGE
GERMAN or ENGLISH
Select GERMAN or ENGLISH
75
- Special functions 8.10 Changing the call duration display
The actual duration of the call will
appear in the display while a call is
being made.
You can determine whether the
duration of the call is displayed or
not.
Button
3x
Display
FEATURES
DISPLAY
LANGUAGE
2x
CALL TIMER
ON or OFF
Select ON or OFF
CALL TIMER
Press and hold button
8.11 Changing the PIN
code on the base
station
Some functions of the telephone
system are protected against
unauthorised use by a PIN code.
The PIN code consists of up to
eight numbers. As supplied, the
PIN code is set to "0000".
Button
4x
Display
FEATURES
SYSTEM
REGISTER
3x
CHANGE PIN
PIN?
Number
pad
Enter old PIN code.
NEW PIN?
Number
pad
Enter new PIN code
REPEAT
Number
pad
Enter new PIN code again.
CHANGE PIN
Press and hold button
76
- Special functions 8.12 Deleting all lists
The contents of the phone book,
the redial facility and the caller list
can be deleted with one
procedure.
Button
5x
Display
FEATURES
RESET
RECORDS
RESET?
RECORDS
The reset is carried out.
Press and hold button
8.13 Factory settings
You can reset the handset to the
factory settings once more by
means of the Factory Settings
function.
Button
5x
Display
FEATURES
RESET
RESET
1x
SETTINGS
PIN?
Number
pad
Enter the PIN code for the
base station
SETTINGS
The factory settings are reset.
External ring tone 1
External ring tone 2
Handset ringer volume 3
Base station ringer volume 3
Call duration on
Direct dialling off
PIN 0 0 0 0
Receiver volume medium
Flash time 1
Confirmation tone on
Tone dialling
Language: German
Baby call off
Button click on
Automatic call accept on
Button click on
Charging monitor on
Monitor off
Dialling blocks off
77
- Multiple handsets -
9
Multiple handsets
Up to four additional handsets can be logged on to your base station. You can
obtain these additional handsets from your AUDIOLINE dealer with the designation
DECT 4501.
Note: Handsets from other manufacturers can also be integrated into the telephone
system by means of the internationally adopted GAP standard. In the same way,
you can use an AUDIOLINE handset on base stations from other manufacturers, as
long as these units work using the GAP standard.
When you use multiple handsets you will have the following options:
Internal calls between handsets.
External calls can be forwarded between handsets.
Incoming external calls are signalled on all handsets.
Room monitoring
Note: If another handset is already using the external line, the message EXT will
appear on all handsets. In this case, it is not possible to make a further external call.
9.1
Making an internal call
When you have connected multiple handsets to a base station, you will be able to
button and then the number of the
make internal calls. To do this, press the
required handset. The call is accepted with the call button
on the handset called.
If an external call comes in while you are making an internal call, you will hear short
signal tones and the message EXT will flash in the display. To take the external call,
and accept the external call with
end the internal call by means of the call button
the call button
.
9.2
Connecting external calls to another handset
If you have accepted an external call on one handset, you can forward the external
button and then the number of
call to another handset. To do this, press the
the required handset. After the internal call has been accepted at the other handset,
you have the following options:
A. Consultation / Brokering: You can now speak to the internal subscriber and
button. You can switch between
return to the external caller by pressing the
the external and the internal call as many times as you like in this way.
B. Forward the call: The external call is forwarded to the handset called by
on the first handset.
pressing the call button
78
- Multiple handsets 9.3
Holding conference calls
An external call can be connected to a further internal subscriber as a conference
call. In this way, two handsets can talk to the external caller simultaneously.
Establish the required connection with the external subscriber. Then press the
button and the internal number of the second handset required. When the second
button for 2
internal subscriber has accepted the call, press and hold the
seconds and all three subscribers will be connected together on a conference call.
The messages INT and EXT will appear in the display. The conference is ended by
one of the internal participants hanging up.
9.4
Room monitoring
With the room monitoring
feature, you place a handset in
the required room and activate
the monitor function. You can
then call up this handset and
listen-in to the room without the
handset ringing. Also in the case
of an external call, the handset
concerned does not ring.
Button
Display
FEATURES
MONITOR
OFF or ON
Select OFF or ON
MONITOR
Hold
The message MONITOR
will flash in the display.
Deactivating room monitoring
Press the
button to enter the right menu level directly. Then press
select OFF. Confirm with
pressed.
and exit programming by holding the
and
button
79
- Multiple handsets 9.5
Logging on and logging off handsets
9.5.1 Logging on DECT4500/4501 handsets
Display
FEATURES
Button
SYSTEM
4x
REGISTER
Number pad
Number pad
BS 1 2 3 4
If the handset is already connected to a base station, the
corresponding numbers will flash.
Select the base station on the number pad.
PIN?
Enter the PIN Code (factory setting 0 0 0 0).
Press the button on the base station for 2 seconds.
SEARCH BS 1
After a short time the handset will be logged on. The internal
number of the new handset will appear in the display.
9.5.2
Logging on other DECT-GAP telephones to the base station
To log on a DECT-GAP handset, follow the instructions in the other manufacturer's
operating manual and then press the
button on the base station for 2 seconds.
Use the PIN code 0 0 0 0 for logging on.
9.5.3
Logging off handsets
A handset can only be logged off using another handset that is still logged-on. It is
therefore not possible to carry out the logging-off procedure using the handset that
is to be logged off.
80
- Multiple handsets Button
Display
FEATURES
4x
SYSTEM
2x
DELETE HS
REGISTER
HANDSET 1
Select the handset that you want to log off.
PIN?
Number pad
9.6
Enter the PIN Code (factory setting 0 0 0 0).
After a short time the handset will be logged off.
Additional base stations
You can increase the range of the handsets by using multiple base stations. In
order to use this effect, all base stations must be connected to one telephone line.
Depending upon how you want to use the system, you can allocate the same phone
number to each base station or you can give the base stations different numbers.
Make sure that the range of each base station overlaps. Please check the range of
the handsets each time before setting up a new base station.
If a handset is logged on to the base station and if automatic base station selection
is switched on (further information in this chapter), the handset will always be
forwarded to the nearest base station automatically. Current calls cannot be
transferred from one base station to another.
81
- Multiple handsets Button
Display
FEATURES
4x
SYSTEM
1x
SELECT BS
REGISTER
AUTO or FIXED
Select whether you want the handset to be automatically or
permanently connected to a base station. When selecting
and then select the required base
FIXED, confirm with
station by means of the number pad. If the handset is logged on
to different base stations, the appropriate numbers will flash.
82
- Troubleshooting -
10 Troubleshooting
If you have problems with your telephone, please check the following points first.
For technical problems, you can also contact our hotline on Tel. 0180 5 00 13 88.
For any claims under the warranty, please refer to your dealer. The warranty period
is 2 years.
No calls possible
Connection is cut off or
drops out
The charging symbol
does not come on while
the handset is on the
base station.
The standard batteries
discharge very quickly.
Display dark
o The telephone line is not correctly connected
or is faulty.
o Use only the telephone cable provided.
o Test whether your telephone connection is in
order by using another telephone.
o The power supply is not plugged in or there is
a total power failure.
o The rechargeable batteries are flat or
defective.
o You are too far away from the base station.
o You are too far away from the base station or
the base station is wrongly positioned.
o Place the handset properly on the base station,
clean the contact surfaces on the handset and
on the base station with a soft, dry cloth.
o Charge the handset. If this does not help,
replace the standard batteries.
o Caused by direct sunlight, allow the handset to
cool down.
83
- Important information -
11
Important information
11.1 Technical data
Standard
Power supply
Range
Range
Standby
Max. call duration
Standard rechargeable batteries
Dialling method
Permissible ambient temperature
Permissible relative humidity
Signal button function
DECT-GAP
Base station 220/230V, 50 Hz
Indoors up to 50 m
Outdoors up to 300 m
up to 144 hours
more than 12 hours
Type AAA 1.2V 650 mAh
Touch-Tone Dialling
10°C to 30°C
20 to 75%
100ms and 300ms
11.2 Changing the telephone cable
If you have to replace your telephone cable, you can locate the appropriate cable at
your dealer's with the help of the following diagram.
F-Codierung - IMPORT Standard
TAE-F
1
2
3
4
5
6
84
Rj11 6/4
1
2
3
4
5
6
12 3 4 5 6
- Important information 11.3 Warranty
AUDIOLINE units are manufactured and tested in accordance with the most up-todate manufacturing procedures. Selected materials and highly developed
technologies ensure trouble-free operation and long life. If, however, your unit
should develop a fault within the warranty period, please contact the shop where
you bought your AUDIOLINE unit, taking with you your purchase receipt. The
warranty period is 24 months calculated from the day of purchase. This warranty is
not applicable to the batteries or battery packs used in the various products.
Warranty conditions:
All defects, which are the result of material or manufacturing faults, will be rectified
free of charge within the warranty period. Claims under the warranty shall not be
considered if the equipment has been tampered with by the purchaser or third
parties. Damage, which results from improper handling or use, incorrect positioning
or storage, inappropriate connection or Installation and through Act of God or other
external influences are not covered by the warranty. In the case of complaints, we
reserve the right to repair or to replace the defective parts or to exchange the unit.
Parts or units that have been exchanged shall become our property. Claims for
damages shall not be entertained unless they relate to intention or gross negligence
on the part of the manufacturer. In accordance with these conditions, all claims
under the warranty shall be made exclusively to your dealer. Rights under the
warranty can no longer be enforced after the expiry of two years from the purchase
and handing over of our products.
85
- Important information 11.4 Declaration of conformity
WE
OF
AUDIOLINE GmbH
Hellersbergstr. 2a
D-41460 Neuss
DECLARE UNDER OUR SOLE RESPONSIBILITY AS EU DISTRIBUTOR THAT
THE PRODUCT
MODEL:
DESCRIPTION:
DECT4800
DECT standard cordless telephone
IS IN CONFORMITY WITH THE BASIC REQUIREMENTS OF DIRECTIVE:
1999/5/EC
AUTHORISED SIGNATORY:
Signature:
Name:
Position in the company:
Date of issue:
________________________________
MANFRED ZINNOW
MANAGING DIRECTOR:
20.06.2003
A copy of this declaration will be retained for 10 years after cessation of production.
SUPPLIER:
PRODUCT:
AUDIOLINE GmbH, Hellersbergstr. 2a,
D-41460 Neuss
DECT4800
This product has been developed for use on an analogue telephone line (PSTN)
within Germany. However, no guarantee can be accepted for trouble-free operation
on all telecommunications terminal equipment connections due to the differences
between the different telecommunications network operators.
86
AUDIOLINE GmbH
Neuss
Service Hotline 0180 5 00 13 88
Internet: www.audioline.de
E-mail: [email protected]