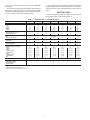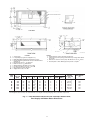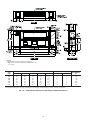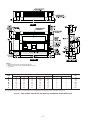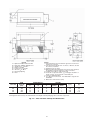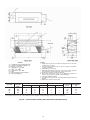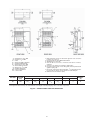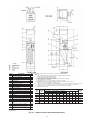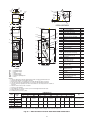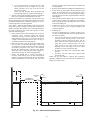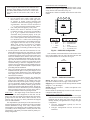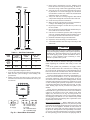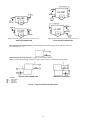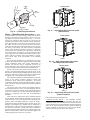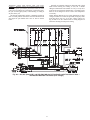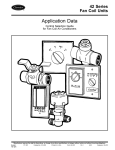
1
42C,D,S,V Series
Fan Coil Air Conditioners
Installation, Start-Up and Service
Instructions
CONTENTS
Page
SAFETY CONSIDERATIONS . . . . . . . . . . . . . . . . . . . . . . 1
INTRODUCTION . . . . . . . . . . . . . . . . . . . . . . . . . . . . . . . . .1,2
PHYSICAL DATA . . . . . . . . . . . . . . . . . . . . . . . . . . . . . . . 2-4
PRE-INSTALLATION. . . . . . . . . . . . . . . . . . . . . . . . . . . 4-42
Unpack and Inspect Units . . . . . . . . . . . . . . . . . . . . . . . . 4
Protect Units From Damage . . . . . . . . . . . . . . . . . . . . . . 4
Prepare Jobsite for Unit Installation . . . . . . . . . . . . . . 4
Identify and Prepare Units. . . . . . . . . . . . . . . . . . . . . . . . 4
INSTALLATION . . . . . . . . . . . . . . . . . . . . . . . . . . . . . . . 42-79
Step 1 — Place Units in Position . . . . . . . . . . . . . . . . 42
• 42C UNITS
• 42V UNITS
• 42D UNITS
• 42S UNITS
Step 2 — Make Piping Connections . . . . . . . . . . . . . 53
• VALVE PACKAGES
• 42C,D,V DRAIN CONNECTIONS
• 42C,D,V WATER SUPPLY/RETURN
CONNECTIONS
• 42C,D,V STEAM CONNECTIONS
• 42C,D,V DIRECT EXPANSION (DX) REFRIGERANT
PIPING
• TEST AND INSULATE
Step 3 — Make Electrical Connections . . . . . . . . . . 66
• FACTORY-INSTALLED OPTIONS
• STANDARD WIRING PACKAGES
Step 4 — Make Duct Connections . . . . . . . . . . . . . . . 77
Step 5 — Frame and Finish Unit. . . . . . . . . . . . . . . . . 77
Step 6 — Cut Out Openings for Grilles and
Thermostats . . . . . . . . . . . . . . . . . . . . . . . . . . . . . . . . . . 77
Step 7 — Make Final Preparations. . . . . . . . . . . . . . . 77
START-UP . . . . . . . . . . . . . . . . . . . . . . . . . . . . . . . . . . . . 79-81
Cooling/Heating System. . . . . . . . . . . . . . . . . . . . . . . . . 80
Air System Balancing . . . . . . . . . . . . . . . . . . . . . . . . . . . 80
Water System Balancing . . . . . . . . . . . . . . . . . . . . . . . . 80
Water Treatment. . . . . . . . . . . . . . . . . . . . . . . . . . . . . . . . . 80
Controls Operation . . . . . . . . . . . . . . . . . . . . . . . . . . . . . . 80
SERVICE . . . . . . . . . . . . . . . . . . . . . . . . . . . . . . . . . . . . . 81,82
Excessive Condensation on Unit . . . . . . . . . . . . . . . . 81
To Clean Coil . . . . . . . . . . . . . . . . . . . . . . . . . . . . . . . . . . . . 81
Check Drain . . . . . . . . . . . . . . . . . . . . . . . . . . . . . . . . . . . . . 81
Fan Motor Bearings . . . . . . . . . . . . . . . . . . . . . . . . . . . . . 81
Clean Fan Wheel . . . . . . . . . . . . . . . . . . . . . . . . . . . . . . . . 81
Clean Electric Heater. . . . . . . . . . . . . . . . . . . . . . . . . . . . 81
Clean or Replace Air Filters . . . . . . . . . . . . . . . . . . . . . 81
Electrical Wiring and Controls . . . . . . . . . . . . . . . . . . 82
Valves and Piping . . . . . . . . . . . . . . . . . . . . . . . . . . . . . . . 82
Filters . . . . . . . . . . . . . . . . . . . . . . . . . . . . . . . . . . . . . . . . . . . 82
Drain . . . . . . . . . . . . . . . . . . . . . . . . . . . . . . . . . . . . . . . . . . . . 82
Warranty . . . . . . . . . . . . . . . . . . . . . . . . . . . . . . . . . . . . . . . . 82
Page
APPENDIX A — POTENTIOMETER
ADJUSTMENT. . . . . . . . . . . . . . . . . . . . . . . . . . . . . . . . . . . 83
APPENDIX B — EVO/ECM 4-SPEED
ADJUSTMENT. . . . . . . . . . . . . . . . . . . . . . . . . . . . . . . . . . . 84
START-UP CHECKLIST FOR 42C,D,S,V SERIES
FAN COIL AIR CONDITIONERS. . . . . . . . .CL-1, CL-2
SAFETY CONSIDERATIONS
Installation of this unit can be hazardous due to electrical components and equipment location (such as a ceiling or elevated
structure). Only trained, qualified installers and service
mechanics should install and service this equipment.
When installing this unit, observe precautions in the literature,
labels attached to the equipment, and any other safety precautions that apply.
• Follow all safety codes.
• Wear safety glasses and work gloves. Never wear bulky
or loose fitting clothing when working on any mechanical equipment. Gloves should be worn for proper protection against heat and other possible injuries. Safety
glasses or goggles should always be worn when drilling,
cutting, or working with chemicals such as refrigerants
or lubricants.
• Use care in handling and installing this unit.
• Never pressurize any equipment beyond specified test
pressures. Always pressure test with an inert fluid or gas
such as clear water or dry nitrogen to avoid possible
damage or injury in the event of a leak or component
failure during testing. Always protect adjacent flammable material when welding or soldering. Use a suitable
heat-shield material to contain sparks or drops of solder.
Have a fire extinguisher readily available.
WARNING
ELECTRIC SHOCK HAZARD. To avoid the possibility
of electrical shock, open and tag all service switches before
installing this equipment.
INTRODUCTION
Carrier fan coil units represent a prudent investment offering trouble-free operation and long service with proper installation, operation, and regular maintenance. Your equipment is
initially protected under the manufacturer’s standard warranty;
however, this warranty is provided under the condition that the
steps outlined in this manual for initial inspection, proper installation, regular periodic maintenance, and everyday operation of the equipment be followed in detail. This manual should
be fully reviewed in advance before initial installation, start-up,
and any maintenance. Should any questions arise, please
Manufacturer reserves the right to discontinue, or change at any time, specifications or designs without notice and without incurring obligations.
Catalog No. 04-53420010-01
Printed in U.S.A.
Form 42-5SI
Pg 1
1-14
Replaces: 42-4SI
See drawings for unit configurations, dimensions, clearances,
and pipe connections. Refer to unit wiring label for all electrical
connections; follow NEC (National Electrical Code) and local
codes.
contact your local sales representative or the factory BEFORE
proceeding.
This document contains general installation instructions for
the 42C,D,S,V unit fan coils. Refer to the unit wiring diagram
installed on the blower housing or specific manufacturer literature for any other type of factory-mounted controls.
PHYSICAL DATA
Component weight data, shipping weights, and filter data of
the 42C,D,S,V units are provided in Tables 1-4.
Table 1 — Physical Data — 42C Series Units
UNIT SIZE 42C
02
03
04
06
08
10
12
NOMINAL AIRFLOW (cfm)
200
300
400
600
800
1000
1200
SHIPPING WEIGHT (lb)*
42CA
42CE
42CG
42CK
36
55
98
115
39
60
118
120
49
70
126
135
59
82
168
150
64
95
176
155
95
135
215
227
107
154
245
241
COIL WATER WEIGHT
(Approx lb per row of coil)
42CA, CE, CG, CK
0.7
0.8
1.0
1.4
1.7
2.3
2.7
COILS
FPI
Coil Face Area (sq ft)
0.8
1.1
1.4
2.3
3.2
3.7
MOTOR (qty)
42C Series
1
1
1
1
1
2
2
BLOWER (qty)
42CA, CE, CG, CK
1
1
2
2
2
4
4
NA
10 x 18
NA
10 x 22
NA
10 x 28
NA
10 x 33
NA
10 x 40
NA
10 x 54
NA
10 x 62
10 x 231/2
8 x 231/2
10 x 28
8 x 28
10 x 321/2
8 x 321/2
10 x 37
8 x 37
10 x 41
8 x 41
10 x 541/2
8 x 541/2
10 x 63
8 x 63
10 x 28
7 x 21
1
10 x 28
7 x 21
1
10 x 33
7 x 27
1
10 x 45
7 x 38
1
10 x 45
7 x 38
1
10 x 62
7 x 52
1
10 x 62
7 x 52
1
FILTERS
Nominal Size (in.) (1-in. thick)
42CA
42CE†
42CG
Bottom Return
Rear Return
42CK
Bottom Return
Rear Return
Qty
SUPPLY DUCT COLLAR
10 fins/inch
1.9
1-in.
PIPING CONNECTIONS (Sweat) (in. OD)
Coil Outlet and Inlet
Drain Connection
Tell-Tale Drain
5/
8
7/
8
5/
8
*Calculate Operating Weight of Unit: Shipping Weight + Coil Water
Weight x Number of Coil Rows.
†Filter size if located in return-air plenum.
2
Table 2 — Physical Data — 42V Series Units
UNIT SIZE 42V
01
02
03
04
06
08
10
12
NOMINAL AIRFLOW (cfm)
150
200
300
400
600
800
1000
1200
SHIPPING WEIGHT (lb)*
42VA
42VB
42VC
42VE
42VF
42VG
—
—
—
—
—
40
42
63
50
72
64
—
47
68
60
100
69
74
57
82
72
108
83
—
77
99
110
154
100
—
79
101
—
—
102
—
108
133
—
—
135
—
127
154
—
—
156
—
COIL WATER WEIGHT
(Approx lb per row of coil)
42VA, VB, VC†, VF
42VE
42VG
—
—
0.4
0.7
0.9
—
0.8
1.2
1.0
1.0
1.6
—
1.4
2.3
—
1.7
—
—
2.3
—
—
2.7
—
—
12 fins/inch
10 fins/inch
1.4
1.9
2.3
3.2
3.7
COILS
FPI (42VA, VB, VF)
FPI (42VC, VE, VG)
Coil Face Area (sq ft)
0.8
0.8
1.1
MOTOR (qty)
42VA, VB, VF
42VC, VE
42VG
—
—
1
1
1
—
1
1
2
1
1
—
1
2
—
1
—
—
2
—
—
2
—
—
BLOWER (qty)
42VA, VB, VF
42VC, VE
42VG
—
—
1
1
2
—
1
2
2
2
2
—
2
4
—
2
—
—
4
—
—
4
—
—
—
—
10 x 141/2
1
73/4 x 213/4
7 x 213/4
—
1
73/4 x 213/4
7 x 263/4
10 x 28
1
73/4 x 313/4
7 x 343/4
—
1
73/4 x 413/4
7 x 483/4
—
1
73/4 x 433/4
—
—
1
73/4 x 573/4
—
—
1
73/4 x 653/4
—
—
1
FILTERS
Nominal Size (in.) (1-in. thick)
42VA, VB, VF
42VC, VE
42VG
Qty
SUPPLY DUCT COLLAR
1-in.
PIPING CONNECTIONS (Sweat) (in.)
Coil Outlet and Inlet
Drain Connection
5/ OD
8
3/ MPT
4
*Calculate Operating Weight of Unit: Shipping Weight + Coil Water Weight x
Number Of Coil Rows.
†Available in sizes 02-06.
Table 3 — Physical Data — 42D Series Units
06
08
10
12
14
16
18
20
NOMINAL AIRFLOW (cfm)
UNIT SIZE 42D
600
800
1000
1200
1400
1600
1800
2000
SHIPPING WEIGHT (lb)*
42DA
42DC
42DD
42DE
42DF
64
94
135
150
157
79
107
145
160
167
90
150
155
170
177
108
169
180
195
202
119
174
190
205
215
124
178
200
215
225
141
195
215
230
240
151
220
230
235
255
COIL WATER WEIGHT
(Approx lb per row of coil)
1.3
1.6
1.9
2.3
2.7
3.0
3.4
3.7
COILS
FPI
Coil Face Area (sq ft)
1.6
2.1
2.5
3.0
3.5
4.1
4.6
5.0
MOTOR (qty)
1
1
1
2
2
2
2
2
BLOWER (qty)
1
1
1
2
2
2
2
2
14 x 21
14 x 26
14 x 30
14 x 35
14 x 40
14 x 45
14 x 50
14 x 54
123/4 x 21
123/4 x 20
14 x 143/4
14 x 14
123/4 x 26
123/4 x 25
14 x 193/4
14 x 20
123/4 x 30
123/4 x 29
14 x 233/4
14 x 24
123/4 x 35
123/4 x 34
14 x 283/4
14 x 28
123/4 x 40
123/4 x 39
14 x 333/4
14 x 34
123/4 x 45
123/4 x 44
14 x 383/4
14 x 38
123/4 x 50
123/4 x 49
14 x 433/4
14 x 44
123/4 x 54
123/4 x 53
14 x 473/4
14 x 48
5/
8
7/
8
7/
8
1
1 /8
1
1 /8
15/8
5/
8
7/
8
1
1 /8
1
1 /8
11/8
15/8
5/
8
7/
8
1
1 /8
1
1 /8
11/8
15/8
5/
8
7/
8
1
1 /8
1
1 /8
11/8
15/8
FILTERS
Nominal Size (in.) (1-in. thick)
42DA
42DC
42DD
(Front Return)
(Bottom Return)
42DE
42DF
Qty
10 fins/inch
NA
1
SUPPLY DUCT COLLAR
PIPING CONNECTIONS
Coil Inlet/Outlet (in. OD)
1 and 2 Row
3 Row
4 Row
5 Row
6 Row
8 Row
1-in.
5/
8
5/
8
7/
8
7/
8
7/
8
1
1 /8
5/
8
5/
8
7/
8
7/
8
7/
8
1
1 /8
5/
8
7/
8
7/
8
7/
8
7/
8
1
1 /8
5/
8
7/
8
7/
8
7/
8
7/
8
1
1 /8
*Calculate Operating Weight of Unit: Shipping Weight + Coil Water Weight x Number of Coil Rows.
3
Table 4 — Physical Data — 42S Series Units
UNIT SIZE 42S
NOMINAL AIRFLOW (cfm)
SHIPPING WEIGHT (lb)*
42SGA,SGM,SU
42SH
42SJ
42SGS
42SM
COIL WATER WEIGHT
(Approx lb per row of coil)
COILS
FPI
BLOWER (qty)
42SGA,SH,SU,SGM,SGS,SM
42SJ
FILTERS
Nominal Size (in.) (1-in. thick)
Qty
PIPING CONNECTIONS
Inlet (in. OD)
03
300
04
400
06
600
08
800
10
1000
12
1200
14
1400
16
1600
20
2000
180
202
360
162
—
225
247
450
203
—
240
262
480
216
—
260
286
520
234
—
280
311
560
252
—
305
336
610
275
—
—
—
—
—
390
—
—
—
—
390
—
—
—
—
390
4.09
4.09
4.39
1
—
1
—
1
—
1.79
2.63
3.45
14 fins/inch
1
2
1
2
121/2 x 241/4
1
2
1
2
161/4 x 263/4
1/
2,
1
2
1
2
201/2 x 291/4
1†
241/2 x 291/2
261/2 x 291/2
unless larger size valve package is selected
*Calculate Operating Weight of Unit: Shipping Weight + Coil Water Weight x Number of Coil Rows.
†42SJ units require two filters.
rugged appearance. Still, great care must be taken to assure
that no force or pressure is applied to the coil, piping, or drain
stub-outs during handling. Depending on the options and accessories, some units may contain delicate components that
may be damaged by improper handling. All units shall be handled by the chassis or as close as possible to the unit mounting
point locations. In the case of a full cabinet unit, the unit must
be handled by the exterior casing. This is acceptable provided
the unit is maintained in an upright position, and no force is applied that may damage internal components or painted
surfaces.
The equipment must always be properly supported. Temporary supports used during installation or service must be adequate to hold the equipment securely. Equipment should always be stored in the proper orientation as marked on the carton. To maintain warranty, protect units against hostile
environment (such as rain, snow, or extreme temperatures),
theft, vandalism, and debris on jobsite. Equipment covered in
this manual is not suitable for outdoor installations. Do not allow foreign material to fall into drain pan. Prevent dust and debris from being deposited on motor, fan wheels and cooling/
heating coils. Failure to do so may have serious adverse effects
on unit operation, and in the case of the motor and blower assembly, may result in immediate or premature failure. Manufacturer's warranty is void if foreign material is allowed to be
deposited on the motor or blower wheels of any unit. Some
units and/or job conditions may require some form of temporary covering during construction.
PRE-INSTALLATION
Unpack and Inspect Units — All units are carefully
inspected at the factory throughout the manufacturing process
under a strict detailed quality assurance program, and, where
possible, ALL major components and sub-assemblies are carefully tested for proper operation and verified for full compliance with factory standards. Operational testing of some customer-furnished components such as electronic control valves
and digital controllers may be a possible exception.
Each unit is carefully packaged for shipment to avoid damage during normal transit and handling. Equipment should always be stored in a dry place, and in the proper orientation as
marked on the carton. All shipments are made F.O.B. factory
and are the responsibility of the receiving party to inspect the
equipment upon arrival. Any obvious damage to the carton
and/or its contents should be recorded on the bill of lading and
a claim should be filed with the transportation company, and
Carrier should be advised. After determining the condition of
the carton exterior, carefully remove each unit from the carton
and inspect for hidden damage. At this time, check to make
sure that “furnished only” items such as thermostats, grilles etc.
are accounted for whether packaged separately or shipped at a
later date. Any hidden damage should be recorded and immediately reported to the transportation company, a claim should
be filed with the transportation company, and Carrier should be
notified. In the event a claim for shipping damage is filed, the
unit, shipping carton, and all packing must be retained for
physical inspection by the transportation company. All equipment should be stored in the factory shipping carton with internal packing in place until installation.
At the time of receipt, the equipment type and arrangement
should be verified against the order documents. Should any
discrepancy be found, the local sales representative should be
notified immediately so that proper action may be taken.
Should any questions arise concerning warranty repairs, the
factory must be notified BEFORE any corrective action is taken. Where local repairs or alterations can be accomplished, the
factory must be fully informed of the extent and expected cost
of those repairs before work is begun. Where factory operations are required, the factory must be contacted for authorization to return equipment and a Return Authorization Number
will be issued. Unauthorized return shipments of equipment
and shipments not marked with an authorization number will
be refused. In addition, any claims for unauthorized expenses
will not be accepted by the manufacturer.
Prepare Jobsite for Unit Installation — To save
time and to reduce the possibility of costly errors, set up a complete sample installation in a typical room at jobsite. Check all
critical dimensions such as pipe, wire, and duct connection
requirements. Refer to job drawings and product dimension
drawings as required (see Fig. 1-38). Instruct all trades in their
part of the installation.
Identify and Prepare Units — Be sure power require-
ments match available power source. Refer to unit nameplate
and wiring diagram.
1. Check all tags on unit to determine if shipping screws are
to be removed. Remove screws as directed.
2. Rotate the fan wheel by hand to ensure that the fan is
unrestricted and can rotate freely. Check for shipping
damage and fan obstructions. Adjust blower motor as
required.
3. Perform "Dry Fit" of valve assembly that may be shipped
unattached to unit coil assembly. Should any questions
arise on fit up please contact your local representative.
Protect Units from Damage — All equipment is de-
signed and fabricated with robust materials and presents a
4
1
2
3
4
5
6
—
—
—
—
—
—
7 —
8 —
9 —
10 —
LEGEND
Junction Box (remote mount)
Flexible Metal Conduit
Drain Conn, 7/8-in. OD
Tell-Tale Drain Conn, 5/8-in. OD (optional)
Drip Lip (optional, shipped loose)
Hanger Slots (4), Rubber Grommet
has 3/8-in. Diameter Hole
Supply Duct Collar, 1-in.
Air Vent, 1/8-in. MPT
Return Conn, 5/8-in. OD
Supply Conn, 5/8-in. OD
NOTES:
1. Right hand unit shown; left hand unit opposite. Coil connection
locations are ±5/8-inch.
2. Unit sizes 02 and 03 have one motor, one blower; sizes 04
through 08 have one motor, 2 blowers; sizes 10 and 12 have
2 motors, 4 blowers.
3. Standard 3-row coil shown.
4. Overall unit dimension increases by 4 in. with optional electric
heat.
5. Not shown: 3-speed fan switch; wall plate; closed cell foam on
main drain pan.
6. Units have galvanized finish.
7. For optional coil connections, view 42CA-203-1 using the Fan Coil
Builder.
8. Dimensions shown in inches (mm).
a42-4099.eps
UNIT
SIZE
NOM
AIRFLOW
(Cfm)
DIMENSIONS (in.)
A
A’
B
D’
E
F
G
02
03
04
06
08
10
12
200
300
400
600
800
1000
1200
211/4
251/4
311/4
361/4
431/4
571/4
651/4
311/4
361/4
431/4
431/4
571/4
651/4
751/4
16
20
26
31
38
52
60
13
14
15
10
17
11
13
181/4
221/4
281/4
331/4
401/4
541/4
621/4
61/4
61/4
61/4
71/2
71/2
71/2
71/2
83/4
83/4
83/4
10
10
10
10
H
Blower
QTY/UNIT
Motor
FACE
AREA
(sq ft)
UNIT
WEIGHT*
(lb)
193/4
233/4
293/4
343/4
413/4
553/4
633/4
1
1
2
2
2
4
4
1
1
1
1
1
2
2
0.83
1.08
1.35
1.88
2.31
3.16
3.65
36
39
49
59
64
95
107
*Unit weights are based on dry coils and minimum rows. Weights exclude packaging, valves, and other components.
Fig. 1 — 42CA Furred-In Horizontal Unit Dimensions
5
1 —
2 —
3 —
4 —
5 —
6 —
7 —
8 —
9 —
10 —
11 —
12 —
NOTES:
1. Right hand unit shown; left hand unit opposite. Coil connection
locations are ±5/8-inch.
2. Unit sizes 02 and 03 have one motor, one blower; sizes 04
through 08 have one motor, 2 blowers; sizes 10 and 12 have
2 motors, 4 blowers.
3. Standard 3-row coil shown.
4. Overall unit dimension increases by 4 in. with optional electric
heat.
5. Not shown: 3-speed fan switch; wall plate; closed cell foam on
main drain pan.
6. Units have galvanized finish.
7. For optional coil connections, view 42CA-203-1 using the Fan Coil
Builder.
a42-4100.eps
8. Dimensions shown in inches (mm).
LEGEND
Junction Box (remote mount)
Flexible Metal Conduit
Strip Heater High Limit
Electric Strip Heater Element
Tell-Tale Drain Conn, 5/8-in. OD (optional)
Drain Conn, 7/8-in. OD
Drip Lip (optional, shipped loose)
Supply Duct Collar, 1-in.
Air Vent, 1/8-in. MPT
Return Conn, 5/8-in. OD
Supply Conn, 5/8-in. OD
Hanger Slots (4), Rubber Grommet
has 3/8-in. Diameter Hole
UNIT
SIZE
NOM
AIRFLOW
(Cfm)
DIMENSIONS (in.)
QTY/UNIT
A
A’
B
D’
E
F
G
H
Blower
02
03
04
06
08
10
12
200
300
400
600
800
1000
1200
211/4
251/4
311/4
361/4
431/4
571/4
651/4
311/4
361/4
431/4
431/4
571/4
651/4
751/4
16
20
26
31
38
52
60
13
14
15
10
17
11
13
181/4
221/4
281/4
331/4
401/4
541/4
621/4
6 1 /4
6 1 /4
6 1 /4
7 1 /2
7 1 /2
7 1 /2
7 1 /2
83/4
83/4
83/4
10
10
10
10
193/4
233/4
293/4
343/4
413/4
553/4
633/4
1
1
2
2
2
4
4
Motor
FACE
AREA
(sq ft)
UNIT
WEIGHT*
(lb)
1
1
1
1
1
2
2
0.83
1.08
1.35
1.88
2.31
3.16
3.65
38
41
51
61
66
97
109
*Unit weights are based on dry coils and minimum rows. Weights exclude packaging, valves, and other components.
Fig. 2 — 42CA Furred-In Horizontal Unit with Electric Heat Dimensions
6
1—
2—
3—
4—
5—
6—
7—
8—
9—
10 —
11 —
12 —
13 —
14 —
15 —
NOTES:
1. Right hand unit with standard 3-row coil shown; left hand unit opposite. Coil
connection locations are ±5/8-inch.
2. Unit sizes 02 and 03 have one motor, one blower; sizes 04 through 08 have
one motor, 2 blowers; sizes 10 and 12 have 2 motors, 4 blowers.
3. Standard 3-row coil shown.
4. Unit available with bottom or rear return air.
5. Overall dimension increases by 4 in. with optional electric heat.
6. Not shown: 3-speed fan switch; wall plate; 1/2-in. fiberglass insulation on
inside of plenum, closed cell foam on main drain pan.
7. Units have galvanized finish.
8. For optional coil connections, view 42CA-203-1 using the Fan Coil Builder.
9. Dimensions shown in inches (mm).
LEGEND
Junction Box, 4 in. x 4 in.
Flexible Metal Conduit
Mounting Bracket
Drain Conn, 7/8-in. OD
Tell-Tale Drain Conn, 5/8-in. OD (optional)
Drip Lip (optional, shipped loose)
Filter
Return Duct Collar, 1-in.
Filter Access Panel
Access Panel
Supply Duct Collar, 1-in.
Air Vent, 1/8-in. MPT
Return Conn, 5/8-in. OD
Supply Conn, 5/8-in. OD
Hanger Slots (4), Rubber Grommet has
3/ -in. Diameter Hole
8
a42-4101
UNIT
SIZE
NOM
AIRFLOW
(Cfm)
A
A’
B
DIMENSIONS (in.)
C
D’
E
F
G
H
02
03
04
06
08
10
12
200
300
400
600
800
1000
1200
211/4
251/4
311/4
361/4
431/4
571/4
651/4
311/4
361/4
431/4
431/4
571/4
651/4
751/4
16
20
26
31
38
52
60
181/4
221/4
281/4
331/4
401/4
541/4
621/4
13
14
15
10
17
11
13
193/4
233/4
293/4
343/4
413/4
553/4
633/4
61/4
61/4
61/4
71/2
71/2
71/2
71/2
83/4
83/4
83/4
10
10
10
10
153/8
193/8
253/8
303/8
373/8
513/8
593/8
QTY/UNIT
FACE
UNIT
RETURN AIR
AREA WEIGHT*
DUCT
Blower Motor (sq ft)
(lb)
(inches)
1
1
2
2
2
4
4
1
1
1
1
1
2
2
0.83
1.08
1.35
1.88
2.31
3.16
3.65
*Unit weights are based on dry coils and minimum rows. Weights exclude packaging, valves, and other components.
Fig. 3 — 42CE Furred-In Horizontal Unit with Plenum Dimensions
7
55
60
70
82
95
135
154
101/2 x 181/4
101/2 x 221/4
101/2 x 281/4
101/2 x 331/4
101/2 x 401/4
101/2 x 541/4
101/2 x 621/4
1—
2—
3—
4—
5—
6—
7—
8—
9—
10 —
11 —
12 —
13 —
14 —
15 —
16 —
17 —
NOTES:
1. Right hand unit with standard 3-row coil shown; left hand unit opposite. Coil
connection locations are ±5/8-inch.
2. Unit sizes 02 and 03 have one motor, one blower; sizes 04 through 08 have
one motor, 2 blowers; sizes 10 and 12 have 2 motors, 4 blowers.
3. Standard 3-row coil shown.
4. Unit available with bottom or rear return air.
5. Overall dimension increases by 4 in. with optional electric heat.
6. Not shown: 3-speed fan switch; wall plate; 1/2-in. fiberglass insulation on
inside of plenum, closed cell foam on main drain pan.
7. Units have galvanized finish.
8. For optional coil connections, view 42CA-203-1 using the Fan Coil Builder.
9. Dimensions shown in inches (mm).
LEGEND
Junction Box, 4 in. x 4 in.
Flexible Metal Conduit
Mounting Bracket
Electric Strip Heater Element
Drain Conn, 7/8-in. OD
Strip Heater High Limit
Tell-Tale Drain Conn, 5/8-in. OD (optional)
Drip Lip (optional, shipped loose)
Filter
Return Duct Collar, 1-in.
Filter Access Panel
Access Panel
Supply Duct Collar, 1-in.
Air Vent, 1/8-in. MPT
Return Conn, 5/8-in. OD
Supply Conn, 5/8-in. OD
Hanger Slots (4), Rubber Grommet has
3/ -in. Diameter Hole
8
A42-4102
UNIT
SIZE
NOM
AIRFLOW
(Cfm)
A
A’
B
DIMENSIONS (in.)
C
D’
E
F
G
H
Blower
QTY/UNIT
Motor
02
03
04
06
08
10
12
200
300
400
600
800
1000
1200
211/4
251/4
311/4
361/4
431/4
571/4
651/4
311/4
361/4
431/4
431/4
571/4
651/4
751/4
16
20
26
31
38
52
60
181/4
221/4
281/4
331/4
401/4
541/4
621/4
13
14
15
10
17
11
13
193/4
233/4
293/4
343/4
413/4
553/4
633/4
61/4
61/4
61/4
71/2
71/2
71/2
71/2
83/4
83/4
83/4
10
10
10
10
153/8
193/8
253/8
303/8
373/8
513/8
593/8
1
1
2
2
2
4
4
1
1
1
1
1
2
2
FACE
UNIT
AREA WEIGHT* RETURN AIR
DUCT
(sq ft)
(lb)
0.83
1.08
1.35
1.88
2.31
3.16
3.65
57
62
72
84
97
137
156
*Unit weights are based on dry coils and minimum rows. Weights exclude packaging, valves, and other components.
Fig. 4 — 42CE Furred-In Horizontal Unit with Plenum and Electric Heat Dimensions
8
101/2 x 181/4
101/2 x 221/4
101/2 x 281/4
101/2 x 331/4
101/2 x 401/4
101/2 x 541/4
101/2 x 621/4
1—
2—
3—
4—
5—
6—
7—
8—
9—
10 —
11 —
12 —
13 —
14 —
15 —
NOTES:
1. Right hand unit shown; left hand unit opposite. Coil connection locations
are ±5/8-inch.
2. Unit sizes 02 and 03 have one motor, one blower; sizes 04 through 08
have one motor, 2 blowers; sizes 10 and 12 have 2 motors, 4 blowers.
3. Cabinet has an Arctic White baked finish.
4. Refer to supply and return connections above for coil stub-out locations.
5. Not shown: optional drip lip, 3-speed fan switch; wall plate; 1/2-in. fiberglass insulation on inside of casing, closed cell foam on main drain pan.
6. For optional coil connections, view 42CA-203-1 using the Fan Coil
Builder.
7. Valve package is factory-installed inside the cabinet when ordered with
the unit (based on component size).
8. Dimensions shown in inches (mm).
LEGEND
Junction Box, 4 in. x 4 in.
Optional Return Air Location
Drip Lip (optional, shipped loose)
Mounting Holes (4), Rubber Grommets
have 3/8-in. Diameter Hole
Electrical Knockout, 7/8-in. Diameter
Return Knockout, 1-in. Diameter
Supply Knockout, 11/2-in. Diameter
Drain Knockout, 11/2-in. Diameter
Supply, Return Connections, 5/8-in. OD
Drain Connection, 7/8-in. OD
Optional Valve Package (inside cabinet)
Filter
Standard Stamped-Return Air Grille
Removable Hinged Access Panel
Supply Grille, Stamped, Standard
UNIT
SIZE
NOM
AIRFLOW
(Cfm)
A
B
02
03
04
06
08
10
12
200
300
400
600
800
1000
1200
38
42
48
53
60
74
82
171/8
211/2
257/8
345/8
39
521/8
607/8
A42-4105
DIMENSIONS (in.)
C
107/16
101/4
111/16
93/16
101/2
1015/16
109/16
E
F
G
Blower
QTY/UNIT
Motor
FACE
AREA
(sq ft)
UNIT
WEIGHT*
(lb)
34
38
44
49
56
70
78
53/4
53/4
53/4
63/4
63/4
63/4
63/4
11
11
11
12
12
12
12
1
1
2
2
2
4
4
1
1
1
1
1
2
2
0.83
1.08
1.35
1.88
2.31
3.16
3.65
98
118
126
168
176
215
245
*Unit weights are based on dry coils and minimum rows. Weights exclude packaging, valves, and other components.
Fig. 5 — 42CG Horizontal Cabinet Unit Dimensions
9
1—
2—
3—
4—
5—
6—
7—
8—
9—
10 —
11 —
12 —
13 —
14 —
15 —
16 —
NOTES:
1. Right hand unit shown; left hand unit opposite. Coil connection
locations are ±5/8-inch.
2. Unit sizes 02 and 03 have one motor, one blower; sizes 04
through 08 have one motor, 2 blowers; sizes 10 and 12 have
2 motors, 4 blowers.
3. Cabinet has an Arctic White baked finish.
4. Refer to supply and return connections above for coil stub-out
locations.
5. Not shown: 3-speed fan switch; wall plate; 1/2-in. fiberglass
insulation on inside of casing, closed cell foam on main drain
pan.
6. For optional coil connections, view 42CA-203-1 using the Fan
Coil Builder.
7. Valve package is factory-installed inside the cabinet when
ordered with the unit (based on component size).
8. Dimensions shown in inches (mm).
LEGEND
Junction Box, 4 in. x 4 in.
Optional Stamped Rear Return Grille
Drip Lip (optional, shipped loose)
Electric Strip Heater Element
Mounting Holes (4), Rubber Grommets
have 3/8-in. Diameter Hole
Electrical Knockout, 7/8-in. Diameter
Return Knockout, 1-in. Diameter
Supply Knockout, 11/2-in. Diameter
Drain Knockout, 11/2-in. Diameter
Drain Connection, 7/8-in. OD
Valve Package (optional, inside cabinet)
Filter
Standard Stamped-Return Air Grille
Removable Hinged Access Panel
Supply, Return Connections, 5/8-in. OD
Supply Grille, Stamped, Standard
UNIT
SIZE
NOM
AIRFLOW
(Cfm)
A
B
02
03
04
06
08
10
12
200
300
400
600
800
1000
1200
38
42
48
53
60
74
82
171/8
211/2
257/8
345/8
39
521/8
607/8
A42-4106
DIMENSIONS (in.)
C
107/16
101/4
111/16
93/16
101/2
1015/16
109/16
QTY/UNIT
E
F
G
Blower
34
38
44
49
56
70
78
5 3 /4
5 3 /4
5 3 /4
6 3 /4
6 3 /4
6 3 /4
6 3 /4
11
11
11
12
12
12
12
1
1
2
2
2
4
4
Motor
FACE
AREA
(sq ft)
UNIT
WEIGHT*
(lb)
1
1
1
1
1
2
2
0.83
1.08
1.35
1.88
2.31
3.16
3.65
98
118
126
168
176
215
245
*Unit weights are based on dry coils and minimum rows. Weights exclude packaging, valves, and other components.
Fig. 6 — 42CG Horizontal Cabinet with Electric Heat Dimensions
10
1
2
3
4
5
6
10
9
D
7
8
1
2
3
4
—
—
—
—
5
6
7
8
9
10
—
—
—
—
—
—
NOTES:
1. Right hand unit shown; left hand unit opposite.
2. Internal factory valve package and drains may not align with cabinet
knockouts.
3. Dimensions shown in inches (mm). All dimensions are ±1/4 inches.
4. Bottom panel is Arctic White polyester powder coat paint.
LEGEND
Junction Box
L-shape Drip Lip (optional, shipped loose)
Chilled/Hot Water Supply and Return Connection
Resilient Mounting Grommets with 3/8-in. Diameter Hole
(typically 4)
Electrical Knockout, 7/8-in. Diameter
Drain Knockout, 11/2-in. Diameter
Stamped Return Air Grille and 1-in. Filter
Condensate Drain Connection, 7/8-in. OD
Hinged Bottom Return Air Panel
Supply Duct Collar, 1-in. OD
A42-4149
DIMENSIONS (in.)
QTY/UNIT
UNIT
SIZE
NOM
AIRFLOW
(Cfm)
A
B
C
D
E
F
Blower
Motor
02
03
04
06
08
10
12
200
300
400
600
800
1000
1200
35
35
41
53
53
75
75
16
20
26
31
38
52
60
123/4
83/4
83/4
153/4
83/4
163/4
83/4
37
37
43
55
55
77
77
32
32
38
50
50
72
72
6
6
6
7
7
7
7
1
1
2
2
2
4
4
1
1
1
1
1
2
2
BOTTOM
RETURN
FILTER SIZE
(in.)
UNIT WEIGHT*
(lb)
10 x 231/2
10 x 28
10 x 321/2
10 x 37
10 x 41
10 x 541/2
10 x 63
115
120
135
150
155
227
241
*Unit weights are based on dry coils and minimum rows. Weights exclude packaging, valves, and other components.
Fig. 7 — 42CK Horizontal Cabinet Unit with Telescopic Access Panel,
Front Supply, and Bottom Return Dimensions
11
12
11
9
13
10
a42-4150
1
2
3
4
5
6
—
—
—
—
—
—
7
8
9
10
11
12
13
—
—
—
—
—
—
—
LEGEND
Contactor Box
Strip Heater High Limit
Electric Strip Heater Element
L-shape Drip Lip (optional, shipped loose)
Chilled/Hot Water Supply and Return Connection
Resilient Mounting Grommets with 3/8-in. Diameter Hole
(typically 4)
Electrical Knockout, 7/8-in. Diameter
Drain Knockout, 11/2-in. Diameter
Stamped Return Air Grille and 1-in. Filter
Condensate Drain Connection, 7/8-in. OD
Hinged Bottom Return Air Panel
Supply Duct Collar, 1-in. OD
Drain Pan
NOTES:
1. Right hand unit shown; left hand unit opposite.
2. Internal factory valve package and drains may not align with
cabinet knockouts.
3. Dimensions shown in inches (mm). All dimensions are
±1/4 inches.
4. Bottom panel is Arctic White polyester powder coat paint.
DIMENSIONS (in.)
QTY/UNIT
UNIT
SIZE
NOM
AIRFLOW
(Cfm)
A
B
C
D
E
F
Blower
Motor
02
03
04
06
08
10
12
200
300
400
600
800
1000
1200
35
35
41
53
53
75
75
16
20
26
31
38
52
60
123/4
83/4
83/4
153/4
83/4
163/4
83/4
37
37
43
55
55
77
77
32
32
38
50
50
72
72
6
6
6
7
7
7
7
1
1
2
2
2
4
4
1
1
1
1
1
2
2
BOTTOM
RETURN
FILTER SIZE
(in.)
UNIT WEIGHT*
(lb)
10 x 231/2
10 x 28
10 x 321/2
10 x 37
10 x 41
10 x 541/2
10 x 63
117
122
137
152
157
229
243
*Unit weights are based on dry coils and minimum rows. Weights exclude packaging, valves, and other components.
Fig. 8 — 42CK Horizontal Cabinet Unit with Telescopic Access Panel,
Front Supply, Bottom Return, and Heater Dimensions
12
2
1
3
4
5
6
7
8
11
10
9
1
2
3
4
5
—
—
—
—
—
6
7
8
9
10
11
—
—
—
—
—
—
LEGEND
Junction Box
1-in. Ducted Rear Return and 1-in. Filter
L-shape Drip Lip (optional, shipped loose)
Chilled/Hot Water Supply and Return Connection
Resilient Mounting Grommets with 3/8-in. Diameter Hole
(typically 4)
Electrical Knockout, 7/8-in. Diameter
Drain Knockout, 11/2-in. Diameter
1-in. Ducted Rear Return and 1-in. Filter
Condensate Drain Connection, 7/8-in. OD
Hinged Bottom Return Air Panel
Supply Duct Collar, 1-in. OD
NOTES:
1. Right hand unit shown; left hand unit opposite.
2. Internal factory valve package and drains may not align with
cabinet knockouts.
3. Dimensions shown in inches (mm). All dimensions are
±1/4 inches.
4. Bottom panel is Arctic White polyester powder coat paint.
a42-4151
UNIT
SIZE
NOM
AIRFLOW
(Cfm)
DIMENSIONS (in.)
QTY/UNIT
A
B
C
D
E
F
Blower
Motor
REAR RETURN
FILTER SIZE (in.)
UNIT WEIGHT*
(lb)
02
03
04
06
08
10
12
200
300
400
600
800
1000
1200
35
35
41
53
53
75
75
16
20
26
31
38
52
60
123/4
83/4
83/4
153/4
83/4
163/4
83/4
37
37
43
55
55
77
77
32
32
38
50
50
72
72
6
6
6
7
7
7
7
1
1
2
2
2
4
4
1
1
1
1
1
2
2
7 x 21
7 x 21
7 x 27
7 x 38
7 x 38
7 x 52
7 x 52
115
120
135
150
155
227
241
*Unit weights are based on dry coils and minimum rows. Weights exclude packaging, valves, and other components.
Fig. 9 — 42CK Horizontal Cabinet Unit with Telescopic Access Panel,
Front Supply, and Rear Return Dimensions
13
14
1
2
3
4
5
6
7
—
—
—
—
—
—
—
8
9
10
11
12
13
14
—
—
—
—
—
—
—
LEGEND
Contactor Box
Strip Heater High Limit
Electric Strip Heater Element
1-in. Ducted Rear Return and 1-in. Filter
L-shape Drip Lip (optional, shipped loose)
Chilled/Hot Water Supply and Return Connection
Resilient Mounting Grommets with 3/8-in. Diameter Hole
(typically 4)
Electrical Knockout, 7/8-in. Diameter
Drain Knockout,11/2-in. Diameter
1-in. Ducted Rear Return and 1-in. Filter
Condensate Drain Connection, 7/8-in. OD
Hinged Bottom Return Air Panel
Supply Duct Collar, 1-in. OD
Drain Pan
NOTES:
1. Right hand unit shown; left hand unit opposite.
2. Internal factory valve package and drains may not align
with cabinet knockouts.
3. Dimensions shown in inches (mm). All dimensions are
±1/4 inches.
4. Bottom panel is Arctic White polyester powder coat paint.
a42-4152
UNIT
SIZE
NOM
AIRFLOW
(Cfm)
A
B
DIMENSIONS (in.)
C
D
E
F
Blower
QTY/UNIT
Motor
REAR RETURN
FILTER SIZE (in.)
UNIT WEIGHT*
(lb)
02
03
04
06
08
10
12
200
300
400
600
800
1000
1200
35
35
41
53
53
75
75
16
20
26
31
38
52
60
123/4
83/4
83/4
153/4
83/4
163/4
83/4
37
37
43
55
55
77
77
32
32
38
50
50
72
72
6
6
6
7
7
7
7
1
1
2
2
2
4
4
1
1
1
1
1
2
2
7 x 21
7 x 21
7 x 27
7 x 38
7 x 38
7 x 52
7 x 52
117
122
137
152
157
229
243
*Unit weights are based on dry coils and minimum rows. Weights exclude packaging, valves, and other components.
Fig. 10 — 42CK Horizontal Cabinet Unit with Telescopic Access Panel,
Front Supply, Rear Return, and Heater Dimensions
14
LEGEND
1 — Junction Box, 4 in. x 4 in.
2 — Drip Lip (optional, shipped loose)
3 — Mounting Holes (4), Rubber Grommets
have 3/8-in. Diameter Hole
4 — Piping Knockout, 11/2-in. Diameter
5 — Electrical Knockout, 7/8-in. Diameter
6 — Drain Knockout, 11/2-in. Diameter
7 — Supply Duct Collar
8 — Return Connection, 5/8-in. OD
9 — Optional Rear Return. Consult factory for
collar dimensions
10 — Drain, 7/8-in. OD
11 — Stamped Bottom Return Air Grille
12 — Filter
13 — Stamped Air Supply Grille
14 — Hinged Bottom Access Panel
15 — Supply Connection, 5/8-in. OD
NOTES:
1. Right hand unit shown; left hand unit opposite. Coil connection
locations are ±5/8-inch.
2. Unit sizes 02 and 03 have one motor, one blower; sizes 04
through 08 have one motor, 2 blowers; sizes 10 and 12 have
2 motors, 4 blowers.
3. Bottom access panel has an Arctic White baked finish.
4. Refer to supply and return connections above for coil stub-out
locations.
5. Not shown: 3-speed fan switch; wall plate; 1/2-in. fiberglass
insulation on inside of casing, closed cell foam on main drain
pan.
6. For optional coil connections, view 42CA-203-1 using the Fan
Coil Builder.
7. Valve package is factory-installed inside the cabinet when
ordered with the unit (based on component size).
8. Bottom return or bottom supply is an ETO (engineering to order)
request.
A42-4107
9. Dimensions shown in inches (mm).
UNIT
SIZE
NOM
AIRFLOW
(Cfm)
DIMENSIONS (in.)
A
D
02
03
04
06
08
10
12
200
300
400
600
800
1000
1200
35
35
41
53
53
75
75
37
37
43
55
55
77
77
QTY/UNIT
E
Blower
Motor
FACE AREA
(sq ft)
UNIT WEIGHT*
(lb)
32
32
38
50
50
72
72
1
1
2
2
2
4
4
1
1
1
1
1
2
2
0.83
1.08
1.35
1.88
2.31
3.16
3.65
115
120
135
150
155
227
241
*Unit weights are based on dry coils and minimum rows. Weights exclude packaging, valves, and other components.
Fig. 11 — 42CK Horizontal Cabinet Unit with Telescopic Access Panel Dimensions
15
1—
2—
3—
4—
5—
6—
7—
8—
9—
10 —
11 —
12 —
13 —
14 —
15 —
16 —
17 —
LEGEND
Junction Box, 4 in. x 4 in.
Strip Heater High Limit
Electric Strip Heater Element
Drip Lip (optional, shipped loose)
Mounting Holes (4), Rubber Grommets
have 3/8-in. Diameter Hole
Piping Knockout, 11/2-in. Diameter
Electrical Knockout, 7/8-in. Diameter
Drain Knockout, 11/2-in. Diameter
Supply Duct Collar
Optional Rear Return. Consult factory for
collar dimensions.
Drain, 7/8-in. OD
Stamped Bottom Return Air Grille
Filter
Stamped Air Supply Grille
Hinged Bottom Access Panel
Supply Connection, 5/8-in. OD
Return Connection, 5/8-in. OD
NOTES:
1. Right hand unit shown; left hand unit opposite. Coil connection
locations are ±5/8-inch.
2. Unit sizes 02 and 03 have one motor, one blower; sizes 04
through 08 have one motor, 2 blowers; sizes 10 and 12 have
2 motors, 4 blowers.
3. Bottom access panel has an Arctic White baked finish.
4. Refer to supply and return connections above for coil stub-out
locations.
5. Not shown: 3-speed fan switch; wall plate; 1/2-in. fiberglass
insulation on inside of casing; closed cell foam on main drain
pan.
6. For optional coil connections, view 42CA-203-1 using the Fan
Coil Builder.
7. Valve package is factory-installed inside the cabinet when
ordered with the unit (based on component size).
8. Bottom return or bottom supply is an ETO (engineering to order)
request.
9. Dimensions shown in inches (mm).
A42-4108
DIMENSIONS (in.)
QTY/UNIT
UNIT SIZE
NOM AIRFLOW
(Cfm)
A
D
E
Blower
Motor
FACE AREA
(sq ft)
UNIT WEIGHT*
(lb)
02
03
04
06
08
10
12
200
300
400
600
800
1000
1200
35
35
41
53
53
75
75
37
37
43
55
55
77
77
32
32
38
50
50
72
72
1
1
2
2
2
4
4
1
1
1
1
1
2
2
0.83
1.08
1.35
1.88
2.31
3.16
3.65
117
122
137
152
157
229
243
*Unit weights are based on dry coils and minimum rows. Weights exclude packaging, valves, and other components.
Fig. 12 — 42CK Horizontal Cabinet with Telescopic Access Panel and Electric Heat Dimensions
16
FRONT VIEW
a42-4381
NOTES:
1. Right hand unit shown; left hand unit opposite.
2. Dimensions shown in inches (mm). All dimensions are
±1/4 inches.
DIMENSIONS (in.)
QTY/UNIT
UNIT
SIZE
A
B
C
D
Blower
Motor
UNIT WEIGHT*
(lb)
02
03
04
06
08
10
12
243/16
243/16
343/16
443/16
463/16
603/16
683/16
22
22
32
42
44
58
66
23
23
33
43
45
59
67
16
18
26
36
38
52
60
1
1
2
2
2
4
4
1
1
1
1
1
2
2
42
47
57
77
79
108
127
*Unit weights are based on dry coils and minimum rows. Weights exclude packaging, valves, and other components.
Fig. 13 — 42VA Furred-In Vertical Unit Dimensions
17
a42-4382
NOTES:
1. Right hand unit shown; left hand unit opposite.
2. Dimensions shown in inches (mm). All dimensions are
±1/4 inches.
DIMENSIONS (in.)
QTY/UNIT
UNIT
SIZE
A
B
C
D
Blower
Motor
UNIT WEIGHT*
(lb)
02
03
04
06
08
10
12
243/16
243/16
343/16
443/16
463/16
603/16
683/16
22
22
32
42
44
58
66
23
23
33
43
45
59
67
16
18
26
36
38
52
60
1
1
2
2
2
4
4
1
1
1
1
1
2
2
42
47
57
77
79
108
127
*Unit weights are based on dry coils and minimum rows. Weights exclude packaging, valves, and other components.
Fig. 14 — 42VA Furred-In Unit with Electric Heat Dimensions
18
a42-4383
NOTES:
1. Right hand unit shown; left hand unit opposite.
2. Dimensions shown in inches (mm). All dimensions are
±1/4 inches.
DIMENSIONS (in.)
QTY/UNIT
UNIT
SIZE
A
B
C
D
E
Blower
Motor
UNIT WEIGHT*
(lb)
02
03
04
06
08
10
12
41
41
51
61
63
77
85
22
22
32
42
44
58
66
23
23
33
43
45
59
67
171/4
171/4
26
39
39
521/8
61
31/8
31/8
33/4
21/4
31/4
35/8
31/4
1
1
2
2
2
4
4
1
1
1
1
1
2
2
63
68
82
99
101
133
154
*Unit weights are based on dry coils and minimum rows. Weights exclude packaging, valves, and other components.
Fig. 15 — 42VB Vertical Cabinet Unit Dimensions
19
a42-4384
NOTES:
1. Right hand unit shown; left hand unit opposite.
2. Dimensions shown in inches (mm). All dimensions are
±1/4 inches.
DIMENSIONS (in.)
QTY/UNIT
UNIT
SIZE
A
B
C
D
E
Blower
Motor
UNIT WEIGHT*
(lb)
02
03
04
06
08
10
12
41
41
51
61
63
77
85
22
22
32
42
44
58
66
23
23
33
43
45
59
67
171/4
171/4
26
39
39
521/8
61
31/8
31/8
33/4
21/4
31/4
35/8
31/4
1
1
2
2
2
4
4
1
1
1
1
1
2
2
63
68
82
99
101
133
154
*Unit weights are based on dry coils and minimum rows. Weights exclude packaging, valves, and other components.
Fig. 16 — 42VB Vertical Cabinet Unit with Electric Heater Dimensions
20
a42-4385
NOTES:
1. Right hand unit shown; left hand unit opposite.
2. Dimensions shown in inches (mm). All dimensions are
±1/4 inches.
DIMENSIONS (in.)
QTY/UNIT
UNIT
SIZE
A
B
C
D
E
Blower
Motor
UNIT WEIGHT*
(lb)
02
03
04
06
08
10
12
41
41
51
61
63
77
85
22
22
32
42
44
58
66
23
23
33
43
45
59
67
171/4
171/4
26
39
39
521/8
61
31/8
31/8
33/4
21/4
31/4
35/8
31/4
1
1
2
2
2
4
4
1
1
1
1
1
2
2
64
69
83
100
102
135
156
*Unit weights are based on dry coils and minimum rows. Weights exclude packaging, valves, and other components.
Fig. 17 — 42VF Vertical Cabinet Unit with Slant Top Dimensions
21
a42-4386
NOTES:
1. Right hand unit shown; left hand unit opposite.
2. Dimensions shown in inches (mm). All dimensions are
±1/4 inches.
DIMENSIONS (in.)
QTY/UNIT
UNIT
SIZE
A
B
C
D
E
Blower
Motor
UNIT WEIGHT*
(lb)
02
03
04
06
08
10
12
41
41
51
61
63
77
85
22
22
32
42
44
58
66
23
23
33
43
45
59
67
171/4
171/4
26
39
39
521/8
61
31/8
31/8
33/4
21/4
31/4
35/8
31/4
1
1
2
2
2
4
4
1
1
1
1
1
2
2
64
69
83
100
102
135
156
*Unit weights are based on dry coils and minimum rows. Weights exclude packaging, valves, and other components.
Fig. 18 — 42VF Vertical Cabinet Unit with Slant Top and Electric Heater Dimensions
22
14-3/8
(368)
1
2
3
4
5
6
7
8
—
—
—
—
—
—
—
—
NOTES:
1. Right hand unit shown; left hand unit opposite. Coil connection
locations are ± 5/8-inch.
2. Unit sizes 02 through 04 have one motor, 2 blowers; size 06
has 2 motors, 4 blowers.
3. Standard 2-row coil shown.
4. Optional unit-mounted switch box and controls, when specified,
are installed on opposite side from cooling connections.
5. Height increases by 2 in. with electric heat.
6. Not shown: 3-speed fan switch, 1/2-in. fiberglass insulation on
inside of casing, closed cell foam on main drain pan.
7. Units have galvanized finish.
8. For optional coil connections, view 42VC-203-1 using the Fan
Coil Builder.
A42-4112
9. Dimensions shown in inches (mm).
LEGEND
Optional Unit Mounted Control Box
Drain Pan, Auxiliary, Shipped Loose
Supply Conn, 5/8-in. OD
Drain, 3/4-in. MPT
Return Conn, 5/8-in. OD
Air Vent, 1/8-in. MPT
Discharge Opening
Filter
UNIT SIZE
NOM
AIRFLOW
(Cfm)
DIMENSIONS (in.)
QTY/UNIT
A
B
C
Blower
Motor
FACE AREA
(sq ft)
UNIT WEIGHT*
(lb)
02
03
04
06
200
300
400
600
23
28
36
50
22
27
35
49
17
22
30
44
2
2
2
4
1
1
1
2
1.18
1.53
2.08
3.06
50
60
72
110
*Unit weights are based on dry coils and minimum rows. Weights exclude packaging, valves, and other components.
Fig. 19 — 42VC Furred-In Lowboy Unit Dimensions
23
1—
2—
3—
4—
5—
6—
7—
8—
9—
LEGEND
Unit-Mounted Control Box (Optional)
Drain Pan, Auxiliary, Shipped Loose
Air Vent, 1/8-in. MPT
Supply Conn, 5/8-in. OD
Drain, 3/4-in. MPT
Return Conn, 5/8-in. OD
Filter
Electrical Sheath Heater Element
Discharge Opening
NOTES:
1. Right hand unit shown; left hand unit opposite. Coil connection
locations are ± 5/8-inch.
2. Unit sizes 02 through 04 have one motor, 2 blowers; size 06 has
2 motors, 4 blowers.
3. Standard 2-row coil shown.
4. Optional unit-mounted switch box and controls, when specified,
are installed on opposite side from cooling connections.
5. Height increases by 2 in. with electric heat.
6. Not shown: 3-speed fan switch, 1/2-in. fiberglass insulation on
inside of casing, closed cell foam on main drain pan.
7. Units have galvanized finish.
8. For optional coil connections, view 42VC-203-1 using the Fan Coil
Builder.
9. Dimensions shown in inches (mm).
A42-4113
UNIT SIZE
NOM
AIRFLOW
(Cfm)
DIMENSIONS (in.)
QTY/UNIT
A
B
C
Blower
Motor
FACE AREA
(sq ft)
UNIT WEIGHT*
(lb)
02
03
04
06
200
300
400
600
23
28
36
50
22
27
35
49
17
22
30
44
2
2
2
4
1
1
1
2
1.18
1.53
2.08
3.06
50
60
72
110
*Unit weights are based on dry coils and minimum rows. Weights exclude packaging, valves, and other components.
Fig. 20 — 42VC Furred-In Lowboy Unit with Electric Heat Dimensions
24
14-3/8
(368)
NOTES:
1. Right hand unit shown; left hand unit opposite. Coil connection
locations are ± 5/8-inch.
2. Unit sizes 02 through 04 have one motor, 2 blowers; size 06 has
2 motors, 4 blowers.
3. Cabinet has an Arctic White baked finish.
4. Height increases by 2 in. with electric heat.
5. Standard 2-row coil shown.
6. Not shown: 1/2-in. fiberglass insulation on inside of casing,
closed cell foam on main drain pan.
7. For optional coil connections, view 42VC-203-1 using the Fan
Coil Builder.
8. Valve package is factory-installed inside the cabinet when
ordered with the unit (based on component size).
A42-4114
9. Dimensions shown in inches (mm).
LEGEND
Fan Switch, 3-Speed, behind Access Door
Front Panel Fastener
Stamped Supply Grille
Supply Conn, 5/8-in. OD
Return Conn, 5/8-in. OD
Stamped Return Grille
Filter
Air Vent, 1/8-in. MPT
Optional Valve Package (inside cabinet)
Drain Pan, Auxiliary, with 3/4-in. MPT
Drain Connection
11 — Return Air Grille
1—
2—
3—
4—
5—
6—
7—
8—
9—
10 —
UNIT SIZE
NOM
AIRFLOW
(Cfm)
DIMENSIONS (in.)
QTY/UNIT
A
B
C
D
Blower
Motor
02
03
04
06
200
300
400
600
41
46
54
68
22
27
35
49
33/4
4
35/8
41/16
17
211/2
301/4
433/8
2
2
2
4
1
1
1
2
FACE AREA UNIT WEIGHT*
(sq ft)
(lb)
*Unit weights are based on dry coils and minimum rows. Weights exclude packaging, valves, and other components.
Fig. 21 — 42VE Cabinet Lowboy Unit Dimensions
25
1.18
1.53
2.08
3.06
72
100
108
154
NOTES:
1. Right hand unit shown; left hand unit opposite. Coil connection
locations are ± 5/8-inch.
2. Unit sizes 02 through 04 have one motor, 2 blowers; size 06 has
2 motors, 4 blowers.
3. Cabinet has an Arctic White baked finish.
4. Height increases by 2 in. with electric heat.
5. Standard 2-row coil shown.
6. Not shown: 1/2-in. fiberglass insulation on inside of casing,
closed cell foam on main drain pan.
7. For optional coil connections, view 42VC-203-1 using the Fan
Coil Builder.
8. Valve package is factory-installed inside the cabinet when
ordered with the unit (based on component size).
9. Dimensions shown in inches (mm).
A42-4115
LEGEND
Fan Switch, 3-Speed, behind Access Door
Electrical Sheath Heater Element
Stamped Supply Grille
Supply Conn, 5/8-in. OD
Return Conn, 5/8-in. OD
Stamped Return Grille
Filter
Air Vent, 1/8-in. MPT
Front Panel Fastener
Optional Valve Package (inside cabinet)
Drain Pan, Auxiliary, with 3/4-in. MPT
Drain Connection
12 — Return Air Grille
1—
2—
3—
4—
5—
6—
7—
8—
9—
10 —
11 —
UNIT SIZE
NOM
AIRFLOW
(Cfm)
DIMENSIONS (in.)
QTY/UNIT
A
B
C
D
Blower
02
03
04
06
200
300
400
600
41
46
54
68
22
27
35
49
33/4
4
35/8
41/16
17
211/2
301/4
433/8
2
2
2
4
Motor
FACE AREA
(sq ft)
UNIT
WEIGHT*
(lb)
1
1
1
2
1.18
1.53
2.08
3.06
72
100
108
154
*Unit weights are based on dry coils and minimum rows. Weights exclude packaging, valves, and other components.
Fig. 22 — 42VE Cabinet Lowboy Unit with Electric Heat Dimensions
26
1—
2—
3—
4—
5—
6—
7—
8—
9—
10 —
11 —
LEGEND
Supply Conn, 5/8-in. OD
Air Vent, 1/8-in. MPT
Filter
Return Air Grille, Stamped
Stamped Supply Grille
Return Conn, 5/8-in. OD
Removable Front Panel
Drain Conn, 7/8-in. OD
Auxiliary Drain Pan
Valve Compartment
Junction Box
NOTES:
1. Right hand unit shown; left hand unit opposite. Coil connection
locations are ± 5/8-inch.
2. Front panel has an Arctic White baked finish.
3. Standard 2-row coil shown.
4. Unit size 01 has one motor, one blower; size 03 has 2 motors,
2 blowers.
5. Unit has 1/2-in. flanges for mounting to wall surface.
6. Front panel hooks at top of unit, swing down and snap in at bottom
against a spring clip.
7. Not shown: 3-speed fan switch, wall plate, 1/2-in. fiberglass insulation on inside of casing, closed cell foam on main drain pan.
8. Dimensions shown in inches (mm).
A42-4116
UNIT SIZE
NOM
AIRFLOW
(Cfm)
A
B
DIMENSIONS (in.)
C
D
E
Blower
QTY/UNIT
Motor
UNIT
WEIGHT*
(lb)
01
03
150
300
253/4
393/4
153/4
293/4
14
28
11/2
115/16
123/4
257/8
1
2
1
2
40
74
*Unit weights are based on dry coils and minimum rows. Weights exclude packaging, valves, and other components.
Fig. 23 — 42VG Furred-In Wall Unit Dimensions
27
a42-4120
1—
2—
3—
4—
5—
6—
7—
8—
9—
10 —
11 —
LEGEND
Motor Junction Box
Motor-Blower Assembly
Electric Strip Heater Element (optional)
Auxiliary Drip Lip (optional, shipped loose)
Tell-Tale Drain (optional)
Drain Connection, 7/8-in. OD
Air Vent, 1/8-in. MPT
Supply Connection
Supply Duct Collar, 1 in.
Return Connection
Mounting Holes (four, 3/4-in. diameter) have Rubber
Grommets with 3/8-in. holes.
UNIT SIZE
06
08
10
12
14
16
18
20
NOM
AIRFLOW
(cfm)
600
800
1000
1200
1400
1600
1800
2000
*Unit weights are based on dry coils and minimum rows. Weights
exclude packaging, valves, and other components.
NOTES:
1. Right hand unit shown; left hand unit opposite. Coil connection
locations are ± 5/8 inch.
2. Sizes 06, 08 and 10 have one motor, one blower; sizes 12
through 20 have 2 motors, 2 blowers.
3. Standard 4-row coil shown. Other coil option dimensional data
available on request.
4. For optional coil connections, view 42DA-203-1 using the Fan
Coil Builder.
5. Fan switch, wall plate not shown.
6. Galvanized finish provided as standard.
7. Dimensions are in inches (mm).
DIMENSIONS (in. ± 1/8)
QTY/UNIT
A
A’
B
D’
E
H
Blower
Motor
UNIT
WEIGHT*
(lb)
23
28
32
37
42
47
52
56
32
37
42
47
52
56
62
66
14
19
23
28
33
38
43
47
131/2
131/2
141/2
141/2
141/2
131/2
141/2
141/2
17
22
26
31
36
41
46
50
181/2
231/2
271/2
321/2
371/2
421/2
471/2
511/2
1
1
1
2
2
2
2
2
1
1
1
2
2
2
2
2
64
79
90
108
119
124
141
151
Fig. 24 — 42DA Furred-In Ceiling Unit with Electric Heat Dimensions
28
1—
2—
3—
4—
5—
6—
7—
8—
9—
10 —
11 —
12 —
13 —
14 —
15 —
16 —
UNIT
SIZE
06
08
10
12
14
16
18
20
*Unit weights are based on dry coils and minimum rows. Weights exclude
packaging, valves, and other components.
NOTES:
1. Right hand unit shown; left hand unit opposite. Coil connection locations are
± 5/8 inch.
2. Sizes 06, 08 and 10 have one motor, one blower. Sizes 12 through 20 have
2 motors, 2 blowers.
3. Filter and filter rack are standard.
4. Standard 4-row coil shown. Other coil option dimensional data available on
request.
5. For optional coil connections, view 42DA-203-1 using the Fan Coil Builder.
6. Fan switch, wall plate not shown.
7. Galvanized finish provided as standard.
8. Dimensions are in inches (mm).
LEGEND
Motor Junction Box Opposite Piping
Insulated Return Air Plenum
Mounting Clips (shipped loose)
Electrical Strip Heater Element (optional)
Auxiliary Drip Lip (shipped loose) with 3/8-in. Hole
Tell-Tale Drain (optional)
Drain Connection, 7/8-in. OD
Filter Retainer Angle
Access Panel
Return Duct Collar, 21/2 in.
Air Vent, 1/8-in. MPT
Return Connection
Filter, 1-in.
Supply Duct Collar, 1 in.
Supply Connection
Mounting Holes (four, 3/4-in. diameter) with
Rubber Grommet
NOM
AIRFLOW
(cfm)
600
800
1000
1200
1400
1600
1800
2000
A42-4121
DIMENSIONS (in. ± 1/8)
QTY/UNIT
A
A’
B
D’
E
F
G
H
Blower
Motor
UNIT
WEIGHT*
(lb)
23
28
32
37
42
47
52
56
32
37
42
47
52
56
62
66
14
19
23
28
33
38
43
47
131/2
131/2
141/2
141/2
141/2
131/2
141/2
141/2
17
22
26
31
36
41
46
50
21
26
30
35
40
45
50
54
251/4
301/4
341/4
391/4
441/4
491/4
541/4
581/4
181/2
231/2
271/2
321/2
371/2
421/2
471/2
511/2
1
1
1
2
2
2
2
2
1
1
1
2
2
2
2
2
94
107
150
169
174
178
195
220
Fig. 25 — 42DC Furred-In Ceiling Unit with Plenum and Electric Heat Dimensions
29
A42-4122
SEE NOTE 8
1—
2—
3—
4—
5—
6—
7—
8—
9—
10 —
11 —
12 —
LEGEND
Motor Junction Box
Air Vent, 1/8-in. MPT
Return Connection
Optional 6-in. Legs
Bottom Return (optional)
Return Air Opening
Supply Connection
Drain Connection, 7/8-in. OD
Front Access Panel
Filter, Throwaway
Electric Strip Heater Element (optional)
Supply Duct Connection, 1-in.
UNIT
SIZE
06
08
10
12
14
16
18
20
NOM
AIRFLOW
(cfm)
600
800
1000
1200
1400
1600
1800
2000
*Unit weights are based on dry coils and minimum rows. Weights exclude packaging,
valves, and other components.
NOTES:
1. Right hand unit shown; left hand unit opposite. Coil connection locations are
± 5/8 inch.
2. Standard 4-row coil shown. Other coil option dimensional data available on
request.
3. Sizes 06, 08 and 10 have one motor, one blower. Sizes 12 through 20 have
2 motors, 2 blowers.
4. Supply and return connections terminate within unit when valves are factory
installed.
5. For optional coil connections, view 42DD-203-1 using the Fan Coil Builder.
6. Fan switch and wall plate are not shown.
7. Galvanized finish provided as standard.
8. Units with internal factory valve packages have external connections located in
triangular section above coil.
9. Consult Carrier for ducted front return air and external filter rack with 1-in. duct
collar and throwaway filters.
10. Units with electric heat require additional access on the side of unit for servicing
contactor box.
11. With bottom return, access to filter is through the front access panel.
12. Dimensions are in inches (mm).
DIMENSIONS (in. ± 1/8)
QTY/UNIT
A
B
C
Blower
Motor
23
28
32
37
42
47
52
56
21
26
30
35
40
45
50
54
15
20
24
29
34
39
44
48
1
1
1
2
2
2
2
2
1
1
1
2
2
2
2
2
Fig. 26 — 42DD Vertical Unit with Full Casing and Electric Heat Dimensions
30
UNIT
WEIGHT*
(lb)
135
145
155
180
190
200
215
230
LEGEND
1 — Motor Junction Box
2 — Unit Mounting Channel (2), 14-gage; 4
Mounting Slots, 1/2-in. x 2-in.
3 — Auxiliary Drip Lip (optional, shipped loose)
4 — Side Access Panels
5 — Electrical Strip Heater Element (optional)
6 — Supply Air Duct Connection, 1 in.
7 — Manual Air Vent
8 — Filter, Throwaway, 1-in.
9 — Return Air Duct Connection, 21/2 in.
10 — Drain, 7/8-in. OD
11 — Bottom Access Panel
12 — Drain Pan
13 — Coil Inlet, Copper Sweat Connection
14 — Coil Outlet, Copper Sweat Connection
UNIT SIZE
NOM AIRFLOW
(cfm)
06
08
10
12
14
16
18
20
600
800
1000
1200
1400
1600
1800
2000
A
31
36
40
45
50
55
60
64
*Unit weights are based on dry coils and minimum rows. Weights exclude packaging,
valves, and other components.
NOTES:
1. Right hand unit shown; left hand unit opposite.
2. Coil stub-out location data available on request.
3. Unit fabricated of galvanized steel.
4. Internal parts fabricated of galvanized steel.
5. Sizes 06, 08 and 10 have one motor, one blower. Sizes 12 through 20 have
2 motors, 2 blowers.
6. Units must have drain line pitched and trapped externally.
7. For optional coil connections, view 42DA-203-1 using the Fan Coil Builder.
8. Fan switch, wall plate not shown.
9. Galvanized finished provided as standard.
10. Dimensions are in inches (mm).
A42-4123
DIMENSIONS (in. ± 1/8)
B
C
15
15
20
20
24
24
29
29
34
34
39
39
44
44
48
48
QTY/UNIT
D
26
31
35
40
45
50
55
59
Blower
Motor
UNIT WEIGHT*
(lb)
1
1
1
2
2
2
2
2
1
1
1
2
2
2
2
2
150
160
170
195
205
215
230
235
Fig. 27 — 42DE Ceiling Unit with Full Casing and Electric Heat Dimensions
31
1
2
3
4
5
6
7
8
9
10
11
12
13
14
LEGEND
—Junction Box
—Return Air Grille, Hinged, Bar Type, with
Filter Frame (Anodized Aluminum Only)
—Unit Mounting Channel (2), 14-gage; 4
Mounting Slots, 1/2 in. x 2-in.
—Auxiliary Drip Lip
—Electric Strip Heater Element (optional)
—Coil Inlet, Copper Sweat Connection
—Coil Outlet, Copper Sweat Connection
—Manual Air Vent
—Filter, Throwaway
—Bottom Access Panel
—Drain, 7/8-in. OD
—Drain Pan Insulated with Styrofoam
—Side Access Panel (2)
—Supply Air Grille (Double Deflection)
UNIT SIZE
NOM AIRFLOW
(cfm)
06
08
10
12
14
16
18
20
600
800
1000
1200
1400
1600
1800
2000
A
31
36
40
45
50
55
60
64
*Unit weights are based on dry coils and minimum rows. Weights exclude packaging,
valves, and other components.
NOTES:
1. Right hand unit shown; left hand unit opposite.
2. Coil stub-out connection data available on request.
3. Units fabricated of galvanized steel with an Arctic White baked finish.
4. Internal parts fabricated of galvanized steel.
5. Sizes 06, 08 and 10 have one motor, one blower. Sizes 12 through 20 have
2 motors, 2 blowers.
6. Units must have drain line pitched and trapped externally.
7. Stamped supply and return grilles are not available.
8. Bottom return air is not available.
9. For optional coil connections, view 42DA-203-1 using the Fan Coil Builder.
10. Fan switch and wall plate are not shown.
11. Dimensions are in inches (mm).
A42-4124
DIMENSIONS (in. ± 1/8)
B
C
D
14
26
131/2
181/2
20
31
221/2
24
35
28
40
271/2
321/2
34
45
371/2
38
50
44
55
421/2
461/2
48
59
E
81/2
8
8
81/2
8
81/2
8
8
QTY/UNIT
Blower
Motor
1
1
1
1
1
1
2
2
2
2
2
2
2
2
2
2
UNIT WEIGHT*
(lb)
150
160
170
195
205
215
230
235
Fig. 28 — 42DF Exposed Ceiling Unit with Supply and Return Grille and Electric Heat Dimensions
32
24
CR
CS
D
HR
HS
R
S
—
—
—
—
—
—
—
ITEM
1
2
3
4
5
LEGEND
Cold Water Return
Cold Water Supply
Drain
Hot Water Return
Hot Water Supply
Return
Supply
DESCRIPTION
Electrical Knockouts
3-in. Expanded Section
Strip Heater (Optional)
Limit Switch**†† (Optional)
1/ -in.
2
Isolation Ball Valves**
QTY
1
3/5
1
1
2/4
6
Flexible Drain Tube/P-Trap
1
7
Coil 1/2-in. OD Copper Tube
1
8
9
10
11
12
13
14
15
16
17
18
19
20
21
22
Filter, Throwaway, 1-in.**
Return Air Opening
Air Vent, Manual
Molex Connector for Field-Installed Stat
Control Box
Knockout (For Optional Remote Mounting)
Riser, Supply and Return (Copper)
Riser, Drain (Copper)
Drain Pan
Acoustical Bypass Panel
Blower
Motor, 3-Speed, PSC, with Quick Connect
Access Panel (Control Box)
Control Opening (Surface Mount Stat)
Duct Collar, 1/2-in. Extension (Typical)
23
Supply Air Opening(s)
Top Supply Collar 1-in Extension
(Optional)
24
1
1
1
1
1
2
2/4
1
1
1
1
1
1
1
*Drawing provided for reference only. Dimensions may vary with options ordered.
NOTES:
1. Units are fabricated of galvanized steel with a 16-gage galvanized fan deck.
2. All risers are insulated with (1/2-in. or 3/4-in. thick) closed cell insulation.
3. Thermostats shipped loose for field connection.
4. Risers are piped to coil with valves as specified.
5. Blower, motor, valves, coil, and filter are accessible through the return air opening.
6. Unit and control box are insulated.
7. Riser length = [(floor to floor) +2 in.], maximum riser length = 119 inches.
8. Maximum riser size is 21/2-in. diameter. If larger sizes are required, please consult the factory.
9. Expansion loops in hot water heating circuits as required.
10. A 9-in. x 21/4-in. slot is provided in the inside back panel for coil connection penetration to permit expansion
and contraction of risers. Care must be taken to position the risers so that coil connection is at center of slot.
11. Drawing is pictorial (see unit arrangements for actual supply and return air orientation).
12. All dimensions are in inches.
A42-4125
DIMENSIONS (in.)
Double Supply
Top Supply
A
B
C
D
14
6
14
10
UNIT
SIZE
NOM
AIRFLOW
(cfm)
03
300
04
400
14
12
14
6
14
10
06
600
18
10
18
6
16
08
800
18
12
18
6
10
1000
—
—
22
12
1200
—
—
22
Single Supply
A
B
14
8
E
G
H
I
UNIT
WEIGHT†
(lb)
17
11/2
11/2
14
180
17
11/2
11/2
14
225
12
20
1
2
18
240
16
12
20
1
2
18
260
8
18
16
24
1
3
22
280
8
18
16
24
1
3
22
305
1/2/3
1/2/3
†Unit weights are based on dry coils and minimum rows. Weights exclude packaging, valves, and other components.
1
**Factory-Installed.
††Field-Installed.
Fig. 29 — 42SG Furred-In Stack Dimensions
33
23
22
21
20
19
CR
CS
D
HR
HS
R
S
—
—
—
—
—
—
—
ITEM
1
LEGEND
Cold Water Return
Cold Water Supply
Drain
Hot Water Return
Hot Water Supply
Return
Supply
DESCRIPTION
Full Riser Chase
QTY
1
2
3
4
5
6
Electrical Knockouts
3-in. Expansion Section
Strip Heater (Optional)
Limit Switch**†† (Optional)
1/ -in. Isolation Ball Valves**
2
7
8
9
Flexible Drain Tube/P-Trap
Drain Pan
Coil 1/2-in. OD Tube
1
1
Filter, Throwaway, 1-in.**
Air Vent, Manual
Control Box
Cabinet Camloc® Fasteners
1
1
1
14
3-Speed Switch (Optional)
15
16
17
18
19
20
21
22
23
Electrical Access Panel
Riser, Supply and Return (Copper)
Riser, Drain (Copper)
Return Air Panel
Motor, 3-Speed, PSC
Blower
Thermostat (Optional)
Hinged Control Access Door
Double Deflection Steel Core Grille Assembly
10
11
12
13
1
3/5
1
1
2/4
*Drawing provided for reference only. Dimensions may vary with options ordered.
NOTES:
1. Units are fabricated of 18-gage galvanized steel with a 16-gage galvanized fan deck, painted with Arctic White.
2. Risers are piped to coil with valves as specified.
3. Blower, motor, valves, coil, and filter are accessible through the return air opening.
4. Unit and control box are insulated.
5. Riser length = [(floor to floor) +2 in.], maximum riser length = 119 inches.
6. Maximum riser size is 21/2-in. diameter. If larger sizes are required, please consult the factory.
7. Expansion loops in hot water heating circuits as required.
8. A 9-in. x 21/4-in. slot is provided in the inside back panel for coil connection penetration to permit expansion and
contraction of risers. Care must be taken to position the risers so that coil connection is at center of slot.
9. Drawing is pictorial (see unit arrangements for actual supply and return air orientation).
10. 42SHA available in front return only.
11. All dimensions are in inches.
a42-4303
1
DIMENSIONS (in.)
Double Supply
C
D
A
B
14
6
17
223/8
E
F
G
UNIT
WEIGHT†
(lb)
21/2
221/8
143/4
202
17
223/8
21/2
221/8
143/4
247
8
20
253/8
21/2
265/8
173/4
262
14
10
20
253/8
21/2
265/8
173/4
286
16
14
12
24
293/8
21/2
311/8
173/4
311
16
14
12
24
293/8
21/2
311/8
173/4
336
UNIT
SIZE
NOM
AIRFLOW
(cfm)
1
03
300
1
2/4
1
1
1
1
1
1
1
04
400
14
12
14
8
06
600
14
12
14
08
800
14
16
10
1000
18
12
1200
18
2
Single Supply
A
B
14
8
†Unit weights are based on dry coils and minimum rows. Weights exclude packaging, valves, and other components.
**Factory-Installed.
††Field-Installed.
Fig. 30 — 42SH Cabinet Dimensions
34
26
CR —
CS —
D —
HR —
HS —
R —
S —
ITEM
1
LEGEND
Cold Water Return
Cold Water Supply
Drain
Hot Water Return
Hot Water Supply
Return
Supply
DESCRIPTION
Electrical Knockouts
QTY
6
2
Gypsum Board, 5/8-in. Type “X”
3
4
5
6
3-in. Expanded Section
Strip Heater**(Optional)
Limit Switch**†† (Optional)
3/5
2
2
1/ -in.
2
4/8
7
Thermafiber Insulation
2
8
9
Flexible Drain Tube/P-Trap
Coil 1/2-in. OD Copper Tube
2
1
Isolation Ball Valves**
2
10
11
12
13
14
15
16
17
18
19
Filter, Throwaway, 1-in.**
Return Air Opening
Air Vent, Manual
Knockout (For Optional Remote Mounting)
Molex Connector for Field Installed Stat
Control Box
Riser, Drain (Copper)
Riser, Supply and Return (Copper)
Drain Pan
Return Air Blockoff Panel (Optional)
2
2
2
2
2
2
1
2/4
2
20
21
22
23
24
Blower
Motor, 3-Speed, PSC, with Quick Connect
Access Panel (Control Box)
Control Opening (Surface Mount Stat)
Duct Collar, 1/2-in. Extension (Typical)
2
2
2
2
25
Supply Air Opening(s)
Top Supply Duct Collar, 1-in. Extension
(Optional)
26
1
*Drawing provided for reference only. Dimensions may vary with options ordered.
NOTES:
1. Units are fabricated of 18-gage galvanized steel with a 16-gage galvanized fan deck.
2. All risers are insulated with closed cell insulation.
3. Thermostats shipped loose for field connection.
4. Risers are piped to coil with valves as specified.
5. Blower, motor, valves, coil, and filter are accessible through the return air opening.
6. Unit and control box are insulated.
7. Riser length = [(floor to floor) +2 in.], maximum riser length = 119 inches.
8. Maximum riser size is 21/2-in. diameter. If larger sizes are required, please consult the factory.
9. Expansion loops in hot water heating circuits as required.
10. A 9-in. x 21/4-in. slot is provided in the inside back panel for coil connection penetration to permit expansion
and contraction of risers. Care must be taken to position the risers so that coil connection is at center of slot.
11. Drawing is pictorial (see unit arrangements for actual supply and return air orientation).
12. All dimensions are in inches.
A42-4304
DIMENSIONS (in.)
Top Supply
E
C
D
14
10
17
UNIT
SIZE
NOM
AIRFLOW
(cfm)
03
300
04
400
14
12
14
6
14
10
17
06
600
18
10
18
6
16
12
08
800
18
12
18
6
16
10
1000
—
—
22
8
12
1200
—
—
22
8
Single Supply
A
B
14
8
Double Supply
A
B
14
6
G
H
I
J
UNIT
WEIGHT†
(lb)
11/2
11/2
14
395/8
360
11/2
11/2
14
395/8
450
20
1
2
18
455/8
480
12
20
1
2
18
455/8
520
18
16
24
1
3
22
535/8
560
18
16
24
1
3
22
535/8
610
†Unit weights are based on dry coils and minimum rows. Weights exclude packaging, valves, and other components.
1/2/3
1/2/3
1
**Factory-Installed.
††Field-Installed.
Fig. 31 — 42SJ Back-to-Back Furred-In Stack Dimensions
35
24
CR —
CS —
D —
HR —
HS —
R —
S —
ITEM
1
2
3
4
5
6
7
8
9
10
11
12
13
14
15
16
17
LEGEND
Cold Water Return
Cold Water Supply
Drain
Hot Water Return
Hot Water Supply
Return
Supply
DESCRIPTION
Electrical Knockouts
QTY
1
3-in. Expanded Section
Strip Heater** (Optional)
Limit Switch**†† (Optional)
1/ -in. Isolation Ball Valves**
2
Flexible Drain Tube/P-Trap
Coil 1/2-in. OD Copper Tube
3/5
1
1
2/4
1
1
Filter, Throwaway, 1-in.**
Return Air Opening
Air Vent, Manual
Knockout (For Optional Remote Mounting)
Molex Connector for Field-Installed Thermostat
Control Box
Riser, Supply and Return (Copper)
Riser, Drain (Copper)
Drain Pan
1
1
1
2
1
1
2/4
1
1
*Drawing provided for reference only. Dimensions may vary with options ordered.
NOTES:
1. Units are fabricated of 18-gage galvanized steel with a 16-gage galvanized fan deck.
2. All risers are insulated with closed cell insulation.
3. Thermostats shipped loose for field connection.
4. Risers are piped to coil with valves as specified.
5. Blower, motor, valves, coil, and filter are accessible through the return air opening.
6. Unit and control box are insulated.
7. Riser length = [(floor to floor) +2 in.], maximum riser length = 119 inches.
8. Maximum riser size is 21/2-in. diameter. If larger sizes are required, please consult the factory.
9. Expansion loops in hot water heating circuits as required.
10. A 9-in. x 21/4-in. slot is provided in the inside back panel for coil connection penetration to permit expansion
and contraction of risers. Care must be taken to position the risers so that coil connection is at center of slot.
11. Drawing is pictorial (see unit arrangements for actual supply and return air orientation).
12. All dimensions are in inches.
A42-4128
DIMENSIONS (in.)
Double Supply
Top Supply
A
B
C
D
14
6
14
10
UNIT
SIZE
NOM
AIRFLOW
(cfm)
03
300
04
400
14
12
14
6
14
10
06
600
18
10
18
6
16
Single Supply
A
B
14
8
E
G
H
I
UNIT
WEIGHT†
(lb)
17
11/2
11/2
14
180
17
11/2
11/2
14
225
12
20
1
2
18
240
Acoustical Bypass Panel
1
08
800
18
12
18
6
16
12
20
1
2
18
260
18
19
20
21
22
Blower
Motor, 3-Speed, PSC, with Quick Connect
Access Panel (Control Box)
Control Opening (Surface Mount Thermostat)
Duct Collar, 1/2-in. Extension (Typical)
1
1
1
1
10
1000
—
—
22
8
18
16
24
1
3
22
280
12
1200
—
—
22
8
18
16
24
1
3
22
305
23
Supply Air Opening(s)
Top Supply Duct Collar, 1-in. Extension
(Optional)
24
†Unit weights are based on dry coils and minimum rows. Weights exclude packaging, valves, and other components.
1/2/3
1/2/3
1
**Factory-Installed.
††Field-Installed.
Fig. 32 — 42SGM Furred-In Master Stack Dimensions
36
23
CR —
CS —
D —
HR —
HS —
R —
S —
ITEM
1
2
3
4
5
6
7
8
9
10
11
12
13
14
15
16
17
18
19
20
21
22
23
LEGEND
Cold Water Return
Cold Water Supply
Drain
Hot Water Return
Hot Water Supply
Return
Supply
DESCRIPTION
Electrical Knockouts
QTY
1
Strip Heater** (Optional)
Limit Switch**†† (Optional)
1/ -in. Isolation Ball Valves**
2
Coil Stub Outs
Shipping Brace
Flexible Drain Tube/P-Trap
Coil 1/2-in. OD Copper Tube
1
1
2/4
2/4
2/4
1
1
Filter, Throwaway, 1-in.**
Return Air Opening
Air Vent, Manual
Knockout (For Optional Remote Mounting)
Molex Connector for Field-Installed Stat
Control Box
Drain Pan
Return Air Blockoff Panel (Optional)
Blower
Motor, 3-Speed, PSC, with Quick Connect
Access Panel (Control Box)
Control Opening (Surface Mount Thermostat)
Duct Collar, 1/2-in. Extension (Typical)
Supply Air Opening(s)
Top Supply Duct Collar 1-in. Extension
(Optional)
1
1
1
2
1
1
1
1
1
1
1
1
1/2/3
*Drawing provided for reference only. Dimensions may vary with options ordered.
NOTES:
1. Units are fabricated of 18-gage galvanized steel with a 16-gage galvanized fan deck.
2. All risers are insulated with closed cell insulation.
3. Thermostats shipped loose for field connection.
4. Risers are piped to coil with valves as specified.
5. Blower, motor, valves, coil, and filter are accessible through the return air opening.
6. Unit and control box are insulated.
7. Riser length = [(floor to floor) +2 in.], maximum riser length = 119 inches.
8. Maximum riser size is 21/2-in. diameter. If larger sizes are required, please consult the factory.
9. Expansion loops in hot water heating circuits as required.
10. A 9-in. x 21/4-in. slot is provided in the inside back panel for coil connection penetration to permit expansion and
contraction of risers. Care must be taken to position the risers so that coil connection is at center of slot.
11. Drawing is pictorial (see unit arrangements for actual supply and return air orientation).
12. All dimensions are in inches.
A42-4129
DIMENSIONS (in.)
Double Supply
Top Supply
A
B
C
D
14
6
14
10
UNIT
SIZE
NOM
AIRFLOW
(cfm)
03
300
04
400
14
12
14
6
14
10
06
600
18
10
18
6
16
08
800
18
12
18
6
10
1000
—
—
22
12
1200
—
—
22
Single Supply
A
B
14
8
E
G
H
I
UNIT
WEIGHT†
(lb)
17
11/2
11/2
14
162
17
11/2
11/2
14
203
12
20
1
2
18
216
16
12
20
1
2
18
234
8
18
16
24
1
3
22
252
8
18
16
24
1
3
22
275
†Unit weights are based on dry coils and minimum rows. Weights exclude packaging, valves, and other components.
1/2/3
1
**Factory-Installed.
††Field-Installed.
Fig. 33 — 42SGS Furred-In Slave Stack Dimensions
37
Item
1
2
3
Description
Float Switch (Optional)
Drain Pan
Flexible Drain Tube/P-Trap
4
Drain Knockout (3 Sides)
5
6
7
8
Blower
Riser Knockouts (3 Sides)
1/2 in. Flare Adaptor (SWT x 37.5)
Coil, 1/2 in. OD Copper Tube
1 in. Throwaway Filter
(Factory Installed)
Manual Air Vent
Return Air Opening
Knockout (For Optional Thermostat
Remote Mounting)
Molex Connector for Field-Installed
Thermostat
Control Box
Duct Collar Extension
(1/2 in. Side, 1 in. Top)
Outside Air Knockout
(On Each Side Panel)
Electrical Knockouts
(Near Each Side)
Service Switch (Optional)
Motor, 3-Speed, PSC, with Quick
Connect
Access Panel for Motor and Blower
Assembly
Access Panel (Control Box)
Control Opening Knockout
(Surface Mount Thermostat)
Supply Air Openings
(4 Sides and Top, Stitch Cut)
9
10
11
12
13
14
15
16
17
18
19
20
21
22
23
3
(76)
3-5/8
(92) HR
Qty
1
1
1
1 each
side
1
2/4
2/4
1
D CR
1-1/4
(32)
CS
1
C
16
H
TOP VIEW
A
23
4
DETAIL SIDE VIEW
F
15
3
1
3
4
(102)
1-1/4
(32)
17
H
2
1-1/4
(32)
D
1
1
1
HS
3
(76)
3-5/8
(92)
B
1
1/2/3
1
1
14
22
13
21
18
1
1
88
(2235)
12
20
6
19
1
1
H H
R S
1
C C
R S
11
7
10
63
(1600)
1/2/3
5
51
(1295)
9
39
(991)
8
CR
CS
D
HR
HS
PSC
SWT
—
—
—
—
—
—
—
LEGEND
Cold Water Return
Cold Water Supply
Drain
Hot Water Return
Hot Water Supply
Permanent Split Capacitor
Sweat
I
E
E
SIDE VIEW
FRONT VIEW
NOTES:
1. Units are fabricated of 18-gage galvanized steel with a 16-gage galvanized fan deck.
2. Thermostats shipped loose for field connection.
3. Blower, motor, valves, coil, and filter are accessible through the return air opening.
4. Unit and control box are insulated with 1/2-in. (13 mm) coated fiberglass insulation.
5. All risers will ship separately from units. Riser dimensions are measured from centerline of knockout.
6. Drain knockouts on three sides of cabinet.
7. Flex hoses ship with unit.
8. Thread fittings on both ends of flex hoses must be field tightened and leak tested.
9. Return air panel not shown.
10. All dimensions are in inches (mm).
UNIT
SIZE
UNIT
WEIGHT*
(lb)
03
180
04
225
06
240
08
260
10
280
12
305
5
(127)
8
(203)
a42-4305
DIMENSIONS (in.)
A
Side Supply
B
Size
C
D
Size
Top Supply
E
FILTER SIZE
(in.)
F
H
I
14
12
14 x 12
14
10
14 x 10
17
3
11/2
14
121/2 x 241/4 x 1
18
12
18 x 12
16
12
16 x 12
20
1
2
18
161/4 x 263/4 x 1
22
16
22 x 16
18
16
18 x 16
24
1
3
22
201/2 x 291/4 x 1
*Unit weights are based on dry coils and minimum rows. Weights exclude packaging, valves, and other components.
Fig. 34 — 42SU Universal Furred-In Stack Dimensions
38
3
(76)
3-5/8
(92) HR
HS
D CR CS
3
(76)
3-5/8
(92)
1
1-1/4
(32)
2
1-1/4
(32)
D
3
4
(102)
1-1/4
(32)
19
H
C
18
H
TOP VIEW
A
25
4
DETAIL SIDE VIEW
F
17
B
24
5
16
15
23
6
88
(2235)
14
20
7
8
22
21
H H
R S
13
C C
R S
11
51
(1295)
10
12
13
16
I
E
FRONT VIEW
—
—
—
—
—
—
—
Limit Switch (Factory Installed)
Strip Heater
Blower
Riser Knockouts (3 Sides)
1/2 in. Flare Adaptor (SWT x 37.5)
Coil, 1/2 in. OD Copper Tube
1 in. Throwaway Filter
(Factory Installed)
Manual Air Vent
Return Air Opening
Knockout (For Optional
Thermostat Remote Mounting)
Molex Connector for
Field-Installed Thermostat
Control Box
Duct Collar Extension
(1/2 in. Side, 1 in. Top)
Outside Air Knockout
(On Each Side Panel)
Electrical Knockouts
(Near Each Side)
Service Switch (Optional)
Motor, 3-Speed, PSC,
with Quick Connect
Access Panel for Motor and Blower
Assembly
Access Panel (Control Box)
Control Opening Knockout
(Surface Mount Thermostat)
Supply Air Openings
(4 Sides and Top, Stitch Cut)
15
5
(127)
8
(203)
CR
CS
D
HR
HS
PSC
SWT
Drain Knockout (3 Sides)
5
6
7
8
9
10
14
39
(991)
17
18
E
19
SIDE VIEW
20
21
LEGEND
Cold Water Return
Cold Water Supply
Drain
Hot Water Return
Hot Water Supply
Permanent Split Capacitor
Sweat
22
23
24
25
NOTES:
1. Units are fabricated of 18-gage galvanized steel with a 16-gage galvanized fan deck.
2. Thermostats shipped loose for field connection.
3. Blower, motor, valves, coil, and filter are accessible through the return air opening.
4. Unit and control box are insulated with 1/2-in. (13 mm) coated fiberglass insulation.
5. All risers will ship separately from units. Riser dimensions are measured from centerline of
knockout.
6. Drain knockouts on three sides of cabinet.
7. Flex hoses ship with unit.
8. Thread fittings on both ends of flex hoses must be field tightened and leak tested.
9. Return air panel not shown.
10. All dimensions are in inches (mm).
UNIT
SIZE
UNIT
WEIGHT*
(lb)
03
182
04
227
06
242
08
262
10
282
12
307
Description
Float Switch (Optional)
Drain Pan
Flexible Drain Tube/P-Trap
4
11
9
12
63
(1600)
Item
1
2
3
Qty
1
1
1
1 each
side
1
1
1
2/4
2/4
1
1
1
1
3
1
1
1/2/3
1
1
1
1
1
1
1
1/2/3
a42-4306
DIMENSIONS (in.)
A
Side Supply
B
Size
C
D
Size
Top Supply
E
FILTER SIZE
(in.)
F
H
I
14
12
14 x 12
14
10
14 x 10
17
3
11/2
14
121/2 x 241/4 x 1
18
12
18 x 12
16
12
16 x 12
20
1
2
18
161/4 x 263/4 x 1
22
16
22 x 16
18
16
18 x 16
24
1
3
22
201/2 x 291/4 x 1
*Unit weights are based on dry coils and minimum rows. Weights exclude packaging, valves, and other components.
Fig. 35 — 42SU Universal Furred-In Stack with Heater Dimensions
39
3
(76)
3-5/8
(92) HR HS
3
(76)
3-5/8
(92)
3
(76)
3
(76)
1-1/4
(32)
D CR CS
1-1/4
(32)
HS D CR
11
(280)
11
(280)
ELECTRICAL
KNOCKOUTS
3
(76)
3
(76)
24
(610)
24
(610)
4-PIPE
4 (102)
4
22
(559)
2-PIPE
4 (102)
1 (25)
SUPPLY PLENUM
(OPTIONAL)
16
(406)
CONTROL BOX
MOTOR/BLOWER,
3 SPEED, PSC,
HIGH STATIC
RISER
KNOCKOUTS
66*
(1676)
(OPTIONAL)
RETURN AIR
59
PANEL
(1499)
39
(991)
SWT X 37.5
FLARE
ADAPTER
FILTER
COIL
FLEXIBLE
DRAIN
TUBE/P-TRAP
28
(711)
30
(762)
CR —
CS —
D
—
HR —
HS —
PSC —
SWT—
22
(559)
4-3/4 (121)
ACOUSTICAL
SERVICE
ACCESS PANEL
(OPTIONAL)
INTERLOCKING
DISCONNECT
SWITCH
1 (25)
16
(406)
SUPPLY
TOP DUCT
COLLAR, 1"(25)
SUPPLY AIR
OPENING
4-3/4 (121)
22
(559)
LEGEND
Cold Water Return
Cold Water Supply
Drain
Hot Water Return
Hot Water Supply
Permanent Split Capacitor
Sweat
DRAIN PAN
5
(127)
24
(610)
5
(127)
NOTES:
1. Unit measurements on drawings are shown in inches (millimeters).
2. Units are fabricated of galvanized steel with a 16 gage galvanized fan deck.
3. Blower, motor, valves, coil, and filter are accessible through the return air opening.
4. Unit and control box are insulated with 1/2-in. (13 mm) coated fiberglass insulation.
5. Maximum riser size is 21/2-in. (64 mm) diameter. If larger sizes are required, please
consult the factory.
6. This drawing is pictorial. (See unit arrangements for actual supply and return air
orientation.)
7. Riser length = [floor to floor + 2-in. (51 mm)]. Maximum riser length is 119-in.
(3023 mm).
8. Unit shipping weight is approximately 390 lb (176 kg).
Fig. 36 — 42SM Mega Furred-In Stack Dimensions
40
PANEL DIMENSIONS (in.)
A42-4173
A
a42-4167
A
PANEL NO.
UNIT
UNIT SIZE
A
1
42SG,SJ,
SU
03, 04
06, 08
10, 12
15.5
19.5
23.5
42SM
14,16,20
29.5
2
42SG,SJ
03, 04
06, 08
10, 12
15.5
19.5
23.5
3
42SG,SJ
03, 04
06, 08
10, 12
15.2
19.2
23.2
A
61.1
NOTE: Dimensions in inches.
55.3
55.5
A42-4272
PANEL NO. 1
PANEL NO. 2
PANEL NO. 3
a42-4169
A
A
A
A42-4275
A42-4274
60.5
61.1
52.5
PANEL NO. 2 WITHOUT DOOR
PANEL NO. 1 FOR 42SU
PANEL NO. 1 FOR 42SM
Fig. 37 — Return-Air Wall Panels for Furred-In Units — Panels with No Frame Dimensions
41
PANEL AND FRAME DIMENSIONS (in.)
PANEL NO.
UNIT
UNIT SIZE
A
4
42SG,SJ,
SU
03, 04
06, 08
10, 12
15.1
19.1
23.1
5
42SG,SJ
03, 04
06, 08
10, 12
15.1
19.1
23.1
A42-4273
NOTE: Dimensions in inches.
A42-4168
A42-4276
A
A
A42-4277
A
A
60.4
60.4
54.7
51.7
PANEL NO. 4
PANEL NO. 5 WITH CONTROL DOOR
PANEL NO. 5 WITHOUT DOOR
PANEL NO. 4 FOR 42SU
Fig. 38 — Return-Air Wall Panels for Furred-In Units — Panels with Frame Dimensions
unit. Hanger rods and fasteners and other required hardware must be field-supplied.
4. Move unit into position. Ensure unit is level or pitched
towards drain to ensure proper drainage and operation.
Pitch of suspended unit can change after coil is filled;
recheck after filling coil.
5. Mounting unit:
a. Use rods and fasteners to suspend the unit at the
factory-provided mounting holes with rubber
grommets on the top of the unit on 42CG, CK
units. Reach into unit and attach unit to the ceiling
using the 0.375-in. mounting holes (4) in top
panel; do not use any other locations.
INSTALLATION
Step 1 — Place Units in Position
42C UNITS
1. Select the unit location. Allow adequate space for free air
circulation, service clearances, piping and electrical
connections, and any necessary ductwork. For specific
unit dimensions, refer to Fig. 1-12. Allow clearances according to local and national electric codes.
2. Make sure ceiling is able to support the weight of the unit.
See Table 1 for nominal unit weight.
3. Ensure bottom panel has been removed from 42CG, CK
units with mounting holes. When unit is lifted, access to
the 0.375-in. mounting holes is through the bottom of the
42
Fasteners, furring strips, and other seals (if required) must
be field-supplied.
4. Remove all wall and floor moldings from behind the unit.
5. Ensure 42VA top panel (under window application) and
42VB, VF front panel has been removed from unit to
obtain access to the four 0.75-in. mounting holes. Hanger
rods and fasteners and other required hardware must be
field-supplied.
6. Move unit into position. Ensure unit is level or pitched
towards drain to ensure proper drainage and operation.
Pitch of suspended unit can change after coil is filled;
recheck after filling coil.
7. Adjust 42VA, VB, VC, VE, VF units leveling legs so unit
is level. Unit must be level for proper operation and
condensate drainage.
8. Mounting unit:
The type of mounting device is a matter of choice, however, the mounting point shall always be that provided in
the chassis or cabinet.
a. Use rods and fasteners to suspend the unit at the
factory-provided mounting holes with rubber
grommets on the top of the unit on 42VA, VB, VF
units. Reach into unit and attach unit to the wall
using the 0.375-in. mounting holes (4) in top
panel; do not use any other locations. The four
mounting holes and hanger slots with rubber
grommets are NOT for balancing unit.
b. On 42VG unit ensure unit is placed snug within
the wall.
c. On 42VC, VE unit ensure unit is placed flush
against the wall.
NOTE: For any unit without a return-air duct connection,
applicable installation codes may limit unit to installation in
single-story residence only.
b. Use rods and fasteners to suspend the unit at the
factory-provided 0.375-in. hanger slots (4) with
rubber grommets on the top of the unit on the
42CA and CE units.
NOTE: The four mounting holes and hanger slots
with rubber grommets are NOT for balancing unit.
6. The 42CA units without plenums and 42CE with bottom
inlet may be installed in noncombustible areas only.
NOTE: The installation of horizontal concealed units must
meet the requirements of the National Fire Protection Association (NFPA) Standard 90A or 90B concerning the use of concealed ceiling space as return-air plenums.
42V UNITS — While the manufacturer is not involved in the
design and selection of support methods and components, it
shall be noted that unacceptable system operating characteristics and/or performance may result from improper or inadequate unit structural support.
1. Select the unit location. Allow adequate space for free air
circulation, service clearances, piping and electrical
connections, and any necessary ductwork. For specific
unit dimensions, refer to Fig. 13-23. Allow clearances according to local and national electric codes. See Fig. 39
for minimum clearance recommendations.
2. Make sure the floor is able to support the weight of the
unit. See Table 2 for nominal unit weight. Vertical units
are designed to be floor mounted or otherwise supported
from below, and bolted to the wall or floor structure
through the mounting holes provided in the chassis.
These units may be wall hung only when originally ordered from the factory for wall mount applications.
3. Ensure wall behind unit is smooth and plumb; if
necessary, install furring strips on walls with irregular
surfaces or mullions. Furring strips must be positioned
behind mounting holes in unit (42VA, VB, VF units).
12"
Level Unit
±¼"
½"
Minimum
½"
Minimum
30" Minimum
per building code
FRONT VIEW
SIDE VIEW
Fig. 39 — Clearance Recommendations
43
construction, floor plans, and unit configurations, each installation is different. The actual step-by-step method of installation
may vary from unit to unit. However, the risers should be
moved as little as possible to avoid damage to the unit and internal components.
42SG, SH, and SJ Units
1. Begin on lowest floor and progress upward, floor by
floor, to top.
2. Examine drain line (Fig. 34 and 35). Be sure both ends
are in place and that it forms a trap. Avoid pinching drain
line.
3. Tip unit over riser hole in building floor. As unit is
righted, align riser with unit below.
NOTE: The unit must be lowered into the space taking
care to properly align the risers to engage the riser swaged
section on the unit below. The riser should never be bent
or pushed together to be passed through the floor slot and
should never be lifted up or pulled down to meet the riser
on the floor below or above.
4. Install isolator pads beneath the four corners of unit if
applicable.
5. Before anchoring the equipment in place, the unit must be
leveled and the cabinet must be squared and brought into
line with any adjacent or included walls. The unit may be
anchored in place by bolting directly through the unit
floor or attaching to the cabinet in some location that will
not interfere with drywall or other items such as the supply grille, thermostat, or return access panel. When attaching to the unit cabinet, care must be taken to not penetrate the cabinet in locations that may damage internal
components or wiring. The mounting technique is a matter of choice; however, the unit should always be anchored securely to prevent movement during construction
and riser expansion and contraction. On certain units,
shipping screws or braces must be removed after the unit
is installed. Be sure to check all tags on the unit to determine which, if any, of these devices need to be removed.
6. If installing a 42SJ unit, follow Steps a-h. For 42SG and
42SH units, continue to Step 7.
NOTE: The 42SJ back-to-back fan coils have been designed to serve two separate rooms. These products are
classified by Underwriters Laboratories Inc. for use in
penetration firestop systems, control number 27WL when
ordered with 1-hr rated chase. See UL Fire Resistance
Directory for more information. Figure 40 shows the
42SJ unit with standard risers and with Siamese risers.
a. Lay out the control lines for the drywall track and
studs in the floor and ceiling (see Fig. 41).
NOTE: Tracking may be installed now or after the
unit is set.
b. Position the 42SJ fan coil assembly between two
rooms with the unit drywall separation spotted
over the wall control lines.
42D UNITS
1. Select the unit location. Allow adequate space for free air
circulation, service clearances, piping and electrical connections, and any necessary ductwork. For specific unit
dimensions, refer to the submittal drawings. Allow clearances according to the local and national electrical codes.
2. Be sure either the ceiling (42DA, DC, DE, and DF units)
or floor (42DD unit) is able to support the weight of the
unit. See Table 3 for nominal unit weight.
3. Move unit into position. Ensure unit is level or pitched
towards drain to ensure proper drainage and operation.
See Fig. 24-28. Pitch of suspended unit can change after
coil is filled; recheck after filling coil.
4. Mounting units to the ceiling:
a. When unit is lifted, access to the 0.375-in. mounting holes is on the top panel of the unit. Hanger
rods and fasteners and other required hardware
must be field-supplied.
b. Use rods and fasteners to suspend the unit at the
factory-provided mounting holes with rubber
grommets on the top of the unit. Attach unit to the
ceiling using the 0.375-in mounting holes (4) in
top panel; do not use any other locations.
c. Use the rods and fasteners to suspend the unit at
the factory-provided 0.375-in. hanger slots (4)
with the rubber grommets on the top of the unit on
the 42DA, DC, DE, and DF units.
NOTE: The four mounting holes and hanger slots
with rubber grommets are NOT for balancing unit.
d. Models 42DA and 42DC with bottom inlet may be
installed in noncombustible return spaces only.
5. Mounting units on the floor:
a. Ensure wall behind the unit is smooth and plumb;
if necessary, install furring strips on walls with
irregular surfaces or mullions. Furring strips must
be positioned behind mounting holes on 42DD
units. Fasteners, furring strips, and other seals (if
required) must be field-supplied.
b. If the unit has leveling legs, adjust them correctly
to level the unit.
6. Protect units from damage caused by jobsite debris. Do
not allow foreign material to fall in unit drain pan.
Prevent dust and debris from being deposited on motor or
fan wheels.
42S UNITS — A factory tag is on top of each unit. Tag states
riser tier number, floor, room number if furnished and supplyair arrangement. Check unit for any other labels that apply to
installation. Units should not be installed at locations other
than that marked on the unit identification tag. If no specific
detail is shown on tag for unit location then determine configuration for the Universal unit based on information within this
manual. Should any questions arise regarding unit configuration, contact the sales representative or the factory BEFORE
proceeding. Remove unit from pallet and take directly to
assigned space for installation. While all equipment is
designed and fabricated with sturdy materials and may present
a rugged appearance, great care must be taken to assure that no
force or pressure be applied to the coil, risers or piping during
handling. Never use the riser to lift the unit. To maintain the
straight and square cabinet alignment, avoid lifting or supporting the cabinet only at the top and bottom. For specific unit
dimensions refer to Fig. 29-33.
While the manufacturer does not become involved in the
design and selection of support methods and components, it
should be noted that unacceptable system operating characteristics and/or performance may result from improper or inadequate unit structural support. Due to variations in building
42SJA
42SJA
42SJB
42SJB
Fig. 40 — 42SJ
Unit with Standard and Siamese Risers
44
7. Attach unit risers:
CAUTION
CHASE
SIDE
PANEL
DRYWALL
TRACK AND
STUD
CONTROL
LINES
Toxic residues and loose particles resulting from manufacturing and field piping techniques such as joint compounds,
soldering flux, and metal shavings may be present in the
unit and the piping system. Special consideration must be
given to system cleanliness when connecting to solar,
domestic or potable water systems. Failure to heed this
warning could result in equipment damage.
INSTALL WALL
STUD INTO
POCKET
FORMED BY
CHASE SIDE
PANEL
NOTE: Submittals and product literature detailing unit
operation, controls, and connections should be thoroughly reviewed BEFORE beginning the connection and testing of risers and piping. The supply and return connections are marked on the coil stub-outs and the valve package with an “S” meaning supply or inlet and “R” meaning
return or outlet indicating flow direction to and from the
coil. Blue letters mark the chilled water connections and
red letters mark the hot water connections.
a. Each riser has a 3-in. swaged portion at top and
sufficient extension at bottom for an inserted
length of approximately 2-inches. This unit-tounit joint is NOT intended for full bottoming in
the joint, but allows for variations in floor-to-floor
dimensions and for correct riser positioning.
If job requires that unit risers be supplemented
with between-the-floor extensions, pieces may be
field-supplied or factory-supplied. If factorysupplied, insulation is also provided.
b. Level unit to ensure proper coil operation and
condensate drainage. Proper riser installation and
vertical positioning in the unit provides for a unit
piping run-out to the service valves which are centered in the access slots and level or sloping down
slightly away from the riser. This prevents condensation from running back to the riser and possible damage from dripping at the bottom of a
riser column. Each job has specific requirements,
and satisfying those requirements is the responsibility of the installer. After units are positioned
and riser centered in pipe chase, make unit plumb
in two directions, using unit frame as a reference.
c. Anchor unit to building. Use bolts or lag screws
through holes provided in unit frame.
d. After all units in a stack are anchored, make unitto-unit riser joints. First, center each coil-to-riser
line within the expansion slot in the unit back
panel. Each riser joint must be in vertical
alignment with at least 1-in. penetration into the
swaged joint. This condition is met if floor-tofloor dimension is as specified and coil-to-riser
lines are properly centered. Wide variations in
floor-to-floor dimensions may necessitate cutting
off or extending individual risers. Such modifications are the full responsibility of the installing
contractor.
e. Before making the riser joints, the riser insulation
must be pulled back away from the joint and protected from heat during the brazing process. The
riser joint filler material must be selected to withstand the total operating pressure (both static and
pumping head) to which the system will be subjected. Low temperature lead alloy solders such as
“50/50” and “60/40” are normally not suitable.
INSTALL STUDS FROM TOP OF
UNIT TO CEILING (4 CORNERS)
Fig. 41 — 42SJ Wall Board Installation
c. If not already installed, install the floor and ceiling
tracks up to and over the 42SJ fan coil unit.
d. Position the vertical studs and fasten into each of
the stud pockets formed into the chase side panels
(see Fig. 41).
NOTE: The studs may be mechanically fastened
to the 42SJ fan coil. Care should be taken, however, not to penetrate the supply or return water
risers or internal piping. Given the levelness of the
floor and/or the fan coil assembly, some shimming
may be necessary.
e. Assemble the specified wall construction up to
and over the top of the fan coil unit (see Fig. 42).
f. With the fire-wall separation being complete, the
drywall skin on the surface of the individual fan
coils can be applied. Drywall can be applied
directly to the surface, or, if necessary, studding
may be installed on the corners for vertical control
(see Fig. 42).
g. For ease of installation of the access panel, apply
drywall on the return air side directly to the surface of the unit (see Fig. 42). When applying the
wall board directly to the unit cabinet, it may be
necessary to shim the wall board in some areas to
achieve the desired finished wall surface.
h. After all drywalling and painting is complete,
install thermostats, supply air grilles and return air
panels.
WALL STUDS
INSTALL
GYPSUM
BOARD TO
FACE OF
UNIT WITH
CUT OUTS
FOR SUPPLY,
RETURN AND
THERMOSTAT
INSTALL WALL
GYPSUM
BOARD
(TO WALL AND
OVER TOP OF
UNIT)
INSTALL
GYPSUM
BOARD TO
UNIT SIDES
Fig. 42 — 42SJ Unit Installation
45
Potential 42SU Unit Configurations
Risers: Three Locations — The pre-installed supply, return,
and drain risers (2-pipe or 4-pipe applications) can be oriented
on any of three sides of the unit (see Fig. 43).
NOTE: Risers cannot be installed on the return air side of the
cabinet.
IMPORTANT: Chilled water and hot water risers should
never be piped to drain down into the condensate riser.
Extensive water damage can occur due to drain overflow. Drain chilled and hot water risers to a remote location away from the unit such as sink, room or floor
drains.
a42-4283
HS
D
CR
CS
42SU
CABINET
CS
HR
CR
HS
D
D
HS
CR
CS
HR
HR
8. Anchor risers as required:
a. Do not fasten risers rigidly within each unit.
Risers must be free to move within pipe chase
in response to normal vertical expansion and
contraction. The unit internal piping is designed to
accommodate a total riser vertical movement of
± 3/4 in., due to thermal expansion and/or contraction, when positioned properly at the jobsite.
b. Built-in risers must be anchored at some point
to building structure. Unit design accommodates
up to 11/2-in. expansion and contraction in riser
assemblies when positioned properly at the jobsite. Risers must be anchored to the building structure to limit expansion and contraction movement
to a maximum of 11/2 inches. Riser anchoring and
expansion compensation is not included in the factory-supplied unit and must be field provided.
While some special riser features are available
from the factory, riser end caps, air vents, and/or
flushing loops are normally provided on the job by
the installer.
9. Test the system for leaks after the connections are completed. When testing with air or some other gas, it might
be necessary to tighten stem packing nuts on some valves
to maintain air pressure in the riser. Pressure testing risers
with water should be done with the unit service valves
closed to prevent flushing debris into the unit valve packages. This will also allow risers to be drained down after
testing in the winter to avoid freeze-up problems. In the
event that leaking or defective components are discovered, the sales representative must be notified before any
repairs are attempted. All leaks should be repaired before
proceeding with the installation.
10. After system integrity has been established, pull the riser
insulation back into place over the joint and glue or seal
to prevent sweating and heat loss or gain. Internal chilled
water piping and valves are located over the drain pan
and need not be insulated.
11. If required, fireproof where necessary. Any fireproofing
requirements where risers or piping penetrate floors or
walls are the responsibility of the installer. This work
should be done only after all pressure testing is completed. The fireproofing method used must accommodate
pipe expansion and contraction and the piping must be
protected from abrasion and chemical attack. The pipe insulation also must be maintained to prevent sweating and
must be protected from wear or erosion at the joint between the insulation and the fireproofing material.
42 SU Units — The unique design of the universal stack fan
coil unit allows for field configuration for each unit. Air discharge, riser, drain, and outside air knockouts have been strategically located on each unit. Risers, shown with unit, are for
reference only. All risers are factory fabricated and shipped
loose for field installation.
It is important that you identify all of the unit feature locations and which knockouts you intend to use before proceeding
with the installation. See Fig. 43-47. Also, it must be determined whether your application requires a Mating Unit (primary/secondary) and its configuration. Consult your local sales
representative or the factory for further details on primary/secondary arrangements.
RETURN AIR
R
R =
D =
S =
D
S
RETURN
DRAIN
SUPPLY
2- or 4-PIPE
HR
HR
HS
D
CR
CS
HS
=
=
=
=
=
D
CR
CS
HOT WATER RETURN
HOT WATER SUPPLY
DRAIN
COLD WATER RETURN
COLD WATER SUPPLY
Fig. 43 — 42SU Unit Configuration
Unit orientation is determined based on the location of the
risers in the building. The riser side of the universal stack unit
always determines the rear of the unit. See Fig. 44.
a42-4284
REAR
(RISER SIDE)
LEFT
42SU
CABINET
RIGHT
FRONT
Fig. 44 — 42SU Unit Orientation
Return Air: Single Location — The return air/access panel
may then be oriented on the left, right, or front of the unit.
Supply Air: Five Locations (4 sides and top) includes stitched
design for 1/2-in. duct flanges.
Outside Air: Two Locations — Either side adjacent to the
return air opening.
NOTE: Outside air opening may be used on a side if risers are
configured on that same side.
Supply, Return, and Drain Riser Installation
1. Three sides of each universal stack unit have four supply
and return riser knockouts along the center and one drain
knockout near the lower part of the unit (see Fig. 45).
Identify whether your application uses a 2-pipe or 4-pipe
configuration.
a. Two-pipe configurations typically use the two
inner riser knockouts.
b. Four-pipe configurations will use all four riser
knockouts.
46
2. Locate and mark the riser and drain knockouts that apply
to your particular unit application, ensuring proper orientation of the return air opening in room.
3. Insert a flat head screw driver into knockout slot shown in
Fig. 46.
4. Pry screw driver back and forth until knockout tabs break
away from the unit.
5. Discard knockout. Be careful of sharp edges.
6. Use a sharp retractable knife (see Fig. 47) and vertically
cut the insulation down the center of the riser and drain
knockouts the full length of the knockout.
7. Use adhesive or glue to re-attach insulation that has
pulled away from the unit during knockout removal
process.
a42-4285
a42-4309
SUPPLY AND RETURN
KNOCKOUT
KNOCKOUT
TAB
DRAIN
KNOCKOUT
KNOCKOUT
SLOT
KNOCKOUT
TAB
SIDE VIEW
Fig. 46 — Remove 42SU Unit Knockouts
a424287
SIDE SUPPLY AIR
KNOCKOUT
(1 PER SIDE)
OPTIONAL
ELECTRICAL
KNOCKOUTS
OUTSIDE AIR
KNOCKOUT
(2 SIDES ONLY,
ADJACENT TO
RETURN AIR
OPENING)
a42-4286
ELECTRICAL
KNOCKOUTS
Fig. 47 — 42SU Unit Knockout Insulation Removal
Double Riser Swag Installation
1. The riser carton should contain:
a. 2-pipe application:
1 supply riser with threaded ball valve stub-out
1 return riser with threaded ball valve stub-out
1 drain riser with copper stub-out
b. 4-pipe application:
2 supply riser with threaded ball valve stub-out
2 return riser with threaded ball valve stub-out
1 drain riser with copper stub-out
2. Measure the building’s floor-to-floor height and refer to
Table 5 for correct field supplied riser extension length
required.
RISER KNOCKOUTS
(4 PER SIDE,
EXCEPT ON
RETURN AIR SIDE)
RETURN
AIR
DRAIN
INSULATION
CUT LINE
SUPPLY AND RETURN
INSULATION CUT LINE
DRAIN KNOCKOUT
(1 PER SIDE,
EXCEPT ON
RETURN AIR SIDE)
Table 5 — Recommended Extension Length
TOP VIEW
FLOOR-TO-FLOOR
DIMENSION (in.)
EXTENSION LENGTH
REQUIRED (in.)
102
26
104
28
106
30
3. Before cutting riser extensions, make sure the piece of
riser you are going to cut to make the extension matches
the riser diameter that was ordered with unit. All transition pieces like riser reducers are field supplied and
field installed.
4. Cut riser extensions using the recommended length from
Table 5.
5. Identify and orient each unit riser so the installer knows
which end is the top and which is the bottom. Use Fig. 48
and Table 6 for reference.
TOP SUPPLY
AIR KNOCKOUT
Fig. 45 — Locate 42SU Unit Knockouts
47
SUPPLY/
RETURN
TOP
9. Insert brazed extension/riser into the building’s floor
block-out hole in the order specified in Fig. 48. Insert extension into swage of unit below, approximately 2-inches.
10. Verify the floor to riser stub-out and/or ball valve assembly dimension. For a return and supply riser, this dimension should be 39-inches. For a drain riser, this dimension
should be 5-inches. (See Table 6.)
11. Verify riser stub-out is correctly aligned so that stub-out
will penetrate through the riser knockout slot of the unit.
12. Secure the riser positions for final braze.
13. Make sure braze joint between riser and cut extension according to local building code specifications.
14. Repeat steps 2 through 13 for each floor as you move up
the riser column.
15. Once all risers have been installed, the installer must perform a leak test for each riser column.
16. Once the riser column has passed its leak test inspection,
each riser extension should be properly insulated. No exposed copper should be allowed for the riser columns.
17. Install the unit drain P-trap per unit instructions.
18. Prepare the unit for assembly per unit instructions.
19. Attach and install hose kits and P-trap to the unit per unit
instructions.
DRAIN
TOP
26.75
60.75
53
19
CAUTION
Fig. 48 — Riser Extension
Toxic residues and loose particles resulting from manufacturing and field piping techniques such as joint compounds,
soldering flux, and metal shavings may be present in the
unit and the piping system. Special consideration must be
given to system cleanliness when connecting to solar,
domestic or potable water systems.
Table 6 — Unit Riser Orientation
BOTTOM
STUB-OUT
SWAGE TO
HIGHT - AFF
RISER
(Above
STUB-OUT (in.) Finished Floor)
RISER
TYPE
TOP SWAGE TO
RISER
STUB-OUT (in.)
Supply
and
Return
Riser
26.75
53
39
Drain
Riser
60.75
19
5
Submittals and product literature detailing unit operation,
controls, and connections should be thoroughly reviewed BEFORE beginning the connection and testing of risers and
piping.
To assure optimal unit performance, the supply connection(s) are marked on the unit’s coil with an “S” meaning supply or inlet and “R” meaning return or outlet indicating flow direction to and from the coil. Blue letters mark the chilled water
connections and red letters mark the hot water connections.
The unit’s internal piping is designed to accommodate a total riser vertical movement of ±1½ in., due to thermal expansion and/or contraction, when positioned properly at the jobsite. Risers must be anchored to the building structure to limit
expansion and contraction movement to a maximum of 3 inches. Riser anchoring and expansion compensation is not included in the unit and must be provided. Riser end caps, air vents,
and/or flushing loops must be provided at the jobsite by the
installer.
Proper field riser installation and vertical positioning in the
unit should have a pipe run-out to the service valves which are
centered in the knockout access slots and that slope down
slightly away from the riser (see Fig. 48). This prevents condensation from running back to the riser and possible damage
from dripping at the bottom of a riser column. Each job has
specific requirements and satisfying those requirements is the
responsibility of the installer.
6. Insert cut riser extensions into the bottom swages of the
risers to a penetration depth of 2-inches.
7. Invert the riser with extension to allow for an easier braze.
Make the braze joint according to local building code
specifications.
8. Identify and orient the brazed risers so that they will
match the riser locations for the installed unit. Use Fig. 49
for reference.
42SU
CABINET
RETURN AIR
R D S
R = Return
D = Drain
S = Supply
HR
HS
D
CR
CS
Riser to Unit Installation — Before making the riser joints,
the riser insulation must be pulled back away from the joint and
protected from heat during the brazing process. Each riser joint
must be in vertical alignment. Variations in floor-to-floor dimensions may require field work such as cutting off or extending the risers. This operation is the responsibility of the installer. The riser joint filler material must be selected to withstand
the total operating pressure (both static and pumping head) to
HR = Hot Water Return
HS = Hot Water Supply
S = Supply
CR = Cold Water Return
CS = Cold Water Supply
Fig. 49 — Brazed Riser Orientation
48
which the system will be subjected. Low temperature lead alloy solders such as “50/50” and “60/40” are normally not suitable.
Riser to Drain Installation
1. After the applicable supply, return, and drain knockouts
have been removed, carefully position the unit so that the
riser ball valves penetrate into the unit through the riser
knockouts making sure the insulation penetrates into the
unit as shown in Fig. 50-53.
2. Before anchoring the equipment in place, the unit must be
leveled and the cabinet must be plumb and squared. The
unit may be anchored in place by bolting directly through
the unit floor or attaching to the cabinet in some location
that will not interfere with drywall or other items such as
the supply grille, thermostat, or return access panel.
When attaching to the unit cabinet, care must be taken to
not penetrate the cabinet in locations that may damage internal components or wiring. The mounting technique is a
matter of choice; however, the unit should always be anchored securely to prevent movement during construction
and riser expansion and contraction. After anchoring the
unit, it is then ready for the various service connections
such as riser connections and electrical.
3. The plastic flare caps on the end of the riser ball valves
should be removed and discarded.
4. All universal stack units use reinforced braided stainless
steel flexible hose kits for piping between field-installed
risers and unit water coils as shown in Fig. 51. The hose
kit design has threaded connections on each end. The
hose kits allow for riser fluctuations due to thermal
expansion.
a42 4288
RISER STUBOUT
INSULATION
BALL
VALVE
RISER KNOCKOUT
SLOT
WRENCH
SWIVEL
CONNECTION
BACK-UP
WRENCH
Fig. 52 — 42SU Unit Riser to Unit Installation
(Tighten Swivel Connections)
a42-4291
DRAIN PAN
UNIT INSULATION
UNIT WALL
RISER KNOCKOUT
RISER
DRAIN
CLAMP
CLAMP
P-TRAP
RISER STUBOUT
Fig. 53 — 42SU Unit Riser to Drain Installation
5. Use a wrench to tighten the swivel connections. Use a
backup wrench to hold the riser ball valve stationary to
prevent it from bending or twisting during installation as
shown in Fig. 52. Be careful to not over tighten swivel
connections.
UNIT INSULATION
OUTER
CABINET
a42-4290
BALL
VALVE
THREADED
FLARE FITTING
CAUTION
Hose connection torque requirements are 350 in. lb +10/
–0 in. lb to prevent leaks.
6. Locate the unit’s coil fitting.
7. The plastic flare caps on the end of the coil fitting should
be removed and discarded.
8. Use a wrench to tighten the swivel connections. The baffle acts as a secondary wrench. Be careful to not over
tighten swivel connections.
FLARE CAP
Fig. 50 — 42SU Unit Riser to Unit Installation
Setup
a42-4289
FLEXIBLE
HOSE KIT
RISER STUBOUT
INSULATION
RISER
CAUTION
BALL
VALVE
Hose connection torque requirements are 350 in. lb +10/
–0 in. lb to prevent leaks.
9. Locate the p-trap drain and rubber hose factory installed
to the drain pan connection in the bottom of the unit as
shown in Fig. 53.
10. Push the rubber drain hose over the riser drain stubout. Be
careful not to bend the drain stubout.
11. Adjust the hose clamp over the riser stubout and rubber
hose to hold in place as shown in Fig. 53.
12. Test for leaks. Any and all leaks should be repaired before
proceeding with installation. When testing with air or
some other gas, it might be necessary to tighten stem
packing nuts on some valves to maintain air pressure in
the riser. Pressure testing risers with water should be done
with the unit service valves closed to prevent flushing
BAFFLE
COIL
CONNECTION POINT TO ANY FACTORY
FURNISHED AND INSTALLED
COMPONENTS.
Fig. 51 — 42SU Unit Riser to Unit Installation
49
9. Use adhesive or glue to re-attach insulation that has
pulled away from the unit during knockout removal
process.
10. For ducted applications tape should be applied along and
around all of the supply air opening knockouts to prevent
air leakage.
debris into the unit valve packages. This will also allow
risers to be drained down after testing in the winter to
avoid freeze-up problems. In the event that leaking or defective components are discovered, the sales representative must be notified BEFORE any repairs are attempted.
All leaks should be repaired before proceeding with the
unit installation.
13. After system integrity has been established, the riser insulation must be pulled back into place over the joint and
glued or sealed to prevent sweating and heat loss or gain.
All of the risers including the riser stubouts should be
properly covered with insulation. Internally mounted
chilled water piping and valves are located over the drain
pan and need not be insulated.
Any fireproofing requirements where risers or piping penetrate floors or walls are the responsibility of the installer. This
work should be done only after all pressure testing is completed. The fireproofing method used must accommodate pipe expansion and contraction and the piping must be protected from
abrasion and chemical attack. The pipe insulation also must be
maintained to prevent sweating and must be protected from
wear or erosion at the joint between the insulation and the fireproofing material.
When no risers are ordered for the universal stack unit, it is
the responsibility of the installer to make sure that an isolation
ball valve is installed between each supply and return piping
connection to the unit. Flare fittings are factory provided to allow connection between the ball valves and the hoses.
Supply Air Installation — Each side of the unit has one supply air knockout as well as a supply air knockout on the top of
the unit (see Fig. 45).
1. Determine which supply air opening/openings are required for your application.
NOTE: The supply air opening on the riser side of the
unit should not be used.
2. Use a sharp retractable knife to trim insulation using center knockout slot/trim line as pattern (see Fig. 54).
3. Use a sharp standard needle nose pliers and grab knockout tab (see Fig. 54).
a42-4293
DUCT FLANGE
UNIT
WALL
90°
UNIT
INSULATION
Fig. 55 — 42SU Supply Air Installation
All installations should be made in compliance with all governing codes and ordinances. Compliance with all codes is the
responsibility of the installing contractor.
42 SM Units — The unique design of the mega stack fan coil
unit allows for field configuration of each unit. Risers, shown
with unit, are for reference only. All risers are factory fabricated and shipped loose for field installation.
It is important that you identify all of the unit feature locations before proceeding with the installation, see Fig. 36. Also,
it must be determined whether your application requires a mating unit (primary/secondary) and its configurations. Consult
your local sales representative or the factory for further details
on primary/secondary arrangements.
Unit orientation is determined based on the location of the
risers in the building. Risers can only be installed on the rear
side of the unit and always determine the rear of the mega stack
unit. The return air is always on the front (see Fig. 56).
HR
HS
D
CR
a42-4294
CS
REAR
KNOCKOUT TAB
(10 PLACES)
LEFT
42SM
CABINET
RIGHT
FRONT
DUCT BREAK
(4 PLACES)
RETURN AIR
R
KNOCKOUT TAB
TRIM LINE
R =
D =
S =
a42-4291
Fig. 54 — 42SU Unit Supply Air Installation
D
S
RETURN
DRAIN
SUPPLY
2- or 4-PIPE
4. Twist or pry pliers back and forth until knockout tab
breaks away from unit.
5. Repeat for all supply air tabs until all have been broken.
6. Discard center knockout piece. Be careful of sharp edges.
7. Use a sharp retractable knife to trim any excess insulation
using knockout hole as pattern.
8. Use duct pliers (hand seamers) to fold duct flange out of
the unit 90 degrees for each side of the supply air opening
along duct break (see Fig. 54). The 90-degree flanges can
now be used as drywall stops to prevent coverage of discharge opening (see Fig. 55).
HR
HR
HS
D
CR
CS
HS
=
=
=
=
=
D
CR
CS
HOT WATER RETURN
HOT WATER SUPPLY
DRAIN
COLD WATER RETURN
COLD WATER SUPPLY
Fig. 56 — 42SM Unit Installation
Supply, Return, and Drain Risers
CAUTION
Toxic residues and loose particles resulting from manufacturing and field piping techniques such as joint compounds,
soldering flux, and metal shavings may be present in the
unit and the piping system. Special consideration must be
given to system cleanliness when connecting to solar,
domestic or potable water systems.
50
2. Before anchoring the equipment in place, the unit must be
leveled and the cabinet must be plumb and squared. The
unit may be anchored in place by bolting directly through
the unit’s floor or attaching to the building walls through
the cabinet walls in some location that will not interfere
with drywall or other items such as the supply grille, thermostat, or return access panel. When attaching sheetrock
to the unit cabinet, care must be taken to not penetrate the
cabinet in locations that may damage internal components or wiring. The mounting technique is a matter of
choice; however, the unit should always be anchored securely to the building to prevent movement during construction and riser expansion and contraction. After anchoring the unit, it is then ready for the various service
connections such as riser connections and electrical.
3. The plastic flare caps on the end of the riser ball valves
should be removed and discarded.
4. All mega stack units use reinforced braided stainless steel
flexible hose kits for piping between field installed risers
and unit water coils as shown in Fig. 58. Each hose has
threaded connections on each end. The hose kits allow for
riser fluctuations due to thermal expansion.
5. Use a wrench to tighten the swivel connections. Use a
backup wrench to hold the riser ball valve stationary to
prevent it from bending or twisting during installation as
shown in Fig. 59. Be careful to not over tighten swivel
connections.
Submittals and product literature detailing unit operation,
controls, and connections should be thoroughly reviewed BEFORE beginning the connection and testing of risers and
piping.
The supply and return connections are marked on the coil
stubouts and the valve package depending on your configuration. “CS” means cold water supply, “CR” means cold water
return, “HS” means hot water supply, and “HR” means hot water return to indicate flow direction to and from the coil. Blue
letters mark the chilled water connections and red letters mark
the hot water connections.
The unit internal piping is designed to accommodate a total
riser vertical movement of ±11/2 in., due to thermal expansion
and/or contraction, when positioned properly at the jobsite.
Risers must be anchored to the building structure to limit riser
expansion and contraction movement to a maximum of 3 inches. Riser anchoring and expansion compensation is not included in the factory-supplied unit and must be field provided.
While some special riser features are available from the factory,
riser end caps, air vents, and/or flushing loops are normally
provided on the job by the installer.
Riser to Unit Installation — Proper riser installation and vertical positioning in the unit provides for a unit piping run-out to
the service valves which are centered in the access slots and
level or sloping down slightly away from the riser. This prevents condensation from running back to the riser and possible
damage from dripping at the bottom of a riser column. Each
job has specific requirements and satisfying those requirements
is the responsibility of the installer.
a42-4297
BALL
VALVE
Riser to Drain Installation
1. Carefully position the unit so that the riser ball valves
penetrate into the unit through the riser slot making sure
the insulation penetrates into the unit as shown in Fig. 57
and 58.
WRENCH
UNIT INSULATION
OUTER
CABINET
a42-4295
BACK-UP
WRENCH
RISER STUBOUT
INSULATION
BALL
VALVE
RISER KNOCKOUT
SLOT
SWIVEL
CONNECTION
Fig. 59 — 42SM Riser to Unit Installation
(Tighten Swivel Connections)
THREADED
FLARE FITTING
CAUTION
Hose connection torque requirements are 350 in. lb +10/
–0 in. lb to prevent leaks.
FLARE CAP
6. Locate the unit’s coil fitting.
7. The plastic flare caps on the end of the coil fitting should
be removed and discarded.
8. Use a wrench to tighten the swivel connections. The baffle acts as a secondary wrench. Be careful to not over
tighten swivel connections.
Fig. 57 — 42SM Riser to Unit Installation
FLEXIBLE
HOSE KIT
RISER STUBOUT
INSULATION
RISER
a42-4296
BALL
VALVE
CAUTION
Hose connection torque requirements are 350 in. lb +10/
–0 in. lb to prevent leaks.
BAFFLE
COIL
9. Locate the p-trap drain and rubber hose factory installed
to the drain pan connection in the bottom of the unit as
shown in Fig. 60.
10. Push the rubber drain hose over the riser drain stubout. Be
careful that you do not bend the drain stubout.
11. Adjust the hose clamp over the riser stubout and rubber
hose to hold in place as shown in Fig. 60.
CONNECTION POINT TO ANY FACTORY
FURNISHED AND INSTALLED
COMPONENTS.
Fig. 58 — 42SM Riser to Unit Connection
51
Supply Air Installation
1. If the unit has been ordered with a supply air plenum,
then each side of the unit has one supply air knockout as
well as a supply air knockout on the top of the unit (see
Fig. 61 and 62).
2. Determine which supply air opening/openings are required for your application.
NOTE: The supply air opening on the riser side of the
unit should not be used.
3. Use a sharp retractable knife to trim insulation using center knockout slot/trim line as pattern (see Fig. 63).
4. Use a sharp standard needle nose pliers and grab knockout tab (see Fig. 63).
5. Twist or pry pliers back and forth until knockout tab
breaks away from unit.
6. Repeat for all supply air tabs until all have been broken.
7. Discard center knockout piece. Be careful of sharp edges.
8. Use a sharp retractable knife to trim any excess insulation
using knockout hole as pattern.
9. Use duct pliers (hand seamers) to fold duct flange out of
the unit 90 degrees for each side of the supply air opening
along duct break (see Fig. 63). The 90-degree flanges can
now be used as drywall stops to prevent coverage of discharge opening (see Fig. 64).
a42-4298
UNIT INSULATION
DRAIN PAN
UNIT WALL
RISER KNOCKOUT
RISER
DRAIN
CLAMP
CLAMP
P-TRAP
RISER STUBOUT
Fig. 60 — 42SM Riser to Drain Installation
12. Test for leaks. Any and all leaks should be repaired before
proceeding with installation. When testing with air or
some other gas, it might be necessary to tighten stem
packing nuts on some valves to maintain air pressure in
the riser. Pressure testing risers with water should be done
with the unit service valves closed to prevent flushing debris into the unit valve packages. These valves will also
allow risers to be drained down after testing in the winter
to avoid freeze-up problems. In the event that leaking or
defective components are discovered, the sales representative must be notified BEFORE any repairs are attempted. All leaks should be repaired before proceeding with
the unit installation.
13. After system integrity has been established, the riser insulation must be pulled back into place over the joint and
glued or sealed to prevent sweating and heat loss or gain.
All of the risers including the riser stubouts should be
properly covered with insulation. Internally mounted
chilled water piping and valves are located over the drain
pan and need not be insulated.
Any fireproofing requirements where risers or piping
penetrate floors or walls are the responsibility of the installer. This work should be done only after all pressure
testing is completed. The fireproofing method used must
accommodate pipe expansion and contraction and the
piping must be protected from abrasion and chemical attack. The pipe insulation also must be maintained to prevent sweating and must be protected from wear or erosion at the joint between the insulation and the fireproofing material.
When no risers are ordered for the mega stack unit, it is
the responsibility of the installer to make sure that a fieldsupplied isolation ball valve is installed between each
supply and return piping connection to the unit. Flare
fittings are factory provided to allow connection between
the ball valves and the hoses.
Variations in floor-to-floor dimensions may require field
work such as cutting off or extending the risers. This operation is the responsibility of the installer. The riser joint
filler material must be selected to withstand the total operating pressure (both static and pumping head) to which
the system will be subjected. Low temperature lead alloy
solders such as “50/50” and “60/40” are normally not
suitable.
Chilled water and hot water risers should never be piped
to drain down into the condensate riser. Extensive water
damage can occur due to drain overflow. Drain chilled
and hot water risers to a remote location away from the
unit such as sink, room, or floor drains.
All installations should be made in compliance with all
governing codes and ordinances. Compliance with all
codes is the responsibility of the installing contractor.
SIDE VIEW
a42-4299
OPTIONAL
SUPPLY
PLENUM
SIDE SUPPLY AIR
KNOCKOUT
(1 PER SIDE)
MEGA MOD
CABINET
Fig. 61 — 42SM Unit Knockout Locations
Side View (Typical)
TOP VIEW
ELECTRICAL
KNOCKOUTS
a42-4300
TOP SUPPLY
AIR KNOCKOUT
Fig. 62 — 42SM Unit Knockout Locations
Top View (Typical)
52
with local and national codes must perform all piping connections. Refer to Tables 1-4 for piping connections.
NOTE: It is important to have a common understanding of
which side of the unit is the right hand side and which is the
left hand side.
When facing the supply air outlet from the front of the unit
(air blowing in your face), your right hand will be on the right
side of the unit and your left hand will be on the left side of the
unit. See Fig. 65. Refer to Fig. 66 and 67 for typical piping
connections.
The supply and return piping connections of the factoryprovided valve package are either swaged for field brazing
(standard) or union fitted (optional) for field connection to the
coil.
KNOCKOUT TAB
(10 PLACES)
DUCT BREAK
(4 PLACES)
a42-4301
KNOCKOUT TAB
TRIM LINE
Fig. 63 — 42SM Unit Supply Air Installation
DUCT FLANGE
90º
a42-4302
UNIT
WALL
Fig. 65 — Unit End Reference
UNIT
INSULATION
VALVE PACKAGES — There are limitations on physical
size of pneumatic valves, quantity and type of matching
components, and required control interface. See Fig. 68.
Consult factory before ordering any special valve package
components that are not covered in this book.
Valve packages are shipped with the units or in unit cartons.
Valve packages include belled ends for field soldering to coil
connections.
All factory-furnished cooling valve packages are arranged
to position as much of the package as possible over an auxiliary
drain pan or drip lip. This helps minimize field piping insulation requirements. Refer to Fig. 69-72 for pipe connection
configurations. See Table 7 for descriptions of common piping
components.
Fig. 64 — 42SM Unit Supply Air Installation
10. Use adhesive or glue to re-attach insulation that has
pulled away from the unit during knockout removal
process.
11. For ducted applications tape should be applied along and
around all of the supply air opening knockouts to prevent
air leakage.
Step 2 — Make Piping Connections — Access to
piping is available through the access panels at the side of the
units or front of the unit. Qualified personnel in accordance
53
NOTE: Chilled water piping determines the hand of the unit.
NOTE: Chilled water piping determines the hand of the unit.
SAME END CONNECTION
OPPOSITE END CONNECTION
Valve Packages For 2-Pipe Systems — Valve packages for standard 2-pipe units are piped for same end
connection (L.H. or R.H.).
Valve Packages for 4-Pipe Systems — Select 2 valve packages per unit.
NOTE: Hot water valve package requirements may not be the same as chilled water valve package!
SAME END CONNECTION
OPPOSITE END CONNECTION
LEGEND
CW — Chilled Water
HW — Hot Water
LH — Left Hand
RH — Right Hand
Fig. 66 — Pipe Connection Configurations
54
HYDRONIC COIL ARRANGEMENT
FIELD PIPING CONNECTIONS*
VERTICAL FLOOR UNITS — 42VB, VE, VF
Pipe into cabinet end compartment (opening in
bottom and back).
VERTICAL FLOOR UNITS — 42VA, VC
Pipe to external connections (no cabinet).
CEILING UNITS (EXPOSED) — 42CG, CK, DE, DF
Pipe through knock-outs in rear of cabinet to coil and
valve package connections.
CEILING UNITS (CONCEALED) — 42CA, CE, CF, DA, DC
Pipe to connections extending from end of unit.
42VG
VERTICAL UNITS — 42DD
Pipe to stub connections extending from side of unit.
a42-4177
42VG
WALL UNITS, FURRED-IN
Pipe to stub connections at the side of unit.
or into optional piping compartment. Optional piping compartment is required if valves are factory installed. Factory-installed
valve package is limited to one 2-way or 3-way motorized valve
and 2 hand valves.
*Location of field piping connections will vary depending on number of coil rows on factory-supplied coil or
arrangement of factory-supplied valves.
Fig. 67 — Piping Connection Positions
55
a42-213tf
a42-4222
Coil Connections (Positions A & B) — When isolation valve only is added to supply or return line, the isolation valve will be factory
brazed to the coil stub-out. Addition of any other component or connection to the supply or return line will change the respective coil
connection(s).
Service Fittings (Positions C & D) — Optional fittings for attaching pressure/temperature sensing devices to obtain pressure drop or temperature differential across coil. Used with ball valve or balance valve where extremely accurate water flow balancing is required.
Water Flow Balancing (Positions E, F, & H) — Only one device per total valve package to be used for balancing water flow through the
coil. When isolation valve (ball valve or ball valve with memory stop at position H) is used for water flow balancing, do not specify additional
balancing device at position E or F. When balancing device is specified at position E or F, isolation valve does not require balancing feature
at position H (with a 3-way motorized valve, a bypass balancing valve may be specified in the bypass line to permit equal flow balancing).
Strainer (Position G) — Does not include blow down fitting and should not be used in lieu of main piping strainers.
Isolation Valves (Positions H & J) — Normally requires one each on supply and return line (see exception under water flow balancing
above). When position H is used for balancing (ball valve or ball valve with memory stop), check specifications for service valve requirements.
Fig. 68 — Symbols and Placement of Valves
56
The 2-way motorized valve motor drives valve open and a
spring returns valve to normally closed position (no water
flow with unit OFF).
Supply connection at coil will be swage fit for field braze
(standard) or union (option). Return connection at coil will
be factory brazed if isolation valve only. Addition of any
other component will require swage fit for field braze or
optional union connection.
Check job specifications for system pressure, pressure drop
imitations and flow rate prior to selecting valve package
components or valve package size (1/2in., 3/4 in., etc.).
2-PIPE SYSTEM (One Valve Package) or 4-PIPE SYSTEM
(Two Valve Packages) Application:
• 2 Pipe — Hydronic Heating Only
• 2 Pipe — Hydronic Cooling Only
• 2 Pipe — Hydronic Cooling with Total Electric Heat
• 4 Pipe — Hydronic Cooling and Heating
a42-4174
MOTORIZED
M
BALL VALVE
(2) BALL
(1) 2-WAY MOTORIZED R
COIL
MOTORIZED
2-WAY VALVE
BALL VALVE
M
S
LEGEND
BALL VALVE (WITH
MEMORY STOP)
Ball Valve
M
(2) BALL (ONE WITH
MEMORY STOP)
R
(1) 2-WAY MOTORIZED
Motorized 2-Way Valve
COIL
NOTE: A 1/4-in. bypass line is included in the piping package
when a 2-way valve is specified with a control package containing an automatic changeover device.
M
MOTORIZED
2-WAY VALVE
BALL VALVE
M
S
a42-4308
Fig. 69 — Two-Way Motorized Control Valve Package
a42-4175
The 2-way motorized valve motor drives valve open and a
spring returns valve to normally closed position (no water
flow through coil with unit OFF).
The aquastat bleed bypass bleeds a small amount of water
from supply to return when control valve is closed (required
for system water temperature sensing by aquastat).
Aquastat (A) clips on supply line upstream from aquastat
bleed bypass (as shown at right). It senses system water
temperature to prevent cooling operation with hot water in
system piping or heating operation with chilled water in
system piping. Additional aquastat is required to lock out
the optional auxiliary electric heat when hot water is in the
system.
Supply and return connections at coil will be swage fit for
field braze (standard) or unions (option).
Check job specifications for system pressure, pressure drop
limitations and flow rate prior to selecting valve package
components or valve package size (1/2in., 3/4 in., etc.).
2-PIPE SYSTEM (One Valve Package) Application:
• 2 Pipe — Hydronic Cooling and Heating
• 2 Pipe — Hydronic Cooling and Heating with Auxiliary
Electric Heat
MOTORIZED
M
BALL VALVE
(1) GATE
(1) BALL
(1) 2-WAY MOTORIZED
R
MOTORIZED
2-WAY VALVE
M
COIL
S
BYPASS
BALL VALVE
(2) BALL
(1) BALANCING
(1) 2-WAY MOTORIZED
R
COIL
LEGEND
BALANCING
VALVE
BALL VALVE
M
BYPASS
S
Balancing Valve
MOTORIZED
2-WAY VALVE
Ball Valve
A
CIRCUIT SETTER
Circuit Setter
(1) BALL
(1) CIRCUIT SETTER
(1) 2-WAY MOTORIZED
Gate Shut Off Valve
M
GATE
SHUT OFF
A
Motorized 2-Way Valve
R
MOTORIZED
2-WAY VALVE
M
COIL
S
NOTE: Additional aquastat required as noted above.
BALL VALVE
A
BYPASS
Fig. 70 — Two-Way Motorized Control Valve Package with Aquastat Bleed Bypass Line
57
On the 3-way motorized valve flow is normally closed to coil
and open to system return. Motor closes bypass flow to system return while opening flow through coil. Water bypasses
coil and flows directly to system return when unit is OFF.
The aquastat (A) clips on supply line upstream from 3-way
valve (as shown above). It senses system water temperature to prevent cooling operation with hot water in system
piping or heating operation with chilled water in system piping. Aquastat(s) required for 2-pipe cooling and heating with
automatic changeover control and/or auxiliary electric heat.
A bypass balancing valve may be specified in the bypass
line to permit equal flow balancing.
Supply and return connections at coil will be swage fit for
field braze (standard) or unions (option).
Check job specifications for system pressure, pressure drop
limitations and flow rate prior to selecting valve package
components or valve package size (1/2in., 3/4 in., etc.).
2-PIPE SYSTEM (One Valve Package) or 4-PIPE SYSTEM
(Two Valve Packages) Application:
• 2 Pipe — Hydronic Heating Only
• 2 Pipe — Hydronic Cooling Only
• 2 Pipe — Hydronic Cooling with Total Electric Heat
• 2 Pipe — Hydronic Cooling and Heating
• 2 Pipe — Hydronic Cooling and Heating with Auxiliary
Electric Heat
• 4 Pipe — Hydronic Cooling and Heating
a42-4176
MOTORIZED
M
BALANCING
VALVE
(1) BALL
(1) 3-WAY MOTORIZED
MOTORIZED
3-WAY VALVE
R
M
COIL
(2) BALL (ONE WITH
MEMORY STOP)
(1) 3-WAY MOTORIZED
S
R
(1) GATE
(1) BALL
(1) 3-WAY MOTORIZED
LEGEND
COIL
Balancing Valve
BYPASS
BALL VALVE
MOTORIZED
3-WAY VALVE
M
COIL
BALL VALVE
S
BALL VALVE
(WITH MEMORY STOP)
M
BYPASS
BALL VALVE
MOTORIZED
3-WAY VALVE
BALL VALVE
R
M
BYPASS
GATE
SHUT OFF VALVE
S
Ball Valve
M
Ball Valve with Memory Stop
Circuit Setter
BALL VALVE
(2) BALL
(1) BALANCING
(1) 3-WAY MOTORIZED
Gate Shut Off Valve
M
Motorized 3-Way Valve
COIL
R
BALANCING
VALVE
M
S
BYPASS
BALL VALVE
MOTORIZED
3-WAY VALVE
*When aquastat is used for automatic changeover, bypass is
required as indicated by dashed line.
NOTES:
1. Packages factory furnished and installed.
2. Valves are 5/8-in. ODS unless otherwise specified.
3. If an automatic flow control valve is added, it will be
located on supply line between shutoff valve and coil (or
motorized control valve, if supplied).
(1) BALL
(1) CIRCUIT SETTER
(1) 3-WAY MOTORIZED
MOTORIZED
3-WAY VALVE
R
M
COIL
S
Fig. 71 — Three-Way Motorized Control Valve Package
58
CIRCUIT SETTER
BYPASS
BALL VALVE
When isolation valves only are specified, they will be brazed
to the coil stub-outs.
Check job specifications for system pressure, pressure drop
limitations and flow rate prior to selecting specific components or valve package size (1/2 in., 3/4 in., etc.).
2-PIPE SYSTEM ONLY (One Valve Package) Application:
• 2 Pipe - Hydronic Heating Only
• 2 Pipe - Hydronic Cooling Only
WITH HAND VALVES ONLY
BALL VALVE
LEGEND
(2) BALL
R
Balancing Valve
COIL
Ball Valve
Circuit Setter
BALL VALVE
S
Gate Shut Off Valve
*When aquastat is used for automatic changeover, bypass is
required as indicated by dashed line.
NOTES:
1. Continuous water flow, chilled water or hot water.
2. Not recommended for high humidity applications.
3. 2-Pipe System Only: Not recommended with unitmounted thermostat on vertical units.
4. The addition of any other component(s) wil require
swage fitting for field braze or optional union connection.
5. Packages factory furnished and installed.
6. Valves are 5/8-in. ODS unless otherwise specified.
7. If an automatic flow control valve is added, it will be
located on supply line between shutoff valve and coil (or
motorized control valve, if supplied).
BALL VALVE
(1) BALL
(1) GATE
R
GATE SHUT
OFF VALVE
COIL
S
BALL VALVE
(2) BALL
(1) BALANCING
R
BALANCING
VALVE
COIL
BALL VALVE
S
CIRCUIT SETTER
(1) BALL
(1) CIRCUIT SETTER
a42-4307
R
COIL
BALL VALVE
S
Fig. 72 — Valve Package without Motorized Control
42C,D,V DRAIN CONNECTIONS — Install drain line in
accordance with all applicable codes. A continuous pitch of
1 in. per 10 ft of condensate drain line run is necessary for
adequate condensate drainage. Insulate the drain line to
prevent sweating. Extend the drain line straight from the drain
pan before making any turns. The installer must provide proper
support for the drain line to prevent undue stress on the
auxiliary drain pan.
A drain trap may be required by local codes and is recommended for odor control. The differential height inlet to outlet
must be at least 1-in. wg greater than the total static pressure of
the unit. The differential height of the outlet to the bottom of
the trap must not be less than the total static pressure of the
unit. See Fig. 73 (42D) and 74 (42V).
Provide a trap of at least 2 in. near the end of the drain line
to prevent odors from entering the rooms.
2 IN. MIN
CONDENSATE
PAN STUB-OUT
TRAP
7/8 IN. FIELD-SUPPLIED
DRAIN EXTENSION
Fig. 73 — Typical Drain Line Details
(42D Unit Shown)
59
NOTE: Field trim
“P” trap as required
to prevent kinking.
Drain Pan
Drain
42C,D,V STEAM CONNECTIONS — On units with steam
heating coils, the maximum steam pressure applied to the unit
should never exceed 10 psig. However, when steam is used on
a 4-pipe application system with 1-row and 2-row coils the
maximum steam pressure should never exceed 5 psig (suitable
for only low pressure steam).
Do not drain the steam mains or take-off through the coils.
Drain the mains ahead of the coils through a steam trap to the
return line. Overhead returns require 1 psig of pressure at the
steam trap discharge for each 2 ft elevation to ensure continuous condensate removal.
Proper steam trap selection and installation is necessary. As
a guideline in creating a steam trap locate the steam trap discharge at least 12 in. below the condensate return connection.
This provides sufficient hydrostatic head pressure to overcome
trap losses and ensure complete condensate removal.
42C,D,V DIRECT EXPANSION (DX) REFRIGERANT
PIPING — Use the condensing unit manufacturer's recommended line sizes and requirements. Suction line must be
insulated for correct operation. Use refrigerant-grade copper
lines only. The unit is not applied as a heat pump.
Thermostatic expansion valve (TXV) and sensing bulb are
factory-installed on units when DX coil option is chosen with
distributor and TXV.
NOTE: If a hot water coil is used in the reheat position, a fieldsupplied freezestat must be installed to protect the coil.
TEST AND INSULATE — When all joints are complete,
perform hydrostatic test for leaks. Vent all coils at this time.
Check interior unit piping for signs of leakage from shipping
damage or mishandling. If leaks are found, notify your Carrier
representative before initiating any repairs. Release trapped air
from system (refer to Step 7 — Make Final Preparations
section).
Never pressurize any equipment beyond specific test pressure. Always pressure test with an inert fluid or gas, such as
clear water or dry nitrogen to avoid possible damage or injury
in the event of a leak or component failure during testing.
Unit
Wall
Clamp
2" Minimum
Drain
Clamp
“P” Trap
Fig. 74 — “P” Trap Minimum Configuration
42C,D,V WATER SUPPLY/RETURN CONNECTIONS —
Install piping in accordance with all applicable codes. Position
valves over the drain pan. Be sure valves are in proper operating position and are easily accessible for adjustment. See
Fig. 69-72. Refer to Fig. 75 for copper water tube and joint
material pressure ratings.
If coil and valve package connections will be made with a
solder joint, care should be taken to ensure that the components
in the valve package are not subjected to high temperatures,
which may damage seals or other materials. Protect all valve
accessories with wet or damp rag wrapped around the body
during soldering / brazing process. See Fig. 76. Many 2-position electric control valves are provided with a manual operating lever. This lever should be in the OPEN position during all
soldering operations.
If coil connection is made with a union, the coil side of the
union must be prevented from turning (it must be backed up)
during tightening. See Fig. 69-72 for common valve packages.
The supply and return connections are marked and color
coded on the coil stub out and valve package. Supply side is
marked as 'S' and return side is marked as 'R.' A blue letter indicates cooling side and a red letter indicates heating side. In case
of field-installed valves and piping, install chilled water valve
components in a way that any condensate dripping or sweating
caused is contained in the extended drain pan or auxiliary drain
or drip lip (optional). Optional drip lip is field installed and
may be packaged separately from the unit.
CAUTION
All water coils must be protected from freezing after initial
filling with water. Even if system is drained, unit coils may
still have enough water to cause damage when exposed to
temperatures below freezing.
CAUTION
DO NOT OVERTIGHTEN! Overtightening will distort
(egg shape) the union seal surface and destroy the union.
Following the hydrostatic test, insulate all piping to prevent
sweating.
To ensure compliance with building codes, restore the structure's original fire resistance rating by sealing all holes with
material carrying the same fire rating as the structure.
NOTE: The project specifications for system pressure, pressure drop limitations, and flow rate should be checked prior to
selection of specific components or the valve package size.
60
IMPORTANT: THE ABOVE CHART IS FOR
REFERENCE ONLY. Check all system component
pressure ratings (coils, valves, pumps, etc.) and any
applicable local or national piping codes prior to
specifying system pressure rating.
JOINT MATERIALS
A
50-50 Lead-Tin at 200 F
B
50-50 Lead-Tin at 150 F
C
50-50 Lead-Tin at 100 F
Note 1
D
95-5 Tin-Antimony at 200 F
E
95-5 Tin-Antimony at 150 F
F
95-5 Tin-Antimony at 100 F
NOTES:
1. Not recommended for high system water pressures.
2. Standard factory joint material.
Fig. 75 — Copper Water Tube and Joint Material Pressure Ratings
61
Note 2
Table 7 — Piping Components
SYMBOL/SKETCH
CV FACTOR
3/
2
4
RATING*
PSI
F
MANUAL AIR VENT: Threaded brass needle
valve with screwdriver slot for adjustment.
Application — Body brazed into high point of
heating and cooling coils for bleeding air from
coil. Standard item on all hydronic coils (not
used on steam or DX coils). Should not be
used in lieu of main system air vents.
N/A
N/A
400
100
NO
AUTOMATIC AIR VENT: Nickel plated brass
valve, fiber-disc type, with positive shut-off ballcheck and quick vent feature via knurled vent
screw.
Application — Optional replacement for manual air vent. Automatically passes minute
quantities of air through the fiber discs which
expand upon contact with water, completely
sealing the valve. As air accumulates, the fiber
discs dry and shrink, repeating the cycle. Not
recommended for removing large quantities of
air encountered during initial start-up or subsequent draining and refilling. Should not be
used in lieu of main system air vents.
N/A
N/A
125
240
NO
SWAGE: Copper tube end expanded to accept
a copper tube of the same size for factory or
field brazing.
Application — Used where possible for all tubing joints for best joint integrity.
N/A
N/A
300
200
YES
UNION: Combination wrought copper/cast
brass union assembly, solder by solder.
Application — Used for quick connect (and disconnect) of valve package components to minimize field labor and facilitate servicing of unit.
N/A
N/A
300
200
YES
INSERTION TEST PORT: Brass body valve
for acceptance of test probe (up to 1/8 in.
diameter).
Application — Installed on one (or both) sides
of the coil to allow for temperature or pressure
sensing. Used for close tolerance water balancing and service analysis.
N/A
N/A
250
250
NO
N/A
N/A
400
210
NO
2.12
3.9
300
250
NO
DESCRIPTION
1/
PRESSURE TEST PORT: Brass body 1/4 service access fitting with removable depressor
type core.
Application — Installed on both sides of the
coil to allow for pressure sensing. Attach pressure gages to facilitate close tolerance water
balancing.
CIRCUIT SETTER: Variable water flow balancing valve with manual adjustment knob,
pointer, percent-open scale, memory stop and
integral pressure read-out ports.
Application — Used for close tolerance water
flow balancing. Positive shut-off ball valve feature allows usage as combination balancing
and shut-off valve.
LEGEND
Cv — Coefficient of Velocity
DX — Direct Expansion
ETO — Engineering to Order
*Check all system component pressure ratings (coils, values,
pumps, etc.) with manufacturer and any applicable local or national
piping codes prior to specifying system pressure rating.
62
STEAM
USE
Table 7 — Piping Components (cont)
SYMBOL/SKETCH
DESCRIPTION
CV FACTOR
3/
2
4
RATING*
PSI
F
4
300
250
NO
600
220
NO
1/
BALANCE VALVE: Variable water flow manual balancing valve with screwdriver slot
adjustment screw.
Application — Often used in conjunction with
test port fittings for water flow balancing. Balance by temperature differential or coil pressure drop (check specifications for service
fittings required if balancing by pressure
drop). May be used in 3-way valve bypass
line to permit equal flow balancing.
FIXED FLOW VALVE: Flexible orifice type
(non-adjustable).
Application — Used for water flow balancing.
Valve automatically adjusts the flow to within
10% of set point.
a42-4282
STRAINER: Y-type body with 20 mesh stainless steel screen.
Application — Used for removal of small particles from system water during normal system operation. Should not be used in lieu of
main system strainers. Strainer screen may
have to be removed during initial high pressure system flushing during start-up. Screen
should be removed and cleaned per normal
maintenance schedule (provisions for strainer
blow-down not provided).
BALL VALVE: Manual balance and shut-off
valve.
Application — Used for unit isolation and
water flow balancing. Without memory stop
feature water balance point must be marked
by installer (if necessary). Check specifications for service fittings required when used
for water balancing.
BALL VALVE WITH MEMORY STOP:
Manual balance and shut-off valve.
Application — Used for unit isolation and
water flow balancing. The adjustable memory
stop feature allows return to the balance point
after shut-off. Check specifications for
service fittings required when used for water
balancing.
LEGEND
Cv — Coefficient of Velocity
DX — Direct Expansion
ETO — Engineering to Order
*Check all system component pressure ratings (coils, values,
pumps, etc.) with manufacturer and any applicable local or national
piping codes prior to specifying system pressure rating.
63
14
Valve orifice size
determines CV factor. The orifice of
these fixed flow
valves changes as
flow is regulated.
As the water pressure increases,
the orifice size
decreases,
thereby automatically limiting the
flow rate to the
specified gpm
(±10%).
STEAM
USE
9.0
Clean
19.0
Clean
400
150
N/A
14.2
28.6
600
350
YES
14.2
28.6
600
350
N/A
Table 7 — Piping Components (cont)
SYMBOL/SKETCH
DESCRIPTION
CV FACTOR
1/
2
3/
4
RATING*
PSI
F
STEAM
USE
2-WAY MOTORIZED VALVE (25 PSI close off differential pressure): Electric 2-position flow control
valve (open/closed). Normally closed body with manual override lever. Installed in supply line to unit.
Application — All standard control and valve packages are based upon normally closed valves (valve
electrically powered open and closed by spring
return when electric power removed). Manual override lever allows valve to be placed in the open position for secondary (unit) flushing, constant water flow
prior to start-up, etc. Manual override is automatically disengaged when valve is electrically activated.
Consult factory for normally open valve applications.
3.5
3.5
300
200
YES
15
PSI
MAX.
2-WAY MOTORIZED VALVE (150 PSI close off differential pressure): Electric 2-position flow control
valve (open/closed). Normally closed body with manual override lever. Installed in supply line to unit.
Application — All standard control and valve packages are based upon normally closed valves (valve
electrically powered open and closed by spring
return when electric power removed). Manual override lever allows valve to be placed in the open position for secondary (unit) flushing, constant water flow
prior to start-up, etc. Manual override is automatically disengaged when valve is electrically activated.
Consult factory for normally open valve applications.
4.9
10.3
300
240
NO
4.0
4.0
300
200
N/A
4.9
4.9
300
240
N/A
3-WAY MOTORIZED VALVE (25 PSI close off differential pressure): Electric 2-position flow control
valve (closed to coil/open to bypass or open to coil/
closed to bypass). Normally closed with manual
override lever. Installed in supply line to unit.
Application — Same comments as 2-way motorized
valve except with manual override lever engaged the
valve is open to both ports and water flow will take
the path of least resistance through the valve package (not necessarily 100% through the coil).
3-WAY MOTORIZED VALVE (150 PSI close off differential pressure): Electric 2-position flow control
valve (closed to coil/open to bypass or open to coil/
closed to bypass). Normally closed with manual
override lever. Installed in supply line to unit.
Application — Same comments as 2-way motorized
valve except with manual override lever engaged the
valve is open to both ports and water flow will take
the path of least resistance through the valve package (not necessarily 100% through the coil).
LEGEND
Cv — Coefficient of Velocity
DX — Direct Expansion
ETO — Engineering to Order
*Check all system component pressure ratings (coils, values,
pumps, etc.) with manufacturer and any applicable local or national
piping codes prior to specifying system pressure rating.
64
Table 7 — Piping Components (cont)
SYMBOL/SKETCH
DESCRIPTION
CV FACTOR
1/
2
3/
4
RATING*
PSI
F
STEAM
USE
MODULATING VALVE (Optional)
(Non-Spring Return, Floating Point Actuator):
Modulating valves are designed to control the flow in
the circuit by making incremental adjustments to the
flow path within the valve.
Application — To control fluid flow in fan coil units.
On the 42DD,SG,SJ,SH commercial fan coil models,
the factory provided modulating valve has application
restrictions. In these models, the valve packages are
located in the airstream, downstream of the coil. Due
to the ambient temperature limitations of the modulating valves, the valves can only be used in the units
listed above with 2-pipe cooling only systems.
4.0
300
200
N/A
MODULATING VALVE (Optional)
(Non-Spring Return, Proportional Type Actuator):
Modulating valves are designed to control the flow in
the circuit by making incremental adjustments to the
flow path within the valve.
Application — To control fluid flow in fan coil units.
On the 42DD,SG,SJ,SH commercial fan coil models,
the factory provided modulating valve has application
restrictions. In these models, the valve packages are
located in the airstream, downstream of the coil. Due
to the ambient temperature limitations of the modulating valves, the valves can only be used in the units
listed above with 2-pipe cooling only systems.
4.0
300
200
N/A
MODULATING VALVE (Requires ETO)
(Spring Return): Modulating valves are designed to
control the flow in the circuit by making incremental
adjustments to the flow path within the valve.
Application — Same comments as non-spring return
except when powered, the actuator moves to the
desired position, at the same time tensing the spring
return system. When power is removed for more
than two minutes the spring returns the actuator to
the normal position.
4.0
300
200
N/A
AQUASTAT: Water temperature sensing electrical
switch. (Line Voltage Controls)
Application — Clips directly on nominal size 1/2 in. or
3/ in. copper tubing for water temperature sensing.
4
Must be correctly located for proper control operation.
CHANGEOVER SENSOR: Water temperature sensor thermistor.
Application — Sensor shall clamp on the outside
diameter of the pipe. Sensor plate shall bend to allow
its radius to be adjusted to fit the pipe. Sensor shall
be secured to the pipe with mounting clamp. Insulate
the mounting location of sensor on the pipe.
LEGEND
Cv — Coefficient of Velocity
DX — Direct Expansion
ETO — Engineering to Order
*Check all system component pressure ratings (coils, values,
pumps, etc.) with manufacturer and any applicable local or national
piping codes prior to specifying system pressure rating.
65
Incoming Power
Supply
or
Return
Torch
Field
Tubing
Stub
From Coil
Wet Rag
Option 1
Adaptor
(Factory Installed)
Fig. 77 — High Voltage Wiring Service Switch
(Side Location)
Fig. 76 — Field Piping Connections
Step 3 — Make Electrical Connections — Refer
to unit nameplate for required supply voltage, fan and heater
amperage and required circuit ampacity. Refer to unit wiring diagram for unit and field wiring. See Fig. 77-79. Since
each project is different and each unit on a project may be
different, the installer must be familiar with the wiring diagram and nameplate on the unit before beginning any wiring. Make sure all electrical connections are in accordance
with unit wiring diagram and all applicable codes. The type
and sizing of all wiring and other electrical components
such as circuit breakers, disconnect switches, etc. should be
determined by the individual job requirements, and should
not be based on the size and/or type of connection provided
on the equipment. All installations should be made in compliance with all governing codes and ordinances. Compliance with all codes is the responsibility of the installing
contractor.
The fan motor(s) should never be controlled by any wiring
or device other than the factory-supplied switch or thermostat/
switch combination unless prior factory authorization is
obtained. Fan motor(s) may be temporarily wired for use
during construction only with prior factory approval and only
in strict accordance with the instructions issued at that time.
On 42S vertical stack units, the unit electrical supply is designed to enter through knockouts provided in the top of the
unit and pass down through matching knockouts in the control
section top. Where space allows, power may be pulled directly
through the side of the cabinet into the control section.
All components furnished for field installation by either the
factory or the controls contractor should be located and
checked for proper function and compatibility. All internal
components should be checked for shipping damage, and any
loose connections should be tightened to minimize problems
during start-up.
Any devices such as fan switches or thermostats that have
been furnished from the factory for field installation must be
wired in strict accordance with the wiring diagram that appears
on the unit. Failure to do so could result in personal injury or
damage to components, and will void all manufacturer's
warranties.
Units with factory-supplied and factory-installed aquastats
may be shipped with the aquastats mounted on a coil stub-out.
If this is the case, remove the aquastat before installing valve
package. When reinstalling aquastats, consult the factorypiping diagram in the submittal for proper location. If the valve
package is field-supplied, the aquastat must be installed in a
location where it will sense the water temperature regardless of
the control valve position. A bleed bypass may be required to
guarantee proper aquastat operation. The aquastat bypass line
allows a small amount of water to flow from the supply to the
return piping when the control valve is closed.
Incoming Power
Option 2
Fig. 78 — High Voltage Power Connection
(Unit Without Service Switch)
Incoming Power
Option 3
Fig. 79 — High Voltage Wiring Service Switch
(Bottom Location)
FACTORY-INSTALLED OPTIONS
Condensate Overflow Switch — The condensate overflow
switch is used to detect a clogged condensate drain pan. The
condensate switch uses a normally closed contact to allow the
system control power to pass through the switch energizing the
water valves and fans allowing normal operation. When an
overflow condition is detected by the switch, it opens the NC
contact and de-energizes the water valve and fans.
66
Aquastat — The aquastat must be able to sense whether the
flowing water is being chilled or heated and switches a contact
closed to provide automatic summer or winter changeover for
the system. When a two-pipe cooling/heating system with
optional auxiliary electric heat is desired, an additional aquastat is required.
Units with optional factory furnished and installed aquastats
may be shipped with aquastats mounted on the coil stub out. In
this situation, remove the aquatat before valve package installation. Refer Fig. 70 for factory piping diagram for proper location when reinstalling the aquastats. If the valve package is
field supplied,the aquastat must be installed in a location where
it will sense the water temperature regardless of control valve
position. A bleed bypass should be provided for proper operation of aquastat. The bleed line allows a small amount of water
to flow from supply to return piping when the control valve is
closed for loop temperature sensing.
All field wiring must be in accordance with governing
codes and ordinances. Any modification of unit wiring without
factory authorization will invalidate all factory warranties and
nullify any agency listings. The manufacturer assumes no responsibility for any damages and/or injuries resulting from improper field installation and/or wiring.
typical control sequences only. For detailed control operating
sequence, refer to thermostat operating instructions.
STANDARD WIRING PACKAGES
Manual Fan Control — On vertical cabinet units, a fan-speed
switch may be furnished unit-mounted and wired. See Fig. 80.
On vertical furred-in units and horizontal units, the switch may
be shipped separately on a decorative wall plate for field
mounting and wiring. See Fig. 81.
The standard switch has LOW, MEDIUM, HIGH and OFF
positions plus an auxiliary contact to energize thermostats,
valves, dampers, etc.
NOTE: Wiring diagrams are for typical applications. If other
voltages for heaters or controls are specified, wiring may differ
from that shown. Refer to wiring diagram on unit blower housing for unit specific wiring.
Thermostatic Electric Valve Control, 2-Pipe — A thermostatically controlled 2-position valve provides superior control
to fan cycling. With this control, the fan runs continuously unless it is manually switched to the OFF or AUTO position. The
fan must be on before the valve can be opened to supply water
to the coil.
This system can be used for normal 2-pipe changeover systems
and can also be furnished for cooling-only or heating-only applications by omitting the changeover and specifying which
application is intended. See Fig. 82 and 83 for line voltage control. See Fig. 84 and 85 for 24-v control. Wiring diagrams show
typical applications. Refer to wiring diagram on unit blower
housing for unit specific wiring.
IMPORTANT: Wiring diagrams shown depict typical
control functions. Refer to unit wiring label for specific
functions.
Units may be equipped with line voltage controls or
24 VAC control systems. The following descriptions are for
Fig. 80 — No Controls — Unit-Mounted 3-Speed Switch Only
67
NOTES:
1. Motors are thermally protected.
2. Use copper conductors only.
3. See unit nameplate for power supply. Provide
disconnect means and overload protection as
required.
4. Unit-mounted thermostats are not recommended
for fan control because of poor temperature
sensing. Fan control not available on 42VC,VE
lowboy units.
Fig. 81 — No Controls — Wall-Mounted 3-Speed Switch Only
'120-V WHT ALL OTHERS BLK
NEC CLASS 1 WIRING
a42-4223
Fig. 82 — 42SG,SH,SJ,VA,VB,VC,VE,VF 2-Pipe Heating and Cooling with
Automatic Changeover — Unit-Mounted Thermostat (Line Voltage)
68
a42-4058
'120-V WHT ALL OTHERS BLK
NEC CLASS 1 WIRING
Fig. 83 — 42C,S,V and 42D (600-1000) 2-Pipe Heating and Cooling with Automatic Changeover —
Remote/Wall-Mounted Thermostat (Line Voltage)
a42-4059
Fig. 84 — 42SG,SH,SJ,VA,VB,VF 2-Pipe Heating and Cooling with Automatic Changeover —
Unit-Mounted Debonair® Thermostat (24-v), Duct Sensor
69
a42-4061
NEC CLASS 2 WIRING
Fig. 85 — 42C,S,V (except VG), and 42D (600-1000 cfm) 2-Pipe Heating and Cooling with
Automatic Changeover — Remote/Wall-Mounted Debonair® Thermostat (24-v)
70
Two control methods are available:
1. Use the standard automatic changeover thermostat with a
dead band between heating and cooling.
2. Use a manual changeover thermostat. With this method
only one changeover is required.
Be sure to include a 2-way or 3-way electric valve with this
system.
NOTE: Wiring diagrams are for typical applications. If other
voltages for heaters or controls are specified, wiring may differ
from that shown. See Fig. 86 for line voltage control. See
Fig. 87 and 88 for 24-v control. Refer to wiring diagram on
unit blower housing for unit specific wiring.
Thermostatic 2-Pipe Auxiliary Electric Heat with Valve
Control — This system, also called twilight or intermediate
season electric heat, goes a long way towards solving the
spring and fall control problems of 2-pipe systems.
Chilled water can be run late into the fall, turned on early in
the spring and electric heat will still be available to all units
whenever required.
In winter the system is switched over to hot water. Two
changeover devices are required for this. One device switches
the action of the thermostat and the other locks out the electric
heat when hot water is in the coil.
With this system, the fan runs continuously unless manually
switched to OFF or AUTO position. Fan must be on before
thermostat can send signal to open chilled water valve or turn
on electric heater.
THERMOSTAT PART # 702893-36
PUR
ORG
REMOTE DEVICE BOX
COOL BLU
HEAT RED
L1 BLK
L2 OR N YEL
HI W/ORG
W/RED
LOW W/BRN
UNIT MOUNTED
J BOX
AQUASTATS
QUICK CONNECT
OPTIONAL
BLOWER
BRN
L RED
RED
M BLU
BLU
BLK
RED
H BLK
MOTOR
WHT
COM
RISE
BLU
PUR
BLK
BLK
*WHT
*WHT
EQUIPMENT
GROUND
RED
RED
BRN
BLU
RED
BLK
*WHT
WHT
RISE
L2 or N
VALVE
L1
*WHT
CONTACTOR
LIMIT SWITCH
1
BLK
BLK
BLK
*WHT
L1
L2 OR N
GRN
ONLY 120V WHT/ALL OTHERS BLK
Fig. 86 — 42C,S,V (except VG), and 42D (600-1000 cfm) 2-Pipe Heating and Cooling with
Auxiliary Heat — Remote/Wall-Mounted Thermostat (Line Voltage) and Dual Power Source
71
THERMOSTAT #33CSSN2-FC
R
G
Y1
G3
BLK
DUCT SENSOR
33CSSEN-DS
RS
PUR
RS+5
W1 G2
C H2O CK1
CHANGE OVER
SENSOR
RED
YEL
BLU
BRN
BLK
RED
ORG
WHT
BLK
BLK
VALVE
BLK
BLK
2
Q/C
1
YEL
33
YEL
RED G
QUICK CONNECT
FAN
BLU G2/(W)
BLK G3/(Y)
BLK
COM
(VALVE)
RED
4
(COOL)
3
HI
ORG
(HEAT)
YEL
24
RED L
BLU M
BLU
BLK
*WHT
MED
2
1
BLOWER
BLK H
MOTOR
WHT COM
TRANSFORMER
BLK
EQUIPMENT
GROUND
L1
L2 or N
LOW
WHT/RED
BLK
BLK
*WHT
*WHT
BRN
YEL
0
YEL
BLK
L1
1
06
3
4
2
NC
COM
NO
7
LIMIT SWITCH
8
6
BLK
N
WHT
BLK
CONTACTOR
EQUIPMENT
GROUND
ELEC. HEATER
Fig. 87 — 42SG,SH,SJ,VA,VB,VC,VE,VF 2-Pipe Heating and Cooling with Auxiliary Heat —
Unit-Mounted Debonair® Thermostat (24-v), Duct Sensor and Dual Power Source
a42-4067
NEC CLASS 2 WIRING
Fig. 88 — 42C,S,V (except VG), and 42D (600-1000 cfm) 2-Pipe Heating and Cooling with
Auxiliary Heat — Remote/Wall-Mounted Debonair® Thermostat (24-v)
72
Normally, an automatic changeover thermostat with a dead
band between heating and cooling is used, but a manual
changeover thermostat is also suitable. A 2-way or 3-way valve
must also be used so that the chilled water is off whenever the
heater is on. No changeover device to sense water temperature
is necessary.
NOTE: Wiring diagrams are for typical applications. If other
voltages for heaters or controls are specified, wiring may differ
from that shown. See Fig. 89 for line voltage control. See
Fig. 90 and 91 for 24-v control. Refer to wiring diagram on
unit blower housing for unit specific wiring.
Thermostat 2-Pipe Total Electric Heat with Valve
Control — With this system, the complete heating requirement for the space is provided by the electric heater; the water
system is never changed over for heating. It is therefore possible, just as with 4-pipe systems, to have heating or cooling at
any time of the year.
The fan runs continuously unless it is manually switched to
OFF or AUTO position. Fan must be on before thermostat can
send signal to open chilled water valve or turn on electric
heater.
Fig. 89 — 42C,S,V (except VG), and 42D (600-1000 cfm) 2-Pipe Cooling with Total Electric Heat —
Remote/Wall-Mounted Thermostat (Line Voltage)
73
NOTE: Units may have 2 or 4
elements. Elements wired in
parallel.
a42-4072
Fig. 90 — 42SG,SH,SJ,VA,VB,VC,VE,VF 2-Pipe Cooling with Total Electric Heat —
Unit-Mounted Debonair® Thermostat (24-v) and Duct Sensor
THERMOSTAT #33CSSN2-FC
REMOTE DEVICE BOX
RS+5
RS
R
G
Y1
G3
W1 G2
C H2O CK1
NEC CLASS 2 WIRING
YEL
BLU
BRN
BLK
PUR
RED
ORG
VALVE
BLK
COOL
2
Q/C
1
BLK
YEL
33ZCRLYBRD
G
G2/(W)
G3/(Y)
COM
YEL
QUICK CONNECT
FAN
BLK
(VALVE)
RED
4
BLU
(COOL)
RED L
BLU M
3
HI
BLK
BLOWER
BLK H
2
ORG
(HEAT)
YEL
24
*WHT
MED
1
MOTOR
WHT COM
TRANSFORMER
EQUIPMENT
GROUND
L1
L2 or N
BLK
LOW
WHT/RED
BLK
*WHT
*WHT
0
YEL
1
06
EQUIPMENT
GROUND
3
BLK
4
L1
2
NC
7
BRN
LIMIT SWITCH
COM 8
NO
6
BLK
BLK
WHT
N
ELEC. HEATER
Fig. 91 — 42C,S,V (except VG), and 42D (600-1000 cfm) 2-Pipe Cooling with Total Electric Heat —
Remote/Wall-Mounted Debonair® Thermostat (24-v) and Dual Power Source
74
With this system, the fan runs continuously unless it is
manually switched to OFF/AUTO position. Fan must be on before thermostat can send signal to open the chilled water or hot
water valve.
NOTE: Wiring diagrams are for typical applications. If other
voltages for heaters or controls are specified, wiring may differ
from that shown. See Fig. 92 for line voltage control. See
Fig. 93 and 94 for 24-v control. Refer to wiring diagram on
unit blower housing for unit specific wiring.
Thermostatic Valve Control, 4-Pipe — The 4-pipe system
provides the ultimate in economy and room temperature control. Both hot water and chilled water are available at any time.
Normally an automatic changeover thermostat is used, but a
manual changeover thermostat is also suitable. Two 2-way
valves, two 3-way valves, or one 2-way plus one 3-way valve
must be selected. An automatic changeover device to sense
water temperature is not required.
ONLY 120V WHT/ALL
OTHERS BLK
Fig. 92 — 42C,S,V (except VG), and 42D (600-1000 cfm) 4-Pipe Heating and Cooling —
Remote/Wall-Mounted Thermostat (Line Voltage)
75
a42-4078
Fig. 93 — 42SG,SH,SJ,VA,VB,VC,VE,VF 4-Pipe Heating and Cooling —
Unit-Mounted Debonair® Thermostat (24-v) and Duct Sensor
THERMOSTAT #33CSSN2-FC
REMOTE DEVICE BOX
RS+5
RS
R
G
Y1
G3
W1 G2
C H2O CK1
NEC CLASS 2 WIRING
YEL
BLU
BRN
BLK
PUR
RED
ORG
VALVE
BLK
COOL
BLK
2
Q/C
1
PUR
YEL
33ZCRLYBRD
VALVE
BLK
HEAT
BLK
2
Q/C
1
BRN
YEL
G
G2/(W)
G3/(Y)
COM
QUICK CONNECT
FAN
BLK
(VALVE)
YEL
RED
BLU
(COOL)
HI
YEL
(HEAT)
YEL
24
MED
BLK
4
RED L
BLU M
3
BLOWER
BLK H
2
1
MOTOR
WHT COM
TRANSFORMER
LOW
EQUIPMENT
GROUND
L1
L2 or N
BLK
*WHT
BLK
*WHT
Fig. 94 — 42C,S,V (except VG), and 42D (600-1000 cfm) 4-Pipe Heating and Cooling —
Remote/Wall-Mounted Debonair® Thermostat (24-v)
76
Step 4 — Make Duct Connections — Install all
ductwork to and from unit in accordance with project plans,
specifications, and all applicable codes. Duct construction must
allow unit to operate within duct external static pressure limits
as shown on job submittals. Units designed to operate with
ductwork may be damaged if operated without intended ductwork attached.
Units provided with outside air should have some method
of low-temperature protection to prevent freeze-up. This protection may be any of several methods, such as a low temperature thermostat to close the outside air damper or a preheat coil
to temper the outside air before it reaches the unit. It should be
noted that none of these methods will adequately protect the
coil in the event of power failure. The safest method of freeze
protection is to use glycol in the proper percent solution for the
coldest expected air temperature.
Insulate ductwork as required. Use flexible connections to
minimize duct-to-unit alignment problems and noise transmission where specified.
Set unit markings for minimum clearance to combustible
materials and first 3 ft of ductwork. Install ductwork, accessory
grilles and plenums so that they do not restrict access to filter.
The manufacturer assumes no responsibility for undesirable
system operation due to improper system design, equipment or
component selection, and/or installation of ductwork, grilles,
and other related components.
CAUTION
Proper safety procedures should be followed regarding
ventilation and safety equipment during touch-up and
repainting since materials may pose a health hazard. The
manufacturer's directions should be followed for the products being used.
To repaint the factory-baked enamel, the finish should be
prepared by light sanding with no. 280 grit sand paper or
no. 000 or no. 0000 fine steel wool. The surface may also be
wiped with a liquid surface etch cleaning product such as “No
Sand” or “Pasceo.” These items should be available at most
paint product stores. It should be noted that the more conscientiously this preparation is done, the more effective it will be.
After this preparation is accomplished, the factory finish
should provide excellent adhesion for a variety of air-dried top
coats. Enamel will give a more durable, higher gloss finish,
while latex will not adhere as well and will give a dull, softer
finish. Top coats involving an exothermic chemical process between two components, such as epoxies and urethanes, should
be avoided.
Factory aerosol touch-up paint may require a number of
light “dust coats” to isolate the factory-baked enamel finish
from the quick drying touch-up paint.
Step 6 — Cut Out Openings for Grilles and
Thermostats — On all units with optional supply-air or
CAUTION
return-air grilles, dampers, thermostats, and switch plates, cut
out openings where specified on the job plans. Be careful not to
cut wires, piping or structural supports.
For remote-mounted thermostats use a steel thermostat
shield ring to protect drywall from thermostat wiring where
applicable.
If not included on the unit or furnished from the factory,
supply and return grilles should be provided as recommended
in the product catalog.
Prevent dust and debris from settling in unit. If wall finish
or color is to be spray applied, cover all openings to prevent spray from entering unit. Failure to do so could result
in damage to the unit and/or the reduction of unit efficiency.
Step 5 — Frame and Finish Unit — Models 42SG,
SH, SJ, SU and SM have factory enclosures and may be finished with normally accepted wall covering. However, drywall
secured with adhesive bonding alone is not recommended.
The 42S units are designed to have gypsum board or other
types of wall board applied directly to the unit cabinet surface
to a maximum combined thickness of 5/8-inch. Use low-profile sheet metal panhead screws to secure wallboard to unit
frame. Fasteners may penetrate the cabinet no more than 1/2
inch.
These fasteners must be located to avoid damage to internal
components and wiring in the same manner as anchoring fasteners. Do not apply sheet metal screw or nails where they can
penetrate coil, riser pipes, or electrical junction box and raceways.
Do not secure wallboard to drain pan edges or to control
box enclosure. Condensate leaks or electrical shorts may result.
An alternate method of enclosing the unit is to frame one or
more sides with studding and apply the wall board to this framing. This method requires specific unit features and return access panels when used on the return-air side of a unit. Units not
properly equipped will exhibit poor cooling and/or heating performance and could experience excessive or premature component failures.
Prevent sheetrock dust or other debris from settling on coil
fins, motor-blower assembly or other unit interior surfaces.
EXPOSED
UNIT
FINISH,
TOUCH-UP
AND
REPAINT — Return access and exposed cabinet units may be
furnished with a baked enamel finish. Small scratches in this
finish may be repaired with touch-up paint available from the
factory. Some colors of touch-up paint are available in aerosol
containers and all touch-up paint is available in pint, quart, and
gallon cans.
Step 7 — Make Final Preparations
1. Turn off power to the unit (open unit electrical disconnect).
2. Install thermostats and perform any other final wiring as
applicable. Check the unit for any loose wires.
3. Perform a final visual inspection. All equipment, plenums, ductwork, and piping should be inspected to verify
that all systems are complete and properly installed and
mounted, and that no debris or foreign articles such as paper or drink cans are left in the units or other areas. Clean
dirt, dust, and other construction debris from unit interior.
Be sure to check fan wheel and housing.
4. Rotate fan wheel by hand to be sure it is free and does not
rub housing. Check that wing nuts securing fan assembly
to fan deck are tight.
5. Ensure all panels and filters are installed before checking
fan operation. Turn on power to the unit.
6. Install filter in frame at front of coil. If field-supplied
filters are used, be sure size is as specified in Tables 1-4.
CAUTION
Do not start up or operate unit without filter. Be sure filter
and unit interior are clean. Failure to do so could result in
damage to the equipment or building and furnishings and/
or void all manufacturer's warranties.
7. ECM (Electronically Commutated) Blower:
If the unit is equipped with an ECM blower, additional
steps may be required during the air balancing process.
77
R
The ECM blower is controlled by one of three control
boards, depending on the options ordered with the unit.
Review project submittals or order acknowledgement to
determine which ECM control scheme the unit has. Alternatively, match the control board to the illustrations identified in the Control Board Type section.
8. Check the fan and motor operation.
9. Be sure drain line is properly and securely positioned and
that the line is clear. Pour water into drain to check
operation.
10. Prior to the water system start-up and balancing, the
chilled/hot water systems should be flushed to clean out
dirt and debris which may have collected in the piping
during construction. During this procedure, the system
should be flushed from the supply riser to the return riser
through a cross-over loop at the end of the riser column,
and all unit service valves must be in the closed position.
This prevents foreign matter from entering the unit and
clogging the valves and metering devices. Strainers
should be installed in the piping mains to prevent this material from entering the units during normal operation.
Vent all air from unit coil and related piping. Air venting
from the unit is accomplished by the use of the standard
manual air vent fitting, or the optional automatic air vent
fitting installed on the coil. Venting can be accomplished
by depressing the needle valve core. Automatic air vents
may be unscrewed one turn counterclockwise to speed
initial venting, but should be screwed in for automatic
venting after start-up operations. When steady steam of
water begins to escape, close valve. Vent release air slowly, usually dripping water into drain pan in the process.
Make sure all service valves are open and that the motorized control valves, if supplied, are set for automatic
operation.
OUT
R3
D10
D11
R
C/B
A
B
C
D
BK/
PWM
1
+
–
1
ADJUST
A
B
C
D
A
B
C
D
HIGH
LOW
SPEED A42-4310 SPEED
MED
SPEED
0
EM/W2
W/W1 Y/Y2
Y1
G
Fig. 95 — ECM Jumper Speed Board (42SM Only)
CAUTION
Both of the procedures described below require the control
box to be powered while adjustments are made. Line voltage components are concealed behind a secondary cover.
However, installer should still take all reasonable precautions to prevent electrical shock.
3-Discrete Speed Rheostat Field Adjustment (42SM Only)
(See Fig. 96)— The unit has been factory configured to produce PSC equivalent airflow on high speed, with medium and
low speed set at 80% and 60% of high, respectively. If these
setting are acceptable, then no further configuring is required.
Board mounted rheostats are provided to adjust the airflow pertaining to each output. Each output can be adjusted from 0 to
100% of the motor’s factory programmed operating range. To
set airflow, connect a volt-meter between “common” (near the
red status LED) and Flo1 through Flo4.
CAUTION
The air vent provided on the unit is not intended to replace
the main system air vents and may not release air trapped
in other parts of the system. Inspect the entire system for
potential air traps and vent those areas as required, independently. In addition, some systems may require repeated
venting over a period of time to properly eliminate air from
the system. Failure to properly vent system may negatively
affect operation.
Status
11. Check all control valves in the system for proper operation in accordance with valve manufacturer's instructions.
12. For units with factory-installed ball valves with lever handles — When handle is perpendicular to valve body, there
is no flow through valve. Ball valves may be used as
shutoff valves.
ECM CONTROL OPTION
3-Speed Jumper Field Adjustment (42SM Only) (See
Fig. 95) — The unit has been factory configured to produce
PSC equivalent airflow on high speed, with medium and low
speed set at 80% and 60% of high, respectively. If these setting
are acceptable, then no further configuring is required.
To adjust airflow, relocate board mounted jumpers as indicated on configuration chart. Chart is located on control box
cover.
U3
Rp1
Rp2
Rp3
Rp4
Rp5
Com
Flo0
COMMON
FLO1
Flo1
FLO2
Flo2
Flo3
FLO3
Flo4
FLO4
a
Fig. 96 — ECM Rheostat Speed Board (42SM Only)
Carrier’s convention is to preset and wire Flo1 for high
speed, Flo2 for medium, and Flo3 for low. Flo4 is not used
with any standard thermostat, but may be employed for a more
advanced application. The chart on the control box cover associates airflow rates with the voltage indicated on your volt-meter. For each speed, adjust the rheostat until indicated voltage
matches the desired value from the airflow table.
If a factory provided thermostat or DDC (Direct Digital
Controls) controller is utilized, then the unit is already correctly
configured. A field furnished thermostat or control may require
adjustment of board jumpers.
78
set at 80% and 60% of high, respectively. If these settings are
acceptable, then no further configuring is required.
Board mounted pots are provided to adjust the airflow pertaining to each output. Each output can be adjusted from 0 to
100% of the motor’s factory programmed operating range. Use
voltmeter and airflow chart (on the control box cover) to set
values. Refer to Appendix B for adjustment procedure.
Variable Airflow for 0-10 Vdc Input (See Fig. 99) — If a
factory provided thermostat or DDC controller is utilized, then
the unit is already correctly configured.
Carrier recommends using the specific thermostat or DDC
controller to commission the unit whenever possible. However, the blower can be started and operated without the thermostat. To do so, locate jumper 7 near the large capacitor. Move J7
from 0-10 to Man. Once moved, the onboard pots control fan
speed. To switch the fan in this configuration, place a dry contact inline or on the enable wire.
Variable Airflow for 0-10 Vdc Input (42SM Only) (See
Fig. 97) — Carrier recommends using the specified thermostat
or DDC controller to commission the unit whenever possible.
However, the blower can be started and operated without the
thermostat. To do so, locate the airflow adjustment screw
which is accessible from the inside of the control box. With
service switch in the “ON” position, turn the adjustment screw.
The unit has now been placed in manual override. Manual
override will expire when one of the following conditions is
satisfied:
• Power to the unit is cycled
• 15 minutes elapse with no change to adjustment screw
• Unit receives a control signal from the thermostat or
controller
a42-4313
Fig. 97 — ECM Proportional Speed Board
3-Speed Jumper Field Adjustment (See Fig. 98) — The unit
has been factory configured to produce PSC equivalent airflow
on high speed, with medium and low speed set at 80% and
60% of high, respectively. If these settings are acceptable, then
no further configuring is required.
If alternative airflows are desired, use board mounted pots
to adjust the airflow associated with each input. Each output
can be adjusted from 0 to 100% of the motor’s factory programmed operating range. Use voltmeter and airflow chart (on
control box cover) to set values. Refer to Appendix A for adjustment procedure.
a42-4313
Fig. 99 — ECM Proportional Speed Board
CAUTION
Both of the start-up and servicing procedures described
below require the control box to be powered while adjustments are made. Line voltage components are concealed
behind a secondary cover. However, installer should still
take all reasonable precautions.
L2
START-UP
Before beginning any start-up operation, the start-up personnel should familiarize themselves with the unit, options and
accessories, and control sequence to understand the proper system operation. All personnel should have a good working
knowledge of general start-up procedures and have the appropriate start-up and balancing guides available for consultation.
The building must be completely finished including doors,
windows, and insulation. All internal walls and doors should
be in place and in the normal position. In some cases, the interior decorations and furniture may influence overall system
performance. The entire building should be as complete as
possible before beginning any system balancing.
Except as required during start-up and balancing operations,
no fan coil units should be operated without all the proper ductwork attached, supply and return grilles in place, and all access
doors and panels in place and secure.
C3
C2
VR2
CR1
VR1 K2
L1
LOW MED HIGH
K3
VR3
C1
LOW MED HIGH COM
POTS
K1
Fig. 98 — 3-Speed Potentiometer Adjustment
4-Discrete Speed Potentiometer Field Adjustment, Solid
State — The unit has been factory configured to produce PSC
equivalent airflow on high speed, with medium and low speed
79
After proper system operation is established, the actual unit
air delivery and the actual fan motor amperage draw for each
unit should be recorded in a convenient place for future reference.
Start-up procedures vary depending on time of year (summer or winter) and building characteristics (new building/old
building, occupied/unoccupied, etc.)
Start-up in the cooling mode requires that proper care be
given to avoid condensation problems. Condensation forms on
surfaces that are colder than the dew point of the surrounding
air. If a unit is started and is piped with low-temperature chilled
water in a hot, humid atmosphere, condensation will form on
many parts of the unit. In order to avoid excessive condensation, higher temperature water should initially be used (approximately 65 to 70 F) and the fan coil control set at low or medium fan speed. Be sure the fan current does not exceed motor
nameplate values. Also, outside air supply fans, and bathroom
and kitchen exhaust fans should be off.
As the building temperature drops, the chilled water temperature can be gradually reduced until it reaches 50 F. At this
point the outside air fans can be turned on. When the chilled
water temperature is reduced to its design point, the exhaust
fans can be turned on.
Water System Balancing — A complete knowledge
of the hydronic system, along with its components and controls, is essential to proper water system balancing. This procedure should not be attempted by unqualified personnel. The
system must be complete, and all components must be in operating condition BEFORE beginning water system balancing
operations.
Each hydronic system has different operating characteristics
depending on the devices and controls used in the system. The
actual balancing technique may vary from one system to
another.
After the proper system operation is established, the appropriate system operating conditions such as various water temperatures and flow rates should be recorded in a convenient
place for future reference.
Before and during water system balancing, conditions may
exist due to incorrect system pressures which may result in noticeable water noise or undesired valve operation. After the entire system is balanced, these conditions will not exist on properly designed systems.
Cooling/Heating System — Prior to the water system
start-up and balancing, flush the chilled / hot water systems to
clean out dirt and debris which may have collected in the piping during construction. During the process, all unit service
valves must be in the closed position to prevent foreign matter
from entering the unit and clogging the valves and metering devices. Strainers should be installed in the piping mains to prevent such material from entering units during normal operation.
During system filling, air venting from the unit is accomplished by the use of standard manual air vent or optional automatic air venting installed on the coil. Manual air vents are basically Schrader valves. For air venting, depress the valve unit
the air has vented the coil. When water begins to escape
through the valve, release the valve. Automatic air vents may
be unscrewed one turn counterclockwise to speed initial venting but should be screwed in for automatic venting after startup operation. See Fig. 100 and 101.
Water Treatment — Proper water treatment is a specialized industry. Carrier recommends consulting an expert in this
field to analyze the water for compliance with the water quality
parameters listed in Table 8 and to specify the appropriate water treatment regimen. The expert may recommend typical additives such as rust inhibitors, scaling preventative, antimicrobial growth agents or algae preventatives. Anti-freeze solutions
may be used to lower the freezing point.
Carrier’s water coil tubes and headers are constructed of
pure copper. Multiple brass alloys may be present in the valve
package, depending on unit configuration. It is the user's responsibility to ensure the tube and piping materials furnished
by Carrier are compatible with the treated water.
Failure to provide proper water quality will void the fan
coils unit's warranty.
Table 8 — Water Quality Concentrations
Fig. 100 — Manual Air Vent
Fig. 101 — Automatic Air Vent
Air System Balancing — All duct stubs, grilles, filters,
and return-access panels must be properly installed to establish
actual system operating conditions BEFORE beginning air balancing operations.
Each individual unit and the attached ductwork is a unique
system with its own operating characteristics. For this reason,
air balancing is normally done by balance specialists who are
familiar with all procedures required to properly establish air
distribution and fan-system operating conditions. These procedures should not be attempted by unqualified personnel.
Units with no ductwork have air volumes predetermined at
the factory by supply grille size and normally do not require air
balancing other than selecting the desired fan speed. Units furnished with optional dampers on supply grilles may require
some small adjustments to “fine tune” the air delivery to each
grille. Opposed blade balancing dampers are not available for
all grilles on a unit with electric heat.
WATER CONTAINING
REQUIRED CONCENTRATION
Sulphate
Less than 200 ppm
pH
7.0 to 8.5
Chlorides
Less than 200 ppm
Nitrate
Less than 100 ppm
Iron
Less than 4.5 mg/l
Ammonia
Less than 2.0 mg/l
Manganese
Less than 0.1 mg/l
Dissolved Solids
Less than 1000 mg/l
CaCO3 Hardness
300 to 500 ppm
CaCO3 Alkalinity
300 to 500 ppm
Particulate Quantity
Less than 10 ppm
Particulate Size
800 micron max
Controls Operation — Before proper control operation
can be verified, all other systems must be operating properly.
The correct water and air temperatures must be present for the
control function being tested. Some controls and features are
designed to not operate under certain conditions. For example,
on a two-pipe cooling/heating system with auxiliary electric
heat, the electric heater cannot be energized with hot water in
the system.
A wide range of controls, electrical options and accessories
may be used with the equipment covered in this manual. Consult the approved unit submittals, order acknowledgements,
80
wheel or motor. The wheel and housing may be cleaned periodically using a vacuum cleaner and a brush, taking care not to
dislodge the factory balancing weights on the blower wheel
blades.
and other literature for detailed information regarding each individual unit and its controls. Since controls and features may
vary from one unit to another, care should be taken to identify
the controls used on each unit and their proper control
sequence. Information provided by component manufacturers
regarding installation, operation, and maintenance of their individual controls is available upon request.
When changing from one mode to another (cooling to heating or heating to cooling), it may take some time to actually notice a change in the leaving air temperature. In addition, some
units may be designed for a very low air temperature rise in
heating. Before declaring a unit inoperative or a component
defective, it may be necessary to verify operation by more than
one method.
Clean Electric Heater — Lock open and tag unit elec-
trical service switch.
1. Remove dust, dirt, or foreign material before start-up. Do
not block normal airflow to and from units; blockage may
damage electric heaters.
2. Clean heater elements with soft brush or vacuum cleaner
as necessary.
3. To replace blown fusible links (nichrome heaters only):
a. Remove fan deck (horizontal units only) for
access to heater.
b. Remove nut securing link at each end; install new
link; reinstall nuts.
c. Reinstall fan deck (if removed).
Electric resistance heaters typically require no normal periodic maintenance when unit air filters are changed properly.
The operation and service life may be affected by other conditions and equipment in the system. The two most important operating conditions for an electric heater are proper airflow and
proper supply voltage. High supply voltage and/or poorly distributed or insufficient airflow over the element will result in
element overheating and possible limit switch opening. This
condition may result in the heater cycling on the high-limit
thermal cutout. Sheath heaters have automatic reset switches
only. Open strip heaters have an automatic reset switch with a
backup, high-limit thermal switch. Automatic reset switch resets automatically after the heater has cooled down. High limit
thermal switch must be replaced once the circuit has been broken. The high-limit thermal cutout device is a safety device
only and is not intended for continuous operation. With proper
unit application and operation, the high-limit thermal cutout
will not operate. This device only operates when a problem exists, and ANY condition that causes high-limit cutout MUST
be corrected immediately. High supply voltage also causes excessive amperage draw and may trip the circuit breaker or blow
the fuses on the incoming power supply.
After proper airflow and supply power are assured, regular
filter maintenance is important to provide clean air over the
heater. Dirt that is allowed to deposit on the heating element
will cause hot spots and eventual element burn through. These
hot spots will normally not be enough to trip the high-limit
thermal cutout device and may not be evident until actual heater element failure.
SERVICE
Excessive Condensation on Unit — Running chilled
water through a fan coil unit with the unit fan off can cause
excessive condensation. If fan cycling is used, a water flow
control valve should be installed to shut off the water when the
fan stops.
Other methods of control that avoid condensation problems
are as follows:
1. Continuous fan operation with motorized chilled water
valve controlled by a thermostat.
2. Continuous fan operation with thermostat control to
switch fan from high to low speed (instead of off).
To Clean Coil
1. Be sure electrical service switch is open, locked, and
tagged while working on unit.
2. Remove return-air grille access panel and brush between
coil fins with stiff wire brush. Care should be taken to not
damage coil fins. Follow-up by cleaning with vacuum
cleaner. If coil is cleaned with air hose and nozzle, take
care not to drive dirt and dust into other components.
Blow air through the coil fins from the leaving air face.
This should again be followed by vacuuming. Units provided with the proper type of air filters, replaced regularly, will require less frequent coil cleaning.
3. Install clean filter. Refer to Clean or Replace Air Filters
section.
Check Drain — Lock open and tag unit electrical service
switch.
Check drain pan, drain line and trap before initial start-up
and at start of each cooling season. A standard type pipe cleaner for 3/4-in. ID pipe can be used to ensure that pipe is clear of
obstruction so that condensate is carried away. Check the drain
line at filter cleaning time during the cooling season. Be sure
that debris has not fallen into unit through supply-air grille.
Should the growth of algae and/or bacteria be a concern, consult an air conditioning and refrigeration supply organization
familiar with local conditions for chemicals or other solutions
available to control these agents.
Clean or Replace Air Filters — Lock open and tag
unit electrical service switch.
At the start of each cooling season and after each month of
operation (more or less depending on operating conditions) replace throwaway filter or clean permanent filter.
THROWAWAY FILTER — The type of throwaway filter
most commonly used on fan coil units should be replaced on a
regular basis. The time interval between each replacement
should be established based on regular inspection of the filter
and should be recorded in the log for each unit. Replace filter
with a good quality filter of the size shown in Tables 1-4. Do
not attempt to clean and reuse disposable filters. If the replacement filters are not purchased from the factory, the filters used
should be the same type and size as those furnished from or
recommended by the factory. Consult the factory for applications using filter types other than the factory standard or
optional product. Filters with high arc pressure drops are generally not compatible with the fan coil units in this manual.
PERMANENT FILTER — A maintenance schedule for permanent filters should be developed in the same manner as
throwaway filters. Unlike throwaway filters, permanent filters
Fan Motor Bearings — Lock open and tag unit electrical service switch.
Standard motors are permanently sealed and lubricated. No
lubrication is required unless special motors have been
supplied or unusual operating conditions exist.
Clean Fan Wheel — Lock open and tag unit electrical
service switch.
For access to fan assembly, remove front or bottom panel.
Fan assembly may be removed from its tracks if unit has a long
conduit lead. Dirt and debris should not be allowed to accumulate on the blower wheel or housing. This can result in an unbalanced blower wheel condition which can damage a blower
81
valve package from excessive heat should also be used during
replacement.
may be cleaned and re-installed in the unit instead of being discarded when dirty.
1. Tap on solid surface to dislodge heavy particles.
2. Wash in hot water. If needed, use mild solution of commercial solvent such as sal soda or trisodium phosphate.
3. Set filter on end so that water drains out through slots in
frame. Allow filter to dry thoroughly.
4. Recharge filter with Film-Cor or similar recharging oil.
Three ounces is sufficient for medium size filter. Oil may
be applied by insect spray gun. For easier spraying, the oil
can be warmed.
If the filter is dipped in the recharging oil, remove it immediately and allow draining through slots in frame.
5. Replace filter in unit.
If another type of filter is used, follow the filter manufacturer's
instructions.
Filters — The type of throwaway filter most commonly
used on fan coil units should be replaced on a regular basis.
The time interval between each replacement should be established based on regular filter inspection and should be recorded
in the log for each unit. Refer to product catalog for recommended filter size for each product type and size. If the replacement filters are not purchased from the factory, the filter used
should be of same type and size as those furnished from or recommended by the factory. Pleated media or extended surface
filter should not be used since the high air pressure drop encountered with these type of filters is not compatible with the
type of fan coil unit covered in the manual.
A maintenance schedule for permanent filters should be developed in the same manner as throwaway filters. Unlike
throwaway filters, permanent filters may be cleaned and reinstalled in the unit instead of being discarded when dirty. The
optional factory permanent filter may be cleaned in hot soapy
water to remove any trapped dirt the set aside on edge to dry.
Before replacing the filter in the unit, it should be recharged
with some type of entrapment film. The filter should be
sprayed on both sides or submerged in the film to assure complete coverage. The filter should not be allowed to soak in the
film but should be immediately removed and the excess film
drained from the filter before reinstallation in the unit.
NOTE: Permanent filters normally have less static pressure
loss than throwaway filters.
Electrical Wiring and Controls — The electrical
operation of each unit is determined by the components and
wiring of the unit. This may vary from unit to unit. Consult the
wiring diagram attached to the unit for the actual type and
number of controls provided on each unit.
The integrity of all electrical connections should be verified
at least twice during the first year of operation. Afterwards, all
controls should be inspected regularly for proper operation.
Some components may experience erratic operation or failure
due to age. Wall thermostats may also become clogged with
dust and lint and should be periodically inspected and cleaned
to provide reliable operation.
When replacing any components such as fuses, contractors,
or relays, use only the exact type, size and voltage component
as furnished from the factory. Any deviation without factory
authorization could result in personal injury or damage to the
unit. This will also void all factory warranties. Only factorysupplied replacement parts ensure that the warranty and agency
status remain in effect. All repair work should be done in such
a manner as to maintain the equipment in compliance with
governing codes, ordinances and testing agency listings.
More specific information regarding the use and operating
characteristics of the standard controls offered by the manufacturer are contained in other manuals.
Drain — The drain must be checked before initial start-up
and at the beginning of each cooling season to assure that the
drain trap and line are clear. If it is clogged, take steps to clear
the debris so that condensate will flow easily.
Make periodic checks of the drain during the cooling season
to maintain a free flowing condensate. Units provided with secondary or tell-tale drain connection will indicate a clogged
main line by flow from the tell-tale connection.
NOTE: Should the growth of algae and/or bacteria be a concern, consult an air conditioning and refrigeration supply organization familiar with local conditions for chemical or other
solution available to control these growths.
Warranty — All equipment and components sold through
Valves and Piping — No formal maintenance is re-
the Parts Department are warranted under the same conditions
as the standard manufacturer’s warranty with the exception
that the warranty period is thirty (30) days unless the component is furnished as a warranty replacement. Parts furnished as
warranty replacements are warranted for the remaining term of
the original unit warranty or not less than thirty (30) days.
quired on the valve-package components most commonly used
with fan coil units other than a visual inspection for possible
leaks in the course of other normal periodic maintenance. In the
event that a valve should need replacement, the same
precautions taken during the initial installation to protect the
82
APPENDIX A — POTENTIOMETER ADJUSTMENT
5. Attach the red (positive) lead of the meter to the red wire
that bridges the 0-10 vdc outputs: high, medium, and low.
6. High Speed: Close high speed relay by applying 24-v to
the high terminal. Using a small screwdriver turn the
VR3 potentiometer so the meter measures 4.51 vdc. This
will set the ECM speed to 90% of maximum for high
speed. Open the high speed relay.
7. Medium Speed: close medium speed relay by applying
24-v to the medium terminal. Using a small screwdriver
turn the VR2 potentiometer so the meter measures
3.53 vdc. This will set the ECM speed to 70% of maximum for medium speed. Open the medium speed relay.
8. Low Speed: Close low speed relay by applying 24-v to
the low terminal. Using a small screwdriver turn the VR1
potentiometer so the meter measures 2.06 vdc. This will
set the ECM speed to 40% of maximum speed for low
speed operation. Open the low speed relay.
Adjusting the low, medium, and high potentiometers requires the use of a multi-meter capable of measuring 0~5 vdc.
1. Only trained and qualified individuals should attempt to
adjust or service components on any electrical component. Failure to follow safety rules could result in electrical shock or hazard.
2. Unit must be powered to perform the following procedure. If main power is not available, connecting a temporary 24V-40VA power supply to parallel with a secondary
outputs of the unit’s transformer is recommended.
3. Set the electrical multi-meter to volts direct current (vdc)
on the 0~5 or 0~20 vdc scale.
4. Attach black (negative) lead of meter to the DC common
terminal, labeled “L2” above the potentiometer and to the
left of the orange relay.
83
APPENDIX B — EVO/ECM 4-SPEED ADJUSTMENT
6. High Speed: Using a small screwdriver turn the Flo1 potentiometer so the meter measures 4.51 vdc. This will set
the ECM speed to 90% of maximum for high speed operation.
7. Medium Speed: Using a small screwdriver turn the Flo2
potentiometer so the meter measures 3.53 vdc. This will
set the ECM speed to 70% of maximum speed for medium speed operation.
8. Low Speed: Using a small screwdriver turn the Flo3 potentiometer so the meter measures 2.06 vdc. This will set
the ECM speed to 40% of maximum speed for low speed
operation.
9. For setting of Flo0 and Flo4 contact Carrier, otherwise
these potentionmeters should be set to full counter-clockwise rotation.
Adjusting the Flo1, Flo2, Flo3 potentiometers requires the
use of a multi-meter capable of measuring 0~5 vdc.
1. Only trained and qualified individuals should attempt to
adjust or service components on any electrical component. Failure to follow safety rules could result in electrical shock or hazard.
2. 24 vac power must be supplied to ECM board to make
adjustments.
3. Set the electrical multi-meter to volts direct current (vdc)
on the 0~5 or 0~20 vdc scale.
4. Attach black (negative) lead of meter to the “Com” terminal to the left of the potentiometers and below the status
light.
5. Attach the red (positive) lead of the meter to the high
speed “Flo1” terminal below the potentiometer.
84
© Carrier Corporation 2014
Manufacturer reserves the right to discontinue, or change at any time, specifications or designs without notice and without incurring obligations.
Catalog No. 04-53420010-01
Printed in U.S.A.
Form 42-5SI
Pg 86
1-14
Replaces: 42-4SI
START-UP CHECKLIST FOR 42C,D,S,V SERIES FAN COIL AIR CONDITIONERS
I. Project Information
Job Name _______________________________________________________________________
Address ________________________________________________________________________
City ______________________________________________State __________ Zip __________
Installing Contractor _______________________________________________________________
Sales Office _____________________________________________________________________
Start-up Performed By _____________________________________________________________
INSPECTION, INSTALLATION, AND START-UP CHECKLIST
ITEM
Receiving & Inspection
1. Unit received undamaged
2. Unit received complete as ordered
3. “Furnish only” parts accounted for
4. Unit arrangement/hand correct
5. Unit structural support complete and correct
Handling & Installation
6. Mounting grommets/isolators used
7. Unit mounted level and square
8. Proper access provided for unit and accessories
9. Proper electrical service provided
10. Proper overcurrent protection provided
11. Proper service switch/disconnect provided
12. Proper chilled water line size to unit
13. Proper hot water line size to unit
14. Proper refrigerant line sizes to unit
15. Proper steam line sizes to unit
16. Proper steam condensate trap on return line
17. Proper steam supply pressure to unit (10 psi max)
18. All service to unit in code compliance
19. All shipping screws and braces removed
20. Unit protected from dirt and foreign matter
Cooling/Heating Connections
21. Protect valve package components from heat
22. Mount valve packages
23. Connect field piping to unit
24. Pressure test all piping for leaks
25. Install drain line and traps as required
26. Insulate all piping as required
27. Install drip lip under piping as required
28. Connect risers from 42SGM to 42SGS models
29. Connect risers to unit coil valve package (if risers
are shipped/installed separately)
Ductwork Connections
30. Install ductwork, fittings, and grilles as required
31. Flexible duct connections at unit
32. Proper supply and return grille type and size used
33. Control outside air for freeze protection
34. Insulate all ductwork as required
COMPLETE
ITEM
Electrical Connections
35. Refer to unit wiring diagram
36. Connection incoming power service(s)
37. Install and connect “furnish only” parts
38. All field wiring in code compliance
Unit Start-Up
39. General visual unit and system inspection
40. Check for proper fan rotation
41. Record electrical supply voltage
42. Record ambient temperatures
43. Check all wiring for secure connections
44. Close all unit isolation valves
45. Flush water systems
46. Fill systems with water/refrigerant
47. Vent water systems as required
48. All ductwork and grilles in place
49. All unit panels and filters in place
50. Start fans, pumps, chillers, etc.
51. Check for overload condition of all units
52. Check all ductwork and units for air leaks
53. Balance air systems as required
54. Record all final settings for future use
55. Check piping and ductwork for vibration
56. Check all dampers for proper operation
57. Verify proper cooling operation
58. Verify proper heating operation
59. Reinstall all covers and access panels
60. Verify proper condensate drainage
COMPLETE
Manufacturer reserves the right to discontinue, or change at any time, specifications or designs without notice and without incurring obligations.
Catalog No. 04-53420010-01
Printed in U.S.A.
Form 42-5SI
CL-1
1-14
Replaces: 42-4SI
Manufacturer reserves the right to discontinue, or change at any time, specifications or designs without notice and without incurring obligations.
Catalog No. 04-53420010-01
Printed in U.S.A.
Form 42-5SI
CL-2
1-14
Replaces: 42-4SI
SERIAL NUMBER
RH
LH
CFM
ESP
WATTS
FILTER
TYPE
EAT
db/wb
°F
EWT
°F
GPM
PD
H2O
COOLING
SENSIBLE
BTUH
EWT
°F
GPM
PD
H2 O
STEAM
PSI
HEATING
BTUH
kW
VOLTAGE
____________________________________________________________________________________________________________________________________________________________________________
____________________________________________________________________________________________________________________________________________________________________________
____________________________________________________________________________________________________________________________________________________________________________
____________________________________________________________________________________________________________________________________________________________________________
TOTAL
BTUH
EAT
db/wb
°F
42 Series Fan Coil Air Conditioner Maintenance Data Log
FAN AND MOTOR
NOTE: Indicate repairs made, refrigerant added or removed (include amounts), field controls and valve packages added.
MODEL
NUMBER
QTY
- - - - - - - - - - - - - - - - - - - - - - - - - - - - - - - - - - - - - - - - - - - - - - - - - - - - - - - - - - - - - - - - - - - - - - - - - - - - - - - - - - - - - - - - - - - - - - - - - - - - - - - - - - - - - - - - - - - - - - - - - - - - - - - - - - - - - - - - - - - - - - - - - - - - - - - - - - - - - - - - - - - - - - - - - - - - -- - - - - - - - - - - - - - - - - - - CUT ALONG DOTTED LINE
CUT ALONG DOTTED LINE
© Carrier Corporation 2014