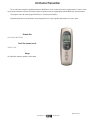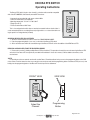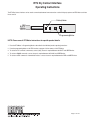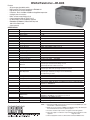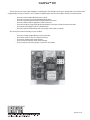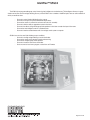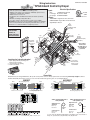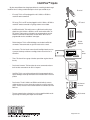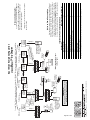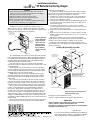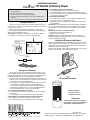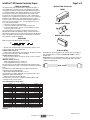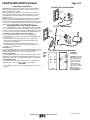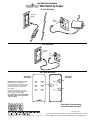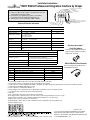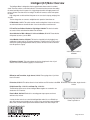
1
Draper Inc., Motorized Flexshade Handbook
Table of Contents
1.
Introduction To Motorized Shades .........................................................................................................................................................................................2
2.
How to Measure, Recommendations and Tips ......................................................................................................................................................................3
3.
Motorized Terms .....................................................................................................................................................................................................................4
Radio Motor Transmitters.................................................................................................................................................................................................................5
A. Handheld 1 and 4 channel remotes................................................................................................................................................................................6
B. Handheld 20 Channel .....................................................................................................................................................................................................7
C. Wall Switches 1 and 4 Channel .................................................................................................................................................................................. 8-9
D. Motor Programming Instructions ..................................................................................................................................................................................10
E. Dry Contact Interface....................................................................................................................................................................................................11
F. Universal RTS Interface .......................................................................................................................................................................................... 12-13
G. RTS Repeater ...............................................................................................................................................................................................................14
5.
Radio Motor Accessories .....................................................................................................................................................................................................15
A. Battery Wand ................................................................................................................................................................................................................16
B. Plug-IN Transformers ....................................................................................................................................................................................................17
C. Din Rail, 3, 6, 12 motor, Transformers .................................................................................................................................................................... 18-23
D. 5 & 10 Motor Power Panels ..........................................................................................................................................................................................24
E. 8 Motor Power Panel ....................................................................................................................................................................................................25
F. RTS Receiver for Standard Motor........................................................................................................................................................................... 26-27
G. Sunis RTS Light Sensor Programming/Operating/Installation Instructions ............................................................................................................ 28-31
6.
Toggle (SP/DT) and DP/DT, Keyed, and Multi-Station Switch ........................................................................................................................................ 32-34
7.
Motor Pigtails and Quick Disconnects..................................................................................................................................................................................35
8.
Isolating Relay Review and Wiring ................................................................................................................................................................................. 36-37
9.
GC4 Overview and Wiring .............................................................................................................................................................................................. 38-39
10. SC1 Overview and Wiring .............................................................................................................................................................................................. 40-41
11. SGC4 Overview and Wiring ........................................................................................................................................................................................... 42-43
12. SPGC4 Overview and Wiring ......................................................................................................................................................................................... 44-45
13. IntelliFlex Inputs Overview ...................................................................................................................................................................................................46
A. Input Device Sample Config .........................................................................................................................................................................................47
B. IR and RF Remote Control ..................................................................................................................................................................................... 48-51
C. IntelliFlex Wall Switch Submittal and Instructions ................................................................................................................................................... 52-55
D. RS 232 Interface ...........................................................................................................................................................................................................56
E. Sun Sensor ............................................................................................................................................................................................................. 57-65
F. Timer ...................................................................................................................................................................................................................... 66-68
G. Dry Contact Convertor .........................................................................................................................................................................................................69
14. IntelliFlex Overview and Planning Sheet ........................................................................................................................................................................ 70-71
15. IntelliFlex Quick Reference Guide .................................................................................................................................................................................. 72-73
16. Intelligent Motor Overview....................................................................................................................................................................................................74
A. Limits and ILT Switch ....................................................................................................................................................................................................75
B. ILT 4 Jack Interface .......................................................................................................................................................................................................76
C. IP Interface ...................................................................................................................................................................................................................77
D. Draper Digital Network Programming ..................................................................................................................................................................... 78-82
17. Explode View of Motorized Flexshade Components ............................................................................................................................................................83
18. Motor Quick Reference Sheet ..............................................................................................................................................................................................84
19. 506S2RH and 510S2RH- Standard and Heavy Duty Motors......................................................................................................................................... 85-86
20. 504S2RH-ST and 506G- Quiet Standard and Heavy Duty Motors ................................................................................................................................ 87-88
21. 506S2ILTRH and 504S2ILTRH-ST- Intelligent and Quiet Intelligent Motor .................................................................................................................... 89-90
22. 506S2RH-RTS and 510S2RH-RTS- Standard and Heavy Duty Radio Motors .............................................................................................................. 91-92
23. 504S2RHST-RTS- Quiet Radio Motor ..................................................................................................................................................................................93
24. 506S2PA and 510 S2PA- Standard and Heavy Duty Motors for Flexshade 2 ................................................................................................................ 94-95
25. 506S2ILT- Intelligent Motor for Flexshade 2 .........................................................................................................................................................................96
26. 506S2-RTS and 510S2-RTS- Standard and Heavy Duty Radio Motors for Flexshade 2 .............................................................................................. 97-98
27. 506S1RH and 510S1RH- Standard and Heavy Duty Motors, 220V, export ................................................................................................................. 99-100
28. 503S1RH-ST- Quiet Standard Motor, 220V, export ............................................................................................................................................................101
29. 506S1PA and 510S1PA- Standard and Heavy Duty Motors for Flexshade 2, 220V, export ....................................................................................... 102-103
30. 660R2- Colossal Shade Motor ...........................................................................................................................................................................................104
31. ST-30, Low Voltage Radio Motor ........................................................................................................................................................................................105
32. BA-RTS, Battery Radio Motor ............................................................................................................................................................................................106
33. Minimum motorized Shade Widths............................................................................................................................................................................. 107-108
34. Motor Flexshade, Flexshade 2, and Colossal Installation Instructions....................................................................................................................... 109-114
35. Scenario: Working Shades from a 12V trigger such as a projector....................................................................................................................................115
36. Scenario: Working Shades from a Hospital Bed, Motion Sensor, lighting System with Dry contact ..................................................................................116
37. Scenario: Working Shades with Multi-Station High Voltage Switches ................................................................................................................................117
38. Scenario: Working Shades from a Home Automation System (Crestron, AMX, etc.) via Dry Contact..............................................................................118
39. Scenario: Working Shades from a Home Automation System (Crestron, AMX, etc.) via RS 232......................................................................................119
40. Scenario: SPDT/DPDT Wiring Diagrams ...........................................................................................................................................................................120
41. Scenario: SC1 to Hill-ROM.................................................................................................................................................................................................121
42. SolarFlex- Sun Tracking Automation .......................................................................................................................................................................... 122-123
43. Draper, Inc. Contact Information ........................................................................................................................................................................................124
For Order Forms Visit
www.draperinc.com
(765) 987-7999
Introduction to Motorized Shades
Motorized shades can be a big profitable opportunity or a big pain depending on how you go about it. Being educated on the product before
handling or installing it will greatly increases your chances at having a successful, profitable install. This is why we at Draper, Inc. have created
this motorized document. We hope this gives you more help on understanding and installing your motorized shade jobs.
Motorized shades offer your customer many benefits. These bullets points are important to remember when selling motorized shades.
• Motorized FlexShades are available in any size from 2´ through 14´ wide. Larger sizes are available with FlexShade 2 or Colossal
FlexShade.
• Installation choices range from simple mounting brackets, to endcaps and fascia, to complete extruded pockets with bottom closure
panels.
• Motorized FlexShades retract completely when not in use for an unobstructed view.
• Choose a glare control fabric—mesh or translucent—or a free-hanging room darkening fabric.
• Depending on size, battens may be used for a smooth, flat surface.
• Compact, tubular gearmotors located within each roller provide smooth, reliable operation.
• Up to five Motorized FlexShades can be coupled to reduce the number of motors.
• A simple wall switch is included with each motorized unit. Or choose the most versatile motor control system: IntelliFlex® offers total
flexibility in how you group, sub-group or individually control your shades.
Draper’s extensive offering of motorized shades and controls can be difficult to understand so please contact us with any questions or concerns that this document cannot answer or raises.
Page 2 of 124
www.draperinc.com
(765) 987-7999
How to Measure for Draper Shades
FlexShades are custom fabricated for
each opening, and must be measured accurately.
Determine the area to be covered, and
decide where brackets or endcaps will be
attached.
Be careful to allow for any irregularity
which will interfere with the proper operation
of the unit (i.e. handles, irregular trim, locks or
opening not square and plumb).
Inside Mount
1. Measure from six positions at each
window—top, center, and bottom for
the width; left, center, and right for the
height.
2. Measure the width of the opening,
providing Draper with the EXACT window opening width at the window’s narrowest point. DO NOT MAKE ANY
DEDUCTIONS for bracketing or
mounting—Draper will make the necessary deductions.
3. Measure the height of the opening,
providing Draper with the EXACT window opening height at the window’s
shortest point. Again, DO NOT MAKE
ANY DEDUCTIONS—Draper will take
the appropriate deductions.
4. Note for Inside Mount Lightbloc
Shade—Draper will take the appropriate deductions from your EXACT
OPENING dimensions in both width
and height.
Outside Mount
1. Measure the width of the window,
specifying the EXACT width and height
you want the product to be. Draper
will make your product to the exact
size you specify. NOTE – adding
overlap to a shade increases privacy
while decreasing light leaks.
2. Note for the Outside Mount Lightbloc
Shade – Draper will fabricate the unit to your
EXACT OVERALL dimensions, taking no
deductions. Make sure to account for the side
and sill channels.
Cloth Measurement: Exact width of cloth.
Depending on product, overall width may be
wider than fabric.
Pocket: If mounting shade brackets or
headbox in a pocket above window opening,
give the exact overall height (top of pocket to
sill) and the exact width of pocket. Draper will
make necessary deductions.
Seams: As standard, shades that are both
wider and taller than the maximum available
fabric width in any given style will be seamed
horizontally (“transversed” or “railroaded”) at
Inside Measure
Draper’s discretion with the seam placed as
high as possible (from the bottom of the shade
up) unless otherwise specified.
Stays: Draper may, at our sole discretion,
add stays to the shade in pockets or at seam
locations to improve surface flatness and
reliable operation. Stays are made of spring
steel and measure ¼” wide and are inserted
in pockets in the fabric measuring approximately 11/8” wide. Shades over 10’ wide OR
over 14’ in height will have stays placed at intervals of no more than 96” (Colossal shades
taller than the widest fabric width have stays
at intervals of no more than 63”).
Note for LightBloc and Skylight Systems:
IM LightBloc—Draper will deduct 1/8” from
your exact opening dimensions in both width
and length. Be sure several measurements
are taken to discover any irregularities in the
opening.
Outside Measure
IM Skylight—Draper will deduct 3/4” from
your exact opening dimensions in both width and length. Draper provides angles to be installed
around the opening and the shade rests on the angles. Be sure several measurements are
taken to discover any irregularities in the opening.
OM LightBloc and Skylight—Draper will fabricate the unit to your exact dimensions, taking
no deductions.
Note which units, if any, abut at mullions.
Installation Tips
Motor Testing
It is recommended to test and set all motor limits prior to electrician wiring motor. Draper sells a test cord, C116.014, for this. Testing and
setting limits on all motor types before the electrician wires the motor is helpful in finding problems before the motor has to be disconnected
from electricity. Motor can lose their limits in shipping even if they are set at Draper, Inc.
Shimming
This is an installation practice used in the field to correct fabric tracking. Shade fabrics are not smooth surfaces so as they roll on themselves, then they will want to walk left or right. Correcting this tracking can be done through shimming. You increase the diameter of one side of
the shade by adding tape which will draw the fabric towards the applied tape. To shim, you will run the fabric down to where it is attached to the
roller. You will then apply an 1” square piece of duct tape to the roller with half on the roller and half on the shade cloth to the outside edge of the
cloth. You may apply up to three pieces in an overlapping fashion on top of each other to help more severe tracking issues. The larger the piece
of duct tape and the more toward the outside of the roller the tape is attached, then the more the fabric will move to that side.
Page 3 of 124
www.draperinc.com
(765) 987-7999
Terms
In trying to understand motorized shades, it is important to know certain terminology. These terms used by Draper, electricians, and others
when discussing motorized cover how power brought to the shades, wire size used, control types used, and more.
High Voltage or Line Voltage—These terms refer to 110 or greater voltage. In the US and Canadian markets, most high voltage shades jobs
are supplying 110 to 120 VAC to the motors. This type of voltage will most likely be in conduit.
Low Voltage—For Draper shades, this is referring to 24 VDC. Low voltage power comes from a transformer receiving high voltage.
Transformer—For Draper shades, this is an item that changes high voltage to low voltage.
Conduit—This is the metal piping that is used to protect wires in the ceiling or walls.
Gauge—This refers to the diameter of the wires. For Draper high voltage shades, the gauge of wire going from the motor to the controls is typically US 18 gauge. Lower numbers are large diameters.
Pigtail or Motor Lead—This refers to the wires coming off of the motor. The standard length for these is 6’, but they can be ordered up to 24’.
Amps or amperage—This is a measurement of power on an electrical circuit. You may be asked the amp draw of a motor so the electrician
does not put too many motors on an electrical circuit.
Home run—This refers to a straight line of wires being supplied from a singular motor to a singular controller or singular port on a controller.
Parallel Wiring—This refers to 2 or more motors being wired together to a controller or a port on a controller.
Dry Contact—These are the closures on a controller. There are three ports that make up the closure; up, common, and down. The common
port is sending out power. When the common port connects with either the up or down port then the shade will react in that direction. This type
of closure allows for low voltage systems to operate shades.
RS 232, RS 485, RS 422—These are computer languages that can be used to operate shades.
Data Cable and CAT 5—These are the low voltage wire used to carry power to low voltage shades or communication signals between low voltage devices.
Page 4 of 124
www.draperinc.com
(765) 987-7999
Radio Motor Transmitters
There are several types of radio motor transmitters, and here is a listing of them and when you need them. A radio motor can learn up to
twelve different transmitters.
-
Single Channel Transmitter, C072.011—This is a one channel remote for operating one shade or one group of shades. It is able to
send an up, stop, down, and intermediate stop command.
-
Four Channel Transmitter, C072.012—This is a four channel remote with a 5th channel that can be used as well for operating up to 5
groups of shades in individually or 4 groups individually and as a group. It is able to send an up, stop, down, and intermediate stop command per channel.
-
Single Channel Wall Switch, C112.074—This is a one channel wall switch for operating one shade or one group of shades. It is able to
send an up, stop, down, and intermediate stop command.
-
Four Channel Wall Switch, C112.076—This is a four channel remote with a 5th channel that can be used as well for operating up to 5
groups of shades in individually or 4 groups individually and as a group. It is able to send an up, stop, down, and intermediate stop command per channel.
-
20 Channel Transmitter, C072.043—This is a 20 channel remote which can be used to operate 20 groups of shades. It has timer,
vacations, and other user functions that one may enjoy. A single or four channel remote is required to first set the motor limits before
using this transmitter.
-
Chronis Timer, C072.033—This single channel transmitter is used to run radio motors at certain programmed times. A single or four
channel remote is required to first set the motor limits before using this transmitter.
-
Dry Contact Interface, C156.100—This single channel transmitter sends out a command based on the connections made on the dry
contact inputs. This device is used for interfacing radio motors with low voltage control systems. A single or four channel remote is
required to first set the motor limits before using this transmitter.
-
Universal RTS Interface, C156.101—This is a 16 channel transmitter which sends out commands based on the inputs of IR, RS 232,
and RS 485 that it receives. A single or four channel remote is required to first set the motor limits before using this transmitter.
-
RTS Repeater, C072.044—This repeater plugs into a wall, and it is used to extend range of a transmitter by picking up a signal and
re-emitting it.
-
Sunis RTS Light Sensor, C156.117—This is a single-channel interior light sensor. This device can have light sensitivity settings. Adjust
to operate radio motor shades per your lighting needs.
www.draperinc.com
(765) 987-7999
Page 5 of 124
Telis Transmitters
Telis hand-held radio transmitters are compatible with RTS Motors and external RTS receivers such
as Centralis or HRC-RF.
Each Telis transmitter can operate any number of motors or receivers. Each motor or receiver will
memorize up to 12 transmitters.
The four channel transmitter can be used for group and individual control of window treatments.
MECHANICAL SPECIFICATIONS
Overall Dimensions: L: 5¼ in. W: 15/8 in. D: 11/16 in.
Operating Temperature: 41 F to 104 F
Typical Range (Optimal Conditions): 65 ft.
ELECTRICAL SPECIFICATIONS
Power: 3V Lithium battery, Cr2430
Frequency: 433.42 Mhz
GENERAL OPERATING INSTRUCTIONS
NOTE: Please Consult RTS Motor or Receiver Instructions for Specific Product Details.
1. Place the RTS Motor or Receiver in Programming Mode as described in the Operating Instructions.
2. Press the programming button on the back of the Telis transmitter to program it in the memory of the RTS Motor or Receiver.
3. Pressing the UP button will raise the window covering, while pressing the DOWN button will lower it. To stop the window covering, simply
press the STOP button.
4. Pressing the Channel Selector button on the four channel transmitter will switch between channels 1 through four and the group (or fifth)
channel. The corresponding LEDs will light to indicate the channel selected.
Channel selector button
on MultiChannel
Transmitter
Page 6 of 124
www.draperinc.com
(765) 987-7999
20-Channel Transmitter
This is a 20-channel, Composio, handheld transmitter for Radio Motors. It has an interactive screen for setting functions. It also has a dock
for placing the transmitter on the wall. The Composio gives one greater control over large groupings of Radio Motors than other transmitters.
The Composio cannot be used to program limits like the 1 and 4 channel transmitters.
Programming instruction for the transmitter come packaged with it. It is a fairly large with several options for a user to select.
Remote Size
67/8" H x 23/16" W x 1" Thick
Dock Size-screws to wall
3" H x 13/16" W
Range
65' under ideal conditions, repeaters can be added.
Page 7 of 124
www.draperinc.com
(765) 987-7999
DECORA RTS SWITCH
Operating Instructions
The Decora RTS Switch (single or four channel) is a wireless radio transmitter compatible
with all the RTS MOTORS, and externally mounted RTS receivers.
- Commands are transmitted by radio waves at 433.42 MHz.
- Power: 3V lithium battery, CR 2430 type
- Operating temperature: +5 C/41 F to +40 C/104 F
- Range: Up to 65 Ft.
- Fits into standard Decora Wall Plates
LIVING RM
SHADES
BLINDS
AWNING
ALL
STOP
This is a low voltage device which does not need to be mounted inside an electrical box. It
can be mounted adjacent to an existing Decora style light switch or, as a stand alone device using the specific low voltage bracket (included).
GROUPING DECORA RTS WALL SWITCHES
1. Set all the receivers/motors you wish to control into PROGRAMMING MODE.
2. Press the programming button (1 sec. max.) on the side of the Decora RTS switch.
3. All the receivers/motors within the transmitted range of the Decora RTS will confirm the addition of the NEW Decora RTS.
REMOVING A DECORA RTS FROM THE RECEIVER’S MEMORY
1. Please refer to section B, “Adding multiple Decora RTS wall switches”. The procedure is exactly the same for removing the Decora RTS
wall switch. If the Decora RTS was previously recorded it will be deleted. If it was not in memory it will be added to the memory of the
receiver/motor.
*NOTE:
It is possible to activate an external receiver with another Decora Transmitter without having access to the programming button on the PCB
of the receiver. Treat the external receiver as you would a motor and press and hold the programming button of the Decora RTS (for 3 sec.) then
briefly press the programming button of the Decora RTS switch you wish to add/remove.
FRONT VIEW
SIDE VIEW
LIVING RM
SHADES
BLINDS
AWNING
ALL
STOP
Select the
Channel
Programming
Button
Page 8 of 124
www.draperinc.com
(765) 987-7999
DECORA RTS SWITCH
Mounting Instructions
The special low-voltage bracket is specifically designed to mount the Decora RTS wall switch next to an existing Decora light switch with an
electrical box already behind the drywall. This bracket differs from other off the shelf low-voltage brackets because it is offset to one side. This
allows a double gang Decora style cover plate to fit over both switches without installing a double gang electrical box behind the drywall. It is
also possible to mount this bracket as a stand alone low voltage device.
INSTALLATION PROCEDURE
NOTE: This bracket is designed for an existing electrical box already behind the sheetrock. If a retrofit electrical box was used, it is recommended to remove the single gang and replace it with a double gang retrofit box.
1. Orient the brackets flat side
against the wall keeping the thin
side closest and centered with the
existing electrical switch box.
2. Align the inside edge of the thin side on
the bracket with the outside edge of the
switch box. Then trace the inside shape (as
shown by the dashed line in the diagram) of
the bracket. (sheetrock not shown for clarity)
15/8"
3. Cut traced opening into drywall. Be careful
not to make the opening larger than necessary, to ensure a tight fit. Use dimensions in
diagram below. Do not exceed these dimensions to ensure a proper fit of the bracket.
Existing Electrical Box
Wood 2 x 4
37/16"
37/16"
Inside
Edge
thin side
of bracket
5. To keep the bracket
in place, bend tabs
90 around drywall, as
tightly as possible.
6. Mount low voltage switch into bracket, with its
edge flush against electrical switch box.
7. Finish the installation by
mounting a standard double
gang Decora switch cover plate,
over both switches
2 5/ 8"
4. Insert bracket (as shown)
into hole, keeping the thin
side closest to the existing
switch box, and laying flat on
drywall.
15/8"
1 5 / 16 "
A l l ow A ntenna to be
extended freel y i nsi de w al l
drywall
BATTERY LIFE
HOW TO REPLACE THE BATTERY
The RTS Switches are powered by a 3V battery (type 2430) which
provides about 3 years operation assuming 4 operations per day.
When the battery becomes discharged, the control LED no longer
lights up when a command is sent, and the command is not carried
out.
1. Remove the screws on the back cover of the RTS Switch.
2. Slide the battery out of its holder by pushing it with a screwdriver.
3. Insert the new battery, maintaining its correct polarity.
NOTE: Do not throw the battery in the trash, but dispose of it properly.
www.draperinc.com
Page 9 of 124
(765) 987-7999
Radio Remote Control Motor Programming Instructions
When you receive a radio remote control motor from Draper, Inc., the motor has no programming on it so it must be learned and programmed to work on the transmitter that you have at the job. Here are the initial programming instructions.
➀ Connect power to 1 motor. Select the transmitter/channel to which you plan to learn the motor. Press and hold the UP and DOWN buttons
at the same time until the motor jogs, then release.
➁ Check the motor run direction by press either the UP or DOWN buttons. This is important because if you do step 3 without doing this step,
then you will need to reset the motor. If you need to reverse the motor direction, then press the STOP button (middle button which might be
labeled MY) for 5 seconds until the motor jogs. Check the direction again to make sure that it works.
➂ Move the motor to its upper limit position. Press the STOP and DOWN buttons at the same time until the motor starts to move down, then
release. You will stop the motor at its lower limit. You can use the UP and DOWN buttons to adjust the motor to the correct lower limit position if need be.
➃ Once the motor is at its lower limit position, then press the UP and STOP buttons at the same time until the motor starts to move up, then
release. The motor should move to the upper limit position in step 3 and stop.
➄ Once the motor has stopped at its upper limit position, then press and hold the STOP button for 5 seconds until the motor jogs.
➅ Now, you must put the motor into USER mode. Find the programming button which is a small button on the back or side of the transmitter
and press it until the motor jogs. Once you have done this, then the motor will operate in normal fashion.
➆ Disconnect power to this motor and move to the next in your installation and start with step 1. Reconnect motor to power when all motors
are programmed.
Reset Motor Instructions
If the motor is not working or responding correctly and you want to reprogram it from the beginning and clear all previous programming,
then follow these steps.
➀ Disconnect the motor from power for 2-5 seconds, reconnect to power for 10-13 seconds, disconnect from power for 2-5 seconds, and
reconnect to power. The motor should move down a little after you reconnect to power the last time.
➁ You will then need to find the programming button which is a small button on the back or side of the transmitter. You will need to depress the
button for 10-15 seconds. The motor should jog up and down once then pause and jog a second time during this time period. Once the motor has completed its second jog, then you can start at step 1 of initial programming as the motor is clear.
Setting an Intermediate Stop
This is done once the shade is in USER mode from the initial programming at top.
➀ Move the motor to the mid-point location that you want the stop located.
➁ Press and hold the STOP button until the motor jogs.
➂ Now, if you hit the STOP button when the motor is standing still, it will move to that intermediate location.
➃ If you want to delete the stop, then go to the intermediate stop and press and hold the STOP button until the motor jogs.
Add/Delete a Channel/Transmitter
To add a channel/transmitter, you just need to follow a couple of steps.
➀ Select the channel/transmitter that is currently operating the motor, then press the programming button until the motor jogs.
➁ Select the new channel/transmitter that you want to add to the motor, then press the programming button until the motor jogs.
➂ The motor should now work on both the old and new channel/transmitter.
To delete a channel/transmitter, you just need to follow a couple of steps.
➀ Select the channel/transmitter that is currently operating the motor and you want to keep, then press and hold the programming button until
the motor jogs.
➁ Select the channel/transmitter that you want to remove, then press and hold the programming button until the motor jogs.
➂ The motor should now only work on the channel/transmitter on step 1.
Adjust Limits in User Mode
If your initial limits have changed or you want to fine tune a motor, you do not need to reset the motor and re-program it. You can just
change the limits with these steps.
➀ Move the motor to the limit (upper or lower) that you want to change.
➁ Press and hold the UP and DOWN buttons until the motor jogs.
➂ Move the motor to its new limit location.
➃ Press and hold the STOP button until the shade jogs.
These instructions are different for low voltage and Intelligent motors with radio technology.
Page 10 of 124
www.draperinc.com
(765) 987-7999
RTS Dry Contact Interface
Operating Instructions
The RTS Dry Contact Interface can be used to communicate between home automation or other third party systems and RTS Motors and Inteo
line of controls.
BatteryHolder
RED
BLACK
GREEN
WHITE
ProgrammingButton
NOTE: Please consult RTS Motor Instructions for specific product details.
1 Place the RTS Motor in Programming Mode as described in the individual product operating instructions.
2 Press the programming button on the RTS Interface to program it in the memory of the RTS Motor.
3 To activate an UP command, a momentary contact (relay) closure is required between the WHITE and GREEN wires.
4 To activate a DOWN command, a contact closure is required between the BLACK and GREEN wires.
5 To activate a STOP command or Intermediate Position, a contact closure is required between the RED and GREEN wires.
®
Page 11 of 124
Universal RTS Interface II
DESCRIPTION
The addressable Universal RTS Interface II (URTSI II) can be used to
communicate between home automation or other third party systems and
RTS Motors and controls. It is capable of individual or group control, and
can be operated via infrared remote, RS232 and RS485 serial communication. Once an input is activated, an RTS radio command is sent to the
automated window treatment.
Part Number: 1810872
CONNECTION DIAGRAM
IR Sensor Modular Pin-Out
(Shown aTb-side Down)
Pin 4
Back of Interface control box
Common
+5V DC
Power
Antenna
IR Signal
Pin 1
N/C
RS232/RS485 Pin-Out
(Shown aTb-side Down)
IR Sensor Input
RS485 Input/Output
Pin 8
RS232 Input
or RS485 Input
Common
RS232 RX
+5V DC
Front of Interface control box
A
B CDE
F01
789
DOWN Button
3 4 56
STOP Button
Pin 1
2
UP Button
Power/Transmit LED
RS232 TX
RS485 B
RS485 A
URTSI Address or
RTS Channel
Rotary Switch
NOTE: Do Not remove antenna.
If a new antenna is needed, it
must beordered from Somfy to
ensure FCC requirements are
maintained.
Program Button
FCC INFORMATION
This device complies with Part 15 of the FCC Results. Operation is subject to the following two conditions:
1. This device may not cause harmful interference, and
2. This device must accept any interference received, including that which may cause undesired operation.
NOTE: This equipment has been tested and found to comply with the limits for CLASS B digital device, pursuant to Part 15 of FCC Rules. These limits are
designed to provide reasonable protection against harmful
interference when the equipment is operated in a commercial environment. This equipment generates, uses and can radiate radio frequency energy and , if not
installed and used in accordance with the instructions,
may cause harmful interference to radio communications. However, there is no guarantee that interference will not occur in a particular installation. If this equipment does cause harmful interference to radio or
television reception, which can be determined by turning the equipment off and on, the user is encouraged to try to correct the interference by one or more of
the following measures:
1. Reorient or relocate the receiving antenna
2. Increase the separation between the equipment and receiver
3. Connect the equipment into an outlet on a circuit different from that to which receiver is connected
4. Consult the dealer or experienced radio/TV technician for help.
WARNING
Changes or modifications not expressly approved by the manufacturer could void the user’s authority to operate the equipment.
®
Page 12 of 124
OPERATION
A. INITIAL SETUP
1. Connect a 9v DC transformer (included) to the receptacle on the back of the control box. The LED will light green to indicate
power.
2. Be careful not to mount or enclose Interface on or in metal, as this may effect radio reception.
3. Set the RTS Receiver or motor into its Programming Mode. Refer to the installation instructions of the relevant RTS receiver
or motor for this procedure.
NOTE: for initial programming provide power only to the motor or control being programmed.
4. Using the rotary switch, select the channel to be programmed. Letters A through F stand for channels 10 through 15, 0 for
16. Briefly press the programming button (1 sec. max), the window treatment will jog to indicate the channel has been
memorized.
5. Repeat the steps above for each channel or product to be memorized, up to 16.
6. To test the control operation, simply press the UP, STOP or DOWN buttons on the front of the control. The window treatment
should move appropriately. The LED will flash red to indicate the radio signal has been transmitted.
B. INFRARED OPERATION
1. The RTS Interface is compatible with Somfy’s multichannel transmitter. Connect an infrared sensor to the appropriate connector on the back of the Interface.
2. Each individual motor is activated by first aiming the transmitter at the sensor and pressing the desired unit number on the
transmitter and then pressing the UP or DOWN buttons. Press the center button to STOP the window treatment at any time.
C. RS232 OPERATION
1. The Somfy RS232 interface uses the following communications settings: 9600 Baud, 8 Data Bits, 1 Stop Bit, No Parity
2. Set the rotary switch to position 1.
3. The basic format for communication is as follows: URTSI ADDR MOTOR CHAN DIR
The URTSI address is 01.
The motor channel should be 2 digits from 01 to 16.
The directional commands are: U = Up D = Down S = Stop (Must be Capital letters)
4. Examples:
Motor 1 UP: 0101U
Motor 5 DOWN: 0105D
Motor 12 STOP: 0112S
D. RS485 OPERATION
1. The Somfy RS485 interface uses the following communications settings: 9600 Baud, 8 Data Bits, 1 Stop Bit, No Parity
2. With RS485, it is possible to connect 16 Universal RTS Interfaces on one network. Each Interface will have its own address.
To select the address, set the rotary switch to the desired number. Letters A through F stand for addresses 10 through 15, 0
for 16.
3. The basic format for communication is as follows: URTSI ADDR MOTOR CHAN DIR
The URTSI address should be 2 digits from 01 to 16.
The motor channel should be 2 digits from 01 to 16.
The directional commands are: U = Up D = Down S = Stop (Must be Capital letters)
4. Examples:
URTSI 1, Motor 1 UP: 0101U
URTSI 3, Motor 12 DOWN: 0312D
URTSI 14, Motor 9 STOP: 1409S
URTSI 10, Motor 15 UP: 1015U
MECHANICAL SPECIFICATIONS
Overall Dimensions: L: 3 in. W: 4 in. D: 1 3/8 in.
Typical Range (Optimal Conditions): 65 ft.
ELECTRICAL SPECIFICATIONS
Power: 9V DC, 200mA
Frequency: 433.42 Mhz
Page 13 of 124
RTS Repeater
Description
The RTS Repeater can be used in installations to extend the range of the standard Radio Technology signal. It will receive the signal from a
Telis or similar device and retransmit the signal to a RTS compatible motor or receiver.
Part Number 1810686
Mechanical Specifications
Operating Procedures
Overall Dimensions: L: 4 in. W: 2¼ in. H: 13/8 in.
Frequency: 433.42MHz
Range: 60ft
Simply plug the receiver into any 120v AC outlet. It should be located
at least halfway between the transmitting device (Telis) and receiving
device (RTS Motor). The red LED will blink, indicating communication.
®
Page 14 of 124
Radio Motor Accessories
In the previous section radio motor transmitter information was given. This section talks about the accessory parts that come with Radio Motors. We have broken down the accessories and to which motor that they belong.
Battery motor accessory is:
Battery Wands- Wands are included with new battery motor shades. The battery wand replacements are part no. C105.005. There are now
reloadable AA battery wands available and part no. is C105.006.
Battery Cables
Part No.
C116.035
C116.036
C116.037
Item
10" Battery Cable
48" Battery Cable
96" Battery Cable
Low Voltage motor accessories are:
Transformers- Transformers are need to supply power to each low voltage motors. The transformers come in different amperages to power different quantities of motors.
Part No.
C215.009
C215.010
C215.011
C215.012
C215.013
C215.014
C215.015
C215.016
C215.017
OtherPart No.
C044.172
C044.173
C202.023
C112.115
C112.116
Item
24VDC, 1.66A for 1 motor
24VDC, 2.5A for 1 motor
24VDC, 5A for 3 motor
24VDC, 10A for 6 motors
24VDC, 15A for 9 motors
24VDC, 20A for 12 motors
24VDC, 5A for 3 motors
24VDC, 10A for 6 motors
24VDC, 20A for 12 motors
Type
Plug-in outlet
Plug-in outlet
Plug-in outlet
Plug-in outlet
Plug-in outlet
Plug-in outlet
Din Rail Mount
Din Rail Mount
Din Rail Mount
Item
5-motor Power Distribution Panel
10-motor Power Distribution Panel
DCT Motor Limit Tool
DCT White Switch
DCT Ivory Switch
Radio Motor, high voltage, accessories are:
Motor Pigtails- Pigtails are needed at different length to connect the motor to power. These motor leads can have a 3 prong plug attached to
connect to an outlet or be bought with a plug already molded. The standard is 6’ with no 3 prong plug.
Part No.
C107.043
C107.044
C107.045
C107.021
C107.039
C107.040
Item
12’ RTS Motor cable, no plug
24’ RTS Motor cable, no plug
3’ RTS Motor cable, with 3 prong NEMA plug
6’ RTS Motor cable, with 3 prong NEMA plug
12’ RTS Motor cable, with 3 prong NEMA plug
24’ RTS Motor cable, with 3 prong NEMA plug
Standard Motor Accessory to turn the motor into a radio motor is:
RTS Receiver for Standard Motor- C156.120
®
Page 15 of 124
Battery Wands
Battery Wands are the power source for battery motors. Wands do come with every motor purchased. Replacement wands can be purchased if needed. Draper only uses the 12V double battery wand or reloadable wand.
Battery life is highly variable depending on the shades size and number of operations that one runs. Typically, the life is 1 to 3 years. Another
thing other than shade size and operation which may reduce battery life is RF interface.
If a battery motor is reading RF interface from an item, then it will stay on and drain battery power much faster. There is no way of knowing if
there is interface draining the motor until it happens. Also conditions can change over time depending on whom or what is the source of the RF
interface.
Reloadable wands will use 8 AA batteries to obtain the 12V needed to run the shade.
Battery Motors will run at different speeds depending on size of shade and type of battery supplying power.
Mounting battery wands can be done with the clips that are sent with the motors. There are 2 wands to mount when install 12V batteries and
just one to mount when installing reloadable wands.
Battery Wand Size—12V Battery—1 Battery size
16" long x 11/16" diameter
Reloadable Wand Size
18" long x 11/16" diameter (screw on cap is ¾" diameter)
®
Page 16 of 124
Plug-In Transformers
These transformers are for supplying 24VDC to our low voltage motors. There are 6 types of transformers, but the numbers and type of
these transformers are subject to change at any time without notice.
These transformers are not special to window shade motors and you may source a transformer which meets the power requirements
needed on your own. If you want something different than we carry, we recommend that you do this.
Plug-in transformers are called this because they plug into an outlet for power.
They will then feed power directly to a motor or a power panel feeding motors. The dims of the current transformers offered are as listed
below.
Single Motor- Wall Plug-in
Dims: 2¼" w x 4" h x 1¼" d
Single Motor- Floor Plug-in, this transformer does not
plug right into an outlet, but a cord plugs into it then
into the outlet like a laptop transformer.
Dims: 2½" w x 37/8" h x 1¼" d
Three Motor- Table top/shelf Plug-in
Dims: 71/8" w x 2" h x 85/8" d
Six Motor- Table top/shelf Plug-in
Dims: 71/8" w x 2¾" h x 85/8" d
Nine Motor- Table top/shelf Plug-in
Dims: 71/8" w x 2¾" h x 85/8" d
Twelve Motor- Table top/shelf Plug-in
Dims: 71/8" w x 2¾" h x 85/8" d
®
Page 17 of 124
DIN-Rail Transformer—DR-120
Features:
- AC input range selectable by switch
- Protections: Short circuit/Overload/Over voltage/Over temperature
- Cooking by free air convection
- Can be installed on DIN rail TS-35/7.5 or 15
- UL 508 (industrial control equipment) approved
- LED indicator for power on
- 100% full load burn-in test
- Fixed switching frequency at 55KHz
- 3 years warranty
SPECIFICATION
MODEL
DC Voltage
Rated Current
Current Range
Rated Power
Ripple & Noise (max.) Note 2.
Voltage Adj. Range
Voltage Tolerance Note 3.
Line Regulation
Load Regulation
Set Up, Rise Time
Hold-Up Time (Ty.)
Voltage Range
Frequency Range
Efficiency (Typ.)
AC Current (Typ.)
Inrush Current (Typ.)
Leakage Current
OUTPUT
INPUT
Overload
PROTECTION
Over Voltage
Over Temperature
ENVIRONMENT
Working Temp.
Working Humidity
Storage Temp. Humidity
Temp, Coefficient
Vibration
SAFETY &
EMC (Note 4.)
Safety Standards
Withstand Voltage
Isolation Resistance
EMI Conduction & Radiator
Harmonic Current
EMS Immunity
OTHERS
NOTE: ➀
➁
➂
➃
MTBF
Dimension
Packing
DR-120-24
24V
5A
0 – 5A
120W
60mVp-p
24 – 28V
±1.0%
±0.5%
±1.0%
36ms/230VAC 32ms/115VAC at full load
88 – 123VAC/176-264VAC by switch 248-370VDC
47 – 63 Hz
64%
2.6A/115VAC 1.6A/230VAC
Cold Start 20A/115VAC 40A/230VAC
<3.5mA/240VAC
105 – 150% rated output power
Protection type: Constant current limiting, recovers
Automatically after fault condition is removed
29-33V
Protection type: Shut down o/p voltage, re-power on to recover
90°C±5°C(TSW1)
Protection type: shut down o/p voltage, recovers automatically
After temperature goes down
-10 – 60+C (refer to output load deraling curve
20 – 90% RH non-condensing
-20 - +65C, 10 – 95% RM
±0.03%/C (0-50°C)
10 – 500Hz, 2G 10min./1cycle.60min.each along X, Y, Z axes;
Mounting Compliance to IEC60068-2-6
UL508, UL60950-1, TUV EN60950-1 approved
!/P-O/P.3KVAC I/P-FG.1.5KVAC 0/P-FG.0.5KVAC
I/P-O/:, I/P-FG, O/P-FG:100M Ohms/500VDC
Compliance to EN55011, EN55022, (CISPR22) Class B
Compliance to EN61000-3-2,-3
Compliance to EN61000-4,2,3,4,5,6,8,11, ENV50204, EN55024,
EN61000-6-2 (EN50082-2), heavy industry level, criteria A
136.8Khrs.min. MIL-HDBK-217F (25°C)
65.5 x 125.2 x 100 mm (W x H x D)
0.78Kg; 20pcs/16.5Kg/1,29CUFT
All parameters NOT specially mentioned are measured at 230VAC input, rated load and 25°C of ambient temperature.
Ripple & noise are measure at 20MHz of bandwidth by using a 10” twisted pair-wire terminated with a 0.1uf & 47uf parallel capacitor.
Tolerance: includes set up tolerance, fire regulation and load regulation.
The power supply is considered a component which will be installed into a final equipment. The final equipment must be reconfirmed that it still
meets EMC directives.
®
Page 18 of 124
DIN-RailTransformer—DR-120—Page 2
Page 19 of 124
www.draperinc.com
(765) 987-7999
DIN-RailTransformer—DR-240
Features:
-
Universal AC input/full range
Built in active PFC function
Protections: Short circuit/Overload/Over voltage/Over temperature
Cooking by free air convection
Can be installed on DIN rail TS-35/7.5 or 15
UL 508(industrial control equipment/approved
LED indicator for power on
100% full load burn-in test
Fixed switching frequency at 100KHz
3 years warranty
SPECIFICATION
MODEL
DRP-240-24
24V
10A
0 – 10A
240W
80mVp-p
OUTPUT
24 – 28V
±1.0%
±0.5%
±1.0%
800ms, 40ms/230VAC 800ms, 40ms/115VAC at full load
24ms/230VAC 24ms/115VAC at full load
65 – 264VAC 120 – 370VDC
47 – 63 Hz
INPUT
84%
2.8A/115VAC 1.4A/230VAC
Cold Start 27A/115VAC 45A/230VAC
<3.5mA/240VAC
105 – 150% rated output power
Protection type: Constant current limiting, recovers
Overload
automatically after fault condition is removed
30 – 36V
PROTECTION
Over Voltage
Protection type: Shut down o/p voltage, re-power on to recover
100°C±5°C(TSW1)detect on heat sink of power transistor
Over Temperature
Protection type: shut down o/p voltage, recovers automatically
after temperature goes down
Working Temp.
-10 – 70+C (refer to output load derating curve)
Working Humidity
20 – 90% RH non-condensing
ENVIRONMENT
Storage Temp. Humidity
-20 - +85C, 10 – 95% RH
Temp, Coefficient
±0.03%/C (0-50°C)
10 – 500Hz, 2G 10min./.1cycle.60min.each along X, Y, Z axes;
Vibration
Mounting Compliance to IEC60068-2-6
Safety Standards
UL508, UL60950-1, TUV EN60950-1 approved
Withstand Voltage
!/P-O/P.3KVAC I/P-FG.1.5KVAC 0/P-FG.0.5KVAC
SAFETY &
Isolation Resistance
I/P-O/P, I/P-FG, O/P-FG:100M Ohms/500VDC
EMC (Note 4.)
EMI Conduction & Radiation
Compliance to EN55011 (CISPR11) EN55022 (CISPR22), EN61204-3 Class B
Harmonic Current
Compliance to EN61000-3-2,-3
Compliance to EN61000-4,2,3,4,5,6,8,11, ENV6150204, EN55024,
EMS Immunity
EN61000-6-2 (EN50082-2), heavy industry level, criteria A
MTBF
105.5Khrs.min. MIL-HDBK-217F (25°C)
OTHERS
Dimension
125.5°125.2°100mm(W”H”D”)
Packing
1.2Kg; 12pcs/16.5Kg/1.29CUFT
NOTE: ➀ All parameters NOT specially mentioned are measured at 230VAC input, rated load and 25°C of ambient temperature.
➁ Ripple & noise are measure at 20MHz of bandwidth by using a 10” twisted pair-wire terminated with a 0.1uf & 47uf parallel capacitor.
➂ Tolerance: includes set up tolerance, fire regulation and load regulation.
➃ The power supply is considered a component which will be installed into a final equipment. The final equipment must be reconfirmed that it still
meets EMC directives.
➄ Derating may be needed under low input voltages. Please check the derating curve for more details.
DC Voltage
Rated Current
Current Range
Rated Power
Ripple & Noise (max.) Note 2.
Voltage Adj. Range
Voltage Tolerance Note 3.
Line Regulation
Load Regulation
Set Up, Rise Time
Hold-Up Time (Ty.)
Voltage Range
Note 5.
Frequency Range
Efficiency (Typ.)
AC Current (Typ.)
Inrush Current (Typ.)
Leakage Current
®
Page 20 of 124
DIN-RailTransformer—DR-240—Page 2
Page 21 of 124
www.draperinc.com
(765) 987-7999
DIN-RailTransformer—DR-480S
Features:
- AC input range selectable by switch
- Built in passive PFC function compliance to EN61000-3-2
- High-efficiency 89% and low dissipation
- Protections: Short circuit/Over Load/Over voltage/Over temperature
- Cooling by free air convection
- Built-in constant current limiting circuit
- Can be installed on DIN rail TS-35/7.5 or 15
- UL 508 (industrial control equipment) approved
- EN61000-6-2(EN50082-2) industrial immunity level
- 100% full load burn-in test
- 3 years warranty
SPECIFICATION
MODEL
OUTPUT
INPUT
DC Voltage
Rated Current
Current Range
Rated Power
Ripple & Noise (max.) Note 2.
Voltage Adj. Range
Voltage Tolerance
Note 3.
Line Regulation
Load Regulation
Set Up, Rise Time
Hold-Up Time (Ty.)
Voltage Range
Note 5.
Frequency Range
Power Factor (Typ.)
Efficiency (Typ.)
AC Current (Typ.)
Inrush Current (Typ.)
Leakage Current
Overload
PROTECTION
Over Voltage
Over Temperature
ENVIRONMENT
Working Temp.
Working Humidity
Storage Temp. Humidity
Temp, Coefficient
Vibration
SAFETY &
EMC (Note 4.)
Safety Standards
Withstand Voltage
Isolation Resistance
EMI Conduction & Radiation
Harmonic Current
EMS Immunity
OTHERS
MTBF
Dimension
Packing
®
DRP480S-24
24V
20A
0 – 20A
480W
120mVp-p
24 – 28V
±1.0%
±0.5%
±1.0%
1200ms, 40ms/230VAC,115VAC at full load
23ms/230VAC, 115VAC at full load
90 – 132VAC/180 264VAC by switch 254-370FDC
47 – 63 Hz
≥ 0.7/230VAC only
89%
8A/115VAC 3.2A/230VAC
Cold Start 27A/115VAC 45A/230VAC
<3.5mA/240VAC
105 – 150% rated output power
Protection type: Constant current limiting, recovers
automatically after fault condition is removed
30 – 36V
Protection type: Shut down o/p voltage, re-power on to recover
100°C±5°C(TSW: detect on heat sink of power switch
Protection type: shut down o/p voltage, recovers automatically
after temperature goes down
-20 – +70°C (refer to output load derating curve)
20 – 90% RH non-condensing
-40 - +85°C, 10 – 95% RH
±0.03%/C (0-50°C)
Component 10 – 500Hz, 2G 10min./.1cycle.60min.each along X, Y, Z axes; Mounting
Compliance to IEC60068-2-6
UL508, UL60950-1, TUV EN60950-1 approved
!/P-O/P.3KVAC I/P-FG.1.5KVAC 0/P-FG.0.5KVAC
I/P-O/P, I/P-FG, O/P-FG:100M Ohms/500VDC
Compliance to EN55011, EN55022, (CISPR22) Class B
Compliance to EN61000-3-2,-3
Compliance to EN61000-4,2,3,4,5,6,8,11, ENV50204, EN61204-3,
EN61000-6-2 (EN50082-2), heavy industry level, criteria A
187.9Khrs.min. MIL-HDBK-217F (25°C)
227°125.2°100mm(W”H”D”)
2.60Kg; 6pcs/16.6Kg/1.75CUFT
NOTE: ➀ All parameters NOT specially mentioned are measured at 230VAC input, rated
load and 25°C of ambient temperature.
➁ Ripple & noise are measure at 20MHz of bandwidth by using a 10” twisted pairwire terminated with a 0.1uf & 47uf parallel capacitor.
➂ Tolerance: includes set up tolerance, fire regulation and load regulation.
➃ The power supply is considered a component which will be installed into a final
Page 22 of 124
equipment.
➄ The final equipment must be reconfirmed that it still meets EMC directives.
DIN-RailTransformer—DR-480S—Page 2
Page 23 of 124
www.draperinc.com
(765) 987-7999
5 and 10 Motor Power Panels
The 5 & 10 motor power panels are for powering the Low Voltage Radio Motors. They are not required, but they do make installation easier.
A transformer is still needed, and it will feed power to the panel. You can parallel wire the motors directly into the power feed off the transformer. This, however, makes connecting and disconnecting the motor from power to program it difficult and cumbersome. With a power panel
you can disconnect or connect each motor individually for programming, this will make installation quicker.
A power panel is also set-up to work with wiring that might have been pulled for a different system.
The diagram below shows the panel and how motors plug into it.
10 Motor Panel = C044.173
5 Motor Panel = C044.172
22 Gauge/2 conductor
150 Ft. Maximum
Sonesse 30 Motor
Connect motor to
terminals 5 & 6 of
motor connector
Connect motor
connector to
power panel
7
6
5
4
3
2
1
12/24V DC
Input
_
+
Power
LEDs
2A Fuse
®
Power Supply Input
18 Gauge/2 Conductor
5 Ft. Maximum
8 Motor Power Panels
The Power Distribution Panel is used to distribute 12 or 24V DC power to up to 8 low voltage motors.
The panel includes mounting snaptrack and mating motor connectors. Typically the panel and power supply is installed in an electrical cabinet supplied by others.
There are also 5- and 10-motor panels.
Part Number: TBA
22 Gauge/2 conductor
150 Ft. Maximum
Sonesse 30 Motor
Connect motor to
terminals 5 & 6 of
motor connector
Connect motor
connector to
power panel
7
6
5
4
3
2
1
12/24V DC
Input
_
+
Power
LEDs
Power Supply Input
18 Gauge/2 Conductor
5 Ft. Maximum
2A Fuse
®
Page 25 of 124
RTS Receiver for Standard Motor
The Universal Receiver provides RTS capability to standard
motors. It can be used stand-alone as a radio control, or with RTS
sensors for sun and wind control. Tow user-defined intermediate positions can be programmed. This control is packaged in a weatherproof
enclosure and includes watertight strain-relief fittings for wires entering the box.
Part No.: C156.120
INSTALLATION PROCEDURES
1 The Universal Receiver should be mounted as close to the motor as
possible. If mounted outside, ensure that the connections are facing down
to avoid rain seepage. Avoid mounting the control against any metallic
surface, as this may affect radio reception.
2 Connect high voltage wires according to the wiring diagram on the next
page. Make sure to use included watertight strain relief fittings to maintain
the weatherproofing of the enclosure.
3 If used, the RTS sensor should be placed close to the awning or shading
system to make sure the wind speed or sun intensity is measured at the
product. Guard against installing the wind sensor too close to an obstruction such as a chimney, gutter or the window covering itself, which could
block the wind and cause erroneous sensor readings. The sensor should
also not be mounted in the shade or be obstructed by trees, to ensure
accurate sunlight readings.
PROGRAMMING PROCEDURES
RECORDING THE INTERMEDIATE POSITION FROM THE TOP OF THE WINDOW TREATMENT
- Bring the window treatment to its upper limit using the Telis transmitter. Press the DOWN and MY buttons simultaneously until the awning begins to move,
then release.
- Stop the window treatment at the intermediate position desired. Press the MY button for 2 seconds to memorize that position.
RECORDING THE INTERMEDIATE POSITION FROM THE BOTTOM OF THE WINDOW TREATMENT
- Bring the motorized treatment to its lower limit. Press the UP and MY buttons simultaneously until the awning begins to move, then release.
- Stop the window treatment at the position desired. Press the MY button for 2 seconds to memorize that position.
DELETING AN INTERMEDIATE POSITION
- Briefly press the MY button of the Telis transmitter to reach the desired intermediate position.
- Continue to press the MY button for 10 seconds until the programming lED on the Central is Receiver stops blinking. That position is now deleted.
TO ADD A NEW TRANSMITTER or SENSOR TO THE MEMORY OF THE RECEIVER
- Press the programming button, for more than 2 seconds, on a transmitter that is already memorized by the Universal Receiver to wake up the receiver. The
programming lED on the Receiver will blink, and the motor will jog. Press the programming button on the new transmitter or sensor to attach it to the
Universal Receiver. The programming lED on the receiver will light and the motor will jog indicating the transmitter or sensor is memorized.
TO REMOVE A TRANSMlffiR or SENSOR FROM THE MEMORY OF THE RECEIVER
- Press the programming button, for more than 2 seconds, on a transmitter that is already memorized by the Universal Receiver to wake up the receiver. The
programming lED on the Receiver will blink, and the motor will jog. Press the programming button on the transmitter or sensor you want to remove from
memory. The programming lED on the receiver will light and the motor will jog indicating that transmitter or sensor will no longer operate the Universal
Receiver.
TO REMOVE All TRANSMITTERS or SENSORS FROM THE MEMORY OF THE RECEIVER
- Press and hold the programming button of the Unviersal Receiver for more than 7 seconds until the lED blinks and the motor jogs twice. This removes All
memorized transmitters or sensors.
®
Page 26 of 124
RTS Receiver for Standard Motor
Page 2 of 2
OPERATING INSTRUCTIONS
System Set Up
① With power off, wire the Universal Receiver as indicated above. Turn all circuit breakers on (motors should not move).
② The motor can be tested using the sequence button located on the Universal Receiver board. Each press of the switch will sequence through
the directions as follows;
DEPRESS 1
UP DIRECTION
DEPRESS 2
STOP
DEPRESS 3
DOWN DIRECTION
DEPRESS 4
STOP
③ Set the Universal Receiver into programming mode by pressing the programming button on the receiver until the LED lights (about 2
seconds). The motor will jog.
④ Press the programming button on the Teli transmitter or RTS sensor to be memorized. The programming LED will blink and the motor will jog
indicating the transmitter has been memorized.
⑤ Operate the motor in the DOWN direction using the radio transmitter.
⑥ The motorized window covering should move down or out. If this is incorrect, turn off the circuit breakers and reverse the red and black wires
of the motor.
Operating Procedures
REMOTE ONLY CONTROL
① Pressing the UP button on the Telis transmitter will move the window treatment up or in. The DOWN button will move the treatment down
or out.
② To stop the motorized product at any time, press the MY button on the transmitter.
③ To reach one of the intermediate positions, the window treatment must first be at the upper or lower limit, and stopped. Pressing the MY
button on the transmitter will move the window treatment to the desired position.
WIND ONLY OPERATION
④ If wind monitoring is desired, an Eolis Sensor RTS or Eolis Wirefree must first be memorized into the receiver. Press the programming button
on the receiver until the LED blinks and the motor jogs. Press the programming button on the bottom of the sensor. The programming LED on
the receiver will light and the motor will jog, indicating the sensor has been memorized.
⑤ Set the desired wind speed on the sensor as specified in the product's operating instructions.
⑥ When the monitored wind speed is greater than the setting, the UP direction will activate after 2 seconds. As long as the wind speed remains
high, all other commands will be ignored.
⑦ When the wind speed drops below the set value, a manual command can be given with the radio transmitter after only one minute.
SUN AND WIND OPERATION
⑧ If sun and wind monitoring is desired, an Eolis Sensor RTS or combination Eolis Wirefree and Sunis must first be memorized into the receiver.
Press the programming button on the receiver until the LED blinks and the motor jogs. Press the programming button on the sensor. The
programming LED on the receiver will light and the motor will jog, indicating hte sensor has been memorized.
⑨ Set the desired wind speed and sun intensity on the sensor as specified in the product's operating instructions.
⑩ When the monitored wind speed is greater than the setting, the UP direction will activate after 2 seconds. As long as the wind speed remains
high, all other commands will be ignored.
⑪ When the measured sun intensity is greater than the set level, a DOWN command is given after a 2 minute delay, assuming no wind is
present. If the upper intermediate position is set, the shade will go to that position. Otherwise, it will go to the lower limit.
⑫ When the sun intensity falls below the set level, the shade will automatically retract after a 15-30 minute delay, assuming no wind is present.
Page 27 of 124
Sunis™ RTS Light Sensor
Programming/Operating/Installation Instructions
DESCRIPTION
The Sunis RTS Light Sensor is a wireless radio transmitter compatible with RTS motors and externally mounted RTS receivers. Window or Sill
mounted, the Sunis RTS operates motorized window coverings in accordance to the amount of sunlight received. Sunlight sensitivity (threshold)
can be adjusted for varying degrees of sunlight intensity.
· Commands are transmitted by radio waves at 433.42 MHZ
· Power: 3V Lithium battery, CR2430
· Operating temperature: 0 deg. C/32 deg. F - +60 deg. C/140 deg. F
· Range: Up to 65ft.
· Mount: Window glass/sill
· Dimensions: Diameter 23/16" /(55.5mm) x Depth ¾" /(19mm)
· Indoor Use Only
STEP ONE: PROGRAMMING
ADDING A SUNIS™ RTS LIGHT SENSOR—INITIAL INSTALLATION
Note: During initial programming, provide power only to motor or RTS receiver being
programmed.
① Carefully remove rear cover to expose sensor control setting panel.
② Set the RTS Receiver or Motor into Programming Mode (Refer to the installation
instructions of the relevant RTS receiver or motor for this procedure).
③ Slide the ON/OFF selector switch to the ON or
On/Off Selector Switch
Control Setting
Panel
Program Button
Position.
④ Using a paperclip or similar device, briefly press the programming button (1 second max)
located onthe Sunis light sensor (see Figure 1). The RTS receiver or Motor will confirm
the addition of the new Sunis light sensor in their respective manners.
Rear Cover
Note: Repeat steps 1-3 when multiple motors are required to operate from the Sunis
light sensor
DELETING A SUNIS™ RTS LIGHT SENSOR FROM MEMORY
① Using a Paperclip or similar device, press and hold the program button (3 sec.) on the
previously addressed Sunis Light Sensor or Telis Transmitter (see Figure 1). The RTS
receiver or motor will confirm programming mode in their respective manners.
Figure 1
② Using a paperclip or similar device, briefly press the programming button (1 sec. max)
located on the Sunis Light Sensor (see Figure 1.) The RTS receiver or Motor will confirm
the deletion of the Sunis Light Sensor in their respective manners.
®
Page 28 of 124
Page 2 of 4
Sunis™ RTS Light Sensor Programming/Operating/Installation Instructions
STEP TWO: INSTALLATION
MOUNTING SUNIS™ LIGHT SENSOR TO WINDOW GLASS OR SILL
① Attach the “screw-in" suction cup mounting device for Window Mount or Sill Mount (see Figure 2).
Window
Glass
Mount
② Determine the appropriate mounting location and throughly clean window glass or sill area of debris
or residue. Firmly press suction cup mount onto INSIDE window (glass or sill) positioning sensor
towards the OUTSIDE of window (see Figure 3).
Note: Sunis light sensor MUST BE free from obstructions in order to correctly sense incoming
light. Sill mount may not be suitable for some window installations.
Window Sill
Mount
Figure 2
Figure 3
STEP THREE: SETTING THE LIGHT (SUN) SENSITIVITY (THRESHOLD)
① Carefully remove rear cover of Sunis Light sensor exposing control setting panel.
② Slide the ON/OFF selector switch to the ON or
Position.
③ Momentarily press the Mode Button, LED Indicator will illuminate to a red color for approx.
15 seconds.
Note: LED indicator light will remain illuminated for approximately 15 seconds. Should
the LED Indicator light extinguish prior to establishing the light sensitivity (threshold)
setting, simply press the MODE BUTTON momentarily to reactivate LED light.
④ Using a small screw driver (or similar device) rotate the Sun Sensitivity Selector to the fully
CLOCKWISE (+) position. LED will remain illuminated (red color) (see Figure 4).
Figure 4
⑤ Slowly rotate the Sun Sensitivity Selector COUNTER CLOCKWISE (-) until the LED indicator illuminates to a green color. A green colored
LED indicates the present light value (threshold) At this value (threshold) the Sunis sensor will provide the necessary DOWN COMMAND
to the motor or RTS receiver.
*Note: Rotating the Sun Sensitivity Selector to a FULL COUNTER CLOCKWISE (-) position will simulate sun if no sun is present. It
is not recommended to leave the selector (Threshold setting) in this position.
www.draperinc.com
(765) 987-7999
Page 29 of 124
Page 3 of 4
Sunis™ RTS Light Sensor Programming/Operating/Installation Instructions
STEP FOUR: OPERATION
The Sunis WireFree RTS Light Sensor cans be operated in either Demonstration Mode (temporary) or Standard (default) mode.
DEMONSTRATION MODE
Demonstration mode reduces the standard operating time delays, permitting almost
instantaneous operating/output response from the Sunis light sensor. This mode facilitates
initial light sensitivity (threshold) settings and quickly demonstrates the operation of the
motorized end product.
① Press and hold MODE BUTTON until LED indicator blinks (color red) LED will continue
to blink for approx. 30 seconds then extinguish (4ee Figure 5).
② If necessary, adjust sun sensitivity (threshold) setting (refer to STEP 3. [4 & 5]) LED will
blink during this mode. Should LED indicator extinguish prior to final setting, simply
press the mode button momentarily to reactivate blinking LED indicator.
③ Sunis RTS light sensor will send a "DOWN" command to the RTS receiver or motor
after 5 seconds of sensing light within the set threshold.
Figure 5
④ Sunis RTS light sensor will send a "UP" command to the RTS receiver or motor IMMEDIATELY after sensing light that HAS NOT reached
(or below) the set threshold.
Note:
① Sunis light sensor will automatically default to standard operating mode after 3 minutes.
② *Rotating the Sun Sensitivity Selector to a FULL COUNTER CLOCKWISE (-) position will simulate sun if no sun is present. It is not
recommended to leave the selector (Threshold setting) in this position.
STANDARD OPERATING MODE
Standard operating mode (default) employs output response time delays.
1 Refer to STEP 3. [1-5] (Setting the Light (Sun) Sensitivity Threshold)
2 Sunis RTS light sensor will send a "DOWN" command to the RTS receiver or motor after 5 Minutes of sensing light within the
set threshold.
3 Sunis RTS light sensor will send a "UP" command to the RTS receiver or motor after 30 Minutes of sensing light that HAS NOT reached
(or below) the set threshold.
Note: LED indicator light will remain illuminated for approx. 15 seconds. To confirm present light level, momentarily press the
mode button to illuminate the LED indicator light.
GREEN LED: INDICATES SUN (Light) WITHIN THRESHOLD SETTING
RED LED: INDICATES SUN (Light) BELOW THRESHOLD SETTING
Note: The Sunis WireFree RTS light sensor is capable of providing control in accordance to light level conditions only.
Once a command is sent, the Sunis will not send another command until there is a change in light condition.
www.draperinc.com
(765) 987-7999
Page 30 of 124
Page 4 of 4
Sunis™ RTS Light Sensor Programming/Operating/Installation Instructions
REPLACING THE BATTERY
The Sunis RTS Light Sensor uses a lithium battery (Type: CR2430).
LED INDICATOR LIGHT will illuminate Orange (color) when battery needs replacing.
① Carefully remove rear cover of Sunis Light sensor exposing the control setting panel
(See Figure 6).
② Firmly grip the molded indentations and rotate control setting panel to open
(counterclock wise) position.
③ Carefully separate from sensor case to expose battery holder.
④ Replace battery with correct rated/type battery. Be certain of battery polarity (+) and (-)
when installing new battery.
Note: Do not use any tools when replacing the battery as there is a risk of
damaging the sensor circuitry.
Figure 6
TROUBLESHOOTING GUIDE
PROBLEM
Window covering does not react to
Sunis Sensor
POSSIBLE CAUSE
· The Sensor Selector is in the “Off” position.
· The Sensor is not programmed to motor or RTS receiver.
· The Light sensitivity (Threshold) values are incorrectly set.
· The Battery is low/weak and needs replacing.
· The Sensor cover is dirty or obstructed.
· The Sensor is incorrectly positioned/mounted.
· Window covering may have received a subsequent
command from another RTS control (i.e., Telis transmitter
or Chronis timer).
Window covering moves too frequently
Window covering reacts incorrectly
·
·
·
The Sensor is in “Demo” mode
A bright light source is affecting the sensor.
Motorized window covering (Directional output) is
programmed incorrectly.
FCC INFORMATION
This device complies with Part 15 of the FCC Results. Operation is subject to the following two conditions:
① The device may not cause harmful interference, and 2. This device must accept any interference received, including that which may cause
undesired operation.
NOTE: This equipment has been tested and found to comply with the limits for CLASS B digital device, pursuant to Part 15 of FCC Rules. These
limits are designed to provide reasonable protection against harmful interference when the equipment is operated in a commercial environment.
This equipment generates, uses and can radiate radio frequency energy and, if not installed and used in accordance with the instructions, may
cause harmful interference to radio communications. However, there is no guarantee that interference will not occur in a particular installation. If
this equipment does cause harmful interference to radio television reception, which can be determined by turning the equipment off and on, the
user is encouraged to try to correct the interference by one or more of the following measures:
① Reorient or relocate the receiving antenna 2. Increase the separation between the equipment and receiver3. Connect the equipment into an
outlet on a circuit different from that to which receivers connected 4. Consult the dealer or experienced radio TV technician for help.
WARNING: Changes or modifications not expressly approved by the manufacturer could void the user’s authority to operate the equipment.
www.draperinc.com
(765) 987-7999
Page 31 of 124
Toggle Switch (SP/DT) and Princess Rocker (DP/DT)
The maintain toggle switch (SP/DT) is the standard switch which is sent with shades. Maintain switches when flipped stay in the up or down
position for one to walk away while the shade moves. Ivory is the standard color (Part 121101), but one can get it in white (Part 121102).
The momentary toggle switch is an alternate switch which one can have in place of the maintained. They come in ivory (Part 121103) or
white (Part 121104). The momentary switch returns to the center/off position when one releases the switch.
The above switch types are rated for 110-230V and 15A. This means that US and export markets can use the switch and the motor draw
through the switch can be up to 12A. The switch fits in a single gang box and uses a conventional light switch cover plate.
The maintained rocker switch (DP/DT) is an up-charge switch which can run two motors at the same time. It comes in ivory (Part C112.012)
and white (Part C112.002). There are two sets of relays on the back of the switch to wire each motor. The motors cannot be parallel wired to the
switch.
The momentary rocker switch is an alternate to the maintained rocker. This switch must be held in place to keep from moving to the center/
off position unlike the maintain switch which stays in position. The momentary switch comes in ivory (Part C112.026) and white (Part C112.043).
The above switch types are rated for 110-230V and 15A. This means that US and export markets can use the switch and the motor draw
through the switch can be up to 12A. The switch fits in a single gang box and uses a princess rocker switch cover plate.
®
Page 32 of 124
KS-3
3-Position Key Switch
®
Technical Data Sheet
Part Numbers:
121018—Maintained
121022—Momentary
USES:
The KS-3 replaces the standard single-station control switch for all products
(screens, shades or projector lifts) where the directional functions (Up and Down)
need to be combined with the security of a key switch.
COMPATIBILITY:
KS-1 Power Supply Key Switch.
The KS-3 is intended as the sole control station, and cannot be used as a multiple
station control. It can, however, be used with the KS-1 power supply key switch,
although having two key switches is redundant.
It is not intended for use with any other control.
CONTACTS:
Two cam-operated Single-Pole, Single-Throw contact blocks (On-Off), wired to
emulate Single-Pole, Double-Throw, Center Off (On-Off-On). Maintained action.
RATING:
600 Volts, UL recognized, CSA recognized.
DESCRIPTION:
3-position key operator.
Cover plate is stainless steel.
Four 6" wire leads: black, black, red and blue (2 commons, down and up).
2¾" x 4½" cover plate fits a single-gang box.
ILLUSTRATION:
ISSUED:
Printed in the U.S.A.
December 2009
Copyright ©2008 Draper, Inc.
Form KS-3_TechDataSheet08
Page 33 of 124
MS-3R, MS-4R
Multiple-Station Control
®
Technical Data Sheet
Part Numbers:
121002—MS-3R and MS-4R
121025—Additional MS-4R
USES:
The MS-3R and MS-4R are 3- and 4-wire versions of the same switch, used for
controlling one screen from multiple locations, using the motor’s voltage (115V or 220V).
MS-4R is the first control station in a series of stations. It is also the intermediate
control (s) in the case of three or more stations. The fourth wire passes electricity to
the next switch in the series. This fourth wire is taped off to create the MS-3R.
MS-3R is the last control station in a series of stations. Therefore, it does not need to
pass electricity to a next switch. It is used with one or more MS-4R controls.
COMPATIBILITY:
MS-3R and MS-4R are used with each other as multiple control stations.
They can also be powered on and off with the KS-1 Power Supply Key Switch.
They are not intended for use with any other controls.
CONTACTS:
Single-Pole, Triple-Throw (On-On-On). Momentary (spring-loaded) action.
RATING:
16 Amps, 277 Volts, UL recognized, CSA recognized.
DESCRIPTION:
Switch is a black, Euro-style (rounded or oval) rocker switch.
Cover plate is aluminum, finished silver satin.
Four 6" wire leads: black, red, blue and black (common, down, up, next switch).
MS-3R and MS-4R start out as the same control. The 3 and 4 indicate the number
of wires connected to the switch. The fourth wire is taped off to create the MS-3R.
2¾" x 4½" cover plate fits a single-gang box.
ILLUSTRATION:
ISSUED:
Printed in the U.S.A.
December 2009
Copyright ©2008 Draper, Inc.
Form MS-3and4R_TechDataSheet08
Page 34 of 124
Motor Pigtails and Disconnects
Motor Pigtails are a standard of 6’ with a 18 gauge 3 conductor with a ground on 4 wire motors. It is a 18-2 with 3 wire motors. The pigtails do
come in longer lengths up to 24’.
3 wire pigtails also can come with an optional 3 prong plug (see page 20).
All motor pigtails are not plenum rated. They are a PVC jacketed cable with a diameter of 5/16".
Quick disconnect plugs come as a standard on Motorized Flexshades with brackets, fascia, or headbox (excluding small pocket headbox). They
are not on Motorized Flexshades in Access Pockets (single, dual or ultimate), and they are not on Lightblocs, Colossals, Flexshade 2s, skylights
or Romans.
The male plug is one foot off the motor. The female lead which can be sent early is toward the J-Box. It is available in 5' lengths (Part C116.030)
as a standard, but you can also order female leads at 11' (Part C116.031), 17' (Part C116.032), and 23’ (Part C116.033). A female plenum rated
lead of 23' (C116.035) is also available.
The female lead can be replaced with a wall entry plate, C201.001, for plugging the male connector into the wall or J-box face plate.
The picture below is the standard plug set-up. Each plug is 2" long so 4" when together.
The female is 1¼" w at the base and 7/8" wide at the neck. It is 7/8" high.
The male plug is 1¼" w at the base and 13/8" wide at the neck. It is 7/8" high.
®
Page 35 of 124
Isolating Relays
The isolating relay (ISO relay) prevents feedback between motors and allows multiple motors to run off a 120V switch. The switches that
Draper supplies are 15A so twelve standard motors are able to run off one switch with isolating relays. To further help you decide if isolating
relays are right for you, here are some conditions in which you would use them:
-
You want to run multiple shades at one time, together off of one high voltage wall switch.
You have parallel wired motors that you are trying to fix.
You want to remote locate controls in J-boxes by the shades to reduce wiring.
You want the cheapest, most effective way to control up to twelve motors from one high voltage switch.
Isolating relays are not to be used if the following are your conditions.
-
You are planning at any point and time to run the shades from a low voltage system such as AMX, Crestron, Vantage, etc.
You want to operate a group of shades as two or more groups and together.
You want to have preset intermediate stop action.
You want to operate the shades from an IntelliFlex input device such as a sun sensor, IntelliFlex wall switch, IR remote, RF
remote, etc.
You want the controls to come in an electrical enclosure.
You want to upgrade the system at a later time to work from a computer or other low voltage switching device.
®
Page 36 of 124
Wiring Instructions
™
Isolating Relay by Draper
Part Number C157.012
Electrical Specifications
Please Note
➀ Make sure power is disconnected before installing controls.
➁ This product is designed to be a job site rescue device by allowing multiple motors
to be connected to one motor control or switch and provides group control of
these motors. Each motor must have its own ISO Relay. Make sure the total FLA
of all motors grouped together does not exceed the load carrying capacity of the
switch or motor control being used.
➂ When installing an ISO into an enclosure, maintain a minimum of .2" (5mm)
spacing in all directions using the supplied spacers. An insulator plate should also
be used. Shorts will result in damage to the component.
➃ All metal traces may have AC power on them and must be insulated from the user
and from electrical ground. An INS-ISO (Draper Part# C199.004) insulation
board is provided.
➄ Large black part may have a small voltage on it immediately after unit is active.
➅ To achieve Pollution Degree 2 environment, mount in an enclosure with tight fitting
seams or one that is gasketed.
➆ The Main Disconnect and Branch Circuit Protection shall be provided by installer.
Protection for shade motor must be provided at the switch or breaker panel.
➇ Maximum surrounding air temperature 70 degrees Celsius.
➈ Use copper conductors rated 75 degrees Celsius or higher only, 18-12AWG.
Please Note: This device has not been evaluated for reliability to the Standard
for Tests for Safety-Related Controls Employing Solid-State Devices, UL 991
and therefore is not considered suitable for entrapment protection.
Input:
E225537
20HN
Line Voltage: 115v AC +/- 10%
Output:
Fr
W h om M
Mot ite-Ne otor:
Mot or Up utral
or D
own
115V AC 5 FLA 1/6 HP
T
ando swi
tc
ISO/or ne h
1 xt
Ne 15
utr
al
Do U p
wn
Dims: 2.07" L x 1.41" W x 0.82" H
(52.6 x 35.8 x 20.8 mm)
1 Isolating Relay fits in a standard
single gang J-Box.
Inserting wire into spring terminal
(For a wiring diagram of more
than one Isolating Relay Daisy
chained together, see below)
➀ Open spring terminal by inserting screwdriver into upper opening.
➁ Insert wire into lower opening.
➂ Remove screwdriver.
Wiring Diagram of more than one Isolating Relay Daisy-Chained
Fabric unrolling from back of
roller (standard)
en
To
110-120V AC
Motor 1
G re
Green
To
Additional
Motor
Green Wire
Neu
tral
U
Dow p
n
ISO
T
PU
ISO
IN
PU
T
Note:
Motor red and black
wires will need to
"flip" if one motor
is right hand and the
other is left hand.
Left hand motor
Interior
side
Black—Down
Red—Up
Fabric unrolling from front of
roller (reverse roll)
Right hand motor
(Standard)
IN
Motor Neutral
Black - Up
Red - Down
Black—Up
Red—Down
Earth
Ground
Neu
tral
U
Dow p
n
11
Ho 5V A
C
Ne t
utr
al
Th
Do any S is can
ubl ing be
e T le P
hro ole
ws ,
wit
ch
Right hand motor
(Standard)
To
110-120V AC
Motor 2
Red—Up
Black—Down
Interior
side
Left hand motor
Red—Down
Black—Up
To
additional
ISOs
Page 37 of 124
Copyright ©2007 Draper Inc. Form ISO_WD07-R4 Printed in U.S.A.
If you encounter any difficulties installing/wiring your IntelliFlex control, call your
dealer or Draper, Inc., Spiceland, Ind., (765) 987-7999; or fax (765) 987-7142.
IntelliFlex™ GC4
The GC4 (group control 4 motors) prevents feedback between motors and allows multiple motors to run off a 120V switch. The switches that
Draper supplies are 15A so twelve standard motors or three GC4' s are able to run off one switch with GC4' s. To further help you decide if a
GC4 is right for you, here are some conditions in which you would use them:
-
You want to run multiple shades at one time, together off of 1 high voltage wall switch.
You want controls in an electrical enclosure and a UL rating on the assembly.
You want to "home run" wires to a control location.
You want the cheapest, most effective way to control up to 12 motors from one high voltage switch.
GC4' s are not to be used if the following are your conditions.
.
.
-
You are planning at any point and time to run the shades from a low voltage system such as AMX, Crestron, Vantage, etc.
You want to operate a group of shades as two or more groups and together.
You want to have preset intermediate stop action.
You want to operate the shades from an IntelliFlex input device such as a sun sensor, IntelliFlex wall switch, IR remote, RF
remote, etc.
You want the controls to be remotely located near the motors to reduce wiring.
You want to upgrade the system at a later time to work from a computer or other low voltage switching device.
®
Page 38 of 120
Part Number C156.058
Wiring Instructions
™
GC4 Control by Draper
Electrical Specifications
Please Note
➀ Make sure power is disconnected before installing controls.
➁ This product allows up to four motors to be connected to one motor control
or switch and provides group control of these motors. Make sure the total
FLA of all motors grouped together does not exceed the load carrying
capacity of the switch or motor control being used.
➂ Up to 3 GC4s (12 motors total) can be banked as long as the switch ratings
are not exceeded and 80% of the circuit breaker rating is not exceeded.
➃ GC4 enclosure is 8" x 8" x 4".
➄ The Main Disconnect and Branch Circuit Protection shall be provided by
installer.
➅ Maximum surrounding air temperature 70 degrees Celsius.
➆ Use copper conductors rated 75 degrees celsius or higher only, 18-12AWG.
Please Note: This device has not been evaluated for reliability to the
Standard for Tests for Safety-Related Controls Employing Solid-State
Devices, UL 991 and therefore not considered suitable for entrapment
protection.
Red (Down)
Black (Up)
To
Motor
White
(Neutral)
Red (Down)
Black (Up)
White
(Neutral)
Ground
To
Motor
White
Ground
Neutral
Line
Power
110-120v AC
Note:
Motor red and black
wires will need to
"flip" if one motor
is right hand and the
other is left hand.
Black
Red
Black
Ground
appropriately
Brown
Input:
Line Voltage: 115v AC +/- 10%
E258229
Output:
115VAC Largest Motor 1FLA, 4FLA Total
Inserting wire into spring terminal
➀ Open spring terminal by inserting screwdriver into upper opening.
➁ Insert wire into lower opening.
➂ Remove screwdriver.
White (Neutral)
Black (Up)
Red (Down)
To
Motor
Ground
White (Neutral)
Black (Up)
Red (Down)
To
Motor
Connect all
Motor
Grounds
Here
Wh
ite
(N
Bla eutra
Re
l)
ck
d(
(U
Do
p
)
wn
)
Motors connect here
as in above diagram
Connect all
Motor
Grounds
Here
Brown
Red
Black
Ground
Connected
to Box
Switch
Additional GC4
(if applicable)
Fabric unrolling from back of
roller (standard)
Right hand motor
(Standard)
Right hand motor
(Standard)
Black—Up
Red—Down
Left hand motor
Black—Down
Red—Up
Fabric unrolling from front of
roller (reverse roll)
Interior
side
Red—Up
Black—Down
Interior
side
Left hand motor
Red—Down
Black—Up
Page 39 of 124
Copyright ©2007 Draper Inc.
Form GC4_WD07-R
Printed in U.S.A.
If you encounter any difficulties installing/wiring your IntelliFlex control, call your
dealer or Draper, Inc., Spiceland, Ind., (765) 987-7999; or fax (765) 987-7142.
IntelliFlex™ SC1
The SCI (smart control 1 motor) gives intelligence to standard motor. This intelligence allows you to group shades and run them from low
voltage switching. You may run the SC l' s from a number of IntelliFlex inputs. Here are some conditions in which you would use them:
-
You want to control shades individually and as a group.
You want to have up to four preset intermediate stop locations.
You want to reduce wiring by remotely locating the controls near motors.
You want to offer the ability to upgrade the system in the future.
You want to be able to change shade groups and operations in the future no matter the layout of the rooms.
You want the most intelligent control for a standard motor.
You want to interface standard motors with a low voltage control system or computer.
SCl's are not to be used if the following are your conditions.
-
You want to use high voltage switching to control the shades.
You want the controls to come in an electrical enclosure.
You want the cheapest group control operation.
You do not want to locate the controls near the shades.
You do not want to learn how to program a control from an IR remote.
®
Page 40 of 124
Part Number C156.065
Wiring Instructions
™
SC1-Gen2 Control by Draper
Caution
Electrical Specifications
➀ Make sure power is disconnected before installing controls.
➁ To Reduce the Risk Of Fire, Electric Shock, Or Injury To Persons, Installation
Work And Electrical Wiring Must Be Done By Qualified Person(s) In
Accordance With All Applicable Codes And Standards.
➂ To reduce the risk of fire and electric shock, install SC1-Gen2 only with listed
window shade operator(s) rated maximum 9.8 amps at 115VAC each.
➃ SC1-Gen2 is a line voltage control, designed to operate one motor. Activation
by low voltage input commands. If you want to switch two or more motors,
ISO relays must be installed in the circuit.
➄ SC1-Gen2 is electrically “hot” on the back of the circuit board. INS-SC1
(Draper Part Number C199.004) insulation board is provided.
Input:
E317985
Data:
+12VDC BUS Commands
3SMW
Low Voltage: Dry Contact—0v AC
Window
Shade
Control
Line Voltage: 85-265VAC 50-60Hz
Output:
½ HP, 115VAC 9.8 FLA / 230VAC 4.9 FLA.
Signal Output is Class 2.
Dimensions: 21/8" W x 3¼" L x 7/8" H.
One SC1-Gen2 fits in a deep single gang J-Box.
Please Note: This device has not been evaluated for reliability to the Standard
for Tests for Safety-Related Controls Employing Solid-State Devices, UL 991
and therefore not considered suitable for entrapment protection.
Wiring Instructions for Controlling One Shade with One SC1
11
H o 5/23
Ne t (bla 0VAC
utr ck
al ( /br
wh ow
ite n)
/bl
ue
)
Data BUS
"Aux" Port
Dry input terminals.
This can be any Single
Pole, Double Throw switch
(Torque dry input screw
terminals to 3 Lb-In.
To
115/230VAC
Motor
Inserting wire into spring terminal
➀ Open spring terminal by inserting screwdriver into upper opening.
➁ Insert wire into lower opening.
➂ Remove screwdriver.
Ground
Note: Motor red/brown and black wires
will need to “flip” if one motor is right
hand and the other is left hand.
Motor Neutral
-white/blue
Black - Up
Red/Brown
- Down
Data BUS
"Eye" Port
Fabric unrolling from back of
roller (standard)
Please Note: When connecting data "BUS," never link an "Eye" port to another "Eye" port. You may
link your BUS from "Eye" to "Aux" or "Aux" to "Aux."
All BUS command input devices must connect to an "Eye" port in order to power the input device.
Right hand motor
(Standard)
Black—Up
Red/Brown—Down
Wiring Instructions for Controlling Multiple Shades with One SC1
Please Note: This configuration
will limit SC1-Gen2 functions.
Left hand motor
Gre
ISO
Green
PU
ISO
IN
PU
T
Note:
Motor red/brown and
black wires will
need to "flip" if one
motor is right hand
and the other is left hand.
Right hand motor
(Standard)
Red/Brown—Up
Black—Down
Interior
side
Left hand motor
IN
Data BUS
"Eye" Port
Fabric unrolling from front of
roller (reverse roll)
Earth
Ground
To
Additional
Motor
Green Wire
T
Motor Neutral
-White/Blue
Black - Up
Red/Brown
- Down
Black—Down
Red/Brown—Up
To
115/230VAC
Motor 2
Neu
tral
U
Dow p
n
Dry input terminals.
This can be any
Single Pole, Double
Throw switch (Torque
dry input screw
terminals to 3 Lb-In.
Neu
tral
U
Dow p
n
SC1
11
Ho 5/230
Ne t (bla VAC
utra ck/
l (w brow
hite n)
/blu
e)
Data BUS
"Aux" Port
en
To
115/230VAC
Motor 1
Interior
side
To
additional
ISOs
Red/Brown—Down
Black—Up
All connection wires must conform to the motor
manufacturer’s recommendation and prevailing
electrical codes. Use appropriate Class 2 wiring as
determined by location of use or install as required by
Article 725 of the NEC and local codes. USE COPPER
CONDUCTORS ONLY rated at 75° C or higher.
Please Note:
All input devices (low voltage LED switches, IR eye, RF receiver) which connect to the Eye jack must be connected using electrically straight 6-conductor
modular cable (RJ25). This means colors do not cross over: blue leads to blue, green to green, etc. (see diagram below)
PIN 6
CORRECT
Tab facing away (down)
BLUE
YELLOW
GREEN
RED
BLACK
WHITE
INCORRECT
PIN 1
PIN 6
WHITE
BLACK
RED
GREEN
YELLOW
BLUE
WHITE
BLACK
RED
GREEN
YELLOW
BLUE
Tab facing away (down) PIN 6
PIN 1
PIN 1
Tab facing away (down)
PIN 1
WHITE
BLACK
RED
GREEN
YELLOW
BLUE
Tab facing away (down) PIN 6
Six-Pin Layout
®
Copyright ©2009 Draper Inc.
Form SC1-Gen2_WD09
COLOR
WHITE
BLA
L CK
RED
GREEN
YELLOW
BLUE
Printed in U.S.A.
PIN #
1
2
3
4
5
6
FUNCTION
R CLOCK
RQ
COMMON
+5VDC
5VDC
R DA
RQ
D TA
RP DA
D TA
+12VDC
12VDC
Page 41 of 124
If you encounter any difficulties installing/wiring your IntelliFlex control, call your
dealer or Draper, Inc., Spiceland, Ind., (765) 987-7999; or fax (765) 987-7142.
IntelliFlex™ SGC4
The SGC4 (smart group control 4 motors) gives intelligence to standard motors. This intelligence allows you to group shades and run them
from low voltage switching. You may run the SGC4' s from a number of IntelliFlex inputs. Here are some conditions in which you would use
them:
-
You want to control shades as a group.
You want the most cost effective group control that works with low voltage switching.
You want the controls in an electrical enclosure and to be a UL assembly.
You want to offer the ability to upgrade the system in the future.
You want to interface standard motors with a low voltage control system or computer.
SGC4's are not to be used if the following are your conditions.
-
You want to use high voltage switching to control the shades.
You want the controls to be remotely located to reduce wiring.
You want preset intermediate stops or the ability to regroup shades.
You want to locate the controls near the shades.
You do not want to learn how to program a control from an IR remote.
®
Page 42 of 124
Part Number C156.059
Wiring Instructions
™
SGC4-Gen2 Control by Draper
Electrical Specifications
Caution
➀ Make sure power is disconnected before installing controls.
➁ SGC4 is a line voltage control, designed to operate up to 4 motors as a
group, activated by Low Voltage input commands.
➂ To Reduce the Risk Of Fire, Electric Shock, Or Injury To Persons, Installation
Work And Electrical Wiring Must Be Done By Qualified Person(s) In
Accordance With All Applicable Codes And Standards.
➃ SGC4 enclosure is 8" x 8" x 4".
➄ Main Disconnect and Branch Circuit Protection provided by installer.
➅ Maximum surrounding air temperature 40° C.
➆ Use copper conductors rated 75° Celsius or higher only, 18-12AWG.
Input:
Data:
+12VDC BUS Commands
Low Voltage: Dry Contact—0v AC
Line Voltage: 115VAC +/- 10%
E317985
3SMW
Output:
Window Shade Control
115VAC Largest Motor 1FLA, 4FLA Total
Signal Output Class 2
Please Note:
All input devices (low voltage LED switches, IR eye, RF receiver) which
connect to the Eye jack must be connected using electrically straight
6-conductor modular cable (RJ25). This means colors do not cross over: blue
leads to blue, orange to orange, etc. (see diagram below).
Please Note: This device has not been evaluated for reliability to the Standard
for Tests for Safety-Related Controls Employing Solid-State Devices, UL 991
and therefore not considered suitable for entrapment protection.
Please Note:
All input devices (low voltage LED switches, IR eye, RF receiver) which connect to the Eye jack must be connected using electrically straight 6-conductor
modular cable (RJ25). This means colors do not cross over: blue leads to blue, green to green, etc. (see diagram below)
PIN 6
INCORRECT
CORRECT
PIN 1
Tab facing away (down)
BLUE
YELLOW
GREEN
RED
BLACK
WHITE
RED
GREEN
YELLOW
BLUE
Tab facing away (down) PIN 6
PIN #
1
2
3
4
5
6
To
115
VAC
Black—Up
Red—Down
Max of 100 feet of
low voltage cable
between controls,
or control and input
with circuit board.
Aux Port: Out to
next IntelliFlex motor
control Aux or Eye port
U
C p
Dowom
n
Programmable Dry
Contact Inputs:
This can be any
Single Pole, Double
Throw switch
Eye Port: In
from previous
Aux port or
input device
To Switch,
splitter or
other input
device
®
Red—Up
Black—Down
Interior
side
Red—Down
Black—Up
N
AC eutr
(11 al
5V
AC
)
White (Neutral)
Black (Up)
Red (Down)
Interior
side
Left hand motor
Black—Down
Red—Up
White
(Neutral)
Red (Down)
Black (Up)
White
Ground
(Neutral)
Fabric unrolling from front
of roller (reverse roll)
Right hand motor
(Standard)
Left hand motor
Ground
To
Motor
BLUE
Tab facing away (down) PIN 6
Right hand motor
(Standard)
Red (Down)
Black (Up)
To
Motor
GREEN
YELLOW
Fabric unrolling from back of
roller (standard)
FUNCTION
R CLOCK
RQ
COMMON
+5VDC
5VDC
R DA
RQ
D TA
RP DA
D TA
+12VDC
12VDC
All connection wires must conform to the motor manufacturer’s recommendation
and prevailing electrical codes. Use appropriate Class 2 wiring as determined by
location of use or install as required by Article 725 of the NEC and local codes. USE
COPPER CONDUCTORS ONLY rated at 75° C or higher.
Note: Motor red/brown
and black wires will
need to “flip” if one
motor is right hand
and the other is left
hand.
RED
PIN 1
Six-Pin Layout
COLOR
WHITE
BLA
L CK
RED
GREEN
YELLOW
BLUE
WHITE
BLACK
WHITE
BLACK
RED
GREEN
YELLOW
BLUE
WHITE
BLACK
PIN 1
PIN 1
Tab facing away (down)
PIN 6
Right hand motor
(Standard)
To
Motor
Ground
White (Neutral)
Black (Up)
Red (Down)
To
Motor
Please Note:
Connect all Ground
wires to ground
block provided
Wh
ite
(Ne
u
Bla tral)
Re
d(
ck
Do
(U
wn
p)
)
To Eye Port
Inserting wire into spring terminal
➀ Open spring terminal by inserting screwdriver into upper opening.
➁ Insert wire into lower opening.
➂ Remove screwdriver.
Page 43 of 124
Copyright ©2009 Draper Inc. Form SGC4-Gen2_WD09-R Printed in U.S.A.
If you encounter any difficulties installing/wiring your IntelliFlex control, call your
dealer or Draper, Inc., Spiceland, Ind., (765) 987-7999; or fax (765) 987-7142.
IntelliFlex™ SPGC4
The SPGC4 (smart programmable group control 4 motors) gives intelligence to standard motors. This intelligence allows you to group
shades and run them from low voltage switching. You may run the SPGC4' s from a number of IntelliFlex inputs. Here are some conditions in
which you would use them:
-
You want to control shades individually and as a group.
You want to have up to four preset intermediate stop locations.
You want the controls in an electrical enclosure and to be a UL assembly.
You want to offer the ability to upgrade the system in the future.
You want to be able to change shade groups and operations in the future no matter the layout of the rooms.
You want the most intelligent control for a standard motor.
You want to interface standard motors with a low voltage control system or computer.
SPGC4's are not to be used if the following are your conditions.
- You want to use high voltage switching to control the shades.
- You want the controls to be remotely located to reduce wiring.
- You want the cheapest group control operation.
- You want to locate the controls near the shades.
- You do not want to learn how to program a control from an IR remote.
®
Page 44 of 124
Part Number C156.060
Wiring Instructions
™
SPGC4-Gen2 Control by Draper
Electrical Specifications
Caution
➀ Make sure power is disconnected before installing controls.
➁ SPGC4 is a line voltage control, designed to individually operate 4 motors,
activated by Low Voltage input commands.
➂ SPGC4 enclosure is 8" x 8" x 4".
➃ The Main Disconnect and Branch Circuit Protection shall be provided by
installer.
➄ Maximum surrounding air temperature 50° C.
➅ Use copper conductors rated 75° Celsius or higher only, 18-12AWG.
Please Note: This device has not been evaluated for reliability to the Standard
for Tests for Safety-Related Controls Employing Solid-State Devices, UL 991
and therefore not considered suitable for entrapment protection.
Max of 100 feet of
cable between
controls, or
control and input
with circuit board.
Dry
Contacts
To Switch,
splitter or
other input
device
Input:
Data:
+12VDC BUS Commands
Low Voltage: Dry Contact—0VAC
Line Voltage: 85-265VAC 50-60Hz
E317985
3SMW
Window Shade Control
Output:
115VAC 60Hz: Largest Motor 1FLA, 4FLA Total
230VAC 50-60Hz: Largest Motor 1FLA, 4FLA Total
Signal Output is Class 2.
To
Motor
Neutral
Red/Brown (Dir)
Black (Dir)
Aux
Port
Aux
Port
To
Eye
Port
Neutral
AC (115/
230VAC)
Eye
Port
Aux
Port
Re
T
d / Bla M o o
Bro ck to
w n (D r
Ne (Di ir)
ut r)
ral
Re
➀ Open spring terminal by inserting screwdriver into upper opening.
➁ Insert wire into lower opening.
➂ Remove screwdriver.
Please Note:
Connect all
Ground wires to
ground block
provided.
Eye
Port
Dry
Contacts
Eye
Port
Data cable
Dry
from Aux Port
Contacts to Eye port of
next SPGC4
Aux
Port
d/ Bla Mo To
Bro ck to
w n (D r
Ne (Di ir)
ut r)
ral
Inserting wire into spring terminal
To
Motor
Neutral
Red/Brown (Dir)
Black (Dir)
Please Note:
All input devices (low voltage LED switches, IR eye, RF receiver) which connect to the Eye jack must be connected using electrically straight 6-conductor
modular cable (RJ25). This means colors do not cross over: blue leads to blue, green to green, etc. (see diagram below)
PIN 6
INCORRECT
CORRECT
PIN 1
Tab facing away (down)
BLUE
YELLOW
GREEN
RED
BLACK
WHITE
WHITE
BLACK
RED
GREEN
YELLOW
BLUE
Tab facing away (down) PIN 6
PIN 1
PIN 6
Tab facing away (down)
PIN 1
WHITE
BLACK
WHITE
BLACK
RED
GREEN
YELLOW
BLUE
RED
GREEN
YELLOW
BLUE
Tab facing away (down) PIN 6
PIN 1
Six-Pin Layout
COLOR
WHITE
BLA
L CK
RED
GREEN
YELLOW
BLUE
PIN #
1
2
3
4
5
6
FUNCTION
R CLOCK
RQ
COMMON
+5VDC
5VDC
R DA
RQ
D TA
RP DA
D TA
+12VDC
12VDC
®
Fabric unrolling from back of
roller (standard)
Left hand motor
Black—Down
Red—Up
Copyright ©2009 Draper Inc. Form SPGC04-Gen2_WD09 Printed in U.S.A.
Right hand motor
(Standard)
Right hand motor
(Standard)
Black—Up
Red—Down
Fabric unrolling from front of
roller (reverse roll)
Interior
side
Red—Up
Black—Down
Interior
side
Left hand motor
Red—Down
Black—Up
Page 45 of 124
If you encounter any difficulties installing/wiring your IntelliFlex control, call your dealer or
Draper, Inc., Spiceland, Ind., (765) 987-7999; or fax (765) 987-7142.
IntelliFlex™ Inputs
We have many different low voltage input devices for controlling shades through
IntelliFlex. Here is a listing and brief description of each input available to you.
OS
CL
OP
OS
CL
OP
EN
IR control
E
EN
L
E
AL
8
1
9
2
10
3
11
4
12
OP
ST
5
6
7
-
IR control- This is an IR eye plugged in an SC1, SGC4, or SPGC4 to
receive IR remote commands.
-
RF control- This is an RF receiver plugged in an SC1, SGC4, or SPGC4 to
receive RF remote commands. Long range antennas are available.
OS
CL
OP
OS
CL
-
E
EN
L
AL
E
8
1
9
2
11
4
12
OP
ST
5
6
7
IntelliFlex wall switch- This switch comes as a BUS version which plugs
directly into a SC1, SGC4, or SPGC4 or an RF version which talks to an
RF receiver. These versions of the switch are programmable to send out
whatever commands are desired. Dry contacts version which are not
programmable are also available for some types.
Sun sensors- This is an interior sensor that will read light intensity and run
a group of shades up and down accordingly. It does not track the sun’ s
movement.
IntelliFlex
wall switch
2
7 vsimple
R2gyDmade
RS 232 interface- This is an RS 232 bridge to run shades from RS 232
commands. These commands can give full function to the controls.
Switch
SYS 4
SYS 53 RS-232
S
SYS 6
SYS 71 SYS 2 SY
SYS N
MAI
EYE
BUS
Timer- This item will run a group of shades up and down at given times of
the day.
-
Dry Contact Converter- This item takes dry contact commands and turns
them into bus commands for the SC1’s to respond.
RS 232
interface
RS232
Sun
sensor
Red = Program Mode
Green = Visible Light
(Test Mode Only)
Wind Disable Light
Input Switch Sensor
-
RF control
10
3
nolo
-
EN
h
Tec
-
OP
PSSW
CAL CLK PGM AUTO RAND MAN
OFF
AM
PM
12:00
d
MO TU WE TH FR SA SU ON
Timer
MODE
NEXT/
ON/
OFF
RESET
DAY/
DST
HOUR+
YEAR-
M+
ZONEYEAR-
-
SolarFlex- This is a sun tracking software which is programmed to drive a
specific building’s shades per the needs of the end user based on the sun’s
position.
-
Dry Contacts- The SC1, SGC4, and SPGC4 are built with dry contacts
already on them so one can connect dry contacts to one of the controls to
drive it. The dry contacts on the controller itself will not communicate on the
BUS line.
Dry Contact
Converter
Two-way communication on the bus line can be accomplished with certain
input set-ups and cabling. Ask Draper for more details.
Dry Contacts
-
®
Page 46 of 124
SC1,
SPGC4
or SGC4
From
"A
To "A ux"
(can a ux"
"Eye t lso be
o
if "Eye Aux"
not in " por t Splitter
use)*
Eye Eye Main Aux
4
6
8
3
5
7
Please Note:
Eye Eye Main Aux
Splitter
To Motor (s)
To Motor (s)
To Motor (s)
PSSW
RR24 RF
Receiver
(-17 mA) RF Signal
to Receiver
Sun
Sensor
Eye
Sun
Sensor
(-13 mA)
Copyright ©2007 Draper Inc. Form IntelliFlex-InputDeviceConfig07 Printed in U.S.A.
PC/
Home
Automation
8
7
Any input device may be connected to any available Eye port.
All Eye ports are "powered" by the "SC1" they feed off of. Each
SC1 Eye port provides 75 milliAmps at 5v of power to the connected input devices. You may attach any combination of input devices
to an SC1 Eye port, as long as the combined power requirements
do not exceed the available power from the SC1 (see chart below).
Notes on Power Consumption:
IR Eyes have no circuit board and can only drive
about 20' of cable.
Input Device1
Power Consumption (milliAmps)
Input Device Power Consumption Chart
4
6
3
5
Notes on Cable Lengths:
You can have a total of approximately 100 feet of
cable between SC1s, up to a maximum of 1000 feet.
However, any device that includes a Repeater can
drive 1000 feet of cable regardless.
RF Remote Receiver
17
IR Receiver Eye
2
Sun Sensor
13
IntelliFlex Bus Switch
8
IntelliFlex RF Switch (not on Bus)
0
IntelliFlex Dry Contact Switch (not on Bus)
0
PSI60
9
R2D7 (RS232 Translator)
17
Hardwired Keypad
1
RF Keypad (not on Bus)
0
1
IR Eye can drive a maximum of 25 SC1s. Other accessories can drive a maximum of 70 SC1s.
*Never connect "Eye" port
to "Eye" port
R2D7
(-17 mA)
IR
Receiving
Eye (-2 mA)
Eye Eye Main Aux
SC1,
SPGC4
or SGC4
IntelliFlex Switch
(Local/Sub-group/
Master Control)
(-8 mA)
IR Signal
to Eye
SC1,
SC1,
SC1,
From "Aux" SPGC4 From "Aux" SPGC4 From "Aux" SPGC4
To "Aux" or SGC4 To "Eye"* or SGC4 To "Eye"* or SGC4
(can also
be "Aux to Eye")*
"Aux"
ux" To to Aux"
A
"
m
Fro
"Eye use)*
lso be
(can a por t is not in
Splitter
if Eye
Wiring diagrams are available for each control
and input device at www.draperinc.com.
IntelliFlex Switch
(Local/Sub-group/
Master Control)
(-8 mA)
SPDT:
Keyswitch,
Mag. switch,
etc.
PSI
60
(-9 mA)
Eye Eye Main Aux
Splitter
To "Eye" Port
(+75mA)
SC1,
SPGC4
or SGC4
To "Eye"
Port
(+75mA)
To Motor (s)
To "Eye" Port
(+75mA)
To Motor (s)
1 sample "Bus" System shown (motors on line voltage side). Multiple "Systems" may be combined and "linked" in an installation.
™ by Draper
Input Device Sample Configuration
To "Eye" Port
(+75mA)
To Motor (s)
Page 47 of 124
Installation Instructions
™
IR Remote Control by Draper
Caution:
➀ The IR Receiver Eye must connect to an "Eye" Jack on an SC1 or
Splitter. If it connects to a Splitter, then the Main Jack of the Splitter
must connect to the "Eye" Jack of an SC1.
➁ Main Jack on splitters connects to Eye Jack on SC1.
➂ Any Aux Jack can be connected to any Aux or Eye Jack.
➃ Never connect any two Eye Jacks together.
➄ For IR commands to work, or for remote programming, there must be
at least one Eye connected to one of the Eye Jacks.
Installing the IR Eye
The IR Eye must connect to an Eye Jack on an SC1 (see Fig. 1) or
Splitter. If the eye connects to a Splitter, then the Main Jack of the Splitter
must connect to the Eye Jack of an SC1. The IR Eye is line-of-sight: It must be
visible to “see” the infrared signal from the transmitter.
Eye Jack for
connecting control
devices to SC1
Aux Jack for
linking SC1s
together
IR Eye in plastic box
shown. IR Eye with
length of modular
cable is also available (see page 2),
and plugs into the
SC1 or other Bus
control in the same
fashion.
inputs will work but the IR will not.
If a splitter is not available, the wiring can be done manually. Assuming
the yellow wire is on the right of the plug with the cable toward you and the
“flipper” away from you (this is how all SC1s are wired), then:
➀ The black wire is common or “ground” (not AC or earth ground) which is
the same as the common pin on the 3 wide screw terminal for manual
switch. Connect all black wires together.
➁ The yellow wire (sometimes white) is the demodulated IR signal. This line
is normally about 5 volts (pulled high by a resistor on the SC1). Connect
all these wires together.
➂ The red wire is 5 Volt power. Do not connect 5 volt lines of multiple
receivers together. Connect the red wire from any one receiver to the red
wire from the eye or the accessory unit.
➃ All green wires are unused and should be cut off and isolated from each
other.
➄ Make sure that none of the wires “flip”—i.e., yellow is always on the right.
Multiple eyes allow operation from more than 1 room, or to cover the room
more completely.
Operation from multiple rooms can also be done using standard IR
repeater systems, such as X-10 Powermid® or products from Xantech. Radio
repeaters such as a remote extender or Leapfrog® can also be used.
When using a Xantech IR repeater system, do not attempt to run the
signal directly from the connecting block into the SC1. Simply place an emitter
near one of the IR Eyes.
Installing IR Eye and SC1 into JBox
Plastic Snap
INS-SC1
Short screws
Figure 1
The combined length of ALL cables in the system (Eye to SC1, plus SC1
to SC1, plus Splitter to SC1, plus Eye to Splitter, plus Splitter to Splitter) can
be up to 100 feet per SC1 without problems. The Repeater/Timer Interface
with built-in IR filter (Part # C072.026) can be used if additional length is
needed. Contact Draper for further information.
If the cable length is too long, some units may operate sporadically
where the motor pulses on and off. Some units may not operate at all, or may
operate intermittently.
Similar symptoms can come from interference in the room. Sunlight is
a very strong infrared source. Try to place the sensor out of direct or bright
reflected sunlight. The Repeater/Timer Interface with built-in IR filter (Part #
C072.026) can be used to help solve this problem.
Sunlight will also reduce your effective range. Expected line-of-sight
range with no interference is at least 50 feet, usually as much as 100 feet.
Electronically ballasted fluorescent lighting and Halogen lights can cause
similar trouble.
None of the wires associated with the IR sensor should be run next to
power lines. And all wires should be kept at least 18" away if run parallel to
a power line. If they must go near power lines, they should cross at a right
angle. They may need to be shielded if running near very noisy power lines.
One eye can be connected to multiple boards by “daisy-chaining” SC1s
together, or using a Splitter. Never use a standard telephone splitter for
this connection. Larger splitters are available—contact Draper for more
information. All connections are made with standard "telephone" type cord,
but connectors are "flipped" so a standard phone cable will not work. See
"A Note on Wiring" on page 2. The installer will need a 6P4C telephone plug
crimping tool, with 6P4C plugs, and silver satin 4 conductor phone wire (all
are available from Draper). 6P6C plugs will also work, as will 6 conductor wire
with these plugs.
When connected together, all receivers must be powered for any of them
to work. Any unit that is not powered will “short out” the IR signal. Manual
Eye Jack for
connecting control
devices to SC1
To Optional
Manual Switch
To
AC Power
and Motor
.062" Nylon Washer
Earth Ground
Please Note: Orientation MUST
be as shown so the ground
terminal connection on the
terminal block connects to
the aluminum plate via the screw.
1" flat head screws in J-box
Infrared Cover fits in Decora Plate
Please see page 2 for more installation
information and IR codes.
Powermid™ is a registered trademark of X-10.
Leapfrog® is a registered trademark of Terk Technologies Corporation.
Please Note:
Draper recommends using a PDA or PC to program your IntelliFlex
controls. Software is available at www.draperinc.com.
For button press sequences to manually program, see “SC1 Quick Reference Guide” at www.draperinc.com
Page 48 of 124
Copyright ©2004 Draper Inc.
Form IntelliFlex-IR_Inst04
Printed in U.S.A.
If you encounter any difficulties installing/wiring your IntelliFlex IR
control, call your dealer or Draper, Inc., Spiceland, Ind., (765) 9877999; fax (765) 987-7142; or e-mail [email protected].
IntelliFlex™ IR Remote Control by Draper
Page 2 of 2
Installing IR Eye Only into J-Box
IR Eye Only
Optional Cable Accessories
Splitter
1" flat head screws in J-box
Infrared Cover fits in Decora Plate
IR Codes
IR wavelength is 950 nm. Light is modulated at 38 KHz with 1/3 duty
cycle.
An on pulse must be at least 158 µseconds (µs) long (6 cycles) and
should not be longer than 448 µs (17 cycles).
From the start of a pulse till the start of the next pulse is 1050 µs for a “0
bit”, and 2000 µs for a “1 bit”.
A Flash is 11 pulses (10 bits), minimum time between flashes (interflash
time) is 11 mseconds (ms). When using the small eye the minimum interflash
time is 25 ms, 30 ms is recommended. There is NO preamble.
Channel 1 OPEN sequence is 0101000010. The sequence always starts
with 01, so for simplicity strip that off, and we get 0100 0010 = hex 42 (see
figure below).
Please Note: low = off, high =38 KHz signal on.
Flash
0
1
0
1
Modular Jack Adapter
Interflash Time (30 ms)
0 0 0 0
Modular Cable Coupler
0
1
2000 µs
time
1050 µs
2000 µs
The complete table of codes (in hex) is:
OPEN1
CLOSE1
OPEN2
CLOSE2
OPEN3
CLOSE3
OPEN4
CLOSE4
OPEN5
CLOSE5
OPEN6
CLOSE6
OPEN7
CLOSE7
OPEN8
CLOSE8
OPEN9
CLOSE9
OPEN10
CLOSE10
OPEN11
CLOSE11
OPEN12
CLOSE12
OPEN ALL (1-12)
CLOSE ALL (1-12)
STOP
42
22
62
12
32
0a
4a
2a
1a
06
46
26
16
0e
56
36
4e
2e
5a
3a
02
72
6a
66
76
6e
52
OPEN13
CLOSE13
OPEN14
CLOSE14
OPEN15
CLOSE15
OPEN16
CLOSE16
OPEN17
CLOSE17
OPEN18
CLOSE18
OPEN19
CLOSE19
OPEN20
CLOSE20
OPEN21
CLOSE21
OPEN22
CLOSE22
OPEN23
CLOSE23
OPEN24
CLOSE24
OPEN ALL (13-24)
CLOSE ALL (13-24)
40
20
60
10
30
08
48
28
18
04
44
24
14
0c
54
34
4c
2c
58
38
1c
70
68
64
74
6c
A Note on Wiring
The IR Receiver Eye must be plugged in to an open "Eye" jack (see diagram
on page 1). All input devices connect using electrically straight 4-conductor
modular cable.
Please note: If you use standard telephone cable, you must first remove one
connector, turn it over and re-attach, to ensure that the cable is electrically
straight (see diagram below).
Please Note:
Draper recommends using a PDA or PC to program your IntelliFlex
controls. Software is available at www.draperinc.com.
For button press sequences to manually program, see “SC1 Quick Reference Guide” at www.draperinc.com
Page 49 of 124
www.draperinc.com
(765) 987-7999
Installation Instructions
™
RF Remote Control by Draper
➀ The Radio Frequency receiver must be connected to an Eye Jack on
an SC1 or splitter.
➁ Mount receiver with the antenna pointing up.
➂ Do not mount receiver on or near a metal surface.
➃ Each RF receiver must be “trained” to “hear” each transmitter before
it will work.
➄ Each receiver can “learn” to “hear” up to five different transmitters.
Installing the Receiver
Connect the receiver to the Eye Jack on an SC1 or splitter (see Fig. 1). If
the eye connects to a splitter, then the Main Jack of the Splitter must connect
to the Eye Jack of an SC1.
Mount the receiver with the antenna pointing up. For longer range
reception, detach the provided antenna and attach the optional Long Range
Antenna—Part # C267.001 (see Fig. 2).
Please Note: For information on installing SC1 or other “BUS” command
controls, please see the instruction sheet for the appropriate item.
Installing the RF Keypad or Wall Switch
"Silver Satin" 4-conductor
Flat Modular Phone Cable
must not "flip"
(i.e., black is always on left).
To
next
SC1
If using an RF Wall Mounted Keypad or RF Wall Switch, first test for reception
and successful operation of the switch in the desired location. Then, cut hole
in appropriate location, attach transmitter module to switch or keypad using
modular cable, and attach switch to wall.
Please see Fig. 3 (below), and information provided with the specific switch or
keypad for more information. Three AAA batteries required.
RR
Tested to Comply
With FCC Standards
Press to Learn
Transmitter
Program
Mode
SC1
To Eye Port
on SC1
FOR HOME OR OFFICE USE
This Class B digital apparatus meets all
requirements of the Canadian InterferenceCausing Equipment Regulations.
Eye Aux
If no transmitters are known (factory default):
➀ The red LED will turn on as soon as the unit is powered.
➁ The red LED will flash every 10 seconds until a transmitter is learned.
➂ Pressing the learn button has no meaning while in this mode (the LED will
turn off while the button is pushed).
To clear all known transmitters:
➀ Press and hold the learn button for 5 seconds. The red LED will blink on
and remain on, until a new transmitter is learned.
➁ Release the button, the red LED will come on. The unit is ready to learn
the 1st transmitter.
Please Note: If you press and release the learn button and the red LED does
not come on, the list may be “full” and no more transmitters can be learned.
The unit may also not be powered correctly—to fix this, clear receiver and
start over.
The receiver will not pass commands to the SC1:
➀ While in the learn mode (the red LED is on).
➁ While the button is pressed.
Please Note: The stop command will be sent to the SC1 system if the
transmitter’s STOP button is still pressed when the receiver exits from learn
mode after learning the transmitter.
UP
Figure 1
Figure 2
Training Your RF Receiver
The receiver can “learn” up to 5 different transmitters. It ships from the
factory with NO transmitters learned: you must train it in the field to work with
your specific transmitters. If the receiver is new with no transmitters learned,
the LED will automatically come on when plugged into an “Eye” port.
➀ Press and release the “Learn Transmitter” button on the receiver. The red
LED will come on if 5 transmitters have not already been learned. The unit
is now ready to learn another radio transmitter.
➁ Press any button on the radio transmitter. The LED on the receiver will go
out. This transmitter is added to the list of known transmitters. The
receiver returns to normal operation after it has learned a transmitter. If
this transmitter is already known to the receiver, the LED will remain lit
because the transmitter does not need to be learned again.
If no command is received within 10 seconds:
➀ The red LED will flash off, then on, and then go out. No new transmitters
were learned.
➁ If no transmitters are known, the LED will turn back on immediately.
If the red LED is on and the learn button is pressed and released:
➀ The red LED will turn off with no changes to the learned list.
➁ If no transmitters are known, the LED will turn back on immediately.
Figure 3
RF Handheld Transmitters
OPEN
CLOSE
OPEN
CLOSE
1
ALL
2
8
3
9
4
10
5
11
6
12
Please see page 2 for
information on radio
frequencies and codes.
STOP
7
Please Note:
For button press sequences to manually
program your control, see “SC1 Quick Reference Guide” at www.draperinc.com
Page 50 of 124
Copyright ©2007 Draper Inc.
Form IntelliFlex-RF_Inst07
Printed in U.S.A.
If you encounter any difficulties installing/wiring your IntelliFlex RF control, call your
dealer or Draper, Inc., Spiceland, Ind., (765) 987-7999; or fax (765) 987-7142.
IntelliFlex™ RF Remote Control by Draper
Page 2 of 2
A Note on Interference
Optional Cable Accessories
This equipment has been tested and found to comply with the limits for a
class B digital device, pursuant to part 15 of the FCC Rules. These limits
are designed to provide reasonable protection against harmful interference
in a residential installation. This equipment generates, uses and can radiate
radio frequency energy and if not installed and used in accordance with
the instructions, may cause harmful interference to radio communications.
However, there is no guarantee that interference will not occur in a particular
installation. If this equipment does cause harmful interference to radio or
television reception, which can be determined by turning the equipment off
and on, the user is encouraged to try to correct the interference by one or
more of the following measures:
➀ Reorient or relocate the receiving antenna.
➁ Increase the separation between the equipment and receiver.
➂ Connect the equipment into an outlet on a circuit different from that to
which the receiver is connected.
➃ Consult the dealer or an experienced radio/TV technician for help.
Operation with non-approved equipment is likely to result in interference to
radio and TV reception. The user is cautioned that changes and modifications
made to the equipment without the approval of manufacturer could void the
user’s authority to operate this equipment.
Splitter
Modular Jack Adapter
Modular Cable Coupler
Radio Codes
Radio Frequency is 418 MHz ± 75 KHz, on-off keying.
On
Off
0 Bit
1 Bit
Start
All times in the following description are nominal with a tolerance of ± 5%,
however, all times must change proportionally.
A packet of data consists of:
A start sequence, 20 address bits, and 16 data bits. The packet is similar to
that used by the Holtek brand of data encoder chips.
The Start sequence consists of:
471 µs on, 471 µs off, 973 µs on, 973µs off, 471 µs on, 471 µs off, 973 µs
on, 973 µs off, 471 µs on.
Address & data bits consist of:
A “0 bit” being defined as 471 µs off, 973 µs on,
A “1 bit” being defined as 973 µs off, 471 µs on.
The start sequence plus the address and data bits make a packet 57 msec
long. There must then be a pause of 17 msec before the packet is transmitted
again.
The address is encoded in 20 bits (A0 = least significant bit, A8 = most
significant bit of 512 possible addresses):
A0 0 A1 0 A2 0 A3 0 A4 A5 A6 A7 A8 1 1 1 1 1 1 1
The button data is encoded in 16 bits (D0 = least significant bit, D7 = most
significant bit of 256 possible numbers):
1 D0 1 D1 1 D2 1 D3 1 D4 1 D5 1 D6 1 D7
The button data is converted into a command compatible with the “BUS”
connecting receiver controls together.
A Note on Wiring
The RF Receiver must be plugged in to an open "Eye" jack (see diagram on
page 1). All input devices connect using electrically straight 4-conductor
modular cable.
Please note: If you use standard telephone cable, you must first remove one
connector, turn it over and re-attach, to ensure that the cable is electrically
straight (see diagram below).
The complete table of codes (in hex) is:
OPEN1
CLOSE1
OPEN2
CLOSE2
OPEN3
CLOSE3
OPEN4
CLOSE4
OPEN5
CLOSE5
OPEN6
CLOSE6
OPEN7
CLOSE7
OPEN8
CLOSE8
OPEN9
CLOSE9
42
22
62
12
32
0a
4a
2a
1a
06
46
26
16
0e
56
36
4e
2e
OPEN10
CLOSE10
OPEN11
CLOSE11
OPEN12
CLOSE12
OPEN13
CLOSE13
OPEN14
CLOSE14
OPEN15
CLOSE15
OPEN16
CLOSE16
OPEN17
CLOSE17
OPEN18
CLOSE18
5a
3a
02
72
6a
66
40
20
60
10
30
08
48
28
18
04
44
24
OPEN19
CLOSE19
OPEN20
CLOSE20
OPEN21
CLOSE21
OPEN22
CLOSE22
OPEN23
CLOSE23
OPEN24
CLOSE24
14
0c
54
34
4c
2c
58
38
1c
70
68
64
OPEN ALL
CLOSE ALL
OPEN ALL (13-24)*
CLOSE ALL (13-24)*
STOP
76
6e
74
6c
52
* These commands correspond to channel 25 on the R2D7 RS232 Serial
Translater.
Page 51 of 124
www.draperinc.com
(765) 987-7999
™
Wall Switch
by
2 button, 1 channel—horizontal
switch for 1 shade or group of shades
2 button, 2 channel—sequencing
switch for 1 shade or group of shades
3 button, 3 channel—sequencing
switch for 1 shade or group of shades
3 button, 1 stop—vertical switch for 1
shade or group of shades
121105—BUS command
121106—Dry Contact
121107—RF (requires
1 RFTM p/n C072.022,
ordered separately)
121108—BUS command
121109—Dry Contact
121110—RF (requires
1 RFTM p/n C072.022,
ordered separately)
121111—BUS command
121112—Dry Contact
121113—RF (requires
1 RFTM p/n C072.022,
ordered separately)
121114—BUS command
121115—RF (requires
1 RFTM p/n C072.022,
ordered separately)
4 button, 2 stop—vertical switch for 1
shade or group of shades
5 button, 3 stop—vertical switch for 1
shade or group of shades
121122—BUS command
121123—RF (requires
1 RFTM p/n C072.022,
ordered separately)
121124—BUS command
121125—RF (requires
1 RFTM p/n C072.022,
ordered separately)
4 button, 2 channel—horizontal switch
for 2 shades or groups of shades
121116—BUS command
121117—Dry Contact
121118—RF (requires
1 RFTM p/n C072.022,
ordered separately)
5 button, 5 channel—sequencing
switch for 1 shade or groups of shades
4 button, 4 channel—sequencing switch
for 4 shades or groups of shades
121119—BUS command
121120—Dry Contact
121121—RF (requires
1 RFTM p/n C072.022,
ordered separately)
6 button, 3 channel—horizontal switch
for 3 shades or groups of shades
121126—BUS command
121127—RF (requires
1 RFTM p/n C072.022,
ordered separately)
121128—BUS command
121129—Dry Contact
121130—RF (requires
1 RFTM p/n C072.022,
ordered separately)
6 button, 4 stop—vertical switch for 1
shade or group of shades
6 button, 6 channel—vertical switch
for 1 shade or group of shades
121136—BUS command
121137—RF (requires
1 RFTM p/n C072.022,
ordered separately)
121138—BUS command
121139—RF (requires
1 RFTM p/n C072.022,
ordered separately)
10 button, 10 channel—sequencing
8 button, 2 stop, 2 groups—vertical
switch for 2 shades or groups of shades switch for 10 shades or groups of shades
121144—BUS command
121145—RF (requires
1 RFTM p/n C072.022,
ordered separately)
121146—BUS command
121147—RF (requires
1 RFTM p/n C072.022,
ordered separately)
12 button, 6 channel—horizontal switch
12 button, 12 channel—sequencing
for 6 shades or groups of shades
switch for 12 shades or groups of shades
121152—BUS command
121153—RF (requires
1 RFTM p/n C072.022,
ordered separately)
121154—BUS command
121155—RF (requires
1 RFTM p/n C072.022,
ordered separately)
6 button, 1 stop, 2 groups—vertical
6 button, 6 channel—sequencing switch
switch for 2 shades or groups of shades
for 6 shades or groups of shades
121131—BUS command
121132—Dry Contact
121133—RF (requires
1 RFTM p/n C072.022,
ordered separately)
8 button, 8 channel—sequencing
switch for 8 shades or groups of shades
121140—BUS command
121141—RF (requires
1 RFTM p/n C072.022,
ordered separately)
121134—BUS command
121135—RF (requires
1 RFTM p/n C072.022,
ordered separately)
8 button, 4 channel—horizontal switch
for 4 shades or groups of shades
121142—BUS command
121143—RF (requires
1 RFTM p/n C072.022,
ordered separately)
10 button, 3 stop, 2 groups—vertical
10 button, 5 channel—horizontal switch
switch for 2 shades or groups of shades
for 5 shades or groups of shades
121148—BUS command
121149—RF (requires
1 RFTM p/n C072.022,
ordered separately)
121150—BUS command
121151—RF (requires
1 RFTM p/n C072.022,
ordered separately)
12 button, 4 stop, 2 groups—vertical
switch for 2 shades or groups of shades
121156—BUS command
121157—RF (requires
1 RFTM p/n C072.022,
ordered separately)
Please Note: For wiring and
programming instructions,
please see page 2.
Please Enter Appropriate Information:
Switch:
Switch:
Switch:
Switch:
How Many?
How Many?
How Many?
How Many?
PROJECT:
ARCHITECT:
CONTRACTOR:
SUPPLIER:
DATE:
Copyright © 2007 Draper Inc. Form IntelliFlexWall Switch_Sub07 Printed in U.S.A.
Page 52 of 124
REVISED:
Page 2 of 2
IntelliFlex Wall Switch by Draper
Programming IntelliFlex Switch
Hardwired “Bus” Command Switch
Dry Contact: Does not have a Bus connection, and is not programmable. It is
somewhat configurable, based on how it is connected—it must be connected
directly to each device it is controlling.
Bus: Programming requires physical contact with the back of the switch. This
allows programming of which button sends which command, and other options.
The switch must be powered by installing it on the SC1 Bus. Plug it into any
available “Eye” jack.
RF: Battery operated. Programming the RF switch requires physical contact with
the back of the switch, and allows programming of which button sends which
command, along with other options. When replacing batteries, test switch to make
sure it works. If not, remove batteries, wait a few seconds, then re-insert them. The
switch may operate with low batteries, but programming may not work.
Program
Button
"Eye"
Jack
Programming Switch “Locally” Using IR Transmitter
RF “Bus” Command Switch
Press programming button on back of switch. Red LED on back of switch will
come on, indicating it is in program mode. This method uses the eye on the back of
the switch, so you must use an IR transmitter for programming, and you must have
access to the back of the switch. Bus commands are ignored during this process.
Program
Button
To set button “#” on the switch to send a new “command”:
➀ Press programming mode button on back of switch (red LED appears).
➁ Press and release the switch button you want to program. The LED will change
from red to green.
➂ Press the command on the IR transmitter you want to be assigned at the
button you just selected (pressing “Stop” at this point will assign the stop
command to the selected button).
➃ The LED will go back to red and you are back in program mode; e.g. to
program the top left button to send Close 7: press the top left button, then
press Close 7 on the IR transmitter.
"Eye"
Jack
Clear button “#”:
Press programming mode button on back of switch (red LED will appear). Press
OPEN “#” on the IR transmitter, where “#” is the switch button number to clear. The
red LED will blink off then back on, and you are back in program mode.
Reset to factory default:
Press programming mode button on back of switch(red LED will appear). Press
CLOSE ALL on IR transmitter. The red LED will blink off then back on, and you are
back in program mode. If this is an RF switch, the radio address will not change.
Exit programming mode:
Press STOP on the IR transmitter, and LED will turn off; or, LED will turn off
automatically after 10 seconds of no IR commands or buttons pushed.
Dry Contact Switch (not programmable)
(Switch
Front/
Button
Map)
(Switch Back/
Board Map)
3
4
5
6
7
8
Please Note
The eye on the back of the switch is only for programming and will not act as a
receiving eye.
5
COM
6
COM
3
COM
4
COM
7
COM
8
COM
Please Note: This drawing indicates all possible
connection and button
locations. Your switch
may not have the same
number of buttons or
connections, but their locations will be consistent
with these "maps."
Dry Contact switch is
not programmable.
Page 53 of 124
(765) 987-7999
www.draperinc.com
Installation Instructions
™
Wall Switch by Draper
RF “Bus” Wall Switch
Program
Button
"Eye"
Jack
“Bus” Wall Switch
Program
Button
"Eye"
Jack
Dry Contact Wall Switch
(Switch Front/
Button Map)
Please Note: This drawing indicates all
possible connection and button locations. Your switch may not have the same
number of buttons or connections, but
their locations will be consistent with
these "maps."
Compare your switch with these diagrams, and wire the buttons and connections on your switch accordingly.
(Switch Back/
Board Map)
3
4
5
6
7
8
5
COM
6
COM
3
COM
4
COM
7
COM
8
COM
Dry Contact switch is not programmable.
Dry Contact switch can be connected to
a Bus via a PSI60.
Please Note: For programming
instructions, please see page 2.
Page 54 of 124
Copyright ©2007 Draper Inc. Form IntelliFlex-WallSwitch_Inst07
Printed in U.S.A.
If you encounter any difficulty installing or servicing your IntelliFlex Switch, call your
dealer or Draper, Inc., Spiceland, Indiana, (765) 987-7999; or fax (765) 987-7142.
Page 2 of 2
IntelliFlex Wall Switch by Draper
Programming IntelliFlex Switch
Dry Contact: Does not have a Bus connection, and is not programmable. It is
somewhat configurable, based on how it is connected—it must be connected
directly to each device it is controlling. Can be connected to a Bus via PSI60.
RF: Battery operated. Programming the RF switch requires physical contact with
the back of the switch, and allows programming of which button sends which
command, along with other options. When replacing batteries, test switch to make
sure it works. If not, remove batteries, wait a few seconds, then re-insert them.
The switch may operate with low batteries, but programming may not work.
Programming Switch “Locally” Using IR Transmitter
Press programming button on back of switch. Red LED on back of switch will
come on, indicating it is in program mode. This method uses the eye on the back
of the switch, so you must use an IR transmitter for programming, and you must
have access to the back of the switch. Bus commands are ignored during this
process.
To set button “#” on switch to send a new “command”:
➀ Press programming mode button on back of switch (red LED appears).
➁ Press and release the switch button you want to program. The LED will change
from red to green.
➂ Press the command on the IR transmitter you want to be assigned at the
button you just selected (pressing “Stop” at this point will assign the stop
command to the selected button).
➃ The LED will go back to red and you are back in program mode; e.g. to
program the top left button to send Close 7: press the top left button, then
press Close 7 on the IR transmitter.
Clear button “#”:
Press programming mode button on back of switch (red LED will appear).
Press OPEN “#” on the IR transmitter, where “#” is the switch button number to
clear. The red LED will blink off then back on, and you are back in program mode.
Reset to factory default:
Press programming mode button on back of switch(red LED will appear).
Press CLOSE ALL on IR transmitter. The red LED will blink off then back on, and
you are back in program mode. If this is an RF switch, the radio address will not
change.
Change RF switch’s radio address:
Press programming mode button on back of switch (red LED will appear).
Press Open 13 on the IR transmitter. Red LED will blink off then back on, and the
radio address will be changed.
Exit programming mode:
Press STOP on the IR transmitter, and LED will turn off; or, LED will turn off
automatically after 10 seconds of no IR commands or buttons pushed.
Please Note
The eye on the back of the switch is only for programming and will not act as a
receiving eye.
Page 55 of 124
(765) 987-7999
www.draperinc.com
Installation Instructions
™
R2D7 RS232 Professional Integration Interface by Draper
To Bus System 7 (or to RF Transmitter)
To Bus System 6
To Bus System 5
To Bus System 4
Please Note
➀ Includes free “GUI” software capable of scheduling timed events and
global alignment positioning of shades.
➁ For information on programming and operation, see IntelliFlex
Programmer instructions available at www.draperinc.com.
➂ This input device can be used with SC1, SGC4 or SPGC4.
To RS232 Port:
Yellow = Rx (Receive data from control system)
Green = Tx (Transmit data to control system)
Red = Unused
Black = Gnd (Signal Ground)
To Bus System 1
To Bus System 2
To Bus System 3
Codes and Technical Information
Serial Port to Motor Link
Information
Data
Header (Start of command)
* (asterisk) for use on RP B US
Subsystem number or
Administration command
0 2 – 7 if BUS, 7 – 99 if Radio
V 3 = report version
R = make port 7 Radio 4
B = make port 7 BUS
Command 5
o = open
p = program
Channel
7
8
00 –60
Number of characters
1 or 2
c = close s = stop
q 6 = quit sending
1
9
2
Time to send 10 11
0 0 0 12 – 9 9 9 20 th of seconds 13 (this value is optional)
3
Terminator
; (semicolon) or “ CR” (enter key)
1
Pause
Send a command on an unused channel for the desired pause
time.
Serial Port Adapter
R2D7 sends
Powered up
“ version, X -on”
Terminator is received
“ LF” if good command
“U” sent if command cannot be understood
“ CR” is sent after command has been relayed to motors
14
overflows and all data is purged
“O” is sent
Buffer is half full
“X -off ” (Ctrl -S)
Buffer is empty
“X -on” (Ctrl -Q), but only if X -off was previously sent
USB-to-DB9 Serial Port Converter
Special characters
Character
You may also need ...
Converts a standard DB9 serial output of
a PC into an RJ11 connection providing
RS232 serial commands.
Motor Link to Serial Port
Event
Buffer
1
1
Description
ASCII Character Number
“ ;”
Semicolon, signifies end of command
59 (0x3B)
“ CR ”
Carriage return, signifies end of command
13 (0x0D)
“ *”
Asterisk, Shift 8 on most keyboards
42 (0x2A)
“ LF ”
Line feed, ignored (not used)
10 (0x0A)
“ X -off ”
Ctrl -S on most keyboards, requests sender to stop sending
19 (0x13)
“ X -on ”
Ctrl -Q on most keyboards, requests sender to resume sending
17 (0x11)
Serves as a bridge between USB port and
standard RS232 Serial Port.
1. Total message length may be as short as 2 and as long as 10 characters, typically 6.
2. 0 means ALL systems, for super groups ALL does not include the radio channels.
3. Version reports “2.1” then R if administered as Radio, or B if BUS, followed by carriage return (All characters after V in this command are ignored).
4. Radio requires a RF TM be plugged into port 7 jack.
5. Case is important: o is different from O and so on.
6. Stop sending a forever command. Any other command will stop transmission, but an error will be reported.
7. If command is stop or quit, then this value is optional and ignored.
8. 00 = ALL.
9. 60 = “cut strap ALL” (note that version 2.0 used 25 for this channel).
10. If no digits, then the command is sent for 2 seconds, except for stop and program which are sent for ¼ second.
11. Time between commands = .5 sec if multiple commands are buffered (Time = .1 sec after a stop).
12. 000 = Forever, use the q command to stop transmission.
13. Max timed pulse = 50 sec. If this is a radio command, the value is rounded up to the nearest 10th second.
14. Buffer is 120 bytes long.
Page 56 of 124
Copyright ©2004 Draper Inc.
Form IntelliFlex-RS232_Inst04
Printed in U.S.A.
If you encounter any difficulties installing/wiring your IntelliFlex
RS232 Professional Integration Interface, call your dealer or
Draper, Inc., Spiceland, Ind., (765) 987-7999; fax (765) 987-7142;
or e-mail [email protected].
Installation and Programming Guide
Sun and Wind Sensor V1.l and Sun Sensor Switch V4 by Draper, Inc.
Connect to the Sun and Wind Sensor as shown:
All wires labeled “Common” are connected together and are electrically the same as the Black wire on the Bus; any
common wire can be used in place of any other common wire in the drawing.
The Light Sensor may be connected to the spring-loaded connector or to the sensor jack. For best results, use only
one of the Light Sensors shown. More than one light sensor can be installed on either or both connections; however,
if this is done the sensors' scale is disturbed. Sharing a Light Sensor between two Sun and Wind Sensors is not
supported. The actual light sensor is the small round device in the box. This part does not have to be in direct
sunlight, but it may be if desired. (If the indoor white box is in direct sunlight it may discolor over time.) The small
white box must NOT be mounted outdoors—it is NOT weatherproof. A weatherproof sensor may easily be
connected to the spring-loaded connector. If the sensor becomes disconnected, then the control unit will not be able
to detect sunlight and will report total darkness all the time. The wire to the light sensor may be up to 500 feet long
and wire type and gauge does not matter, but exterior rated wire should be used if the wire is exposed to the
elements. When connected to a modular jack, this sensor uses the black and green wires as shown.
The two BUS jacks are electrically connected together in parallel.
5VDC Power (the red wire) is shared between BUS and Sun Sensor Switch (DSK) jacks.
Commands on the Sun Sensor Switch jack are repeated to the BUS jacks, and vice versa.
This unit works well with other accessories on the same SC1 Bus.
SUN AND WIND SENSOR LED:
The LED is bi-colored.
-On power-up, the LED will blink red, green if unit is Bus, green, red if unit is RF (lowercase indicates short LED
blink, while UPPERCASE indicates LONG LED blink).
-The GREEN LED will flash briefly whenever the unit is transmitting to the SC1 Bus or via RF.
-The GREEN LED on solid indicates program mode. Note this is opposite the Sun and Wind Sensor.
-The RED LED will flash briefly whenever the unit is unable to transmit to the SC1 Bus due to traffic, indicating that
the command is being discarded.
SUN AND WIND SENSOR Accessory Enter Program Mode:
To Enter Program Mode:
-Using a programmable remote: press & hold STOP; while still holding STOP press both OPEN7 and CLOSE7.
-Release all three buttons; within 6 seconds press CLOSE 'N', where “N” represents the accessory number of this
device (factory default for N is 1), or CLOSE ALL will put all accessories in program mode. Note that Stop+7+7
Close 1 is supported by the R2D7 command: *1a01.
Copyright 2008 IntelliFlex_SUN AND WIND SENSOR_Programming_Inst08 Printed in USA
Page 57 of 124
SUN AND WIND SENSOR V1.l and SUN SENSOR SWITCH V4 by Draper
Page 2 of 9
The Program Mode LED must now be lit solid GREEN, if it is not, repeat the above steps.
The SUN AND WIND SENSOR will automatically exit program mode after 20 seconds if no commands are
received.
If programming commands started via an eye on the BUS, then BUS must be used to complete this programming.
The same goes for the Sun Sensor Switch jack. While in programming mode, commands seen on either jack are
repeated to the other.
While in programming mode, sun and wind sensors and all switches are ignored.
When program mode exits, the sun sensor is reset to where the level is now, there are no pending events.
SUN AND WIND SENSOR Configuration
This Sheet uses "#" for this unit's accessory number - new units will use a 1 where the # is (ALL also works).
1
The accessory number is reset to 1. Radio address is not changed
Defaults:
Accessory number = 1, Plugged into SC1 (RP) Bus, Standard Wind Timing.
For the most reliable operation, this unit should be hardwired to the SC1 system. If that is not practical, the SUN
AND WIND SENSOR may be connected to an RFTM for wireless operation. Please see "Installing SUN AND
WIND SENSOR using radio (RFTM): Step by Step" for more info.
Putting the SUN AND WIND SENSOR in Demo Wind Timing mode is useful for demonstrating the unit to a
potential client without having to wait several minutes to see actions. Demonstrating the Sun Sensor is achieved by
setting a fast Sun Delay Time as described under the Sun Sensor section of this document.
Command send time is not selectable. It is 1/4 second for all commands. This means the controlled SC1 action must
not be momentary, or they must be sticky, which is what is recommended in the notes.
Page 58 of 124
SUN AND WIND SENSOR V1.l and SUN SENSOR SWITCH V4 by Draper
Page 3 of 9
Sun Actions:
This Sheet uses "#" for this unit's accessory number - new units will use a 1 where the # is (ALL also works).
2
The LED will turn RED then back to GREEN to indicate you are in a multi-button sequence.
This means whatever "button" you want to "send" at the selected event, STOP means ignore the event.
4
Completing this sequence automatically turns off user selection of sun "level" via Sun Sensor Switch.
5
See "Sun Thresholds and Levels" for full explanation.
6
See "Sun Intermediate Stops" for full explanation. Summer and Winter events are both set the same.
7
See "SUN assuming fixed levels" for full explanation and warning.
8
Completing this sequence automatically turns on user selection of sun "level" via Sun Sensor Switch.
3
Page 59 of 124
SUN AND WIND SENSOR V1.l and SUN SENSOR SWITCH V4 by Draper
Page 4 of 9
Defaults:
Sun sensor timing = 10 minutes, low sunrise at 68 with increment of 3, low sunset at 48 with increment of 3. User
level selection is allowed and is set to high, Summer and Winter Actions =No Intermediate Positions on Sun (as
shown in "Sun Intermediate Stops"), Sun Sensor not disabled via a channel, No channel to switch between
Summer & Winter, Sun Sensor always uses Summer Actions.
Sun Intermediate Stops
No Intermediate Positions on Sun, use default settings (S+7+7 > C# > C10 > 01):
When the "high" LED on the Sun Sensor Switch display blinks, then the sunrise event is pending. When the selected
delay time expires, Close ALL will be sent. The sunrise event has then happened and the high LED will stop
blinking.
When the "low" LED on the Sun Sensor Switch display blinks, then the sunset event is pending. After the delay time,
Open ALL will be sent. The sunset event has then happened and the low LED will stop blinking.
Other levels of sun will display appropriately with no bus commands.
The user may adjust all levels up or down using the Sun Sensor Switch.
One Intermediate Position on Sun (S+7+7 > C# > C10 > 02):
If it was dark and is getting brighter (motor assumed open), and the "medium" LED on the Sun Sensor Switch
display blinks, then the 1" position sunrise event is pending. When the selected delay time expires, Open23 will be
sent. This sunrise event is then finished and the LED will stop blinking.
When the "hgh" LED on the Sun Sensor Switch display blinks, then the full sunrise event is pending. After the delay
time, Close ALL will be sent. The sunrise event has then finished and the high LED will stop blinking.
As it gets darker, the "medium" LED on the Sun Sensor Switch display will blink. This indicates the 1st position
sunset event is pending.
After the delay time, Open23 will be sent and the LED will stop blinking.
When the "low" LED on the Sun Sensor Switch display blinks, then the full sunset event is pending. After the delay
time, Open ALL will be sent and the low LED will stop blinking.
Other levels of sun will display appropriately with no bus commands.
The user may adjust all levels up or down using the Sun Sensor Switch.
Two Intermediate Positions on Sun, use default settings (S+7+7 > C# > C10 103):
Page 60 of 124
SUN AND WIND SENSOR V1.l and SUN SENSOR SWITCH V4 by Draper
Page 5 of 9
Three Intermediate Positions on Sun, use default settings (S+7+7 > C# > C10 > 08):
Four Intermediate Positions on Sun, use default settings (S+7+7 > C# > C10 > 09):
Sun Thresholds and Levels
User selection of "level” using Sun Sensor Switch:
If the user presses the appropriate buttons on the Sun Sensor Switch to set the Sun threshold, all thresholds are
moved up or down appropriately. All pending sun actions are lost when a level is selected.
Example: Default sunrise setting is 68 with 3 increment, sunset is 48 with 3 increment.
The sunrise LEDs at low setting indicate 68,71,74,77,80, and at high setting 80,83,86,89,92.
The sunset LEDs at low setting indicate 48,5 1,54,57, Mi, and at high setting 60,63,66,69,72.
At low setting with 2 intermediate positions Open23 will be sent at 71, Close23 at 77, Close ALL at 80, Close23 at
57, Open23 at 5 1, and Open ALL at 48.
At medium setting the numbers change to: Open23 @ 77, Close23 @ 83, Close ALL @ 86, Close23 @ 63,Open23
@ 57, and Open ALL @ 54.
Setting Sun Thresholds
To set the sun thresholds you must enter the two-digit low threshold number and then enter the two digit increment.
For example, entering 40 as the low sunset threshold with an increment of 04, sets the low 5 thresholds from low to
high to: 40,44,48,52,56, and the high 5 thresholds to 56,60,64,68,72.
This example would be done with the following sequence: S+7+7 > C# > C5 > 04 > 0 10 > 0 10 > 04
The following sequence must be completed to change any thresholds:
1- Press S+7+7 > C#, the GREEN programming LED must light.
2- Press C4, the LED will blink off then GREEN, and you are setting sunrise thresholds (or press C5 for sunset).
3- Press 0 1-10 to select the 10's of percent of the low threshold (01 0 selects O), the LED will blink RED then
GREEN.
4- Press 01-10 to select the 1's of percent of the low threshold, the LED will blink RED then GREEN.
5- Press 0 1-1 0 to select the 10's of percent of the increment, the LED will blink RED then GREEN.
6- Press 0 1-10 to select the 1's of percent of the increment, the LED will blink off and then be GREEN.
If bad numbers are entered, the LED will flash GREEN & RED a few times and then be GREEN and the original
thresholds are UNCHANGED and the accessory is still in program mode but must get a close command next.
Errors include:
-Entering a starting threshold where low sunrise would not be more than low sunset.
-Entering an increment of 0.
-Entering a threshold and increment where the high threshold (Low + 8" Increment) would be > 99 percent.
-Entering a threshold and increment where a sunrise would not be more than the associated sunset.
-Programming either sunrise or sunset thresholds automatically sets the threshold to high (default).
If you are not using the Sun Sensor Switch to change between the thresholds, then the high threshold set is the only
one used. The programming sequence MUST still be completed.
After installation, be sure to select a Sun Sensor Delay of at least 10 minutes.
Page 61 of 124
SUN AND WIND SENSOR V1.l and SUN SENSOR SWITCH V4 by Draper
Page 6 of 9
SUN assuming fixed levels
The sun sensor is capable of sending independent bus commands as a result of each of the 5 sunrise and sunset
events, and the thresholds may be adjusted individually. However, once this capability is enabled, the user selectable
"level" is disabled. The Sun Sensor Switch is simply a display of sun levels in this case.
Setting any sun event to a custom value (S+7+7 > C# > C1 or C2 > Cx . . . ) automatically turns off the users ability
to set the level. You can force the ASM to allow user selection using S+7+7 > C# > C10 > 04 > S, however,
operation may be strange.
Setting Sun Thresholds individually
S+7+7 > C# > C4 or C5 > Ow > Ox > Oy > Oz may still be used to set multiple thresholds at once; please see that
section above. The highest 5 (as though the user selected high level) are the values used in fixed mode.
To set a specific sun threshold you must enter the two-digit threshold after selecting the threshold to set. For
example, setting the medium sunrise threshold to 86 would be done with the following sequence: S+7+7 > C# > C4 >
C3 > 08 > 04
The following sequence must be completed to change any threshold:
1. Press 5+7+7 > C#, the GREEN programming LED must tight.
2. Press C4, the LED will blink off then GREEN, and you are setting sunrise thresholds (or press C5 for sunset).
3. Press C 1-5 to select which threshold to set, the LED will blink RED then GREEN.
4. Press 0 1 - I0 to select the 10's of percent for this threshold (0 10 select 01, the LED will blink RED then GREEN.
5. Press 0 1-1 0 to select the 1's of percent for this threshold, the LED will blink off and then be GREEN.
If bad numbers are entered, the LED will flash GREEN & RED a few times and then be GREEN and the original
thresholds are UNCHANGED; the accessory is still in program mode but must get a close command next.
Errors include:
-Entering a sunrise threshold smaller than the associated sunset.
-Entering a sunset threshold larger than the associated sunrise.
Programming any individual threshold automatically sets the "level" to high (default).
If you are not using the Sun Sensor Switch to change between the thresholds, then the thresholds as described under
"intermediate positions using default"' are the ones used.
After installation be sure to select a Sun Sensor Delay of at least 10 minutes.
Installing SUN AND WIND SENSOR using radio (RFTM): Step by Step
The SUN AND WIND SENSOR may be connected to an RFTM for wireless operation. However, the batteries on an
RFM will not power the SUN AND WIND SENSOR for very long, so a DCPM must also be used. The "change
radio address" may be used if more than one SUN AND WIND SENSOR is connected to a system using radio and
they happen to have the same address. Connect everything as shown:
This setup allows the SUN AND WIND SENSOR to convert BUS commands received on the Sun Sensor Switch
(DSK) port to radio commands. You must have a method of getting commands into the Sun Sensor Switch port to
program the SUN AND WIND SENSOR. This can be accomplished by temporarily plugging an eye in the Sun
Sensor Switch jack.
Using an IR only handheld transmitter, program the SUN AND WIND SENSOR to radio mode (S+7+7 > C# > C8 >
02).
Press the "learn" button on the RR that you want the SUN AND WIND SENSOR to talk to. Its LED must come on.
Quickly press a button on the IR transmitter aimed at the eye plugged into the SUN AND WIND SENSOR. (This
will cause the SUN AND WIND SENSOR to send a radio command that will be learned by the RR.) The LED on the
RR must go out when the button is pressed indicating the RR has learned the radio address of the SUN AND WIND
SENSOR.
Page 62 of 124
SUN AND WIND SENSOR V1.l and SUN SENSOR SWITCH V4 by Draper
Page 7 of 9
Press an open or close command on the IR transmitter and make sure the appropriate action happens on the SC1
system.
Draper Sun Switch (DSK) (optional):
This Sheet uses $ for this Sun Sensor Switch's accessory number - new units will use a 6 where the # is (ALL also
works).
14 This means open + close, all others are turned off
15 This means whatever “button" you want to "send" when the button is pushed.
Sun Sensor Switch MUST be plugged into the Sun Sensor Switch (DSK) jack for it to work correctly.
Defaults:
Accessory number = 6.
Open button sends OPEN 1.
Stop button sends STOP (this is All Stop).
Close button sends CLOSE 1.
Sun & Wind Mode (both GREEN and RED LEDs will display on the Programming Switch).
It is possible to make the open & close buttons send commands that do not control this motor simulator, but this
would probably be confusing. The open/stop/close LEDs are updated according to the status of the SUN AND WIND
SENSOR ''motor simulator" to which it is connected regardless of any channel number (s).
Note that the default channel for the Sun Sensor Switch is 1 and the default channel for the SUN AND WIND
SENSOR is 22, so the Sun Sensor Switch channels should be changed to 22 for use with SUN AND WIND
SENSOR.
Power-Up
The LEDs go through a sequence where all LEDs are turned on so you may easily determine if any are not working.
After this sequence is completed, the Decorator Switch may take a few seconds before the correct state is displayed.
The sequence begins: All 6 RED LEDs on the Programming unit, then All 6 GREEN LEDs on the Programming
unit, then ALL 4 LEDs on the Control unit. Then the bottom 4 LEDs will flash RED for ¼ of a second indicating
WALL SWITCH is version 4. The version of the SUN AND WIND SENSOR must be 1 and the Sun Sensor Switch
must be 4 for correct operation.
Configuring the WALL SWITCH & SUN AND WIND SENSOR using the WALL SWITCH:
Press and hold the 2 buttons indicated below for 5 seconds to perform the configuration shown. After completion, the
LEDs next to the buttons held will come on green for 1 second. If 5 RED LEDs come on, then that configuration is
not allowed.
Sun & Wind Display:
Medium-high (3d) and medium-low (5th) buttons. The Sun Sensor Switch will display and set both Sun and Wind.
The SUN AND WIND SENSOR does not change any settings.
Sun Only Display:
Medium-high (3d) and low (6th) buttons. The Sun Sensor Switch will display and set only Sun. Multi-positions on
sun are not affected. This does not stop wind detection; the Sun Sensor Switch will just never report wind levels and
the user cannot select a wind threshold.
The SUN AND WIND SENSOR does not change any settings.
Page 63 of 124
SUN AND WIND SENSOR V1.l and SUN SENSOR SWITCH V4 by Draper
Page 8 of 9
NO intermediate positions on Sun:
High (2nd from the top) and medium-high (3d from the top) buttons. Sunrise & Sunset events will be set as shown in
"Sun Intermediate Stops'' section above under “No Intermediate Positions." Selected Sun level is set to high.
The SC1s intended to be controlled by the SUN AND WIND SENSOR are NOT affected by this action and must be
programmed separately.
ONE intermediate position on Sun:
High (2nd) and medium (4th) buttons. Sunrise & Sunset events will be set as shown in "Sun Intermediate Stops"
section above under "One Intermediate Position." Selected Sun level is set to high.
The SC1s intended to be controlled by the SUN AND WIND SENSOR are NOT affected by this action and must be
programmed separately.
TWO intermediate positions on Sun:
High (2nd) and medium-low (5th) buttons. Sunrise & Sunset events will be set as shown in "Sun Intermediate Stops"
section above under "Two Intermediate Positions." Selected Sun level is set to high.
The SC1s intended to be controlled by the SUN AND WIND SENSOR are NOT affected by this action and must be
programmed separately.
THREE intermediate positions on Sun:
High (2nd) and low (6th) buttons. Sunrise & Sunset events will be set as shown in "Sun Intermediate Stops" section
above under 'Three Intermediate Positions." Selected Sun level is set to high. This button combination may be called
Toggle Reference in the Sun Sensor Switch documentation, but the function is as described here for SUN AND
WIND SENSOR.
The SC1s intended to be controlled by the Sun and Wind Sensor are NOT affected by this action and must be
programmed separately.
FOUR intermediate positions on Sun:
Medium-high (3d) and medium (4th) buttons. Sunrise & Sunset events will be set as shown in "Sun Intermediate
Stops" section above under "Four Intermediate Positions." Selected Sun level is set to high. This button combination
may be called Toggle Motor Leads in the Sun Sensor Switch documentation, but the function is as described here for
SUN AND WIND SENSOR.
The SC1s intended to be controlled by the Sun and Wind Sensor are NOT affected by this action and must be
programmed separately.
Sun Sensor in Summer mode:
Medium (4th) and medium-low (5th) buttons. All Sunrise & Sunset events will be Summer actions. This button
combination may be called Auto-return in the Sun Sensor Switch documentation, but the function is as described
here for SUN AND WIND SENSOR.
Sun Sensor in Summer mode:
Medium (4th) and low (6th) buttons. All Sunrise & sunset events will be Winter actions. This button combination
may be called Auto-return in the Sun Sensor Switch documentation, but the function is as described here for SUN
AND WIND SENSOR.
Pressing the button combination to start Calibration will light all 5 LEDs indicating the function is not supported.
Programming the Sun Sensor Switch, Accessory number, BUS & Sun Sensor Switch jacks:
There is no association between the Sun Sensor (Decorator) Switch "accessory number" and simulated SC1 "main
channel".
The Sun Sensor Switch simply works with whatever SUN AND WIND SENSOR it is plugged into. The messages
going between the Sun Sensor Switch for status display and the SUN AND WIND SENSOR are special and not
repeated to the BUS jack.
Page 64 of 124
SUN AND WIND SENSOR V1.l and SUN SENSOR SWITCH V4 by Draper
Page 9 of 9
You cannot program the Sun Sensor Switch using S+7+7 CloseALL unless you are using a splitter etc. The
CloseALL command is interpreted by the SUN AND WIND SENSOR as "'enter program mode" - and it turns on its
GREEN LED and awaits programming commands -and the Sun Sensor Switch goes into program mode, and they do
not use the same programming steps.
Sun Sensor Switch Reporting Delay:
Be aware that the LEDs on the Sun Sensor Switch may lag behind an actual change in light level or other event by as
much as 6 seconds.
This is particularly significant when demonstrating light reactions.
Debug feature, simulating an event:
The Sun Sensor Switch can be used to simulate an event to verify that everything is programmed as desired.
Press and hold the desired 'level" button on the Programming Switch, then press and hold the STOP (middle) button
for 4 seconds to simulate the event associated with that level of wind.
Press and hold the desired button on the Programming Switch, then press and hold the top button for 4 seconds to
simulate the event associated with that level at sunrise (Summer/Winter is whatever is currently selected).
Press and hold the desired button on the Programming Switch, then press and hold the bottom button for 4 seconds to
simulate the event associated with that level at sunset.
If there is no action associated with that level then nothing will happen.
Be careful to not push multiple buttons on the Programming Switch, as that may cause a configuration change!
Order dependent programming on SUN AND WIND SENSOR:
Forcing user level set must be done only after setting all events C 1 ... or C2 ... .
Resetting accessory to factory default, or selecting default actions on multi-sun, puts full sunrise and sunset events on
channel 22 regardless of simulator 'main' channel, so this setting must be made before changing main channel
actions.
Page 65 of 124
Installation Instructions
LCD Timer by Draper
➀ The timer acts as a “normally open” (NO) switching device.
➁ The timer may be set to deliver up to seven (7) On/Off setting pairs.
Each setting pair can be set to activate: everyday, once a week,
every weekday, or weekends only.
➂ When connecting to SC1 or PSI60, polarity does not matter
CAL CLK PGM AUTO RAND MAN
OFF
AM
PM
12:00 d
MO TU WE TH FR SA SU ON
+
➀ The timer acts as a “normally open” (NO) switching device. This delivers a
closed contact in the “On Mode,” and an open contact in the “Off Mode.”
➁ The manual inputs of an SC1 or PSI60—when set into SPST mode—may
be set to react to these types of contact by opening and closing motorized
products to their respective limits.
➂ The timer may be set to deliver up to seven (7) On/Off setting pairs. Each
setting pair can be set to activate: everyday, once a week, every weekday
or weekends only.
➃ The timer can be used as a local switch by pressing the clear “Cover/
Switch, and activating the “Next/On/Off” operation.
➄ The timer is capable of many other powerful and flexible features (including:
Astronomic Feature, Automatic Daylight Savings Time adjustment, Random
Operation feature, and much more). Please see timer “Installation and
Operating Instructions” (included with the timer).
MO
D
D
_
™
Figure 1
Connecting PSI60 to LCD Timer
Optional Eye
Switch B (Wire additional LCD
timer to this switch)
CAL CLK PGM AUTORAND MAN
OFF
AM
PM
12:00 d
PSI60
Connecting to PSI60 or SC1
MO TU WE TH FR SA SU ON
➀ The BLACK and BLUE wires from the timer should be connected to the
Common and Up (Open) terminals on a PSI60 or SC1.
Please Note: Polarity does not matter.
➁ Be sure to configure manual inputs of the PSI60 or SC1 you are using for
Single Pole Single Throw (SPST). Please refer to the documentation for
the PSI60 or SC1 to correctly enable the “SPST Manual Switch” setting.
Please Note: If using a PSI60, be sure to program the PSI60 to send the
specific SC1 “Bus” command you wish the timers action to initiate.
➂ See page 2 of these instructions for configuring the timer to activate at the
desired time(s).
Close
Common
Open
Close
Common
Open
{
{
EYE
BUS
MODE
NEXT/
ON/
OFF
RESET
DAY/
DST
HOUR+
YEAR-
M+
ZONEYEAR-
Program
Mode
LED
To “Eye” jack
on SC1 BUS
Figure 2
Connecting One SC1 to LCD Timer
Technical Notes
➀ The timer’s blue and black wire gauge is too large to fit the screw
terminals of a PSI60 or SC1. Use the wire-nuts provided with the timer to
connect a smaller gauge wire (18-28 AWG is acceptable) to make
interfacing with the screw terminals possible.
➁ Two wires have been provided for making the connection noted above.
➂ The red wire on the Timer is used for three-way line voltage switching,
and is not used in IntelliFlex applications.
➃ Upon initial insertion of the battery, the timer may enter a mode where the
internal motor-switch may cycle repeatedly. In this case, press and release
the Reset button once, and the timer should function normally. If this
does not resolve the issue, refer to the “Troubleshooting Guide” on page 2
of these instructions.
➄ The timer has an internal backup battery (not serviceable), which will
hold your timer memory settings for a short period of time (refer to the
timer documentation for details.) This internal backup battery allows you
an opportunity to replace the AAA battery without losing your timer memory
settings.
➅ For additional actions at the same installation, please purchase additional
timers.
CAL CLK PGM AUTORAND MAN
OFF
AM
PM
12:00 d
MO TU WE TH FR SA SU ON
MODE
NEXT/
ON/
OFF
RESET
DAY/
DST
HOUR+
YEAR-
M+
ZONEYEAR-
Figure 3
Connecting Multiple SC1s to LCD Timer
CAL CLK PGM AUTORAND MAN
OFF
AM
PM
12:00 d
MO TU WE TH FR SA SU ON
MODE
NEXT/
ON/
OFF
RESET
DAY/
DST
HOUR+
YEAR-
M+
ZONEYEAR-
Figure 4
Page 66 of 124
Copyright ©2007 Draper Inc.
Form IntelliFlex-LCDTimer_Inst07 Printed in U.S.A.
If you encounter any difficulties installing/wiring your IntelliFlex LCD Timer, call your
dealer or Draper, Inc., Spiceland, Ind., (765) 987-7999; or fax (765) 987-7142.
IntelliFlex™ LCD Timer by Draper
Page 2 of 3
Programming/Setting the LCD Timer
NEXT/
ON/
OFF
Resetting the timer
Switches between
ON and OFF settings
when programming
the time. Confirms
program entry and
advances timer to
next selection.
Press the reset and the “Next/On/Off” buttons at the same time. Release the
buttons and wait for “12:00” to start blinking.
Setting the calendar
Press the mode button one time. “Cal” will appear in the top left corner. Year
will be flashing between the word “year” and “2000.” If the year is not showing
2000 you must repeat the reset procedure. To adjust the year, press the
“m+zone” button (bottom right). If you pass the current year use the (bottom
center) button to subtract a year. Press the “Next/On/Off” button one time.
Date will be flashing. Press the “day/dst” (bottom left) button to set the current
day. Press the “M+zone” (bottom right) to set the current month. Press the
“Next/On/Off” button one time. “DST/Auto” will be flashing. Press the “Day/
DST” button (bottom left) to select Daylight Savings Time. If daylight savings is
not being used press the button again and select “man.” Press the “Next/On/
Off” button one time. “Zone” will be flashing. Press the “M+zone year” button
(bottom right) and select the zone area of your location (South, Central or
North—see Fig. 7). Press the “Next/On/Off” button one time. “SUNUP” will be
flashing, showing the preset time for this zone. To adjust this time, press the
“Hour/Year” button (bottom center) to adjust the hour and the “M+zone” button
(bottom right ) to adjust the minutes. Press the “Next/On/Off” button one time.
“SUNDN” will be flashing, showing the preset time for this zone. To adjust
this time, press the “Hour/Year” button (bottom center) to adjust the hour and
the “M+zone” to (bottom right) to adjust the minutes. The calendar portion of
the timer is now set. Note: you must continue and set both the clock and the
programming function.
NEXT/ON/OFF
MODE
MODE
Switch from one
program mode
to another.
DAY/
DST
RESET
RESET
Press RESET while holding
down NEXT/ON/OFF
button to clear all previous
programming.
CAL CLK PGM AUTO RAND MAN
OFF
AM
PM
M+
ZONE+
YEAR+
12:00 d
MODE
NEXT/
ON/
OFF
RESET
DAY/
DST
HOUR+
YEAR-
M+
ZONEYEAR-
M+ ZONE + YEAR+
Advances months in the
calendar mode.
Advances minutes in the
clock and program modes.
Advances years in the
calendar mode.
MO TU WE TH FR SA SU ON
HOUR+
YEAR-
DAY/DST
HOUR+ YEARSubtracts years in the
calendar mode.
Advance hours in the
clock and program modes.
Changes days when
setting calendar or
programming ON and
OFF times.
Press to select
automatic or manual
daylight savings time.
Figure 5
Clock Program
Mode Mode
Calendar
Mode
AM/PM
Indicator
Auto
Mode
Random Manual
Mode
Mode
CAL CLK PGM AUTO RAND MAN
OFF
AM
PM
12:00 d
Off
Setting
MO TU WE TH FR SA SU ON
Setting the clock
Press the “mode” button one time. “Clk” will be displayed in the left corner of
the timer. Using the “Hour/Year” button (bottom center) to set the hour of your
current time. Using the “M+zone” (bottom right) button set the minutes of your
current time.
Days of
the week
On
Setting
Program #
Auto
Daylight Savings
Figure 6
Programming
Press the mode button one time. “Pgm” will be displayed on the top left corner
of the timer. We are setting the “On” time for Program 1. “---:--- 1on” will be
displayed on the screen. Press the “Day/DST” (bottom left) button to select the
day or series of days the timer is to turn on. You can either select the “Astro”
time which will adjust as the days get longer and shorter or a specific time. To
use the “Astro” time, press the “Day/DST” until “snst” appears on the screen
(all seven days will be shown on the bottom of the timer). To use a specific
time press the “Day/DST” button and select the day or series of days the timer
is to turn on. Use the “Hour/Year” (bottom center) button to select the hour to
turn the unit on. Use the “M+zone” (bottom right) button to set the minutes of
your on time. Press the “Next/On/Off” button one time. We are now setting the
“Off” time for program 1. Press the “Day/DST” (bottom left) to select the day
or series of days of operation. To use the “Astro” time press the button until
“snup” appears on your screen. To select a specific time, press the button
and select a day or series of days the unit is to turn off. Press the “Hour Year”
(bottom center) button and set the hour of your “Off” time. Press the “M+zone”
(bottom right) button to select the minutes of your “Off” time. For additional
programs press the “Next/On/Off” button to the next program and follow above
steps.
Exit Programming
Press the “Mode” button once for “Auto” or twice for “Auto Rand.”
Note: your timer is in the on position. If the program calls for the unit to
be off at this time Press the next “On/Off” button to toggle the unit to off.
Figure 7
Battery Replacement
The 15 Volt alkaline battery should operate your timer for 1½ years or more
under typical conditions. High or low temperature or frequent use of the
manual pushbutton will reduce the battery life. Replace the battery when the
digital display is dim, the message “lobAt” (meaning low battery) is displayed
or if the timer fails to operate. Press any button to clear the “lobAt” message.
The timer has built-in memory protection providing at least 15 seconds to
change a weak battery without losing your time-of-day setting. You do not
need to turn off the load or the power in order to replace the battery; however,
do not attempt to switch the timer on or off while the battery is out or your time
setting will be lost and the timer will need to be reset.
Page 67 of 124
www.draperinc.com
(765) 987-7999
IntelliFlex™ LCD Timer by Draper
Page 3 of 3
Page 68 of 124
www.draperinc.com
(765) 987-7999
Installation Instructions
™ PSI60 Bus Command Converter by Draper
➀ Make sure power is disconnected before installing controls.
➁ Make sure AC Amperage of any wall switches are not exceeded, and
that wires are large enough for loads.
➂ All AC motor controls are UL approved.
For use with X-10 controls:
➀ SPDT Mode: Program to factory default, and connect 2 universal modules
in momentary mode (one between open and common, the other between
close and common.)
➁ Activate the open module to open the shade; activate the close module to
close the shade; simply repeat any command to stop the shade.
➂ SPST Mode: Maintained—Using one universal module connect two wires
between Open and Common. X-10 to deliver a maintained contact.
Electrically Closed=shade closed. Electrically Open=shade open. The
delay times within the X-10 system make it difficult to stop the motor using
the “Quick Toggle” feature of the SC1.
Installing the PSI60
Ground
SC1
Neutral
Hot
➀ Connect the PSI60 to the SC1 network (see Fig. 1).
Motor Neutral
Red - UP
Black - DOWN
AUX
110V AC
Motor
Programming the PSI60
To Enter Program Mode—
EYE
To other SC1s
➀ Using a programming remote - press & hold “Stop.”
➁ While still holding “Stop,” press both “Open 7” and “Close 7,” then release
all three buttons. Within 6 seconds press “Close All.” The Red Program
Mode LED on the PSI60 must now be lit. If it is not repeat the above steps.
In the following table, S = “Stop,” C = “Close,” O = “Open”.
Optional Eye
PSI60
Program
Mode
LED
Close
Common Right Switch
Open
Close
Common Left Switch
Open
EYE
SC1
This wire MUST connect
to an EYE port
Figure 1
Desired Change
Left Switch Channel to 1
Left Switch Channel to “N” (N = ALL, 1 - 60)
Left Switch Channel to “ALL”
LED:
S+7+7
S+7+7
S+7+7
C ALL
C ALL
C ALL
C1
C1
C1
O1
O “N”
O ALL
S
S
S
Reset the Left Switch options to factory default
SPST Switches on Left
SPDT Maintained Switch on Left
Invert Left SPST switch
S+7+7
S+7+7
S+7+7
S+7+7
C ALL
C ALL
C ALL
C ALL
C2
C2
C2
C2
O ALL
O3
O2
O4
S
S
S
S
Right Switch Channel to “N” (N = ALL, 1 - 60)
S+7+7
C ALL
C3
O “N”
S
General installation guidelines based on type of switch
SC1 control will be programmed to SPDT Momentary by factory default
(SPDT Momentary Switch). Button action is exactly like the keypad. A
momentary press of either directional button sends the appropriate command.
The motor action will be maintained, running the shade to its limit. If the
command is repeated, this will “stop” the motor at that point in its travel.
Program SC1 to “Stop on Manual Button Release.” A standard SPST
maintained switch will now operate the SC1 control just like normal AC
switching. Press “Down,” latching the switch down = the shade runs down.
Action of “Up” is the same. Return switch to center = “Stop.”
•
•
•
•
•
•
SPST Maintained Switch:
Program SC1 for “SPST Switches.” Connect the two wires from the switch
to common and open. Electrical closing of switch sends “Close.” Opening
of switch sends “Open.” Enabling “Invert” causes closing of the switch to
send “Open” and vice versa (useful for winter/summer if using a thermostat).
To “Stop” a motor while it is running: “Quick Toggle” of the switch (running
open—flip to “Close” then back to “Open”) will stop the motor.
blink
blink
off
Notes:
SPDT Momentary Switch or Somfy 3-Button Switch:
SPDT Maintained Switch:
on
•
•
The right switch must be SPDT Momentary. Its type cannot be changed
via programming. Left switch default is SPDT Momentary switch.
The PSI60 unit is also a repeater.
This unit cannot be used as the only repeater in a system unless
everything is already programmed, because “enter program” commands
are blocked and NOT repeated.
While programming this unit (red LED is on) IR signals are not repeated.
Note that the Palm Pilot will not program this unit correctly.
Pushing a second button while another is active will cause the first button
to be interrupted. The SC1 will probably ignore the change. Wait at least ¼
second between button pushes or subsequent pushes will be
misinterpreted.
If you plan to use two switches simultaneously, it is recommended that
they both be SPDT momentary. If left and right switches are pushed
simultaneously, note that only one will be handled at a time.
“ALL on the cut strap T12” cannot be sent by PSI60.
SPST Momentary Push-Button Switch:
Program SC1 for “SPST Switches.” Connect switch between common and
close. A Momentary Press of this switch sends a command to run. The
direction that the motor runs is in relation to the “last command” that the SC1
received, so it could be “Open” or it could be “Close.” This switch method is a
true sequential switching action.
Timed relay closure from automation system:
Program to factory default (SPDT Momentary Switch). Closure of either
relay sends the appropriate command. The contact time of this “Momentary”
closure should be ½ second.
Page 69 of 124
Copyright ©2007 Draper Inc.
Form IntelliFlex-PSI60_Inst07
Printed in U.S.A.
If you encounter any difficulties installing/wiring your IntelliFlex PSI60, call your
dealer or Draper, Inc., Spiceland, Ind., (765) 987-7999; or fax (765) 987-7142.
®
Introductory Overview
The IntelliFlex Control System is an intelligent yet simple package
of controls and input devices that provides a single source opportunity
to install any type of motor controls on a range of products and have
them all work together seamlessly in an installation.
The heart of the system is the SC1 (see Fig. 1), a single motor
switching relay with a built in microprocessor. Think of the SC1 as
being two different switches in one. The relay component acts as a
switch to turn the power on and off to the motor, operator or device
you wish to control. With the IntelliFlex system, the processor on the
SC1 control acts as the switch to tell the relay when to turn on and off.
Eye Jack for
connecting control
devices to SC1
To Optional
Manual Switch
Aux Jack for
linking SC1s
together
From Wall Switch,
IR, RF, or
other control device
To
AC Power
and Motor
Earth Ground
Figure 1
The SC1 communication system uses the power of each device's
microprocessor to receive and interpret commands. There are two
ways of sending commands to the system. One is through a set of dry
contact closure terminals on each SC1. The second and most powerful method is via a low voltage data communication Bus system.
Each SC1 has two RJ11 4-conductor modular phone plug ports
that can be used to link multiple devices together. The microprocessor
on each device listens for commands addressed to it. The Bus utilizes
a proprietary protocol allowing up to 60 channels of communication to
be shared between devices in a single system. Multiple systems can
be combined in an installation.
Each microprocessor is programmed with firmware, which acts
as the operating code for the system. Each device’s firmware can be
written to through special programming functions, allowing special
features and actions to be enabled and modified. (For a complete listing of special functions see our quick reference programming guide.)
The key feature to reprogram for any installation is what is referred
to as the Main Address. This is the primary Bus channel to which the
SC1 processor is programmed to respond. While it is not necessary to
edit this address, doing so allows each SC1 in a Bus system to be addressed individually. Once an SC1 has a unique main address on the
Bus it can be addressed and programmed remotely, thereby eliminating the need to gain physical access to the SC1 to modify or change
its configuration!
Controls
by
Other features include up to six subgroup functions per SC1 and
the ability to enable up to four mid-window stopping positions. It can
be set to turn a light on or off. The motor output terminals can be
reversed via programming, eliminating the need for an electrician to
deal with motor polarity, etc.
Inputs:
The SC1 dry contact input terminals are unique in the ability to
change, through programming, the way the relays respond to contact
closures. These terminals can be used in a standard latch and run
mode or can be set to require a maintained contact for momentary
motor action. They can also be set to X10 timing mode. This flexibility allows the system to be integrated with virtually any automation
system.
The Bus communication is capable of receiving input commands
from a wide variety of different input devices (see our reference sheet,
and sample input device configuration sheets) in any combination and
number and at any time, allowing great flexibility and power in providing a control system ranging from the most simplistic to the most
complex, all in a plug and play fashion.
Input devices include, but are not limited to, IP devices to launch
commands remotely via a Local Area Network (LAN), RS232 devices
for launching commands from a local PC or HA system, sun sensors,
wind sensors, timers, thermostat interfaces, interface devices for other
building automation and fire alarm system overrides, radio remote
controls, infrared remote controls, wireless wall switches and keypads,
hardwired wall switches and keypads, standard toggle switches and
key switches. Each input device can be used to launch individual,
subgroup or group actions, or any combination thereof. Commands
can also locate multiple shades to as many as four intermediate stops.
In addition, Draper has developed a “standard” “custom” switch
program that allows the user to choose a wall switch configured to
provide intuitive labeling and actions in a stocking switch program. The
IntelliFlex Wall Switch is available in over 50 stocking configurations.
Each of up to 12 available buttons can be programmed to send any
command necessary, creating an extremely flexible user interface for
the system.
Draper provides a number of ways to program the system and all
are relatively inexpensive and simple to use. These include programming functions from a number of different keypads and transmitters,
but the fastest and simplest methods are done using free programming PC software (requires Draper’s RS232 translator to connect to
the system).
For the most current information, check out our Web site, www.
draperinc.com.
Page 70 of 124
Copyright © 2005 Draper Inc.
Form IntelliFlex_Overview05
Printed in U.S.A.
®
Controls
Planning Sheet
by
Assign Group Numbers:
Stop
Enabled
(A or
B)
Open
Close Stop
Open
Close Stop
Open
Close Stop
Open
Close
Group ComComEn- Group ComComEn- Group ComComEn- Group ComComChan- mand
mand abled Chan- mand
mand abled Chan- mand
mand abled Chan- mand
mand
nel
Position Position (A or
nel Position Position (A or
nel Position Position (A or
nel Position Position
(%)
(%)
B)
(%)
(%)
B)
(%)
(%)
B)
(%)
(%)
Main Channel
Assignment*
Shade 1
Shade Location
Shade 2
Shade 3
Shade 4
1st Group
2nd Group
3rd Group
4th Group
5th Group
6th Group
Stop
Enabled
(A or
B)
Open
Close Stop
Open
Close Stop
Open
Close Stop
Open
Close
Group ComComEn- Group ComComEn- Group ComComEn- Group ComComChan- mand
mand abled Chan- mand
mand abled Chan- mand
mand abled Chan- mand
mand
nel
Position Position (A or
nel Position Position (A or
nel Position Position (A or
nel Position Position
(%)
(%)
B)
(%)
(%)
B)
(%)
(%)
B)
(%)
(%)
Main Channel
Assignment*
Shade 5
Shade Location
Shade 6
Shade 7
Shade 8
1st Group
2nd Group
3rd Group
4th Group
5th Group
6th Group
Stop
Enabled
(A or
B)
Open
Close Stop
Open
Close Stop
Open
Close Stop
Open
Close
Group ComComEn- Group ComComEn- Group ComComEn- Group ComComChan- mand
mand abled Chan- mand
mand abled Chan- mand
mand abled Chan- mand
mand
nel
Position Position (A or
nel Position Position (A or
nel Position Position (A or
nel Position Position
(%)
(%)
B)
(%)
(%)
B)
(%)
(%)
B)
(%)
(%)
Main Channel
Assignment*
Shade Location
Shade 9
Shade 10
Shade 11
Shade 12
1st Group
2nd Group
3rd Group
4th Group
5th Group
6th Group
Please Note: Main Channel Assignment = Shade at 0%/100%
Stop (A/B) = Indicate whether Stop A or Stop B is enabled
PROJECT:
(If more grids are required, please copy this page. Be sure to submit all
layout grids to Draper, and keep a copy for yourself.)
ARCHITECT:
CONTRACTOR:
SUPPLIER:
Page 71 of 124
Copyright © 2007 Draper Inc.
Form IntelliFlex_PlanningSheet07-R
Printed in U.S.A.
DATE:
REVISED:
SC-1 Quick Reference Guide (OS firmware version 3) by Draper
This Sheet uses # for the receiver’s main channel number - new units will use a 1 where # is.
Note that # can also be ALL if you want to program several receivers S = Stop C = Close 0 = Open
LED
on
blink
Reset EVERYTHING to factory default
S+7+7
O ALL
hold 5 sec. until blink
Reset everything except main channel to factory default
S+7+7
O#
C ALL
Main Channel to “N”ew channel (N = 1 through 59),
S+7+7
O#
C1
1ST Group Channel to “N”ew channel (N = 1 through 60)
S+7+7
O#
C2
1ST Group Channel OFF
S+7+7
O#
C2
Set 2ND Group Channel (same as above)
S+7+7
O#
C3
Set 3RD Group Channel (same as above)
S+7+7
O#
C4
Set 4TH Group Channel (same as above)
S+7+7
O#
C5
Set 5TH Group Channel (same as above)
S+7+7
O#
C 13
Set 6TH Group Channel (same as above)
S+7+7
O#
C 14
Set “Sequential Action” Channel (same as above)
S+7+7
O#
C 20
Set “Specific Stop” Channel (same as above)
S+7+7
O#
C 22
Reset the following options to factory default
S+7+7
O#
C6
Momentary Motor Action
S+7+7
O#
C6
Reverse Motor Direction
S+7+7
O#
C6
Do NOT Act on ALL buttons from Transmitter
S+7+7
O#
C6
Stop On Transmitter Button Release
S+7+7
O#
C6
Disable the Deadbeat Counter
S+7+7
O#
C6
Enable the Deadbeat Counter, and reset it to 120
S+7+7
O#
C6
Reset the following options to factory default
S+7+7
O#
C7
SPST Manual switch
S+7+7
O#
C7
Stop On SPDT Manual Switch Release
S+7+7
O#
C7
Swap Open and Close on SPDT, Invert SPST
S+7+7
O#
C7
Enable SPST Magnetic Switch as Override
S+7+7
O#
C7
Turn off all “A” intermediate stops (factory default)
S+7+7
O#
C 10
Enable “Intermediate Stop A” on the main channel
S+7+7
O#
C 10
Enable “Int. Stop A” on 1ST group channel
S+7+7
O#
C 10
Enable “Int. Stop A” on 2ND group channel
S+7+7
O#
C 10
Enable “Int. Stop A” on 3RD group channel
S+7+7
O#
C 10
Enable “Int. Stop A” on 4TH group channel
S+7+7
O#
C 10
Enable “Int. Stop A” on 5TH group channel
S+7+7
O#
C 10
Enable “Int. Stop A” on 6TH group channel
S+7+7
O#
C 10
Enable “Int. Stop A” on the ALL channel
S+7+7
O#
C 10
Enable “Int. Stop A” on Manual Switches
S+7+7
O#
C 10
Calibrate the travel times **Required for using Int. Stop A or B**
S+7+7
O#
C 10
Reference the bottom (close limit) instead of top (open)
S+7+7
O#
C 10
(if both A & B stops are set on a channel, A takes precedence)
“Intermediate Stop A Open Button,” default is 20% closed
Set to 10x+y percent of travel time away from reference end
S+7+7
O#
C 11
min = 0 0 (at ref.), max = 9 9 (opposite limit) use O10 for 0
“Intermediate Stop A Close Button,” default is 80% closed
S+7+7
O#
C 12
Turn off all “B” Intermediate stops (factory default)
S+7+7
O#
C 15
Enable “intermediate Stop B” on the main channel
S+7+7
O#
C 15
Enable “Int. Stop B” on 1ST group channel
S+7+7
O#
C 15
Enable “Int. Stop B” on 2ND group channel
S+7+7
O#
C 15
Enable “Int. Stop B” on 3RD group channel
S+7+7
O#
C 15
Enable “Int. Stop B” on 4TH group channel
S+7+7
O#
C 15
Enable “Int. Stop B” on 5TH group channel
S+7+7
O#
C 15
Enable “Int. Stop B” on 6TH group channel
S+7+7
O#
C 15
Enable “Int. Stop B” on the ALL channel
S+7+7
O#
C 15
Enable “Int. Stop B” on Manual Switches
S+7+7
O#
C 15
(if both A & B stops are set on a channel, A takes precedence)
“Intermediate Stop B Open Button,” default is 40% closed
S+7+7
O#
C 16
“Intermediate Stop B Close Button,” default is 60% closed
S+7+7
O#
C 17
** There is no Stop button press at the end of the calibration command. Calibration required for Int. Stops to work.**
blink
O “N”
O “N”
O ALL
O “N”
O “N”
O “N”
O “N”
O “N”
O “N”
O “N”
O ALL
O 1
O 2
O 3
O 8
O 11
O 12
O ALL
O 1
O 3
O 5
O 6
O ALL
O 1
O 2
O 3
O 4
O 5
O 6
O 14
O 7
O 8
O 10
O 11
off
S
S
S
S
S
S
S
S
S
S
S
S
S
S
S
S
S
S
S
S
S
S
S
S
S
S
S
S
S
S
S
S
S
S
**
S
Ox Oy
S
Ox Oy
O All
O 1
O 2
O 3
O 4
O 5
O 6
O 14
O 7
O 8
S
S
S
S
S
S
S
S
S
S
S
Ox Oy
Ox Oy
S
S
®
Page 72 of 124
Copyright © 2008 Draper Inc.
Form DraperSC1QuickReferenceGuide_08
Printed in U.S.A.
Page 2 of 2
SC-1 Quick Reference Guide by Draper
Defaults:
Main Channel = 1, Group Channels 1-6 = off, no sequencing action channel,
Maintained Motor Action, Standard Motor Direction, Act on ALL buttons from Transmitter, Standard action on the group buttons, Standard IR Release Time, Do
not Stop On Transmitter Button Release, Deadbeat Counter Disabled, Demo mode Off.
SPDT Manual Switch, Standard Timing, Do not Stop On Switch Release, Standard action (not sticky), Switch inputs as labeled, Magnetic Switch Override
Disabled.
Run Time = 180 sec.
Standard accuracy on Intermediate stops, Intermediate stop reference is at the top, “Auto Tilt” not enabled, Travel Time unknown (i.e., not calibrated).
Intermediate Stop A not enabled on any channel or on the manual switch, Open to Int. Stop A = 20%, Close to Int. Stop A = 80%, no nudge amount.
Intermediate Stop B not enabled on any channel or on the manual switch, Open to Int. Stop B = 40%, Close to Int. Stop B = 60%, no nudge amount.
Minimum load = 0.144A (17 Watts).
Stall load = 6.04 Amps (the maximum rating of the unit at 115V, 695 Watts).
Turn on Delay time = 0 sec (immediate).
Calibration & Intermediate stops:
If you are changing the motor direction (C6 O2) or Using the bottom reference (C10 O11), these options must be selected before doing the calibration
(C10 O10).
The motor limits must be set before doing the calibration. If the limits are changed, then you must recalibrate.
Calibration is required before intermediate stops will work. If the unit is not calibrated correctly, the intermediate stops will be different when going open than
when going closed. The stops will also be off if the material is thick, or if the motor does not move at a constant speed in both directions.
The intermediate stops are calculated based on % of travel time plus nudge offset.
% and nudge can be set before calibration if so desired.
20% = rolling shade barely closed = 20% down from top (assuming top is reference)
If travel time is unknown (not yet calibrated), all intermediate stop commands are ignored.
If you are changing the intermediate stop percent, then you must calibrate the unit after entering the new percent before it becomes active.
If the unit is calibrated and power cycles, and an intermediate stop button is pressed before the unit goes to the reference, then the command will cause the
motor to “auto reset,” i.e., go to the reference limit, then back to the intermediate stop.
Standard action:
There is an auto reset every 6TH intermediate stop movement if the motor does not go to either limit. Any user action that stops the motor part way will
cause the next intermediate stop command to auto reset.
There is an auto reset if an intermediate stop command is received that will cause the motor to go up, or if the motor has gone up anytime since being at the
top.
This Quick Reference guide does not include all SC1 features. If you have a questions on a possible features, please contact Draper, Inc.
24 Channel IR Remote (C072.017) and IR eye required for prgramming. SC1’s are factory set channel 1. SGC4’s are factory set channel 1.
SPGC4 has 4 SC1’s with factory set main channels 1 through 4. Main channel information applies to step 2 of programming (see below).
OPEN
1
CLOSE
1
2
OPEN
3
CLOSE
1
Example:
4
ALL
5
2
6
7
8
8
9
3
10
11
9
12
13
4
14
15
10 16
17
5
18
19
11 20
21
6
22
23 12
25
7
26
27
What is S + 7 + 7 ?
Answer: Hold all three buttons at the
same time to get “into” program mode.
I need to change the SC1 main channel from current channel to a new channel.
From Above:
S+7+7,
O#
C1
O “N”
Stop.
Step 1
Step 2
Step 3
Step 4
Step 5
Step 1-Remote Into Program Mode
S+7+7, see left, remote LED in upper left will blink on release of buttons if
step is done properly.
24
Step 2- SC1 Into Program Mode
O# is open button of current SC1 main channel. SC1 LED will light if step is
done correctly.
STOP
28
Step 3- File On SC1 To Change
Hit close of channel listed, SC1 LED will blink.
Step 4- Change File
Hit open of channel listed or wanted, SC1 LED will blink.
Step 5- Stop
Hit red Stop button, except calibration, LED will go off.
Special Program Note:
Wait no more than 8 seconds between steps or SC1 exits program mode.
Page 73 of 124
www.draperinc.com
(765) 987-7999
Intelligent (ILT) Motor Overview
The Intelligent Motor is designed to offer the sophisticated, diverse control of a window
shade. The motor contains a controller inside of it. This means that there are two wires exiting
the motor head. One wire is for power. It is a high voltage wire which will supply power to the
motor at all times. The other wire is low voltage. This wire will connect to control and operate
the motor.
High voltage wire can be hard wired into power or one can attach a 3 prong and plug it into
an outlet.
The low voltage wire can connect to multiple items for operation. Some items are:
ILT Wall Switch, 121171- This switch must be used for setting limits. Limits are not factory
set and must be done on site with this item. It can also be used to control the motor.
ILT Limit Tool and Address Reader for High Voltage, C202.022-This device is used to
set a motor's limits and retrieve the address from the motor.
ILT Wall Switch
121171
Smart Switches for DDN: 3-Button, C112.112 and 6-Button, C112.111-These switches
will operate any motor (s) on the DDN.
4-Jack Modular Interface, C156.096- This item has 4 modular jacks for plugging in any
combination of inputs such as ILT switches and motors. This device also has a dry contact
interface for operating Intelligent Motors with dry contacts. All motors connect to the interface will operate as a group.
4-Jack Modular Interface,
C156.096
RF Receiver, C156.095- This receiver plugs onto the low voltage lead or into a 4-jack
interface. You use RF transmitters (page 7) to run the motors.
RF Receiver, C156.095
IR Receiver and Transmitter, single channel, 121169- The eye plugs into a 4-jack interface for IR control.
IP Interface, C156.115-This device allows for virtual switches and PC interface to the DDN. IR Receiver and Transmitter, single channel—
121169
RS 485 Control Tap – C156.111; and Power Tap – C156.112 The RS 485 tap allows one to connect Intelligent Motors together on a network to run
shades from an IP interface.
Phoenix Block, C097.024-Terminals for contacting power taps to power, and smart
switches to dry contacts.
A variety of other controls can control the Intelligent Motor when it is on an RS 485 network. Sun sensors, smart switches are just a couple. If you are planning to work Intelligent
Motors from a RS 485 network please review these documents and contact Draper, Inc.
RS 485 Control Tap, C156.111, and
Power Tap, C156.112
®
Page 74 of 124
ILT Switch and Limit Sets
The ILT switch has a modular connector on the back to plug in the Intelligent Motor, once the motor is connected then limits can be set and
the shade can be operated. The ILT switch fits into a single gang box with a decora face plate and is flush with the plate.
Setting Limits on an Intelligent Motor Shade are as follows:
➀ Connect the ILT switch to motor via the modular cable port. The cable connectors MUST NOT be crimped in reverse as with
standard telephone cable.
➁ Set the slide switch to the lower position. Press and hold the down button to run the shade to the desired lower limit. If the shade moves
the opposite direction, release the button and depress the stop button. This will reverse the motor direction. You may then continue
running to the lower limit. Once at the lower limit move the slide switch to the middle position.
➂ Set the slide switch to the upper position. Move the shade to the desired upper limit by depressing the up button.
➃ Once at the upper limit move the slide switch to the middle position. When the slide switch is in the middle position, then the shade is in
user mode.
The shade will move in momentary fashion when the slide switch is up or down for setting limits.
To set an intermediate stop:
➀ Run the shade to the desired intermediate stop.
➁ Press the stop button for at least 3 seconds to record the position.
➂ Now when the shade is stopped, you may press the stop button to run it to the record intermediate stop position.
C +
o 5V
m DC
m
o
n
UD
p o
w
n
To Motor
with
Built-In
Low Voltage
P
PO
OT
TS
S
To Motor
with
Built-In
Low Voltage
Slide
Switch
Back View
®
Page 75 of 124
ILT Dry Contact Interface
Wiring Diagram
To ILT Motors
The ILT Dry Contact Interface will operate up to four ILT motors as
a group from an external device such as a home automation system.
➀ To activate an UP command, a momentary contact closure is
required between the UP and COM terminals.
C
U
O
P +5v M
D
W
N
➁ To activate a DOWN command, a momentary contact closure is
required between the DWN and COM terminals.
➂ To activate a STOP command, a momentary contact closure is
required.
Dry Contact Input
2" W. x 2" L. x 11/8" H.
Typical Application
ILT MOTORS
TO 120V AC
C
U
O
P +5v M
D
W
N
®
Page 76 of 124
Draper Digital Network IP Interface
The Draper Digital Network IP Interface is a serial device server used to connect the RS485 SDN BUS consisting of ILT2 motors and control devices to a managed LAN network. The firmware of the IP Interface is remotely upgradeable over
the Internet. The SDN IP Interface contains an internal Web server with configuration software that is accessed via any standard Web browser. The IP Interface is
compatible with both the PC and the Mac platforms.
Main software features:
An almost unlimited number of personalized GUls can be configured and
created, remotely deployed and then accessed from a link on the individual users
desktop allowing personal solar shading control. The Graphical User Interface
actions have associated URL commands for interfacing with 3rd party IP control
systems. Remote access to the IP Interface for configuration and remote diagnostics is available through HTTP port 80, un-proxied. Completely automated shade
movements can be programmed via internal time scheduling and solar angle utility.
LAN:
Ethernet: 10/100 Mbps, RJ45
Protection: Built-in 1.5 KV magnetic isolation
Serial Interface:
Interface: RS- 232 (Half duplex RS-485 with adapter)
No. of Ports: 1
Port Type: DB9 (Male)
Transmission Speed: 1.2 -115 Kbps
Signals: Tx, Rx, RTS, CTS, DTR, DSR, DCD, GND
Serial Line Protection: 15 KV ESD for all signals
Serial Communication Parameters:
Parity: None, Even, Odd, Space, Mark
Data Bits: 5,6,7,8
Power Requirements:
Power Input: 9 to 18 VDC
Power Consumption: 300 mA@12V
Mechanical:
Casing: Steel case (1 mm)
Dimensions (w x H x D): 2.87 x 1.00 x 3.75 in
Gross Weight: 0.580 kg
Software Features:
Protocols: ICMP, IP, TCP, UDP, DHCP, BOOTP, Telnet, DNS, SNMP, HTTP, SMTP
Configuration: Web console, Telnet console
Environment:
Operating Temperature: 0 to 55°C (32 to 131OF), 5 to 95%RH, non-condensing
Storage Temperature: -20 to 85°C (-4 to 185°F), 5 to 95%RH, non-condensing
Regulatory Approvals:
EMC FCC Class A, CE Class A, Safety UL, CUL, TÜV
Warranty:
5 years
®
Page 77 of 124
Draper Digital Network
The Draper Digital Network which is run from the IP interface mentioned on the previous page is programmed through a series of actions.
These actions and items used to program the system are constantly changing so it is required to contact Draper before programming a Digital
Network. Here are the items that you will currently need to program a Draper Digital Network.
1
2
3
4
5
6
7
Laptop Computer
RS 485 adaptor cable- Draper can direct you where to buy.
DB9 to Cat 5 convertor- Draper can direct you where to buy.
Cat 5 patch cord at least 3’ long
ILT TAP- Buy from Draper
9V battery
GUI for programming- Draper will provide GUI
With these items, you will be able to obtain motor addresses and set group address to operate shades in the desired groups, up to 16
groups per motor.
The first part of installing a Draper Digital Network is to obtain the address of each motor and note the address on a planning sheet or building floor plan. To obtain a motor address, you will need to do the following.
1 Power must be on to the shade.
2 You will need the GUI installed on your laptop.
3 You will connect the laptop to the low voltage line on the motor. This is done by connecting the RS 485 adaptor cable to the laptop, the
DB9 adaptor to the RS 485 cable, a Cat 5 cable from the DB9 to the ILT tap, and then you plug the motor into the ILT tap. A 9V battery or
transformer will need to be supplying power to the tap to work.
4 You will then bring up the motor GUI and hit the “GET ADDRESS” button to retrieve the motor address.
5 You will then need to mark down the address on a planning sheet or floor plan.
The next part of the install is the planning out of groups for operating the shades. You have the motor address, but you need to decide what
groups you want the motor to belong to by assigning like group addresses with different motors. If two motors have the same address in any
group, then they will run together when that address is told to go up or down. Steps to consider in grouping shades are:
1
2
3
4
Each motor address must be 6 characters long using numbers 0-9 and A-F.
You have 16 group addresses per motor.
Any two shades with the same address in them, whether it is a group 1 or group 5 or group16 address, will work together.
If using smart switches or virtual switches, you will want to program an individual address to each motor to make motor changes easier.
®
Page 78 of 124
The next part of the install is to program the group addresses. For this you will have to check several different things:
1 Are the low voltage lines from the motors going to an ILT Tap? Are the ILT Taps connected together with Cat 5? Do you have a 12V trans
former feeding power to every 40 ILT Taps?
2 You may use a splitter to put up to 3 motors in an ILT Tap, but a motor cannot have more than 30’ of cable between it and an ILT Tap even
with a splitter.
3 If the Draper Digital Network is programmed and powered, then you may plug your computer into an ILT Tap on the network and
program.
4 The laptop will plug in as before, but the ILT Tap that it now plugs into will be on the network.
5 You will pull up the GUI that you used to get the motor address.
6 You will type in a motor address that you wish to program and hit the “GET DATA” button.
7 The motor will talk back. If you get an error, then you need to check your set-up as communication is not getting to the motor.
8 You will then change the group addresses to be as you want them and hit “Compute IP Range”, then hit the “Send Data” button. This will
program the motor with the addresses that you want.
9 You will then proceed back to step 6 for the next motor address until all motors are programmed.
Lastly, you will program smart switches and the IP interface to the switch configuration that you want. You program the IP interface and smart
switch as follows.
1 A smart switch is programmed with the same set-up as you used to get a motor address. Except, you will plug in a smart switch not a
motor, but you will plug a smart switch into the ILT Tap by connecting the Cat 5 to the switch.
2 You will pull up a GUI on your laptop for programming the switch and you will determine what addresses you want the switch to send
when buttons are pressed.
3 To program the IP interface, you will need to connect to the server. You will type in the IP address of the interface and access the settings
on the interface.
4 At the settings page, you will set up virtual buttons and what actions you want behind each button.
Programming switches, motor, and IP interface will have more details than this so please use these pages as a reference for the amount of
work done to program the system.
Page 79 of 124
www.draperinc.com
(765) 987-7999
RS485-ILT Link
DESCRIPTION
The RS485-ILT Link will enable third party communication to Somfy’s line of intelligent (ILT) motors, and for programming and receiving addresses from intelligent motors.
MECHANICAL SPECIFICATIONS
Overall Dimensions: L: 31/8 in. W: 25/8 in. H: ¾ in.
CONNECTION DIAGRAM
Low Voltage
Input Detail
+9V DC
Ground
RS485 B
RS485 A
Down
Up
Ground
Termination
Resistor
RS485 Connector
(RJ45) Pin Out
Pin 1
Pin 8
A termination resistor of at least 120ohms
should be placed only at the extreme ends of
the data line, and no more than two resistors
should be placed in any system that does not
use repeaters.
1 - RS485 A
2 - RS485 B
3 - NOT CONNECTED
4 - BUS POWER +9V
5 - BUS POWER +9V
6 - NOT CONNECTED
7 - BUS POWER GND
8 - BUS POWER GND
ORDERING INFORMATION
Description
RS485 - ILT Link
Part Number
1870127
®
Page 80 of 124
Draper Digital Network—Smart Switch
Description: The Smart Switch is a control device which
outputs the DDN protocol over RS-485, providing digital
control of the Digital Network. The Smart Switch
allows the DDN to function as a stand alone natural
lighting control system and can be fully customized
though the DDN Smart Switch Configuration Software.
The Smart Switch is available in 3-button and 6-button
versions which can be located anywhere on the Draper
Digital Network.
Specification:
-Three button Smart Switch -Catalog # 1810827
-Six button Smart Switch -Catalog # 1810828
-Buttons are fully programmable
-Standard Decora style
-Mounts in a single gang box
-8 dry contact inputs for system integration
-IR compatible
-Warranty: 5 years
Back of Switch
Cat5 Network
Connection
8 Dry Contact Inputs
Power LED
®
Page 81 of 124
To LAN
Power Tap
Part No. C156.112
®
Phoenix Block
Part No. C097.024
12V DC
Power Supply
Part No. C215.018
Control Room
Window
Shade
Window Shade
Cat-5 Tee
Part No. C156.114
3
2
1
6-Button
Smart DDN Switch
Part No. C112.111
Control Tap
Part No. C156.111
Window
Shade
Window Shade
3-Button
Smart DDN Switch
Part No. C112.112
Draper Digital Network (DDN)—Sample Configuration
256 Max. Nodes (tap or DDN switches)
4000 Feet Max. Network Cable Length
30 Feet Max. Tap-to-Motor Cable Length
Draper Digital Network
IP Interface
Part No. C156.115
Page 82 of 124
DDN Switch (Local)
Part No. C112.109
Projection
Screen
110-120V Standard and Quiet Motorized Flexshade
Motor Mounting Bracket
Small C002.058.49
Large C002.051.49
Motor End Cap
Small C002.571
Large C002.677
Idler Gudgeon Assembly
2” C052.041
3” C052.064
End Cap
Cover
Retainer Clip
C014.013
End Cap
Cover
Available in
black, white,
ivory,
bronze or
clear
anodized
finish
Idler End Cap
Small C002.572
Large C002.676
Idler Mounting Bracket
Right Small C002.062.49
Right Large C002.055.49
Left Small
C002.063.49
Left Large
C002.056.49
(Shown to right)
Ceiling Small C002.064.49
Ceiling Large C002.064.49
Fascia:
3 7/8”
4 5/8”
Motor Adapter Bracket
Small
C010.240
as shown
Large
C010.267
not shown
Stud
C002.101
brackets only
not shown
Quiet C021.016
Stud used with
Quiet motor
Page 83 of 124
Standard
4-Wire Motors
Altus Motors
ILT DC
Flexshade
Flexshade 2
Flexshade/Export
Flexshade 2/Export
®
Standard motor
506S2RH
510S2RH
504S2RH-ST
506G
506S2PA
510S2PA
506S1RH
510S1RH
503S1RH-ST
506S1PA
510S1PA
660R2
506S2RH-RTS
510S2RH-RTS
504S2RHST-RTS
506S2-RTS
510S2-RTS
ST-30
BA-RTS
506S2ILTRH
Y
Y
Y
Y
Y
Quiet Motor
120
120
120
120
120
120
230
230
230
230
230
120
120
120
120
120
120
24DC
12DC
120
Volts
0.95
1.3
0.95
0.9
0.95
1.3
0.95
0.95
1.3
0.95
1.3
2.5
0.95
1.3
0.95
0.95
1.3
1.8
n/a
0.95
Amps
N
N
N
N
N
N
N
N
N
N
N
N
Y
Y
Y
Y
Y
N
N/A
Y
•
•
1.5" Aluminum
Parallel Wire
•
•
•
•
•
•
•
•
•
•
•
•
•
•
•
•
•
•
•
•
•
•
•
•
•
•
•
•
•
•
6"
•
•
•
•
•
•
•
•
Flexshade MO
•
•
•
Lightbloc
•
•
•
Skylight
•
Colossal
Limit Type
R
P
P
P
T
T
P
P
P
P
T
T
T
R
R
R
R
R
"Limit Setting
P=Push Button
T=Turn Screw
R=Remote/Switch Set"
Page 84 of 124
Min/
Max, C.O.,
Crank overide
24" 29" Y
25" 30" Y
32" 37" Y
24"
6"
36"
24" 29" Y
25" 30" Y
32" 37" Y
36"
36"
• 48"
271/8" 32¼" Y
29" 34" Y
32"
36"
36"
R
R
27¼" 32¼" Y
Min. Crank Width
Draper Products
•
•
•
•
Flexshade 2
•
•
•
•
•
•
F/S 24V only
F/S Battery only
•
•
Min Width
Available tube sizes
•
•
•
•
•
•
•
•
•
•
•
•
•
3 1/8" Steel
•
•
3" Steel
•
•
•
2 1/8" Steel
•
•
•
2" Steel
•
•
•
2" Aluminum
•
4" Steel
Draper Motor Grid
38
38
32
30
38
38
38
38
32
38
38
14
38
38
38
38
38
28
27
38
RPM
Motor Specifications
at a glance
6
10
4
6
6
10
6
10
3
6
10
60
6
10
4
6
10
2
1
6
Torque (Nm)
Motor Name:
506S2RH
Torque in Nm:
Volts: 120
6
Amps: .95
RPM:
38
Parallel Wire:
No
Roller Diameter Choices: 2” aluminum, 2” steel,
2 1/8” steel, 3” steel, 3 1/8” steel
Product (s) Used In: Motorized Flexshades, Lightblocs,
Skylights
Min. Shade Width: 24” om
With Crank Override 29” om
Standard Motor Lead Length:
6’
12’ and 24’
Plug Options: Wago w or w/o wall plate
Anderson w or w/o wall plate
Quick Disconnect, 4-wire only
Lead Type:
18-3 w/ground
Limit Type: Push Button
Optional Lead Lengths:
Part No: C047.054
Used in:
Flexshade, Skylight, Lightbloc
Hardware Only
Controls that motor can wire into: Isolating Relays, SC1 controllers, GC4 control, SGC4 control,
SPGC4 control, Keyed Wall Switch, SP/DT toggle switch, DP/DT toggle switch, Animeo for questions
on other controls ask Draper, Inc.
Installation Procedure:
Special Notes:
1. Install brackets, endcaps, or box to mount shade
This is the standard motor for Draper’s
Flexshade line. If you are pricing a shade, this
2. Test motor using a motor test cable and adjust
limits.
is the included motor in the pricing.
3. Let electrician connect to wiring
_____________________________________
_____________________________________
4. If control programming is required, then
program and set controls.
_____________________________________
_____________________________________
5. Test motors through wiring using switching
_____________________________________
_____________________________________
Page 85 of 124
Motor Name:
510S2RH
Torque in Nm:
Volts: 120
10
Amps: 1.3
RPM:
38
Parallel Wire:
No
Roller Diameter Choices: 2” aluminum, 2” steel,
2 1/8” steel, 3” steel, 3 1/8” steel
Product (s) Used In: Motor Flexshades, Skylights as
needed
Min. Shade Width: 25” om
With Crank override 30” om
Standard Motor Lead Length:
6’
Lead Type:
12’ and 24’
Plug Options: Wago w or w/o wall plate
Anderson w or w/o wall plate
18-3 w/ground
Limit Type: Push Button
Optional Lead Lengths:
Part No: C047.056
Used in:
Flexshade and Skylight
Hardware Only
Controls that motor can wire into: Isolating Relays, SC1 controllers, GC4 control, SGC4 control,
SPGC4 control, Keyed Wall Switch, SP/DT toggle switch, DP/DT toggle switch, Animeo for questions
on other controls ask Draper, Inc.
Installation Procedure:
Special Notes:
1. Install Brackets, endcaps, or box to mount shade
This motor is step up in power from the
standard motor. It is included in pricing
2. Test motor using a motor test cable and adjust
limits.
where needed.
3. Let electrician connect to wiring
4. If control programming is required, then
program and set controls.
5. Test motors through wiring using switches
Page 86 of 124
Motor Name:
504S2RH-ST
Torque in Nm:
Volts: 120
4
RPM:
Amps: .95
32
Parallel Wire:
No
Roller Diameter Choices: 2” aluminum, 2” steel,
2 1/8” steel
Product (s) Used In: Motorized Flexshades, Lightblocs
Min. Shade Width: 32” om
With Crank Override 37” om
Standard Motor Lead Length:
6’
Lead Type:
12’ and 24’
Plug Options: Wago w or w/o wall plate
Anderson w or w/o wall plate
18-3 w/ground
Limit Type: Push Button
Optional Lead Lengths:
Part No: C047.158
Used in:
Flexshade and Lightbloc
Hardware Only
Controls that motor can wire into: Isolating Relays, SC1 controllers, GC4 control, SGC4 control,
SPGC4 control, Keyed Wall Switch, SP/DT toggle switch, DP/DT toggle switch, Animeo for questions
on other controls ask Draper, Inc.
Installation Procedure:
Special Notes:
1. Install brackets, endcaps, or box to mount shade
This is the quiet motor for Draper’s
Flexshade line. If you are pricing a shade, this
2. Test motor using a motor test cable and adjust
limits.
is not included in the shade pricing. It
3. Let electrician connect to wiring
requires an extra charge.
4. If control programming is required, then
program and set controls.
Decibels--42
5. Test motors through wiring using switching
Page 87 of 124
Motor Name:
506G
Motion Control Motor
Torque in Nm: 6
Volts: 120V
RPM: 34
Amps: .9
Parallel Wire:
No
Roller Diameter Choices: 2” aluminum, 2” steel, 2 1/8”
Steel, 3” steel, 3 1/8’ steel
Product (s) Used In: Motorized Flexshades
Min. Shade Width: 24” om
Standard Motor Lead Length:
6’
Lead Type:
30’
Plug Options: Wago w or w/o wall plate
Anderson w or w/o wall plate
18-3 w/ground
Limit Type: Turn Screw
Optional Lead Lengths:
Part No:
C047.134.001
Hardware Restrictions: Cannot go into Duals, Access Pocket,
Ult. Access, Lightblocs, Flexshade 2, Skylight and Colossal.
Controls that motor can wire into: Isolating Relays, SC1 controllers, GC4 control, SGC4 control,
SPGC4 control, Keyed Wall Switch, SP/DT toggle switch, DP/DT toggle switch, Animeo for questions
on other controls ask Draper, Inc.
Installation Procedure:
Special Notes:
1. Install hardware for shade
This quiet motor does not have a crank
override option, and it does not fit into all
2. Mount motor and test limits and operation
hardware._Used for shades either too small
3. Let electrician tie into controls
4. Program controls
or too large for standard quiet motors.
Decibels--42
5. Test operation through controls
Page 88 of 124
Motor Name:
506S2ILTRH
Torque in Nm:
Volts: 120
6
RPM:
Amps: .95
38
Parallel Wire:
Yes
Roller Diameter Choices: 2” aluminum, 2” steel,
2 1/8” steel, 3” steel, 3 1/8” steel
Product (s) Used In: Motorized Flexshades, Lightblocs
Min. Shade Width: 27 1/4” om
With Crank Override 32 1/4”
Standard Motor Lead Length:
6’
Lead Type:
Part No: C047.162
Optional Lead Lengths:
12’ and 24’
Plug Options: 3-prong
18-2 w/ground
Limit Type: Remote Set
Used in:
Flexshade, Skylight, Lightbloc
Hardware Only
Controls that motor can wire into: This motor does not wire into any controls. It is controlled via
controllers that plug into the data cable existing the motor head.
Installation Procedure:
Special Notes:
1. Install brackets, endcaps, or box to mount shade
This motor has built-in intelligence for
operation. It has both a data cable and high
2. Test motor, set limits, and bind to controls
3. Let electrician connect to wiring
voltage cable exiting the motor head. The
data cable ties into control and the high
voltage ties into power.
Page 89 of 124
Motor Name:
504S2ILTRH-ST
Torque in Nm:
Volts: 120
4
RPM:
Amps: .95
38
Parallel Wire:
Yes
Roller Diameter Choices: 2” aluminum, 2” steel,
2 1/8” steel
Product (s) Used In: Motorized Flexshades, Lightblocs
Min. Shade Width: 32” om
Standard Motor Lead Length:
6’
Lead Type:
Part No: C047.164
Optional Lead Lengths:
12’ and 24’
Plug Options: 3-prong
18-2 w/ground
Limit Type: Remote Set
Used in:
Motorized Flexshade
Controls that motor can wire into: This motor does not wire into any controls. It is controlled via
controllers that plug into the data cable existing the motor head.
Installation Procedure:
Special Notes:
1. Install brackets, endcaps, or box to mount shade
This motor has built-in intelligence for
operation. It has both a data cable and high
2. Test motor, set limits, and bind to controls
3. Let electrician connect to wiring
voltage cable exiting the motor head. The
data cable ties into control and the high
voltage ties into power.
Page 90 of 124
Motor Name:
506S2RH-RTS
Torque in Nm:
Volts: 120
6
Amps: .95
RPM:
38
Parallel Wire:
Yes
Roller Diameter Choices: 2” aluminum, 2” steel,
2 1/8” steel, 3” steel, 3 1/8” steel
Product (s) Used In: Motorized Flexshades
Min. Shade Width: 27 1/8” om
With Crank Override 32 1/4”
Standard Motor Lead Length:
6’
Lead Type:
Part No: C047.143
Optional Lead Lengths:
12’ and 24’
Plug Options: 3-prong
18-2 w/ground
Limit Type: Remote Set
Used in: Flexshade, Lightbloc, Skylight Only
Dual Headboxes Not Recommended
Controls that motor can wire into: This motor does not wire into any controls. It is controlled via RTS
Transmitters, both handheld and wall switch.
Installation Procedure:
Special Notes:
1. Install brackets, endcaps, or box to mount shade
This motor has a built-in radio receiver, and it
2. Test motor, set limits, and channels from
transmitter.
is an up-charge on regular shade pricing.
3. Let electrician connect to wiring
Page 91 of 124
Motor Name:
510S2RH-RTS
Torque in Nm:
Volts: 120
10
Amps: 1.3
RPM:
38
Parallel Wire:
Yes
Roller Diameter Choices: 2” aluminum, 2” steel,
2 1/8” steel, 3” steel, 3 1/8” steel
Product (s) Used In: Motor Flexshades and Skylights as
needed
Min. Shade Width: 29” om
With Crank override 34” om
Standard Motor Lead Length:
6’
Lead Type:
Part No: C047.157
Optional Lead Lengths:
12’ and 24’
Plug Options: 3-prong
18-2 w/ground
Limit Type: Remote Set
Used in:
Flexshade and Skylight Hardware Only
Dual Headboxes Not Recommended
Controls that motor can wire into: This motor is not wired into any controls. It is operated through RTS
transmitters, both hand held and wall switch.
Installation Procedure:
Special Notes:
1. Install Brackets, endcaps, or box to mount shade
This motor has a built-in radio receiver, and it
is an up-charge on regular shade pricing.
2. Test motor and set limits and channels using
remote
3. Let electrician connect to wiring
Page 92 of 124
Motor Name:
504S2RHST-RTS
Torque in Nm:
Volts: 120
4
Amps: .95
RPM:
38
Parallel Wire:
Yes
Roller Diameter Choices: 2” aluminum, 2” steel,
2 1/8” steel
Product (s) Used In: Motor Flexshades
Min. Shade Width: 32” om
Standard Motor Lead Length:
6’
Lead Type:
Part No:
Optional Lead Lengths:
12’ and 24’
Plug Options: 3-prong
18-2 w/ground
Limit Type: Remote Set
Used in:
Flexshade and Skylight Hardware Only
Dual Headboxes Not Recommended
Controls that motor can wire into: This motor is not wired into any controls. It is operated through RTS
transmitters, both hand held and wall switch.
Installation Procedure:
Special Notes:
1. Install Brackets, endcaps, or box to mount shade
This motor has a built-in radio receiver, and it
is an up-charge on regular shade pricing.
2. Test motor and set limits and channels using
remote
This motor is also a quiet motor.
3. Let electrician connect to wiring
Page 93 of 124
Motor Name:
506S2PA
Torque in Nm:
Volts: 120
6
RPM:
Amps: .95
38
Parallel Wire:
No
Roller Diameter Choices: 4”
Product (s) Used In: Flexshade 2
Min. Shade Width:
Standard Motor Lead Length:
6’
Lead Type:
Part No: C047.050
Optional Lead Lengths:
12’ and 24’
Plug Options: Wago w or w/o wall plate
Anderson w or w/o wall plate
18-3 w/ground
Limit Type: Turn Screw
36” om
Used in:
Flexshade 2 hardware only
Controls that motor can wire into: Isolating Relays, SC1 controllers, GC4 control, SGC4 control,
SPGC4 control, Keyed Wall Switch, SP/DT toggle switch, DP/DT toggle switch, Animeo for questions
on other controls ask Draper, Inc.
Installation Procedure:
Special Notes:
1. Mount hardware and shade into hardware
This is the standard motor for a Flexshade 2
2. Test motor and adjust limits
3. Let electrician tie into electrical
4. Program controls
5. Test shade operation through switching
Page 94 of 124
Motor Name:
510S2PA
Torque in Nm:
Volts: 120
10
RPM:
Amps: 1.3
38
Parallel Wire:
No
Roller Diameter Choices: 4” steel
Product (s) Used In: Flexshade 2
Min. Shade Width: 36” om
Standard Motor Lead Length:
6’
Lead Type:
18-3 w/ground
Limit Type: Push Button
Used in:
Optional Lead Lengths:
Part No: C047.058
12’ and 24’
Plug Options: Wago w or w/o wall plate
Anderson w or w/o wall
plate
Flexshade 2 Hardware only
Controls that motor can wire into: Isolating Relays, SC1 controllers, GC4 control, SGC4 control,
SPGC4 control, Keyed Wall Switch, SP/DT toggle switch, DP/DT toggle switch, Animeo for questions
on other controls ask Draper, Inc.
Installation Procedure:
Special Notes:
1. Install Brackets, endcaps, or box to mount shade
This motor is step up in power from the
standard Flex 2 motor. It is included in pricing
2. Test motor using a motor test cable and adjust
limits.
where needed.
3. Let electrician connect to wiring
4. If control programming is required, then
program and set controls.
5. Test motors through wiring using switches
Page 95 of 124
Motor Name:
506S2ILT
Torque in Nm:
Volts: 120
6
RPM:
Amps: .95
38
Parallel Wire:
Yes
Roller Diameter Choices: 4” steel
Product (s) Used In: Flexshade 2
Min. Shade Width: 36” om
Standard Motor Lead Length:
6’
Lead Type:
Part No: C047.146
Optional Lead Lengths:
12’ and 24’
Plug Options: 3-prong
18-2 w/ground
Limit Type: Remote Set
Used in:
Flexshade 2 Hardware only
Controls that motor can wire into: This motor does not wire into any controls. It is controlled via
controllers that plug into the data cable existing the motor head.
Installation Procedure:
Special Notes:
1. Install brackets, endcaps, or box to mount shade
This motor has built-in intelligence for
2. Test motor, set limits, and bind to controls
operation. It has both a data cable and high
3. Let electrician connect to wiring
voltage cable existing the motor head. The
data cable ties into control and the high
voltage ties into power.
Not for all FlexShade 2 sizes.
Page 96 of 124
Motor Name:
506S2-RTS
Torque in Nm:
Volts: 120
6
RPM:
Amps: .95
38
Parallel Wire:
Yes
Roller Diameter Choices: 4” steel
Product (s) Used In: Flexshade 2
Min. Shade Width: 36” om
Standard Motor Lead Length:
6’
Lead Type:
Part No: C047.117
Optional Lead Lengths:
12’ and 24’
Plug Options: 3-prong
18-2 w/ground
Limit Type: Remote Set
Used in:
Flexshade 2 Hardware only
Controls that motor can wire into: This motor does not wire into any controls. It is controlled via RTS
Transmitters, both handheld and wall switch.
Installation Procedure:
Special Notes:
1. Install brackets, endcaps, or box to mount shade
This is a radio motor for the Flexshade 2, and
2. Test motor, set limits, and channels using
transmitter.
it is an extra charge on top of the shade price.
3. Let electrician connect to wiring.
Page 97 of 124
Motor Name:
510S2-RTS
Torque in Nm:
Volts: 120
10
RPM:
Amps: 1.3
38
Parallel Wire:
Yes
Roller Diameter Choices: 4” steel
Product (s) Used In: Flexshade 2
Min. Shade Width: 36” om
Standard Motor Lead Length:
6’
Lead Type:
Part No: C047.118
Optional Lead Lengths:
12’ and 24’
Plug Options: 3-prong
18-2 w/ground
Limit Type: Remote Set
Used in:
Flexshade 2 Hardware only
Controls that motor can wire into: This motor does not wire into any controls. It is controlled via RTS
Transmitters, both handheld and wall switch.
Installation Procedure:
Special Notes:
1. Install brackets, endcaps, or box to mount shade
This is a radio motor for the Flexshade 2, and
2. Test motor, set limits, and channels using
transmitter.
it is an extra charge on top of the shade price.
3. Let electrician connect to wiring
Page 98 of 124
Motor Name:
506S1RH
Torque in Nm:
Volts: 230
6
RPM:
Amps: .95
38
Parallel Wire:
No
Roller Diameter Choices: 2” aluminum, 2” steel,
2 1/8” steel, 3” steel, 3 1/8” steel
Product (s) Used In: Motorized Flexshades, Lightblocs,
and Skylights
Min. Shade Width: 24” om
With Crank Override 29” om
Standard Motor Lead Length:
6’
Lead Type:
12’ and 24’
Plug Options: Wago w or w/o wall plate
Anderson w or w/o wall plate
18-3 w/ground
Limit Type: Push Button
Optional Lead Lengths:
Part No: C047.055
Used in:
Flexshade, Lightbloc, Skylight
Hardware Only
Controls that motor can wire into: Isolating Relays, SC1 controllers, GC4 control, SGC4 control,
SPGC4 control, Keyed Wall Switch, SP/DT toggle switch, DP/DT toggle switch, Animeo for questions
on other 230V controls ask Draper, Inc.
Installation Procedure:
Special Notes:
1. Install brackets, endcaps, or box to mount shade
This is the standard motor for Draper’s 230V
2. Test motor using a motor test cable and adjust
limits.
Flexshade line. If you are pricing a shade, this
3. Let electrician connect to wiring
is the included motor in the pricing.
4. If control programming is required, then
program and set controls.
5. Test motors through wiring using switching
Page 99 of 124
Motor Name:
510S1RH
Torque in Nm:
Volts: 230
10
Amps: 1.3
RPM:
38
Parallel Wire:
No
Roller Diameter Choices: 2” aluminum, 2” steel,
2 1/8” steel, 3” steel, 3 1/8” steel
Product (s) Used In: Motor Flexshades
Min. Shade Width: 25” om
With Crank override 30” om
Standard Motor Lead Length:
6’
Lead Type:
12’ and 24’
Plug Options: Wago w or w/o wall plate
Anderson w or w/o wall plate
18-3 w/ground
Limit Type: Push Button
Optional Lead Lengths:
Part No: C047.160
Used in:
Flexshade Hardware Only
Controls that motor can wire into: Isolating Relays, SC1 controllers, GC4 control, SGC4 control,
SPGC4 control, Keyed Wall Switch, SP/DT toggle switch, DP/DT toggle switch, Animeo for questions
on 230V other controls ask Draper, Inc.
Installation Procedure:
Special Notes:
1. Install Brackets, endcaps, or box to mount shade
This motor is step up in power from the
2. Test motor using a motor test cable and adjust
limits.
standard export motor. It is included in pricing
3. Let electrician connect to wiring
where needed.
4. If control programming is required, then
program and set controls.
5. Test motors through wiring using switches
Page 100 of 124
Motor Name:
503S1RH-ST
Torque in Nm:
Volts: 230
3
Amps: .95
RPM:
32
Parallel Wire:
No
Roller Diameter Choices: 2” aluminum, 2” steel,
2 1/8” steel
Product (s) Used In: Motorized Flexshades, Lightblocs
Min. Shade Width: 32” om
With Crank Override 37” om
Standard Motor Lead Length:
6’
Lead Type:
12’ and 24’
Plug Options: Wago w or w/o wall plate
Anderson w or w/o wall plate
18-3 w/ground
Limit Type: Push Button
Optional Lead Lengths:
Part No: C047.159
Used in:
Flexshade and Lightbloc
Hardware Only
Controls that motor can wire into: Isolating Relays, SC1 controllers, GC4 control, SGC4 control,
SPGC4 control, Keyed Wall Switch, SP/DT toggle switch, DP/DT toggle switch, Animeo for questions
on other 230V controls ask Draper, Inc.
Installation Procedure:
Special Notes:
1. Install brackets, endcaps, or box to mount shade
This is the quiet motor for Draper’s 230V
2. Test motor using a motor test cable and adjust
limits.
Flexshade line. If you are pricing a shade, this
3. Let electrician connect to wiring
is the included motor in the pricing.
4. If control programming is required, then
program and set controls.
5. Test motors through wiring using switching.
Page 101 of 124
Motor Name:
506S1PA
Torque in Nm:
Volts: 230
6
RPM:
Amps: .95
38
Parallel Wire:
No
Roller Diameter Choices: 4”
Product (s) Used In: Flexshade 2
Min. Shade Width:
Standard Motor Lead Length:
6’
Lead Type:
Part No: C047.051
Optional Lead Lengths:
12’ and 24’
Plug Options: Wago w or w/o wall plate
Anderson w or w/o wall plate
18-3 w/ground
Limit Type: Turn Screw
36” om
Used in:
Flexshade 2 Hardware only
Controls that motor can wire into: Isolating Relays, SC1 controllers, GC4 control, SGC4 control,
SPGC4 control, Keyed Wall Switch, SP/DT toggle switch, DP/DT toggle switch, Animeo for questions
on other 230V controls ask Draper, Inc. Of course, these are 230V versions of these controls.
Installation Procedure:
Special Notes:
1. Mount hardware and shade into hardware
This is the standard motor for a Flexshade 2
2. Test motor and adjust limits
in export sales.
3. Let electrician tie into electrical
4. Program controls
5. Test shade operation through switching
Page 102 of 124
Motor Name:
510S1PA
Torque in Nm:
Volts: 230
10
RPM:
Amps:1.3
38
Parallel Wire:
No
Roller Diameter Choices: 4”
Product (s) Used In: Flexshade 2
Min. Shade Width:
Standard Motor Lead Length:
6’
Lead Type:
Part No: C047.059
Optional Lead Lengths:
12’ and 24’
Plug Options: Wago w or w/o wall plate
Anderson w or w/o wall plate
18-3 w/ground
Limit Type: Turn Screw
36” om
Used in:
Flexshade 2 Hardware only
Controls that motor can wire into: Isolating Relays, SC1 controllers, GC4 control, SGC4 control,
SPGC4 control, Keyed Wall Switch, SP/DT toggle switch, DP/DT toggle switch, Animeo. For
questions on other 230V controls ask Draper, Inc.
Installation Procedure:
Special Notes:
1. Mount hardware and shade into hardware
This is the more powerful motor for a 230V
Flexshade 2. The price list is adjusted for the
2. Test motor and adjust limits
Motor.
3. Let electrician tie into electrical
4. Program controls
5. Test shade operation through switching
Page 103 of 124
Motor Name:
660R2
Torque in Nm:
Volts: 120
60
Amps: 2.5
RPM:
14
Parallel Wire:
No
Roller Diameter Choices: 6”
Product (s) Used In: Colossal
Min. Shade Width:
Standard Motor Lead Length:
n/a
Lead Type:
Optional Lead Lengths:
Part No: C047.032
No Options
Plug Options: Wago w or w/o wall plate
Anderson w or w/o wall plate
18-3 w/ground
Limit Type: Turn Screw
48” om
Used in:
Colossal Only
Controls that motor can wire into: Isolating Relays, SC1 controllers, GC4 control, SGC4 control,
SPGC4 control, Keyed Wall Switch, SP/DT toggle switch, DP/DT toggle switch, Animeo. For
questions on other controls ask Draper, Inc.
Installation Procedure:
Special Notes:
1. Mount complete unit
This is the standard motor for a Colossal.
2. Test motor and adjust limits
3. Let electrician tie into electrical
4. Program controls
5. Test shade operation through switching
Page 104 of 124
Motor Name:
ST-30
Torque in Nm:
Volts:
24VDC
2
Amps: 1.8
RPM: 28
Parallel Wire:
YES
Roller Diameter Choices: 1 ½” aluminum
Product (s) Used In: Low Voltage Shades only
Min. Shade Width:
Standard Motor Lead Length:
Lead Type:
15’
N/A
Plug Options: Plug-in Transformer or power
box
22-2, awg/conductor
Limit Type:
Optional Lead Lengths:
Part No:
C047.165
Used in:
Brackets, fascia, or headbox only
Remote Set
Controls that motor can wire into:
Works with RTS transmitters only, handheld and wall switch
Installation Procedure:
Special Notes:
1. Install hardware
This motor can possibly tie into existing low
voltage wiring.
2. Install motorized shade
Transformer required to power shades.
3. Install transformer
4. Test motor and set limits from transmitter
Page 105 of 124
Motor Name:
BA-RTS
Torque in Nm:
Volts: 12 V
1
Amps: n/a
RPM:
27
Parallel Wire:
n/a
Roller Diameter Choices: 1 ½” aluminum
Product (s) Used In: Battery Flexshade only
Min. Shade Width:
Standard Motor Lead Length:
Lead Type:
n/a
n/a
Limit Type:
Optional Lead Lengths:
Part No:
C047.144
n/a
Plug Options: n/a
Used in:
Brackets, fascia, or headbox only
Remote Set
Controls that motor can wire into:
Works with RTS transmitters only, handheld and wall switch
Installation Procedure:
Special Notes:
1. Install hardware
Dual Battery Pack part no. is C105.005.
Replacement motor price does include a
2. Install motorized shade
battery pack and is kit part number 122215.
3. Install battery pack
4. Test motor and set limits from transmitter
Page 106 of 124
Minimum Shade Sizes
Motorized
24" OM (241/8" IM) 506 Motorized shade regular motor in 2" roller (Dual 241/8" OM -24¼" 1M)
(If using Somfy 504 Quiet Motor add 7½")
241/8" OM (24¼" IM) 506 Motorized shade regular motor in 3" roller (If using Somfy 504 Quiet Motor add 7½")
24¼" OM (243/8" IM) 506 Motorized shade regular motor in 3" roller with 1/8" brackets (If using Somfy 504 Quiet Motor add 7½")
271/8" OM (27¼" IM) Motorized shade with 506 Altus RTS Round Head or ILT Motor in a 2" or 21/8" Roller (If ILT Quiet Motor or
Altus Quiet Motor, add 7½")
27¼" OM (283/8" IM) Motorized shade with 506 Altus RTS Round Head or ILT Motor in 3" or 31/8" Roller (If ILT Quiet Motor or
Altus Quiet Motor, add 7½")
14" OM (141/8" IM) 12 V Battery Motor shade
18" OM (181/8" IM) Low Voltage ST30 24 V Quiet Motor
247/16" OM (249/16" IM) Motorized lightbloc 506 motor (Dual 249/16" OM - 2411/16" IM) (If using Somfy 504 Quiet Motor add 7½")
27¼" OM (273/8" IM) Motorized Lightbloc with 506 Altus RTS Round Head or ILT Motor (add 7½" if ILT Quiet Motor or Altus
Quiet Motor)
36" OM (361/8" IM) Flexshade 2
36" OM (361/8" IM) Colossal
28" OM (28¼" IM) Roman Motorized regular motor
29" OM (291/8" IM) 506 Motorized shade with crank override regular motor-old style endcap system
291/8" OM (29¼" IM) 506 Motorized shade with crank override regular motor-small snap on endcap system
293/16"OM (295/16" IM 506 Motorized shade with crank override regular motor -large snap on endcap system
24" OM (241/8" IM) MotionCo Quiet Motor in 2" roller (No small pocket hdbx available at this time.)
241/8" OM (24¼" IM) MotionCo Quiet Motor in 3" roller
285/8" OM (293/8" IM) Skylight using 506 Motor or crank operated (Using 1½" Spring roller up to 96" high. 1¾" minimum is 343/8" OM
(351/8" 1M) (NOTE: The spring roller is the ruler of the minimum size.)
33½" OM (34¼" IM) Skylight using Somfy 504 Quiet Motor (Using 1½" Spring roller up to 96" high. 1¾" minimum is 343/8" OM
(351/8" 1M) (NOTE: The spring roller is the ruler of the minimum size if using the 1¾" spring roller.)
291/8" OM (297/8" IM) Skylight using ILT or Altus RH Motor
365/8" OM (373/8" IM) Skylight using ILT Quiet Motor or Altus Quiet Motor
®
Page 107 of 124
Minimum Shade Sizes—Continued
The following is for coupled shades
27" OM (271/16" IM -we take a 1/16" off the left & right panel to equal a total 1/8" IM deduction) for 506 Motorized Coupled unit (If
using Somfy 504 Quiet Motor add 7½")
OR
301/8" OM (301/16" IM -we take a 1/16" off the left & right panel to equal a total 1/8" 1M deduction) for 506 Altus RTS Round Head
or ILT Motor (If ILT Quiet Motor or Altus Quiet Motor, add 7½")
9¾" OM (9¾" IM -No IM deductions are made on center panels) for a center sleeve on a coupled unit
6¼" OM (65/16" IM -we take a 1/16" off the left & right panel to equal a total 1/8" IM deduction) for idler end of a couple unit
Page 108 of 124
www.draperinc.com
(765) 987-7999
Installation Instructions
Motorized FlexShade by Draper
Caution
➀ Inspect all boxes to make sure you have received the proper shades and
parts. Controls may be shipped separately, or in same carton as shades.
➁ Open cartons lengthwise.
➂ All brackets, fascia, headboxes, pockets, wall clips, and other hardware
must be installed level. Shades must be level and square.
➃ All motors should be tested and limits set using test cord before electrician
wires shade.
➄ Before connecting switches, controls, or electrical, make sure power is off.
Wiring indicated in diagram by dashed lines must be completed by an
electrician.
➅ Do not wire motors in parallel without written permission from Draper.
➆ It is the installer’s responsibility to make sure appropriate fasteners are
used for mounting surface.
➇ Please read the following installation guidelines thoroughly and follow
them carefully. Failure to do so may cause product to fall or otherwise
fail, and invalidates warranty.
Please Note: Custom products/installations may not be reflected by this
document. Call Draper, Inc. if you have questions about your installation.
Mounting Endcaps
➀
➁
➂
➃
Snap end covers into place (see Fig. 3).
Mark wall, jamb or ceiling for placement of mounting endcaps.
Drill small starter hole (if necessary) in mounting surface.
Mount endcaps using appropriate fasteners for surface (see Fig. 4 for
endcap dimensions). If this is a coupled unit, be sure to mount coupled
endcap in the center position. The installer is responsible for selecting
mounting hardware appropriate for site conditions.
Caution: Before mounting shades, verify measurements on the card
provided with the shade, and ensure the endcaps are installed at the
correct width.
Mounting Brackets
➀ Mark wall, jamb or ceiling for placement of mounting brackets.
Caution: Before mounting shades, verify measurements on the card
provided with the shade, and ensure the brackets are installed at the
correct width.
➁ Drill small starter hole in mounting surface (if necessary).
➂ Mount brackets using appropriate fasteners for surface (see Fig. 1 for
bracket types). The installer is responsible for selecting mounting
hardware appropriate for site conditions.
Brackets
Figure 3
Endcaps
31/4"
2"
41/2"
27/8"
5/16"
5/8"
21/4"
41/2"
3"
17/8"
27/8" 33/4"
7/8"
5/8"
* Retainer clip
Coupling
(slotted end)
Shade
Roller
Shade
Roller
Small Endcap
*Retainer clip
*Don't forget
Idler End
to install re- (Left Standard)
tainer clip!
Coupling
(slotted)
Coupling
(idler pin)
Bearing boss
oriented toward
slotted coupling
Please Note: Install motor so that limit switches are accessible.
Figure 2
®
Copyright © 2008 Draper Inc. Form MotorizedFlexShade_Inst08-R Printed in U.S.A.
21/2"
Figure 4
➄ Place operator (motor) end into its endcap (see Fig. 5).
➅ For coupled units insert idler pin into center (coupled) endcap. Next Insert
slotted end of next shade into the center (coupled) endcap (see Fig. 5).
➆ Slide notched pin into idler endcap and attach retainer clip(see Fig. 5).
Retainer
Clips
Operator End
(Right Standard)
Three washers not required
if fascia or headbox endcaps
look like this.
Shade
Roller
*Don't forget to
install retainer
clip!
2"
11/4"
11/4"
3"
Large Endcap
Inside/Outside
Ceiling
Operator End
Coupler
(Right Standard)
(Bearing Boss toward
slotted coupler end)
Figure 1
➃ Place operator (motor) end onto its bracket. If a coupled unit, place slotted
end of shade into coupler bracket, then insert idler pin end of next shade
into coupler bracket.
➄ Slide notched pin on idler end into slot on bracket. Slip retainer clip onto
idler end between bracket and roller (see Fig. 2).
Ceiling
Inside/Outside
Idler End
(Left Standard)
2"
17/8"
21/4"
Coupler
Coupling
(idler pin)
Shade
Roller
Operator End
(Small Pocket only)
Bearing
Endcaps
Operator
End
Bearing boss oriented
toward slotted coupling
Three washers
required if fascia
or headbox
endcaps look
like this.
Figure 5
Fascia
➀ Snap end covers onto endcaps.
➁ If Crank override is provided, remove crank
handle assembly from endcap and discard
washers (see Fig. 6)
➂ Follow steps 1 through 6 under "Mounting
Endcaps" section.
➃ Place groove along top of fascia over endFigure 6
caps, and snap into place (see Fig. 7 on
page 2). Fascia is not fully seated until it clicks into place on both
ends. Once in place, check for secure fit. If not secure, secure with
Page 109 of 124
appropriate fastener (not included).
If you encounter any difficulties installing or servicing your Motorized FlexShade, call
your dealer or Draper, Inc., Spiceland, Ind., (765) 987-7999, or fax (765) 987-7142.
Page 2 of 2
Motorized FlexShades by Draper
Small Pocket Endcap Dims
31/4"
2"
5/16"
17/8"
33/4"
STEP 1
2"
2"
17/8"
STEP 2
Clicks into place
Figure 7
11/4"
➄ If crank override is included, re-attach to endcap (see Fig. 8). Make sure fascia
is in place before attaching crank handle, so the screws attach both the handle
and the fascia to the endcap.
11/4"
21/2"
Field Adjustments
Each Draper Solar Control Shade is tested to ensure proper operation. Even
with this testing, some field adjustments may be needed for telescoping. If shade is
telescoping, place a piece of high quality gaffer tape about 1" wide on the exposed
roller (where the fabric will cover it) on the side that you want the fabric drawn
toward. For example: if fabric is tracking to the left, place the tape on the right side.
Electrical Connections
Figure 8
Surface (Ceiling/Wall) Headbox or Large Pocket Headbox
➀ Snap endcap covers onto endcaps.
➁ Place endcaps into back/top portion of wall/ceiling headbox or into pocket
extrusion of large pocket headbox. Using pre-drilled holes in endcaps, mark
the headbox for drilling.
Caution: Before mounting shades, verify measurements on the card
provided with the shade, and ensure the unit is installed at the correct
width.
➂ Drill holes in back or top, depending on whether you will be mounting the
headbox to the wall or ceiling, or in a pocket.
➃ Attach endcaps and wall/ceiling headbox back/top or large pocket headbox
extrusion to wall, ceiling or pocket using mounting hardware appropriate for
site conditions. The installer is responsible for selecting mounting
hardware appropriate for site conditions.
➄ Install shade following steps 2-5 under "Fascia" section.
➅ Attach headbox fascia or large pocket closure (see Fig. 9). Note on surface
style headbox: Fascia is not fully seated until it clicks into place on both
ends. Once in place, check for secure fit. If not secure, secure with
appropriate fastener (not included).
Shade operates on 110-120V, 60 Hz. current. Shade is shipped with internal wiring
complete and control switch(es) fully boxed, and standardly supplied with a 6'
cable lead. Longer lead can be substituted by removing two screws in motor end of
roller, removing lead, plugging new lead in, and replacing screws. Wire to connect
shade to switch(es) and switch(es) to power supply should be furnished by installer. Connections should be made in accordance with attached wiring diagram,
and wiring should comply with national and local electrical codes. DO NOT wire
motors in parallel without written permission from Draper.
All operating switches should be “off” before power is connected.
Cleaning and Maintenance
Idlers on motorized shades may occasionally need lubrication. If lubrication is
required, apply a small amount of a lithium based grease direct to the idler pin.
Most of Draper’s standard fabrics may be cleaned at the window by vacuuming
with a soft brush attachment. They may also be cleaned by using a sponge or soft
cloth and mild solution of warm soapy water. A dishwashing liquid, such as Ivory
liquid, is recommended. A clean dry cloth is recommended for the metal finish.
Exceptions are Flocké and Roc-Rol fabrics, which must be cleaned with a
dry art sponge.
Single Shade Wiring Diagram
For multiple shade or low voltage wiring consult diagrams provided with control.
Internal Shade Wiring
White (Common)
Black
Red
Green (Ground)
Small Pocket Headbox
Surface Headbox
Red
Control
switch
Black
STEP 1
Single gang box by others
Min. 4" x 2 1/8" x 1 7/8" deep
Black
STEP 2
Clicks into place
Secure closure
panel to endcap
with screw
Large Pocket Headbox
Dashed wiring by electrician
To 110-120V Line
STEP 1
NOTE: Test shade
operation. If shade
direction does not
correspond with the
switch orientation,
turn power back
off then switch the
red and black wires
from the motor to the
switch.
STEP 2
STEP 3
Limit Switch Adjustments
CAUTION: Be sure all switches are in “off” position before adjusting limit switches.
Always be prepared to shut off manually when new adjustment is being tested. Do
not allow the shade roller to become exposed by running the shade fabric
too far down. Shade may be severely damaged if allowed to run too far up or
down. Each shade’s limit switch must be set if using group control system.
Push Button Limits
Figure 9
➆ If crank overrise was included, reattach to endcap (see Fig. 8). Make sure fascia
is in place before attaching crank handle, so that the screws attach both the
handle and the fascia to the endcap.
Small (3¼" Hardware) Pocket Headbox
➀ Follow steps 1 through 5 as described in "Surface (Ceiling/Wall) Headbox or
Large Pocket Headbox" section.
Please note that when you remove the crank handle assembly (if provided)
there will be no washers to discard.
➁ If crank override was included, reattach to endcap (see Fig. 8). Make sure the
fascia is in place before attaching crank handle (see Fig. 9), so the screws attach to the handle and the fascia to the endcap.
www.draperinc.com
➀ Fully depress both limit switch push buttons, then operate wall switch to
make sure system works properly.
➁ Raise shade to desired “up” stop position.
➂ Set upper limit by depressing and releasing the proper (back) push button.
➃ Lower shade to desired “down” stop position.
➄ Set lower limit by depressing and releasing the proper (front) push button.
Screw-Type Limits
➀ Determine which direction of fabric travel corresponds with arrows on motor.
➁ Operate shade to desired “down” stop position. Set limit by turning the
proper socket toward the “+” to lower the limit, and “-” to raise it.
➂ Operate shade to desired “up” stopping position. Set limit by turning the
proper screw toward the “-” to raise the limit, and “+” to lower it.
(765) 987-7999
Page 110 of 124
Installation Instructions
FlexShade 2 by Draper
Caution
➀ Inspect all boxes to make sure you have received the proper shades and
parts. Controls may be shipped separately, or in same carton as shades.
➁ Open cartons lengthwise.
➂ All brackets, fascia, headboxes, pockets, wall clips and other hardware
must be installed level. Shades must be level and square.
➃ Before connecting switches, controls, or electrical, make sure power is off.
Wiring indicated in diagram by dashed lines must be completed by an
electrician. Do not wire motors in parallel.
➄ Installation of this product requires two people.
➅ It is the installer’s responsibility to make sure appropriate fasteners are
used for mounting surface.
➆ Please follow installation guidelines carefully. Failure to do so invalidates
warranty.
➂ Rotate the roller assembly idler pin so that the ¼" hole in the shaft is
aligned with the ¼" hole in the idler end bracket (see Fig. 3).
➃ Place idler pin into the idler end bracket.
➄ Insert the cotter pin through the idler end bracket and shaft.
➅ Insert the motor end of the roller assembly into the motor end bracket (see
Fig. 3).
Cotter Pin
Mounting Brackets and Endcaps
Figure 3
➀ Mark wall, jamb or ceiling for placement of mounting brackets or endcaps.
➁ Drill small starter hole in mounting surface (if necessary).
➂ Mount brackets using appropriate fasteners for surface (see Fig. 1 for
bracket and endcap types). Centers of mounting holes are approximately
13
/16" in from outer edge of endcap/bracket.
Please Note: It is the responsibility of the installer to ensure the mounting
surface and mounting hardware are of appropriate type and strength.
Caution: The cotter pin must be correctly installed to insure safe operation of
the shade. If misalignment of the holes in the idler shaft and bracket prevent
the cotter pin from being installed, then the roller assembly must be completely removed and re-installed.
➆ Ensure that the motor retainer ring is properly installed around the grooves
in the motor and the motor end bracket.
➇ Install the motor retainer ring screw and tighten.
Please note: Maximum torque for tightening screw is 5 lb-inches.
➈ Use the cable strap with self-adhesive attachment pads to secure the motor cable to the endcap (see Fig. 4). This will prevent possible damage to
the cable by the roller during shade operation.
Mounting Brackets
Pin End (Left Standard)
Motor End (Right Standard)
Endcaps for Headbox or Fascia
Pin End (Left Standard)
Figure 4
➉ Run electrical wiring (see "Electrical Connections," page 2), and set limits
(see "Adjustments," page 2).
Motor End (Right Standard)
Headbox
Figure 1
➀ Remove headbox cover (see Fig. 5).
Shade Installation
Please Note: Installation of Shade Assembly requires two people.
➀ Remove screw from the motor retainer ring.
➁ Install the motor retainer ring into the groove in the motor end bracket (see
Fig. 2). Do not re-install the screw yet.
Caution: Be sure motor is fully
re-seated in the bracket, and
re-secured carefully with the
motor retaining spring.
1
Figure 2
2
Figure 5
➁ Remove shade and roller from headbox/endcaps.
➂ Mount headbox and endcaps in desired location.
➃ Re-install shade roller (see "Shade Installation" section).
➄ Run electrical wiring (see "Electrical Connections," page 2).
➅ Set limits (see "Adjustments," page 2).
➆ Re-install headbox cover.
Page 111 of 124
Copyright © 2007 Draper Inc.
FormFlexShade2_Inst07-R2 Printed in U.S.A.
If you encounter any difficulties installing or servicing your FlexShade 2, call your
dealer or Draper, Inc., Spiceland, Ind., (765) 987-7999, or fax (765) 987-7142.
FlexShade 2 Instructions by Draper
page 2 of 2
Single Shade Wiring Diagram
Fascia
➀ Mount endcaps and follow steps outlined in "Shade Installation" section to
assemble shade.
➁ Run electrical wiring (see "Electrical Connections").
➂ Set limits (see "Adjustments").
➃ Install fascia (see Fig. 6).
For multiple shades or low voltage wiring consult diagrams provided with
control.
Internal Shade Wiring
White (Common)
Black (Up)
Red (Down)
Green (Ground)
Brown
Red
Figure 6
Control
switch
Single gang box by others
Min. 4" x 2 1/8" x 1 7/8" deep
Black
Dashed wiring by electrician
Adjustments
Your shade motor will feature either push-button or setscrew limit switches.
Use appropriate steps below for your type of motor. At no time should viewing
surface be unrolled enough to expose any part of shade roller.
These instructions are for right-hand motor, fabric from rear of roller.
For left-hand motor, fabric from rear of roller, directions noted below
should be reversed.
To 110-120V Line
NOTE: Wiring diagram for standard right-hand motor placement with fabric
from rear of roller, or left-hand motor placement with fabric from front of roller.
For left hand motor placement with fabric from rear of roller or right hand motor placement with fabric from front of roller, Red is “Up” and Black is “Down.”
Dimensions
Push-Button Limit Switches:
➀ Fully depress both limit switch push buttons, then operate
wall switch to make sure system works properly.
➁ Raise shade to desired “up” stop position.
➂ Set upper limit by depressing and releasing the proper
(back) push button (See Fig. 7).
➃ Lower shade to desired “down” stop position.
➄ Set lower limit by depressing and releasing the proper
(front) push button (see Fig. 7).
NOTE: Each shade’s limits must be set if using group control.
Headbox/Fascia
with Endcaps
A
Front
(Yellow)
Back
(White)
Shade Width
Fascia or Headbox Fabric Width = Shade Width - 2"
Brackets Only Fabric Width = Shade Width - 17/8"
Bottom View
B
Side View
Figure 7
Brackets Only
Setscrew/Socket Limit Switches:
E
E
A
Adjusting Back (White) Socket—White socket is located on the motor end
of roller (see Fig. 8) and is accessible to a small flat screwdriver
or 5/32" hex key. Turning the socket counterclockwise will allow
+
Front
the roller to run farther up or down (as appropriate). Turning it
(Yellow)
Back
+
clockwise will shorten operation, causing it to stop sooner. A
(White)
full revolution of the socket will alter the stopping position of the
Bottom View
shade by approximately 11/4".
Screws
Adjusting Front (Yellow) Socket—Yellow socket is located on
the motor end of roller (see Fig. 8) and is accessible to a small
Side View
flat screwdriver. Turning the socket counterclockwise will allow
Figure
8
the roller to run farther up or down (as appropriate). Turning it
clockwise will shorten operation, causing it to stop sooner. A full revolution of
the socket will alter the stopping position of the shade by approximately 11/4".
Please Note: Each shade’s limits must be set if using group control.
Electrical Connections
Shade operates on 110-120v, 60 Hz. current. Shade is shipped with internal
wiring complete and control switch (es) fully boxed, and standardly supplied
with a 6' cable lead. Longer lead can be substituted by removing two screws
in motor end of roller, removing lead, plugging new lead in, and replacing
screws. Wire to connect shade to switch (es) and switch (es) to power supply
should be furnished by installer. Connections should be made in accordance
with attached wiring diagram, and wiring should comply with national and
local electrical codes. DO NOT wire motors in parallel.
All operating switches should be “off” before power is connected.
C
B
D
Centers of mounting holes in endcaps and brackets are located approximately 13/16" in from the outer edge of the endcap/bracket.
Headbox
Fascia
Brackets
with Endcaps
with Endcaps
Only
5
1
A
6 /8"
6 /2"
57/16"
5
1
B
6 /8"
6 /2"
57/16"
C
N/A
N/A
31/4"
D
N/A
N/A
31/4"
15
E
1"
1"
/16"
Please Note: Maximum bundle diameter is 5 1/4" (for
Headbox, Fascia or Brackets)
Cleaning and Maintenance
Idlers on motorized shades may occasionally need lubrication. If lubrication is required, apply a small amount of a lithium based grease direct to the
idler pin.
Most of Draper’s standard fabrics may be cleaned at the window by
vacuuming with a soft brush attachment. They may also be cleaned by using
a sponge or soft cloth and mild solution of warm soapy water. A dishwashing
liquid, such as Ivory liquid, is recommended. A clean dry cloth is recommended for the metal finish. Exceptions are Flocké and Roc-Rol fabrics, which
must be cleaned with a dry art sponge.
Page 112 of 124
www.draperinc.com
(765) 987-7999
Installation/Operating Instructions
Colossal FlexShade by Draper
Electrical Connections
Caution
➀ Read instructions through completely before proceeding.
➁ Follow instructions carefully. Installation contrary to instructions invalidates warranty.
➂ Pick up shade from ends only. Picking headbox up at other points will
damage case and may damage fabric.
➃ Entire bottom of shade headbox should be unobstructed to permit
access to bottom panel for making electrical connections or servicing.
➄ Shade should be installed level (using a carpenter’s level).
➅ Operating switch(es) packed separately in shade carton. Do not
discard with packing material.
➆ Shade operates on 110-120V, 60 Hz. current.
NOTE: Shade has been thoroughly inspected and tested at factory and found
to be operating properly prior to shipment.
Shade operates on 110-120V, 60 Hz. current.
Junction box is located just above the closure panel, at the motor end of
shade. To properly remove closure panel, two people should follow the steps
on page two of these instructions. The junction box access plate is held
closed with pan head screws and may be opened with a Phillips screwdriver.
Removal of access plate exposes red, black and white pigtail leads and green
internal ground wire per wiring diagram attached.
Shade is shipped with internal wiring complete and control switch(es) fully
boxed. Wire connecting shade to switch(es) and switch(es) to power supply
should be furnished by installer. Connections should be made in accordance
with attached wiring diagram, and wiring should comply with national and
local electrical codes.
All operating switches should be “off” before power is connected.
Operation
When shade is first operated, be cautious! Cycle unit down and up several
times to confirm satisfactory operation.
Adjustments
Mounting Shade
Regardless of mounting method used, the following points apply:
➀ Shade should be lifted into position only by the end mounting brackets.
Draper provides eyebolts to use in hoisting the shade. Never attempt
to lift shade along its length.
➁ Shade should be positively and securely supported so that vibration or
even abusive pulling will not weaken installation.
➂ Installer must insure that fasteners used are of adequate strength and
suitable for the mounting surface chosen. Installer must also insure that
wall or ceiling structure are of adequate strength. Supporting
hardware (chains, cables, rods, etc.) must be essentially vertical.
➃ Entire bottom of headbox must be readily accessible after installation is
complete.
➄ Front, back and top of case must be straight—not forced to warp or bow.
Adjust spreader bars to keep large cases from warping.
➅ Do not use headbox to support adjacent sections of ceiling.
➆ If optional ceiling flange trim kits are attached, use hardware provided.
➇ If headbox is painted, slots on bottom of case should be shielded to
protect viewing surface from paint splatters or overspray.
➈ After the headbox is mounted, and before the shade is operated, you will
need to remove the shipping brackets from inside the headbox. First,
remove the closure panel (see instructions on page 2). You will find the
shipping brackets on the motor-end endcap—one in front of the roller and
one behind (see Fig. 1). Remove the black hexagonal brackets with a
wrench, taking care not to damage the fabric or loosen the wiring (see
caution note below). Replace the closure panel.
Caution: Shade is shipped with motor wiring mounted to the headbox. Be
careful not to pull the wiring loose from the headbox while removing the
brackets—if wiring is loose, it could be damaged during shade operation. If
wiring does come loose, re-mount as it was.
➉ Do not seal unit in ceiling until electrical connections have been made and
shade has been operated successfully.
Shade has been factory set and should not normally require further
adjustment. However, if you desire to change the “up” and “down” stopping
positions, proceed as follows:
CAUTION: Be sure all switches are in “off” position before adjusting
limit switches. Always be prepared to shut shade off manually when new
adjustment is being tested. Shade may be severely damaged if allowed to run
too far up or too far down.
ADJUSTING “FULLY UP” POSITION—Put a small screw driver in the groove
of the yellow button on the motor and press vertically until hearing a "click".
Raise the shade by pressing the "up" switch on unit. Press the "stop" switch
when the shade is at the desired position. Then press the yellow button on
motor until you hear a "click", then release.
ADJUSTING “FULLY DOWN” POSITION—Put a small screw driver in the
groove of the white button on the motor and press vertically until hearing a
"click". Lower the shade by pressing the "down" switch on unit. Press the
"stop" switch when the shade is at the desired position. Then press the white
button on motor until you hear a "click", then release.
AT NO TIME SHOULD SHADE BE UNROLLED ENOUGH TO EXPOSE ANY
PART OF SHADE ROLLER.
Please Note: The above instructions affect only the limits on the motors. For
adjustment procedures using Draper’s IntelliFlex Control Systems, please
consult the installation information for the appropriate control.
1/2" threaded
rod (for suspending
shade) by others.
3/8" -16 threaded rod
(use for adjusting
deflection in extremely
long units) by others.
8"
Eyebolts for hoisting shade
(do not lift shade by center of case).
Headbox support brackets.
131/4"
12"
Knockouts for electrical connections
(two per end) with plastic plugs
Caution: Do not remove the roller assembly from the case unless necessary for repairs. If the roller assembly is removed, be sure motor is fully
re-seated in the bracket, and re-secure it carefully with the motor retaining spring and screw (see diagram below).
Figure 1 (roller and fabric removed for clarity)
Please note: Maximum torque for
tightening screw is 5 lb-inches.
Please see back page for dimensional diagrams of case and optional wall
mounting bracket, wiring diagrams and instructions on removing and replacing the bottom closure.
Page 113 of 124
Copyright © 2007 Draper Inc.
Form ColossalFlexShade_Inst07-R
Printed in U.S.A.
If you encounter any difficulties installing or servicing your Colossal FlexShade, call your
dealer or Draper, Inc., Spiceland, Indiana, (765) 987-7999 or fax (765) 987-7142.
Colossal FlexShade by Draper
Optional Wall Mounting Bracket
Page 2 of 2
Dimensions*
*
* - Case support brackets will be evenly spaced along the case
1"
8"
2"
2 7 /8 "
13/8"
12"
3 1 /4 "
27/8"
31/4"
131/4"
2¼"
27/8"
1
/2" dia.
2"
2¼"
2"
13/4"
3
/8" dia.
Bottom Closure Removal/Replacement
Removal and replacement of the bottom closure panel requires two people.
Closure should be handled as shown in Step 5 below to prevent bowing of the
closure during handling.
*Please Note: Optional wall brackets add 1¾" per bracket to case
length. Wall mounting bracket hole location is 1" from end of
case.
Before removing bottom
closure, you must first
remove brackets at each
end of case (see drawing
at right).
Wiring Diagrams
Internal Shade Wiring
White (Common)
Black
Red
Green (Ground)
Screw and washer
Step 1
Red
Black
Control
switch
Single gang box by others
Min. 4" x 2 1/8" x 1 7/8" deep
Black
Step 2
Dashed wiring by electrician
Step 3
To 110-120V Line
Step 4
NOTE: Test shade operation. If shade direction does not
correspond with the switch orientation, turn power back off
and switch the red and black wires from the motor to the
switch.
Step 5
Page 114 of 124
www.draperinc.com
(765) 987-7999
Black—Common
+
Brown Orange
To 12V DC
switched outlet
(i.e. Projector)
Red— Blue—
Normally Normally closed
open
Page 115 of 124
Wiring by Installer
Down
Tolerance
4-Jack Interface,
SC1 Dry Contact,
RTS Dry Contact,
SGC4, SPGC4
Draper, Inc.
411 S. Pearl St.
Spiceland, IN 47385
To other
CGS
Controllers
By
TDC
DWG No.
11-17-08 GCSIIVIC12-Shades
Date
GCS & Control by Modified VIC-12
None
Scale
Title
Common
Up
Down
To Station-Bed
Interface
(this interface is
not sold by Draper)
Tolerance
4-Jack Interface,
SC1 Dry Contact,
RTS Dry Contact,
SGC4, SPGC4
Wiring by Installer
Down
By
TDC
11-17-08
Date
To other
CGS
Controllers
Draper, Inc.
411 S. Pearl St.
Spiceland, IN 47385
GCSIINC-Shades
DWG No.
GCS & Control by Nurse Call
Common
Up
Down
Title
Scale
None
Page 116 of 124
N
G
115 VAC
Supply
L1
Page 117 of 124
BlueUp
BlueUp
Black-Next
Down
Tolerance
Black - Next
Red - Down
Black - Com
Blue - Up
4-Conductor + Ground
by Others
BlackCommon
Red-Down
Multiple-Station Control
(SS-4R) 1p3T, Momentary
Wiring by Installer
4-Conductor + Ground
by Others
BlackCommon
Red-Down
Black-Next
Multiple-Station Control
(SS-4R) 1p3T, Momentary
None
Scale
Title
BlueUp
By
TDC
11-17-08
MS4R-Shades
DWG No.
Multiple-Station Control
Date
MOTOR
ISO
GC4
Draper, Inc.
411 S. Pearl St.
Spiceland, IN 47385
Black-Next
3-Conductor + Ground
by Others
BlackCommon
Red-Down
Multiple-Station Control
(SS-3R) 1p3T, Momentary
To Home Automation
Crestron, AMX, Etc.
115 VAC
Supply
N L
Tolerance
4-Jack Interface,
SC1 Dry Contact,
RTS Dry Contact,
SGC4, SPGC4
Wiring by Installer
Down
By
TDC
To other
Controllers
Draper, Inc.
411 S. Pearl St.
Spiceland, IN 47385
DWG No.
11-17-08 IntelliFlex-HomeAuto
Date
IntelliFlex & Home Automation
Common
Up
Down
Title
Scale
None
Page 118 of 124
Page 119 of 124
SC1,
SGC4,
SPGC4
To Bus System 1
To Bus System 2
To Bus System 3
To Bus System 7 (or to RF Transmitter)
To Bus System 6
To Bus System 5
To Bus System 4
Universal
RS 232
OR
Down
Tolerance
None
Scale
Title
Draper, Inc.
411 S. Pearl St.
Spiceland, IN 47385
Home
Automation
System
By
TDC
11-17-08
Date
RS232-HomeAuto
DWG No.
RS232 and Home Automation
To RS232 Port:
Yellow = Rx (Receive data from control system)
Green = Tx (Transmit data to control system)
Red = Unused
Black = Gnd (Signal Ground)
R2D7
Home
Automation
System
Page 118 of 124
Page 120 of 124
Order #
Sheet ___
of ___
Job Name:
Model:
Revised:
Location:
Submittal Date:
Revised:
Dealer:
Drawn:
As Built:
Page 121 of 124
Pins may vary per your installation
SolarFlex—Sun Tracking Automation
SolarFlex is a sun tracking automation software which takes your buildings floor plan and runs the shades accordingly. Shades will run up and down based on the sun’s intensity, azimuth, and light penetration needs. SolarFlex can work
with other switching devices or alarm systems as well.
Benefits of SolarFlex are:
1.
2.
3.
4.
5.
6.
Maximum light and glare control
Energy Efficiency
Daylighting Autonomy is maximized.
User records are kept
System can be manipulated or reprogrammed easily to account for changing exterior conditions.
Remote management of system is possible.
To install this system, one will need to dedicate a control closet to locate a PC with the software loaded on it. A small
weather station will also need to exist on the roof. All controls on the job will need to be addressed and those addresses
must be recorded for programming the SolarFlex.
The dedicated PC will be provided by Draper, and it will be programmed with the building floor plan. Floor plans must
be provided to Draper.
The weather station on the roof will let the PC know if it is sunny or not. If it is not sunny then the shades will not
deploy. If it is, then the PC using the GPS of the building, time, and date will know the position of the sun and run the
shades.
The PC will need to reach out an obtain time in order to operate. If it does not then the time might get off and actions
will not be correct.
This system is designed to give the user the most energy efficient operation of their shades, but people will sometimes not want this type of operation. The system can have wall switches or other devices to override the sun sensors.
The system will recalibrate every few hours to correct any overrides, and the system can be set not to respond to
override commands if desired.
The PC with the SolarFlex software must not be a work station PC. The shades can be run from the PC.
Solarflex is programming will require a lot of planning and coordination with Draper to ensure the system is correct.
Please contact Draper when planning to use this system so a series of steps for creating the system can be established
for a job.
See other side for diagram.
®
Page 122 of 124
SolarFlex—Sun Tracking Automation—page 2
Below is a picture of what the PC will be showing.
Page 123 of 124
www.draperinc.com
(765) 987-7999
Contacting Draper
Telephone (U.S. and Canada)—800-989-0126
Fax—866-637-5611
Faxed/e-mailed purchase orders are processed directly. However, incomplete orders will be placed on hold until questions are answered. Draper will default to
standards when applicable—see page 4. To ensure complete and accurate orders are received, please use Draper order forms.
Order forms are available online at www.draperinc.com/go/ShadeOrderForm.htm
Internet
Our Web site, www.draperinc.com, is a convenient, 24-hour source for product information.
Email addresses are available below and in the Contact Us section of our Web site.
Key Contacts
Shade Sales
Specialist
Region
Regional Manager
Shade Region
CT, NH, ME, MA, RI, VT, Eastern Canada (NB, NF,
NS, PE, ON, QC)
Eric Guffey, LEED® AP, CTS — ext. 300
[email protected]
CT, NH, ME, MA, RI, VT, Eastern Canada (NB, NF,
NS, PE, ON, PQ)
Karen Reno — ext. 359
[email protected]
NY
NJ, NY, PA
Todd Garner, CSI — ext. 303
[email protected]
Karen Reno — ext. 359
[email protected]
PA, NJ
Teri Boxell — ext. 524
[email protected]
DC, DE, MD
Teri Boxell — ext. 524
[email protected]
KY, VA, WV
Dan Turner — ext. 620
[email protected]
FL GA, NC, SC
Tracy Linville, CTS — ext. 519
[email protected]
MI, OH, KY (Cincinnati area only)
Lana Mathews — ext. 239
[email protected]
IN, IL
Dan Turner — ext. 620
[email protected]
Stuart Milligan, CTS, LEED® AP — ext. 215
[email protected]
DC, DE, KY, MD, VA, WV
FL, GA, NC, SC
Matt Schultz, CSI, CDT, LEED® AP
770-562-4757
[email protected]
IL, IN, MI, OH, KY (Cincinnati area only)
Art Tober, CSI, CDT
586-416-0829
[email protected]
TX
Chad Tabor, CTS — ext. 255
[email protected]
TX
Lana Byrket — ext. 462
[email protected]
IA, MN, MT, NE, ND, SD, WI,
Central Canada (AB, MB, SK)
Brian Kunz, LEED® AP, CTS — ext. 214
[email protected]
IA, MN, MT, NE, ND, SD, WI,
Central Canada (AB, MB, SK)
Doug Ross — ext. 281
[email protected]
AZ, CA (Southern), NV (Southern), HI
Kathy Greenway, CSI
951-600-9056
[email protected]
AZ, CA (Southern), NV (Southern), HI
Lana Byrket — ext. 462
[email protected]
AL, AR, LA, MS, MO, TN
Kylee Whistler, CTS — ext. 358
[email protected]
AL, AR, LA, MS, MO, TN
Tracy Linville, CTS — ext. 519
[email protected]
AK, CA (Northern), NV (Northern), OR, WA, Western Canada (BC)
Vicki Long
714-447-4383
[email protected]
AK, CA (Northern), NV (Northern), OR, WA,
Western Canada (BC)
Lana Byrket — ext. 462
[email protected]
CO, ID, KS, NM, OK, UT, WY
CO, ID, KS, NM, OK, UT, WY, Kansas City (MO)
Jeff Broome—ext. 270
[email protected]
Doug Ross — ext. 281
[email protected]
Kansas City (KS), Kansas City (MO)
Tracy Linville, CTS — ext. 519
[email protected]
Sales/Marketing Management
Chris Broome, CSI, LEED® AP
ext.
205
E-mail address
[email protected]
Window Coverings Manager
Jeff Miller, LEED® AP
533
[email protected]
Green Buildings Specialist
Clint Childress, LEED® AP
450
[email protected]
®
Special Assistance
NAME
EMAIL ADDRESS
Technical Support
Mike Oldham
304
Clint Childress, LEED® AP 450
Ryan Carmony
621
Customer Service
Manager
Beverly Ferguson
206
Returns
Amy Denney
293
Traffic Support
Tina Loveless
468
Order Status
Debbie Spera
301
Customer Service Support
Carol McLemore
253
EXT.
[email protected]
[email protected]
[email protected]
[email protected]
[email protected]
[email protected]
[email protected]
[email protected]
Page 124 of 124