1
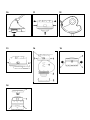
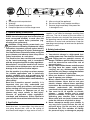
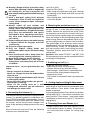
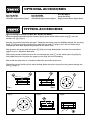
GRASS TRIMMERS
■ STOCK No.56477
56478
■ PART No.GT3525T
GT4729DA
• INSTRUCTIONS •
IMPORTANT: PLEASE READ THESE INSTRUCTIONS CAREFULLY TO ENSURE THE
SAFE AND EFFECTIVE USE OF THIS TOOL.
11/2000
SPECIFICATION
Whilst every effort has been made to ensure that the information given in this manual is correct at
the time of going to print, the Draper Tools policy of continuous improvement determines the right
to change specification without notice.
STOCK No. . . . . . . . . . . . . . . . . . . . . . . . . . . 56477 . . . . . . . . . . . . . . . . . . . . . . . . . . . . . 56478
PART No. . . . . . . . . . . . . . . . . . . . . . . . . . . GT3525T . . . . . . . . . . . . . . . . . . . . . . . . GT4729DA
VOLTAGE . . . . . . . . . . . . . . . . . . . . . . . . . . . 230V . . . . . . . . . . . . . . . . . . . . . . . . . . . . . . 230V
POWER . . . . . . . . . . . . . . . . . . . . . . . . . . . . . 350W . . . . . . . . . . . . . . . . . . . . . . . . . . . . . 475W
CUTTING WIDTH . . . . . . . . . . . . . . . . . . . . 250mm. . . . . . . . . . . . . . . . . . . . . . . . . . . . 290mm
LINE FEED SYSTEM . . . . . . . . . . . . . . . . . "Tap n’ Go" . . . . . . . . . . . . . . . . . . . Fully Automatic
LINE . . . . . . . . . . . . . . . . . . . . . . . . . . . . . Single 6M. . . . . . . . . . . . . . . . . . . . . . Double 2x5M
SUPPORT HANDLE . . . . . . . . . . . . . . . . . Adjustable. . . . . . . . . . . . . . . . . . . . . . . . Adjustable
WEIGHT . . . . . . . . . . . . . . . . . . . . . . . . . . . . 2.1kg. . . . . . . . . . . . . . . . . . . . . . . . . . . . . . 2.2kg.
SOUND POWER LEVEL . . . . . . . . . . . . . . . . 91dbA . . . . . . . . . . . . . . . . . . . . . . . . . . . . 94dbA
SOUND PRESSURE LEVEL . . . . . . . . . . . . . . 84dbA . . . . . . . . . . . . . . . . . . . . . . . . . . . . 84dbA
VIBRATION LEVEL . . . . . . . . . . . . . . . . . . . 2.8m/s2 . . . . . . . . . . . . . . . . . . . . . . . . . . . 2.8m/s2
POWER SUPPLY
CONNECTING YOUR MACHINE TO THE POWER SUPPLY:
To eliminate the possibility of an electric shock, your machine has been fitted with a BS approved,
non-rewirable moulded plug and cable which incorporates a fuse, the value of which is indicated on
the pin face of the plug. Should the fuse need to be replaced, an
approved BS1362 fuse must
be used of the same rating, marked thus
.
The fuse cover is detachable, never use the plug with the cover omitted. If a replacement fuse cover
is required, ensure it is of the same colour as that visible on the pin face of the plug (i.e. red).
If the fitted plug is not suitable, it should be cut off and destroyed. *The end of the cable should now
be suitably prepared and the correct type of plug fitted. See below.
*WARNING:
A plug with bare flexible wires exposed is hazardous if engaged in a live power socket outlet.
WARNING: THIS APPLIANCE IS DOUBLE INSULATED.
Blue - Neutral, Brown - Live.
As these colours may not correspond with the coloured markings identifying the terminals in your
plug, proceed as follows:
The wire which is coloured blue must be connected to the terminal which is marked with the letter
'N' or coloured black or blue.
The wire which is coloured brown must be connected to the terminal which is marked with the
letter 'L' or coloured red or brown.
DECLARATION OF CONFORMITY
We Draper Tools Ltd. Hursley Road, Chandlers Ford, Eastleigh, Hampshire. SO53 1YF. England.
Declare under our sole responsibility that the product:
Stock No. 56477 & 56478
Part No. GT3525T & GT4729DA
Description: GRASS TRIMMERS
To which this declaration relates is in conformity with the following directive(s): 98/37/EEC,
89/336/EEC & 73/23/EEC.
With reference to: DINVDE0730-2ZP, DINVDE0730-1, EN55014-1, EN55014-2, EN61000-3-2 & EN60001-3-3.
JOHN DRAPER
Managing Director
01/99
GUARANTEE
Draper Garden Power tools have been carefully tested and inspected before shipment and are guaranteed to be free
from defective materials and workmanship for a period of 12 months from the date of purchase except where tools are
hired out when the guarantee period is ninety days from the date of purchase.
Should the machine develop any fault, please return the complete tool to your nearest authorized warranty repair agent
or contact Draper Tools Limited, Hursley Road, Chandler’s Ford, Eastleigh, Hampshire, SO53 1YF. England.
Telephone: (023) 8026 6355.
If upon inspection it is found that the fault occurring is due to defective materials or workmanship, repairs will be carried
out free of charge.This guarantee does not apply to normal wear and tear, nor does it cover any damage caused by
misuse, careless or unsafe handling, alterations, accident, or repairs attempted or made by any personnel other than the
authorized Draper warranty repair agent.
This guarantee applies in lieu of any other guarantee expressed or implied and variations of its terms are not authorized.
Your Draper guarantee is not effective unless you can produce upon request a dated receipt or invoice to verify your
proof of purchase within the 12 month period.
Please note that this guarantee is an additional benefit and does not affect your statutory rights.
Draper Tools Limited, Hursley Road, Chandler’s Ford,
Eastleigh, Hampshire. SO53 1YF. U.K.
1
2
3
4
5
6
7
8
9
10
11
12
13
14
15
16
1
1
2
3
4
2
3
4
GB
Wear eyes and ear protectors!
Warning!
Read the operation instructions
Keep third persons out of the danger zone
2. General Safety Instructions
Machine noise information regulation 3,
GSGV: the noise pressure level at the place of
work can exceed 85 dB(A). In such cases the
operator will require noise protection (e.g.
wearing of ear protectors).
Attention: Using electric power tools, you
must observe following fundamental safety
instructions to protect yourself against electric
shock, against danger of injuries and danger of
fire. Read all these instructions before using the
grass trimmer and observe them. Keep these
safety instructions at a safe place.
The machine has been constructed according
to the latest technology and in accordance
with the recognised technical safety regulations.
Nevertheless, use of the machine can involve
risks to the user or third persons, and can cause
damage to the machine or other objects.
Use the machine in a safety conscious manner
for suitable applications and in technically
perfect condition only and according to the
operating instructions! Immediately rectify or
have any faults rectified which could adversely
affect safety!
Read the instruction manual carefully. It is
important that you fully understand and
observe the safety precautions and warnings
before starting and using your trimmer for the
first time. Careless or improper use of any
trimmer may cause serious or fatal injury.
Observe all applicable safety regulations,
standards and ordinances. Please familiarise
yourself with the machine before the first use.
3. Application
The machine is exclusively intended for cutting
decorative lawn, i.e. lawn edges. Any other use or
use going beyond that, such as the cutting of
brushwood and hedges or large areas of lawn, is
5
5
6
7
6
7
After-running of the appliance!
Do not use tool in wet weather conditions
Remove plug immediately if the power flex
is damaged or cut
considered improper use. The manufacturer /
supplier is not liable for damages resulting from
such use. The risk is borne by the user alone. A
proper utilisation also includes the observance of
the operating manual and the compliance with the
conditions of control and maintenance. Keep the
operating manual always at hand near the place the
machine is used!
4. Safety Instructions
A. General Instructions
1. Your electric trimmer is a high-speed, fastcutting power tool. The electrical connection
and cutting tool are potential sources of
danger. Therefore, special safety precautions
must be observed to reduce the risk of
personal injury.
2. Always switch off the trimmer and disconnect
the plug from the power supply before
carrying out any maintenance or repair
work on the unit. Always unplug the trimmer
if you leave it without supervision.
3. Have your dealer or a specialist show you
how to operate your trimmer.
4. Minors should never be allowed to use an
electric trimmer. Never lend or rent your
electric trimmer without these operating
instructions. Be sure that anyone using your
trimmer understands the information
contained in these operating instructions.
5. You must be fit to operate an electric
trimmer - rested, healthy and in good
physical condition. If you get tired while
operating your trimmer, take a break.
Never work with an electric trimmer while
under the influence of alcohol or drugs.
6. Never attempt to modify your trimmer in
any way since it may increase the risk of
personal injury. Do not use wire or metal
reinforced line. This excludes all liability
for personal injury or damage to property
caused by improper use or impermissible
modification.
7. Do not use the trimmer if other persons,
above all children, or animals are near the
working area.
8. The high-speed cutting head may catch
and fling stones and other foreign objects a
great distance. To reduce the risk of injury,
ensure that bystanders / children and
animals are at least 15 m (50 ft) away from
your own position.
B. Operational Precautions
9. Only use your trimmer for cutting grass and
weeds next to walls, under fences, around
trees and posts, on steps, garden paths and
patios, under bushes and hedges, on steep
slopes, in gaps between paving stones, etc.
C. Instructions regarding to safe handling
10. A power circuit breaker must be installed in
the power outlet to which the trimmer is
connected or on the electric cord to the
trimmer. Contact an electrician for further
information. For a safe operation, it is
recommended to supply the machine over
a fault current safety breaker (RCD) with a
fault current not over 30 mA.
11. Before starting work check that your electric
trimmer is in good condition and that it is
operating properly. Pay special attention to
the power supply cord, extension cord,
power outlet, switch and cutting head.
12. Before using the machine, the line and
extension cords have to be checked for
signs of damage or ageing. Do not use the
trimmer when the cords are damaged or
worn.
13. If the cord is damaged during utilisation, it
must be disconnected immediately from
the mains. DO NOT TOUCH THE CORD
BEFORE IT IS DISCONNECTED FROM THE
MAINS.
14. Attention! Danger. The cutting head continues
to rotate after switch-off (flywheel effect).
Keep your fingers and feet well clear to
avoid injury.
15. Use only extension cords that are approved
for outdoor applications and that comply
with specifications. Couplings and plugs
must be splashwater-proof. Never operate
your trimmer without a properly mounted
and secured safety cover. Check tightness
of cutting head.
16. Do not use damaged power supply cords,
extension cords, couplings, plugs or cutting
heads.
17. Do not switch on the unit when hands
or feet are near the cutting elements.
18. Wear goggles or properly fitted safety glasses,
sturdy closed shoes with non-slip soles,
snug-fitting work clothes, gloves and ear
protectors (ear plugs or ear mufflers).
19. Careless use can cause injuries to hand
and feet by the rotating cutting elements.
20. Always hold your trimmer firmly, if possible
with both hands - make sure you always
maintain a good balance and secure footing.
21. Work calmly and stay alert. Operate the
trimmer under good visibility and daylight
conditions only.
22. Arrange the extension cord so that it cannot
be damaged and does not cause a hindrance.
23. Be careful not to chafe the extension cord
on corners, pointed or sharp objects. Do not
squeeze extension cord, e.g. through
narrow gaps in doors or windows.
24. Make sure the open side of the protection
guard is pointing away from yourself before
you switch on the trimmer.
25. Never tug the extension cord to disconnect
the plug. Always grip the plug.
26. Use particular caution while working in
dense growth areas where your view of the
ground is obscured.
27. Never leave your trimmer outdoors in rain.
28. Do not cut wet grass or other growth.
Never use in rain.
29. Hold the extension cord so that it is
always away from the rotating nylon line.
30. Transporting the electric trimmer, e.g.
carrying it to another site: Switch of the
unit, disconnect the plug.
31. Take special care in slippery
conditions - on slopes and uneven ground.
32. Work in a line across the slope and take
special care when turning around.
33. Watch for hidden obstacles such as tree
stumps and roots to avoid stumbling.
34. Clean the cutting head at regular intervals.
35. Check the condition of the cutting head at
frequent intervals. If the behaviour of the
cutting head changes (vibration, noise),
check immediately as follows: Switch off
the trimmer, hold it firmly and bring the
cutting head to a standstill by pressing it
against the ground. Then disconnect plug
from power supply. Check condition of cutting
head - look for cracks.
36. Warning ! Danger of injury by the line cutting
device. After replacing a spool or lengthening
the cutting line, be sure to bring the unit
onto normal working position before turning it
on again.
37. Have a damaged cutting head replaced
immediately - even if it only has superficial
cracks. Never attempt to repair a damaged
cutting head.
38. Always switch off your trimmer and
disconnect it from the power supply before
taking a break and after finishing work. Do
not forget maintenance. (Plug disconnected!)
Only carry out maintenance and repairs
described in these operating instructions.
Any other work should be performed by
your dealer.
39. Inspect cooling air slots on the motor housing
at regular intervals for clog-ups and clean
as necessary.
40. Only use original spare parts.
41. Only use original cutting heads and
replacement spools. Never use metal cutting
devices.
42. Clean plastic parts with a damp cloth. Do
not use aggressive cleaning chemicals.
43. Never hose down the electric trimmer!
44. Store trimmer indoors in a dry, high or
locked place and always keep out of reach
of children.
Important notice - so your guarantee does not
expire:
• Always keep the air-intake clean.
• Never use a longer line than the blade-retainer
allows to use.
• Only use original monofilaments with 1,4 mm
ø and original spools.
• Never press the cutting head on the ground,
while motor is running.
• Never hit the cutting head on a hard
underground, otherwise you will unbalance
and damage the motor shaft.
5. Connecting the trimmer (fig. 1)
The machine can only be used on single-phase AC
current. It is double-insulated in accordance with
Class II VDE 0740 and EEC 20 and therefore, it can be
used from sockets without earth wire. Before using
the trimmer, ensure that the mains voltage is the
same as the operating voltage shown on the rating
plate.
Wires of extension cord must have the following
minimum cross sectional area:
up to 25 m (80 ft):
1 mm²
more than 25 m (80 ft):
1,5 mm²
• Make a loop in the extension cord, push it through
the opening in the handle and hook over the lug
(strain relief).
• After finishing work, unhook loop from lug and pull
it out of the handle.
6. Mounting the protection cover (fig. 3+4)
Remove the spool cover by pushing the spool cover
tab (fig. 15, pos. 1) at the side of the cutting head
inwards. Remove the spool and the spring. Place
the protection cover onto the trimmer housing in
such a way that the 2 guide edges of the protection
cover are located in the corresponding gaps of the
motor housing. Now turn the protection cover by 90°
up to the right position as shown in the illustration.
The guide edges of the protection cover must be
placed properly in the corresponding groove of the
motor housing. Finally, fix the protection cover
with the enclosed screw. Insert spring and spool.
Thereafter, position spool cover and fix it on the
cutting head.
Attention: With model GT 3525 T and GRT 4729
DA the protection cover can be assembled without
removing the cutting head.
7. Switching on / off (fig. 2)
To operate your grass trimmer:
• Make sure you have a secure footing.
• Hold the trimmer firmly (with both hands).
• Stand upright - hold trimmer in relaxed position.
• Do not rest the cutting head on the ground.
• Squeeze the switch.
• The trimmer is switched off when you release the
switch.
8. Cutting Angle and Height Adjustment
Height adjustment-(fig. 5): Press button 1 and
adjust length of shaft to the most comfortable of the
three positions. Press button 2 and adjust front
handle as required.
Cutting angle adjustment: Press button 3 to release
cutting head (fig. 6) - it can now be swivelled to two
other positions. Press button 1 and rotate handle
180 degrees as far as to the stop (ill 7). Position for
edging-(fig. 8)
9. Trimming Grass and Weeds (fig. 9)
• Sweep trimmer back and forth uniformly to cut
small patches of grass or weeds. The trimmer is
not constructed and suitable for cutting large
areas.
• Wherever possible, cut with left-hand side so that
cuttings, dust and stones are thrown forwards,
away from the user.
• Ideal working conditions are achieved if the trimmer
is tilted to the left at an angle approx. of 30°.
10. Adjusting Nylon Line GT 3525T
Check the nylon line regularly if it is damaged or if it
still has the correct length.
When cutting performance deteriorates: Hold the
running trimmer above a patch of grass. Tap the
cutting head on the ground (fig. 10). Note the fresh
line will be advanced only if lines are still at least 2.5
cm (1 inch) long. If the lines are shorter: Switch off
the trimmer, disconnect plug from power supply.
Press in the spool and pull end of lines firmly
outwards (fig.11). If end of lines arenot visible - see
point 11 (replacement of spool). For model GT 4729
DA the string is automatically adjusted to the
proper length in the case that it becomes shorter
than the minimum length
The line(s) will automatically be cut to the correct
length (when trimmer is running) if too much line
has been released (ill 12). Attention: Clean the
cutting blade from grass in order to avoid that the
cutting effect will be influenced.
WARNING: Hazard of injury through the cutting
blade.
11. Replacement of Spool
Model GT 3525 T:
Switch off trimmer and disconnect from power
supply. Wait until the nylon lines stop to rotate.
Then push the two locking devices 1 at the sides of
the cutting head, and remove the cutting head cover
2 (fig. 13). Remove the used thread coil and put in
the new coil 3 such, that one end of the thread comes
out of each outlet at the sides of the cutting head (fig.
14). Please take care that the spring 4 is pro-perly
seated under the thread coil. Finally, close the cover
by pushing it in its seat. Both locks must properly
engage.
Model GT 4729 DA:
First, turn the machine off and pull plug out of
socket. Wait until the nylon line completely stops
moving. Then press both side buttons 1 (pic. 15)
and take off the cover 2. Take out the empty spool
and replace with the new spool 3 in such a way that
one end of the line always stick out on the side of
the cutting head from the button (pic. 16). With a
slight turn secure the spool , so that it sits at the
correct position in the base plate. Then replace the
cover and snap both side buttons back.
12. Trouble Shooting
• Trimmer does not work: Check power supply
(e.g. by testing on another socket or by means of
a voltage tester). Should it still not work, although the
socket is o.k., send it undismantled to an
authorised service station for repair.
• Cutting line disappears into spool: Remove
spool (acc. to point 11), pull end of line through the
metal outlet and reinsert spool. In case nylon line
is used up insert a new spool with line.
Do not make any other repairs on your own; have
your trimmer checked and repaired by an authorised
service station.
13. Storing
• Clean the unit thoroughly, especially the cooling
air slots on the motor housing.
• Store trimmer indoors in a dry, high or locked
place and keep out of reach of children.
OPTIONAL ACCESSORIES
Part No.AGP2
Stock No.56723
GT3525T Replacement Spool
Part No.AGP4
Stock No.56725
GT4729DA Replacement Spool
Part No.AGP5
Stock No.56726
Replacement Nylon Spool Lines
FITTING ACCESSORIES
Spool Line Replacement for Part Nos. AGP3 and AGP4:
With the spool removed from the trimmer gently prize off the white nylon ring ✪✌ over the
smaller rim ✫✌. (Fig.1.)
Remove any excess line from the spool. Feed the end of the new line (AGP5) through the securing
holes ✬✌ (Fig.2.) and by applying heat melt the line end ✭✌ (Fig.3.) so it will not come back
through the hole. Now repeat this process for the other line.
Now position the spool with the recess ✮✌ (Fig.4.) facing downwards, wind the line around the
upper race in a clockwise direction.
When fully wound, feed the end of the line through the hole ✯✌ in the white nylon ring (Fig.5.),
then slide the nylon ring over the upper race to stop the line unwinding.
Now wind the other line in a clockwise direction round the lower race.
When fully wound, hold in place while sliding down the nylon ring so the line passes through the
slot ✰✌ (Fig.6.).
Fig.1.
Fig.4.
Fig.3.
Fig.2.
Fig.5.
Fig.6.
DRAPER TOOLS LIMITED,
Hursley Road, Chandler's Ford, Eastleigh, Hants. SO53 1YF. U.K.
Helpline: (023) 8049 4344.
Sales Desk: (023) 8049 4333.
General Enquiries: (023) 8026 6355.
Fax: (023) 8026 0784.
www.draper.co.uk
e-mail: [email protected]
YOUR DRAPER STOCKIST
©Published by Draper Tools Ltd.
No part of this publication may be reproduced,
stored in a retrieval system or transmitted in
any form or by any means, electronic, mechanical
photocopying, recording or otherwise without prior
permission in writing from Draper Tools Ltd.