1
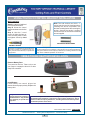
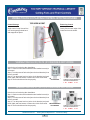
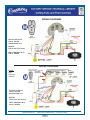
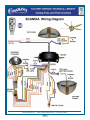
For W-72 and W-73 Operation See Page XX
For Wiring Diagrams
See Page
Versa•Touch2™
W-72 AND W-73
Versa•Touch2™
The refined Versa•Touch2 includes all of the standard features of the Versa•Touch, in a new design that is compatible
with a greater number of Casablanca fan models than before. The Versa•Touch2 hand-held remote provides three
forward or reverse fan speeds, full spectrum light dimming and memory, and has an optional wall plate bracket.
Versa•Touch2 may be used alone to control several fans or with extra controls to operate a single fan from different
locations.
This convenient remote, included with all Versa•Touch models, appeals to the purist who is seeking high quality
performance.
•
•
•
•
•
Wireless remote operation uses one 12 volt battery
Operates separate fan & light functions within a 35 foot radius
32 programmable transmission channels eliminates interference
One control may operate many fans or several controls can operate one fan
Additional controls available to provide added convenience
VERSA•TOUCH 2 OPERATION
Fan Control
To start the fan, press the selected speed button to run the fan at the desired
speed.
LO=Low speed MED=Medium speed HI=High speed
To turn off the fan. Press the FAN OFF button.
Airflow Direction
To reverse the airflow press the REVERSE button. Reverse operates at any
speed whether fan is on or off. The fan returns to its set speed after reversing.
Light Control
Turn the light on or off independently from the fan by pressing the LIGHT
button. Hold the button in excess of 0.7 seconds, it becomes a dimmer. The
light varies from ‘bright’ to ‘dim’ over approximately 8 seconds. This sequence
will reverse the light when it reaches the brightest or dimmest level if you
continue to hold the LIGHT button. Release the button when the desired level
is reached.
Auto Resume
Quickly pressingf (less than 0.7 seconds) on/off operation of the LIGHT button
maintains the desired brightness level set previously.
Versa-Touch2 Wall Controls - CONTINUED
Casablanca Fan Co. - Factory Service Department - Technical Library
6
Versa•Touch 2™ (W-72 and W-73)
The refined Versa•Touch 2™ includes all of the standard
features of theVersa•Touch, in a new design that is
compatible with a greater number of Casablanca fan
Models than ever before. The Versa•Touch2™ hand-held
remote provides three forward or reverse fan speeds, full
spectrum light dimming with up light down ligh or both
and memory and has an optional wall plate bracket.
Versa•Touch 2™ may be used alone to control several
fans or with extra controls to operate a single fan from
different locations.
W-72
(Transmitter)
W-73
(Transmitter)
VERSA•TOUCH 2 © INSTALLATION
WOOD SCREW
1” (2)
12V BATTERY
W-72
CONTROL
(TRANSMITTER)
W-72
CONTROL
HOLDER
DRYWALL
ANCHOR
6-32 (2)
SCREW
6-32 X 3/8” (2)
SCREW
6-32 X 1”(2)
VERSA•TOUCH 2 © CONTROL BRACKET INSTALLATION
CAUTION! Do not use with wall dimmer or Rocker Switch.
Rocker
Switch
Toggle Switch
NOTE: -If a ROCKER SWITCH is installed at
the fan power location, it must be changed to a
TOGGLE SWITCH as shown.
Standard Light Switch
Step A. Remove the two screws holding the switch cover
plate. Do not remove the cover plate.
Step B. Orient the control bracket as shown and line up
the two inner mounting holes with those on the switchPLATE.
Step C. Install and tighten screws by hand only.
Versa-Touch2 Wall Controls - CONTINUED
Casablanca Fan Co. - Factory Service Department - Technical Library
7
VERSA•TOUCH 2 © CONTROL BRACKET INSTALLATION
Wall Installation
Note: The wall anchors and 6-32 x 1”
screws may be used in situations where
mounting to a stud is not possible. Use
the inner mounting holes. After securing the
anchor, discard the anchor’s pointed
screws and use the 6-32 decor ovalhead
screws supplied.
Step A. Locate a 2x4 wall stud
in a convenient location.
Step B. Orient the control
bracket as shown over the 2x4
stud.
Step C. Use the 1” wood
screws in either the inner or
outer mounting holes. Install
and tighten screws by hand
only.
DECOR OVALHEAD SCREWS
DRYWALL ANCHOR
Changes or modifications not expressly approved in writing by Casablanca Fan Co.
may void the users authority to operate this
equipment.
This device complies with RSS-210 of Industry Canada. Operation is subject to the following two conditions: (1) this device may not cause interference,
and (2) this device must accept any interference, including interference that
may cause undesired operation of the device.
VERSA•TOUCH © BATTERY INSTALLATION
Remove Battery Door
Turn control on its front. Twist a coin or use
your finger to unsnap the door A. Lift door
away from control B.
Install Battery
Press battery into control aligned as
shown.Observe proper polarity. Replace the
battery door.
12V BATTERY
Changes or modifications not
expressly approved in writing by
Casablanca Fan Co. may void the
users authority to operate this
equipment.
This device complies with RSS-210 of Industry Canada. Operation is subject to
the following two conditions: (1) this device may not cause interference, and (2)
this device must accept any interference, including interference that may cause
undesired operation of the device.
Versa-Touch2 Wall Controls - CONTINUED
Casablanca Fan Co. - Factory Service Department - Technical Library
8
VERSA•TOUCH 2 © PLACING CONTROL INTO THE HOLDER
Control Storage
Removing Control
Angle control in top first until the
unit can be gently pushed back
and snapped into place.
Gently Pull the lower edge of the
control out from the holder.
VERSA•TOUCH 2 © ( W-72 ) IF FAN DOES NOT WORK
If the fan is not functioning after installation:
Step 1. Check to make sure that batteries are installed correctly in
the control.
Step 2. Turn the power off to the fan (from the circuit breaker) for at
least 5 seconds.
Step 3. Turn the power back on (at the circuit breaker) and push
the Hi, Med, and Low buttons–in that order–within 20 seconds. CIRCUIT BREAKER
Step 4. The fan should now function properly.
OR FUSE BOX
PRESS IN THIS ORDER TO
SET NEW FREQUENCY:
1. HI 2. MED 3. LO
VERSA•TOUCH 2 © ( W-73) IF FAN DOES NOT WORK
If the fan is not functioning after installation:
Step 1. Check to make sure that batteries are installed correctly in
the control.
Step 2. Turn the power off to the fan (from the circuit breaker) for at
least 5 seconds.
Step 3. Turn the power back on (at the circuit breaker) and push
the Hi, Med, and Low buttons–in that order–within 20 seconds. CIRCUIT BREAKER
Step 4. The fan should now function properly.
OR FUSE BOX
PRESS IN THIS ORDER TO
SET NEW FREQUENCY:
1. HI 2. MED 3. LO
Casablanca Fan Co. - Factory Service Department - Technical Library
9
VERSA•TOUCH 2 ( W-72 ) OPERATION
Fan Control
To start the fan, press the selected speed button to run the fan at the desired
speed.
LO=Low speed MED=Medium speed HI=High speed
To turn off the fan, press the FAN OFF button.
Airflow Direction
To reverse the airflow press the REVERSE button. Reverse operates at any
speed whether fan is on or off. The fan returns to its set speed after reversing.
Light Control
Turn the light on or off independently from the fan by pressing the LIGHT
button. Hold the button in excess of 0.7 seconds, it becomes a dimmer. The
light varies from ‘bright’ to ‘dim’ over approximately 8 seconds. This sequence
will reverse the light when it reaches the brightest or dimmest level if you
continue to hold the LIGHT button. Release the button when the desired level
is reached.
Auto Resume
Quick pressing (less than 0.7 seconds) on/off operation of the LIGHT button
maintains the desired brightness level set previously.
VERSA•TOUCH 2 ( W-73 ) OPERATION
Fan Control
To start the fan, press the selected speed button to run the fan
at the desired speed.
1=Low speed
2=Medium speed
3=High speed
To turn off the fan. Press the FAN OFF button.
Airflow Direction
To reverse the airflow press the REVERSE button. Reverse operates
at any speed whether fan is on or off. The fan returns to its set
speed after reversing.
Light Control
Turn the light on or off independently from the fan by pressing the
UP LIGHT/DOWN LIGHT OR BOTH button. (This is a rocker
switch. Press the left side for the Up Light, right side for the Down
light , and the middle for both.) Hold the button in excess of 0.7
seconds, it becomes a dimmer. The light varies from ‘bright’ to
‘dim’ over approximately 8 seconds. This sequence will reverse
the light when it reaches the brightest or dimmest level if you
continue to hold the LIGHT button. Release the button when the
desired level is reached.
Auto Resume
Quick pressing (less than 0.7 seconds) on/off operation of the LIGHT
button maintains the desired brightness level set previously.
Versa-Touch2 Wall Controls - CONTINUED
Casablanca Fan Co. - Factory Service Department - Technical Library
10
VERSA•TOUCH 2 © CHANGING FREQUENCY SETTING
Note: All fans leave the factory set to ‘00000’.
You will only have to change the dip switch settings in the
remote if you are using more than one fan in the same area and
want to control them separately.
Step 1. At the circuit breaker or fuse box, turn the power off for
the fan you want to change.
Step 2. Open the battery door of the Versa•Touch control and
remove the batteries.
Step 3. Change the dip switch settings, assuring that they are
different from the previously installed Versa•Touch fan.
Step 4. Re-install the batteries and the battery door on the
control.
Step 5. At the circuit breaker or fuse box, turn the power back
on for the fan whose frequency you are changing.
Step 6. Within 20 seconds of restoring power, push the Hi,
Med, and Lo buttons (in that order).
Note: You may want to label your controls to
assure you do not mix them up.
WARNING: Do not turn the power off at the circuit
breaker, then back on, for the previously installed
Versa•Touch 2 fan(s), as you may inadvertantly change
the frequency settings for it as well.
W-73
(Transmitter)
W-72
(Transmitter)
WITHIN 20 SECONDS OF TURNING THE
POWER ON, PRESS IN THIS ORDER TO
SET NEW FREQUENCY:
1. HI
2. MED
3. LO
WITHIN 20 SECONDS OF TURNING THE
POWER ON, PRESS IN THIS ORDER TO
SET NEW FREQUENCY:
1. HI
2. MED
3. LO
Casablanca Fan Co. - Factory Service Department - Technical Library
11
PROBLEM
TROUBLESHOOTING
VERSA•TOUCH 2
POSSIBLE REMEDIES..
Before Requesting Service: Please follow this troubleshooting guide before contacting your dealer for assistance.
FAN WILL NOT START
•Check main circuit fuses, circuit breakers, or wall switch position. Check all wire connections,
making sure the power is turned off during this inspection.
•Pin connectors are not making good contact. Check the connections in the switch housing and
under the top cover.
•Battery weak - install fresh Alkaline battery.
•Fan receiver defective - replace.
•Check the frequency setting: Turn power off, at the circuit breaker, only for the fan not functioning for at least 5 seconds; turn the power back on; within 20 seconds press the Hi, Med, and
Lo buttons (in that order) to set the frequency of the fan to the control.
FAN WOBBLES OR
•Be sure canopy pin is properly set into the slot on the ball.
SHAKES EXCESSIVELY •Check that bladeholders have not been bent during installation and blades are balanced.
•Hanger bracket and/or ceiling outlet are loosely attached: Make sure that the hanger bracket is
tightly. attached to the ceiling outlet box. Make sure that the downrod assembly is secured
firmly.
•Downrod is loosely attached to downrod base: Make sure that all screws are securely tightened .
FAN NOISY DURING
OPERATION
•Check and tighten light fixture retaining screws, glass shade screws and/or the light bulb(s).
•Tighten canopy screws and mounting plate assembly. Check that the wire nuts inside the
canopy and switch housing are not touching the metal parts or have fallen off the wire splices.
Tighten as necessary.
•Tighten blade holders to flywheel (or direct drive motor) and blade to bladeholder screws.
•Make sure all screws in the motor housing are snug, but not overly tight. Defective bulb:
Replace bulb.
DOES NOT RUN ON
LOW SPEED
•If new, “break-in” may be required - run at higher speed for several days.
BATTERY LIFE
•Not using Alkaline batteries: Replace with Alkaline batteries.
SEEMS SHORT
• LIGHT O.K., NO FAN: Pin connectors are not making good contact, check 9 pin connector under top cover.
• FAN O.K., NO LIGHT; Defective receiver; Replace receiver. Defective motor; Replace motor. Broken socket; Replace socket.
• FAN AND LIGHT ON FULL, NO CONTROL; Defective receiver; Replace Receiver.
• MISSING ONE SPEED: Defective receiver; Replace Receiver.
• FAN DOESN’T CHANGE SPEED, LIGHT O.K.: Replace receiver.
• FAN O.K., LIGHT NOT DIM: Defective receiver; Replace Receiver.
• NO REVERSE: Defective receiver; Replace Receiver.
• FAN OPERATES ONLY WHEN TRANSMITTER IS CLOSED: Check antenna wire is not touching metal plate.
• FAN STARTS WORKING BY ITSELF: Frequency interference; Change frequency as described on Page 2.
1.This device complies with Part 15 of the FCC Rules.Operation is subject to the following two conditions: (1) this device may
not cause harmful interference,and (2) this device must accept any interference received,including interference that may
cause undesired operation.
2.This equipment has been tested and found to comply with the limits for a Class B digital device, pursuant to Part 15 of the
FCC Rules. These limits are designed to provide reasonable protection against harmful interference in a residential installation. This equipment generates,uses and can radiate radio frequency energy and,if not installed and used in accordance
with the instructions,may cause harmful interference to radio communications. However,there is no guarantee that interference will not occur in a particular installation. If this equipment does cause harmful interference to radio or television
reception,which can be determined by turning the equipment off and on,the user is encouraged to try to correct the interference
by one or more of the following measures: Reorient or relocate the receiving antenna, Increase the separation between the
equipment and receiver, Connect the equipment into an outlet on a circuit different from that to which the receiver is connected,
Consult the dealer or an experienced radio/TV technician for help. Note: Any changes or modifications to the transmitter or
receiver not expressly approved by Casablanca Fan Company may void one’s authority to operate this remote control.
Casablanca Fan Co. - Factory Service Department - Technical Library
12
WIRING DIAGRAMS
Receiver PC Board:
Part #: 7801350 (OLD)
7801760 (NEW)
Standard W/Coil
MOTOR:
Part #: Call The Factory
WALL CONTROL: W-73
Part #: 7854210
WIRING DIAGRAMS
Receiver PC Board:
Part #: 7801760 (NEW)
Standard W/Coil
MOTOR:
Part #: Call The Factory
WALL CONTROL: W-73
Part #: 7854210
Casablanca Fan Co. - Factory Service Department - Technical Library
20
WIRING DIAGRAMS
Receiver PC Board:
Part #: 7801750
Standard W/O Coil
MOTOR:
Part #: Call The Factory
WALL CONTROL: W-72
Part #: 7854200
WIRING DIAGRAMS
FANS:
Bella
Mykonos
Santorini
Receiver PC Board:
Part #: 7801760
Standard W/O Coil
MOTOR:
Part #: Call The Factory
WALL CONTROL: W-73
Part #: 7854210
Casablanca Fan Co. - Factory Service Department - Technical Library
21
WIRING DIAGRAMS
Receiver PC Board:
Part #: 7801750
Standard W/O Coil
MOTOR:
Part #: Call The Factory
WALL CONTROL: W-72
Part #: 7801750
WIRING DIAGRAMS
FANS:
Bella
Mykonos
Santorini
Receiver PC Board:
Part #: 7801760
Standard W/O Coil
MOTOR:
Part #: Call The Factory
WALL CONTROL: W-73
Part #: 7854210
Casablanca Fan Co. - Factory Service Department - Technical Library
22
Casablanca Fan Co. - Factory Service Department - Technical Library
23