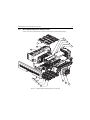
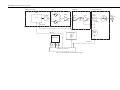
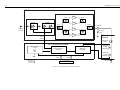
1
i
Foreword
This manual is intended for use by experienced technicians familiar with similar types of equipment. Specifically, it
contains installation information required for the MTR3000 Base Station/Repeater.
For information related to the service of the MTR3000 Base Station/Repeater, refer to the list of applicable manuals
available separately. This list is provided in the Related Publications on page xiv.
General Safety Precautions
See "General Safety and Installation Standards and Guidelines" on page ii.
Manual Revisions
Changes which occur after this manual is printed are described in PMRs (Publication Manual Revisions). These PMRs
provide complete replacement pages for all added, changed, and deleted items. Go to the following web sites according to
regions to obtain PMRs:
Europe, Middle East and Africa (EMEA): https://emeaonline.motorola.com
Latin America (LACR) and North America (NAG): http://www.motorola.com/businessonline
Parts Ordering
See "Appendix A", "Appendix C" or "Appendix D" for information on how to obtain replacement parts. For part numbers,
refer to the MOTOTRBO MTR3000 Base Station/Repeater Basic Service Manual (Motorola publication part number
68007024096).
Computer Software Copyrights
The Motorola products described in this manual may include copyrighted Motorola computer programs stored in
semiconductor memories or other media. Laws in the United States and other countries preserve for Motorola certain
exclusive rights for copyrighted computer programs, including, but not limited to, the exclusive right to copy or reproduce
in any form the copyrighted computer program. Accordingly, any copyrighted Motorola computer programs contained in
the Motorola products described in this manual may not be copied, reproduced, modified, reverse-engineered, or
distributed in any manner without the express written permission of Motorola. Furthermore, the purchase of Motorola
products shall not be deemed to grant either directly or by implication, estoppel, or otherwise, any license under the
copyrights, patents or patent applications of Motorola, except for the normal non-exclusive license to use that arises by
operation of law in the sale of a product.
Document Copyrights
No duplication or distribution of this document or any portion thereof shall take place without the express written
permission of Motorola. No part of this manual may be reproduced, distributed, or transmitted in any form or by any
means, electronic or mechanical, for any purpose without the express written permission of Motorola.
Disclaimer
The information in this document is carefully examined, and is believed to be entirely reliable. However, no responsibility is
assumed for inaccuracies. Furthermore, Motorola reserves the right to make changes to any products herein to improve
readability, function, or design. Motorola does not assume any liability arising out of the applications or use of any product
or circuit described herein; nor does it cover any license under its patent rights nor the rights of others.
Trademarks
MOTOROLA and the Stylized M Logo are registered in the U.S. Patent and Trademark Office. All other product or service
names are the property of their respective owners.
© 2010 by Motorola, Inc. All rights reserved.
ii
General Safety and Installation
Standards and Guidelines
WARNING
WARNING: For safe installation, operation, service and repair of this equipment,
follow the safety precautions and instructions described below, as well as any
additional safety information in Motorola’s product service and installation
manuals and the Motorola R56 Standards and Guidelines for Communications
Sites manual (6881089E50). To obtain copies of these materials, please contact
Motorola as directed at the end of this section. After installation, these
instructions should be retained and readily available for any person operating or
servicing this base station/repeater or working near it.
Failure to follow these safety precautions and instructions could result in serious
injury or property damage.
The installation process requires preparation and knowledge of the site before
installation begins. Review installation procedures and precautions in the
Motorola R56 manual before performing any site or component installation.
Personnel must use safe work practices and good judgment, and always follow
applicable safety procedures, such as requirements of the Occupational Safety
and Health Administration (OSHA), the National Electrical Code (NEC), and local
codes.
The following are additional general safety precautions that must be observed:
• To continue compliance with any applicable regulations and maintain the safety of this
equipment, do not install substitute parts or perform any unauthorized modifications.
• All equipment must be serviced by Motorola trained personnel.
• If troubleshooting the equipment while the power is on, be aware of live circuits which
could contain hazardous voltage.
• Do not operate the radio transmitters unless all RF connectors are secure and all
connectors are properly terminated.
• All equipment must be properly grounded in accordance with the Motorola R56 and
specified installation instructions for safe operation.
• Slots and openings in the cabinet are provided for ventilation. Do not block or cover
openings that protect the devices from overheating.
• Some equipment components can become extremely hot during operation. Turn off all
power to the equipment and wait until sufficiently cool before touching.
• Maintain emergency first aid kits at the site.
• Never store combustible materials in or near equipment racks. The combination of
combustible material, heat and electrical energy increases the risk of a fire hazard.
• Equipment shall be installed in a site that meets the requirements of a “restricted access
location,” per (UL60950-1 & EN60950-1), which is defined as follows: “Access can only
be gained by service persons or by users who have been instructed about the reasons for
the restrictions applied to the location and about any precautions that shall be taken; and
access is through the use of a tool or lock and key, or other means of security, and is
controlled by the authority responsible for the location.”
• Burn hazard. The metal housing of the product may become extremely hot. Use caution
when working around the equipment.
iii
• RF energy burn hazard. Disconnect power in the cabinet to prevent injury before
disconnecting and connecting antennas.
• Shock hazard. The outer shields of all Tx and Rx RF cables outer shields must be
grounded per Motorola R56 manual.
• Shock hazard. DC input voltage shall be no higher than 60 VDC. This maximum voltage
shall include consideration of the battery charging “float voltage” associated with the
intended supply system, regardless of the marked power rating of the equipment.
• All Tx and Rx RF cables shall be connected to a surge protection device according to
Motorola R56 manual. Do not connect Tx and Rx RF cables directly to an outside
antenna.
•
Compliance with National and International standards and guidelines for human
exposure to Electromagnetic Energy (EME) at Transmitter Antenna sites generally
requires that persons having access to a site shall be aware of the potential for exposure
to EME and can exercise control of exposure by appropriate means, such as adhering to
warning sign instructions. See this installation manual and Appendix A of Motorola R56.
This product complies with the requirements set forth by the European R&TTE regulations and
applicable CENELEC standards concerning human exposure to Electromagnetic Energy (EME) at
Transmitter Antenna sites. "Appendix E" in this manual includes an EME exposure analysis of a
typical system configuration for this product.
For a different system configuration than the typical configuration, compliance with applicable EME
exposure standards (current versions of the EN50384 and EN50385 standards for occupational and
general public exposure, respectively) can be evaluated by either employing the method illustrated in
the typical system configuration EME exposure analysis included in "Appendix E" in this manual, or
employing another suitable method among those described in the current version of the EN50383
standard.
Once the occupational and general public compliance boundaries are determined, means to ensure
that workers and people are outside the respective boundaries, for instance using appropriate
signage or restricted access, should be implemented; if this is not possible or practically achievable
for the specific system configuration, the configuration should be modified in order to make it
possible. The R56 Standards and Guidelines for Communications Sites (6881089E50) manual
provides examples of signage that can be used to identify the occupational or general public
compliance boundaries.
Refer to product specific manuals for detailed safety and installation instructions. Manuals can be
obtained with product orders, downloaded from http://www.motorola.com/businessonline, or
purchased through the Motorola Aftermarket & Accessory Department.
WARNING
This is a class A product. In a domestic environment, this product may
cause radio interference in which case the user may be required to take
adequate measures.
iv
MOTOTRBO MTR3000 Base Station/Repeater
Supplemental Safety and Installation Requirements
ATTENTION!
The MOTOTRBO MTR3000 Base Station/Repeater must be installed in a suitable, in-building
enclosure. A restricted access location is required when installing this equipment into the end
system.
The base station/repeater contains a Class 1 built-in power supply component. It is equipped with an
appliance inlet for connecting to an AC input, as well as DC input terminals which meet SELV DC
circuit requirements.
When installing the equipment, all requirements of relevant standards and local electrical codes must
be fulfilled.
The maximum operating ambient temperature of this equipment is 60°C. The maximum operating
altitude is 3000 meters above sea level.
The 28.6 VDC output from the power supply to the PA is at an energy hazard level (exceeds 240
VA). When installing into the end system, care must be taken so as not to touch the output wires.
When the MOTOTRBO MTR3000 Base Station/Repeater is used in a DC reverting system, the DC
power supply must be located in the same building as the MOTOTRBO MTR3000 Base Station/
Repeater, and it must meet the requirements of a SELV circuit.
v
Environmental Information
Material Content
NOTE: The Motorola MOTOTRBO MTR3000 Base Station/Repeater system and its subsystems
have been created in compliance with the environmental goals of the European Union’s
Restriction of Hazardous Substances (RoHS) and the Waste Electrical and Electronic
Equipment (WEEE) Directive 2002/96/EC as well as Motorola’s corporate goals to minimize
environmental impact of its products.
This Motorola policy is reflected throughout the entire design, procurement, assembly, and
packaging process.
In support of these efforts to provide environmentally-responsible products, please comply
with the information in the following sections regarding product disposal for systems being
replaced.
Disposal of your Electronic and Electric Equipment
Please do not dispose of electronic and electric equipment or electronic and electric accessories with
your household waste. In some countries or regions, collection systems have been set up to handle
waste of electrical and electronic equipment.
In European Union countries, please contact your local equipment supplier representative or service
center for information about the waste collection system in your country.
Disposal Guideline
The following symbol on a Motorola product indicates that the product should not be disposed of with
household waste.
vi
Part 68 Information
Part 68 FCC Guideline
This section applies when the MTR3000 Base Station/Repeater is equipped with the optional
Wireline Interface Board.
This equipment complies with Part 68 of the FCC rules and the requirements adopted by the ACTA.
On the rear of this equipment is a label that contains, among other information, the registration
number:
US: ABZNINANT3000
If requested, this number must be provided to the telephone company.
The connector used to connect this equipment to the premises wiring and telephone network must
comply with the applicable FCC Part 68 rules and requirements adopted by the ACTA. A compliant
connector is provided with this product. See installation instructions for details.
REN: N/A
Connector: RJ1DC
Authorized Network Port: 04NO2
Service Order Code: 7.0Y
If the equipment causes harm to the telephone network, the telephone company will notify you in
advance that temporary discontinuance of service may be required. But if advance notice is not
practical, the telephone company will notify you as soon as possible. Also, you will be advised of
your right to file a complaint with the FCC if you believe it is necessary.
The telephone company may make changes in its facilities, equipment, operations, or procedures
that could affect the operation of the equipment. If this happens, the telephone company will provide
advance notice in order for you to make necessary modifications to maintain uninterrupted service.
If you experience trouble with this equipment, please refer to "Appendix A", "Appendix C" or
"Appendix D" for repair and warranty information. If the equipment is causing harm to the telephone
network, the telephone company may request that you disconnect the equipment until the problem is
resolved.
None of the circuit boards in this equipment are field repairable. For assistance in sending the
boards back for repair, please contact the Service Center listed in "Appendix A", "Appendix C" or
"Appendix D".
This equipment cannot be used on public coin phone service provided by the telephone company.
Connection to party line service is subject to state tariffs. Contact the state public utility commission,
public service commission or corporation commission for information.
Table of Contents
vii
Table of Contents
Foreword ..........................................................................................................i
General Safety Precautions..........................................................................................................................i
Manual Revisions .........................................................................................................................................i
Parts Ordering ..............................................................................................................................................i
Computer Software Copyrights ....................................................................................................................i
Document Copyrights ...................................................................................................................................i
Disclaimer.....................................................................................................................................................i
Trademarks ..................................................................................................................................................i
General Safety and Installation
Standards and Guidelines .............................................................................ii
MOTOTRBO MTR3000 Base Station/Repeater
Supplemental Safety and Installation Requirements.................................iv
Environmental Information............................................................................v
Part 68 Information........................................................................................vi
Chapter 1
1.1
1.2
1.3
Description .......................................................................... 1-1
Introduction .................................................................................................................................. 1-1
1.1.1 Flexible Mechanical Design............................................................................................. 1-1
1.1.2 Electrical Design.............................................................................................................. 1-2
1.1.2.1 Transmitter Circuitry ......................................................................................... 1-2
1.1.2.2 Receiver Circuitry ............................................................................................. 1-2
1.1.2.3 Station Control Module ..................................................................................... 1-2
1.1.2.4 Wireline Circuitry .............................................................................................. 1-2
1.1.3 Summary of Operating Features ..................................................................................... 1-3
1.1.3.1 Standard Features ............................................................................................ 1-3
1.1.3.2 Optional Features ............................................................................................. 1-4
Base Station/Repeater Components ........................................................................................... 1-5
Functional Theory of Operation ................................................................................................... 1-7
1.3.1 Transmitter Circuitry Operation ....................................................................................... 1-7
1.3.1.1 Introduction ....................................................................................................... 1-7
1.3.1.2 Exciter Module Operation ................................................................................. 1-7
1.3.1.3 Power Amplifier Module Operation ................................................................... 1-7
1.3.2 Receiver Circuitry Operation ........................................................................................... 1-8
1.3.2.1 Introduction ....................................................................................................... 1-8
1.3.2.2 Receiver Module Operation .............................................................................. 1-8
1.3.3 Station Control Module Operation ................................................................................... 1-9
1.3.3.1 Introduction ....................................................................................................... 1-9
1.3.3.2 Station Control Module Operation .................................................................... 1-9
viii
Table of Contents
1.3.4
1.3.5
Chapter 2
2.1
2.2
2.3
2.4
2.5
2.6
Wireline Module Operation ............................................................................................ 1-10
1.3.4.1 Introduction ..................................................................................................... 1-10
1.3.4.2 Wireline Module Operation ............................................................................. 1-10
Power Supply Module Operation ................................................................................... 1-11
Installation ........................................................................... 2-1
Pre-Installation Considerations .................................................................................................... 2-1
2.1.1 Installation Overview........................................................................................................ 2-1
2.1.2 Environmental Conditions at Intended Installation Site ................................................... 2-2
2.1.3 Equipment Ventilation...................................................................................................... 2-3
2.1.4 AC Input Power Requirements ........................................................................................ 2-4
2.1.5 DC Input Power Requirements ........................................................................................ 2-4
2.1.6 Equipment Mounting Methods ......................................................................................... 2-4
2.1.6.1 Floor-Mount Cabinet ......................................................................................... 2-5
2.1.6.2 Modular Racks.................................................................................................. 2-6
2.1.7 Site Grounding and Lightning Protection ......................................................................... 2-7
2.1.7.1 Site Grounding Lightning Protection Recommendations .................................. 2-7
2.1.7.2 Equipment Grounding Guidelines..................................................................... 2-7
2.1.8 Recommended Tools and Equipment ............................................................................. 2-8
2.1.9 Equipment Unpacking and Inspection ............................................................................. 2-8
2.1.10 Base Station/Repeater Unpacking................................................................................... 2-8
Mechanical Installation................................................................................................................. 2-9
2.2.1 Unpacking Equipment...................................................................................................... 2-9
2.2.1.1 Introduction ....................................................................................................... 2-9
2.2.1.2 Unpacking Base Stations/Repeaters ................................................................ 2-9
2.2.1.3 Front Bezel – Removal and Replacement ........................................................ 2-9
2.2.1.4 Unpacking Floor-Mount Cabinets ................................................................... 2-10
2.2.2 Mounting Procedures..................................................................................................... 2-12
2.2.2.1 Introduction ..................................................................................................... 2-12
2.2.2.2 Installing Racks............................................................................................... 2-12
2.2.2.3 Mounting Floor-Mount Cabinets ..................................................................... 2-12
2.2.2.4 Transferring Equipment from Shipping Container to Rack or Cabinet............ 2-13
2.2.2.5 Installing Slide Rail Assembly in a Motorola Cabinet...................................... 2-13
2.2.2.6 Installing Slide Rail Assembly in a Non-Motorola Cabinet .............................. 2-15
Electrical Connections ............................................................................................................... 2-17
2.3.1 Power Supply Connections............................................................................................ 2-18
2.3.1.1 AC Input Power Connection ........................................................................... 2-18
2.3.1.2 DC Input Power Connection ........................................................................... 2-18
2.3.1.3 Ground Connection......................................................................................... 2-19
2.3.1.4 Battery Connection ......................................................................................... 2-19
2.3.2 RF Antenna Connections............................................................................................... 2-20
2.3.3 System Cable Connections ........................................................................................... 2-20
2.3.4 Base Station/Repeater Maintenance Connections ........................................................ 2-26
Post Installation Checklist .......................................................................................................... 2-27
2.4.1 Applying Power.............................................................................................................. 2-27
2.4.2 Verifying Proper Operation ............................................................................................ 2-27
2.4.2.1 Front Bezel LEDs............................................................................................ 2-28
2.4.2.2 Exercising Radio Operation ............................................................................ 2-30
Optimization ............................................................................................................................... 2-30
2.5.1 Optimizing Tasks ........................................................................................................... 2-30
2.5.2 Copying Base Station/Repeater Codeplug Date To a PC-compatible Computer.......... 2-31
Installing Base Station/Repeater Hardware Options.................................................................. 2-31
Table of Contents
Chapter 3
3.1
ix
Base Station/Repeater Operation ...................................... 3-1
Description ................................................................................................................................... 3-1
3.1.1 LED Indicators ................................................................................................................. 3-1
3.1.2 External Device Connections .......................................................................................... 3-1
3.1.3 Service Connections........................................................................................................ 3-2
Appendix A EMEA Regional Warranty, Service and
Technical Support ......................................................................................A-1
A.1
A.2
A.3
A.4
A.5
Warranty and Service Support.....................................................................................................A-1
A.1.1 Warranty Period and Return Instructions ........................................................................A-1
A.1.2 After Warranty Period ......................................................................................................A-1
European Radio Support Centre (ERSC) ....................................................................................A-2
Piece Parts ..................................................................................................................................A-2
Technical Support ........................................................................................................................A-3
Further Assistance From Motorola ..............................................................................................A-3
Appendix B Commercial Warranty .........................................................B-1
Appendix C LACR Replacement Parts Ordering and Motorola
Service Centers ..........................................................................................C-1
C.1
C.2
Replacement Parts Ordering .......................................................................................................C-1
C.1.1 Basic Ordering Information..............................................................................................C-1
C.1.2 Motorola Online ...............................................................................................................C-1
Motorola Service Centers ............................................................................................................C-1
C.2.1 Servicing Information.......................................................................................................C-1
C.2.2 Motorola de México, S.A. ................................................................................................C-1
C.2.3 Motorola de Colombia, Ltd. .............................................................................................C-1
Appendix D NAG Replacement Parts Ordering and Motorola
Service Centers ..........................................................................................D-1
D.1
D.2
Replacement Parts Ordering .......................................................................................................D-1
D.1.1 Basic Ordering Information..............................................................................................D-1
D.1.2 Motorola Online ...............................................................................................................D-1
D.1.3 Mail Orders ......................................................................................................................D-1
D.1.4 Telephone Orders............................................................................................................D-1
D.1.5 Fax Orders.......................................................................................................................D-2
D.1.6 Parts Identification ...........................................................................................................D-2
D.1.7 Product Customer Service...............................................................................................D-2
Motorola Service Centers ............................................................................................................D-2
D.2.1 Servicing Information.......................................................................................................D-2
D.2.2 Motorola Service Center..................................................................................................D-2
D.2.3 Motorola Federal Technical Center .................................................................................D-2
D.2.4 Motorola Canadian Technical Logistics Center ...............................................................D-2
x
Table of Contents
Appendix E MOTOTRBO Base Station/Repeater –
EME ASSESSMENT.................................................................................... E-1
E.1
E.2
E.3
E.4
E.5
E.6
E.7
Executive Summary .....................................................................................................................E-1
Exposure Prediction Model ..........................................................................................................E-1
E.2.1 Exposure in Front of the Antenna ....................................................................................E-1
E.2.2 Exposure at Ground Level ...............................................................................................E-3
Typical System Configuration ......................................................................................................E-4
Exposure Limits ...........................................................................................................................E-4
EME Exposure Evaluation ...........................................................................................................E-4
E.5.1 Exposure in Front of the Antenna ....................................................................................E-4
E.5.2 Exposure at Ground Level ...............................................................................................E-4
Compliance Boundary Description...............................................................................................E-5
References...................................................................................................................................E-5
List of Figures
xi
List of Figures
Figure 1-1
Figure 1-2
Figure 1-3
Figure 1-4
Figure 1-5
Figure 1-6
Figure 1-7
Figure 2-1
Figure 2-2
Figure 2-3
Figure 2-4
Figure 2-5
Figure 2-6
Figure 2-7
Figure 2-8
Figure 2-9
Figure 2-10
Figure 2-11
Figure 3-1
Figure 3-2
Figure E-1
Figure E-2
Figure E-3
MTR3000 Base Station/Repeater ........................................................................................ 1-1
MTR3000 Base Station/Repeater Components ................................................................... 1-5
VHF and UHF Receiver Module Functional Block Diagram............................................... 1-13
800/900 MHz Receiver Module Functional Block Diagram................................................ 1-14
Exciter Module Functional Block Diagram ......................................................................... 1-15
Power Amplifier Functional Block Diagram ........................................................................ 1-16
Wireline Functional Block Diagram .................................................................................... 1-17
Floor-Mount Cabinet ............................................................................................................ 2-5
Modular Rack ....................................................................................................................... 2-6
Removal and Replacement of Front Bezel .......................................................................... 2-9
Remove Cardboard Cover ................................................................................................. 2-10
Remove Antistatic Bag....................................................................................................... 2-11
Remove Bolts and Nuts ..................................................................................................... 2-11
Slide Rail Installation for Motorola Cabinet (Left Side Shown)........................................... 2-14
Slide Rail Installation for Non-Motorola Cabinet (Left Side Shown)................................... 2-16
ESD Connect ..................................................................................................................... 2-17
Location of External Connectors at Rear of Base Station/Repeater .................................. 2-17
Making Connections to Storage Battery............................................................................. 2-20
Front Bezel LEDs and Connectors....................................................................................... 3-1
SCM Connectors.................................................................................................................. 3-2
Reference frame for the point of interest (POI) cylindrical co-ordinates ..............................E-2
Schematic of the ground-level exposure model adopted for the assessment......................E-3
Compliance boundary for general public (GP) and occupational (OCC) exposure..............E-5
xii
List of Figures
Notes
List of Tables
xiii
List of Tables
Table 1-1.
Power Supply Module AC Performance Specification ....................................................... 1-11
Table 1-2.
Power Supply Module DC Performance Specification ....................................................... 1-11
Table 2-1.
Cabinet Models .................................................................................................................... 2-5
Table 2-2.
Cabinet Slides ...................................................................................................................... 2-5
Table 2-3.
Rack Models ........................................................................................................................ 2-6
Table 2-4.
Plugs for Different Countries .............................................................................................. 2-18
Table 2-5.
J7 Auxiliary System Connector Pins .................................................................................. 2-21
Table 2-6.
J5 System Connector, Row A Pins .................................................................................... 2-23
Table 2-7.
J5 System Connector, Row B Pins .................................................................................... 2-24
Table 2-8.
J5 System Connector, Row C Pins .................................................................................... 2-25
Table 2-9.
SCM Connectors................................................................................................................ 2-26
Table 2-10. Front Bezel LED indicators ................................................................................................ 2-28
Table 2-11. MTR3000 Software and Hardware Controlled LEDs ......................................................... 2-29
xiv
List of Tables
Related Publications
MOTOTRBO MTR3000 Base Station/Repeater Basic Service Manual.................................... 68007024096
MOTOTRBO MTR3000 Base Station/Repeater Detailed Service Manual ............................... 68007024097
Motorola Quality Standards Fixed Network Equipment Installation Manual R56........................6881089E50
Description: Introduction
1-1
Chapter 1 Description
1.1
Introduction
The Motorola MTR3000 base station/repeater provides a modular, flexible analog and digital station
designed for today's communication systems and of the future. The stations are available for use in
these configurations:
• Analog Conventional
• Digital (MOTOTRBO)
- MOTOTRBO DMR Tier 2 Conventional – Single Site
- MOTOTRBO DMR Tier 2 Conventional – IP Site Connect
- MOTOTRBO Capacity Plus Trunking
- MOTOTRBO Connect Plus Trunking
- MOTOTRBO Transmit Interrupt
- MOTOTRBO Dynamic Mixed Mode (DMM)
• LTR Trunking
• Passport Trunking
NOTE: At any given time, the base station/repeater either operates as a digital repeater or as an
analog repeater.
Refer to the Summary of Operating Features section for a list of standard features and
optional features.
1.1.1
Flexible Mechanical Design
All elements of the base station/repeater are designed for EIA 48.3 cm (19") rack mounting, allowing
the equipment to be mounted in standard telephone-style equipment racks, or various sizes of
Motorola cabinets. Figure 1-1 shows a typical base station/repeater.
Figure 1-1 MTR3000 Base Station/Repeater
1-2
1.1.2
Description: Introduction
Electrical Design
1.1.2.1 Transmitter Circuitry
The base station/repeater transmitter circuitry is designed for continuous duty operation and may be
operated at full rated power. Output power is continually monitored by an internal directional coupler.
The forward power voltage from the coupler feeds a power control loop which continually adjusts and
maintains the desired output power. All adjustments are electronic, including deviation and output
power.
1.1.2.2 Receiver Circuitry
The base station/repeater receiver circuitry features multiple bandwidth (12.5 kHz, 20 kHz, 25 kHz,
and 30 kHz) capability. Injection signals for the first and second mixers are generated by frequency
synthesizer circuitry electronically controlled by the Station Control Module (SCM). All receive
signals (analog) are detected and digitized before being sent to the SCM, providing improved,
consistent audio quality throughout the coverage area.
NOTE: For UHF band, 30 kHz bandwidth is not supported.
For digital mode, only 12.5 kHz bandwidth is supported.
1.1.2.3 Station Control Module
The SCM is microprocessor-based and features extensive use of ASIC and digital signal-processing
technology. The SCM serves as the main component for the base station/repeater, providing signalprocessing and operational control for the base station/repeater modules.
1.1.2.4 Wireline Circuitry
The station wireline circuitry options provide a wide variety of telephone interfaces and remote
control mechanisms such as Tone Remote Control and DC Remote Control. Telephone line
connections are easily made to the wireline circuitry via connectors on the rear of the station.
Description: Introduction
1.1.3
Summary of Operating Features
1.1.3.1 Standard Features
The following are the standard features for the base station/repeater:
• MOTOTRBO Conventional Operation (2-Slot TDMA, 4FSK Modulation)
• Analog Conventional Operation (FM)
• Continuous Duty Cycle Operation over -30°C to +60°C
• Meets or exceeds the following standards:
- TIA603D
- ETSI 086
- ETSI 113
- ETSI TS 102 361-1 Part 1: DMR Air Interface Protocol
- ETSI TS 102 361-2 Part 2: DMR Voice and Generic Services and Facilities
- ETSI TS 102 361-3 Part 3: DMR Packet Data Protocol
• Synthesized Frequency Generation
• Two Female N-type Antenna Connectors (Rx and Tx)
• Ethernet Port (Network)
• Front mounted USB Port (Service)
• Front mounted microphone port
• Front mounted speaker port
• 9 configurable GPIO/GPI ports
• Power for third party controllers (1 AMP)
• 1.5 PPM Frequency Stability (Temperature AND 1-Year Aging) (VHF and UHF)
• 0.1 PPM Frequency Stability (Temperature AND 1-Year Aging) (800/900 MHz)
• External Reference Capability
• Wireline Capability
• Switching Power Supply operates from 85–264 VAC and frequencies of 47–63 Hz
• Multi-Power Source configurable (AC, DC, or AC with Battery Revert)
• Station Diagnostic Tests-Fixed Set of Tests Factory run upon Start-up
• Physical Dimensions: 5.25" H x 19" W x 16.5" D (133 x 483 x 419 mm) 3RU
• Weight: 40 pounds (19kg) excluding a cabinet or other peripheral equipment
Motorola Network Interface for:
• IP Site Connect
• Repeater Diagnostics and Control (RDAC)
1-3
1-4
Description: Introduction
Third Party Controller Interface:
• Phone Patch
• Multi Coded Squelch Interface (Repeater Panel)
• Tone Remote Adapter
• LTR Trunking
• Passport Trunking
NOTE: The MTR3000 base station/repeater only supports the third party controllers noted above
when it is configured in analog mode.
1.1.3.2 Optional Features
The following are the optional features for the base station/repeater:
• External Pre-selector (Not available for the 800/900 MHz band)
• Antenna Relay
• Duplexer (Not available for the 900 MHz band)
• External Dual Circulator Tray (Not available for the 900 MHz band)
• Integrated Tone Remote Control (with Wireline option)
• Integrated DC Remote Control (with Wireline option)
• Analog Voting (with Wireline option)
In addition, the following features are also included. These features are shipped in a preset
condition, but may be altered through the use of the CPS.
• 16 Tx/Rx Frequencies – Factory Programmed with 1 Tx, 1 Rx
• 12.5 kHz or 25 kHz Operation – Factory Programmed to 12.5 kHz
• 6.25e compliant
• 1 Tx and 1 Rx (PL or DPL) Squelch Code per channel – Factory Programmed to CSQ
• Base Station Identification (BSI) – Factory Programmed as “BLANK” (“BLANK” disables BSI)
• Push-To-Talk (PTT) Priority – Factory Programmed to Repeat Path
Description: Base Station/Repeater Components
1.2
1-5
Base Station/Repeater Components
Figure 1-2 shows the modules and components that comprise a base station/repeater.
2
3
4
1
5
6
16
15
14
13
12
9
11
8
1
7
10
Figure 1-2 MTR3000 Base Station/Repeater Components
1-6
Description: Base Station/Repeater Components
Item No.
Description
1
Top/Bottom Chassis Plate
2
Option Card Bracket
3
Auxiliary I/O Board (FRU)a
4
4-wire Wireline Board
5
Backplane Interface Board
6
Backplane Interface Board Shield
7
Fan Grille (Power Amplifier or Power Supply)
8
Power Amplifier Fan
9
Power Amplifier (FRU)
10
Receiver Module (FRU)
11
Station Control Module (FRU)
12
Station Control Module Front Panel
13
Front Bezel
14
Exciter Module (FRU)
15
Power Supply Fan
16
Power Supply (FRU)
a. Auxiliary I/O Board is not available.
Description: Functional Theory of Operation
1.3
1-7
Functional Theory of Operation
The following functional theory of operation provides an overview of the base station/repeater
circuitry.
1.3.1
Transmitter Circuitry Operation
1.3.1.1 Introduction
The Transmitter Circuitry comprises two modules, the Exciter Module and the Power Amplifier (PA)
Module. These modules combine to generate, modulate, and amplify the RF signal which is
transmitted via the site transmit antenna.
1.3.1.2 Exciter Module Operation
The Exciter Module, which interfaces directly to the SCM, generates a modulated RF signal at the
desired transmit frequency and sends this signal to the PA for amplification. The circuitry operates as
follows.
The transmit synthesizer and Voltage-Controlled Oscillator (VCO) circuitry on the Exciter Module
accept frequency programming data from the SCM via the Serial Peripheral Interface (SPI) bus, and
generate an RF carrier at the specified frequency. The VCO is directly modulated by transmit audio/
data from the SCM. The resulting modulated RF signal (at a level of approximately +12 dBm) is then
fed to the PA.
See Figure 1-5 for the Exciter block diagram.
1.3.1.3 Power Amplifier Module Operation
The PA modules are designed for continuous-duty operation across all bands and power levels. The
actual circuit stages employed in a PA depend on the specific frequency band. All PA modules
contain a driver and final RF amplification stage, a low-pass filter/directional coupler at the output,
and diagnostic and power control circuitry.
The PA modules employ a single internal circulator to protect the PA from transmitter intermodulation
and antenna mismatch (VSWR). They are broadband devices and require no tuning to operate at the
base station/repeater site.
The modulated RF signal from the Exciter Module is delivered to the PA Module and amplified to the
specified output power via the driver and final amplification stages. The gain of the driver stage is
controlled by a control voltage which is derived from power control signals from the SCM and high
VSWR/thermal protection circuitry on the PA output board.
A combination of hardware and software controls are used to regulate the power output level. To set
the power and current limits, the SCM provides software control through a D/A converter connected
to the SPI bus. This control relies on various monitored PA signals which are fed back to the SCM via
an A/D converter (also connected to the SPI bus).
The directional coupler is essentially a calibrated wattmeter which feeds a DC voltage proportional to
the output power to the power control circuitry to serve as the feedback signal in the power control
loop. Under normal operating conditions, the power control circuitry compares this DC voltage from
the directional coupler to a reference voltage from the D/A converter which represents the desired
output power. Based on the comparison, a power control voltage is generated to control the output
power from the PA Module.
1-8
Description: Functional Theory of Operation
The modulated RF signal is amplified by the Driver/Final Module and is output to the site transmit
antenna via a circulator and a harmonic filter/coupler. During excessive output VSWR, the ratio of
the forward and reflected voltages from the directional coupler may be used to reduce, or turn off, the
transmitter power. Additional circuitry is also provided to reduce output power during excessive
current drain and high temperature conditions, and to control the fan.
See Figure 1-6 for the Power Amplifier block diagram.
1.3.2
Receiver Circuitry Operation
1.3.2.1 Introduction
The Receiver Circuitry accepts receive RF signals from the site receive antenna, performs filtering
and dual conversion, and outputs a digitized receive signal to the SCM. The receiver module utilized
has an on-board preselector.
1.3.2.2 Receiver Module Operation
The receive signal is input from the site receive antenna to the receiver module, or to an external
preselector filter (a separate assembly attached to the rear of the base station/repeater which
provides highly selective bandpass filtering). The signal is fed through a low-pass filter, varactortuned preselector (VHF/UHF)/fixed preselector (800/900 MHz), RF amplifier and image filter to the
RF input of the first mixer. The filtered signal is mixed with an injection signal generated by the
receive synthesizer/VCO, resulting in a first i-f (intermediate frequency) signal. The injection signal
frequency is determined by frequency programming data from the SCM via the SPI bus. The specific
frequency of the first i-f depends on the frequency band of the base station/repeater.
The first i-f signal is filtered and input to a custom receiver IC. This component contains circuitry for
generating the second injection signal, mixing down the first i-f to 2.25 MHz, amplification and A/D
(analog-to-digital) conversion of the second i-f signal, resulting in a digitized receive signal. This
signal is fed as differential data to the SCM.
See Figure 1-3 for the Receiver block diagram.
Description: Functional Theory of Operation
1.3.3
1-9
Station Control Module Operation
1.3.3.1 Introduction
The heart of the SCM Module is the two Texas Instruments OMAP1710 processors. Each OMAP
processor contains an ARM Host and a C55 DSP processor. One of these OMAP processor is
dedicated to Receiver DSP operations, while the other OMAP provides for all other operations,
including the transmitter functions.
1.3.3.2 Station Control Module Operation
The SCM controls the entire coordination of the base station/repeater functions. Specifically, the
SCM provides for the following functionalities:
• Contains and runs the preloaded base station/repeater software
• Manages inbound and outbound RF and Audio traffic
• Provides external speaker and microphone ports
• Provides an on-board USB port for local configuring, alignment and diagnostics via the
following applications:
- Customer Programming Software (CPS)
- Tuner application
- Repeater Diagnostic and Control (RDAC) software
- Online Help
• Provides an Ethernet port for IP site, Capacity Plus, Connect Plus, connectivity and remote
RDAC
• Provides GPIO connectivity for third party controller interfaces
• Provides for analog base station/repeater audio connectivity
• Data and Control to the Receiver via the SPI and SSI respectively
• Data and Control to the Exciter via the SPI and SSI respectively
• Control of the PA’s set power via the SPI
• Generates the internal station reference
• Provides control of the front panel status indicators
1-10
1.3.4
Description: Functional Theory of Operation
Wireline Module Operation
1.3.4.1 Introduction
The wireline module serves as the interface between the analog telephone lines and the analog
signals of the station. The wireline module supports both 2-wire and 4-wire configurations. In
general, the wireline processes and routes all wireline audio signals between the station and the
landline equipment (such as consoles). Landline-to-station and station-to-landline audio signals are
connected to the wireline via copper pairs at the rear of the station.
1.3.4.2 Wireline Module Operation
Wireline board is used to connect an analog audio source and sink (such as a console) to the base
station/repeater. The wireline uses an on-board FPGA to perform various DSP audio processing
functions such as tone remote control, filtering, wireline squelch, and echo cancellation.
On the wireline board, audio is converted from the analog domain to the digital domain by a CODEC.
The FPGA can then process the digital audio before sending the data back to the CODEC to be
converted back to analog. Both the Tx and Rx path are processed by the FPGA in this way. Audio
enters and leaves the wireline board as analog.
Rx Audio represents data received over-the-air by the base station/repeater's receiver module. Tx
Audio is analog audio that originates from a remote location that is to be broadcast over-the-air by
the station's transmitter. A single 2-channel (stereo) CODEC is used to perform the A/D and D/A
conversions.
The wireline board provides the connection to an analog audio source/sink (such as a console) to the
MTR3000 Base Station/Repeater. Specifically, the wireline board provides for the following:
• Tone Remote Control
• DC Remote Control
• Analog Voting
• 4-wire balanced audio connection
• 2-wire balanced audio connection
See Figure 1-7 for the Wireline block diagram.
Description: Functional Theory of Operation
1.3.5
1-11
Power Supply Module Operation
Power Supply Modules are offered to handle:
• AC or DC input power
• Base station/repeater requirements
A Power Supply Module is used in a base station/repeater with a Power Amplifier Module (e.g. rated
at 100 W output power).
• AC Input Power
The model generates the +5.1 V, +14.2 V, and +28.6 V operating voltages for the base station/
repeater modules.
These modules have power factor correction and include a connection for battery backup.
Table 1-1. Power Supply Module AC Performance Specification
Input Voltage Range
Output Voltages
Power Factor Correction
85 to 264 VAC
+5.1 V, +14.2 V, and +28.6 V
Provided internally within power supply module.
• DC Input Power
The model accepts a DC input (+21.7 to +32 VDC). The output voltages are:
- the input filtered voltage
- a regulated +5.1 VDC
- a regulated +14.2 VDC.
Table 1-2. Power Supply Module DC Performance Specification
Input Voltage Range
Output Voltages
21.6 to 32 VDC
+5.1 V, +14.2 V, and +28.6 V
1-12
Description: Functional Theory of Operation
Notes
Description: Functional Theory of Operation
1-13
RX_ATTEN
Receiver Front End Circuitry
RX_LO_IN
IOUTL
3.3V
Custom BE
IC
TBPF
LNA
Image Filter
1st IF XTAL
Atten
IF Amp
2ndIF XTAL
16.8 MHz REF
Custom BE IC SPI
18 MHz REF
System
Clock Tank
Circuit
12V
Super
Filter
12V
Aux DAC
10V
VCO_EN
Iout
LOOP
FILTER
VSL_DC
Unequal
Splitter
EN
5V
14.2V
10V
OUT
SL
RX
Custom
SYNTH IC
PREIN
PI PAD
Attenuator
RX VCO1
VCO Buffer
Amplifier
Low Pass
Filter
Driver
Final
Trident
Reset
8V
LPF
3.3V
2.775V
VSL_DC
CPLD SPI
16.8 MHz REF
14.2V
Voltage Reg.
Vcc_CP
System
Clock Loop
Filter
Switched Voltage
Reg.
OP
AMP
IOUTC
Receiver Back End Circuitry
12V
Custom BE IC SSI
RX_IF
IF
RF
LO
RF_RX_IN
LPF
Backplane Connector
Custom Back End
Receiver IC Circuitry
RX BE
2nd LO +
Loop Filter
RX_Standby
Memory Circuitry
EN
OUT
SL
RX VCO2
16.8MHz Ref
EEPROM
PI PAD
Attenuator
EEPROM SPI
Voltage Controlled Oscillator
(VCO)
16.8MHz
Reference
VCO_LD
Inj_Final
CPLD
Metering IC
Synthesizer Circuitry
Buffer
Metering, EEPROM,Synth SPI
VCO_SLV
Abacus_Clock
Abacus 2nd LO
Buffer
Trident Reset
Synth SPI
Figure 1-3 VHF and UHF Receiver Module Functional Block Diagram
ADC Metering Circuitry
Description: Functional Theory of Operation
1-14
RX_ATTEN
Custom Back End
Receiver IC Circuitry
RX BE
2nd LO +
Loop Filter
Receiver Front End Circuitry
Custom BE
IC
LPF
Fixed BPF
Image Filter
LNA
1st IF
Atten
Custom BE IC SSI
RX_IF
IF
RF
LO
RF_RX_IN
Backplane Connector
RX_LO_IN
IOUTL
3.3V
XTAL
IF Amp
2ndIF
XTAL
16.8 MHz REF
Custom BE IC SPI
18 MHz REF
12V
IOUTC
System
Clock Tank
Circuit
10V_RX
12V
Aux DAC
VCO_EN
LOOP
FILTER
Iout
EN
VSL_DC
10V_RX
Unequal
Splitter
OUT
5V
10V
14.2V
SL
RX
Custom
SYNTH IC
PI PAD
Attenuator
PREIN
VCO Buffer
Amplifier 800
VCO RF
Switch
Low Pass
Filter
Driver
Final
Trident
Reset
8V
LPF
3.3V
2.775V
VSL_DC
RX VCO2
EN
CPLD SPI
16.8 MHz REF
10V
RX VCO1
14.2V
Voltage Reg.
Vcc_CP
System
Clock Loop
Filter
Reg.
12V
Super
filter
Switched Voltage
Receiver Back End Circuitry
RX_Standby
10V_RX
Memory Circuitry
OUT
SL
PI PAD
Attenuator
16.8MHz Ref
VCO Buffer
Amplifier 900
EEPROM
EEPROM SPI
Voltage Controlled Oscillator
(VCO)
16.8MHz
Reference
VCO_LD
Inj_Final
CPLD
Metering IC
Synthesizer Circuitry
Buffer
Buffer
Trident Reset
Synth SPI
Figure 1-4 800/900 MHz Receiver Module Functional Block Diagram
Metering, EEPROM,Synth SPI
VCO_SLV
Abacus_Clock
Abacus 2nd LO
ADC Metering Circuitry
Description: Functional Theory of Operation
1-15
Phase-Locked Loop
VCO
Amplifiers
RF Switch Circuitry
VCO_1
U4500
Buffer
Driver
Loop Filter
Final
RF
Switch
PLL
Q4602
U4700
U4701
U4800
VCO_2
Pre-Scalar
SSI Bus
Switch
Driver
SPI Circuitry
- CPLD
- ADC
- NVM
- PLL
Regulators
Bus
Bus
8V
10V
Bus
14.2V
Ex Enable
Backplane Connector
Figure 1-5 Exciter Module Functional Block Diagram
LPF
RF
Output
Connector
Description: Functional Theory of Operation
1-16
RF Board
Final Amplifier
U4120
Q4300
U4920
Driver Amplifier
Q2100
Q2300
Q4400
U4110
U4910
Circulator
RF Input
Connector
U4130
Q4500
U4930
50 Ohm
Load
Q4600
Output
Board
Power
Control
Voltage
Harmonic
Filter
DC Distribution Board
SPI Circuitry
- CPLD
- DAC
- ADC
- NVM
SPI
Buss
Backplane
Connector
(10 Pin)
Power Control
Circuitry
28.6V
Buss
Metering
Circuitry
14.2V
Buss
Power Supply
Connector
Figure 1-6 Power Amplifier Functional Block Diagram
Forward
Power
Detector
Reverse
Power
Detector
RF Output
Connector
Description: Functional Theory of Operation
1-17
FPGA
Line 2
Surge
Protection
...
D/A
A/D
Jumpers
(2-Wire TX/RX)
DC
Remote
Decoder
Wireline
TX Audio
Impedance
Matching
Network
Line 1
Surge
Protection
Decoded DC
Control Signals
(to FPGA)
Impedance
Matching
Network
A/D
Decoded DC
Control Signals
Figure 1-7 Wireline Functional Block Diagram
RX Audio
from Control Board
and J7 DB25
D/A
TX Audio
to Control Board
and J7 DB25
SPI Bus
To/From
Control Board
GPIO Signals
To/From
Control Board
and J7 DB25
A/D
Select 2W/4W
RX
Audio
...
Station Backplane (J4)
CODEC
CODEC
Description: Functional Theory of Operation
1-18
Notes
Installation: Pre-Installation Considerations
2-1
Chapter 2 Installation
2.1
Pre-Installation Considerations
Proper installation ensures the best possible performance and reliability of the base station/repeater
equipment. Pre-installation planning is required. This includes considering the mounting location of
the equipment in relation to input power, antennas, and telephone interfaces. Also to be considered
are site environment conditions, the particular mounting method (several available), and required
tools and equipment.
If this is the first time installing this type of equipment, it is highly recommended that the user read:
• this entire installation section before beginning the actual installation, and
• the Motorola Quality Standards Fixed Network Equipment Installation manual, R56
(6881089E50); specifically refer to the information on ground connection for lightning
protection.
2.1.1
Installation Overview
The following information is an overview for installing the base station/repeater and ancillary
equipment. Step-by-step procedures for each of the major installation tasks are then provided
beginning in "Mechanical Installation" section on page 2-9.
• Plan the installation, paying particular attention to environmental conditions at the site,
ventilation requirements, and grounding and lightning protection.
• Unpack and inspect the equipment.
• Mechanically install the equipment at the site.
• Make necessary electrical and cabling connections, including the following:
- AC input cabling
- Coaxial cables to transmit and receive antennas
- Phone line connections
- System cables
• Perform a post-installation functional checkout test of the equipment to verify proper
installation.
• Proceed to the Optimization procedures to customize the base station/repeater parameters per
customer specifications (e.g., operating frequency, PL, codes, etc.).
2-2
2.1.2
Installation: Pre-Installation Considerations
Environmental Conditions at Intended Installation Site
IMPORTANT:
If the base station/repeater is to be installed in an environment which is
unusually dusty or dirty (and so does not meet the air quality
requirements), the air used to cool the base station/repeater modules
must be treated using appropriate filtering devices. Dust or dirt
accumulating on the internal circuit boards and modules is not easily
removed, and can cause such malfunctions as overheating and
intermittent electrical connections.
The base station/repeater may be installed in a suitable, restricted access, indoor enclosure in any
location suitable for electronic communications equipment, provided that the environmental
conditions do not exceed the equipment specifications for temperature, humidity, and air quality.
These are:
• Operating Temperature Range
-30°C (-22°F) to +60°C (+140°F)
This is the temperature measured in close proximity to the base station/repeater. For example,
if the base station/repeater is mounted in a cabinet, the temperature within the cabinet would be
measured.
• Humidity
Not to exceed 95% relative humidity @ 50°C (122°F).
• Air Quality
For equipment operating in an environmentally controlled environment with the base station(s)/
repeater(s) rack mounted, the airborne particulates level must not exceed 25 µg/m3.
For equipment operating in an area which is not environmentally controlled (base station(s)/
repeater(s) cabinet mounted), the airborne particulates level must not exceed 90 µg/m3.
Installation: Pre-Installation Considerations
2.1.3
2-3
Equipment Ventilation
The base stations/repeaters are equipped with cooling fans that are used to provided forced
convection cooling.
When planning the installation, observe the following ventilation guidelines.
• Mounting the MTR3000 base station/repeater in a cabinet
- Cabinets must be equipped with ventilation slots or openings in the front (for air entry) and
back or side panels (for air to exit). If several base stations/repeaters are installed in a
single cabinet, be sure ventilation openings surround each base station/repeater to allow
for adequate cooling.
- All cabinets must have at least 15 cm (6 in) of open space between the air vents and any
wall or other cabinets. This allows adequate air flow.
- When multiple cabinets (each equipped with several base stations/repeaters) are installed
in an enclosed area, make sure the temperature within each cabinet does not exceed the
recommended/maximum operating temperature of +60°C (+140°F). It may be necessary to
have air-conditioning or other climate-control equipment installed to satisfy the
environmental requirements.
IMPORTANT:
The mounting of only ONE BASE STATION/REPEATER PER CABINET
is recommended. More than one base station/repeater per cabinet will
result in degradation of thermal specifications at high ambient
temperatures.
Appropriate precautions should be taken to ensure that base station/
repeater ambient temperature does not exceed +60°C (+140°F).
If multiple base stations/repeaters are required, AND THERMAL
SPECIFICATION DEGRADATION IS ACCEPTABLE, the following is
recommended when no cabinet fans are used. Up to three base stations/
repeaters can be mounted in a 76.2 cm (30 in) or larger cabinet with two
rack units of spacing between each base station/repeater. This will result
in thermal specification performance of
-30°C (-22°F) to +40°C (+104°F).
• Mounting the MTR3000 base station/repeater in a Rack
Caution
Multiple MTR3000 base stations/repeaters can be mounted in an open rack
without degradation of specification. To maintain thermal specifications for
equipment including the X621BF option, MTR3000 base stations/repeaters
require one rack unit of spacing between base stations/repeaters. For base
stations/repeaters with the X621BF option installed, with no spacing, the base
stations/repeaters' ambient temperature may not exceed +55˚C (+131˚F).
2-4
2.1.4
Installation: Pre-Installation Considerations
AC Input Power Requirements
The base station/repeater is equipped with a switching power supply, this assembly operates from
85 VAC to 264 VAC at 47 to 63 Hz AC input power. A standard 3-prong line cord is supplied to
connect the power supply to the AC source.
It is recommended that a standard 3-wire grounded electrical outlet be used as the AC source.
The AC socket-outlet must be installed near the equipment and must be easily
accessible.
Caution
The outlet must be connected to an AC source capable of supplying a maximum of 1020 VAC. For a
nominal 110/120 VAC input, the AC source must supply 8.5 A and should be protected by a circuit
breaker rated at 15 A. For a nominal 220/240 VAC input, the AC source must supply 4.25 A and
should be protected by a circuit breaker rated at 10 A.
• Requirement for European Union (EU) Countries
Beginning January 1, 2001, input harmonic current specifications were changed for most
electronic telecommunication equipment installed in EU countries. Accordingly, power factor
correction is necessary for MTR3000 base stations/repeaters.
Power Supply model DLN6707 has internal power factor correction.
2.1.5
DC Input Power Requirements
The DC source operates from 21.6 VDC to 32 VDC. This DC source must be located in the same
building as the base station/repeater, and it must meet the requirements of a SELV circuit.
The Power Supply module in the base station/repeater provides DC power to the Receiver, Exciter,
SCM and Power Amplifier module via one or more of the three DC output taps; 28.6 VDC, 14.2 VDC
and 5.1 VDC by using a DC Input cable.
2.1.6
Equipment Mounting Methods
The base station/repeater equipment can be mounted in a rack or cabinet.
The base station/repeater can be mounted:
• in a floor-mount indoor cabinet. Each floor-mount cabinet has front and rear vented doors and
has the capacity to hold a minimum of a single base station/repeater (see thermal limitations
described under Equipment Ventilation), and required ancillary equipment. The larger cabinets
provide additional room for supplementary peripheral equipment.
• in a rack. Open frame racks accept multiple base stations/repeaters and ancillary equipment;
EIA 48.3 cm (19 in) rack configuration.
Installation: Pre-Installation Considerations
2-5
2.1.6.1 Floor-Mount Cabinet
The front, side and top views for all available floor-mount cabinets are shown in Figure 2-1. See
Table 2-1 for the cabinet models and associated description.
Table 2-1. Cabinet Models
Model
Description
THN6700
12 inch indoor cabinet
THN6701
30 inch indoor cabinet
THN6702
46 inch indoor cabinet
Refer to Section 2.1.3. Equipment Ventilation for recommended ventilation clearances.
For improved access to the unit, tray slides are available as shown in Table 2-2.
Table 2-2. Cabinet Slides
WARNING
Model
Description
THN6788
Slides Motorola Cabinet
CLN6833
Slides Non-Motorola Cabinet
Ensure that the cabinet is securely anchored to the floor, thereby avoiding
possible equipment tipping and personal injury. Refer to Mounting FloorMount Cabinets for details on proper cabinet installation.
Big holes
(2)
Station
Support
Brackets (2)
VIEWED FROM
TOP
Small
holes (4)
TOP VIEW
FRONT VIEW
SIDE VIEW
Figure 2-1 Floor-Mount Cabinet
Mounting
Rails (4)
2-6
Installation: Pre-Installation Considerations
2.1.6.2 Modular Racks
See Table 2-3 for the rack models and associated description.
Table 2-3. Rack Models
Model
Description
THN6752
30 inch Modular Rack (16 RK U)
THN6753
45 inch Modular Rack (24 RK U)
THN6754
52 inch Modular Rack (27 RK U)
The side, top and bottom views for all available modular racks are shown in Figure 2-2. The top and
bottom plates are identical, and all dimensions and clearances are common to all racks.
Recommended clearance front and rear is 91.44 cm (36 in) minimum for servicing access. Refer to
Equipment Ventilation for recommended ventilation clearances.
FRU kit CLN6679 (Rack Mount Hardware) is included with each rack model. This allows proper
installation of the MTR3000 base station/repeater within the rack’s center of gravity.
NOTE: This kit includes two rack mount standoffs and eight mounting screws.
Rack Center
Hole
SIDE VIEW
Figure 2-2 Modular Rack
TOP/BOTTOM
VIEW
Installation: Pre-Installation Considerations
2.1.7
2-7
Site Grounding and Lightning Protection
2.1.7.1 Site Grounding Lightning Protection Recommendations
IMPORTANT:
Proper site grounding and lightning protection are vitally important
considerations. Failure to provide proper lightning protection may result
in permanent damage to the radio equipment.
One of the most important considerations when designing a communications site is the ground and
lightning protection system. While proper grounding techniques and lightning protection are closely
related, the general category of site grounding may be divided as follows:
• Electrical Ground
Ground wires carrying electrical current from circuitry or equipment at the site is included in the
category of electrical ground. Examples include the AC or DC electrical power used to source
equipment located at the site, telephone lines, and wires or cables connected to alarms or
sensors located at the site.
• RF Ground
This type of ground is related to the transmission of radio frequency energy to earth ground. An
example of RF grounding is the use of shielding to prevent or at least minimize the leakage of
unwanted RF transmissions from communications equipment and cables.
• Lightning Ground
Providing adequate lightning protection is critical to a safe and reliable communications site.
Telephone lines, RF transmission cables, and AC and DC power lines must all be protected to
prevent lightning energy from entering the site building.
Although a comprehensive coverage of site grounding techniques and lighting protection is not
within the scope of this manual, there are several excellent industry sources for rules and guidelines
on ground and lightning protection at communications sites.
NOTE: Motorola recommends the following reference source:
Motorola Quality Standards Fixed Network Equipment Installation manual, R56
(6881089E50)
2.1.7.2 Equipment Grounding Guidelines
The base station/repeater is equipped with a ground screw located on the rear of the base station/
repeater Power Supply module. This screw is used to connect the base station/repeater to the site
ground point. It is assumed that all telephone lines, antenna cables, and AC or DC power cabling
has been properly grounded and lightning protected by following the rules and guidelines provided in
the above reference.
2-8
2.1.8
Installation: Pre-Installation Considerations
Recommended Tools and Equipment
In addition to the typical compliment of hand tools, the following tools and equipment are
recommended for proper installation of the base station/repeater equipment.
• Tarpaulin or plastic drop cloth or cover surrounding equipment while drilling concrete anchor
holes (for installations where cabinet or rack is being anchored to concrete).
• Vacuum cleaner for removing concrete dust caused by drilling.
2.1.9
Equipment Unpacking and Inspection
The base station/repeater equipment may be shipped by either air freight or electronic van (as
specified by customer), except where noted. The base station/repeater is shipped in a box; the base
station/repeater is positioned between pieces of cushioned corrugated cardboard.
Thoroughly inspect the equipment as soon as possible after delivery. If any part of the equipment
has been damaged in transit, immediately report the extent of the damage to the transportation
company and to Motorola.
NOTE: Antistatic plastic bags should be kept for future shipping/transporting of base station/repeater.
2.1.10 Base Station/Repeater Unpacking
When a base station/repeater is delivered from Motorola, it arrives in suitable packing materials. If
the unpacked equipment is damaged, return it to Motorola in its original packaging.
WARNING
Equipment should be handled in its original packaging until it is delivered
to its final destination. If the equipment is damaged while being moved
without the original packaging, the warranty claim is not valid.
Installation: Mechanical Installation
2.2
2-9
Mechanical Installation
This section describes the procedures to unpack and mechanically install the base station/repeater
equipment. A variety of mounting methods are possible, depending on whether a cabinet or rack (if
any) has been selected to house the base station(s)/repeater(s). Installation procedures are
provided for each of the cabinet and rack types, as well as the slide rail.
IMPORTANT:
2.2.1
Be sure to observe proper electrostatic discharge precautions if modules
must be removed from the base station/repeater.
Unpacking Equipment
2.2.1.1 Introduction
Base station/repeater equipment packing methods vary depending upon the type of rack or cabinet
selected by the customer. Unpacking procedures for these various methods are provided in the
following paragraphs.
IMPORTANT:
The equipment must be immediately inspected for damage after
unpacking, and a report of the extent of any damage made to the
transportation company and to Motorola.
2.2.1.2 Unpacking Base Stations/Repeaters
The base station/repeater is shipped in a carton, cushioned by four plastic inserts at the corners of
the carton.
WARNING
Improper handling of the base station/repeater may cause personal injury
or damage to the base station/repeater. DO NOT pick up the base station/
repeater by holding the Preselector (if so equipped). Use the handles on
the front of the base station/repeater, or the Power Supply and Power
Amplifier casings when picking up the base station/repeater.
2.2.1.3 Front Bezel – Removal and Replacement
Remove the station front bezel from its chassis locking clip by carefully pulling it forward.
Replace the station front bezel by inserting one of the front bezel locking clips into corresponding
latch on the station housing, and carefully pressing the panel on the opposite side until the second
locking clip snaps into place.
Figure 2-3 Removal and Replacement of Front Bezel
2-10
Installation: Mechanical Installation
2.2.1.4 Unpacking Floor-Mount Cabinets
The floor-mount cabinets are shipped mounted to a wooden skid, secured with corrugated corner
braces held by a plastic strap, and covered with a cardboard cover. Unpack the equipment as
described below.
1. Remove cardboard cover from floor-mount cabinet.
2. Cut band as shown.
3. Remove top packing spacer and corrugated corner supports. (See Figure 2-4 for Step 1 to
Step 3.)
Cardboard
Cover
Top Packing
Spacer
Cut This
Band
Corrugated
Corner
Supports
Wooden
Skid
Figure 2-4 Remove Cardboard Cover
Installation: Mechanical Installation
2-11
4. Remove antistatic bag. Do not discard bag, it will be reinstalled to protect equipment during
installation (see Figure 2-5).
Antistatic Bag
Figure 2-5 Remove Antistatic Bag
5. Depending on cabinet type, either open or remove front and rear doors to gain access to the
four (4) bolts securing the floor-mount cabinet to the wooden skid. Remove the bolts and nuts
as shown (see Figure 2-6).
Station
Cabinet
Wooden
Skid
Figure 2-6 Remove Bolts and Nuts
6. Use hoist to lift the floor-mount cabinet from the skid. Remove skid and return floor-mount
cabinet to floor.
7. Replace antistatic bag over base station/repeater (if desired) to provide protection during
installation.
2-12
2.2.2
Installation: Mechanical Installation
Mounting Procedures
2.2.2.1 Introduction
The base stations/repeaters can be mounted in the selected cabinet or rack, and may be installed by
following the procedures below. However, the following three scenarios require special mounting
procedures:
• Customer plans to mount equipment in a rack or cabinet.
• Customer orders two base stations/repeaters in a single rack.
• Customer requires slide rail assembly.
2.2.2.2 Installing Racks
In a typical installation, the rack is bolted to a concrete floor to provide stability.
The following procedure describes the steps necessary to bolt the rack to a concrete floor. Be sure to
check with local authorities to verify that the following procedure conforms to local building codes
and regulations before permanently installing the rack.
1. Carefully align the rack at the desired anchoring location.
2. Use the rack mounting foot as a template and mark the location of the six 19 mm (3/4 in)
diameter mounting holes. All six anchoring positions must be used.
3. Move the rack aside, drill holes in the concrete floor, and install the mounting anchors (RAM
RD-56 anchors recommended) per instructions provided with the anchors. Make sure that
none of the anchors comes in contact with the reinforcing wire mesh buried in the concrete;
the rack must be electrically isolated from any other equipment or materials at the site.
4. Align the rack with the installed anchors and lightly secure the rack to the floor using the
proper mounting hardware. Do not tighten the mounting hardware at this time.
5. Check the vertical plumb of the rack. Also check that the top is level. Use shims (flat washers
or flat aluminum plates) as necessary under the rack mounting foot to achieve vertical plumb
and horizontal level.
6. Tightly secure the rack to the floor anchors making sure that it remains vertically plumb and
horizontally level.
7. After all debris is removed and cement dust is cleared away, remove whatever protective
covering has been placed on the equipment, including the antistatic bag.
Caution
Cement dust from concrete flooring is harmful to electronic equipment and
wiring. Make sure that the rack and any collocated equipment are protected prior
to drilling holes in the concrete floor. Use a tarpaulin, cloth, or plastic sheeting to
cover exposed equipment. (The rack should be already covered with an
antistatic bag; do not remove the bag at this time.) Use a vacuum while drilling
the holes to minimize the spread of concrete dust. Carefully clean up any
accumulated dust and debris from the anchor installation before uncovering the
equipment.
2.2.2.3 Mounting Floor-Mount Cabinets
Each cabinet bottom is pre-drilled with four (4) mounting holes to allow attachment to the site floor. If
installing on a concrete floor, use the cabinet as a template, mark the hole locations, and follow the
procedures above for anchoring equipment racks. If installing on a wooden floor, use lag bolts and
washers (customer supplied) to secure the cabinet to the floor.
Installation: Mechanical Installation
2-13
2.2.2.4 Transferring Equipment from Shipping Container to Rack or Cabinet
As mentioned under Equipment Unpacking and Inspection, a base station/repeater can be shipped
in a box. Upon delivery, the equipment must be removed from the container and transferred to a rack
or cabinet.
NOTE: Cabinets and racks must have mounting rails and hole spacing compatible with EIA Universal
48.3 cm (19 in) specifications. Cabinets must provide adequate ventilation (as detailed under
Equipment Ventilation) and must meet the following criteria:
• 41.3 cm (16.25 in) deep
• 48.3 cm (19 in) wide
• 13.4 cm (5.25 in) high
• Two mounting rails 5 cm (2 in) from front of cabinet with front mounting holes 5.7 cm (2.25 in)
apart (center to center).
Contact Motorola Engineering for specific questions regarding mounting equipment in
customer-supplied cabinets.
2.2.2.5 Installing Slide Rail Assembly in a Motorola Cabinet
Referring to Figure 2-7, perform the following procedure to install slide rail.
On a bench-top, working on one side of the slide rail assembly at a time:
1. Remove the Inner-Slide Rail from the slide assembly (left and right) by depressing the Slide
Locking Latch and sliding the Inner-Slide Rail out from the slide assembly.
2. Install the Inner-Slide Rail (left) on the Power Supply side by:
- removing the two bottom screws from the base station/repeater power supply EMI cover,
and
- installing the Inner-Slide Rail (left) with the supplied screws.
3. Install the Inner-Slide Rail (right) on the PA side using the holes in the PA casing.
4. Attach each Outer-Slide Rail to a Cabinet Bracket with supplied screws.
NOTE: The left and right Cabinet Brackets are identical.
The Locking Tab of each Outer-Slide Rail must face towards the rear of the cabinet.
Working in the cabinet:
5. The cabinet must have a set of vertical cabinet rails in the back as well as the front. If there is
no set in the back, these must be installed. The back rail is installed the same as the front rail,
with the supplied screws.
6. Install each assembled Cabinet Bracket (with attached Outer-Slide Rail) to the appropriate
side of the cabinet. The U-shaped cutout of the Cabinet Bracket must face up.
7. Slide the base station/repeater (with an Inner-Slide Rails mounted on each side) into the
Outer-Slide Rails in the cabinet; an audible snap is heard. Continue sliding the base station/
repeater in until the base station/repeater is fully seated.
8. Secure the base station/repeater to the cabinet front rails with the supplied screws.
2-14
Installation: Mechanical Installation
Cabinet
Rail, front
Direction That
Station Slides
Out
Bracket Screws (4)
Cabinet
Rail, rear
Outer-Slide Rail
Inner-Slide Rail
Mounting Screws (2),
station side
LE
FT
Cabinet
Bracket
Outer-Slide Rail
Mounting Screws;
countersunk (2)
Locking Tab
(towards back of
cabinet)
Inner-Slide Rail
Slide Locking Latch
Figure 2-7 Slide Rail Installation for Motorola Cabinet (Left Side Shown)
NOTE: The left-side slide rail assembly is shown, as viewed from the front of the cabinet. The left side
is a mirror image of the right side.
The middle-slide rail is not shown (for clarity).
Installation: Mechanical Installation
2-15
2.2.2.6 Installing Slide Rail Assembly in a Non-Motorola Cabinet
Referring to Figure 2-8, perform the following procedure to install non-Motorola slide rail.
On a bench-top, working on one side of the slide rail assembly at a time:
1. Remove the Inner-Slide Rail from the slide assembly (left and right) by depressing the Slide
Locking Latch and sliding the Inner-Slide Rail out from the slide assembly.
2. Install the Inner-Slide Rail (left) on the Power Supply side by:
- removing the two bottom screws from the base station/repeater power supply EMI cover,
and
- installing the Inner-Slide Rail (left) with the supplied screws.
3. Install the Inner-Slide Rail (right) on the PA side using the holes in the PA casing.
4. Attach each Outer-Slide Rail to the cabinet Brackets with supplied screws. Only use the lower
slot of each bracket. Leave the screws loose; they will tightened when the brackets are
mounted in the cabinet (in step 7).
NOTE: The left and right Cabinet Bracket sets are identical.
The Locking Tab of each Outer-Slide Rail must face towards the rear of the cabinet.
Working in the cabinet:
5. Install a cage nut in line with clearance hole in Threaded Strip prior to fitting the Front Bracket
to the front cabinet rail. This nut is required for mounting the base station/repeater (in step 9).
The cage nuts are provided with the cabinet.
6. Fit the Short Bracket and Long Bracket (with attached Outer-Slide Rail) to the Front and Rear
Cabinet Rails using the Bracket Mounting Screws and Threaded Strips.
7. Tighten the Outer-Slide Rail hardware after positioning the Outer-Slide Rail front side in line
with the inner surface of the Front Cabinet Rails.
8. Slide the base station/repeater (with an Inner-Slide Rails mounted on each side) into the
Outer-Slide Rails in the cabinet; an audible snap is heard. Continue sliding the base station/
repeater in until the base station/repeater is fully seated.
9. Secure the base station/repeater to the Front Cabinet Rails with the supplied Base Station/
Repeater Mounting Screws.
2-16
Installation: Mechanical Installation
Front Cabinet
Rail
Station
Mounting
Screws; (2)
Install a cage nut in line with clearance
hole in Threaded Strip prior to fitting
bracket to the front cabinet rail.
This nut is required for mounting the
station.
The cage nuts are provided with the
cabinet.
Bracket
Mounting
Screws; (4)
Mount Outer-Slide Rails to
Brackets; ONLY use lower slot
of Brackets.
Rear Cabinet
Rail
Short Bracket
Long Bracket
Outer-Slide
Rail
Direction That
Station Slides
Out
Threaded
Strip
Outer-Slide Rail
Mounting Hardware
sets; (4)
LE
FT
Locking Tab
(towards back of
cabinet)
Inner-Slide Rail
Inner-Slide Rail Mounting
Screws (2), station side
Figure 2-8 Slide Rail Installation for Non-Motorola Cabinet (Left Side Shown)
NOTE: The left-side slide rail assembly is shown, as viewed from the front of the cabinet. The left side
is a mirror image of the right side.
The middle-slide rail is not shown (for clarity).
Installation: Electrical Connections
2.3
2-17
Electrical Connections
After the base station/repeater equipment has been mechanically installed, electrical connections
must be made. This involves making the following connections to:
• power supply,
• antenna coax cables,
• system cables, and
• wireline telephone lines.
IMPORTANT:
When installing option boards, ensure that an Electro-Static Discharge
(ESD) cable is connected (via banana plug) to the hole in the front-right
handle of the base station/repeater when installing option boards.
Otherwise, the option boards may be damaged. See Figure 2-9.
ESD Connect
Figure 2-9 ESD Connect
There are also electrical connections associated with maintenance and troubleshooting of the base
station/repeater. These connectors are located on the front of the SCM (see Service Connections
section for position of these connectors).
Figure 2-10 shows the position of the base station/repeater external connectors located at the rear of
the base station/repeater.
P7 Connector
(Power Amplifier)
J6 Connector
(Wireline)
P10 Connector
(Antenna Relay)
Rx Port
Tx Port
AC Connector
DC Connector
P8 Connector
J7 Auxiliary
(Power Supply)
System Connector
J5 System Connector
Chassis
Ground Screw
Figure 2-10 Location of External Connectors at Rear of Base Station/Repeater
2-18
2.3.1
Installation: Electrical Connections
Power Supply Connections
2.3.1.1 AC Input Power Connection
Do not apply AC power to the base station/repeater at this time. Make sure that
the circuit breaker associated with the AC outlet is turned to OFF.
Caution
The AC socket-outlet must be installed near the equipment and must be easily
accessible.
Each base station/repeater is shipped with an 2.5 m (8 ft) 3-conductor line cord. Figure 2-10 shows
the AC line cord connector. Insert the plug into an appropriate grounded outlet.
The North American line cord is equipped with a NEMA 5–15 plug, intended for 110/120 VAC
operation. The optional European line cord (X189AA) is equipped with a “Schuko” style CEE VII (7)
plug, intended for 220/240 VAC operation. See Table 2-4 for plugs for different countries.
Table 2-4. Plugs for Different Countries
Location
Option Number
Europe
X189AA
U.K.
X162AD
Australia
X191AD
If an alternate line cord is required, obtain a line cord employing “HAR” flexible cord with fittings
approved by the safety testing agency in the end-use country.
2.3.1.2 DC Input Power Connection
For DC-only operation, the DC source power is connected to the base station/repeater through the
battery backup connector shown in Figure 2-10. The operation is also described in
“Battery Connection” on page 2-19. The DC source must be located in the same building as the base
station/repeater, and it must meet the requirements of a SELV circuit.
The DC power cable (CA01520AA) can be used for the base station/repeater.
Ensure that the appropriate voltage is connected with a nominal 28.6 VDC
(21.0 to 32.0 VDC).
WARNING
Installation: Electrical Connections
2-19
2.3.1.3 Ground Connection
The base station/repeater is equipped with a ground screw located on the rear of the base station/
repeater Power Supply module. Connect the ground screw to the site ground point. The size of the
wire used for this connection must be 8 AWG minimum.
Refer to Motorola Quality Standards Fixed Network Equipment Installation
manual, R56 (6881089E50) for complete information regarding lightning
protection.
Caution
The base station/repeater is to be connected to a battery supply that is in
accordance with the applicable electrical codes for the end use country; for
example, the National Electrical Code ANSI/NFPA No. 70 in the U.S.
2.3.1.4 Battery Connection
Battery backup interface offers the capability of connecting to battery backup power in the event of
an AC power line failure.
The battery backup system is connected to the base station/repeater through the red and black
connector mounted at the rear of the base station/repeater. The connector has a cover with the label
stating the below.
CAUTION: See manual before removing cover.
This label directs the technician to read the information provided below:
This battery backup system must have, at a minimum, a disconnect relay controlled by an AC fail
detector.
WARNING
Caution
DO NOT connect a battery directly to the base station/repeater. Damage to
batteries as well as to the base station/repeater may occur. Batteries must
be connected to the base station/repeater through an Argus Technologies
Battery Reverting Charger, Model #010-523-20 (Motorola Model #L1884) for
24 V charging systems. These systems were developed specifically for this
interface and tested by Motorola for proper base station/repeater
operation. Damage resulting from use of any other charging systems will
void the warranty. Refer to qualified sales/service representative for
charger ordering information.
The base station/repeater is to be connected to a battery supply that is in
accordance with the applicable electrical codes for the end use country; for
example, the National Electric Code ANSI/NFPA No.70 for the U.S.
2-20
Installation: Electrical Connections
Cables are supplied with the charging option. Do not make connections directly from the base
station/repeater to the storage battery. Connect as shown in Figure 2-11.
Required input power:
• Voltage - 28.4 VDC
• Current - 13.0 Amps
Both positive and negative terminals must be
protected with appropriate fast acting fuses.
Secondary circuitry must be SELV type and be
installed nearby, preferable in the same building.
All installations shall be carried out by trained
service personnel only.
DC input Connector located at rear of
the station for hooking up the Battery
backup system.
Figure 2-11 Making Connections to Storage Battery
Connector ESD cover must be in place when Battery Backup cable is not in use
– to prevent exposure to live contacts.
Caution
2.3.2
RF Antenna Connections
The transmit and receive antenna RF connections are made using two separate N-type connectors.
Coax cables from the receive and transmit antennas must be connected to the two N-type
connectors. The position of these connectors is shown in Figure 2-10.
In the case where an optional Antenna Relay is used on the base station/repeater, the coax cable
from the single transmit/receive antenna is connected to the middle N-type connector of the Antenna
Relay.
2.3.3
System Cable Connections
System connections are made through one or both of the following connectors:
• Auxiliary System Connector
• System Connector
The location of the Auxiliary System Connector and System Connector on the base station/repeater
rear panel is shown in Figure 2-10.
Table 2-5 provides a description of commonly used J7 Auxiliary System Connector pins.
Table 2-6 to Table 2-8 provides a description of the J5 System Connector pins.
NOTE: (*) Indicates an active low signal.
Installation: Electrical Connections
2-21
Table 2-5. J7 Auxiliary System Connector Pins
Pin #
Pin
Assignment
Input/
Output
I
To/From
Signal Characteristics
1
Tx Audio
2
GPI_1
I/O
J3-C32, J4-A16 Output Logic Low: 0.5 VDC max
Output Logic High: Open Collector with 10K pull-up to 5 V
Input Logic Low: 0 to 0.8 VDC
Input Logic High: 3.0 to 14 VDC
3
Aux Rx Audio
O
J3-A19
4
GPIO_2
I/O
J3-B32, J4-C18 Output Logic Low: 0.5 VDC max
Output Logic High: Open Collector with 10K pull-up to 5 V
Input Logic Low: 0 to 0.8 VDC
Input Logic High: 3.0 to 14 VDC
5
GPIO_10
I/O
J3-A17, J4-B17 Output Logic Low: 0.5 VDC max
Output Logic High: Open Collector with 10K pull-up to 5 V
Input Logic Low: 0 to 0.8 VDC
Input Logic High: 3.0 to 14 VDC
6
GPIO_9
I/O
J3-A13, J4-A4
7
Rx Audio
O
J3-A30, J4-C16 Auxiliary Receiver Audio – Nominal output level is 330 mVrms
with a 60% deviation receive signal. 1000 Ω output impedance.
8
GPIO_6
I/O
J3-A32, J4-B19 Output Logic Low: 0.5 VDC max
Output Logic High: Open Collector with 10K pull-up to 5 V
Input Logic Low: 0 to 0.8 VDC
Input Logic High: 3.0 to 14 VDC
9
GND
10
GPIO_7
I/O
J3-C30, J4-A20 Output Logic Low: 0.5 VDC max
Output Logic High: Open Collector with 10K pull-up to 5 V
Input Logic Low: 0 to 0.8 VDC
Input Logic High: 3.0 to 14 VDC
11
GPI_1*
I/O
J3-C32, J4-A16 Output Logic Low: 0.5 VDC max
Output Logic High: Open Collector with 10K pull-up to 5 V
Input Logic Low: 0 to 0.8 VDC
Input Logic High: 3.0 to 14 VDC
12
GPIO_7
I/O
J3-C30, J4-A20 Output Logic Low: 0.5 VDC max
Output Logic High: Open Collector with 10K pull-up to 5 V
Input Logic Low: 0 to 0.8 VDC
Input Logic High: 3.0 to 14 VDC
13
Tx Data
I
14
Reserved
15
GPIO_3
I/O
J3-B30, J4-A17 Transmit Audio – Nominal input level is 80 mVrms for 60%
deviation with scaling factor set to 100%. 600 Ω input impedance.
Auxiliary Receiver Audio – Nominal output level is 330 mVrms
with a 60% deviation receive signal. 1000 Ω output impedance
Output Logic Low: 0.5 VDC max
Output Logic High: Open Collector with 10K pull-up to 5 V
Input Logic Low: 0 to 0.8 VDC
Input Logic High: 3.0 to 14 VDC
J3-B29, J4-A19 Transmit Data/PL/DPL – Nominal input level is 80 mVrms for
20% deviation with scaling factor set to 100%. 600 Ω input
impedance.
J3-B31, J4-A18 Output Logic Low: 0.5 VDC max
Output Logic High: Open Collector with 10K pull-up to 5 V
Input Logic Low: 0 to 0.8 VDC
Input Logic High: 3.0 to 14 VDC
2-22
Installation: Electrical Connections
Table 2-5. J7 Auxiliary System Connector Pins (Continued)
Pin #
Pin
Assignment
Input/
Output
To/From
Signal Characteristics
16
GND
17
GND
18
GND
19
GND
20
Fused 14.2VDC
21
GPIO_8
22
Emph Tx Audio
23
GPI_4
I/O
J3-A31, J4-A10 Output Logic Low: 0.5 VDC max
Output Logic High: Open Collector with 10K pull-up to 5 V
Input Logic Low: 0 to 0.8 VDC
Input Logic High: 3.0 to 14 VDC
24
GPIO_5
I/O
J3-C31, J4-B10 Output Logic Low: 0.5 VDC max
Output Logic High: Open Collector with 10K pull-up to 5 V
Input Logic Low: 0 to 0.8 VDC
Input Logic High: 3.0 to 14 VDC
25
GPIO_6
I/O
J3-A32, J4-B19 Output Logic Low: 0.5 VDC max
Output Logic High: Open Collector with 10K pull-up to 5 V
Input Logic Low: 0 to 0.8 VDC
Input Logic High: 3.0 to 14 VDC
1 Amp max
I/O
I
J3-C29, J4-A12 Output Logic Low: 0.5 VDC max
Output Logic High: Open Collector with 10K pull-up to 5 V
Input Logic Low: 0 to 0.8 VDC
Input Logic High: 3.0 to 14 VDC
J3-A29, J4-B12 Emphasized Transmit Audio – Nominal input level is 80 mVrms
for 60% deviation with scaling factor set to 100%. 600 Ω input
impedance.
Installation: Electrical Connections
2-23
Table 2-6. J5 System Connector, Row A Pins
Pin #
Pin Assignment
Input/
Output
To/From
Signal Characteristics
1
Reserved
O
–
–
2
Reserved
O
J1-C31, J2-C31
–
3
N/C
O
–
–
4
AC Fail
O
P8-5, J1-C29, J2-C29, J3-C24 TTL output, active high
5
Reserved
I
J1-C28, J2-C28
–
6
Reserved
I
J1-C27, J2-C27
–
7
Reserved
I
J1-C26, J2-C26
–
8
Reserved
I
J1-C25, J2-C25
–
9
Reserved
I
J1-C24, J2-C24
–
10
Reserved
O
J1-C23, J2-C23
–
11
Reserved
O
J1-C22, J2-C22
–
12
Reserved
O
J1-B25, J2-B25
–
13
Antenna Relay
O
P10-1, J3-C26
OCO, 200 mA, active low
14
Reserved
O
J3-C19
–
15
N/C
–
–
–
16
N/C
–
–
–
17
Reserved
I
J3-C16
–
18
Accessory 14.2 VDC
O
P8 pins 3, 4 (through F2)
+14.2 VDC
19
GND
–
Station ground
–
20
5 VDC
O
P8 pins 7, 8
+5.1 ± 0.25 VDC
21
Reserved
O
J3-C12
–
22
Spare
I
J1-C11, J2-C11
23
N/C
–
–
–
24
N/C
–
–
–
25
N/C
–
–
–
26
Ext PTT-
I
J1-C7, J2-C7
Opto-Isolated PTT Input
27
GND
–
Station ground
–
28
Reserved
I/O
J1-C6, J2-C6
–
29
Ext PTT+
I
J1-C5, J2-C5
Opto-Isolated PTT Input
30
AC Fail Relay (NO)
O
J1-C4, J2-C4
Normally Open Relay Contact
31
GND
–
Station ground
–
32
Accessory 14.2 VDC
O
P8 pins 3, 4 (through F2)
+14.2 VDC
2-24
Installation: Electrical Connections
Table 2-7. J5 System Connector, Row B Pins
Pin #
Pin Assignment
Input/
Output
To/From
Signal Characteristics
1
Reserved
O
J1-B32, J2-B32
–
2
Reserved
O
J1-B31, J2-B31
–
3
Carrier Operated Relay (Common)
O
J1-B30, J2-B30
Common Relay Contact
4
Carrier Detect Switch
O
J1-B29, J2-B29, J3-B24
TTL output, active high
5
Reserved
I
J1-B28, J2-B28
–
6
Reserved
I
J1-B27, J2-B27
–
7
Reserved
I
J1-B26, J2-B26
–
8
Reserved
I
J3-B25
–
9
Reserved
I/O
J1-B24, J2-B24
–
10
N/C
N/C
–
11
Reserved
I/O
J1-B22, J2-B22
–
12
Reserved
I/O
J1-B23, J2-B23
–
13
Reserved
–
N/C
–
14
Reserved
I
J1-B19, J2-B19, J3-B19, J7-14 –
15
GND
–
Station ground
–
16
N/C
–
–
–
17
N/C
–
–
–
18
Accessory 14.2 VDC
O
P8 pins 3, 4 (through F2)
+14.2 VDC
19
GND
–
Station ground
–
20
5 VDC
O
P8 pins 7, 8
+5.1 ± 0.25 VDC
21
Reserved
O
J1-B12
–
22
N/C
–
–
–
23
N/C
–
–
–
24
N/C
–
–
–
25
N/C
–
–
–
26
N/C
I
J1-B7, J2-B7
–
27
GND
–
Station ground
–
28
Reserved
O
J4-C10
–
29
AC Fail Relay (Common)
O
J1-B4, J2-B4
Common relay contact
30
Reserved
O
J4-A9
–
31
GND
–
Station ground
–
32
Accessory 14.2 VDC
O
P8 pins 3, 4 (through F2)
+14.2 VDC
–
Installation: Electrical Connections
2-25
Table 2-8. J5 System Connector, Row C Pins
Pin #
Pin Assignment
Input/
Output
To/From
Signal Characteristics
1
Reserved
O
J1-A32, J2-A32
–
2
Reserved
O
J1-A31, J2-A31, J3-A26
–
3
Carrier Operated Relay (Normally
Open)
O
J1-A30, J2-A30
Normally Open Relay Contact
4
Reserved
O
J1-A29, J2-A29
–
5
Reserved
I
J1-A28, J2-A28
–
6
Reserved
I
J1-A27, J2-A27, J3-B26
–
7
Reserved
I
J1-A26, J2-A26
–
8
Reserved
I
J3-A25
–
9
RF Relay Control Out (Auxiliary I/O)
O
J1-B5, J2-B5
OCO, 200 mA, 40 V, active
high
10
Ext PTT* Out (Auxiliary I/O)
I
J1-A23, J2-A23, J3-A23
TTL input
11
RSSI
O
J1-A22, J2-A22, J3-A22
Typically 0.5 VDC for -120
dBm to 4.5 VDC for -40 dBm
carrier. Variation with carrier
level at approximately 50 mV/
dBm.
12
Reserved
I/O
J1-A24, J2-A24
–
13
N/C
–
–
–
14
Aux Rx Audio
O
J1-A19, J2-A19, J3-A19, J7-3 –
15
GND
–
Station ground
–
16
GND
–
Station ground
–
17
Reserved
O
J1-A16, J2-A16, J3-A16
–
18
Accessory 14.2 VDC
O
P8 pins 3, 4 (through F2)
+14.2 VDC
19
GND
–
Station ground
–
20
5 VDC
O
P8 pins 7, 8
+5.1 ± 0.25 VDC
21
Reserved
O
J3-A12
–
22
N/C
–
–
–
23
N/C
–
–
–
24
GPIO_10
J1-A9, J2-A9, J3-A17
TTL input/output
25
N/C
–
–
–
26
N/C
–
–
–
27
GND
–
Station ground
–
28
Reserved
I
J4-C12
–
29
GPIO_9
J1-A4, J2-A4, J3-A13
TTL input/output
30
Reserved
I
J4-A11
–
31
GND
–
Station ground
–
32
Accessory 14.2 VDC
O
P8 pins 3, 4 (through F2)
+14.2 VDC
I/O
I/O
2-26
2.3.4
Installation: Electrical Connections
Base Station/Repeater Maintenance Connections
Table 2-9 provides a description of the maintenance connections located on the front of the SCM.
Table 2-9. SCM Connectors
Connector
Name
Service
Connector
Type
USB Type B
Purpose
Service Computer connection. This connector is accessible with front
cover in place. VBUS (+5 V) is not provided on the USB connector.
Microphone connection. Compatible with microphone GMMN4063 or
equivalent (older model, GMN6147). This connector is accessible with
front cover in place.
Mic
Speaker
RJ45 (8 Pin)
4P4C
NOTE: The Mic port is only supported in analog mode regardless of the
microphone used. For older microphone model (GMN6147), the three
control buttons for speaker volume control, Rx monitor and Intercom
control functions are not supported.
Speaker connection. Compatible with Service Speaker HSN1006 or
equivalent (older model, HSN1000). This connector is accessible with
front cover in place.
NOTE: The Speaker port is only supported in analog mode regardless of
the speaker used.
Ethernet
RJ45 (8 Pin)
(Vertical)
Network connection to Trunking Controller. The front cover must be
removed to access this connector. An optional extension cable can also
be used to route this input to the rear of the station. Alternatively, the
Ethernet cable can also be routed out through the slots provided in the
front panel.
Ext Ref
BNC (Vertical)
External reference input. The front cover must be removed to access this
connector. Alternatively, an extension cable can be used to route this input
to the rear of the station.
Installation: Post Installation Checklist
2.4
2-27
Post Installation Checklist
After the base station/repeater equipment has been mechanically installed and all electrical
connections have been made, power may now be applied and the base station/repeater checked for
proper operation.
2.4.1
Applying Power
Before applying power to the base station/repeater, make sure all boards are securely seated in the
appropriate connectors on the backplane interface board and that all RF cables are securely
connected.
Turn ON the circuit breaker controlling the AC outlet that is supplying power to the base station/
repeater Power Supply Module, or switch on the DC-supply to a base station/repeater with a
DC Power Supply Module.
• Changing Fuse
To replace the base station/repeater fuse for failure, perform the following steps:
1. Turn off base station/repeater power at source (e.g., AC breaker).
2. Remove fuse cover plate located on the backplane interface board shield by unscrewing
one M4 screw.
3. Pull defective fuse carefully with a pair of small needle nose pliers.
4. Replace new fuse (6583049X16) carefully with a pair of small needle nose pliers.
For continued protection of the base station/repeater against risk of fire, replace
the fuse only with the same type and rating of fuse.
Caution
5. Restore power to the base station/repeater.
2.4.2
Verifying Proper Operation
Operation of the base station/repeater can be verified by:
• observing the state of the six LEDs located on the front bezel, and
• exercising radio operation.
Caution
Some base station/repeater components can become extremely hot during base
station/repeater operation. Turn off all power to the base station/repeater, and
wait until sufficiently cool before touching the base station/repeater.
2-28
Installation: Post Installation Checklist
2.4.2.1 Front Bezel LEDs
After booting up the base station/repeater, the six LEDs (Power/Status, Tx Slot 1, Tx Slot 2, Rx Slot
1, Rx Slot 2 and the Mode LEDs) flashes in unison.
The general status and condition of the MTR3000 Base Station/Repeater can be obtained by
observing the eight LED indicators on the front bezel. Table 2-10 shows the LED symbols and their
meaning while Table 2-11 identifies the information conveyed via the LED indicators.
Table 2-10. Front Bezel LED indicators
LED
Definition
Status
Tx Slot 1 (for label number 1)
Tx Slot 2 (for label number 2)
Rx Slot 1 (for label number 1)
Rx Slot 2 (for label number 2)
Mode
Ethernet Link
Reference
Installation: Post Installation Checklist
2-29
Table 2-11. MTR3000 Software and Hardware Controlled LEDs
LED Function Name
LED Color
Power/Status,
Tx Slot 1, Tx Slot 2,
Rx Slot 1, Rx Slot 2
Amber
Mode
Blue
Power/Status
Status Indication
Flashing
Station booting up
Off
Off
Station Off
Green
Flashing
Station Operating Normally, with DC power
Solid
Station Operating Normally, with AC power
Flashing
Station Operational – Minor Alarm
Solid
Station Not Operational – Major Alarm
Flashing
Station in Service Mode
Solid
Station is Disabled (Dekeyed)
Off
Off
Transmitter is not transmitting
Green
Solid
Transmitter is transmitting
Flashing
Transmitter is transmitting, but at reduced power
Red
Amber
Tx Slot 1
Tx Slot 2
LED State
Rx Slot 1
Rx Slot 2
Off
Off
Receiver qualifier has not been met
Green
Solid
Receiver qualifier has been met
Mode
Off
Off
Analog Mode (FM)
Blue
Solid
Digital Mode (2 Slot TDMA, 4FSK)
Blue
Flashing
DMM feature is active, but no calls are currently
being processed.
Off
Off
No Ethernet connection
Green
Solid
Linked
Flashing
Network traffic
Off
Off
No external reference is present
Green
Solid
Training process is completed and the calibration
data has been written to the EEPROM, or an
external reference is present after training (which
the base station/repeater has phase locked to).
Amber
Solid
Locked to external reference, and training is in
progress
Ethernet Link
Reference
2-30
Installation: Optimization
NOTE: The RDAC application will be needed when the Status LED is red (solid or flashing). This
status indicates a minor or major alarm. The RDAC application is used to identify the specific
alarm and probable diagnosis to aid in identifying the FRU at fault.
If the Reference LED remains amber for more than ten minutes during the alignment, then
verify the integrity of the source used to train the base station/repeater’s internal reference. If
the integrity of the source is verified to be good, then the SCM will need to be replaced.
2.4.2.2 Exercising Radio Operation
This may be carried out when an external speaker and microphone are connected to the SCM.
The kit number for the speaker is HSN1006. The external speaker requires an adaptor cable with the
part number 0185180U01.
Using a speaker other than the recommended HSN1006 or older HSN1000 may
result in the station blowing a fuse.
Caution
The kit number for the noise-cancelling microphone is GMMN4063 or older GMN6147.
2.5
Optimization
After the base station/repeater and ancillary equipment have been mechanically installed, properly
cabled, and power applied, the equipment must then be optimized; that is, before placing the base
station/repeater in operation. Optimizing is performed through the Customer Programming Software
(CPS) with the kit number, RVN5115 and a USB cable (NAG: CLN8665A, EMEA: DDN9957) is
required.
After the base station/repeater is operational, the base station/repeater’s codeplug data must be
copied to a PC-compatible computer.
2.5.1
Optimizing Tasks
Optimization involves the following tasks:
1. Reading the base station/repeater codeplug from the base station/repeater (this ensures a
match between the base station/repeater serial number (resident in the codeplug) and the
serial number (part of the customized base station/repeater codeplug data) that is written
back to the base station/repeater (see task 5).
2. Customizing the base station/repeater codeplug and saving the data to the base station/
repeater.
3. Aligning the base station/repeater for:
- Modulation Limit
- Speaker Level
- Station Reference
- MTR2000 PA Calibration
- Receiver Squelch Adjust
- Wireline Transmit Level
Installation: Installing Base Station/Repeater Hardware Options
2-31
- Wireline Squelch Level
- Wireline Receive Level
- Wireline Rx Equalization
4. Performing post-optimization procedures.
5. Writing the customized codeplug to the base station/repeater codeplug.
For details on these tasks, refer to the Customer Programming Software (CPS) Online Help.
WARNING
2.5.2
Copying Base Station/Repeater Codeplug Date To a PC-compatible Computer
Caution
2.6
A minimum of a 10-minute warm up period prior to aligning the station reference
is required with the 800/900 MHz base station/repeater. Failure to comply will
result in an inaccurate reference frequency alignment.
A copy of each base station/repeater’s codeplug data must be made on an IBMPC compatible computer. This is done through the Customer Programming
Software (CPS).
Installing Base Station/Repeater Hardware Options
When a base station/repeater is ordered with an Antenna Relay or External Preselector option, the
respective module is attached to the base station/repeater when delivered.
When a base station/repeater is ordered with an External Double Circulator option, this circulator is
provided in a peripheral tray.
In the case where an option is later added to the base station/repeater, it can be installed according
to the information provided in the Ancillary Equipment sections of the appropriate Instruction manual.
Also refer to the Troubleshooting section for information on tuning the External Preselector.
2-32
Installation: Installing Base Station/Repeater Hardware Options
Notes
Base Station/Repeater Operation: Description
3-1
Chapter 3 Base Station/Repeater Operation
3.1
Description
This section describes the LED indicators and connectors provided on the base station/repeater.
The set of LEDs indicate the operational status of the base station/repeater.
There are two sets of connectors for devices external to the base station/repeater:
• One set connects to external devices to enable full operation of the base station/repeater.
These are located at the back of the base station/repeater.
• Another set connects to external devices for servicing the base station/repeater. These are
located on the SCM.
3.1.1
LED Indicators
A set of eight LEDs is located on the base station/repeater front bezel. The position of the eight LEDs
on the front bezel is shown in Figure 3-1. These LEDs indicate the status of the base station/repeater
during normal operation.
Figure 3-1 Front Bezel LEDs and Connectors
For further information on the states of these LEDs, refer to “Front Bezel LEDs” on page 2-28.
3.1.2
External Device Connections
Refer to Section 2.3: Electrical Connections for the position of the base station/repeater external
connectors and line cord, located on the back panel.
The connection to external devices on the back panel is the J7 Auxiliary System Connector. The
connector is a 25-pin connector used for connecting to an external device such as a trunking
controller, tone remote adaptor or phone patch. See Figure 2-10 for the location of the connector.
The connection to external devices on the front of the SCM is the BNC connector. The connector
allows the base station/repeater to be connected to a 5 MHz or 10 MHz external reference signal.
Figure 3-1 shows the location of the connectors on the front of the SCM and Figure 3-2 shows the
position of the BNC connector on the SCM.
3-2
3.1.3
Base Station/Repeater Operation: Description
Service Connections
Service ports and LEDs are located on the front of the SCM.
Figure 3-2 shows the position of the connectors on the SCM.
Ethernet Connector
USB Connector
5/10 MHz External
Reference Signal
Service Speaker
Connector
Service Microphone
Connector
Figure 3-2 SCM Connectors
The service ports include connectors for:
• 5/10 MHz External Reference Signal
• Ethernet Connector
• Service Speaker Connector
• USB Connector
• Service Microphone Connector
EMEA Regional Warranty, Service and Technical Support: Warranty and Service Support
Appendix A
A.1
A-1
EMEA Regional Warranty, Service and
Technical Support
Warranty and Service Support
Motorola offers long term support for its products. This support includes full exchange and/or repair
of the product during the warranty period, and service/ repair or spare parts support out of warranty.
Any "return for exchange" or "return for repair" by an authorized Motorola Dealer must be
accompanied by a Warranty Claim Form. Warranty Claim Forms are obtained by contacting an
Authorized Motorola Dealer.
A.1.1 Warranty Period and Return Instructions
The terms and conditions of warranty are defined fully in the Motorola Dealer or Distributor or
Reseller contract. These conditions may change from time to time and the following notes are for
guidance purposes only.
In instances where the product is covered under a "return for replacement" or "return for repair"
warranty, a check of the product should be performed prior to shipping the unit back to Motorola.
This is to ensure that the product has been correctly programmed or has not been subjected to
damage outside the terms of the warranty.
Prior to shipping any radio back to the appropriate Motorola warranty depot, please contact
Customer Resources (Refer to page A-3). All returns must be accompanied by a Warranty Claim
Form, available from your Customer Services representative. Products should be shipped back in
the original packaging, or correctly packaged to ensure no damage occurs in transit.
A.1.2 After Warranty Period
After the Warranty period, Motorola continues to support its products in two ways.
1. Motorola's Managed Technical Services (MTS) offers a repair service to both end users and
dealers at competitive prices.
2. MTS supplies individual parts and modules that can be purchased by dealers who are
technically capable of performing fault analysis and repair.
A-2
A.2
EMEA Regional Warranty, Service and Technical Support: European Radio Support Centre (ERSC)
European Radio Support Centre (ERSC)
The ERSC Customer Information Desk is available through the following service numbers:
Austria:
08 00 29 75 41
Italy:
80 08 77 387
Belgium:
08 00 72 471
Luxemburg:
08 00 23 27
Denmark:
80 88 05 72
Netherlands:
08 00 22 45 13
Finland:
08 00 11 49 910
Norway:
80 01 11 15
France:
08 00 90 30 90
Portugal:
08 00 84 95 70
Germany:
08 00 18 75 240
Spain:
90 09 84 902
Greece:
00 80 04 91 29 020
Sweden:
02 07 94 307
UK:
08 00 96 90 95
Switzerland:
08 00 55 30 82
Ireland:
18 00 55 50 21
Iceland:
80 08 147
Or dial the European Repair and Service Centre:
Tel: +49 30 6686 1555
Please use these numbers for repair enquiries only.
A.3
Piece Parts
Some replacement parts, spare parts, and/or product information can be ordered directly.
If a complete Motorola part number is assigned to the part, it is available from Motorola Radio
Products and Solutions Organization (RPSO). If no part number is assigned, the part is not normally
available from Motorola. If the part number is appended with an asterisk, the part is serviceable by
Motorola Depot only. If a parts list is not included, this generally means that no user-serviceable
parts are available for that kit or assembly.
Orders for replacement parts, kits and assemblies should be placed directly on Motorola's local
distribution/dealer organization or via Motorola Online at: http://emeaonline.motorola.com
* The Radio Products and Solutions Organization (RPSO) was formerly known as the Radio
Products Services Division (RPSD) and/or the Accessories and Aftermarket Division (AAD).
EMEA Regional Warranty, Service and Technical Support: Technical Support
A.4
A-3
Technical Support
Motorola Product Services is available to assist the dealer/distributors in resolving any malfunctions
which may be encountered.
A.5
North Europe - Stephen Woodrow
Telephone: +44 (0) 1256 488 082
Fax: +44 01256 488 080
Email: [email protected]
Central and East Europe - Siggy Punzenberger
Telephone: +49 (0) 6128 70 2342
Fax: +49 (0) 6128 95 1096
Email: [email protected]
Russia and Belarus - Andrey Nagornykh
Telephone: +7 495 787 8910
Fax: +7 495 785 0185
Email: [email protected]
Germany - Customer Connect Team
Telephone: +49 (0) 30 6686 1539
Fax: +49 (0) 30 6686 1916
Email: [email protected]
Middle East and Africa - Wayne Holmes
Telephone: +49 (0)6126 957 6237
Fax: +49 (0)6126 957 6826
Email: [email protected]
Italy - Ugo Gentile
Telephone: +39 02 5220 7825
Fax: +39 02 5220 7810
Email: [email protected]
France - Armand Roy
Telephone: +33 1 6935 7868
Fax: +33 1 6935 7808
Email: [email protected]
France - Laurent Irrmann
Telephone: +33 1 6935 7866
Fax: +33 1 6935 7808
Email: [email protected]
Further Assistance From Motorola
You can also contact the Customer Help Desk through the following web address.
http://www.motorola.com/feedback
A-4
EMEA Regional Warranty, Service and Technical Support: Further Assistance From Motorola
Notes
Commercial Warranty: Limited Warranty
Appendix B
B-1
Commercial Warranty
NOTE: This is only applicable to LACR and NAG.
Limited Warranty
MOTOROLA COMMUNICATION PRODUCTS
I. What This Warranty Covers And For How Long
MOTOROLA INC. (“MOTOROLA”) warrants the MOTOROLA manufactured Communication
Products listed below (“Product”) against material defects in material and workmanship under normal
use and service for the period of time from the date of purchase as scheduled below:
Base Station/Repeater
Two (2) Years
Product Accessories
One (1) Year
Motorola will at its option and at no charge either repair the defective Product (with new or
reconditioned parts), replace it (with a new or reconditioned Product), or refund the purchase price of
the defective Product during the warranty period provided it is returned before the expiration of the
warranty period and in accordance with the terms of this warranty. Replaced Product, parts or boards
are warranted for the balance of the original applicable warranty period. All replaced Product, parts
of boards shall become the property of MOTOROLA.
This express limited warranty is extended by MOTOROLA to the original end user purchasing the
Product for commercial, industrial or governmental use only and is not assignable or transferable to
any other party. This is the complete warranty for the Product manufactured by MOTOROLA.
MOTOROLA assumes no obligations or liability for additions or modifications to this warranty unless
made in writing and signed by an officer of MOTOROLA. Unless made in a separate agreement
between MOTOROLA and the original purchaser, MOTOROLA does not warrant the installation,
maintenance or service of the Product.
MOTOROLA is not responsible in any way for any ancillary equipment not furnished by MOTOROLA
which is attached to or used in connection with the Product, or for operation of the Product with any
ancillary equipment, and all such equipment is expressly excluded from this warranty. Because each
system which may use the Product is unique, MOTOROLA disclaims liability for range, coverage, or
operation of the system in part or as a whole under this warranty.
B-2
Commercial Warranty: Limited Warranty
II. General Provisions
This warranty sets forth the full extent of MOTOROLA'S responsibilities regarding the Product.
Repair, replacement or refund of the purchase price, at MOTOROLA'S option, is the exclusive
remedy. THIS WARRANTY IS THE COMPLETE WARRANTY FOR THE PRODUCT AND IS GIVEN
IN LIEU OF ALL OTHER WARRANTIES. MOTOROLA DISCLAIMS ALL OTHER WARRANTIES OR
CONDITIONS, EXPRESS OR IMPLIED, INCLUDING WITHOUT LIMITATION, IMPLIED
WARRANTIES OF MERCHANTABILITY AND FITNESS FOR A PARTICULAR PURPOSE. IN NO
EVENT SHALL MOTOROLA BE LIABLE FOR DAMAGES IN EXCESS OF THE PURCHASE PRICE
OF THE PRODUCT, FOR ANY COMMERCIAL LOSS; INCONVIENCE; LOSS OF USE, TIME,
DATA, GOOD WILL, REVENUES, PROFITS OR SAVINGS; OR OTHER SPECIAL, INCIDENTAL,
INDIRECT, OR CONSEQUENTIAL DAMAGES IN ANY WAY RELATED TO OR ARISING FROM
THE SALE OR USE OF THE PRODUCT.
III. How To Get Warranty Service
You must provide proof of purchase (bearing the date of purchase and Product item serial number)
in order to receive warranty service and deliver or send the Product item, transportation and
insurance prepaid, to an authorized warranty service location before the expiration of the warranty
period. Warranty service will be provided by Motorola through one of its authorized warranty service
locations. If you first contact the company which sold you the Product, it can facilitate your obtaining
warranty service. You can also open a Contact Us case on Motorola Online
(http://www.motorola.com/businessonline) for LACR, or call Motorola at 1-888-567-7347 US/Canada
for NAG.
IV. What This Warranty Does Not Cover
This warranty does not cover:
A. Defects or damage resulting from use of the Product in other than its normal customary or
authorized manner.
B. Defects or damage from misuse, accident, liquid, lightning, neglect or act of God.
C. Defects or damage from testing, maintenance, installation, alteration, modification, or
adjustment not provided or authorized in writing by MOTOROLA.
D. Breakage or damage to antennas unless caused directly by defects in material or
workmanship.
E. A Product subjected to unauthorized Product modifications, disassemblies or repairs
(including, without limitation, the addition to the Product of non-Motorola supplied equipment)
which adversely affect performance of the Product or interfere with Motorola's normal
warranty inspection and testing of the Product to verify any warranty claim.
F.
Product which has had the serial number removed or made illegible.
G. Freight costs to ship the product to the repair depot.
H. Batteries (because they carry their own separate limited warranty) or consumables.
I.
Customer’s failure to comply with all applicable industry and OSHA standards.
J.
A Product which, due to illegal or unauthorized alteration of the software/firmware in the
Product, does not function in accordance with MOTOROLA’s published specifications or the
FCC type acceptance labeling in effect for the Product at the time the Product was initially
distributed from MOTOROLA.
K. Scratches or other cosmetic damage to Product surfaces that does not affect the operation of
the Product.
Commercial Warranty: Limited Warranty
L. Normal and customary wear and tear.
V.
Governing Law
This Warranty is governed by the laws of the State of Illinois, USA.
B-3
B-4
Commercial Warranty: Limited Warranty
Notes
LACR Replacement Parts Ordering and Motorola Service Centers: Replacement Parts Ordering
Appendix C
C.1
C-1
LACR Replacement Parts Ordering and
Motorola Service Centers
Replacement Parts Ordering
C.1.1 Basic Ordering Information
When ordering replacement parts or equipment information, the complete identification number
should be included. This applies to all components, kits, and chassis. If the component part number
is not known, the order should include the number of the chassis or kit of which it is a part, and
sufficient description of the desired component to identify it.
C.1.2 Motorola Online
Motorola Online users can access our online catalog at http://www.motorola.com/businessonline
To register for online access:
• Have your Motorola Customer number available.
• Please go to http://www.motorola.com/businessonline and click on “Sign Up Now.”
• Complete form and submit it.
• Contact your BDM to complete set-up and it will be done within 24 to 48 hours.
C.2
Motorola Service Centers
C.2.1 Servicing Information
If a unit requires further complete testing, knowledge and/or details of component level
troubleshooting or service than is customarily performed at the basic level, please send the radio to
a Motorola Service Center as listed below.
C.2.2 Motorola de México, S.A.
Bosques de Alisos 125
Col. Bosques de las Lomas CP 05120
México D.F.
México
Tel: (5) 257-6700
C.2.3 Motorola de Colombia, Ltd.
Carrera 7 No. 71-52
Bogota - Colombia
Tel: (571) 376-6990
C-2
LACR Replacement Parts Ordering and Motorola Service Centers: Motorola Service Centers
Notes
NAG Replacement Parts Ordering and Motorola Service Centers: Replacement Parts Ordering
Appendix D
D.1
D-1
NAG Replacement Parts Ordering and
Motorola Service Centers
Replacement Parts Ordering
D.1.1 Basic Ordering Information
When ordering replacement parts or equipment information, the complete identification number
should be included. This applies to all components, kits, and chassis. If the component part number
is not known, the order should include the number of the chassis or kit of which it is a part, and
sufficient description of the desired component to identify it. The MOTOTRBO MTR3000 Base
Station/Repeater Basic Service Manual (Motorola publication part number 68007024096) includes
complete parts lists and part numbers.
D.1.2 Motorola Online
Motorola Online users can access our online catalog at
http://www.motorola.com/businessonline
To register for online access, please call 1-800-422-4210 (for U.S. and Canada Service Centers
only). International customers can obtain assistance at http://www.motorola.com/businessonline.
D.1.3 Mail Orders
Mail orders are only accepted by the U.S. Federal Government Markets Division (USFGMD):
Motorola Inc.
7031 Columbia Gateway Drive
3rd Floor - Order Processing
Columbia, MD 21046
U.S.A.
D.1.4 Telephone Orders
Radio Products and Solutions Organization*
(United States and Canada)
7:00 AM to 7:00 PM (Central Standard Time)
Monday through Friday (Chicago, U.S.A.)
1-800-422-4210
1-847-538-8023 (United States and Canada)
U.S. Federal Government Markets Division (USFGMD)
1-877-873-4668
8:30 AM to 5:00 PM (Eastern Standard Time)
D-2
NAG Replacement Parts Ordering and Motorola Service Centers: Motorola Service Centers
D.1.5 Fax Orders
Radio Products and Solutions Organization*
(United States and Canada)
1-800-622-6210
1-847-576-3023 (International)
USFGMD
(Federal Government Orders)
1-800-526-8641 (For Parts and Equipment Purchase Orders)
D.1.6 Parts Identification
Radio Products and Solutions Organization*
(United States and Canada)
1-800-422-4210
D.1.7 Product Customer Service
Radio Products and Solutions Organization (United States and Canada)
1-800-927-2744
* The Radio Products and Solutions Organization (RPSO) was formerly known as the Radio
Products Services Division (RPSD) and/or the Accessories and Aftermarket Division (AAD).
D.2
Motorola Service Centers
D.2.1 Servicing Information
If a unit requires further complete testing, knowledge and/or details of component level
troubleshooting or service than is customarily performed at the basic level, please send the radio to
a Motorola Service Center as listed below.
D.2.2 Motorola Service Center
Motorola Repair
2214 Galvin Drive
Elgin, IL 60123
Tel: 1-800-221-7144
D.2.3 Motorola Federal Technical Center
4395 Nicole Drive
Lanham, MD 20706
Tel: 1-800-969-6680
Fax: 1-800-784-4133
D.2.4 Motorola Canadian Technical Logistics Center
Motorola Canada Ltd.
8133 Warden Avenue
Markham, Ontario, L6G 1B3
Tel: 1-800-543-3222
Fax: 1-888-331-9872 or 1-905-948-5970
MOTOTRBO Base Station/Repeater – EME ASSESSMENT: Executive Summary
Appendix E
E.1
E-1
MOTOTRBO Base Station/Repeater – EME
ASSESSMENT
Executive Summary
The Electromagnetic Energy (EME) compliance boundaries in a typical system configuration of the
Motorola MOTOTRBO MTR3000 Base Station/Repeater described in the following are derived.
Compliance is established with respect to the applicable limits defined in the ICNIRP guidelines [1],
the United States regulations [2]-[3], and in the CENELEC Standards EN50384:2002 [5] and
EN50385:2002 [6]. These standards and regulations apply to occupational and general public EME
exposure.
The assessment was carried out using a computational method described in the CENELEC
Standard EN50383:2002 [4], which is referenced by the EN50385:2002, and this report has been
drafted in accordance with its requirements. Thus the assessment and report address the European
Radio and Telecommunications Terminal Equipment (R&TTE) Directive requirements concerning
EME exposure.
The following table provides the compliance distances for general public and occupational-type
exposure, for the antenna considered in this analysis, based on a typical system configuration:
Compliance distances
Antenna front
(Andrew mod. DB408)
Ground level
(20 m below antenna)
General public exposure
6m
Always compliant
Occupational-type exposure
1.2 m
Always compliant
E.2
Exposure Prediction Model
E.2.1
Exposure in Front of the Antenna
The cylindrical-wave model defined in Clause 8.3.4 of the EN50383:2002 standard is applied to
determine the compliance boundaries for workers and general public for a typical system
configuration of the MOTOTRBO MTR3000 Base Station/Repeater.
E-2
MOTOTRBO Base Station/Repeater – EME ASSESSMENT: Exposure Prediction Model
Figure E-1 Reference frame for the point of interest (POI) cylindrical co-ordinates
POI
z
(ρ ,φ , z)
φ
L
ρ
Per the reference frame in Figure E-1, the cylindrical-wave model is applicable in the volume
described in cylindrical co-ordinates ( ρ , φ , z ) as follows:
λ / 4 ≤ ρ ≤ min{rc ,2 L2 / λ } ,
φ ≤δ /2,
z ≤ L/2 ,
where λ is the wavelength in m, L is the antenna largest dimension in m, δ is the angle in
degrees defining the -3 dB beamwidth of a directional antenna (for an omni-directional antenna δ is
equal to 360 degrees), and
rc = G A ⋅ L ⋅ δ / 720
where G A is the antenna maximum gain relative to an isotropic antenna. The power flux density
( S ), expressed in W / m 2 , is calculated as follows:
S cyl =
where
P 180
π Lρ δ
(1)
P is the input power to the antenna. In the region where,
λ / 4 ≤ rc ≤ 2 L2 / λ
the power flux density is calculated as the maximum between the cylindrical and spherical-wave
models, where the latter is expressed as follows:
S sph =
PG A
4πρ 2
Spatial power density averaging, which is required by some regulations, is embedded in the
cylindrical-wave model formulation, therefore it does not require additional considerations.
(2)
MOTOTRBO Base Station/Repeater – EME ASSESSMENT: Exposure Prediction Model
E.2.2
E-3
Exposure at Ground Level
Several methods can be employed to determine the EME exposure at ground level. Such an
assessment is not necessary if the mounting height of the antenna is larger than the compliance
distance in front of the antenna, computed using the EN50383:2002 methodology outlined in E.2.1. If
this is not feasible, then the following approach can be employed.
At ground level exposure occurs in the antenna far-field. The antenna phase center is assumed to be
the mounting height. The resulting predictive equation for the power density is:
S (d ) = (2.56)
where
P ⋅ G (θ )
4π (H 2 + d 2 )
(3)
G (θ ) is the elevation gain pattern, which is approximated by the following expression:
(4)
where k 0 = 2π / λ is the free-space wavenumber and L is the effective antenna length yielding the
appropriate vertical beamwidth, while H is the antenna height above ground and d is the point of
interest (POI) distance from the vertical antenna projection to ground (see Figure E-2). The
multiplicative factor 2.56 is introduced to enforce near-perfect, in-phase ground reflection as
recommended in [2]. In this case, spatial averaging is not carried out to make the EME exposure
assessment more conservative.
Figure E-2 Schematic of the ground-level exposure model adopted for the assessment
array broadside direction
θ(d)
LOS distance
H
θ(d)
d
E-4
E.3
MOTOTRBO Base Station/Repeater – EME ASSESSMENT: Typical System Configuration
Typical System Configuration
The MOTOTRBO MTR3000 Base Station/Repeater operates in the frequency ranges 403–470 MHz
and 470–524 MHz, with up to five channels transmitting 100 W radio frequency (RF) power. The
typical system configuration comprises an omnidirectional array antenna featuring 6–10 dBd gain,
installed at or above 20 m from ground level, and fed by the MTR3000 through a combiner
characterized by a typical 3 dB transmission loss, and a 30 m 7/8” coaxial cable characterized by a
typical 2.7 dB/100m loss at 400 MHz, resulting in a total 3.9 dB transmission loss. Based on these
characteristics, the RF power at the antenna input is about 200 W.
Since shorter antennas provide a conservative EME exposure assessment from equation (1), the
parameters of a typical 6.6 dBd antennas are employed. Such an antenna (e.g., Andrew DB408)
would exhibit a typical elevation beamwidth of about 14 degrees.
E.4
Exposure Limits
Based on the MTR3000 operating frequency range, the most conservative power density limits are
those defined in the ICNIRP guidelines [1]. They are 10.1 W/m2 for occupational exposure, and 2.02
W/m2 for general public exposure. They will be used for the EME exposure assessment.
E.5
EME Exposure Evaluation
E.5.1
Exposure in Front of the Antenna
The assessment is based on the following characteristics of the Andrew DB408 antenna:
G A = 10
6.6 + 2.15
10
P = 200 W
= 7 .5
δ = 360o
L = 2.7 m
The compliance boundary distance is computed, from equation (1), as follows:
ρ=
P 180
π L S lim δ
where Slim is the applicable power density limit. For occupational exposure, this equation gives:
ρ OCC =
200 W
180
= 1 .2 m
2
π ⋅ 2.7 m ⋅10.1 W / m 360
while for general public exposure it gives:
ρ GP =
E.5.2
200 W
180
=6m
2
π ⋅ 2.7 m ⋅ 2.02 W / m 360
Exposure at Ground Level
Since the antenna installation height above ground level in the typical system configuration (20 m) is
larger than either of the compliance boundaries determined in E.5.1, the EME exposure at ground
level is always compliant with the exposure limits defined in the ICNIRP guidelines.
MOTOTRBO Base Station/Repeater – EME ASSESSMENT: Compliance Boundary Description
E.6
E-5
Compliance Boundary Description
Based on the analysis in section E.5, the compliance boundaries for occupational and general public
exposure are defined as cylinders enclosing the antenna (see Figure E-3), extending 75 cm (one
wavelength) above and below the physical antenna, with radii:
Occupational exposure:
ρ OCC = 1.2 m
General Public exposure:
ρ GP = 6 m
Figure E-3 Compliance boundary for general public (GP) and occupational (OCC) exposure
ρ GP / OCC
E.7
References
1. International Commission on Non-Ionizing Radiation Protection (ICNIRP), “Guideline for
Limiting Exposure to Time-Varying Electric, Magnetic, and Electromagnetic Fields,” Health
Physics, vol. 74, no. 4, pp. 494-522, April 1998.
2. United States Federal Communication Commission, “Evaluating compliance with FCC
guidelines for human exposure to radio frequency electromagnetic fields,” OET Bulletin 65,
Ed. 97-01, Section 2 (Prediction Methods), August 1997.
3. US Code of Federal Regulations, Title 47, Volume 1, Sec. 1.1310 Radio frequency radiation
exposure limits (Revised as of October 1, 2003).
http://edocket.access.gpo.gov/cfr_2003/octqtr/47cfr1.1310.htm.
E-6
MOTOTRBO Base Station/Repeater – EME ASSESSMENT: References
4. EN 50383:2002. Basic standard for the calculation and measurement of electromagnetic field
strength and SAR related to human exposure from radio base stations and fixed terminal
stations for wireless telecommunications system (110 MHz - 40 GHz). CENELEC (European
Committee for Electrotechnical Standardization).
5. EN 50384:2002. Product standard to demonstrate the compliance of radio base stations and
fixed terminal stations for wireless telecommunication systems with the basic restrictions or
the reference levels related to human exposure to radio frequency electromagnetic fields (110
MHz - 40 GHz). Occupational. CENELEC (European Committee for Electrotechnical
Standardization).
6. EN 50385:2002. Product standard to demonstrate the compliances of radio base stations and
fixed terminal stations for wireless telecommunication systems with the basic restrictions or
the reference levels related to human exposure to radio frequency electromagnetic fields (110
MHz - 40 GHz). General public. CENELEC (European Committee for Electrotechnical
Standardization).
Motorola, Inc.
1301, E. Algonquin Rd.
Schaumburg, IL 60196-1078, U.S.A.
MOTOROLA and the Stylized M Logo are
registered in the U.S. Patent and Trademark Office.
All other product or service names are the property
of their respective owners.
© 2010 by Motorola, Inc.
All rights reserved. Printed in the U.S.A.
December 2010.
www.motorola.com/mototrbo
*68007024098*
68007024098-E