1
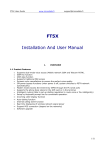
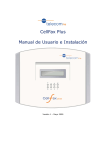
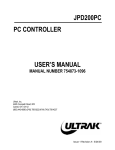
CellFax Plus
Installation and User Manual
Version 1 – May 2009
VoIPon www.voipon.co.uk [email protected] Tel: +44 (0)1245 808195 Fax: +44 (0)1245 808299
CellFax Plus Installation and User Manual
Document Control
Date
May 2009
Doc
Version
1
Change
1st release of document
1. OVERVIEW
1.1
Product Features
•
•
•
•
•
•
•
•
•
•
•
•
•
•
•
Supports dual-mode voice access (Mobile network GSM and Telecom PSTN).
GSM Fax function
GSM data function
Supports traditional PBX access
Dynamic echo cancellations to ensure the perfect voice quality
Off-power bypass functions (when power is off, system switches to PSTN network
automatically if PSTN connected)
Modem mode (Access the Internet by GPRS through the PC serial port)
Supports the phone book stored in the SIM card or in the terminal
Intelligent routing (Able to set up dialing regulation to route voice or fax intelligently)
Incoming caller display function
Auto-dialing function
Internal calling divert function
Real time displaying of wireless network signal power
Software upgrade
Battery back-up (if supplied)
2
VoIPon www.voipon.co.uk [email protected] Tel: +44 (0)1245 808195 Fax: +44 (0)1245 808299
CellFax Plus Installation and User Manual
1.2
Safety
Guidelines for Safe Use of the CellFax Plus:
Please read this information before connecting the CellFax. The instructions are intended for
your safety. Please follow these guidelines.
Recommendations for safe use of the product:
•
Do not expose the product to liquid or moisture
•
Do not expose the product to open flames
•
Do not attempt to modify the product
•
Do not use the product near medical equipment without requesting permission from
your treating physician or authorised medical staff
•
Do not use the product when in, or around aircraft, or areas showing the sign "turn off
two way radio".
•
Do not use the product in an area where the potential explosive atmosphere exists.
Power Supply:
Connect the AC power supply adapter only to designated power sources.
Radio Frequency (RF) exposure and Specific Absorbsion Rate (SAR)
The CellFax Plus is a low power radio transmitter and receiver. When turned on it emits low
levels of radio frequency energy. Governments around the world have adopted international
safety guidelines. ICNIRP (International Commission on Non-Ionizing Radiation Protection) and
IEEE (The Institute of Electrical and Electronic Engineers) have developed guidelines to
establish the permitted levels of radio wave exposure for the general population. Specific
Absorption Rate (SAR) is the unit of measurement for the amount of radio frequency absorbed
by the body when using a mobile phone. For GSM terminal equipment an MPE calculation is
used to determine the safe working distance from the Terminal during normal use. The values
stated are determined at the highest certified power levels in laboratory conditions. Actual
radiated levels during normal use may be well below this value. This is because the RF
transmitter is designed to work at minimum power where ever possible.
TelecomFM CellFax Plus meets the legal requirements of ICNIRP encompassed within the
following standards:
The CellFax Plus complies with European standards EN50383:2003, EN 50392:2002 and
EN50385:2002 and with Council Recomendation 1999/519/EC relating to human exposure to
RF energy. In accordance with these standards and in order to maintain safe levels of exposure
to RF Energy. The CellFax and its antenna, during use, must be placed at a distance greater
then 13.5 CM from the human body.
3
VoIPon www.voipon.co.uk [email protected] Tel: +44 (0)1245 808195 Fax: +44 (0)1245 808299
CellFax Plus Installation and User Manual
1.3
Approvals Conformity
Declaration of Conformity
Applicant: TelecomFM Ltd.
Address: 895 Plymouth Road, Slough,
Berkshire, SL1 4LP, U.K.
Product: CellFax Plus
This equipment complies with the European R&TTE
Directive no. 1999/5/EC on radio and telecommunication
terminal equipment.
TelecomFM
May 2009
1.4
Battery operation (if supplied)
1
2
3
Do not connect anything onto the battery! This will invalidate any warranty and may
cause malfunction or even injury.
Do not expose the battery to moisture, water, or fire. This will make the battery
ineffective or unusable.
Please dispose of the battery in accordance with local rules and regulations.
4
VoIPon www.voipon.co.uk [email protected] Tel: +44 (0)1245 808195 Fax: +44 (0)1245 808299
CellFax Plus Installation and User Manual
2. INSTALLATION INSTRUCTION
2.1 Interface Description
Cellfax Plus Back panel
CELLFAX PLUS Back panel interface description:
………
Antenna port
………Power supply
………………Power button
IOIO ………… RS232 Serial Port
PHONE ………Phone port, connect to regular phone
FAX…………… FAX port, connect to regular fax machine
PSTN………… External line port,connect to external phone line
2.2 Indicators (LEDs)
Indicators
There are 8 indicators on the front panel of the CellFax Plus, functioning as follows:
1.
Power supply indicator
Power LED ON: DC12V power adapter connected
Power LED Off: DC12V power adapter disconnected
2.
Battery indicator
Battery LED ON: Battery is in use
Battery LED Slow Flashing: Battery power is low
Battery LED Off: Battery is not in use
5
VoIPon www.voipon.co.uk [email protected] Tel: +44 (0)1245 808195 Fax: +44 (0)1245 808299
CellFax Plus Installation and User Manual
3.
Voice/Fax/Data indicator
Voice/Fax/Data LED ON: Call in progress
Voice/Fax/Data LED Flashing: Inbound call in progress
Voice/Fax/Data LED Off: Not in use
4.
Start up status indicator
Start up LED ON: Cellfax Plus is initialised successfully
Start up LED Slow Flashing: Cellfax Plus is initialising
Start up LED Quick Flashing Indicates a start-up failure
5.
GSM Signal Status Indicator
GSM signal LEDs ON: identifies Signal Strength
GSM signal Flashing once per second: identifies GSM general errors
GSM signal Flashing 10 times per second: identifies GSM serious error
GSM general errors (indicated by the signal LEDs)
LED flashing slowly On/Off is defined as “1”
LED Off is defined as “0”
110:
010:
111:
011:
No SIM card
Network Registration failure
GSM/GPRS is in Modem mode
PIN code required
GSM serious errors (indicated by the signal LEDs)
LED flashing Quickly On/Off is defined as “1”
LED Off is defined as “0”
001:
010:
011:
100:
101:
110:
111:
Lock Base Station
Lock the service provider
PIN code error
IMSI error
Require PUK
GSM/GPRS baud rate error
other errors
6
VoIPon www.voipon.co.uk [email protected] Tel: +44 (0)1245 808195 Fax: +44 (0)1245 808299
CellFax Plus Installation and User Manual
2.3 Hardware Installation Steps
1. Unscrew the screw from the SIM cover on the underside of the Cellfax Plus and remove
the SIM cover.
2. Slide the SIM latch open and insert a SIM card making sure the gold contacts of the
SIM touch the gold contacts of the SIM holder.
3. If your Cellfax Plus unit was supplied with a Battery, then push the 3 pin male
connector found on the Battery into the female connector found in the housing of the
SIM holder, making sure you line up the connectors correctly.
4. Place the Battery in the space allocated and then reattach the SIM cover. Replace the
screw.
5. Connect a regular telephone into the socket marked ‘Phone’ indicated on Cellfax
Plus back panel.
6. Connect a Fax machine into the socket marked ‘Fax’ indicated on Cellfax Plus back
panel.
7. (optional) Connect a landline to the socket marked ‘PSTN” on Cellfax Plus back panel.
Caution: Do NOT plug a landline into the “Phone socket” as this may cause damage.
8. Connect the antenna to the socket marked “Y” on Cellfax Plus back panel.
9. Plug one end of the power adapter into the power socket and the other end into the
“12VDC” power interface indicated on the back panel.
To turn the CellFax Plus ON: Press the power button to turn on. The LEDs
,
, , and
(if fitted) will come on for approximately 6 seconds then go out leaving the
Status indicator
flashing while initialising. Once the Status indicator and GSM signal
status LEDs are lit the device is ready to use.
NOTE: If the GSM signal LEDs start to flash then refer to GSM errors above.
NOTE: If batteries are fitted then Charging Times are: 12 hours for the first time,
8 hours thereafter.
To turn the CellFax Plus OFF: Press and hold the power button for 3 seconds; release
the power button, the Power and Network indicators turn off immediately.
7
VoIPon www.voipon.co.uk [email protected] Tel: +44 (0)1245 808195 Fax: +44 (0)1245 808299
CellFax Plus Installation and User Manual
3. APPLICATIONS
31 Mode (#*1*1# with no sim) – Standalone
Voice/Fax standalone mode application
32A Mode (#*1*2# with no sim) – PBX Trunk Connection
When connecting to the PBX in this mode you are required to connect to the Phone port on
the back of the unit.
PBX relay mode application
32B Mode (#*1*3# with no sim) – PBX Extension Connection
When connecting to the PBX in this mode you are required to connect to the PSTN port on the
back of the unit.
PBX extension access mode application
8
VoIPon www.voipon.co.uk [email protected] Tel: +44 (0)1245 808195 Fax: +44 (0)1245 808299
CellFax Plus Installation and User Manual
4. OPERATING INSTRUCTION
4.1 Telephone Function
4.1.1 Making a phone call
1.
2.
3.
4.
Lift up the handset; you will hear a dialing tone.
Dial the telephone number; the system will dial your number automatically.
When the called party answers voice communication is established
Clearing down the handset will hang up the call.
4.1.2 Receiving a phone call
1. The telephone will ring and the PHONE
Lift the handset and start talking.
indicator will flash indicating an incoming call.
4.1.3 Call Waiting and Three Parties Conference Function
This device supports GSM Call Waiting and three parties conference function
Note: Please make sure these services are available on the Network SIM you are
using
We recommend that the phone you are using for Teleconferencing have the “R” and “#”
buttons available.
During your call if you receive another call you will hear “Du, Du” tone. You now have the
following options:
• To ignore the incoming call, take no action
• To reject the incoming call, press the R button and then press 0.
• To end the current call and answer the new call, press the R button and then press 1, or
hang up the phone to end the current call, the phone will start ringing and the new call
can be answered by picking up the phone
• To place the current call on hold and answer the new call, press the R button and then
press 2. The speaker can also switch between both parties by pressing the R button and
then pressing 2.
• During a conference call, the user can press the R button and then # to hold the current
call. Dial the new number after hearing the dial tone.
• When the speaker talks with the new call, the former conversation will still be held. If
the speaker wants to hold the three parties conference, press button R and then 3 to
add the current conversation into the holding party. This sets the Teleconference
• Clearing down the handset will hang up the conference.
9
VoIPon www.voipon.co.uk [email protected] Tel: +44 (0)1245 808195 Fax: +44 (0)1245 808299
CellFax Plus Installation and User Manual
4.2 Fax function
4.2.1 Sending a fax
User can send a fax by attaching a regular G3 Analogue fax machine to the Fax port on the
back panel of the Cellfax Plus unit.
Note: Some older Fax machines cannot send the identification tone and the user must add
the Command *01* before the number to prompt the system that this call is a FAX call.
Note: the Cell-FAX does not support using voice and fax functions in the same call.
When sending a Fax press Start key immediately after dialing to set the mode to Fax.
4.2.2 Receiving a fax
User can receive a fax by attaching a regular G3 Analogue fax machine to the Fax port on
the back panel of the Cellfax Plus unit.
The device supports two fax receiving mode: synchronous mode and asynchronous mode.
the mode can be set using a keypad command (see section 4.4.2).
Note: Ensure that the SIM card in the unit has a separate Fax number for receiving faxes.
4.3 Data Function
User can transmit data by attaching a regular Analogue Modem to the phone port of the
Cellfax Plus
Alternatively the Cellfax Plus can be attached to a PC via the Serial port using the DB9 to
DB9 serial cable. This will allow the PC to communicate with the Cellfax Plus as a Standard
Modem and also to use the GPRS features of the unit.
To set up your PC to connect to the Cellfax Plus unit via the serial port use the following
instructions:
10
VoIPon www.voipon.co.uk [email protected] Tel: +44 (0)1245 808195 Fax: +44 (0)1245 808299
CellFax Plus Installation and User Manual
4.3.1 Installing the Modem
From the Start Menu, click Control Panel
Note: If the screen displayed differs to that shown here click Switch to Classic View
Double click Phone and Modem Options
Select the Modems Tab
Click Add…
11
VoIPon www.voipon.co.uk [email protected] Tel: +44 (0)1245 808195 Fax: +44 (0)1245 808299
CellFax Plus Installation and User Manual
Select Don’t detect my modem, I will select it from a list
Click Next
Ensure that Standard Modem Types is selected on the left and click on Standard 19200 bps
Modem on the right
Click Next
12
VoIPon www.voipon.co.uk [email protected] Tel: +44 (0)1245 808195 Fax: +44 (0)1245 808299
CellFax Plus Installation and User Manual
Select the serial port that the CELLFAX PLUS is attached to and click Next
Click Finish
13
VoIPon www.voipon.co.uk [email protected] Tel: +44 (0)1245 808195 Fax: +44 (0)1245 808299
CellFax Plus Installation and User Manual
Click OK
The CELLFAX PLUS is now installed as a modem on your PC. If you wish to use GPRS
refer to section 4.3.4 for instructions on setting up for GPRS.
14
VoIPon www.voipon.co.uk [email protected] Tel: +44 (0)1245 808195 Fax: +44 (0)1245 808299
CellFax Plus Installation and User Manual
4.3.2 Connecting to the Internet
It is assumed that an Internet account has already been set up with a service provider.
You will have been given:
• Telephone number for the dial-up connection
• Username and Password
From the Start Menu, click Control Panel
Double click Network Connections
Click Create A New Connection
Click Next
Select Connect to the network at my workplace and click Next
15
VoIPon www.voipon.co.uk [email protected] Tel: +44 (0)1245 808195 Fax: +44 (0)1245 808299
CellFax Plus Installation and User Manual
Click Dial-up connection and click Next
Click Next
Enter a name for the connection and click Next
Enter the phone number for your internet provider and click Next
Click Finish
16
VoIPon www.voipon.co.uk [email protected] Tel: +44 (0)1245 808195 Fax: +44 (0)1245 808299
CellFax Plus Installation and User Manual
Enter the Username and Password given to you by your Internet provider and click Dial
The computer will then connect to your Internet provider and log you on.
4.3.3 Disconnecting from the Internet
When on-line there is a computer icon in the bottom right corner of the screen that flashes
whenever data is being transferred.
To terminate the connection, right click on this icon and click on Disconnect. The CELLFAX
PLUS will then go off line and return to voice mode after a few seconds.
17
VoIPon www.voipon.co.uk [email protected] Tel: +44 (0)1245 808195 Fax: +44 (0)1245 808299
CellFax Plus Installation and User Manual
4.3.4 Setting up GPRS
The following are additional steps that need to be carried out in order to use the
CELLFAX PLUS unit with GPRS.
To connect to the internet via GPRS the Cellfax Plus requires a GPRS enabled SIM Card and the
following information must be provided by the Network Operator:
•
•
•
Access Point Name (APN)
Username
Password
Increase port speed and add Advanced Settings:
Click Start, Settings, Control Panel
Double-click Phone and Modem Options
Click on the Standard 19200 bps Modem and click Properties
Change the Maximum Port Speed setting to 115200
Click on the Advanced tab
18
VoIPon www.voipon.co.uk [email protected] Tel: +44 (0)1245 808195 Fax: +44 (0)1245 808299
CellFax Plus Installation and User Manual
Under Extra initialisation commands enter the following text exactly as it appears here:
AT+CGDCONT=1,”IP”,”APN”
Where APN is the access point name is provided by the Network operator.
Click OK to confirm the settings
Click OK to exit the Phone and Modem options screen.
Configure connection:
Refer to the section 4.3.2 Connecting to the Internet for instructions on setting up an internet
connection. Right-click the connection and choose Properties. Click Configure and change the
modems Maximum Speed to 115200bps. Click OK.
When prompted for a Username and Password enter the Username and Password provided by
the Network Operator. When prompted for a phone number use the following number for a
GPRS connection exactly as it appears here:
*99***1#
19
VoIPon www.voipon.co.uk [email protected] Tel: +44 (0)1245 808195 Fax: +44 (0)1245 808299
CellFax Plus Installation and User Manual
4.4
Telephone Keypad Configuration Commands
User may enter commands by using telephone keypad of a telephone connected to the
Phone socket on the back panel of the unit as follows:
1. Lift Receiver
2. Enter Command – a confirmation tone will then be heard
3. Replace Receiver
4.4.1 System Configuration
1. Set system date
Command #*20*y*m*d#
Set the system date, y means year, m means month, and d means day
2. Set system time
Command #*21*h*m*s#
Set the system time of the device, h means hour, m means minute and s means
seconds.
3. Set work mode
Command #*1*working mode#
Set the work mode of Cellfax Plus: Working mode = 0 is voice mode. 1 is voice/fax
mode. 2 is PBX Trunk mode. 3 is PBX extension mode
4. Set dial mode
Command #*333*n#
Set the terminal dialing mode, n=0 is audio dial mode; n=1 is pulse dial mode.
5. Set auto-dialing delay
Command #*3*seconds#
Set up dialing time and auto sending-out time upon completely entry of numbers,
default setting 3 seconds.
<seconds> Set point range 1-20 sec
6. Set external line flash key delay
Command #*4*<flashDelay>#
Set external line flash key delay, default, 700ms delay
<delay>
0~2000 ms
7. Set GSM output voice volume
Command #*53*volume#
Set GSM output voice volume. Volume = 0 ~ 4.
8. Set overtime of Button R
Command #*85*n#
Set time of Button R, This feature is only available in the SIM card used by the open
call waiting function effectively. Default, 2 seconds
<n> 1~5 seconds
9. Set FAX and Voice Ring both ports
Command #*68*n#
n= 0 for separate ringing (Fax calls ring on FAX port, Voice calls ring on PHONE port)
n= 1 for both to ring (Fax and Voice calls ring on PHONE port and FAX port).
10. Minute Prompt
20
VoIPon www.voipon.co.uk [email protected] Tel: +44 (0)1245 808195 Fax: +44 (0)1245 808299
CellFax Plus Installation and User Manual
Command #*110*n#
Description n=1 the device will send a prompt tone per one minute during user’s
conversation. n=0 Disable this function.
4.4.2 Fax mode configuration
1. Set fax receive mode
Command #*950*n#
Description n=0 fax receiving mode is Synchronization; n=1 fax receiving mode is
Asynchronous. Default n=0.
2. Set fax send mode
Command #*951*n#
Description n=0 fax sending mode is Synchronization; n=1 fax sending mode is
Asynchronous. Default n=0.
4.4.3 Call Diverts
1.
Set the FXO call diversion type
Command #*75*n#
Description: Set the FXO call diversion type (0=divert always;1=divert when no
answer; 2=do not divert)
2.
Set the divert number from FXO to GSM
Command #*71*Number#
Description: Set the divert number from FXO to GSM. Number is the number which
will be dialled from GSM port.
3.
Set the call divert switch from GSM to FXO
Command #*76*n#
Description: Set the call divert switch from GSM to FXO (0=off 1=on)
4.
Set the call divert number from GSM to FXO
Command #*77*number#
Description: Set the call divert number from GSM to FXO. When the GSM to FXO call
diversion is on, GSM dials this Number from FXO port.
21
VoIPon www.voipon.co.uk [email protected] Tel: +44 (0)1245 808195 Fax: +44 (0)1245 808299
CellFax Plus Installation and User Manual
4.4.4 Detect the caller ID identification function standard
1. Detect the Caller ID Standard
Command #*99#
Description: Detect the standard of supporting caller ID identification. After completing
this command, the user should hang up the phone immediately. If the standard of
displaying caller ID identification is compliant with local standard, then the display will
show “0123456789”. If the device can not display this character string, the user will
need to change the current standard of caller ID identification by command
“#*81*n#”.
2. Select Caller ID standard
Command #*81*n#
Description: Select the standard of caller ID identification.
(0=Off 1= ETSI DTMF 2= ETSI V.23 3= Bellcore) Default value is 3
3. Set keyboard command for transmitting caller ID during calling
Command #*82*n#
Description: Set keyboard command for whether or not to transmit caller ID during
calling (0=No transmit 1= Transmit).
4.4.5 Set Serial port Mode
1
Set serial port mode
Command #*83*n#
Description: Set serial port mode (0=Off 1=CLI 2=MODEM).
4.4.6 SIM Card settings
1
Input PIN code
Command #*86*n#
Description: Input PIN code (n is the PIN code)
2
Modify PIN code
Command #*88*old pin*new pin*new pin#
Description: Modify PIN code. The “Old pin” is old PIN code, the “New pin” is new PIN
code which must be entered twice.
3
Input PUK code
Command #*89*PUK*PIN#
Description: Input PUK code,PUK is input by user PIN is new PIN code input by user
4
Set PIN code function
Command #*90*n*pin#
Description: Set PIN code function (n=0 Disable PIN function n=1 Enable PIN function)
22
VoIPon www.voipon.co.uk [email protected] Tel: +44 (0)1245 808195 Fax: +44 (0)1245 808299
CellFax Plus Installation and User Manual
4.4.7 Hotline call number
1
Set the hotline call number
Command #*65*hotline number#
Description: set the hotline call number.
2
Set the hotline dialing time
Command #*66*seconds#
Description: Set the time from picking up to auto-dialing the hotline number.
Seconds = 0 disables the Hotline feature (default)
Seconds = 1 ~ 10 is the auto-dial time. If no number is dialled within the specified
number of seconds after picking up the handset then the hotline number will be dialed.
4.4.8 Emergency call number
1. Set the emergency number 112
Command #*672*n#
n=1, all emergency numbers dialled will be 112 (default)
n=0 will not dial 112.
2. To add the emergency call number
Command #*67*n#
Set the emergency call number, n = emergency number up to 12 digits
Note: Before you can change the Emergency number you are required to remove 112
by entering command #*672*0#.
3. Delete all the emergency call number
Command #*670#
Description: deletes all the emergency number that was set.
4. Show all the emergency call number(require LCD)
Command #*671#
Description: Show all the emergency number that was set.
NOTE: Emergency Calls
This terminal operates using GSM signals, which cannot guarantee connection in all
conditions. Therefore, you should never rely solely on the terminal equipment for
essential communications such as medical or emergency services.
NOTE: Check with your Network provider if emergency services are available.
Command (*|#|*#|**|##) 004*DN*BS#
Description GSM diverting call under all terms
1.
GSM outgoing call limiting
Command (*|#|*#) 33*PW*BS#
Description GSM outgoing calls are limiting
2.
GSM international call restriction
Command (*|#|*#) 331*PW*BS#
Description GSM restrict the outgoing international call
3.
GSM international call restriction except the homeland
Command (*|#|*#) 332*PW*BS#
23
VoIPon www.voipon.co.uk [email protected] Tel: +44 (0)1245 808195 Fax: +44 (0)1245 808299
CellFax Plus Installation and User Manual
Description GSM restrict all the international call except the homeland
4.
GSM all incoming call restriction
Command (*|#|*#) 35*PW*BS#
Description GSM restrict all the incoming call
5.
GSM all incoming call restriction roam
Command (*|#|*#) 351*PW*BS#
Description GSM restrict all incoming call during roaming
6.
GSM enable/disable call waiting
Command (*, #, *#43#)
Description GSM enable/disable call waiting function
24
VoIPon www.voipon.co.uk [email protected] Tel: +44 (0)1245 808195 Fax: +44 (0)1245 808299
CellFax Plus Installation and User Manual
4.4.9 Technical Specification
Frequency Bands
•
GSM 900/1800MHz
Transmission Power
•
EGSM 900 Class4 (2W Peak)
•
GSM 1800 Class1 (1W Peak)
Frequency Range
•
EGSM 900
880~915 MHz
925~960 MHz
•
GSM 1800 1710~1785 MHz
1805~1880 MHz
Power Consumption
•
Average power consumption < 5W
Power Supply
•
Output DC12V,1000mA
•
Input 100~240V AC; 50~60Hz
Port interface
•
RJ11: Fax and Phone port (2RJ11), PSTN port (1RJ11)
•
RS232: DB9 port
•
GSM Antenna: TNC-female (50Ω)
•
SIM card: 3V SIM card
Phone port
•
Impedance 270Ω+(750Ω|150nF) default
•
Open circuit voltage (OCV) 50V on-hook
•
Feed current 25mA (off-hook)
•
Ringing Load Supports integrating 3 phones (Max 3REN)
Working Environment
•
Operating temperature
0~45
•
Operating humidity:
20%~75%
•
Storage temperature: -20~60
•
Storage Humidity
5%~95%`
Dimensions:
•
Length×Width×Height 20cm×15cm×4cm
•
Weight: 0.5kg
Battery backup (if supplied)
•
Lithium 3.7v/1700mAh
•
Standby Time: 12-18 hours, depending on the Network condition, humidity and
temperature.
•
Airtime2-3 hours, depend on the Networks (subject to humidity and temperature)
•
Charging Time: 12 hours for the first time, 8 hours thereafter.
25
VoIPon www.voipon.co.uk [email protected] Tel: +44 (0)1245 808195 Fax: +44 (0)1245 808299
CellFax Plus Installation and User Manual
5. FREQUENTLY ASKED QUESTIONS
Q: How long do I wait until I am able to make a phone call or send a fax?
A: Once the Status indicator and GSM signal status LEDs are lit the device is ready to use.
Q: What will happen if I make a wrong connection to Telephone socket and PSTN socket?
A: Only plug in the correct apparatus into the sockets marked on the rear panel (see
Installation Instructions on page 5). Failure to connect correct apparatus may cause
permanent damage and invalidate your warranty.
Q: Why does the device always send the FAX as a voice outgoing call?
A: Some outdated FAX cannot send the identification tone, In this case the user must add the
“*01*” command before the number to instruct the system that this call is a FAX call (such as
*01*Number).
Q: Why does the device always make the voice outgoing call when user makes the data call?
A: Some outdated Modem cannot send the CNG identification tone, so the user should add the
“*02*” before the number to prompt the system this call is Data call (Such as *02*Number).
Q: Is it possible to transmit fax via GSM with any SIM card?
A: Before using GSM fax functions the user must make sure that:
For sending faxes, ensure the SIM card data transmission service is available (GSM network
support is required)
For receiving, ensure the SIM card receiving fax service is available. (GSM network support is
required; usually this function needs dual numbers – one voice number and one fax number.
For fax receiving, use only the fax number).
Q: What type of fax machine do I need to use?
A: CELLFAX PLUS is in line with G3 fax criteria. Any compatible G3 standard fax machine is OK.
Q: When I use GSM fax, is it possible to fax like a desktop fax machine, i.e. make a phone call
before sending faxes?
A: This is not possible. CELLFAX PLUS does not support GSM voice/ fax switch over function.
This function requires GSM/GPRS network supporting TS61 (allowing user to make phone calls
while faxing). When sending faxes, press the Start key immediately after completing your
number dialled; when receiving faxes, please set fax machine to Auto receive mode.
Q: When does the battery work?
A: The battery will operate when there is no mains power to the Cellfax Plus unit.
Q: How do I know when the battery is running low?
A: The battery LED will start to flash indicating it is low.
Q: How can I tell if a battery is fitted?
A: If the mains power is disconnected you will not see the battery LED lit and the Cellfax Plus
unit will not operate. You can also check by opening the SIM cover that holds the battery.
26
VoIPon www.voipon.co.uk [email protected] Tel: +44 (0)1245 808195 Fax: +44 (0)1245 808299
CellFax Plus Installation and User Manual
6. WARRANTY
1. The CellFax Plus is supplied with a 1 year return to base warranty which covers any defect
in design or manufacture. No other warranties whatsoever are given.
2. TelecomFM shall accept no liability for any error or damages of any kind resulting from the
use of this document or the equipment it relates to.
3. No responsibility is assumed by TFM for the use or reliability of the Cell-Fax Plus when used
in a situation or with other equipment not supplied or specified by TFM.
4. The wording in this document may change from time to time. Please refer to the TelecomFM
web site www.telecomfm.co.uk for the latest release
27
VoIPon www.voipon.co.uk [email protected] Tel: +44 (0)1245 808195 Fax: +44 (0)1245 808299