1
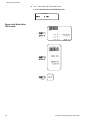
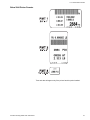
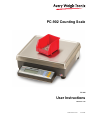
PC-902 Counting Scale
PC-902
User Instructions
ENGLISH - USA
43000-0018 Issue AC
June 2008
© Avery Weigh-Tronix LLC, 2006. All rights reserved.
The information contained herin is the property of Avery Weigh-Tronix LLC and is supplied without liability
for errors or omissions. No part may be reproduced or used except as authorised by contract or other
written permission. The copyright and foregoing restriction on reproduction extend to all media in which
the information may be embodied.
Trademarks and acknowledgements
Avery Weigh-Tronix, Avery Berkel, Dillon, NCI and Salter Brecknell are registered trademarks in certain
jurisdictions. All third party brands and product names used within this document are trademarks or
registered trademarks of their respective holders.
IMPORTANT
When programming or configuring the equipment you must ensure that you comply with all relevant
standards and legislation. The example settings given in this book may not be legal for trade with the
public.
Declarations of compliance
United States
This equipment has been tested and found to comply with the limits for a Class A digital device, pursuant to Part 15
of the FCC Rules. These limits are designed to provide reasonable protection against harmful interference when
the equipment is operated in a commercial environment. This equipment generates, uses, and can radiate radio
frequency energy and, if not installed and used in accordance with the instruction manual, may cause harmful
interference to radio communications. Operation of this equipment in a residential area is likely to cause harmful
interference in which case the user will be required to correct the interference at his own expense.
Canada
This digital apparatus does not exceed the Class A limits for radio noise emissions from digital apparatus set out in
the Radio Interference Regulations of the Canadian Department of Communications.
Le présent appareil numérique n’émet pas de bruits radioélectriques dépassant les limites applicables aux appareils
numériques de la Classe A prescrites dans le Règlement sur le brouillage radioélectrique edicté par le ministère des
Communications du Canada.
Contents
page
Contents ......................................................................................................................... 3
Introduction..................................................................................................................... 5
Keyboard and Display .................................................................................................... 6
Scale Setup and Operation ............................................................................................ 8
Unpacking the Scale
8
Installing the Scale
8
Battery Power Option ............................................................................................... 9
Internal Battery ................................................................................................... 9
External Battery.................................................................................................. 9
Operation as a Scale .............................................................................................. 10
Operation as a Counting Scale .............................................................................. 11
Counting Using Bulk Sampling ............................................................................... 12
Counting Using Dribble Sampling .......................................................................... 13
Using Reverse Sampling for Counting, Method 1 .................................................. 14
Using Reverse Sampling for Counting, Method 2 .................................................. 15
Method #2 - With a Tare Weight ...................................................................... 15
Method #2 - Without a Tare Weight ................................................................. 15
Clearing a Tare Weight
15
Serial Communications................................................................................................. 16
Cable Pinouts
16
Preset Print Formats .............................................................................................. 18
Imp Printer Formats.......................................................................................... 18
Dymo Label Writer Setra 300 Formats............................................................. 20
Zebra 2844 Printer Formats ............................................................................. 21
PC Protocol ...................................................................................................... 22
NCI Protocol ..................................................................................................... 24
Broadcast Protocol ........................................................................................... 26
Error Messages ............................................................................................................ 27
Specifications ............................................................................................................... 29
3
4
PC-905 Counting Scale User Instructions
1
Introduction
This manual tells you how to operate the PC-902 high precision counting
scale. You can configure your scale for different options and sampling
methods. See the PC-902 Service Manual for details on configuration and
calibration. This scale also has an RS-232 I/O channel for communication
with appropriate remote devices.
The manual is divided into the following sections:
- Keyboard and Display (page 6)
- Scale Setup and Operation (page 8)
- Serial Communications (page 16)
- Error Messages (page 27)
PC-902 Counting Scale User Instructions
5
Keyboard and Display
2
Keyboard and Display
Figure 2.1 shows the front panel of the PC-902. This is made up of the
keyboard and display.
Figure 2.1 PC-902 Front Panel
There are six keys to the right of the display:
•
PRINT
Sends serial data from the RS-232 port to a
connected printer. If the unit is configured for PC
or Broadcast mode, this key will not function. See
the Service Manual.
•
UNITS
Press this key to change the displayed unit of
measure. If enabled, the choices are lb, kg, g,
and oz.
•
COUNT/WEIGHT
Toggles between displaying weight and count
when a piece weight is active.
•
SAMPLE
Used to select a sample size and to initiate the
calculation of sample piece weight.
This key also functions as an ON/STANDBY key
for battery powered scales. Press the key to start
the scale. Press and hold this key for five
seconds to put the scale in standby mode. The
display will show SLEEP.
As long as AC is connected to the scale it will
power up where it left off unless the scale is
SEALED. When sealed it performs the full power
up count down and zero reset.
6
•
TARE
Press this key to tare the weight on the scale.
You can also press this after keying in a numeric
tare value to accept it and activate net weight
mode
•
ZERO
Zeroes the scale weight or count.
PC-902 Counting Scale User Instructions
The display has seven alphanumeric characters for displaying numbers and
messages. Annunciators are built into the display to indicate the following
functions:
PC-902 Counting Scale User Instructions
•
COUNT
Annunciator indicates the scale is in count mode.
•
WEIGHT
Annunciator indicates scale is in weight mode.
•
lb, kg, g, oz
Annunciator indicates the current unit of
measure.
•
LO BAT
Annunciator indicates the battery has 1 or 2 hours
of battery life remaining, depending on battery
installed. See the battery information under 3.3 Battery Power Option (page 9). Recharge the
battery when this is displayed.
•
STABLE
Annunciator indicates weight on the scale is
stable.
•
TARE
Annunciator indicates a tare weight is in effect
and displayed weight is net weight.
•
ZERO
Annunciator indicates the scale is at center zero
weight.
7
Scale Setup and Operation
3
Scale Setup and Operation
This section of the manual covers getting your scale ready to work and
operating the scale. This section is divided into the following:
3.1
•
3.1 - Unpacking the Scale (page 8)
•
3.2 - Installing the Scale (page 8)
•
3.3 - Battery Power Option (page 9)
•
3.4 - Operation as a Scale (page 10)
•
3.5 - Operation as a Counting Scale (page 11)
•
3.6 - Counting Using Bulk Sampling (page 12)
•
3.7 - Counting Using Dribble Sampling (page 13)
•
3.8 - Using Reverse Sampling for Counting, Method 1 (page 14)
•
3.9 - Using Reverse Sampling for Counting, Method 2 (page 15)
•
3.10 - Clearing a Tare Weight (page 15)
Unpacking the Scale
Unpack the PC-902 and remove the shipping materials from around the
scale.
3.2
Installing the Scale
Place the scale on a stable, level surface out of the way of air currents. Use
the adjustable feet to level the scale. Be sure the scale does not rock back
and forth. Lock the feet in position with the knurled locking rings.
The PC-902 comes with the AC transformer in place beneath the scale. Plug
the unit into a grounded 120VAC source.
If the battery option is installed, charge the unit for 16 hours before using the
scale for the first time.
8
PC-902 Counting Scale User Instructions
3.3 Battery Power Option
3.3
Battery Power Option
The PC-902 has an internal and an external battery option.
The battery can be recharged in place by connecting the transformer to a
power source and to the scale. The battery will recharge while the scale is
being powered by the transformer. See the Battery Information table below
for information on charge times, etc. The battery circuits are designed with
overcharge protection.
Press the SAMPLE key on the front panel to turn the scale on. Press the
SAMPLE key for five seconds to shut the scale off. You can set the battery
option to shutoff the scale automatically after a period of time. See the
Service Manual for this information.
Internal Battery
If you ordered the internal battery, it will be installed in the unit prior to
shipping.
External Battery
If you are going to use the external battery, remove the transformer from
beneath the scale, place the battery in its place with padding between the
battery and the scale base and around the battery. Secure the battery with
the restraining strap. Plug the battery cable into the receptacle on the back
of the scale.
PC-902 Counting Scale User Instructions
9
Scale Setup and Operation
3.4
Operation as a Scale
The PC-902 can be used as a bench scale or as a counting scale. The
annunciators indicate when you are in the weigh mode or count mode and
when the unit is configured for pounds, kilograms, grams, or ounces.
While in weight mode, press the UNITS key to change the unit of measure.
Small words at the bottom of the display (LOBAT, STABLE, TARE, ZERO)
let you know when the battery (if installed) is low, when the scale is stable
(no motion), when a tare is in effect, and when the scale is at zero.
Follow these instructions for operating the PC-902 as a scale:
The scale will power up in the counting mode if a piece weight was active
when powered down.
1.
If the display shows SLEEP while
powered by AC in the unsealed
mode, the diagnostics test is
skipped on wake up from the
SAMPLE key.
For AC powered models, plug the unit into a grounded 120VAC source.
For battery and AC powered models, the unit will power up when
plugged into the outlet or the battery. If the unit is in SLEEP (standby)
mode, press the SAMPLE key…
The scale performs an internal diagnostics test, zeroes the scale,
then displays the count or weight. The scale is in the weigh mode
when the weight annunciator is lit.
2.
If necessary, zero the scale by pressing the ZERO key…
The ZERO annunciator illuminates.
3.
For gross weighing, place the object to be weighed on the scale…
Gross weight is displayed.
4.
For net weighing, place object to be tared on the scale and press the
TARE key…
The TARE annunciator illuminates, and zero weight is displayed.
5.
Place material to be weighed on the scale.
Net weight of material is displayed.
6.
If your scale is hooked up to a printer or PC and the weight is stable,
press PRINT to transmit data.
Formatted weight and count information is printed. The format is
selectable. See the Service Manual for information on print
formats.
10
PC-902 Counting Scale User Instructions
3.5 Operation as a Counting Scale
3.5
Operation as a Counting Scale
Counting consists of two major steps; entering a piece weight and adding the
items to be counted. You enter the piece weight in one of these ways:
•
bulk sampling or dribble sampling (bulk is the default method)
•
reverse sampling, method 1 or method 2 (method 1 is default). This
can be used if either bulk or dribble is enabled.
These are fully explained in their respective sections below along with step
by step instructions for counting using these methods. Sampling methods
were set up before you received your scale but they can be changed. See
the Service Manual.
Once a piece weight is established,
it remains active until another piece
weight is automatically calculated
by a sampling process.
General Counting Information
If the COUNT annunciator is lit, numbers on the display show the number of
pieces on the scale. If the WEIGHT annunciator is lit, the display shows the
weight of the items on the scale. Press the COUNT/WEIGHT key to switch
between these two.
If there is no piece weight, the scale will not go into count mode when you
press the COUNT/WEIGHT key.
After counting items, remove them and the display should return to zero. If
not, press the ZERO key.
The STABLE annunciator is controlled by the weight division setting and
STABLE setting in SCALE menu and does not necessarily reflect the
stability in the count mode.
You can place a container on the scale and press the TARE key to tare the
weight. The TARE indicator lights to remind you that there is an active tare
weight.
When you press the SAMPLE key the scale performs an auto-zero or tare.
A counting scale needs a minimum amount of weight to calculate counts with
accuracy. Avery Weigh-Tronix recommends the sample weight be a
minimum of 0.04% of scale capacity for 99% accuracy. The table below
shows the minimum sample weights recommended to guarantee the
accuracies listed. Actual minimum sample weight required is 0.02%.
PC-902 Counting Scale User Instructions
11
Scale Setup and Operation
3.6
Counting Using Bulk Sampling
Bulk sampling is an automated sampling method. You place all the items to
be sampled on the scale at the same time and the scale will automatically
calculate the piece weight and display the count, without any further action.
Follow these steps for bulk sampling.
If you have a container, place it on the scale and press the TARE key to tare
the container. This can be done in count or weight mode.
1.
In weight or count mode, repeatedly press the sample key until the
sample size you want is displayed and press SAMPLE…
Your display may show ZEroing briefly. This occurs if it takes time
for the scale to find the Zero Reference. If a zero reference cannot
be acquired within 10 seconds due to excessive vibration, Abort
will be displayed. If this sampling error occurs, check to be sure the
scale is stable and start over at step #1. If all is OK, you will see the
following:
Important!
If there is no active piece weight,
the scale will not go into count
mode when you press the COUNT/
WEIGHT key.
Add 5 is displayed. 5 is the default sample size. The minimum
sample size can be configured to be 1, 2, 5, 10, 25, 50 or 100. See
the PC-902 Service Manual.
2.
Place 5 sample parts on the scale at the same time…
StAndbY is displayed while the unit computes the weight of the
sample and displays the count. If the scale determines that the
sample size meets the minimum accuracy requirement, 5 will be
displayed and you can skip to step 4.
If the scale determines the sample size does not meet the minimum
accuracy requirement, the display will prompt you to Add XXX
more parts. When prompting you, Add will flash.
The number XXX is the result of the scale rounding up, to the next
available sample size, from an actual number of pieces it has
calculated are needed to meet the required accuracy. For example:
If the scale determines that six pieces are needed to be added for
the sample weight to meet the minimum for the required accuracy,
the display will show the next larger sample size, 10 in this
example, and the display will show Add 10.
When you press the SAMPLE key,
the PC-902 performs an autozero
operation. So, if you have an empty
container on the scale and press
the SAMPLE key, the container
weight will be zeroed and when
you place the parts to be counted
on the scale, only the weight and
count of the parts will be shown.
3.
Add the requested samples to those already on the scale at the same
time…
StAndbY is displayed while the scale updates the piece weight. If
the sample meets the minimum accuracy, the count will be
displayed.
4.
Add the items you wish to count to the scale…
Total count is displayed.
5.
Remove the parts from the scale and add more of the same parts to
continue counting.
Press the COUNT/WEIGHT key to
toggle between count and weight
mode.
12
PC-902 Counting Scale User Instructions
3.7 Counting Using Dribble Sampling
3.7
Counting Using Dribble Sampling
Dribble sampling requires one more step than bulk sampling You can count
the items to be sampled onto the scale and then press the SAMPLE key to
begin the piece weight calculation. This can be handy if the items are more
easily counted onto the scale one at a time versus all at once.
Follow these steps for dribble sampling.
If you have a container, place it on the scale and press the TARE key to tare
the container and press the TARE key. This can be done in count or weight
mode.
1.
In weight or count mode, repeatedly press the sample key until the
sample size you want is displayed and press SAMPLE…
Your display may show ZEroing briefly. This occurs if it takes time
for the scale to find the Zero Reference. If a zero reference cannot
be acquired within 10 seconds due to excessive vibration, Abort
will be displayed. If this sampling error occurs, check to be sure the
scale is stable and start over at step #1. If all is OK, you will see the
following:
Important!
If there is no active piece weight,
the scale will not go into count
mode when you press the COUNT/
WEIGHT key.
Add 5 is displayed. 5 is the default sample size. The minimum
sample size can be configured to be 1, 2, 5, 10, 25, 50 or 100. See
the PC-902 Service Manual.
2.
Count 5 sample parts onto the scale, wait for the STABLE annunciator
to light and then press the SAMPLE key…
StAndbY is displayed while the unit computes the weight of the
sample and displays the count. If the scale determines that the
sample size meets the minimum accuracy requirement, 5 will be
displayed and you can skip to step 4.
If the scale determines the sample size does not meet the minimum
accuracy requirement, the display will prompt you to Add XXX
more parts. When prompting you, Add will flash.
The number XXX is the result of the scale rounding up, to the next
available sample size, from an actual number of pieces it has
calculated are needed to meet the required accuracy. For example:
If the scale determines that six pieces are needed to be added for
the sample weight to meet the minimum for the required accuracy,
the display will show the next larger sample size, 10 in this
example, and the display will show Add 10.
When you press the SAMPLE key,
the PC-902 performs an autozero
operation. So, if you have an empty
container on the scale and press
the SAMPLE key, the container
weight will be zeroed and when
you place the parts to be counted
on the scale, only the weight and
count of the parts will be shown.
3.
Add the requested samples to those already on the scale. Wait for the
scale to stabilize, then press the SAMPLE key…
StAndbY is displayed while the scale updates the piece weight. If
the sample meets the minimum accuracy, the count will be
displayed.
4.
Add the items you wish to count to the scale…
Total count is displayed.
5.
Remove the parts from the scale and add more of the same parts to
continue counting.
Press the COUNT/WEIGHT key to toggle between count and weight mode.
PC-902 Counting Scale User Instructions
13
Scale Setup and Operation
3.8
Using Reverse Sampling for Counting, Method 1
Method 1 or 2 are chosen in the
Service Menu. See the Service
Manual for instructions.
Reverse sampling occurs when you place an unknown number of items on
the scale, determine a piece weight (by method 1 or 2), and the scale counts
items as they are removed from the scale.
Method 1 and 2 are slightly different. Method 1 results in negative counts as
parts are removed. Method 2 results in positive counts as parts are removed.
Method 1 is explained below, method 2 in the next section.
Method #1 (Default setting)
1.
Place full container on the scale.
2.
Press SAMPLE…
ADD XXX is displayed.
3.
Remove an unknown number of parts from the container. Once stable
the scale will acknowledge that the weight is less then initial zero and
the message Add XXX will return.
4.
Add the number of parts shown back into the container. If SAMPLE
TYPE is set to DRIBBLE mode, press the SAMPLE key.…
The scale will calculate the piece weight and display the number of
parts based on the net weight on the scale.
5.
14
To begin reverse counting of parts, clear any entered tare weight,
place all the parts back into the container and press ZERO. As parts
are removed, the count of items removed is displayed as a negative
number.
PC-902 Counting Scale User Instructions
3.9 Using Reverse Sampling for Counting, Method 2
3.9
Using Reverse Sampling for Counting, Method 2
Method 1 or 2 are chosen in the
Service Menu. See the Service
Manual for instructions.
Reverse sampling is independent of the bulk or dribble modes. It does not
matter which of those you have enabled.
Reverse sampling occurs when you place an unknown number of items on
the scale, determine a piece weight (by method 1 or 2), and the scale counts
items as they are removed from the scale.
Method 1 and 2 are slightly different. Method 1 results in negative counts as
parts are removed. Method 2 results in positive counts as parts are removed.
Method 2 is explained below, method 1 in the previous section.
Method 2 can be done with or without taring a container. Both ways are
explained below:
Method #2 - With a Tare
Weight
1.
Place an empty container on the scale and press the TARE key to
enter a tare weight.
2.
Place the parts in the container on the scale.
3.
Press the SAMPLE key…
ADD XXX is displayed.
4.
Remove the number of parts shown by the ADD XXX prompt…
The display will flash ADD XXX.
5.
Press the SAMPLE key…
The display will show the number of parts remaining in the
container.
6.
Place the parts that were sampled back into the container…
The total number of parts is displayed.
7.
If you want to see positive counts as items are removed from the
scale, press the ZERO key…
The scale will clear the count and tare value and as parts are
removed from the scale, the display will show a positive number.
Method #2 - Without a Tare
Weight
1.
Without a tare weight entered place full container on the scale.
2.
Press the SAMPLE key…
ADD XXX is displayed.
3.
Remove the number of parts shown by the ADD XXX prompt…
The display will flash ADD XXX.
4.
Press the SAMPLE key…
The display will show the number of parts removed from the scale.
3.10
5.
Keep removing parts to see the total number removed.
6.
You can add more parts to the scale, then press the ZERO key to zero
the count and continue removing parts and counting what you
remove.
Clearing a Tare Weight
To clear the current tare weight, press the TARE key with no weight on the
scale or press the CLEAR key followed by the TARE key. The active tare
will be deleted.
PC-902 Counting Scale User Instructions
15
Serial Communications
4
Serial Communications
This section covers the serial communications capabilities of the PC-902. In
this section you will find:
Default serial settings are:
9600 Baud, 8 databits, No parity,
and 1 stop bit
4.1
•
4.1 - Cable Pinouts (page 16)
•
4.2 - Preset Print Formats (page 18)
•
- Imp Printer Formats (page 18)
•
- Dymo Label Writer Setra 300 Formats (page 20)
•
- Zebra 2844 Printer Formats (page 21)
•
- PC Protocol (page 22)
•
- NCI Protocol (page 24)
•
- Broadcast Protocol (page 26)
Cable Pinouts
The RS-232 serial port connection at the rear of the scale is shown in Figure
4.1.
Figure 4.1 PC-902 Back Panel
16
PC-902 Counting Scale User Instructions
The functional pinout is as follows:
DB-9F Scale Serial I/O Connector
Pin
PC-902 Counting Scale User Instructions
Signal Description
1
Reserved
2
TXD
3
RXD
4
Reserved
5
SIG GND
6
Reserved
7
Reserved
8
Reserved
9
+5V
17
Serial Communications
4.2
Preset Print Formats
Imp Printer Formats
8 Formats are available with the Imp printer selected.
LEGEND:
CR = carriage return
LF = line feed
SP = space
U = units character
W = net weight character
C = count character
T = Tare character
G = gross weight character
P = piece weight character
I = weight type identifier ‘G’, ‘T’, ‘N’ (gross, tare or net)
1.
Ft 1 = Net weight onlyWWWW.WW<CR><LF>
2.
Ft 2 = Net weight with unitsWWWW.WW<SP>UU<CR><LF>
3.
Ft 3 = GTN with units‘G’<SP>GGGG.GG<SP>UU<CR><LF>
‘T’<SP>TTTT.TT<SP>UU<CR><LF>
‘N’<SP>WWWW.WW <SP>UU<CR><LF>
18
PC-902 Counting Scale User Instructions
4.2 Preset Print Formats
4.
Ft 4 = Displayed count or weight with identifierIn COUNT MODE,
<SP> CCCCCCC<SP>PCS<CR><LF>
In WEIGH MODE,
I<SP>WWWW.WW<CR><LF>
5.
Ft 5 = Displayed weight with identifier and unitsIn COUNT MODE,
<SP> CCCCCCC<SP>PCS<CR><LF>
In WEIGH MODE,
I<SP>WWWW.WW<SP>UU<CR><LF>
6.
Ft 6 = Net weight with units, count and piece weightNet
Count
= WWWW.WW<SP>UU<CR><LF>(Net = or Gross = )
= CCCCCCC<CR><LF>
Piece Wt = PPPPPP<SP>UU<CR><LF>
7.
Ft 7 = Net weight only with polarity and units in a fixed field format.
<SP/->WWWW.WWW<SP>UU<CR>
PC-902 Counting Scale User Instructions
19
Serial Communications
8.
Ft 8 = Count only with a fixed field formatCOUNT:<SP>CCCCCCC<SP>PCS<CR><LF>
Dymo Label Writer Setra
300 Formats
20
PC-902 Counting Scale User Instructions
4.2 Preset Print Formats
Zebra 2844 Printer Formats
Time and date will appear only if the printer has this option installed.
PC-902 Counting Scale User Instructions
21
Serial Communications
PC Protocol
The scale's RS-232 bidirectional communication works in a master/slave
protocol. A computer or master sends a command code to the scale (slave)
which will return a response to the master device or perform a scale
function. Commands to the scale are in uppercase, terminated with a
carriage return. Scale responses begin with the lowercase equivalent of the
command code.
COMMAND
RESPONSE
DESCRIPTION
CA<CR>
none
Clear Sample
CC<CR>
cc_xxxxx<CR>
Request piece count
CP<CR>
cp_x.xxxxxxuu<CR>
Request piece weight value
CM<CR>
none
Switch to count mode
DIxxxxxxx<CR>
none
Display Message xxxx
(message is 7 characters max)
IC<CR>
none
Reset Scale (warm start)
PWx.xxxxx_uu<CR>
none
Loads x.xxxxx as piece weight
TR<CR>
tr_ _ _ _x.xxxuu<CR>
Request tare value
TZ<CR>
none
Clear the current tare
Txxxx.x_uu<CR>
none
Loads xxxx.x as tare
WD<CR>
wd_ _ _xx.xxx<CR>
Request net weight
WE<CR>
we_ _ _xx.xxxuu<CR>
Request net weight with units
W<CR>
w_ _ _ _x.xxxuuHML<CR>
Request net weight with units
and status
WG<CR>
wg_ _ _xx.xxxuu<CR>
Request gross weight with
units
WM<CR>
none
Switch to weight mode
WS<CR>
ws_HML<CR>
Request scale status
WZ<CR>
none
Zero the scale
Legend:
1)
"_"
represents the ASCII space character
2)
"u”
represents the units of measure character(s):
"LB" for pounds
"KG" for kilograms
"G" for grams
22
3)
<CR>
represents the ASCII carriage return
4)
HML
represents three bytes of scale status information as
described under Status Bytes below.
5)
Value entered is assumed to be in same units of measure as
what the scale is currently in.
6)
Display messages are limited to seven characters.
PC-902 Counting Scale User Instructions
4.2 Preset Print Formats
Status Bytes
PC-902 Counting Scale User Instructions
23
Serial Communications
NCI Protocol
Key to symbols used:
<STX>
Start of Text
<ETX>
End of Text character
<LF>
Line Feed character
<CR>
Carriage Return character
<SP>
Space
X
Weight characters from display including minus sign and outof-range characters
HML...
Three status bytes
uu
Units of measure (lb, kg, oz, g, etc. using ANSI standard
abbreviations).
Command
Possible Scale Response
Notes*
Descriptions
W<CR>
<LF>XXXXX.XXuu<CR><LF>[HML]<CR><ETX
1,2
Returns weight
H<CR>
<LF>XXXXX.XXXuu<CR><LF>[HML]<CR><ETX>
1,2
Returns weight in high resolution
Z<CR>
<LF>[HML]<CR><ETX>
Zeros scale
S<CR>
<LF>[HML]<CR><ETX>
Returns scale status
T<CR>
<LF>[HML]<CR><ETX>
Tares the scale
M<CR>
<LF>XXXXXXXXMM<CR><LF>[HML]<CR><ETX>
Returns raw counts
U<CR>
As if UNITS key was pressed
Changes unit of measure
All other
<LF>?<CR><ETX>
Bad command
*NOTES
24
1.
The decimal point position may be different depending on selected
capacity and division. There may not be a decimal point in some
gram’s unit of measure.
2.
The character count will be one more if the decimal point is included.
PC-902 Counting Scale User Instructions
4.2 Preset Print Formats
The NCI protocol may have three status bytes. The status bits are defined
as follows:
PC-902 Counting Scale User Instructions
25
Serial Communications
Broadcast Protocol
Broadcast protocol will support the use of the RD-4100, RD-6100 and
Evolution series indicators as remote displays.
The broadcast protocol will output this display string:
G<SP>00000<SP>lb<CR><LF>
26
PC-902 Counting Scale User Instructions
5
Error Messages
The error messages you might see on the display are shown below.
Error message
no CAL
Scale has not yet been calibrated
Lo bAt
Low Battery voltage
SPL Err - Abort
CAn't
PC-902 Counting Scale User Instructions
Error condition
Sampling error, aborting process. Use next available
sample size.
Unable to perform the requested function
------- (middle segments)
Unable to perform automatic zero balance on power-up
------- (upper segments)
Over-range condition
------- (lower segments)
Under-range condition
27
Error Messages
28
PC-902 Counting Scale User Instructions
6
Specifications
Capacity (lb)
Available Countby Values
5,000d
NTEP
(Default)
25,000d
50,000d
100,000d
10
.002
.001
.0005
.0002
.0001
25
.005
.002
.001
.0005
.0002
50
.01
.005
.002
.001
.0005
100
.02
.01
.005
.002
.001
Capacity (kg)
Available Countby Values
5,000d
NTEP
(Default)
25,000d
50,000d
100,000d
5
.001
.0005
.0002
.0001
.00005
12
.002
.001
.0005
.0002
.0001
25
.005
.002
.001
.0005
.0002
50
.01
.005
.002
.001
.0005
Capacity (g)
Resolution can be expanded up to
500,000 divisions depending on
the application.
PC-902 Counting Scale User Instructions
Available Countby Values
5,000d
NTEP
(Default)
25,000d
50,000d
100,000d
5000
1
.5
.2
.1
.05
12000
2
1
.5
.2
.1
25000
5
2
1
.5
.2
50000
10
5
2
1
.5
Capacity (oz)
available countby values
5,000d
NTEP
(Default)
25,000d
50,000d
100,000d
160
.05
.02
.01
.005
.002
400
.1
.05
.02
.01
.005
800
.2
.1
.05
.02
.01
1600
.5
.2
.1
.05
.02
29
Specifications
Internal Resolution:
1:2,000,000
Dimensions:
Weighing Platform:
12.6” X 14.08”, 25, 50 & 100 lb capacity
8” diameter, 10 lb capacity
Display Assembly:
6.31” x 12.86”
Overall Dimensions: 17.50” x 14.08” x 4.25-5.40”
Construction:
Diecast aluminum base and load bridge, Stainless Steel Weight Platter,
ABS plastic display assembly
Display:
Large 0.5” H 7-digit / 7-segment Backlit LCD display.
Response Time (typical)
The dynamic response of the scale is adjustable through the filtering
selection. The time weight is applied to scale to the time stable weight is
displayed which varies depending on the amount of weight applied and any
filtering that is in effect.
Stability Time
Weight Applied
Filter On
Filter Off
Internal scale
0 - 1000d
1.0 sec
.75 sec
+1000d
1.25 sec
1.0 sec
External scale
0 - 1000d
1.5 sec
1.25 sec
+1000d
2.0 sec
1.75 sec
Battery Saver
Selectable modes of 5,10,20,30, and 60 minutes for auto shut-off and
adjustment of backlit to auto or off to increase battery performance.
Power Supply
Standard:120 Vac +10% -15% standard 3 wire w/ground @
60 Hz +/- 3 Hz
9 VDC @ 1.3 Amps DC minimum
UL approved
Optional:230 Vac +10% - 15% with universal connector @
50 Hz +/- 3 Hz
9 VDC @ 1.8 Amps DC minimum
CE approved
Internal / External Battery
Sealed lead acid with a full charge value of 6.8 +/- .1 volts at 2.8 AH
(external) or 7.0AH .
Operating Environment:
+5 to 40 degrees C(Class III Device)
+5 to 35 degrees C(Class II Device)
10 to 90% RH, non-condensing
Agencies:
NTEP 12,500 divisions pending, Class II (25, 50 lb capacities)
NTEP 10,000 divisions pending, Class III (10, 100 lb capacities)
OIML 10,000 divisions single interval, 6,000 divisions multi-interval
30
PC-902 Counting Scale User Instructions
Avery Weigh-Tronix USA
1000 Armstrong Dr.
Fairmont MN 56031 USA
Tel: 507-238-4461
Fax: 507-238-4195
Email: [email protected]
www.wtxweb.com
Avery Weigh-Tronix UK
Foundry Lane,
Smethwick, West Midlands,
England B66 2LP
Tel: +44 (0)870 903 4343
Fax: +44 (0)121 224 8183
Email: [email protected]
www.averyweigh-tronix.com