1
How to Contact Us
Our main office
(UK, Europe):
The Software Center
PO Box 2000, Nottingham,
NG11 7GW, UK
Main:
(0115) 914 2000
Registration (UK only):
(0800) 376 1989
Sales (UK only):
(0800) 376 7070
Customer Service/
Technical Support:
http://www.support.serif.com/
General Fax:
(0115) 914 2020
North American office
(USA, Canada):
Serif Inc, The Software Center,
17 Hampshire Drive, Suite 1 & 2,
Hudson, NH 03051, USA
Main:
(603) 889-8650
Registration:
(800) 794-6876
Sales:
(800) 489 6703
Customer Service/
Technical Support:
http://www.support.serif.com/
General Fax:
(603) 889-1127
Online
Visit us on the web at:
http://www.serif.com/
International
Please contact your local distributor/dealer. For further details, please contact us
at one of our phone numbers above.
Credits
This User Guide, and the software described in it, is furnished under an end user
License Agreement, which is included with the product. The agreement specifies
the permitted and prohibited uses.
Trademarks
Serif is a registered trademark of Serif (Europe) Ltd.
PhotoPlus is a registered trademark of Serif (Europe) Ltd.
All Serif product names are trademarks of Serif (Europe) Ltd.
Microsoft, Windows and the Windows logo are registered trademarks of
Microsoft Corporation. All other trademarks acknowledged.
Windows Vista and the Windows Vista Start button are trademarks or
registered trademarks of Microsoft Corporation in the United States and/or
other countries.
Adobe Photoshop is a registered trademark of Adobe Systems Incorporated in
the United States and/or other countries.
Copyrights
Digital Images © 2008 Hemera Technologies Inc. All Rights Reserved.
Digital Images © 2008 Jupiterimages Corporation, All Rights Reserved.
Digital Images © 2008 Jupiterimages France SAS, All Rights Reserved.
Portions Images ©1997-2002 Nova Development Corporation; ©1995
Expressions Computer Software; ©1996-98 CreatiCom, Inc.; ©1996-99
Cliptoart; ©1996-99 Hemera; ©1997 Multimedia Agency Corporation; ©199798 Seattle Support Group. Rights of all parties reserved.
Portions graphics import/export technology LEADTOOLS © LEAD
Technologies, Inc. All Rights Reserved.
The Radiance Software License, Version 1.0
Copyright (c) 1990 - 2002 The Regents of the University of California, through
Lawrence Berkeley National Laboratory. All rights reserved.
This product includes Radiance software (http://radsite.lbl.gov/) developed by
the Lawrence Berkeley National Laboratory (http://www.lbl.gov/).
©2010 Serif (Europe) Ltd. All rights reserved. No part of this User Guide may be
reproduced in any form without the express written permission of Serif (Europe)
Ltd.
Serif PhotoPlus X4 ©2010 Serif (Europe) Ltd. All rights reserved.
Companies and names used in samples are fictitious.
Contents
1. Welcome ............................................................ 1
Welcome to PhotoPlus X4 .................................................................................. 3
PhotoPlus and AlbumPlus Organizer: a powerful combination......... 3
Registration ............................................................................................................... 3
New features ............................................................................................................. 4
Existing features ...................................................................................................... 6
Installation .............................................................................................................. 13
2. Getting Started ................................................. 15
Startup Wizard ...................................................................................................... 17
Starting from scratch.......................................................................................... 18
Opening an existing file.................................................................................... 20
Opening a raw image......................................................................................... 22
Getting images from cameras and scanners ........................................... 26
Saving a file ............................................................................................................ 26
3. Layers and Masks ............................................ 29
Basics of using layers.......................................................................................... 31
Using layer groups .............................................................................................. 37
Using blend modes............................................................................................. 38
Adjusting opacity/transparency.................................................................... 40
Using depth maps ............................................................................................... 41
Using masks ........................................................................................................... 44
Table of Contents
4. Image Adjustments and Effects ...................... 49
Introduction to image adjustments .............................................................51
Overview: Adjusting image colors ................................................................51
Using adjustment layers ....................................................................................54
Retouching ..............................................................................................................57
Straightening a photo ........................................................................................58
Using PhotoFix ......................................................................................................60
Overview: Applying special effects ...............................................................67
Using filter layers ..................................................................................................68
Using the Filter Gallery .......................................................................................74
Applying 2D layer effects ..................................................................................78
Applying 3D layer effects ..................................................................................79
Warp tool effects...................................................................................................82
Merging bracketed photos ..............................................................................84
5. Manipulating Images ....................................... 89
Making a selection ...............................................................................................91
Modifying a selection .........................................................................................96
Manipulating a selection................................................................................ 100
Changing image and canvas size ............................................................... 102
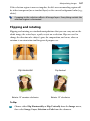
Flipping and rotating ....................................................................................... 107
Deforming ............................................................................................................ 108
Mesh warping ..................................................................................................... 110
Using Image Cutout Studio........................................................................... 114
Using channels ................................................................................................... 117
Interpreting histograms ................................................................................. 119
Table of Contents
6. Painting and Drawing..................................... 121
Color concepts .................................................................................................... 123
Choosing colors.................................................................................................. 124
Painting .................................................................................................................. 128
Stamping and spraying pictures ................................................................. 130
Erasing .................................................................................................................... 131
Using patterns ..................................................................................................... 134
Filling a region .................................................................................................... 136
Cloning a region................................................................................................. 141
Creating and editing text ............................................................................... 142
Drawing and editing lines and shapes ..................................................... 145
Creating outlines................................................................................................ 152
Using paths........................................................................................................... 154
7. Making Images for the Web .......................... 159
Slicing images ..................................................................................................... 161
Creating image maps....................................................................................... 162
8. Macros and Batch Processing....................... 165
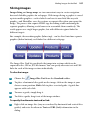
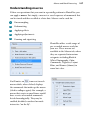
Understanding macros.................................................................................... 167
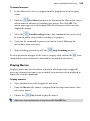
Batch processing................................................................................................ 172
9. Creating Animations ...................................... 177
Getting started with animation ................................................................... 179
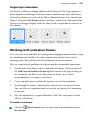
Working with animation frames.................................................................. 181
10. Pressure sensitivity and pen tablets.............. 185
Pressure sensitivity............................................................................................ 187
Using pen tablets ............................................................................................... 188
Table of Contents
11. Printing and Exporting ................................... 191
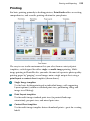
Printing .................................................................................................................. 193
Publishing a PDF file......................................................................................... 201
Exporting to another file format ................................................................. 203
Sharing documents by email........................................................................ 206
12. AlbumPlus Organizer: Getting Started.......... 207
Organizing photos ............................................................................................ 209
Creating a new album ..................................................................................... 210
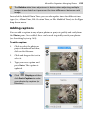
Adding photos to your album ..................................................................... 214
13. AlbumPlus Organizer: Managing Photos ...... 221
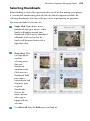
Selecting thumbnails ....................................................................................... 223
Thumbnail styles................................................................................................ 224
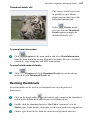
Resizing thumbnails ......................................................................................... 227
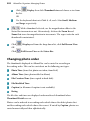
Changing photo order .................................................................................... 228
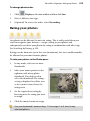
Rating your photos ........................................................................................... 229
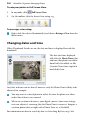
Changing dates and time............................................................................... 230
Adding captions................................................................................................. 233
Adding comments and file information to photos ............................. 234
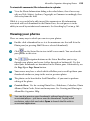
Viewing your photos........................................................................................ 235
Full Screen View ................................................................................................. 236
Deleting photos ................................................................................................. 238
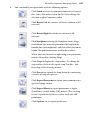
Copying and moving photos ....................................................................... 239
Rotating and flipping photos ....................................................................... 239
Creating panoramas......................................................................................... 240
File management .............................................................................................. 242
Setting preferences .......................................................................................... 244
Using the Tags pane ......................................................................................... 245
Understanding metadata............................................................................... 250
Table of Contents
14. AlbumPlus Organizer: Searching for Photos 253
Searching for photos ........................................................................................ 255
Searching by tag ................................................................................................ 255
Searching by media type................................................................................ 258
Searching by rating........................................................................................... 259
Searching by import history.......................................................................... 260
Searching by text ............................................................................................... 261
Searching by photo properties .................................................................... 262
Searching by date .............................................................................................. 264
15. Index ............................................................... 265
Table of Contents
1
Welcome
2
Welcome
Welcome
3
Welcome to PhotoPlus X4
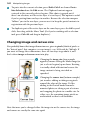
Welcome to PhotoPlus X4 from Serif—more than ever, the best value in
image creation and editing software for any home, school, organization, or
growing business. PhotoPlus is the number one choice for working with
photographs and paint-type images, whether for the web, multimedia, or the
printed page.
PhotoPlus has the features you’ll need... from importing or creating pictures,
through manipulating colors, making image adjustments, applying filter effects
and so much more, all the way to final export. Built-in support for the most
modern digital cameras makes it easy to open your very own digital photos,
either as JPG or as unprocessed raw images.
PhotoPlus also offers on-computer post-shoot development, using Raw Studio,
where you're in full control of your raw image's white balance and exposure, and
perform "blown" highlight recovery. Raw Studio complements other studios,
such as PhotoFix, Filter Gallery, and Image Cutout Studio for image
adjustments, filter effects (including stunning artistic effects), and layer cutouts,
respectively.
For an overview of PhotoPlus, see Existing features and New features (specific to
PhotoPlus X4).
PhotoPlus and AlbumPlus Organizer: a powerful
combination
PhotoPlus takes care of all your image creation and photo editing needs.
However, if you're looking to take a step back from photo editing and manage
your collection of photos, scanned images, etc. you can use AlbumPlus
Organizer (see p. 209), installed automatically and fully integrated with
PhotoPlus. You'll be able to sort, rate, caption, and tag your photo collection, as
well as search by a variety of methods.
Registration
Don’t forget to register your new copy, using the Registration Wizard on the
Help menu. That way, we can keep you informed of new developments and
future upgrades!
4
Welcome
New features
Effects and Adjustments
Non-destructive Image Adjustments! (p. 60)
Preserve your original image layer by creating filter layers directly after
PhotoFix adjustments. For different adjustments on areas of your image,
create one or more masks—each mask storing its own set of editable
adjustments! Now use improved help-assisted Red Eye, Straighten, Crop,
and Spot Repair tools for easy retouching. Save individual or multiple
adjustments as favorites for future use. Try out Curves adjustments,
directly from PhotoFix.
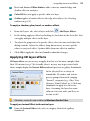
Apply Adjustment Layers from new Adjustment Tab (p. 54)
Add adjustment layers easily—avoiding those time-consuming dialogs!
Simply select one of an impressive range of adjustment presets and you're
done! Each preset is designed to correct common tonal or color image
deficiencies, every one customizable to your specific needs.
Filter Layer Improvements (p. 68)
Automatically create filter groups with optional filter masking. Apply
blend modes and opacity filter-by-filter.
Filter Gallery (p. 74)
With a fresh new look, the gallery now incorporates the ever-popular
Instant Artist effects (Oil, Impressionist, Pencil, Watercolor, Paint and Ink,
and more).
Productivity and Workflow
Customized Keyboard Shortcuts, Menus and Toolbars
Take advantage of customizable keyboard shortcuts—assign your own
keystrokes to toolbar and menu commands! Tailor PhotoPlus to your needs
with menu, toolbar, and icon customization. Now jump between tools
using single-letter keyboard shortcuts.
Change your Studio Tab Layouts
With different workspaces, PhotoPlus offers a choice of Studio tab layouts,
each designed for specific tasks or uses. Alternatively, create your own
workspaces!
Welcome
5
Modify Selection with Preview
Feather, Smooth, Contract, and Expand your selection in combination,
from one location. Preview your current settings on the page.
Design
Quick-and-easy Cutouts (p. 114)
Image Cutout Studio makes light work of cutting out parts of your active
layer. Use brushes to discard uniform backgrounds (sky, walls, backdrops)
or keep subjects of interest (people or objects).
Selection Power—by Brush! (p. 99)
Create selection areas defined by your laid-down brush strokes. Use Effect,
Stamp, and Media brushes for more creative selection areas; your brush's
characteristics (size, spacing, opacity) being honoured along with the
stroke's pressure sensitivity.
Pressure Studio for Pen Tablets (p. 188)
Calibrate and test your tablet's input devices, switch on/off global
pressure input, and even set up function keys, rings, wheels, and sliders
from within PhotoPlus—all from a single studio! Appropriate brushes are
now pressure-sensitive by default! For Wacom Intuos4 users, take
advantage of OLED touch-sensitive shortcuts, where illuminated PhotoPlus
tool icons show in your tablet's Functions area.
Pixel grid for Web Developers
Draw objects and position selection areas with absolute pixel accuracy;
benefit from automatic grid display and pixel-by-pixel snapping.
..and some other enhancements you've requested
User Interface Color Schemes
Choose from Silver, Blue, Aqua, Silver-Blue, or Classic for a different
PhotoPlus look.
Running out of Workspace?
Control the automatic sizing and collapse of Studio tabs. Apply animation
effects during expansion and collapse of tab groups.
Improved EXIF Support (p. 203)
Retain EXIF data when saving or exporting an image.
6
Welcome
Existing features
PhotoPlus power
Professional Input and Output Options
Import an impressive selection of graphic files, including raw images from
all the major manufacturers' cameras (and many more...). Support for
Photoshop® (.PSD), HD Photo, and Corel Paint Shop Pro® import! Export
to an equally extensive choice of graphic file formats!
Preset Canvas Sizes
If you're creating a new picture, adopt a preset canvas size selected from
Photo, Video, Web, Animation or International/US Paper categories.
Alternatively, create your own categories and canvas sizes which can be
saved for future use!
Versatile Layer Management
Create standard layers of varying opacity over your Background layer.
Select, link, merge, arrange, hide, duplicate one or multiple layers all at the
same time. Grouping of layers offers easier "bulk" manipulation and better
organization. Blend Modes can be applied between layers. Shape and Text
layers can be edited at any time; Adjustment and Filter layers offer nondestructive image correction and effects. Masking is supported on all layer
types.
Post-shoot Raw "Development" with Raw Studio
Open raw files in Raw Studio and fine tune your work with white balance,
exposure, noise reduction, and chromatic aberration adjustments.
Recover "blown" image highlights with the fantastic Highlight recovery
feature. A supporting multi-color histogram aids exposure and recovery
control.
Unique Selection Options
PhotoPlus goes well beyond the basic rectangle, ellipse, freehand, and
polygon lasso tools, adding more than a dozen completely customizable
selection shapes like polygons, spirals, and stars. Use Magnetic Selection to
find edges as you trace them. Or define a selection shaped like text! Paint to
Select mode lets you literally "brush on" selectedness. Store and load
Welcome
7
selections between any open file. Use combination buttons (as for shapes)
to define cutout selection regions. Convert selections into paths.
Crop to Common Print Sizes
Use the Crop Tool for easy cropping to different portrait and landscape
preset and custom print sizes—print resolution will auto-adjust to honour
any print size.
Special Erase Options
Need to remove that blue sky and leave the clouds? Use the Flood Eraser to
fill the blue regions with transparency. Want to isolate a shape from a flat
color background? The Background Eraser samples pixels under the brush,
so only unwanted colors drop out.
Color
16-bit Color Depth/Detail
Work in high levels of detail (16-bits/channel) for both RGB and grayscale
modes. Each mode can be adopted from scratch or after raw/HD photo
import and when outputting HDR merge results.
Channels
Use PhotoPlus's Channels tab to edit the Red, Green and Blue channels
independently.
Histogram Support
The Histogram tab dynamically responds to show the values for the
currently active selection within your document. See how curves and level
adjustments affect your image as they happen!
Custom and preset color selection
The Color tab operates in RGB, CMYK, HSL, and Grayscale models for
selecting foreground and background colors when painting, creating lines
or filling shapes. Use the Swatches tab for themed galleries of preset color
swatches. Use a Web-browser safe category when outputting to the web.
8
Welcome
Gradient Fills
Take your pick of radial, linear, conical, or square fills—perfect for
masking, to hide or reveal parts of your photo using smooth graduated
blends to transparency. One master dialog allows editing of five gradient
fill types combining both color and transparency. Choose from a built-in
gallery of presets, add your own categories and fills. (Of course, there's
standard flood fill as well.)
Professional Color Management
ICC color profiling means you'll achieve more accurate colors with specific
monitors and printers—for printed output that more closely matches onscreen colors.
Brushes, lines and shapes
Brushes
The Paintbrush Tool lets you apply brush strokes using preset brush tips.
choose a tip from basic, calligraphic, and various media categories
(watercolor, charcoal, paint, etc.). Stamp and Spray Picture Brush effects
and stamps. PhotoPlus lets you create your own category and brush tips!
Apply different colors, levels of transparency, blend modes, to any brush, all
at varying flow rates. Built-in support for most pressure-sensitive graphics
tablets.
Freehand and Bézier Curve and Shape Drawing
Powerful vector-drawing tools let you produce any shape under the sun
with controllable, connectable, editable line segments.
Editable QuickShapes
Easy to create, easy to change! Simply drag sliders to morph chevrons,
hearts, badges, teardrops, moons, zigzags, and many more... apply layer
effects and gradient fills... and edit any shape at any time. Create multiple
shapes on a single layer—add, subtract, intersect, or exclude with previous
shapes for frames, cutouts and custom contours. Draw directly as a Shape
layer, path or as a filled bitmap on a raster layer.
Paths
Use the full range of line- and shape-drawing tools to create editable
outlines via the Paths tab. Convert paths to or from selections on any layer.
"Stroke" paths using any brush to create bordered shapes!
Welcome
9
Text
Editable Text
Add formatted color text directly onto your image, reposition and scale it
by dragging. Text layers keep the contents separate so you can go back and
edit selected areas of text or adjust formatting (color, transparency, etc.) at
any time!
Effects
Filter Gallery
The distort, blur, edge, sharpen, render and stylistic effects can be applied
singularly or in combination within a Filter Gallery... guaranteed to keep
you up late!
Filter Layers
Convert to Filter Layer creates a non-destructive layer for powerful control
of applied filter effects—switch filter effects on/ off, modify or add to an
existing set of filter effects at a later date. Apply to standard or Background
layers. For either, your layer content now remains unaffected!
Special Effects
A wild and whimsical assortment for instant creativity to turn your photos
into works of art. PhotoPlus supports third-party Photoshop® plug-ins, and
even lets you design your own custom filters.
Layer Effects
Add 2D Layer Effects such as Shadow, Glow, Bevel, Outline and Emboss
for a sophisticated look on text or other image elements. Apply multiple
effects onto a layer's existing effects for stunning design output. Move into
the realm of astounding 3D Lighting and Surface Effects—advanced
algorithms bring flat shapes to life! Vary surface and multiple-light source
properties. Start with a pattern or a function, adjust parameters for
incredible surface contours, textures, fills. Use Reflection Maps of
indoor/outdoor bitmap environments or Transparency control to create
realistic glass-like reflective surfaces. Try 3D Painting using Depth Maps to
add instant dimensionality to your artwork. Painting or erasing on a
layer's depth map appears as raised or lowered strokes on the image! Use
with 3D layer effects to achieve "carved" side-view textures.
10
Welcome
Versatile Deform and Warp Tools
The "Swiss Army Knife" of image tools, the Deform Tool lets you rotate,
resize, skew, reshape, or add perspective to any selection or layer. Warp
tools pull, stretch, and distort image details, or shrink and enlarge. Pixels
turn to putty with the Mesh Warp Tool!
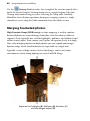
Merge Bracketed Photos
Use HDR (High Dynamic Range) Merge to bring together same-shot
photos, each taken at different exposure settings. The composite photo, of
wider dynamic range, would otherwise be impossible to capture in one
shot. Optionally save intermediate HDR images for future use.
Adjustments
Image Adjustments
Apply professional, darkroom-style color and histogram adjustments to
your images—giving you fingertip control over tones and colors. Adjust
Shadow/Highlight/Midtone to calm down overexposed skies in one single
operation without having to resort to manipulating curves and levels.
Employ the Blur and Sharpen tools to enhance or reduce local detail...
blend multiple layers more cleanly. There's even a dedicated tool for
removing "red eye" from flash photos.
Editable Adjustment Layers
Not only apply color corrections and special effects, but store each change
on a separate layer or group. To fine-tune any adjustment later, just click its
layer and change the settings!
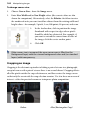
PhotoFix
Use for cumulative image adjustments! Adjustments include White
Balance, Brightness&Contrast, HSL (Hue/Saturation/Lightness), Noise
Reduction. Straighten and Crop your images—even control Exposure.
Equally, apply a Black and White Film effect, Sharpen, and fix Red Eye
and various lens-related problems amongst many others. A full-screen
dual-image preview display lets you compare and fix your images in an
instant.
Welcome
11
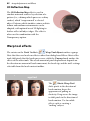
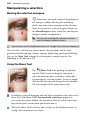
Retouching
Clone, Smudge, and Erase tools are included as essential retouch tools. Use
the PhotoFix’s Blemish Remover to subtly remove skin blemishes and
unwanted light reflections—all via blending. For more heavy-duty retouch
work, use the Patch Tool which is especially good for blending out
irregularly-shaped regions!
Productivity/Workflow
Always-at-Hand Tools
A Context toolbar improves your efficiency by allowing the viewing and
editing of a tool's properties in context with the tool currently selected; save
and retrieve your favorite tool settings via a Tool Presets tab.
Macros
Macros let you automate your actions by using a huge number of
categorized macro presets—alternatively, record and apply your own macro
to any number of photos—give all your photos the same frame, age them or
make a color enhancement all at the same time!
Batch Processing
Use batch processing to repeat your tasks, e.g. changing file types, all at the
same time without user intervention. When used in conjunction with
macros the possibilities are endless.
Web and Animation
Image Slicing and Image Maps
Now it's not just the pros who can use these techniques to add links to web
graphics! Simply click to divide images into segments—each with its own
hyperlink and popup text—or add hotspots to specific regions. PhotoPlus
outputs the HTML code and lets you preview the results directly in your
web browser.
12
Welcome
Animation Tools
It's easy and fun to create or edit animations for the web. You can import
and export animated GIFs, apply special effects (including 2D and 3D),
tweening, even let PhotoPlus create entire animations for you
automatically. Or export to the .AVI format for movies and multimedia!
Convert to Animation makes the process of taking any image into
animation mode a breeze!
Print and Share
Easy Printing
Print your project with powerful scaling and tiling options.
Print Studio
PhotoPlus's unified Print Studio allows you to print single images, artistic
and paper-saving layouts as well as contact sheets. Use the large range of
built in layouts or quickly and easily create your own.
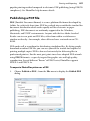
Publish to PDF
Export your documents to PDF, with powerful options for professional
printing (PDF/X-1 compatibility and prepress marks).
Powerful Image Export Optimizer
The Export Optimizer lets you see how your image will look (and how
much space it will take up) before you save it! Its multi-window display
provides side-by-side WYSIWYG previews of image quality at various
output settings, so you can make the best choice every time. Export to a
wide range of graphic formats including HD photo and TIF (48- and 64-bit
RGB; or 16-bit Grayscale).
Welcome
13
Installation
Minimum:
Windows-based PC with DVD/CD drive and mouse (main processor must
support SSE2 instructions)
Microsoft Windows® XP* SP2 (32 bit), Windows® Vista, or
Windows® 7 operating system
512MB RAM
276MB free hard disk space; 480MB with AlbumPlus Organizer installed.
1024 x 600 monitor resolution
* Requires Microsoft Windows Imaging Component.
Additional disk resources and memory are required when editing large and/or
complex images.
Optional:
Windows-compatible printer
TWAIN-compatible scanner and/or digital camera
Pressure-sensitive pen tablet
Internet account and connection required for accessing online resources
First-time install
To install PhotoPlus X4 simply insert the PhotoPlus X4 Program CD into your
DVD/CD drive. The AutoRun feature automatically starts the Setup process.
Just answer the on-screen questions to install the program.
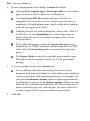
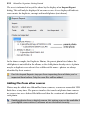
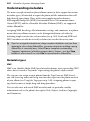
Re-install
To re-install the software or to change the installation at a later date, select
Control Panel from the Windows Start menu and then click on the Programs Uninstall a program option. Make sure the PhotoPlus X4 Program CD is
inserted into your CD/DVD drive, then select Serif PhotoPlus X4, click the
Change button and simply follow the on-screen instructions.
14
Welcome
2
Getting Started
16
Getting Started
Getting Started
17
Startup Wizard
Once PhotoPlus has been installed, you're ready to start!
The Setup routine during install adds a Serif PhotoPlus X4 entry to the
Windows Start menu. Use the Windows Start button to pop up the Start
Menu, click on All Programs and then click the PhotoPlus item.
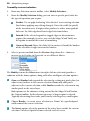
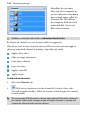
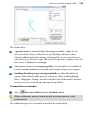
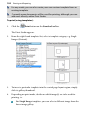
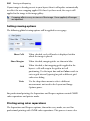
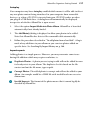
On program launch, the Startup Wizard is displayed which offers different
routes into PhotoPlus:
Create a New Image (or New Animation), to start from scratch.
Import From Twain, to acquire images (from scanner or camera).
HDR Photo Merge, for bracketing photos taken at different exposure
levels.
Go to My Album, to organize photos via AlbumPlus Organizer.
Open Recent, to list recently opened photos and PhotoPlus projects (plus
unopened photos). Hover over each entry for a quick preview!
Learning, to access online tutorial resources (web and video).
18
Getting Started
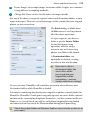
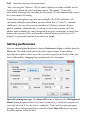
Use the Choose Workspace drop-down menu to choose your workspace
appearance (i.e., Studio tab positions, tab sizes, and show/hide tab status). You
can adopt the default workspace profile <Default Profile>, the last used profile
<Current Profile>, a range of pre-defined profile, or a custom workspace profile
you've previously saved.
As you click on different profiles from the menu, your workspace will
preview each tab layout in turn.
If you don’t want to use the Startup Wizard again, check the "Don't show this
wizard again" box. However, we suggest you leave it unchecked until you’re
familiar with the equivalent PhotoPlus commands. Switch the wizard back on
again by checking Use Startup Wizard via Preferences... (General menu
option) on the File menu.
Starting from scratch
PhotoPlus deals with two basic kinds of image files. We'll differentiate them as
pictures (still images) and animations (moving images). The two types are
closely related, and creating either from scratch in PhotoPlus involves the same
series of steps.
PhotoPlus lets you create an image based on a pre-defined canvas size (e.g., 10 x
8 in). Different canvas size options are available from a range of categories
(International/US Paper, Photo, Video, web, or Animation). Alternatively, you
can create your own custom canvas sizes, and even store them for future use. For
either preset or custom sizes, the resolution can be set independently of canvas
size.
When you create a new image, you can choose to work in different color modes,
i.e. RGB or Grayscale, in either 8- or 16-bits/channel. Use a Bit Depth of 16 bit
for higher levels of image detail.
Getting Started
19
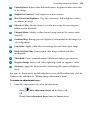
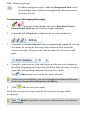
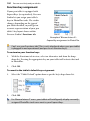
To create a new image or animation (using Startup Wizard) :
1.
The first time you launch PhotoPlus, you'll see the Startup Wizard, with a
menu of choices. Click New Image or New Animation.
2.
In the New Image dialog, you can either:
1.
For a preset canvas size, select a suitable Category from the dropdown list. Categories are named according to how your image or
animation is intended to be used, e.g. pick a Photo category for photosized canvases.
2.
Pick a canvas Size from the drop-down list.
OR
For a custom canvas size, enter your own Width and Height. If the
dimensions are non-standard, the Size drop-down list will be shown as
"Custom." For future use, save the custom size with Add Size... (from
the
button) if necessary.
Although you can resize the image canvas size (width x height) later, it's
usually best to allow some extra canvas area at first.
3.
(Optional) Add a Resolution for the new image file. Leave the resolution as
is unless you're sure a different value is required.
4.
(Optional) Select a Color Mode, choosing to operate in RGB or Grayscale
mode.
5.
(Optional) Select a Bit Depth of 16 bits per channel for projects which
require higher levels of color detail. Otherwise a bit depth of 8 bits/channel
is used as default.
6.
(Optional) Select a background type in the Background drop-down list.
When painting from scratch, you'll normally choose White.
You can also choose Background Color, to use the current background
color shown on the Color tab.
When creating an animation, Transparent is often called for.
7.
When you've made your selections, click OK.
20
Getting Started
To create a new picture or animation (during your session):
New on the Standard toolbar.
1.
If the Startup Wizard is disabled, click
2.
In the New Image dialog, set your canvas size (see above) and then check
Animation to create an animation or leave unchecked for a picture.
3.
Click OK. The new image or animation opens in a separate untitled
window.
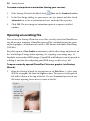
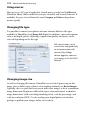
Opening an existing file
You can use the Startup Wizard to access files recently viewed in PhotoPlus or
any file on your computer. PhotoPlus opens all the standard formats for print
and web graphics, in addition to its native .SPP format and Adobe Photoshop
.PSD files.
Raw files open in a Raw Studio environment, which offers image adjustment on
the "undeveloped" image before opening. See Opening a raw image on p. 22.
Similarly, intermediate HDR images (OpenEXR and Radiance) can be opened in
a dialog at any time for readjusting your HDR merge results (see p. 84).
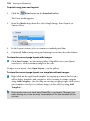
To open a recently opened PhotoPlus Picture or graphic (via Startup
Wizard):
1.
From the Startup Wizard (at startup time or via File>New...), select your
SPP file or graphic file from the Open section. The most recently opened
file will be shown at the top of the list. To see a thumbnail preview of any
file before opening, hover over its name in the list.
Getting Started
2.
21
Click the file name to open it.
PhotoPlus opens the image as a maximized currently active document; the
document appears in the Documents tab.
Recently viewed files also appear at the bottom of the File menu. Simply
select the file name to open it.
To open any image file:
1.
From the Startup Wizard (at startup time or via File>New...), click
Open....
OR
Click
Open on the Standard toolbar.
2.
In the Open dialog, select the folder and file name. To open multiple files,
press the Shift or Ctrl key when selecting their names (for adjacent or nonadjacent files).
3.
Click the Open button to open the desired image as a maximized
document.
To open images by drag-and-drop:
Drag and drop an image file or preview thumbnail into PhotoPlus from
Windows Explorer either:
into the current workspace (to create a new layer).
OR
onto the Documents tab (to create a new image window).
22
Getting Started
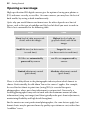
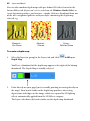
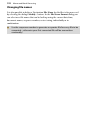
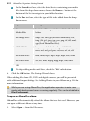
Opening a raw image
High-specification SLR digital cameras give the option of saving your photos as
JPG, and more recently, as raw files. On some cameras, you may have the best of
both worlds, by saving as both simultaneously.
Quite why you would choose one format over the other depends on a host of
factors, such as the type of workflow and the level of detail you want to work to.
This is best summarized in the following table.
JPG
raw
Basic level of color or grayscale
detail, with 8-bit images
Highest level of color or
grayscale detail, with 16-bit
images
Small file sizes (so faster writeto-card time)
Larger file sizes
(so slower write-to-card time)
JPG files are automatically
processed by camera
raw files are unprocessed by
camera
Limited adjustment control
(post-shoot)
Absolute adjustment control
(post-shoot)
There is a healthy debate in the photographic industry about which format to
choose. Professionally, the old idiom "horses for courses" applies. For example,
the need for fast shoot-to-print time (using JPGs) is essential for sports
photographers where post-shoot adjustment is not practical. Conversely, a
wedding photographer may wish to work with the maximum amount of color
information (using raw images) and then typically make post-shoot adjustments,
maintaining flexibility and high detail throughout.
For the amateur or semi-professional photographer, the same factors apply, but
format choice may be governed more by quality expectations or cost, rather than
"workflow" issues.
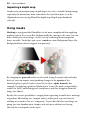
Getting Started
23
Workflow refers to the shoot-to-print progress when working with JPG or raw
files. A JPG workflow is destructive, in that your JPG file is "developed" in your
camera without user intervention. Conversely, a raw workflow is nondestructive because your raw file is "undeveloped"—you can control your
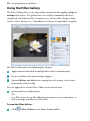
image's development within your photo-editing program (PhotoPlus).
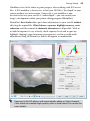
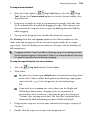
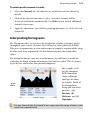
PhotoPlus's Raw Studio offers post-shoot adjustments to your raw file without
affecting the original file. White balance, exposure, highlight recovery, noise
reduction, and the removal of chromatic aberration are all possible. With an
in-built histogram, it's easy to firstly check exposure levels and to spot any
highlight clipping (suggesting image overexposure), and to secondly make
adjustments using the human eye and the histogram in combination.
Opening 16-bit HD photos will automatically adopt a 16-bits/channel
Color mode to maintain high-quality color or tonal detail. See modes for
more details.
24
Getting Started
Once you click OK you won't be able to undo your adjustments—it's
therefore recommended to spend time "developing" your image
correctly before exiting Raw Studio.
Once you've exited Raw Studio you'll enter the usual PhotoPlus user interface.
As for any other file format you can then optionally add text, lines, shapes, and
apply some creative filter effects (not all effects are available in 16 bits/channel
mode). On saving (File>Save or File>Save As...), you'll be prompted to save
your work as a PhotoPlus picture (.SPP) only. Typically most users would then
export to a 16-bit file format such as .tif or .hdp.
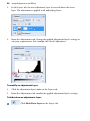
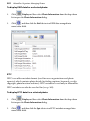
To adjust a raw image:
1.
Open a raw file by using
Open on the Standard toolbar. (see Starting
from scratch on p. 18). If opening multiple raw files, once you've adjusted
an image, Raw Studio will load the next image automatically until all files
are loaded.
Open raw images previously copied to your computer, rather than
directly from your camera's memory card (e.g., SD).
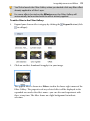
2.
From Raw Studio, adopt the program's, camera's or a custom white balance.
Auto: White balance calculated automatically by PhotoPlus. The
camera's white balance setting is ignored.
Camera: The camera's manual or automatic white balance setting is
used. PhotoPlus is not used to set white balance.
Custom: Click
Color Selector then hover over a neutral color on
the screen to calculate the white balance manually. Typically, a
subject's white shirt or blue sky can be clicked on as the neutral
"reference" point.
3.
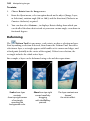
Drag the Exposure slider left or right to make the image darker or lighter.
The values are equivalent to your camera's f-stop settings, i.e. a value of 1 =
1 f-stop.
When increasing the Exposure value, use the histogram to check that
your highlights aren't clipped (i.e., when the graph disappears abruptly
off the right-hand edge of the histogram).
Getting Started
25
4.
Drag the Black Point slider right to set the darkest parts of the image to
black (by shifting the histogram's left-most edge, making all "clipped" pixels
in the shadow region turn black).
5.
For recovery of blown highlights, from the Mode drop-down menu choose
Recovery, and if needed, increase the Strength slider until you get ideal
results. The Clip option, as default, means that highlights remain blown (no
recovery is attempted). The Neutral option also recovers highlights if
you're experiencing color casting.
6.
For Noise reduction set a Strength. Noise may be evident on images
captured in low light or with a high ISO camera setting. The greater the
value, the more smoothing occurs to remove speckling. Too much noise
reduction may produce an unwanted blurring effect.
7.
Remove unwanted Chromatic Aberration (color fringing on object edges
on high-contrast photos) by adjusting Red/Cyan or Blue/Yellow sliders.
Each slider adjusts one color channel relative to the other channel.
8.
To reduce the color information down to "8 Bits/Channel", select from the
Bit Depth option. By default, optimum raw color information is preserved
(i.e., 16 Bits/Channel). (See Color modes for more details).
9.
From the Color Space drop-down menu, assign a color space to your image
which matches your intended color workspace. For professional work,
AdobeRGB, ProPhoto, or WideGamut offer larger color spaces (i.e more
colors) than the standard RGB (sRGB) space (this is acceptable for most
users), but you'll need to enable color management and pick the same color
space as your chosen workspace. matching
10. Click OK (or Reset to discard applied adjustments). The raw image
becomes your PhotoPlus document.
26
Getting Started
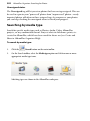
Getting images from cameras and scanners
If your digital camera or scanner supports the industry-wide TWAIN standard,
you can bring pictures from these devices directly into PhotoPlus.
To set up your TWAIN device for importing:
See the documentation supplied with the device for operating instructions.
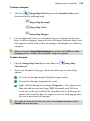
To import a TWAIN image:
1.
(via Startup Wizard) Choose Import From Twain.
OR
(During your PhotoPlus session) Choose Import from the File menu, then
select Acquire.
2.
Complete the procedure using the acquisition dialog associated with the
selected TWAIN source.
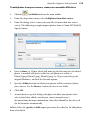
If you have more than one TWAIN-compatible device installed, you may need
to select which source you wish to scan with.
To select a different TWAIN source for scanning:
Choose Import from the File menu, then choose Select Source from the
submenu.
See PhotoPlus help for some useful tips about scanning.
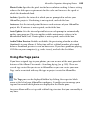
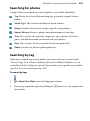
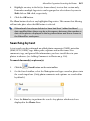
Saving a file
The process of saving differs depending on the type of file you are working on,
the file's current saved state and the file type you want to save.
PhotoPlus lets you work on (and save) one of several file types:
An open PhotoPlus Picture (.Spp) file is project-based and so preserves
'project' information (e.g., layers, masks, paths) when saving the file.
For a currently open image file you can edit and save the image back to its
original format. However, if you've added layers, masks, or paths to your
image you'll be prompted to optionally create an spp file to preserve
'project' information (otherwise it will be lost). If you choose not to create
an spp file, the additional content is included in the now flattened image.
Getting Started
27
An intermediate HDR image can be saved, which stores the results of an
HDR Photo Merge in an hdr file for future use. See Merging bracketed
photos (p. 84) for more information.
To save your PhotoPlus Picture (.Spp):
Click the
Save button on the Standard toolbar.
OR
To save under a different path or base name, choose Save As... from the
File menu. The window title bar is updated accordingly.
If the current window is untitled or non-native, the Save As dialog opens,
and prompts for a spp file name based on the base name shown in the
title bar.
The procedure for an altered image is slightly more complicated as PhotoPlus
will assist you in deciding if you want to save or lose any added "project
information" added to the original image.
To save your currently open image:
If you've altered the background layer only and no layers, paths, or masks
have been added, you can save (without prompt) the altered image to its
current base name (shown in the window title bar) by choosing one of the
above Save options. Changes are included in the image.
OR
If you've added layers, paths, or masks to your image, when you click a Save
option you'll be asked if you want to preserve the "project" information.
In the dialog, click Yes to save your project information (as an spp
file).
OR
click No to save as a flattened image (i.e., without layers).
To revert an image file:
Click Revert from the File menu. The last saved version of your image is
displayed.
28
Getting Started
3
Layers and Masks
30
Layers and Masks
Layers and Masks
31
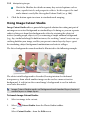
Basics of using layers
If you're accustomed to thinking of pictures as flat illustrations in books, or as
photographic prints, the concept of image layers may take some getting used to.
In fact, layers are hardly unique to electronic images. The emulsion of
photographic film has separate layers, each sensitive to a different color—and
we've all noticed multiple-image depth effects like store window reflections or
mirrored interiors. There is still something magical about being able to build up
an image in a series of planes, like sheets of electronic glass, each of which can
vary in transparency and interact with the layers below to produce exciting new
images and colors.
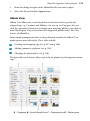
Kinds of layers
In a typical PhotoPlus image—for example, a photograph you've scanned in, a
new picture file you've just created, or a standard bitmap file you've opened—
there is one layer that behaves like a conventional "flat" image. This is called the
Background layer, and you can think of it as having paint overlaid on an
opaque, solid color surface.
32
Layers and Masks
You can create any number of new
layers in your image. Each new one
appears on top of the currently active
layer, comprising a stack that you can
view and manipulate with the Layers
tab. We call these additional layers
standard layers to differentiate them
from the Background layer. Standard
layers behave like transparent sheets
through which the underlying layers
are visible.
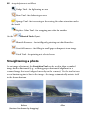
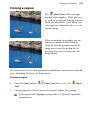
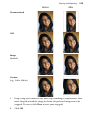
In the example on p. 31, the standard layers Surfer Girl, Beach, and Sky are
arranged foreground to background by their position in the layer stack, with the
Background layer not being used.
Other types of layers also exist in PhotoPlus:
Shape layers are specifically designed to keep drawn lines and shapes
(including QuickShapes) separate from the other layers so that they remain
editable. (See Drawing and editing lines and shapes; p. 145)
Text layers, work like Shape layers, but are intended exclusively for Text.
(See Creating and editing text; p. 142)
Adjustment layers apply corrective image adjustments to lower layers. (See
Using adjustment layers; p. 54)
Filter layers, are much like standard layers, but you can apply one or more
filter effects to the layer without permanently altering layer content. You
also have full control over effects in the future. (See Using filter layers;
p. 68)
For now though we're concerned mainly with the Background and standard
layers.
A key distinction is that pixels on the Background layer are always opaque, while
those on standard layers can vary in opacity (or transparency—another way of
expressing the same property). That’s because standard layers have a "master"
Opacity setting that you can change at any time (with on-screen real-time
Layers and Masks
33
preview), while the Background layer does not. A couple of examples will show
how this rule is applied in PhotoPlus:
Suppose you are creating a new image. The New Image dialog provides
three choices for Background: White, Background Color, and Transparent.
If you pick White or Background Color, the Layers tab shows a single layer
in the new image named "Background." If you pick Transparent, however,
the single layer is named "Layer 1"—and in this case, the image (typically an
animation file) has no Background layer.
If you cut, delete, or move a selection on
the Background layer, the "hole" that's
left exposes the current background
color (as shown on the Color tab). The
same operations on a standard layer
expose a transparent hole.
Selections and layers
With few exceptions, you will work on just one layer at any given time, clicking
in the Layers tab to select the current or active layer. Selections and layers are
related concepts. Whenever there's a selection, certain tools and commands
operate only on the pixels inside the selection—as opposed to a condition where
nothing is selected, in which case those functions generally affect the entire
active layer.
If your image has multiple layers, and you switch to another layer, the selection
doesn't stay on the previous layer—it follows you to the new active layer. This
makes sense when you realize that the selection doesn't actually include image
content—it just describes a region with boundaries.
Operations involving layers
Many standard operations, such as painting, selecting and moving, Clipboard
actions, adjusting colors, applying effects, and so on, are possible on both the
Background layer and standard layers.
Others, such as rearranging the order of layers in the stack, setting up different
color interactions (blend modes and blend ranges) between layers, varying layer
opacity (transparency), applying 2D layer effects and 3D layer effects, using
34
Layers and Masks
depth maps, creating animation frames, or masking, only work with standard
layers.
Once an image has more than just a background layer, the layer information can
only be preserved by saving the image in the native PhotoPlus (.SPP) format.
Multiple layers are merged when you export an image to a standard "flat" bitmap
format (e.g., .PNG). It’s best to save your work-in-progress as .SPP files, and
only export to a different file format as the final step.
Some standard operations can be applied to all layers simultaneously by
checking the Use All Layers option from the Context toolbar.
To carry out basic layer operations:
To select a layer, click on its name in the Layers tab. The selected layer is
now the active layer. Note that each layer’s entry includes a preview
thumbnail, which is visible at all times and is especially useful when
identifying layer contents.
To select multiple layers together, use Ctrl-click or Shift-click to select
non-adjacent or adjacent layers in the tab's stack. Once selected, multiple
layers can be moved, linked, aligned, duplicated, grouped, rearranged,
hidden, merged and deleted. To select all standard layers, choose Select All
layers from the Layers menu, or for just linked layers, choose Select Linked
Layers.
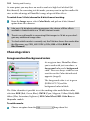
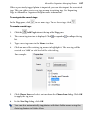
To create a new standard layer above the active layer, click the
New
Layer button on the Layers tab. Dragging a file icon and dropping it onto
the current window also creates a new layer from the dragged image.
Select
New Layer Group to create a group in which you can store
layers which have some relationship to each other—some layers may only
be related to a specific photo feature such that any changes to those layers
will be restricted to the group’s scope only. This gives greater control to
enable changes to opacity, blend modes and hide/show layer settings for the
group rather than for individual layers.
Click the
New Adjustment Layer button to apply an image
adjustment to a layer (See Using adjustment layers on p. 54).
Layers and Masks
The
layer.
35
Add Layer Mask button adds a mask to the currently selected
The
Add Layer Depth Map button creates a depth map for the
selected layer.
The
Add Layer Effects button creates a 2D or 3D effect on the layer.
Right-click to copy/paste, clear or hide effects.
To remove one or more selected layers, click the
Delete Layer button
on the Layers tab. Hidden layers can also be deleted without prior selection
by using Delete>Hidden Layers. (You can delete the Background layer, as
long as it's not the only layer.)
To make a layer's contents visible or invisible, click the
Hide/Show Layer button next to its name on the Layers tab.
Use
lock buttons on the Layers tab to prevent
accidental modification of opacity, pixel color, object positions or all three
on the active layer (or group), respectively.
To convert any shape or text layer to a standard layer, right-click on the
layer name and choose Rasterize from the menu.
Use different thumbnail sizes in the Layers tab by clicking the Tab Menu
button, then choosing Small Thumbnails or Large Thumbnails.
To convert the Background layer to a standard (transparent) layer, rightclick "Background" on the Layers tab and choose Promote to Layer. The
layer's name changes from "Background" to "Layer <number>." To convert
a standard layer to a Background layer, right-click the layer and choose
Layer to Background.
To convert the layer to a non-destructive filter layer, for applying and
managing effect and adjustment filters, right-click and select Convert to
Filter Layer. (See Using filter layers on p. 68)
To access Layer Properties—including Name, Blend Mode, Opacity, and
Blend Ranges—right-click the layer name and choose Properties....
36
Layers and Masks
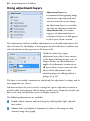
To control layer content:
To select all layer content use Select>Select All or Ctrl+A. To select nontransparent regions on a layer, Ctrl-click on a layer thumbnail. Use Invert
to selection transparent regions.
To move layer content, select one or more layers containing the
content to be moved (from the Layers tab), then drag with the Move Tool
with no selection area present (press Ctrl+D to remove any selection).
To align layer content, select one or more layers (as above), then choose
Align from the Layers menu, then select an option from the submenu.
To distribute layer content, select one or more layers (as above), then
choose Distribute from the Layers menu, then select an option from the
submenu.
To carry out advanced layer operations:
To create a new standard layer from a selection, choose New Layer from
Selection Copy or New Layer from Selection Cut from the Layers menu.
The former command leaves the original region intact; the latter cuts the
original region to the Clipboard.
To clone one or more active layers and their contents as new standard
layers, right-click the selected layers then choose Duplicate... (or Alt-drag
in the editing window with Move Tool selected). The process also lets you
copy the layer to a new or currently opened image.
To link layers, select multiple layers and choose Link Layers from the
Layers menu (or right-click in the Layers tab).
To rearrange layers, select the layer(s) in the Layers tab and drag up or
down. A red line "drop target" appears between layers as you drag. Drop the
layer(s) on a target to relocate in the stack.
To merge layers together into one, right click and choose Merge Down
(merges into layer below), Merge Visible (merges only visible layers),
Merge Selected Layers (merges currently selected layers), or Merge All (to
flatten all layers into one).
Layers and Masks
37
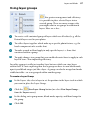
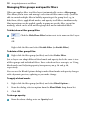
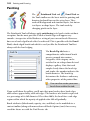
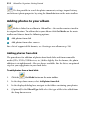
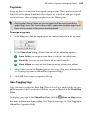
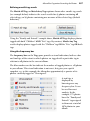
Using layer groups
For greater management and efficiency
it is possible to place selected layers into a
created group. There are many reasons why
you might want to use groups in addition to
layers. Here are a few...
To create a self-contained group of layers which are all related, e.g. all the
Retouch layers used in your photo.
To collect layers together which make up a specific photo feature, e.g. the
beach components of a seaside shot.
To make a mask or blend apply to only specific layers, i.e. those that
contained within a group.
To apply changes to a group that you would otherwise have to apply to each
layer in turn—thus improving efficiency.
In reality a group is really just another layer but one which can store layers
within itself. It’s not surprising then that a group can have its own blend mode,
opacity and blend ranges just like a layer. A group can also be merged and made
visible/invisible—or even grouped within another group.
To create a Layer Group:
In the Layers tab, select a layer to set the position in the layer stack in which
you want to place the Layer Group.
Click the
New Layer Group button (or select New Layer Group...
from the Layers menu).
In the dialog, enter group name, blend mode, opacity, and blend range for
the group.
Click OK.
38
Layers and Masks
To add one or more layers to a Layer Group:
Select the layer(s) you want to add to the group and drag onto the group
name (a red line indicates where the layer is to be placed). The layer(s) will
then appear indented under the group.
Alternatively, you can select multiple layers and add them to a new unnamed
group by selecting either New Layer Group from Selected Layers or Group
Layers on the Layers menu.
To remove a layer:
To remove the layer(s), drag the layer away from the group and drop it into
an ungrouped area of the Layers tab. You can also use Ungroup Layers
from the Layers menu if all layers are to be removed.
To merge a Layer Group:
To flatten the layer group, select the group and choose Merge>Merge Layer
Group from the Layers menu.
You cannot move the Background layer to a group.
Using blend modes
You can think of blend modes as different rules for putting pixels together to
create a resulting color. In PhotoPlus, you'll encounter blend modes in several
contexts:
As a property of individual tools, the tool's blend mode
determines what happens if you use the tool to apply a new
color pixel on top of an existing color pixel. Note that once
you've applied paint to a region, that's it—you've changed the
color of pixels there. Subsequently changing a tool's blend
mode won't alter brush strokes you've already laid down!
Behind and Clear modes are only available for tools and
not for layers.
Layers and Masks
39
As a property of individual layers, a layer's blend mode determines how
each pixel on that layer visibly combines with those on layers below.
(Because there are no layers below the Background layer, it can't have a
blend mode.) Note that changing a layer's blend mode property doesn't
actually alter the pixels on the layer—so you can create different blend
mode effects after creating the image content, then merge layers when
you've achieved the result you want.
As a property of certain 3D layer effects, where the blend mode is one of
many settings that determine a color change superimposed on the layer's
pixels. The effects themselves are editable and don't alter the actual pixel
values—nor does the effect's blend mode alter the layer's blend mode
setting.
For an illustration of the individual blend modes, see "blend modes" in the
PhotoPlus Help’s index.
A tool or layer's Opacity setting interacts with its blend mode to produce
varying results. For details, see Adjusting opacity/transparency on p. 40.
To set a tool's blend mode:
Select the tool and use the drop-down list (displays Normal by default) on
the tool's Context toolbar.
To set a standard layer's blend mode:
Select the layer and choose the mode from the blend mode's drop-down list.
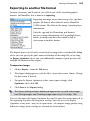
It's also possible to include or exclude tones or colors to be included in any
blending operation by using blend ranges. For more details, see PhotoPlus help.
40
Layers and Masks
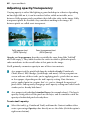
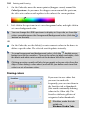
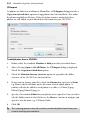
Adjusting opacity/transparency
Varying opacity is rather like lighting a gauze backdrop in a theater: depending
on how light falls on it, it can be rendered either visible or invisible, or in
between. Fully opaque pixels contribute their full color value to the image. Fully
transparent pixels are invisible: they contribute nothing to the image. Inbetween pixels are called semi-transparent.
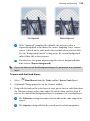
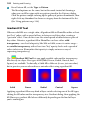
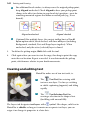
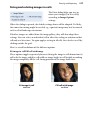
Fully opaque text
(100% Opacity)
Semi-transparent text
(50% Opacity)
Opacity and transparency describe essentially the same thing (like "half full"
and "half empty"). They both describe the extent to which a particular pixel's
color contributes to the overall color at that point in the image.
You'll primarily encounter opacity in one of these two contexts:
As a property of the pixels laid down by individual tools (Paintbrush,
Clone, Eraser, Fill, Smudge, QuickShape, and more). When you paint onscreen with one of these tools, you're applying pixels—pixels that are more
or less opaque, depending on the tool's opacity setting. Note that once
you've applied paint to a region, that's it—you've changed the opacity of
pixels there. Subsequently changing a tool's opacity setting won't alter brush
strokes you've already laid down!
As a property of individual standard layers (in example above). The layer's
opacity setting affects all the pixels on the layer, and is cumulative with the
opacity of individual pixels already there.
To set a tool's opacity:
Select the tool (e.g., Paintbrush Tool) and from the Context toolbar either
enter a percentage Opacity value directly or use the slider (click the option's
right arrow button).
Layers and Masks
41
To set a layer's opacity:
Select the layer in the Layers tab and adjust the Opacity setting at the top of
the tab—either enter a percentage Opacity value directly or use the slider
(click the option's right arrow button).
To read the opacity values of pixels on the active layer:
1.
Select the
Color Pickup Tool from the Tools toolbar and move it
around the image.
2.
Read the value shown for "O" (Opacity) on the Hintline (e.g., O:40%).
The readout updates constantly, showing the opacity value of each pixel
under the cursor.
For more useful hints and tips about using opacity, see PhotoPlus help.
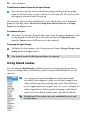
Using depth maps
Depth maps let you add remarkable 3D realism to ordinary images. A standard
"flat" image, of course, has only two dimensions: X and Y, or width and height.
Adding a depth map to a layer gives you an extra channel that stores
information for a third (Z-axis or depth) dimension, in effect adding "volume" to
the image. It's as if the original image acquires a surface with peaks and valleys—
and you can play with the elevation of the landscape to achieve different visual
results.
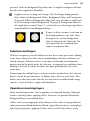
The example opposite was created simply by painting
in white (on a green background) with a fuzzy brush
on the depth map.
Changes on the "map" layer produce the effect of highs
and lows in the "surface"... it's like using a 3D brush!
42
Layers and Masks
You can also combine depth maps with pre-defined 3D effects hosted in the
Instant Effects tab (if you can't see it, switch on via Window>Studio Tabs) to
create fascinating surfaces and textures—simply click on a thumbnail from one
of the tab's categorized galleries with your layer containing the depth map
selected, e.g.
Elements Fire Storm
Abstract Plasma
Stone Polished Stone
To create a depth map:
1.
Select the layer (or group) in the Layers tab and click
Depth Map.
Add Layer
You'll see a thumbnail of the depth map appear to the right of the bitmap
thumbnail. The Depth Map is initially selected.
2.
Paint directly on your page (you're actually painting or erasing directly on
the map). Your brush stroke on the depth map produces interesting
depressions and ridges on the image, which are exposed by 3D lighting
effects automatically applied from the 3D Effects category.
The Layers tab shows the brush strokes on the depth map thumbnail.
Layers and Masks
43
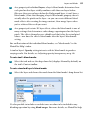
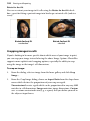
While working on the layer, you can switch back and forth between the bitmap,
depth map, and (optional) mask by clicking the appropriate layer thumbnail.
For a layer filled with green pixels:
depth map selected
bitmap selected
You can also switch the depth map off and on to assess its contribution to the
image, or subtract it for creative reasons.
To switch the depth map off and on:
Shift-click its preview thumbnail, next to the layer name.
When the depth map is switched off a red "X" appears across
the thumbnail.
To remove the depth map and cancel its effects on the layer:
Select the map thumbnail and click the layer tab's
(Don't press the Delete key!)
Delete button.
44
Layers and Masks
Importing a depth map
Another way of incorporating a depth map is to create a suitable bitmap image
separately (or borrow one from somewhere else) and then paste it via the
Clipboard into an existing PhotoPlus depth map (depth map thumbnail
selected).
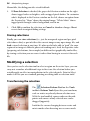
Using masks
Masking in a program like PhotoPlus is a bit more complicated than applying
masking tape to the screen! But fundamentally the concept is the same: you can
hide certain parts of an image—in this case by rendering them transparent,
hence invisible. To do that, you create a mask on a non-Background layer (the
Background layer doesn't support transparency).
By changing the grayscale values on the mask (using the paint tools and other
devices), you can impose corresponding changes in the opacity of the
underlying layer's pixels (values stored as the layer's alpha channel). For
example, by applying a gradient "blacking out" across the mask, you gradually
render the layer's underlying pixels transparent, and they disappear from the
image (see above).
Besides the creative possibilities, ranging from vignetting to multi-layer montage
to gradient-fill masking (see example above) and beyond, a great feature of
working on a mask is that it is "temporary". If you don't like the way things are
going, you can abandon your changes and start over without ever having
affected the actual pixels on the layer!
Layers and Masks
45
Each non-Background layer can have one mask at any given time. (The
Background layer can’t have one because it doesn’t support transparency.) Mask
information, like layer information, can only be preserved by saving the image in
the native PhotoPlus (.SPP) format.
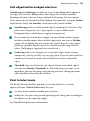
Masking can also be applied to adjustment and effect filters, where you can
isolate regions (e.g., an image background) to which you want a filter to be
applied. (See Using filter masks on p. 44). Similarly, you can use studio-based
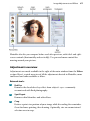
filter masking on adjustments by using PhotoFix (see p. 60).
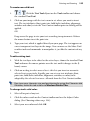
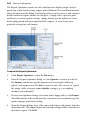
Creating the mask
Before you can use a mask, you
have to create it on a particular
layer. The mask can start out as
transparent (revealing the whole
layer), opaque (hiding the whole
layer), a transparency gradient
(opposite) or—if you create it
from a selection—a bit of both
(with only the selected region
hidden or revealed). The mask
shows as a mask thumbnail.
The choice depends on how you want to work with the layer's contents. By
darkening portions of a clear mask, you can selectively fade layer pixels. By
lightening an opaque mask, you selectively reveal layer pixels.
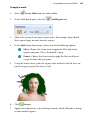
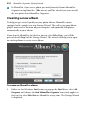
To create a mask:
1.
Select a layer in the Layers tab. This is the layer where you want to create
the mask, and select specific region(s) if desired.
2.
Then either:
Click the
Add Layer Mask button to create a Reveal All mask (or
Reveal Selection if there is one). Instead, Alt-click the button for a
Hide All Mask (or Hide Selection).
OR
46
Layers and Masks
Choose Mask>Add Mask from the Layers menu and then one of the
following from the submenu:
• Reveal All for a transparent mask over the whole layer
• Hide All for an opaque mask over the whole layer
• Reveal Selection for an opaque mask with transparent "holes" over
the selected region(s)
• Hide Selection for a transparent mask with opaque "blocks" over the
selected region(s)
On the Layers tab, a mask preview thumbnail appears, confirming that a mask exists.
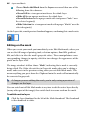
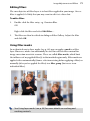
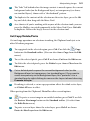
Editing on the mask
When you create your mask you immediately enter Edit Mask mode, where you
can use the full range of painting tools, selection options, flood fills, gradient
fills, and effects to alter the mask's grayscale values. These manipulations cause
corresponding changes in opacity, which in turn changes the appearance of the
pixels on the layer itself.
The image window's titlebar shows "Mask", indicating that a mask is currently
being edited. The Color tab switches to Grayscale mode when you're editing a
mask, and reverts to the previous setting when you exit Edit Mask mode. This
means anything you paste from the Clipboard onto the mask will automatically
be converted to grayscale.
As long as you are editing the mask, you're only seeing a preview of
changes on the layer.
You can switch out of Edit Mask mode at any time to edit the active layer directly
(or any other part of the image), then switch back to resume work on the mask.
To edit the active layer:
Click the layer thumbnail to the left of the Mask thumbnail. The thumbnail
is then bordered in white.
Layers and Masks
47
To edit the active layer's mask:
Click the mask thumbnail, or check Edit Mask on the Layers menu.
In Edit Mask mode, you're normally viewing not the mask, but rather the effects of
changes "as if" you were making them on the layer below. Adding a Reveal All mask
can be a bit confusing, because there's initially no evidence the mask is there at all (i.e.
the layer appears exactly the same as it did before you added the mask)!
It's sometimes helpful to switch on the View Mask setting, which hides the layer and
lets you see only the mask, in all its grayscale glory. For example, a Reveal All mask
appears pure white in View Mask mode—the white represents a clear mask with no
effect on the underlying layer pixels' opacity. View Mask can also be useful in the
latter stages of working on a mask, to locate any small regions that may have escaped
your attention.
To view the active layer's mask:
Alt-click the mask preview thumbnail. Alt-click again to stop viewing the mask.
White or light portions of the mask reveal layer pixels (make them more opaque).
Black or dark portions hide layer pixels (making them more transparent).
You can disable the mask to see how the layer looks without the mask's effects. Note
that disabling the mask is not the same as cancelling Edit Mask mode—it only affects
your view of the layer, not which plane (i.e. mask or layer) you're working on.
To disable the active layer's mask:
Shift-click the mask preview thumbnail or right-click it and select
Disable Mask (or select from the Layers>Mask). (Shift-click again
or uncheck the menu item to enable masking again.)
When the mask is disabled, a red "X" appears across its thumbnail.
If you want to fine-tune a mask or layer's position independently of each
other it’s possible to unlink them. You may have noticed a small link button
between the layer and mask thumbnails on the Layers tab, i.e.
48
Layers and Masks
A click on this button will unlink the layer and mask, changing the button to
display a red cross through it; you can also right click the mask preview
thumbnail to link/unlink. By selecting the layer or mask thumbnail, you can
then drag the layer or mask on the page, respectively. After fine-tuning, click the
button to relink the mask to the layer.
Masks and selections
Suffice it to say that a selection, which lets you isolate specific parts of the active
layer, often makes an ideal basis for a mask. Once you've created, modified, and
manipulated a selection, it's easy to turn it into a mask.
To create a mask from a selection:
1.
Choose Mask>Add Mask from the Layers menu. Remember you can't
create a mask on a background layer!
2.
To create a mask revealing the selected region, choose Reveal Selection
from the submenu. Pixels outside the selection will be 100% masked.
OR
To create a mask hiding the selected region, choose Hide Selection from
the submenu. Pixels outside the selection will be revealed.
You can also select part of an image to create a custom brush shape, for example
a textured brush or special shape.
Conversely, you can create a selection directly from the mask. Within the
resulting selection, pixels that are lighter on the mask (conferring more opacity)
become relatively more selected. This correlates with Paint to Select mode (see
p. 99), where painting in lighter tones also confers "selectedness."
To create a selection from a mask:
Ctrl-click on the layer’s mask thumbnail, or select the mask preview
thumbnail and choose Create from Mask from the Select menu.
In the selection that results, darker areas on the mask become relatively less
selected than lighter areas, i.e. more protected from changes.
4
Image Adjustments
and Effects
50
Image Adjustments and Effects
Image Adjustments and Effects
51
Introduction to image adjustments
A major part of photo-editing is making corrections (i.e., adjustments) to your
own near-perfect images. Whether you’ve been snapping with your digital
camera or you've just scanned a photograph, at some point you may need to call
on PhotoPlus’s powerful photo-correction tools to fix some unforeseen
problems.
For photo-correction, several methods can be adopted. You can use a
combination of:
Image color adjustments: For applying color adjustments to a selection or
layers.
PhotoFix: For making cumulative corrective adjustments from within a
studio environment.
Retouch brush-based tools: Red Eye, Smudge, Blur, Sharpen, Dodge/Burn
(for exposure control), Sponge (for saturation control), Scratch Remover.
If you work with raw images you can make image adjustments on your
unprocessed raw file (before interpolation). Adjustments include white balance,
exposure, highlight recovery, noise reduction, and chromatic aberration
removal. See Opening a raw image on p. 22.
Overview: Adjusting image colors
PhotoPlus provides a number of different adjustment filters that you can apply
to a selection or to an active standard layer. Typically, these adjustments are used
to correct deficiencies in the original image.
Each adjustment can be applied in one of several ways:
via the Adjustments tab, as an Adjustment Layer. (Non-destructive).
via PhotoFix, a studio environment for managing and applying cumulative
adjustments. (Non-destructive).
via Image>Adjust, on a Filter Layer. (Non-destructive).
via Image>Adjust, on a standard layer. (Destructive).
52
Image Adjustments and Effects
Here’s a summary of the available PhotoPlus image adjustments.
Levels displays a histogram plot of lightness values in the image, from
which you can adjust the tonal range by shifting dark, light, and gamma
values.
Curves displays lightness values in the image using a line graph, and lets
you adjust points along the curve to fine-tune the tonal range.
Color Balance lets you adjust color and tonal balance for general color
correction in the image.
Brightness/Contrast: Brightness refers to overall lightness or darkness,
while contrast describes the tonal range, or spread between lightest and
darkest values.
Shadow/Highlight/Midtone controls the extent of shadows, highlights, and
contrast within the image.
Hue/Saturation/Lightness: Hue refers to the color’s tint—what most of us
think of as rainbow or spectrum colors with name associations, like "blue"
or "magenta". Saturation describes the color’s purity—a totally unsaturated
image has only grays. Lightness is what we intuitively understand as relative
darkness or lightness—ranging from full black at one end to full white at
the other.
Replace Color lets you "tag" one or more ranges of the full color spectrum
that require adjustment in the image, then apply variations in hue,
saturation, and/or brightness to just those color regions (not to be confused
with the simpler Replace Color Tool).
Selective Color lets you add or subtract a certain percentage of cyan,
magenta, yellow, and/or black ink for creating effects.
Channel Mixer lets you modify a color channel using a mix of the current
color channels.
Gradient Map lets you remap grayscale (lightness) information in the image
to a selected gradient. The function replaces pixels of a given lightness in
the original image with the corresponding color value from the gradient
spectrum.
Image Adjustments and Effects
53
Lens Filter adjusts the color balance for warming or cooling down your
photos. It digitally mimics the placement of a filter on the front of your
camera lens.
Threshold creates a monochromatic (black and white) rendering. You can
set the threshold, i.e. the lightness or gray value above which colors are
inverted.
Equalize evenly distributes the lightness levels between existing bottom
(darkest) and top (lightest) values.
Negative Image inverts the colors, giving the effect of a photographic
negative.
Black and White Film is used for grayscale conversion with controllable
source channel input.
Posterize produces a special effect by reducing the image to a limited
number of colors.
Instead of the manual tonal adjustments above, the PhotoPlus Image menu
affords a number of functions you can apply to correct shadow/highlight values
in an image automatically. Adjust>AutoLevels or Adjust>AutoContrast may
do the job in one go; if not, you can use Adjust>Levels... or
Adjust>Shadow/Highlight/Midtone....
Use the Histogram tab to display statistics and image color values,
helping you to evaluate the kinds of image adjustments that may be
needed.
54
Image Adjustments and Effects
Using adjustment layers
Adjustment layers are
recommended for applying image
adjustments experimentally and
non-destructively to your image.
An adjustment layer is created by
selecting an adjustment from the
Adjustments tab. As its name
suggests, an adjustment layer is
considered a layer so it will appear
in the Layers tab on creation.
The Adjustments tab lists available adjustments in a selectable adjustments list;
after selection, the tab displays a Settings pane for that adjustment (and for any
selected adjustment layer present in the Layers tab).
Unlike the other layer types,
adjustment layers don't store content
in the form of bitmap images, text, or
shapes. Rather, an adjustment layer
applies the adjustment to content on
all layers below it (you can restrict the
effects of the adjustment to one
underlying layer by adding both to a
group; see p. 33).
The layer is essentially a container in which only the adjustment's settings and its
layer properties are stored.
Adjustment layers let you revisit the settings for a given adjustment as often as
needed, while continuing to edit the image in other ways. If you later decide you
don't even need an adjustment, you can simply remove it!
The following adjustments are available:
Levels: Adjust contrast and tonal range by shifting dark, light, and midtone values.
Curves: Fine-tune lightness (luminance) values in the image or color
channel using a line graph.
Image Adjustments and Effects
55
Color Balance: Adjust color and tonal balance for general color correction
in the image.
Brightness/Contrast: Vary brightness and/or contrast.
Hue/Saturation/Lightness: Vary hue, saturation, and/or lightness values,
or colorize an image.
Selective Color: Add or subtract a certain percentage of cyan, magenta,
yellow, and/or black ink.
Channel Mixer: Modify a color channel using a mix of the current color
channels.
Gradient Map: Remap grayscale (lightness) information in the image to a
selected gradient.
Lens Filter: Apply a color filter to warm up (or cool down) your image.
Black & White Film: Convert your color image to black and white
intelligently.
Threshold: Create a monochromatic (black and white) representation.
Negative Image: Invert each color, replacing it with an "opposite" value.
Posterize: Apply the Posterize effect by limiting the number of lightness
levels.
For more in-depth details on each adjustment, view the PhotoPlus help, click the
Contents tab, and open the "Making Image Adjustments" book.
To create an adjustment layer:
1.
From the Adjustments tab, select an adjustment.
Click
New Adjustment Layer on the Layers tab.
OR
Choose New Adjustment Layer from the Layers menu.
56
Image Adjustments and Effects
2.
In the Layers tab, the new adjustment layer is inserted above the active
layer. The adjustment is applied to all underlying layers.
3.
From the Adjustments tab, change the applied adjustment layer's settings to
suit your requirements. For example, for a levels adjustment:
To modify an adjustment layer:
1.
Click the adjustment layer's name in the Layers tab.
2.
From the Adjustments tab, modify the applied adjustment layer's settings.
To hide/show an adjustment layer:
Click Hide/Show Layer on the Layers tab.
Image Adjustments and Effects
57
To delete an adjustment layer:
(via Layers tab) Select the adjustment layer and click
OR
Delete Layer.
(via Adjustments tab) Select the adjustment and click
Delete Layer.
This removes the last applied adjustment layer, so be careful not to remove
additional adjustment layers in the Layers tab by clicking multiple times.
To access layer properties for an adjustment layer:
Right-click the layer name and choose Properties....
As with other layers, you can change the adjustment layer’s name, set its opacity,
blend mode, and/or blend ranges. You can also drag an adjustment layer up or
down within the Layers tab to determine exactly which other layers are below
and therefore affected by it.
Retouching
The Tools toolbar includes an assortment of comparatively simple pressuresensitive brush-based tools that come in handy at various stages of photo
editing. Retouching tools work on Background and standard layers, but not on
text layers or shape layers.
On the
Retouch Tools flyout:
Red Eye Tool - for correcting the "red eye" phenomenon common in
color snapshots
Smudge Tool - for picking up color from the click point and "pushing"
it in the brush stroke direction
Blur Tool - for reducing contrast under the brush, softening edges
without smearing colors
Sharpen Tool - for increasing contrast under the brush, enhancing
apparent sharpness
58
Image Adjustments and Effects
Dodge Tool - for lightening an area
Burn Tool - for darkening an area
Sponge Tool - for increasing or decreasing the color saturation under
the brush
Replace Color Tool - for swapping one color for another
On the
Blemish Tools flyout:
Blemish Remover - for intelligently painting out skin blemishes
Scratch Remover - for filling in small gaps or dropouts in an image
Patch Tool - for painting out selected areas
Straightening a photo
As an image adjustment, the Straighten Tool can be used to align a crooked
image back to horizontal (e.g., restoring proper horizontal alignment in a
scanned image that wasn't aligned correctly on the scanner). Use the tool to trace
a new horizon against a line in the image—the image automatically orients itself
to the drawn horizon.
Before
(horizon line drawn by dragging)
After
Image Adjustments and Effects
59
You can straighten using one of two methods: As a separate tool used directly on
your image (below) or via the PhotoFix studio environment (see p. 60).
To straighten (via Straighten Tool):
1.
Choose the
Straighten Tool from the
the Tools Toolbar.
Crop Tools flyout on
2.
On the Context toolbar, choose an option from the Canvas drop-down list.
This lets you decide how your straightened image will be displayed:
Crop - Crops and adjusts the straightened image so that it displays on
the largest possible canvas size, without displaying any border.
Expand to Fit - Increases the canvas size to display the entire
straightened image. The border area is filled with the current
background color.
Original Size - Displays the straightened image within the original
canvas dimensions. The border area is filled with the current
background color.
On the image that needs straightening, look for a straight line on the
image to which you can set the new horizon (e.g., the divide between
the land and sea above).
3.
(Optional) Uncheck Rotate All Layers to restrict the operation to the active
layer only. Otherwise all layers are rotated.
4.
Using the Straighten cursor, drag a horizon from one end of the image's
line to the other (the length of the horizon is not important) then release.
The image orients itself to the new line.
60
Image Adjustments and Effects
Using PhotoFix
PhotoFix provides an image adjustment
environment within PhotoPlus which simplifies
the often complicated process of image
correction. The studio environment offers the
following key features:
Adjustment filters
Apply tonal, color, lens, and sharpening
filters.
Retouching filters
Apply red-eye correction, spot repair,
straightening, and cropping.
Non-destructive operation
All filters are applied without affecting the
original picture (by automatically creating
a filter layer), and can be edited at any
point in the future.
Powerful filter combinations
Create combinations of mixed adjustment
filters for saveable workflows.
Selective masking
Apply filters to selected regions using
masks.
Save and manage favorites
Save filter combinations to a handy
Favorites tab.
To launch PhotoFix:
Click
PhotoFix on the Photo Studio toolbar.
Let's get familiar with the PhotoFix interface showing a non-default Split
horizontal view is displayed.
Image Adjustments and Effects
61
PhotoFix also lets you compare before-and-after previews, with tiled- and splitscreen controls (horizontally and vertically). Use pan and zoom control for
moving around your picture.
Adjustments overview
Adjustments are made available to the right of the main window from the Filters
section. Here's a quick overview of all the adjustments hosted in PhotoFix, some
tool-based and some available as filters.
Retouch tools:
Red Eye
Removes the dreaded red eye effect from subject's eyes—commonly
encountered with flash photography.
Spot Repair
Removes skin blemishes and other flaws.
Crop
Retains a print-size portion of your image while discarding the remainder.
Great for home printing, then framing. Optionally, size an unconstrained
selection area to crop.
62
Image Adjustments and Effects
Straighten
Re-aligns slightly or wildly crooked photos by resetting the image's horizon,
then applying an auto-crop.
See supporting PhotoFix help for more details.
Filter-based:
White Balance
"Cool down" or "warm up" your photo by adjusting lighting either by
selecting presets or customizing temperature/tint combinations.
Lighting
Simple adjustments to a photo's exposure, brightness, contrast, shadows,
and highlights.
Curves
Correct the tonal range of a photo, i.e. the shadow, midtone, and highlight
regions—and control individual color components.
HSL
Adjust the Hue, Saturation, and Lightness of your image independently.
Black and White Film
Intelligently apply grayscale by varying the gray tones of red, green or blue
colors in your original image. Also apply color tints.
Chromatic Aberration
Reduces red/cyan or blue/yellow fringing on object edges.
Lens Distortion
Fixes barrelling and pincushion distortion encountered when
photographing straight-edged objects at close range.
Lens Vignette
Removes darkening in photo corners.
Unsharp Mask
Makes your image sharper at image edges—great for improving image
quality after other adjustments have been made.
Some adjustments can also be applied independently from the Effects
menu.
Image Adjustments and Effects
63
To apply an adjustment (from a favorites preset):
1.
From the Favorites tab, scroll the tab to review the categorized
adjustments; select a preset or custom thumbnail.
2.
Click OK.
When applied, your image layer is automatically converted to a non-destructive
filter layer with a PhotoFix adjustment entry nested under the filter layer entry.
To apply an adjustment (using custom settings):
1.
Review the available adjustments in the Filters section, before expanding
the adjustment you want to apply by clicking
2.
Expand filter.
Modify the adjustment using sliders, check boxes, graph adjustments, and
drop-down menus (you can also enter absolute values into available input
boxes). The image will be adjusted automatically to reflect the new settings
in the preview window.
You'll notice the adjustment filter is enabled once a setting is changed, i.e.
the
3.
Enable/disable filter option becomes grayed out (
).
Click OK. A filter layer is created (as above).
To reset (and disable) a modified adjustment:
Click
Reset settings in the top-right corner of the adjustment's pane.
To edit PhotoFix adjustments:
Double-click the PhotoFix entry on the filter layer. PhotoFix is launched
with the previously set adjustments still applied.
64
Image Adjustments and Effects
Using PhotoFix masks
Masks in PhotoFix adopt the same principles as layer masks (see p. 44). In
PhotoFix however, masking is used to apply adjustment filters to selected
"painted" regions of your image or to protect painted regions from change.
Painting is used exclusively to create PhotoFix masks.
Each new mask comprises the selected mask region, plus a set of adjustments
applied to that mask. You can change the adjustments associated with the mask
at a later date.
In the first example below, the model's hair has been masked by painting,
allowing White Balance to be adjusted in that painted region only. Conversely,
in the second example, the sky has been painted to protect it from masking,
allowing light levels to be adjusted for Tower Bridge's stonework.
To achieve the above, PhotoFix uses two mask modes, namely Mode Select and
Mode Protect. When you begin masking you'll need to decide which mode you
want to use.
Image Adjustments and Effects
65
To apply a mask:
Create Mask from the main toolbar.
1.
Select
2.
In the Mask Brush pane, select the
3.
Adjust the settings to suit your requirements. For example, adjust Brush
Size to paint larger or more intricate regions.
4.
In the Mode drop-down menu, choose one of the following options:
Add Region tool.
Select: Choose this if you want to apply the filter only to the
regions you paint. This is the default setting.
Protect: Choose this if you want to apply the filter to all areas,
except for those that you paint.
5.
Using the brush cursor, paint the regions to be masked (selected areas are
painted in green; protected areas in red).
6.
Click
7.
Apply your adjustments as described previously, which will make a change
to your masked regions.
Accept.
66
Image Adjustments and Effects
Adding multiple masks
So far we've looked at an individual mask applied to an image. However,
PhotoFix also supports multiple masks where a different set of adjustments can
be applied to each mask. You can therefore build up a patchwork of masked
regions for absolute and selective control of image adjustments.
To apply additional masks:
1.
In PhotoFix, click the down arrow on the Filters heading.
2.
From the drop-down list, select New....
3.
In the Mask Brush pane, change settings and paint as described previously
in "To apply a mask".
4.
Click OK. The new mask, named Mask 1, Mask 2, etc. is applied to your image.
5.
Apply your adjustments as described previously.
6.
Repeat the process for further masks.
Once applied, masks are applied cumulatively. The default global mask is
applied to your image first, then Mask 1, then Mask 2, etc., if present. As a result,
you may wish to rearrange the mask order for different results. You can also
rename and delete masks.
To rearrange, rename or delete a mask:
1.
From the down arrow on the Filters heading, select Manage....
2.
From the dialog, select a mask and use appropriate supporting buttons.
3.
Click OK.
To edit a mask:
1.
From the down arrow on the Filters heading, select
your mask name (a check indicates selection).
2.
Modify your adjustments as described previously.
Image Adjustments and Effects
67
Saving favorites
If there's a specific filter setting (or combination of
filters) you want to keep for future use it's easy to
save it as a favorite. PhotoFix stores preset and
custom favorites together in the Favorites tab. You
can even create your own categories (e.g., My
Adjusts) within the tab for storing your custom
adjustments.
To save a filter(s) as a new favorite:
Save Filter on the modified filter's
1.
Click
pane.
2.
From the dialog, enter a favorite name and
pick a category to save the filter to. Optionally,
click
to save to a new category.
If you want to further manage your favorites into
user-defined categories, click Manage Favorites...
on the Favorites tab's Tab Menu.
When increasing the Exposure value, use the histogram to check that
your highlights aren't clipped (i.e., when the graph disappears abruptly
off the right-hand edge of the histogram).
Overview: Applying special effects
Special effects are grouped into different categories, i.e. distortion, blur,
sharpen, edge, noise, render, stylistic, and artistic, which offer the user a
diverse choice of creative opportunities in PhotoPlus.
Before going ahead and applying your effects, it's a good idea to review Using
filter layers (see p. 68) before deciding on your approach, i.e. whether you work
non-destructively or destructively.
68
Image Adjustments and Effects
Each effect can be applied in one of several ways:
via dialog, on a filter layer. (Non-destructive).
via the Filter Gallery on a filter layer. (Non-destructive).
via dialog, on a standard layer. (Destructive).
Equally dramatic effects can be applied by using Warp tools on the Tools
toolbar's flyout or 2D/3D layer effects via the Layers tab.
As with image adjustments (see Overview: adjusting image colors on
p. 51), you can use filter effects to improve the image, for example by
sharpening, but more often the emphasis here is on the "creative"
possibilities when effects are applied.
Using filter layers
If you apply a filter effect to a
standard or background layer, the
layer is permanently altered.
However, if you want the flexibility
of being able to edit your filter
effects at any point in the future
(and don't want to destroy the
layer contents) you can convert
your standard or background layer
to a Filter Layer (e.g., L_213).
Think of a Filter Layer as a way of keeping layer content independent of any
filters you wish to use, with the flexibility of being able to manipulate a filter
layer in the same way as other layers. Otherwise without filter layers, you would
have to repeatedly undo your operations if you've had a rethink and no longer
want to apply a specific filter.
When applied, filters are created within filter groups, nested individually under
the Filter Layer. When you double-click a filter you display its specific settings.
You can apply a blend mode and opacity to each filter, and additionally filter
masking to the filter group.
For added security, it's good practice to create a duplicate of any
background layer you initially have.
Image Adjustments and Effects
69
To convert to a filter layer:
1.
In the Layers tab, right-click a standard or Background layer and choose
Convert to Filter Layer.
2.
The layer now shows the letter "F" indicating that it is now a filter layer, and
ready to have a filter applied.
To add filters to the filter layer:
1.
Select the filter layer.
2.
Add an adjustment via the Image menu.
OR
Add an effect via the Effects menu or via the Filter Gallery (p. 74).
Each filter, as it is applied, is created within a filter group nested under the
selected filter layer. In the example below, the Curves adjustment filter and
Gaussian Blur effect filter is applied to the selected filter layer L_213. They'll be
stored within Filter Group 1.
As a filter layer has all the properties of standard and Background layers, you
may wish to review Basics of using layers (p. 31) and Manipulating layers.
Essentially, you can edit, hide/show, and delete filter layers as for image layers, as
well as apply a blend mode or opacity level.
To edit filter layer properties:
In the Layers tab, right-click the filter layer and choose Properties....
70
Image Adjustments and Effects
Managing filter groups and specific filters
When you apply a filter to a filter layer it automatically creates a filter group.
This allows you to store and manage a selection of filters more easily—you'll be
able to control multiple filter in bulk by operating at the group level, e.g. to
hide/show, delete, apply blend modes, and opacity to all filters simultaneously.
Most operations can be applied equally to group or specific filter, except for
masking, which can be used on filter groups but not on individual filters.
To hide/show a filter group/filter:
Click the Hide/Show Filter button next to its name on the Layers
tab.
OR
Right-click the filter and select Disable Filter (or Enable Filter).
To delete a filter group/filter:
Right-click the filter group (or filter) and select Delete Filter.
Just as layers can adopt different blend mode and opacity levels the same is true
of filter groups and individual filters. For a refresh on these concepts, see Using
blend modes and Adjusting opacity/transparency on p. 38 and p. 40,
respectively.
You can use the Blend Options dialog to make blend mode and opacity changes
with a dynamic preview, updating as you make change.
To apply a blend mode:
1.
Right-click the filter group (or filter) and select Blend Options....
2.
From the dialog, select an option from the Blend Mode drop-down list.
3.
Click OK.
To change opacity:
From the above dialog, enter an Opacity level.
Image Adjustments and Effects
71
Editing filters
The core objective of filter layers is to host filters applied to your image. Once a
filter is applied, it's likely that you may want to edit it at a later date.
To edit a filter:
1.
Double-click the filter entry, e.g. Gaussian Blur.
OR
Right-click the filter and select Edit Filter....
2.
The filter can then be edited via dialog or Filter Gallery. Adjust the filter
and click OK.
Using filter masks
In an identical way to layer masks (see p. 44) you can apply a mask to a filter
layer. However, masks can additionally be used for selective filter control for
image correction or artistic reasons. These are called filter masks, which limit
the influence of any applied filter(s) to that masked region only. Filter masks are
applied either automatically (from a selection existing before applying a filter) or
manually (after you've applied the filter) to a filter group (but never to an
individual filter).
See Using layer masks (see p. 44) for more details on masking and
masking controls.
72
Image Adjustments and Effects
To create a filter mask (from a selection):
1.
Make a selection on which your mask will be based, e.g. a brush selection
around the subject of interest. By default the area outside the selection is
masked (not affected), while the selection area has the chosen filter applied
(i.e., the effect will not be applied to it). If you want to do the opposite,
choose Invert from the Select menu.
2.
In the Layers tab, select the filter layer to which you wish to apply a filter.
3.
Add an adjustment via the Image menu.
OR
Add an effect via the Effects menu or via the Filter Gallery.
The filter is created within an automatically created filter group, which
applies a mask automatically (mask thumbnail circled).
4.
(Optional) Fine-tune the filter by double-clicking the filter entry and
editing the settings.
To create a filter mask (by mask painting):
1.
With no selections present, in the Layers tab, select the filter layer to which
you wish to apply a filter.
2.
Add an adjustment via the Image menu.
OR
Add an effect via the Effects menu or via the Filter Gallery.
Image Adjustments and Effects
73
3.
Right-click the created filter group and select Add Mask from the flyout
menu. A mask thumbnail appears to the left of the filter name.
4.
Paint or draw on your image using a suitable grayscale value set as your
foreground color tab. The lower the value, the less masking that is applied
to the original image. The mask thumbnail updates accordingly.
The above mask thumbnail would apply a
mask which produces a vignette effect. As
you can also paint with different grayscale
levels you can achieve even more complex
masking effects.
To disable (enable) a mask:
Right-click the filter group and select Disable Mask (or Enable Mask) from
the flyout menu.
To delete a mask:
Right-click the filter group and select Delete Mask from the flyout menu.
74
Image Adjustments and Effects
Using the Filter Gallery
The Filter Gallery offers a one-stop studio environment for applying single or
multiple filter effects. The gallery hosts sets of filter thumbnails which are
categorized into different effect categories (e.g., Distort, Blur, Sharpen, Edge,
Artistic, Noise, Render, etc.). Thumbnails are shown in expandable categories.
The Filter Gallery offers the following key features:
Application of individual or multiple filter effects simultaneously.
Preview window with zoom and pan support.
Optional Before and After views arranged as tiles or split-screen, both
horizontally and vertically.
You can apply filters via the Filter Gallery in one of two ways:
permanently to a standard layer.
OR
on a Filter Layer (see p. 68), allowing you to protect your image layer, as
well as manage your filters at a later date.
To view the Filter Gallery:
Click
Filter Gallery on the Photo Studio toolbar.
Image Adjustments and Effects
75
You'll also launch the Filter Gallery when you double-click any filter effect
already applied to a Filter Layer.
For some effects hosted on the Effects menu, the Filter Gallery will
automatically be launched with the effect already applied.
To add a filter in the Filter Gallery:
Expand button (click
1.
Expand your chosen effect category by clicking the
to collapse).
2.
Click on an effect thumbnail to apply it to your image.
The applied filter is shown in a Filters stack in the lower-right corner of the
Filter Gallery. The properties of any selected effect will be displayed in the
expanded area under the effect name—you can alter and experiment with
these at any time. The filter shows on a light background to indicate
selection.
76
Image Adjustments and Effects
Use the Undo button to undo recent changes to the filter (or
the Redo button to re-apply the changes).
3.
Adjust sliders (or enter input values) until your filter suits your
requirements. Some filters offer check boxes, drop-down menus, and
additional controls (e.g., Advanced settings). The large preview window
updates automatically as you adjust any values.
Adding a new filter will replace any selected filter in your filter stack,
including your newly added as it remains selected by default. This is
because the Replace selected option is checked.
To add multiple filters:
Uncheck Replace selected, then add one or more additional effects as
described above.
Any filter can be temporarily disabled, reset, or deleted once applied.
To disable:
Click
To reset:
Click
. Any changes to settings are reverted back to
the filter's defaults.
To delete:
Click
, then click
to enable again.
. The filter is removed from the stack.
The effect's properties are expanded by default but can be collapsed to make
more of the Filters stack visible.
To collapse/expand filter properties:
To collapse, click the
expand again, click the
button preceding the filter effect name. To
button.
Image Adjustments and Effects
77
To replace a filter:
1.
Ensure Replace selected is checked.
2.
Select the filter you wish to replace by clicking anywhere in the filter's pane.
On selection, the selected filter shows a lighter background, e.g., Gaussian
below.
3.
Select a replacement filter from an effect category. Your selected filter is
replaced in the stack with no change made to the existing stack order.
The order in which effects appear in the effect list may produce very different
results. If you’re not happy with the current order, PhotoPlus lets you drag and
drop your effects into any position in the stack. Effects are applied in the same
way that layers are applied, i.e. the most recently added filter always appears at
the bottom of the list and is applied to the picture last (after the other filters
above it).
Filters can be moved around the filter list to change the order in which they are
applied to the photo.
To reorder filters:
Drag and drop your filter into any position in the stack. A dotted line
indicates the new position in which the entry will be placed on mouse
release.
78
Image Adjustments and Effects
Applying 2D layer effects
Layer effects can be applied to the contents of standard (transparent) layers, text
layers, or shape layers. Standard or "2D" layer effects like shadow, glow, bevel,
and emboss are particularly well adapted to text, while 3D layer effects (covered
elsewhere; p. 79) create the impression of a textured surface.
Unlike image adjustments and Effects menu manipulations, layer effects don’t
directly change image pixels—they work like mathematical "lenses" that
transform how a layer’s bitmap appears. Since the settings are independent, you
can adjust them ad infinitum until you get the result you want!
Here's an example of each effect applied to the letter "A".
Drop Shadow Inner Shadow
Outer Bevel
Emboss
Outer Glow
Inner Glow
Inner Bevel
Pillow Emboss
Color Fill
Outline
Drop Shadow adds a diffused shadow "behind" solid regions on a layer.
Inner Shadow adds a diffused shadow effect inside the edge of an object.
Outer Glow adds a color border outside the edge of an object.
Inner Glow adds a color border inside the edge of an object.
Bevel and Emboss/Inner Bevel adds a rounded-edge effect inside an object.
Bevel and Emboss/Outer Bevel adds a rounded-edge effect (resembling a
drop shadow) outside an object.
Bevel and Emboss/Emboss adds a convex rounded edge and shadow effect
to an object.
Image Adjustments and Effects
79
Bevel and Emboss/Pillow Emboss adds a concave rounded edge and
shadow effect to an object.
Color Fill lets you apply a specific color to a layer.
Outline applies a border effect to the edge of an object. See Creating
outlines on p. 152.
To apply a shadow, glow, bevel, or emboss effect:
Add Layer Effects.
1.
From the Layers tab, select a layer and click
2.
In the dialog, apply an effect by checking its check box in the list at left. You
can apply multiple effects to the layer.
3.
To adjust the properties of a specific effect, select its name and adjust the
dialog controls. Adjust the sliders, drop-down menu, or enter specific
values to vary each effect. Options differ from one effect to another.
4.
Click OK to apply the effect or Cancel to abandon changes.
Applying 3D layer effects
3D layer effects are just as easy to apply, but they’re a bit more complex than
their 2D cousins (see p. 78). Actually, there’s an easy way to get started with
them: simply display the Instant Effects tab and preview its gallery thumbnails.
In the tab you’ll see a variety of
remarkable 3D surface and texture
presets grouped into wide-ranging
"themed" categories (e.g., Glass Text,
Abstract, Wood, Metal, etc.). Click any
thumbnail to apply it to the active
layer. Assuming the layer has some
color on it to start with, you’ll see an
instant result!
If hidden, make this tab visible via Window>Studio Tabs.
To apply an Instant Effect to the active layer:
From the Instant Effects tab, select a category, then click a gallery
thumbnail.
80
Image Adjustments and Effects
To make the effect appear smaller or larger in relation to the image, drag
the Scale slider or type a value in the tab.
You can apply an effect from the Instant Effects tab preset, edit it (using the
Layer Effects dialog) and then save it as a custom preset in a user-defined
category (you'll have to create and select the category first). To save the preset,
right-click in the tab and choose Add Item.... From the dialog, you can adjust
the Scale of the effect and have your thumbnail preview stored as a Rectangle or
as Text (using the letter "A"). For either type, the thumbnail will appear in the
gallery.
If you want to have complete flexibility when creating 3D effects, you can
click the Add Layer Effects button on the Layers tab. The dialog is shared for
both 2D and 3D effects—simply check the 3D Effects box and experiment with
the settings (enable other 3D check boxes as appropriate).
For more information about creating 3D filter effects, see online Help.
3D effects overview
Suppose you’ve applied a 3D layer effect preset from
the Instant Effects tab, and then you bring up the
Layer Effects dialog. On inspecting the settings used
in the preset, the first thing you’ll notice is that several
boxes may be checked.
• 3D Effects is a master switch for this group, and its
settings of Blur and Depth make a great difference;
you can click the "+" button to unlink them for
independent adjustment.
• 3D Pattern Map allows for blend mode, opacity,
depth, displacement and softening adjustments, along
with a choice of gradient fills. This is checked
depending on the type of instant effect selected.
• 3D Lighting provides a "light source" without which
any depth information in the effect wouldn’t be
visible. The lighting settings let you illuminate your
3D landscape and vary its reflective properties.
Image Adjustments and Effects
81
To apply 3D Effects:
Click
Add Layer Effects on the Layers tab and check 3D Effects in
the Layer Effects dialog. Adjust the "master control" sliders here to vary the
overall properties of any individual 3D effects you select. Blur specifies the
amount of smoothing applied. Larger blur sizes give the impression of
broader, more gradual changes in height. Depth specifies how steep the
changes in depth appear. The button is normally down, which links the
two sliders so that sharp changes in Depth are smoothed out by the Blur
parameter. To adjust the sliders independently, click the button so it's up
(not blue).
Check a 3D effect in the 3D Effects list which reflects the 3D effect you can
achieve. Procedures for each are detailed below.
Transparency
The uniform transparency of a layer and its objects (with 3D layer effects
applied) can be controlled via the Layers tab with the Opacity option (see rear
heart shape in example below). However, for more sophisticated transparency
control, transparency settings can instead be set within the Layer Effects dialog.
The effect can be used to create more realistic transparency by independently
controlling transparency on reflective (edges) and non-reflective (flat) areas of
the object (see front heart shape below).
Use this effect in conjunction with reflection maps and multiple
directional light sources for ultra-realistic glass effects.
3D Lighting + Layer
Opacity 50%
3D Lighting +
Transparency effect
82
Image Adjustments and Effects
3D Reflection Map
The 3D Reflection Map effect is used to
simulate mirrored surfaces by selection of a
pattern (i.e., a bitmap which possesses a shiny
surface) which "wraps around" a selected
object. Patterns which simulate various realistic
indoor and outdoor environments can be
adopted, with optional use of 3D lighting to
further reflect off object edges. The effect is
often used in combination with the
Transparency option.
Warp tool effects
The entries on the Tools Toolbar's
Warp Tools flyout work as a group.
Note that these are brush-on effects rather than dialog-based filters. Most of the
tools shift pixels that the brush passes over, while the Unwarp brush undoes the
effects of the other tools. The actual amount of pixel displacement depends on
the direction or amount of brush movement, the brush tip, and the tool's settings
selectable from the brush context toolbar.
Original
Effect
applied
The
Elastic Warp Tool
shifts pixels in the direction of
brush motion, hence the
appearance of pulling or
elasticity. Drag across the image
to shift pixels in the direction of
brush motion. Use for subtle
effects such as creating a
"smiling" subject.
Image Adjustments and Effects
83
Pinch and
Punch
The
Tools apply, respectively, a
concave or convex spherical
distortion under the brush.
Wiggle the brush in the region
you want to change.
The
Twirl Tools
produce a "spin art" effect—
liquid paint on a surface
revolving either clockwise or
counter-clockwise around a
central point. Wiggle the brush
in the region you want to
change.
The
Thick/Thin Warp
Tool shifts pixels 90º to the right
of the brush direction, which
has the effect of spreading or
compressing edges along the
stroke. Creatively speaking, if
you drag the Thick/Thin tool
clockwise, you'll get a concave
"pinch" effect, while counterclockwise motion results in a
convex "punch" effect. Drag
across the image to shift pixels
90º to the right of the brush
direction.
84
Image Adjustments and Effects
Use the
Unwarp Tool to reduce the strength of the current warped effect
under the brush. Drag the Unwarp brush across a warped region. Note that
Unwarp only works as long as you're still using the Warp tools. Similarly,
PhotoPlus treats all your operations during one warping session as a single,
cumulative event; using the Undo command clears the whole session.
Merging bracketed photos
High Dynamic Range (HDR) merge, or tone mapping, is used to combine
bracketed photos or scanned images from film, each shot taken at different
exposure levels (typically one each for highlights, midtones, and shadows) and
within seconds apart. Your camera can't capture all exposure levels in a single
shot, so by bringing together multiple photos you can expand your image's
dynamic range which would otherwise be impossible in a single shot.
Typically, scenes of high contrast such as landscapes, sunsets or indoor
environments (with strong lighting) are suited to HDR Merge.
Exposure for Highlights (A), Midtones (B), Shadows (C),
and the Merged output (D).
Image Adjustments and Effects
85
For good results, it's important to bear the following points in mind:
Many modern cameras offer auto-bracketing which automatically takes
several shots at different exposure levels. A two-EV spacing is considered to
be optimum for most occasions. Alternatively, shoot with manual exposure
set.
Always shoot the same scene! Your output is based on a composite of the
same scene.
Take as many shots as is needed to cover your required dynamic range.
Use a tripod for optimum camera stability. Also avoid photographing
objects affected by windy conditions (e.g., moving tree branches).
Ensure Aperture priority is set on your camera (see your camera's
operating manual for more details).
The HDR merge is a two-stage process, firstly to select the source files (JPG or
raw) for merging, and then performing the merge itself after having adjusted
merge settings to optimize the output). The process can be carried out directly
on source files without loading them into your project in advance.
PhotoPlus lets you optionally save the merged HDR image to one of several
formats (namely OpenEXR, HDR and HD Photo), which can be opened at a
later date, saving you from having to align and merge your original images
again.
To select and merge bracketed photos:
1.
From the Startup Wizard, click HDR Photo Merge.
2.
From the dialog, click Add.
3.
Browse to, then select multiple files from the chosen folder—use Ctrl-click
or Shift-click for selecting non-adjacent or adjacent images. Click Open.
The files listed show image name and an exposure value equivalent to your
camera's exposure setting (the values are not for just for show—they're
crucial for successful HDR merging).
86
Image Adjustments and Effects
Click the Add button to add more photos or the Remove button to exclude
a selected photo.
For scanned images (from camera film) which won't possess EXIF-derived
Exposure values, you can click the Edit Exposure button to add your own
exposure values to entries if you've kept a record (or you could just add
+2.0, 0, and -2 then experiment with the results).
4.
(Optional) Uncheck Align images if you're sure your source images are
perfectly aligned (perhaps by a third-party application). Otherwise,
PhotoPlus will automatically attempt to align each photo's corresponding
pixel data.
5.
(Optional) Check Infer film response curve to affect a tone curve needed
to accurately process scanned images (from camera film). Otherwise, keep
unchecked for digital camera use.
6.
Click OK. The Merge HDR dialog is displayed, showing a preview of your
intermediate HDR image.
Don't worry if your initial results look less than desirable. You're only half
way towards your stunning image but you'll need to modify the HDR
image using a series of adjustments next.
Image Adjustments and Effects
87
To adjust your intermediate image:
1.
From the HDR Merge dialog, an image preview is displayed, along with a
merge file list and merge settings. Optionally, uncheck an image from the
upper-right list to exclude it from the merge.
2.
Drag the Compression slider to a new value—use your eye to judge the best
merge results, but also the supporting Histogram to ensure that the tonal
range fits into the visible graph without clipping. The option compresses or
expands the dynamic range by dragging right or left, respectively.
3.
Set a Brightness level to make the image either lighter or darker.
4.
Adjust the Black Point slider right to shift the histogram's left-most edge
making all affected pixels in the shadow region turn black.
5.
Reduce Local Contrast Radius to alleviate image "flatness" when
compressing the dynamic range (see Compression above).
6.
Set the Temperature to give a warmer "reddish" or cooler "blueish" look;
drag to the right or left, respectively.
7.
Adjust the Saturation value to reduce or boost the color in your image.
8.
Check Output 16-bits per channel if you're looking for the highest level of
detail in your merged output. Then click OK.
9.
From the next dialog, you'll be asked if you want to save the intermediate
HDR Image or just continue as an untitled project.
Click Yes to preserve the HDR image. This saves having to select,
align, and merge images again, but you'll still need to reapply any
adjustments previously made. Select a file location, file format, name
for your file, then click Save. The file format (OpenEXR .exr, Radiance
.hdr, or HD Photo .hdp) can be chosen from the drop-down menu.
OR
Click No if you don't need to preserve the HDR image (you'll have to
select, align, and merge again). Your merge results will be the basis for
an Untitled project.
If you've created an intermediate HDR image, it can be opened as for any
other file (see p. 20).
88
Image Adjustments and Effects
5
Manipulating Images
90
Manipulating Images
Manipulating Images
91
Making a selection
In any photo editing program, the selection
tools and techniques are as significant as any of
the basic brush tools or commands. The basic
principle is simple: quite often you'll want to
perform an operation on just a portion of the
image. To do this you must define an active
selection area.
The wide range of selection options in PhotoPlus lets you:
Define just about any selection shape, using various drawing and painting
techniques.
Modify the extent or properties of the selection (see p. 96)
Carry out various manipulations on the selected pixels, including cut, copy,
paste, rotate, adjust colors, apply special effects, etc. (see p. 100)
Selection basics
Although the techniques for using the various selection methods differ, the end
result is always the same: a portion of the active layer has been "roped off" from
the rest of the image. The boundary is visible as a broken line or marquee
around the selected region (see above).
Whenever there's a selection, certain tools and commands operate only on the
pixels inside the selection—as opposed to a condition where nothing is selected,
in which case those functions generally affect the entire active layer.
You may occasionally (especially if the marquee is hidden) find yourself
using a tool or command that seems to have no effect... it's probably
because there's still a selection somewhere, and you're trying to work
outside the selection. In this case, just cancel the selection.
92
Manipulating Images
To cancel the selection (select nothing):
Right-click and choose Deselect, use the Select menu or press Ctrl+D.
The opposite of selecting nothing is selecting everything:
To select the entire active layer, press Ctrl+A, or choose Select All from the
Select menu.
For partial selection of opaque pixels, you can Ctrl-click the layer thumbnail (in
Layers tab).
If your image has multiple layers, and you switch to another layer, the
selection doesn't stay on the previous layer—it follows you to the new
active layer. This makes sense when you realize that the selection doesn't
actually include image content—like an outline map, it just describes a
region with boundaries.
Selection tool options
PhotoPlus offers a very wide range of other selection methods, and a variety of
commands for modifying the extent or properties of the selected pixels—all
available from the Tools toolbar. Note that the selection tools work on
Background and standard layers, but not on text layers or shape layers.
Available
from:
Selection
Tools flyout
Tools
Rectangle Selection Tool—drag out a rectangular
selection area of your chosen size (use the Ctrl key to
constrain to a Square area).
Ellipse Selection Tool—drag out an ellipse selection
area (use Ctrl key to constrain to a circle).
QuickShape Selection Tools flyout—provides
different variable shapes, including pie, star, arrow, heart,
spiral, wave, and so on. The shapes can be further
"morphed" into other custom QuickShapes by dragging
node handles around the QuickShape.
Manipulating Images
Lasso
Tools flyout
93
Freehand Selection Tool—lets you draw a freehand
(irregular) line which is closed automatically to create an
irregularly shaped selection area.
Polygon Selection Tool—lets you draw a series of
straight-line segments (double-click to close the polygon).
Magnetic Selection Tool—lets you trace around an
object edge creating a selection line that snaps to the edge
as you drag.
directly from
toolbar
directly from
toolbar
Text
Tools flyout
Magic Wand Tool—lets you select a region based on
the color similarity of adjacent pixels—simply click a
starting pixel then set a Tolerance from the context
toolbar. It works much like the fill tool, but the result is a
selected region rather than a region flooded with a color.
Selection Brush Tool—lets you paint your selection
as a series of brush strokes.
Text Selection Tool—lets you create a selection in
the form of text. Click with the tool to display the Text
cursor. Type your text, format as needed, and click OK.
(See Creating and Editing text.)
For any selection tool, the Context toolbar includes combination buttons (New,
Add, Subtract, and Intersect) that determine the effect of each new selection
operation. For example, starting with a square selection (created with the New
button), here's what a second partly overlaid square (shown with a solid line)
might produce with each setting:
New
94
Manipulating Images
Add
=
Subtract
=
Intersect
=
For Rectangle and Ellipse Selection tools, the Context toolbar additionally lets
you set a Fixed Size or Fixed Aspect, or number of Rows or Columns (Rectangle
Selection Tool only) in advance of creating your selection—great if you have a
clear idea of the selection area required!
Using the Selection Brush Tool is a simple way to create a brush-based selection.
For a more sophisticated selection method, utilizing full brush control and
painting in grayscale for degrees of selectiveness, use Paint to Select mode. (See
Paint to Select mode on p. 99.)
Selecting layer opacity/transparency
New layers are transparent (they have an alpha channel), but once you've placed
pixels on the layer you'll be able to select between the layer's pixels (i.e., their
opacity) and remaining transparency.
To create a selection from a layer's opacity/transparency:
For selection of Opacity: In the Layers tab, Ctrl-click on the layer’s image
thumbnail.
For selection of Transparency: As above, but additionally select Invert
from the Select menu.
Manipulating Images
95
Color Range
As an intelligent color selection method, i.e. where selection is based on
"tagging" a specific range of colors or tones in the image, choose Color Range
from the Select menu.
To select a color range:
1.
Choose Color Range... from the Select menu. The Color Range dialog
appears, with the image visible in the main Preview window.
2.
To make an initial selection:
To tag a particular color or tone group, such as "Reds" or "Midtones,"
choose the group’s name from the Select drop-down list.
OR
Click
Color Picker to sample a chosen pixel color under the
visible dropper cursor. With this method, the Tolerance slider lets you
include a wider or narrower range of colors in the selection, based on
the chosen color.
Once you’ve made an initial selection, you can use the Add Color
and Subtract Color buttons to include/exclude further colors in the selection by
single-click or by dragging across the image to tag/untag a color range.
Alternatively, for initial selection, drag across the image to select ranges.
96
Manipulating Images
Meanwhile, the dialog provides visual feedback.
1.
If Show Selection is checked, the grayscale Selection window on the right
shows tagged values as brighter, with untagged pixels darker. To customize
what’s displayed in the Preview window on the left, choose an option from
the Preview list: "None" shows the original image, "White Matte" shows
tagged pixels through a white background, and so on.
2.
Click OK to confirm the selection, or Cancel to abandon changes. Reset
reverts back to original dialog settings.
Storing selections
Finally, you can store selections (i.e., just the marqueed region and per-pixel
selectedness data) as part of either the current image or any open image file, and
load a stored selection at any time. It's often useful to be able to "grab" the same
region of an image at different phases of working on it. And, for repetitive tasks
(preparing web buttons, for example) on different but graphically similar files,
by storing a selection you can reuse it rather than having to recreate it for each
file.
Modifying a selection
Once you've used a selection tool to select a region on the active layer, you can
carry out a number of additional steps to fine-tune the selection before you
actually apply an effect or manipulation to the selected pixels. Paint to Select
mode even lets you use standard painting or editing tools as selection tools!
Transforming the selection
The
Selection Deform Tool on the Tools
toolbar's Deform Tools flyout lets you transform,
scale or rotate any already drawn selection area.
With the tool enabled, square nodes on the midpoints and corners of any selected area can be
dragged (opposite).
Look for the cursor changing between resize and
rotate modes when hovering over a corner node.
Manipulating Images
97
Use in conjunction with the Ctrl key to transform the selection area without
constraint, creating a skewed transform (drag nodes as appropriate). The Alt
key resizes the area about its center, while the Shift key maintains the area’s
aspect ratio. It’s also possible to move the small center of rotation "handle" in the
center of the transform to produce an arc rotational movement rather than
rotating around the area’s center (by default).
Holding down the Shift key whilst rotating will cause a movement in 15
degree intervals.
Making the selection larger or smaller
If the selection you've made isn't quite the right shape, or doesn't quite include
all the necessary pixels (or perhaps includes a few too many), you can continue
to use the selection tools to add to, or subtract from, the selected region.
To add or subtract to/from the existing selection with a selection tool:
Select the tool and drag while holding down the Shift or Alt key, respectively.
The newly selected pixels don't have to adjoin the current selection—it's
possible to select two or more separate regions on the active layer.
Modifying the selection
Once you've made a selection,
several modify selection operations
can be used in combination to alter
the selection area. Feather, smooth,
contract, and expand operations
are possible from a single Modify
Selection dialog, along with the
popular Grow, Similar, and Invert
available separately. Combining
the operations in a dialog improves
efficiency, and lets you preview
your modified selection directly on
the page as you make changes.
Several preview methods are
possible.
98
Manipulating Images
To modify a current selection:
1.
From any Selection context toolbar, select Modify Selection....
2.
From the Modify Selection dialog, you can enter a specific pixel value for
the type of operation you require.
Feather: Use to apply feathering "after the fact" to an existing selection
(but before applying any editing changes). Enter the width (in pixels)
of the transition area. A higher value produces a wider, more gradual
fade-out. See Soft-edged and hard-edged selections below.
Smooth: If the selected region has ragged edges or discontinuous
regions (for example, if you've just used the Magic Wand Tool), use
the option to control the extent of smoothing.
Contract/Expand: Move the slider left to contract (shrink) the borders
of the selection, or right to extend its borders.
3.
Select a preview method from the Preview drop-down list—choose to
preview as an Overlay, in Grayscale, or use different Mattes.
The Modify item on the Select menu (or right-click on selection) provides a
submenu with the above options, along with other intelligent selection options:
Grow and Similar both expand the selection by seeking out pixels close (in
color terms) to those in the current selection. Grow only adds pixels
adjacent to the current selection, while Similar extends the selection to any
similar pixels in the active layer.
Both options use the tolerance setting entered for the Magic Wand Tool on
the Context toolbar. As the tolerance increases, a larger region is selected.
Typically when using these tools, you'll start by selecting a very small region.
Choose Border... to create a new selection as a "frame" of a specified pixel
width around the current selection.
The Invert option selects the portion of the active layer outside the current
selection. Unselected pixels become selected, and vice versa.
Manipulating Images
99
Soft-edged and hard-edged selections
Antialiasing and feathering are different ways of controlling what happens at
the edges of a selection. Both produce softer edges that result in smoother
blending of elements that are being combined in the image. You can control
either option for the Standard and QuickShape Selection tools, using the Feather
input box (or slider) and Antialias check box on the Context toolbar.
Antialiasing produces visibly smooth edges by making the selection's edge
pixels semi-transparent. (As a layer option, it's not available on the
Background layer, which doesn't support transparency.)
If an antialiased selection (for example, one pasted from another image)
includes partially opaque white or black edge pixels, you can use Matting
options on the Layers menu to remove these pixels from the edge region,
yielding a smoother blend between the selection and the image content
below. (Fully opaque edge pixels are not affected.)
Feathering reduces the sharpness of a selection's edges, not by varying
transparency, but by partially selecting edge pixels. If you lay down paint on
a feathered selection, the paint will actually be less intense around the
edges.
Threshold converts a feathered, soft-edged selection into a hard-edged
selection (use Modify>Threshold). As with feathering, you won't see an
immediate effect on the image, but painting and other editing operations
will work differently inside the selection.
Paint to Select mode
The Brush Selection Tool lets you paint a selection. However, as a more
advanced feature, Paint to Select mode lets you:
use finer brush control to modify your selection.
modify the selection using standard painting and editing tools according to
the lightness of the colors you apply.
See PhotoPlus Help for more information.
100
Manipulating Images
Manipulating a selection
Moving the selection marquee
Sometimes, you need to adjust the position of
the marquee without affecting the underlying
pixels. Any time you're using one of the selection
tools, the cursor over a selected region changes to
the Move Marquee cursor, which lets you drag the
marquee outline to reposition it.
You’re only moving the selection outline—
not the image content inside it.
You can also use the keyboard arrows to "nudge" the selection marquee.
Once you have selected your chosen pixels, the operations which can be
performed include moving, cutting, copying, duplicating, pasting and deleting.
You use the Move Tool to drag the selection plus its image content. (See
Modifying a selection on p. 97).
Using the Move Tool
The
Move Tool is for pushing actual pixels
around. With it, you can drag the content of a
selection from one place to another, rather than
just moving the selection outline. To use it, simply
click on the selection and drag to the new location.
The selected part of the image moves also.
If nothing is selected, dragging with the Move Tool moves the entire active
layer. (Or, if the Move Tool's Automatically select layer property is
selected on its context toolbar, the tool moves the first visible item's layer
beneath the move cursor when you click to move.)
When the Move Tool is chosen, you can also use the keyboard arrows to
"nudge" the selection or active layer.
Manipulating Images
101
The "hole" left behind when the image content is moved exposes the current
background color (on the Background layer), or transparency (see above;
on standard layers), shown with a "checkerboard" pattern.
To duplicate the contents of the selection on the active layer, press the Alt
key and click, then drag with the Move Tool.
As a shortcut if you're working with any one of the selection tools, you can
press the Ctrl key to switch temporarily to the Move Tool. Press Ctrl+Alt
to duplicate. Release the key(s) to revert to the selection tool.
Cut/Copy/Delete/Paste
Cut and copy operations on selections involving the Clipboard work just as in
other Windows programs.
To copy pixels in the selected region, press Ctrl-C or click the
Copy
button on the Standard toolbar. (You can also choose Copy from the Edit
menu.)
To cut the selected pixels, press Ctrl-X or choose Cut from the Edit menu.
To delete the selected pixels, press the Delete key or choose Clear from the
Edit menu.
Cut or deleted pixels expose the current background color (on the
Background layer) or transparency (on standard layers). If you want to
create transparency on the Background layer, first "promote" it to a
standard layer by right-clicking its name on the Layers tab and choosing
Promote to Layer.
If nothing is selected, a cut or copy operation affects the whole active layer,
as if Select All were in effect.
When pasting from the Clipboard, PhotoPlus offers several options.
To paste as a new image in an untitled window, press Ctrl+V or click
the Paste as New image button on the Standard toolbar. (Or select from
the Edit>Paste menu.)
To paste as a new layer above the active layer, press Ctrl+L or choose
Paste>As New Layer from the Edit menu.
102
Manipulating Images
To paste into the current selection, press Shift+Ctrl+L or choose Paste>
Into Selection from the Edit menu. The Clipboard contents appear
centered in the currently selected region. (This choice is grayed out if
there's no selection, or if the active layer is a text layer.) This option is useful
if you’re pasting from one layer to another. Because the selection marquee
“follows” you to the new layer, you can use it to keep the pasted contents in
registration with the previous layer.
To duplicate part of the active layer on the same layer, press the Alt key and
click, then drag with the Move Tool. (Or if you're working with a selection
tool, press Ctrl+Alt and drag to duplicate.)
Changing image and canvas size
You probably know that image dimensions are given in pixels (think of pixels as
the "dots of paint" that comprise a screen image)—say, 1024 wide by 768 high. If
you want to change these dimensions, there are two ways to go about it, and
that's where image and canvas come into play.
Changing the image size (top example
opposite) means scaling the whole image (or
just a selected region) up or down. Resizing
is actually a kind of distortion because the
image content is being stretched or
squashed.
Changing the canvas size (bottom example)
just involves adding or taking away pixels
around the edges of the image. It's like
adding to the neutral border around a
mounted photo, or taking a pair of scissors
and cropping the photo to a smaller size. In
either case, the remaining image pixels are
undisturbed so there's no distortion.
Note that once you've changed either the image size or the canvas size, the image
and canvas are exactly the same size again!
Manipulating Images
103
Changing image size
The Image Size dialog lets you specify a new size for the whole image, in terms
of its screen dimensions and/or printed dimensions.
To resize the whole image:
1.
Choose Image Size... from the Image menu.
2.
To specify just the printed dimensions, uncheck Resize layers. Check the
box to link the Pixel Size (screen) settings to the Print Size or Resolution
settings.
3.
To retain the current image proportions, check Maintain aspect ratio.
Uncheck the box to alter the dimensions independently.
4.
If adjusting screen dimensions:
Select a preferred scale (either "Pixels" or "Percent") in the drop-down
list.
Select a resampling method. As a rule, use Nearest Pixel for hard-edge
images, Bilinear Interpolation when shrinking photos, Bicubic
Interpolation when enlarging photos, and Lanczos3 Window when
best quality results are expected.
5.
If adjusting printed dimensions, select your preferred units of measurement
and resolution. The pixel size will automatically alter with print size
adjustment.
6.
Enter the new values and click OK.
Changing canvas size
PhotoPlus provides several ways of changing the canvas size that was originally
chosen when creating a new image (see p. 18). If you just want to reduce the
canvas area, you can use the Crop Tool (see Cropping an image on p. 104) or
the Image>Crop to Selection command. To either enlarge or reduce the canvas,
the Image>Canvas Size... command provides a dialog that lets you specify
where pixels should be added or subtracted.
104
Manipulating Images
To change canvas size:
1.
Choose Canvas Size... from the Image menu.
2.
Enter New Width and/or New Height values (the current values are also
shown for comparison). Alternatively, select the Relative check box to enter
the number of units you want to add or subtract from the existing width and
height values—for example, 5 pixels, 1 cm, 100 points, 10 percent, and so on.
3.
In the Anchor box, click to position the image
thumbnail with respect to edges where pixels
should be added or subtracted. For example, if
you want to extend the canvas from all sides of
the image, click the center anchor point.
4.
Click OK.
If the canvas size is increased, the new canvas area is filled (on the
Background layer) with the current background color and (on standard
layers) with transparency.
Cropping an image
Cropping is the electronic equivalent of taking a pair of scissors to a photograph,
except of course with a pair of scissors there is no second chance! Cropping deletes
all of the pixels outside the crop selection area, and then resizes the image canvas
so that only the area inside the crop selection remains. Use it to focus on an area of
interest—either for practical reasons or to improve photo composition.
Before
After (Rectangular Crop)
Manipulating Images
105
To crop unconstrained:
1.
From the Tools toolbar's
Crop Tools flyout, select the
Crop
Tool. Ensure the Unconstrained option is set in the Context toolbar's first
drop-down list.
2.
Drag out a rectangle to create an unconstrained rectangle, then fine-tune
the areas dimensions if needed by dragging the edges. Note that you can
also constrain the crop area to be a square, by holding down the Ctrl key
while dragging.
3.
To crop to the designated size, double-click inside the crop area.
The Shading check box and Opacity option on the Context toolbar sets the
shade color and transparency of the unwanted region outside the rectangle,
respectively. Uncheck Shading to view only the rectangle, with no shading and
full transparency.
Cropping with the Crop Tool affects all image layers. Everything outside
the designated region is eliminated. If there's a marquee-based selection,
it is ignored and deselected during cropping.
To crop to a specific print size or resolution:
1.
Select the
2.
Then either:
Crop Tool from the Tools toolbar.
For print sizes, choose a pre-defined print size from the first drop-down
menu in the Context toolbar. Both portrait and landscape crop regions
can be selected—e.g., 4 x 6 in for portrait, 6 x 4 in for landscape.
OR
If you need to set a custom size, enter values into the Height and
Width drop-down menus, choosing inches or centimeters as
measurement units in advance—note that the print size changes to
"Custom" after entering new values. The Print Size resolution alters
automatically while honouring your print Width and Height.
3.
Drag out your crop area to create your constrained rectangle or square (if
Custom).
4.
Double-click the crop area to crop to the designated size.
106
Manipulating Images
Use the Thirds grid check box on the Context toolbar for improving photo
composition. A 3 x 3 rectangular grid with equally spaced lines (two vertically,
two horizontally) is superimposed on top of your photo when the check box is
selected.
Moving and resizing the grid allows the main subject of your photo (in this case
a big wheel) to be offset and balanced against a foreground or background
feature within the photo (e.g., the sky as background). Position a main item of
interest in the photo where any two lines intersect within the crop grid (four
intersections are possible). This is known as the "rule of thirds" which will help
you find the most balanced composition where your eyes are drawn to the main
subject. Double-click to crop the photo to the outer grid dimensions.
You can also crop an image to any
selection area, no matter what shape, as
defined with one of the selection tools.
For example, here’s cropping applied to
a selection created with a QuickShape
Selection Tool, called the Thought
Selection Tool.
To crop the image to the selection:
Choose Crop to Selection from the Image menu.
Manipulating Images
107
If the selection region is non-rectangular, the left-over surrounding region will
be either transparent (on a standard layer) or the current background color (e.g.,
white).
Cropping to the selection affects all image layers. Everything outside the
selected region is eliminated.
Flipping and rotating
Flipping and rotating are standard manipulations that you can carry out on the
whole image, the active layer, a path, or just on a selection. Flips are used to
change the direction of a subject's gaze, fix composition, and so on, whereas
rotation is an orientation tool for general purpose use.
Flip Horizontal
Flip Vertical
Rotate: 15° counter-clockwise
Rotate: 10° clockwise
To flip:
Choose either Flip Horizontally or Flip Vertically from the Image menu,
then select Image, Layer, Selection or Path from the submenu.
108
Manipulating Images
To rotate:
1.
Choose Rotate from the Image menu.
2.
From the flyout menu, select an option based on the object (Image, Layer,
or Selection), rotation angle (90º or 180º), and the direction (Clockwise or
Counter-clockwise) required.
3.
You can also select Custom..., to display a Rotate dialog, from which you
can do all of the above but instead set your own custom angle, even down to
fractional degrees.
Deforming
The
Deform Tool lets you move, scale, rotate, or skew a selection or layer.
Start by making a selection if desired, then choose the Deform Tool. For either
selection or layer, a rectangle appears with handles at its corners and edges, and
a fixed point (initially in the center of the region). If there's no selection, the
rectangle includes the whole active layer.
For example, a layer can be deformed using scale and skew operations.
Scale down layer
contents
from top-right corner
of rectangle;
revealing the
background color.
Skew from top-right
corner handle by
dragging
with the Ctrl key
pressed.
The layer contents are
skewed
for artistic effect.
Manipulating Images
109
The tool's action depends on the exact position of the mouse pointer. As you
move the pointer around the enclosed region, the cursor changes as shown
below to indicate which action is possible.
To move the region without any deformation, drag from its neutral
midsection. This action works just like the Move Tool.
To reshape the region, drag from an edge or corner handle. A
variety of options are available (watch the Hintline for tips).
Over a corner handle:
• Drag to scale region in two dimensions (height and width).
• To maintain constant proportions, drag with the Shift key
down.
• To scale the region relative to the fixed point, drag with the
Alt key down. Pixels further from the fixed point will move
further than those close to it.
• To freely distort the region from one corner, drag with the
Ctrl key down.
• To scale relative to the fixed point with constant proportions,
drag while pressing Shift+Alt.
• To distort relative to the fixed point, drag while pressing
Ctrl+Alt. The opposite corner mirrors the dragged corner's
movement.
• To distort the region along either adjacent edge, drag while
pressing Shift+Ctrl.
• For a perspective effect, drag while pressing Shift+Ctrl+Alt.
The adjacent corner mirrors the dragged corner's movement.
Over an edge handle:
• Drag to move the edge in or out, for a squash/stretch effect.
• For a squash/stretch effect relative to the fixed point, drag
with the Alt key down. Pixels further from the fixed point will
move further than those close to it.
• To move the edge freely, for a skew effect, drag with the Ctrl
key down.
• For a skew effect relative to the fixed point, drag while
pressing Ctrl+Alt. The opposite edge mirrors the dragged
edge's movement.
110
Manipulating Images
• For a constrained skew effect, press Shift+Ctrl and drag the
edge along its line.
• For constrained skew relative to the fixed point, press
Shift+Ctrl+Alt and drag the edge along its line.
To rotate the region about the fixed point, drag from just outside a
corner. To constrain rotation in 15-degree steps, press the Shift key
after you've begun rotation, and hold it down until after you release
the mouse button. You can change the location of the fixed point
(see below).
To reposition the fixed point, move the cursor to the exact center
until a small target appears, then drag. The fixed point can be moved
anywhere—even outside the deformation region. Great for arced
rotations.
For even more sophisticated warping effects, you can use mesh warping (see
below). Aside from minor cursor differences, the following instructions also apply
to the Deform Mesh Tool included on the Mesh Warp Tool's Context toolbar.
Mesh warping
The
Mesh Warp Tool works like the Deform Tool outfitted with complex
curves. It lets you define a flexible grid of points and lines that you can drag to
distort an image, or part of an image (or layer). You can edit the mesh to vary its
curvature, and even custom-design a mesh to match a particular image's
geometry—for example, curves that follow facial contours—for more precise
control of the warp effect.
The Mesh Warp Tool works on Background and standard layers, but not
on text layers or shape layers.
When you first select the tool, a simple
rectangular mesh appears over the image,
with nine nodes: one at each corner, one at
the center, and one at the midpoint of each
edge. Straight lines connect adjacent nodes.
A context toolbar also appears to support the
Mesh Warp Tool.
Manipulating Images
111
The straight line segments are actually
bendable curves. When you alter the
contours of the mesh and distort the initial
rectangular grid, the underlying image
deforms accordingly. To change the mesh,
you simply move nodes, node attractor
handles, or connecting lines; add or subtract
nodes as needed; and/or edit nodes to
change the curvature of adjoining lines.
To select a mesh node:
Click it. (Shift-click or drag a marquee to select multiple nodes.)
One or more attractor handles appear on the selected node(s) and on any
adjacent nodes. The number of handles per node will vary depending on the
number of adjacent nodes.
To warp the mesh:
Drag a mesh node to move it.
OR
Drag a line segment to reshape it.
OR
Drag a node's attractor handles.
To add a new node:
Double-click on a line segment.
OR
Click on a line segment then select the
displayed Context toolbar.
Add Node button on the
The new node appears, along with extra nodes where the new connecting lines
intersect existing lines. Adding a new node further subdivides the mesh.
112
Manipulating Images
To delete one or more nodes:
1.
Select the node(s).
2.
Press Delete.
OR
Click the
Delete node(s) button on the displayed Context toolbar.
Deleting a node also deletes lines and nodes connected to it. If you delete a
corner or edge node, the overall mesh area will decrease. To delete a specific grid
line and its nodes, click to place a marker on the line, then press Delete.
The bendability of line segments depends on the type of nodes at either end. You
can change a node from one type to another simply by selecting it and using the
Context toolbar buttons:
Mesh nodes can be sharp, smooth, or symmetric (see illustrations below).
Changing a node's type lets you control how much the curved segments bend on
either side of the node. To determine a node's current type, select it and check to
see which Mesh Node button on the toolbar is also selected.
To change a node to a different type:
Select it and click one of the other node buttons.
Experiment, and you'll begin to appreciate the fine control that these settings
afford. For example, using a light-blue Quick Grill shape, it's easy to appreciate
the difference between node types.
Sharp means that the slope and depth of the
curves on either side of the node are completely
independent of each other. The contours can be
adjusted separately, and the intersection can be
pointed.
Smooth means that the slope of the curve is the
same on both sides of the node, but the depth of the
contours on either side can differ.
Manipulating Images
113
Symmetric nodes join curves with the same
slope and depth on both sides of the node.
To reset the mesh to full-frame and rectangular:
Click the
Reset Mesh button on the Mesh Context toolbar.
To hide the mesh for a better preview of the image:
Click the
Hide/Show Mesh button on the Mesh Context toolbar.
Click again to reveal the mesh for editing.
The Deform Mesh option makes it easy to move, scale, skew, or rotate a mesh
region about a fixed point; a region is the area enclosed by multiple nodes. It
works just like the standard Deform tool (described above) but on multiple
nodes instead of individual ones.
To deform the mesh systematically:
1.
Shift-click or drag a marquee to select multiple nodes.
2.
Click the
Deform Mesh button on the Mesh Warp Tool's Context
toolbar. A red selection rectangle appears around the designated nodes (you
may need to zoom in to see this), with a fixed point in the center and
handles at its corners, sides, and center.
To deform the mesh region, drag from any corner or midpoint handle.
To rotate the mesh region, drag from just outside any corner handle.
To move the fixed point, move the cursor over the fixed point symbol
until the cursor changes, then drag (this then lets you perform arc
rotations). To move the entire region, drag from elsewhere within the
region.
114
Manipulating Images
Watch the Hintline for details on many key-assisted options such as
skew, squash/stretch, and perspective effects. In this respect, the tool
works almost exactly like the regular Deform Tool (see p. 108).
3.
Click the button again to return to standard mesh warping.
Using Image Cutout Studio
Image Cutout Studio offers a powerful integrated solution for cutting out part of
an image on an active Background or standard layer. In doing so, you can separate
subject of interests from their backgrounds, either by retaining the subject of
interest (usually people, objects, etc.) or removing a simple uniform background
(e.g., sky, studio backdrop). In both instances, the resulting "cutout" creates an eyecatching look for your image, and lets you present cutouts layer-by-layer—great
for simulating subject/background combinations and artistic collages.
The latter background removal method is illustrated in the following example.
The white initial background is discarded, leaving interim checkerboard
transparency, from which another image can be used as a more attractive
background. A red tint on the second image's background is used to indicate
areas to be discarded.
Image Cutout Studio works on Background and standard layers, but not
on text layers or shape layers.
To launch Image Cutout Studio:
1.
Select an image to be cut out.
2.
Select
Cutout Studio from the Photo Studio toolbar.
- or Select Cutout Studio... from the Edit menu.
Manipulating Images
115
Changing output settings
You can set the level of transparency and pixel blending at the
cutout edge by adjusting the output settings, Width and Blur.
Control of the cutout edge lets you blend your cutout into new
backgrounds more realistically.
To change output settings:
1.
Drag the Width slider to set the extent (in pixels) to which "alpha" blending
is applied inside the cutout edge. This creates an offset region within which
blending occurs.
2.
Adjust the Blur slider to apply a level of smoothing to the region created by
the above Width setting.
You'll need to click
Preview in order to check output setting
adjustments each time.
Selecting areas to keep or discard
A pair of brushes for keeping and discarding is used to "paint" areas on your
active layer. The tools are called Keep Brush and Discard Brush, and are either
used independently or, more typically, in combination with each other. When
using either tool, the brush paints an area contained by an outline which is
considered to be retained or discarded (depending on brush type). A
configurable number of pixels adjacent to the outline area are blended.
To aid the selection operation, several display modes are available
to show selection.
Show Original, Show Tinted, and Show Transparent buttons
respectively display the image with:
selection areas only
various colored tints aiding complex selection operations
checkerboard transparency areas marked for discarding.
For Show Tinted, a red tint indicates areas to be discarded; a green
tint shows areas to be kept.
116
Manipulating Images
For Show transparent mode, a different Background color can be
set (at bottom of the Studio) which might help differentiate areas
to keep or discard.
To select areas for keeping/discarding:
1.
In Image Cutout Studio, click either Keep Brush Tool or
Discard Brush Tool from the left of the Studio workspace.
2.
(Optional) Pick a Brush size suitable for the area to be worked on.
3.
(Optional) Set a Grow tolerance value to automatically expand the selected
area under the cursor (by detecting colors similar to those within the
current selection). The greater the value the more the selected area will
grow.
4.
Using the circular cursor, click and drag across the area to be retained or
discarded (depending on Keep or Discard Brush Tool selection). It's OK to
repeatedly click and drag until your selection area is made.
The
Undo button reverts to the last made selection.
To fine-tune your selection, you can switch between Keep and Discard
brushes by temporarily holding down the Alt key.
5.
Click
OK to create your cutout.
You'll now see your active layer with the selected areas cut away (made
transparent).
Click
Reset if you want to revert your selected areas and start your
cutout again.
Manipulating Images
117
Refining your cutout area
Erase and Restore touch-up tools can be used to refine the cutout area within the
studio before completing your cutout.
The touch-up tools are brush based and are only to be used to fine-tune
your almost complete cutout—use your Keep and Discard brush tools for
the bulk of your work!
To restore or remove portions of your cutout:
1.
With your cutout areas already defined, click
Preview (Output
settings tab). You can use the button to check your cutout as you progress.
2.
Restore Touch-up Tool or
Click the
button from the left of the Studio workspace.
3.
Paint the areas for restoring or erasing as you would with the brush tools.
Erase Touch-up Tool
If you've touched up part of your image between each preview, you'll be
asked if you want to save or discard changes.
Using channels
Every color photo that you use in PhotoPlus will have channels associated with
it. For the color mode RGB, the individual channels Red (R), Green (G) and Blue
(B) make up a composite RGB channel. Alternatively, channels can also be
separate, i.e. as their individual colors—Red, Green and Blue. Each channel
stores that particular color’s information which, when combined with the other
channels, brings about the full color image.
Within PhotoPlus, channels are treated as a color sub-set of the active
selected layer, whether this is a background, standard, shape or text
layer.
118
Manipulating Images
PhotoPlus lets you show,
hide, and select composite or
specific channels of any photo
from a single point, called the
Channels tab. This tab lists
the composite RGB and each
individual Red, Green and
Blue channel in turn.
If hidden, make this tab visible via Window>Studio Tabs.
By default, all channels are selected and visible (see opposite).
Why do we want to select channels anyway? This is because you can apply an
edit to an individual channel in isolation. Typically, you could:
Apply a filter effect
Make an image adjustment
Paint onto a channel
Paste selections
Apply a color fill
Apply a mask
To hide/show channels:
1.
Select the Channels tab.
2.
Click the eye button next to the channel(s) (it doesn't have to be
selected) to make it hidden. When the button is clicked again, the channel
is made visible.
The composite RGB channel is shown only when all the other channels
are shown. When only a single or pair of single channels is shown the
composite channel will never be shown.
Manipulating Images
119
To select specific channels for edit:
1.
Select the Channels tab. All channels are switched on and are shown by
default.
2.
Click on the channel you want to select—the other channels will be
deselected and hidden automatically. Use Shift-click to include additional
channels if necessary.
3.
Apply the adjustment, special effect, painting operation, etc. to the selected
channel(s).
Interpreting histograms
The Histogram tab is used to view the distribution of colors and tones spread
throughout your current selection, selected layer or entire photo (by default).
This gives an opportunity to view and interpret a complete snapshot of the range
of colors and, most importantly, the distribution of pixels that adopt those
colors.
The histogram doesn't carry out any adjustments by itself, but it is useful for
evaluating the kinds of image adjustments that may be needed. This decision is
up to the user and his/her own personal judgment.
pixel
count
0<--------------tonal range----------->255
For example, we'll
use the composite
RGB channel for
clarity (although
you'll get all colors
by default). Think of
the histogram as
being split into three
portions—(A)
Shadows, (B)
Midtones, and (C)
Highlights.
For any channel, the horizontal X axis represents the range of tones, each
tone is at a specific level.
120
Manipulating Images
The vertical Y axis is the relative pixel count at each of the levels on the X axis
described above. The higher the graph is at any level, the more pixels reside at
that particular level. Remember that this histogram could refer to a Red, Green,
Blue, RGB or luminance channel.
A crosshair cursor can be moved around the histogram, displaying the pixel
count for the color level that your cursor is currently placed at. For example, the
tab above shows the cursor at color level 131, which has a count of 4459 pixels.
You can choose to view the histogram for an individual Red, Green or Blue
channel, All colors, or the composite of the three, the RGB channel. Luminance
(or lightness) can also be shown.
To view a specific channel:
Click the Tab Menu button at the top right of the tab to reveal a flyout.
To change to a different channel, e.g. RGB, pick a channel from the list or
display statistics by checking Show Statistics.
6
Painting and Drawing
122
Painting and Drawing
Painting and Drawing
123
Color concepts
Color modes
PhotoPlus operates in several color modes to let you work in standard and higher
levels of color or tonal detail—these are 8-bits/channel RGB (or 8-bits/channel
Grayscale) and the more detailed 16-bits/channel RGB (or 16-bits/channel
Grayscale) . Editing in 8 bits/channel mode will use 256 levels per color channel, as
opposed to 16-bits/channel, which uses 65,536 levels per channel.
As a rule of thumb, use 16-bit working for "as-your-eyes-see-it" image accuracy.
If you work with 16-bit images, you'll probably want to benefit from the
optimum color or tonal information throughout your project. In fact, 16bits/channel color mode is invoked automatically when:
importing a raw image from Raw Studio.
opening a 16-bit Microsoft HD photo.
PhotoPlus also lets you manually choose modes:
Choose...
Then pick...
when creating
a new image
New Image
(Startup
Wizard) or
File>New
Color Mode: RGB or Grayscale
Bit Depth: 8 or 16 bits per channel
at any time
Image>Color
Mode
RGB 8 Bits/Channel
RGB 16 Bits/Channel
Grayscale 8 Bits/Channel
Grayscale 16 Bits/Channel
when
outputting the
results of an
HDR Merge
File>HDR
Merge...
Output 16-bits per channel
124
Painting and Drawing
At some point, you may have no need to work at a high level of detail (16
Bits/channel). In converting to 8-bit mode, you may want to opt for smaller file
sizes or take advantage of PhotoPlus's range of special filter effects.
To switch from 16-bits/channel to 8-bits/channel working:
From the Image menu, select Color Mode, and pick an 8-bits/channel
option from the submenu.
Like most 16-bit photo editing programs, the choice of filter effects
available is limited while in a 16-bits/channel mode.
There's no real benefit in converting 8 bit images to 16 bit as you don't
gain any additional image data.
To check which mode is currently set, the Title bar shows the mode after
the file name, e.g. CRW_4832.CRW @ 20%,3088 x 2056, RGB 16
Bits/Channel.
Choosing colors
Foreground and background colors
At any given time, PhotoPlus allows
you to work with just two colors—a
foreground color and a background
color. These are always visible as two
swatches on the Color tab indicated
opposite (ringed).
The foreground color is set to green
(RGB 63:173:73) and the
background color to black.
The Color tab makes it possible to set the working color model before color
selection: RGB (Red, Green, Blue); CMYK (Cyan, Magenta, Yellow, Black); HSL
sliders (Hue, Saturation, Lightness); HSL Color Wheel; HSL Color Box; or
Grayscale. models
To set the mode:
Choose an option from the
drop-down list.
Painting and Drawing
125
Defining colors
Now, a few things to remember about how these colors are used:
When you draw a selection, shape, or use the paintbrush tools, you could
apply the foreground color.
However, the black text in the design could be created after swapping
foreground and background colors over using the tab's
button. Loading
the foreground and background color with two frequently used colors is a
great way to boost productivity when painting and drawing.
Why background color? When you cut, delete, or erase an area on the
Background layer, the area exposes the currently set background color—
as if that color were there "behind" the portion of the image being
removed. (By the way, layers other than the Background behave
differently: on these, a removed area exposes transparency.)
To define foreground and background color:
Color Pickup Tool on the Tools toolbar.
1.
Select the
2.
Left-click with the tool anywhere on an image to "pick up" the color at that
point as the new foreground color. Right-click to define a new background
color.
3.
(Optional) On the Context toolbar, set the Sample Size (pickup region) as a
single "Point Sample", "3 x 3 Average" or "5 x 5 Average" area. The last two
options lets you sample an "averaged" color over a square pixel region, ideal
for sampling halftone images, i.e. when point sampling is not suitable.
To switch temporarily to the Color Pickup Tool from a paint, line, shape,
fill, or text tool, hold down the Alt key, then click to define the
foreground color.
OR
126
Painting and Drawing
1.
On the Color tab, move the mouse pointer (dropper cursor) around the
Color Spectrum. As you move the dropper cursor around the spectrum,
the tab's active color swatch updates to the color at the cursor position.
2.
Left-click in the spectrum to set a new foreground color, and right-click to
set a new background color.
You can change this RGB spectrum to display in Grayscale, or show the
colors spread between the Foreground/Background colors (click the
button on the tab).
OR
On the Color tab, use the slider(s) or enter numeric values in the boxes to
define a specific color. The selected swatch updates instantly.
To swap foreground and background colors, click the
double arrow
button next to the swatches. To reset the colors to black and white, click
the black and white mini-swatch at the bottom left of the swatch.
Clicking an active swatch will also let you apply a chosen color from the
Adjust Color dialog's color wheel, and will let you define and store that
color in a set of custom colors.
Storing colors
If you want to save colors that
you want to work with
frequently, you can store them in
the Swatches tab as thumbnails
(this avoids continually defining
colors in the Color tab). The
Swatches tab hosts galleries of
categorized color thumbnails.
If hidden, make this tab
visible via
Window>Studio Tabs.
Painting and Drawing
127
You can store your currently selected foreground color (in Color tab) to the
currently selected category (e.g., G_234); you can also create categories yourself
into which you can add your own thumbnails. The Swatches tab also lets you
choose pre-defined colors from a range of "themed" categories (e.g., Earth,
Fruits, Pastel, and web browser safe).
To add a color to the Swatches tab:
1.
Either:
Choose a color from the Color tab's color spectrum.
OR
Select the Color Pickup Tool and hover over then click on a chosen color.
You’ll notice the Color tab’s foreground color swatch change.
2.
From the Swatches tab, pick the correct category to store the color.
3.
New Swatch button to add the foreground color to the
Click the
current gallery.
To apply a color from the Swatches tab:
Select any gallery thumbnail then paint, draw, fill, etc. Note that a
thumbnail click will change the Color tab's foreground color.
128
Painting and Drawing
Painting
The
Paintbrush Tool and
Pencil Tool on
the Tools toolbar are the basic tools for painting and
drawing freehand lines on the active layer. They
work on Background and standard layers, but not on
text layers or shape layers. The tools work by
changing pixels on the layer.
The Paintbrush Tool will always apply antialiasing to its brush strokes without
exception. For the most part this is ideal as brush edges will appear very
smooth—irrespective of the Hardness setting of your current brush. However,
how can a hard-edged brush effect be achieved? This is possible with the Pencil
Tool, a hard-edged brush tool which is used just like the Paintbrush Tool but
always with the hard-edging.
The Brush Tip tab hosts a
comprehensive collection of brush
presets grouped into various
categories; each category can be
switched to via a drop-down list and
displays a gallery. Note that each
sample clearly shows the brush tip
and stroke; the number indicates the
brush diameter. The brush tip
determines the thickness and many
other properties of the painted line.
You can also create your own
brush from within the tab.
If you scroll down the gallery, you’ll note that some brushes have hard edges,
while others appear fuzzy, with soft edges. The hardness of a brush is expressed
as a percentage of its full diameter. If less than 100%, the brush has a soft edge
region within which the opacity of applied color falls off gradually.
Brush attributes (blend mode, opacity, size, and flow) can be modified via a
context toolbar (along with more advanced Brush Options) and, if necessary,
saved for future use with the Tool Presets tab.
Painting and Drawing
129
If a more bespoke brush tip is required, you can also customize your own brush
tip and save it in its own user-defined category. (See PhotoPlus help for details.)
An important factor when applying brush strokes is the level of opacity applied
to the brush. This attribute affects brush strokes significantly when the stroke is
applied onto already transparent standard layers. The greater the opacity the
more opaque the brush stroke, and vice versa. Experiment to achieve the right
combination of opacity and color for your brush strokes.
To use the Paintbrush or Pencil tool:
1.
From the Tools toolbar's Brush Tools flyout, select
the Paintbrush Tool or Pencil Tool.
2.
Choose a brush tip preset on the Brush Tip tab. If you've picked a Basic
brush, set a brush color (i.e. the foreground color) from the Color tab
before painting.
3.
(Optional) Change brush tip's attributes, if necessary, on the Context
toolbar. These changes do not affect the brush presets present in the Brush
Tip tab.
4.
Drag the cursor on the active layer, holding the left mouse button down to
paint in the foreground color.
Brush options
The Brush Options dialog, accessible from the Context toolbar's Brush option,
lets you customize a brush or define properties for a new one. As you vary the
settings, you can see the effect of each change in the preview window.
Painting using pen tablets
Brush strokes can be applied directly to the page by using your mouse or, if
available, a pen tablet; the latter method is ideally suited for applying pressuresensitive strokes to your project. PhotoPlus supports pressure sensitivity, with
tablet calibration and key assignment possible directly from within the program
(via Pressure Studio).
130
Painting and Drawing
Stamping and spraying pictures
The
Picture Brush Tool works like a custom brush
that sprays a series of pre-defined or custom images at
regular intervals as you drag. Used in conjunction with
the Brush Tip tab you can select from a variety of picture
brushes in different categories, and you can import Paint
Shop Pro "picture tubes".
You can use the tool either to "stamp" single images at
specific points or lay out a continuous stream of
repeating pictures as in the letter "S" on the left.
The Picture Brush tool works on Background and standard layers, but not on
text layers or shape layers.
To draw with the Picture Brush:
Picture Brush
1.
From the Tools toolbar's Brush Tools flyout, select the
Tool.
2.
On the Brush Tip tab, pick a brush tip from one of the categories.
To control image elements, right-click a brush from any Brush Tip tab
category, and choose Brush Options....
3.
From the Context toolbar, scale the opacity and size of the image elements
produced by using the Opacity and Diameter option. For pen tablet users,
check stylus Size and/or Opacity to make these brush properties respond to
your pressure device.
Note that Diameter isn't an absolute setting, but a relative one. Each picture
brush stores its own pre-defined elements, and this scaling determines how
the tool scales elements up or down when drawing. The actual size of stored
elements varies between brushes, so you may need to adjust the image
diameter when switching between different brushes.
4.
To "stamp" single images at specific points, click in various places on your
canvas. To spray a continuous line of images, drag a path across the page.
Painting and Drawing
131
To import a Paint Shop Pro picture tube file:
1.
On the Brush Tip tab, select a category you've created yourself, right-click
and choose Import....
2.
Use the dialog to browse for and select the picture tube (.TUB) file to
import.
If you right-click on any gallery sample, you can manage categories, and access
brush options. With a bit of forethought, it’s not difficult to lay out your own
master images and from them create your own custom Picture Brush tips. (For
details, see online help.)
Erasing
Sometimes the rubber end of the pencil can be just as important to an artist as
the pointed one. The Eraser Tools flyout on the Tools toolbar provides ways of
enhancing an image by "painting" with transparency rather than with color:
The Standard Eraser Tool for replacing colors in
an image either with the background color or with
transparency (on Background or other standard
layers, respectively).
The Background Eraser Tool for erasing pixels
similar to a sampled reference color underlying the
cursor crosshair—great for painting out unwanted
background colors.
The Flood Eraser Tool for filling a region with
transparency, erasing pixels similar to the color under
the cursor when you first click.
In general, you can set tool properties for each tool including brush
characteristics, opacity, tolerance, flow, and choose a brush tip. The Eraser tools
work on Background and standard layers, but not on text layers or shape layers.
132
Painting and Drawing
To erase with the Standard Eraser:
Standard Eraser from the Tools toolbar's Eraser Tools flyout.
1.
Select
2.
(Optional) Change attributes, especially brush Size and Opacity, on the
Context toolbar.
For erasing with an airbrush effect or hard-edged brush, check the
Airbrush or Hard Edge option.
For tablet users, pressure sensitivity can be switched on via Brush Options
(click Brush thumbnail); ensure the Controller drop-down list is set to
"Pressure" on selected attributes.
3.
Drag with the tool on the active layer. On the Background layer, erased pixels
expose the current background color. On other layers, they expose transparency.
To erase with the Background Eraser:
Background Eraser from the Tools toolbar's Eraser Tools
1.
Select
flyout.
2.
(Optional) Change properties on the Context toolbar as described above.
3.
Drag with the tool on the active layer to erase pixels similar to a sampled
reference color directly under the brush tip.
With "Contiguous" limits (the default), the tool erases only withintolerance pixels adjacent to each other and within the brushes width;
this tends to restrict erasure to one side of an edge or line. When you
set "Discontiguous" limits, all matching pixels are erased under the
brush even if they are non-adjacent (great for removing uniform
background like sky). The "Edge Detected" setting can improve erasure
along one side of a contrasting edge or line.
Painting and Drawing
Contiguous
133
Discontiguous
With "Continual" sampling (the default), the reference color is
repeatedly updated as you move the cursor. Sampling "Once" means
erasure is based on the color under the crosshair when you first click.
Use the "Background Swatch" setting to use the current background
color (Color tab) as the reference.
You also have the option of protecting the current foreground color
from erasure (Protect foreground).
If you use the tool on the Background layer, it's promoted to a standard
layer.
To erase with the Flood Eraser:
Flood Eraser from the Tools toolbar's Eraser Tools flyout.
1.
Select
2.
(Optional) Change properties on the Context toolbar.
3.
Drag with the tool on the active layer to erase pixels close in color (based on
the Tolerance range) to the color under the cursor when you first click. If
you use the tool on the Background layer, it's promoted to a standard layer.
The Tolerance setting determines the breadth of the color range to be
erased.
The Opacity setting will alter the erased areas level of transparency.
134
Painting and Drawing
Check Contiguous to erase only within-tolerance pixels connected to
each other; when unchecked, all in-range pixels are erased.
Check Use All Layers to take color boundaries on other layers into
account, although erasure happens only on the current layer.
Antialias smooths the boundary between the erased area and the
remaining area.
Erasing using pen tablets
During retouching, areas of your image can be erased by brushing out, either by
using your mouse or, if available, a pen tablet. For tablet users, PhotoPlus
supports pressure sensitivity, with tablet calibration and key assignment possible
directly from within the program (via Pressure Studio).
Using patterns
The
Pattern Tool lets you paint a pattern directly onto your canvas. In
effect, it "clones" any pattern bitmap you’ve selected while providing the
flexibility to paint wherever you wish, and control opacity, blend mode, and so
on. Like the Clone Tool, the Pattern brush picks up pixels from a source—in this
case, the bitmap pattern—and deposits them where you’re drawing. You can
choose a pre-defined, tiled bitmap pattern from the Patterns dialog, or define
your own patterns.
As an example, patterns can be used effectively as a painted background, perhaps
when creating web graphics.
Painting and Drawing
135
To paint with a pattern:
Pattern Tool from the Tools toolbar's Clone Tools flyout.
1.
Select the
2.
On the Context toolbar, choose your brush attributes (see PhotoPlus Help)
and click the Pattern thumbnail to display the Patterns dialog. To select
from various pattern categories, right-click any of the thumbnails and
choose a different category from the bottom of the flyout menu. Simply
click a pattern to select it. Other right-click options let you edit the pattern
categories or add new patterns from stored bitmap files.
3.
To paint, drag with the tool on the active layer (or in the current selection).
The Aligned check box in the Context toolbar determines what happens
each time you begin brushing in a new place. If checked, the pattern
extends itself seamlessly with each new brush stroke; if unchecked, it
begins again each time you click the mouse.
Creating your own patterns
The built-in selection of patterns in the Patterns dialog provides a useful starting
point, but you can also create your own patterns from any selection, or even the
whole image. And take a look at the Tile Maker effect if you have a relatively
small sample region (like a patch of grass) and want to produce a pattern from it
that can be tiled seamlessly over a broader area.
For best results, you'll need to scale your image, or size your selection, so
that the pattern is of a suitable size from which to tile from.
To create a new pattern:
1.
Define a selection if you wish, and choose Create Pattern... from the Edit
menu.
2.
To store the pattern, select a user-defined category from the dialog's
Category drop-down menu (or keep with the default My Patterns
category).
3.
Click OK.
A thumbnail appears in the category gallery, ready to brush on (or use as a brush
tip texture or fill) at any time. Right-clicking any pattern lets you rename the
pattern categories or add new patterns from stored bitmap files.
136
Painting and Drawing
Filling a region
Filling regions or layers is an alternative to brushing on colors or patterns.
Making a selection prior to applying a fill, and setting appropriate options, can
spell the difference between a humdrum effect and a spectacular one.
The Fill Tools flyout on the Tools toolbar includes two tools for filling
regions with color and/or transparency: Flood Fill and Gradient Fill. In
addition, you can use the Edit>Fill... command to apply either a color or
pattern fill. As with paint tools, if there is a selection, the Fill tools only affect
pixels within the selected region. If you’re operating on a shape or text layer, a
single fill affects the interior of the object(s) on the layer.
Flood and pattern fills
The
Flood Fill Tool works on Background and standard layers, replacing
an existing color region with the foreground color. How large a region is
"flooded" with the fill color depends on the difference between the color of the
pixel you initially click and the color of surrounding pixels.
To use the Flood Fill Tool:
Flood Fill Tool from the Tools toolbar's Fill Tools flyout.
1.
Select the
2.
Set tolerance and layer fill options on the Context toolbar.
You can use the Context toolbar to set a tolerance value—how much
of a color difference the tool looks for. With a low tolerance setting,
the tool "gives up easily" and only fills pixels very close in color to the
one you click (a setting of 0 would fill only pixels of the same color;
255 would fill all pixels). As the tolerance increases, so does the tool's
effect on pixels further in color from the original pixel, so a larger
region is flooded.
When Antialias is checked, the boundary of a color fill is smoothed;
uncheck to produce a hard edge to the fill boundary.
When checked, Contiguous affects only pixels connected to the
clicked pixel; uncheck to affect in-range pixels throughout the region.
Painting and Drawing
137
The Context toolbar includes an All Layers option. If checked, the
Flood Fill tool samples pixels on all layers (both shown and hidden)
underlying the click point, as if the layers were merged into one. If
unchecked, it only samples pixels on the active layer. In either case, it
only fills pixels on the active layer.
A pattern can be applied as a fill from the Context toolbar by picking a
Pattern (click the thumbnail) from the gallery, then choosing the Fill
drop down list to be "Pattern".
3.
Click with the tool where you want to start the fill.
The Edit>Fill... command lets you flood-fill a region on a standard layer using
any color, not just the foreground color. On the other hand, it’s strictly a solid
color flood without the subtleties of the Flood Fill Tool’s properties. Simply
choose the command to display the Fill dialog.
To use the Fill command:
Choose Fill... from the Edit menu. The Fill dialog appears.
For a flood fill, set the Type to Color.
Choose whether the fill color is to be the current Foreground color,
Background color or a Custom color.
Specify the blend mode and opacity of the fill.
If you check Preserve Transparency, transparent areas will resist the flood
color; otherwise, everything in the selection or layer will be equally washed
with the fill.
138
Painting and Drawing
For a Pattern fill, set the Type to Pattern.
The blend options are the same, but in this mode instead of choosing a
color you can fill a region with any pattern stored in the Patterns dialog.
Click the pattern sample to bring up the gallery of pattern thumbnails, then
right-click any thumbnail to choose a category from the bottom of the list.
(See Using patterns on p. 134.)
Gradient Fill Tool
Whereas solid fills use a single color, all gradient fills in PhotoPlus utilize at least
two "key" colors, with a spread of hues in between each key color, creating a
"spectrum" effect. You can fine-tune the actual spread of color between pairs of
key colors. Likewise, a gradient fill in PhotoPlus can have either solid
transparency—one level of opacity, like 50% or 100%, across its entire range—
or variable transparency, with at least two "key" opacity levels and a spread of
values in between. (Remember that opacity is simply an inverse way of
expressing transparency.)
The
Gradient Fill Tool lets you apply variable color and/or transparency
fills directly to a layer. Five types of fill (Solid, Linear, Radial, Conical, and
Square) are available. Technically, a Solid fill is different (it uses just one color)
but in practice you can also achieve a unicolor effect using a gradient fill.
Solid
Linear
Radial
Conical
Square
Applying a gradient fill on any kind of layer entails selecting one of the fill types,
editing the fill colors and/or transparency in a Gradient dialog, then applying the
fill. However, gradient fills behave differently depending on the kind of layer
you're working on.
Painting and Drawing
139
On standard and Background layers, the tool
creates a "spectrum" effect, filling the active layer
or selection with colors spreading between the
key colors in the selected gradient fill. The fill is
applied rather like a coat of spray paint over
existing pixels on the layer; color and
transparency properties in the fill gradient
interact with the existing pixels to produce new
values. In other words, once you've applied the
fill, you can't go back and edit it (except by
undoing it and trying again).
Transparency works in a comparable way, affecting how much the paint you
apply is "thinned." At full opacity, the fill completely obscures pixels underneath.
On text and shape layers, the Gradient
Fill Tool is even more powerful—the fill’s
color and transparency properties remain
editable. Technically, the fill is a property
of the layer, and the shape(s) act as a
"window" enabling you to see the fill.
Thus a single fill applies to all the shapes
on a particular layer—note the gradient
fill opposite which is applied across three
QuickShapes present on the same layer.
Transparency gradients determines which portions of the object you can see
through. Note that the Flood Fill Tool doesn't work with text or shapes. When
first drawn, a shape takes a Solid fill using the foreground color. You can change
the fill type as described below.
To apply a gradient fill:
Gradient Fill Tool from the Tools toolbar's Fill Tools flyout.
1.
Select
2.
Select a fill type from the Context toolbar. Choose Linear, Radial, Conical
or Square.
140
3.
Painting and Drawing
To choose a preset or to edit the fill's colors and/or transparency values,
click the color sample on the Context toolbar.
The Gradient dialog appears, where you can select a preset fill from the
default gallery or right-click and choose a fill from different pre-defined
categories (e.g., Blues, Greens, etc.). The right-click menu also lets you add,
edit or delete categories; items can also be added (or deleted) when a
custom fill is created in the fill spectrum. See PhotoPlus help for details on
how to edit gradient fills.
4.
(Optional) Check Reverse to swap the direction of your chosen fill.
5.
(Optional) Uncheck Transparency if you don't want transparency (if
present) in your chosen gradient fill to be preserved; otherwise, the fill's
transparency is maintained when the fill is applied.
6.
Once you've defined the fill, click with the tool where you want to start the
fill and drag to the point where you want it to end.
To change a text or shape layer’s fill type, or edit its color(s):
Double-click the text/shape layer (or right-click and choose Edit Fill...).
OR
Choose the Gradient Fill Tool and use the Context toolbar.
Either option lets you choose a fill type, and/or click the color (or gradient)
sample to edit the fill.
On text or shape layers, the fill path (the line in the illustration above) remains
visible even after you’ve applied the fill, and you can adjust the fill’s placement
after the fact by dragging the fill path’s end nodes with the Gradient Fill Tool.
Painting and Drawing
141
Cloning a region
The
Clone Tool is like two magic
brushes locked together. While you trace
or "pick up" an original drawing with one
brush, the other draws ("puts down") an
exact duplicate somewhere else—even in
another image.
When retouching, for example, you can
remove an unwanted object from an
image by extending another area of the
image over it (note the pickup area is
positioned over the sea rather than the
original boat).
The tool acts on the active Background or standard layer, and can even clone all
layers (including Text layers or Shape layers).
To clone a region:
1.
From the Tools toolbar's
Tool.
2.
Change properties, if necessary, on the Context toolbar. For example:
Clone Tools flyout, select the
Clone
Reducing the tool's Opacity setting results in a "ghosted" copy of the
original pixels.
142
Painting and Drawing
For additional brush strokes, to always reuse the original pickup point,
keep Aligned unchecked. Check Aligned to have your pickup point
change to be offset in relation to your brush tip's position—great for
removing unwanted regions that follow a natural path (e.g., a tree
branch).
Aligned unchecked
Aligned checked
(Optional) For multiple layers, the context toolbar hosts a Use all
layers option which, when checked, will clone all layers (including
Background, standard, Text and Shape layers together). When
unchecked, only the active (selected) layer is cloned.
3.
To define the pickup origin, Shift-click with the tool.
4.
Click again where you want to start the copy, then drag to paint the copy
onto the new location. Repeat as needed. A crosshair marks the pickup
point, which moves relative to your brush movements.
Creating and editing text
PhotoPlus makes use of two text tools, i.e.
The
Text Tool, for entering solid
text on a new layer. Use for eye-catching
or subtle captioning (opposite) and titling
equally.
The
Text Selection Tool, for
creating a selection in the shape of text
(for filling with unusual fills).
The Layers tab designates text layers with a symbol. Like shapes, solid text in
PhotoPlus is editable: as long as it remains on a separate text layer, you can
retype it or change its properties at a later date.
Painting and Drawing
143
To create new solid text:
1.
Click the Text Tools flyout on the Tools toolbar and choose
the standard Text Tool.
2.
Click on your image with the text cursor to set where you want to insert
text. The text attributes (font, point size, bold/italic/underline, alignment,
antialias and color) set on the Text Context toolbar prior to clicking will be
applied.
OR
Drag across the page to size your text according to requirements. Release
the mouse button to set the point size.
3.
Type your text, which is applied directly on your page. The text appears on
a new transparent text layer in the image. You can now use the Move Tool
or other tools and commands to manipulate it, just like the contents of any
layer.
To edit existing text:
1.
With the text layer to be edited as the active layer, choose the standard Text
Tool and move the mouse pointer over the text until it changes to the (Ibeam) cursor.
2.
Click on or drag to select areas of text—this lets you insert or overwrite
selected text, respectively. Equally, you can set new text attributes (font,
point size, bold/italic/underline, alignment, antialias, or color) to be
adopted by the selected text area—all made from the Text Context toolbar.
Fine-tune your character size and positioning by using the Character tab.
If hidden, make this tab visible via Window>Studio Tabs.
To change text's solid color:
1.
Select all or part of any text.
2.
Click the color swatch on the Context toolbar and use the Adjust Color
dialog. (See Choosing colors on p. 124.)
3.
Select your new color and click OK.
144
Painting and Drawing
To swap to a gradient color:
1.
On the Layers tab, right-click the Text layer and choose Edit Fill....
2.
Change the Fill Type from Solid to one of Linear, Radial, Conical, or
Square.
3.
Click on the Fill gradient swatch and select a preset gradient fill or create
your own gradient from the dialog (see Filling a region on p. 136). The
gradient fill is immediately applied to your text.
This applies a gradient fill to all of your text on the layer and not to
selected text.
To convert any text layer to a standard layer:
Right-click on the layer name and choose Rasterize from the menu.
To create a text selection:
1.
Text Tools flyout (Tools toolbar) and choose the
Click the
Text Selection Tool.
2.
Click at the location on the image where you want to begin the selection.
OR
Drag across the page to size your text selection according to requirements.
Release the mouse button to set the point size.
3.
(Optional) On the Text Context toolbar, set the selection text attributes to
be adopted by the new selection (e.g., the font and point size).
4.
Type your text directly onto the page.
5.
OK button on the Context toolbar. A
When you're done, click the
selection marquee appears around the text's outline.
6.
You can now cut, copy, move, modify, and of course fill the selection.
Unlike solid text, the text selection doesn't occupy a separate layer.
Painting and Drawing
145
Drawing and editing lines and shapes
For drawing and editing lines and shapes, the Tools toolbar includes the
following drawing tool flyouts:
The QuickShape Tools flyout featuring an assortment of tools for
creating rectangles, ellipses, polygons, and other shapes.
The Line Tools flyout features straight lines, plus freehand pen and
curved pen lines.
Overview
Each of the drawing tools has its own creation and editing rules, as detailed
below. Before continuing, let's cover some things that all shape objects have in
common:
Shapes have outlines known as paths. In a nutshell, shapes as discussed
here are filled lines (i.e., they’re closed, with color inside). Later, we’ll cover
unfilled lines (paths) separately, and consider their special properties. The
various drawing tools are all path-drawing tools, applicable to both the
filled and unfilled kind of line.
Unlike painted regions you create on raster (bitmap) layers, both
QuickShapes and lines are vector objects that occupy special shape layers,
marked with an symbol on the Layers tab. Each shape layer includes a
path thumbnail representing the shape(s) on that layer.
A QuickShape or straight line can be drawn directly as a shape layer, path
or as a filled bitmap. The Context toolbar hosts buttons which allow you to
decide how your lines and shapes are to be drawn, i.e.
Shape Layer—create your QuickShape or line on a new shape
layer or add to an existing shape layer.
Paths—add your shape or line directly as a path rather than as
a new/existing shape layer. (See Using paths on p. 154).
Fill Bitmaps—creates a filled bitmap of the shape or straight
line on a raster layer (e.g., the Background layer).
146
Painting and Drawing
Curved and freehand pen lines cannot be drawn as filled bitmaps.
Assuming you’re working on a non-shape layer when you create a shape, the
new shape appears on a new shape layer. But what about the next shape you
create? Shape layers can store more than one shape, and it’s up to you where the
next one will go.
This decision is made easy by use of the Context toolbar when the QuickShape
or line tool is selected. The toolbar displays a series of combination buttons
which determine the layer on which the shape will be placed and the relationship
the new shape will have on any existing shapes on the same layer.
New—Adds the shape to a new shape layer.
Add—Adds the shape to the currently selected layer.
Subtract—removes overlap region when a new shape is added
over existing shapes on the currently selected layer. The new shape
itself is not included.
Intersect—includes the intersection area only when a new shape
is added onto existing selected shapes on the currently selected layer.
Exclude—excludes the intersection area when a new shape is
added onto existing selected shapes on the currently selected layer.
To change the fill type, or edit its color(s):
Double-click the shape layer.
OR
Choose the Gradient Fill Tool and use the Context toolbar.
Either approach lets you add a spectrum fill, a solid color fill, and/or a
transparency gradient to a shape or text object.
Painting and Drawing
147
A single fill is shared by all the shapes on a particular layer. (Technically the
fill is a property of the layer, and the shape(s) act like a "window" that lets
you see the fill.) So if you want to draw a red box and a yellow box, for
example, you'll need two shape layers.
You can also alter a shape layer's Opacity using the Layers tab.
Creating and editing QuickShapes
QuickShapes in PhotoPlus are pre-designed, filled contours that let you instantly
add all kinds of shapes to your page, then adjust and vary them using control
handles—for innumerable possibilities!
The QuickShape Tools flyout lets you choose from a
wide variety of commonly used shapes, including boxes,
ovals, arrows, polygons, stars, and more. Each shape has
its own built-in "intelligent" properties, which you can
use to customize the basic shape.
QuickShapes can also be drawn as paths as described
elsewhere in Using paths (see p. 154).
To create a QuickShape :
1.
Click the
QuickShapes flyout on the Tools Toolbar and select a
shape from the flyout menu. (To choose the most recently used shape, just
click the toolbar button directly.)
2.
Ensure the
3.
If creating the shape on a new layer, make sure the
New button on the
Context toolbar is selected. If creating multiple shapes on the same layer,
select one of the other combination buttons on the Context Bar (see above)
to specify how the multiple shapes will interact (see above).
Shape Layers button is selected on the Context toolbar.
148
Painting and Drawing
4.
Select a foreground color, and any other characteristics for the QuickShape.
5.
Drag out the shape on the image. It displays as an outline; hold down the
Ctrl key while drawing to constrain the aspect ratio. Once drawn, the shape
takes a Solid fill using the Color tab's foreground color.
To create a filled bitmap from your QuickShape instead, choose the
Fill Bitmaps button instead of the Shape Layers button.
Each QuickShape is adjustable, so you can experiment before committing to a
particular figure and edit it later—with innumerable possibilities!
If you switch to the Node Edit Tool, you can adjust the shape. The number of
displayed "edit" control handles varies according to the shape; for example, the
rectangle has just one control, the polygon has two, and the star has four.
As an example, dragging the side control handle on the middle Quick Pentagon
shape downwards will morph the shape to a hexagon, heptagon, octagon, and so
on. Dragging the top control handle to the right will rotate the shape in an
counter-clockwise direction.
To edit a QuickShape:
1.
Click its layer or path name in the Layers or Paths tab, respectively, to select
it. If on a Shape layer, make sure the layer's path thumbnail is selected (it
has a white border; arrowed below) to allow the path to be edited with the
Node Edit Tool or Shape Edit Tool, i.e.
Painting and Drawing
2.
149
Use either:
The
Node Edit Tool (Tools toolbar) to click on the shape and
readjust any of the shape's handles.
OR
The
Shape Edit Tool to select, move, resize, and deform
individual shapes.
(If you only have one shape on a layer, you can use the Move Tool and
Deform Tool.) To resize without constraint, you can drag any shape's
handle; to constrain the shape's proportions, hold down the Shift key
while dragging. To deform the shape, drag a node while the Ctrl key is
pressed.
Creating and editing lines
Lines can be drawn by using dedicated tools from the Tools toolbar's Line Tools
flyout.
The Line Tool produces an antialiased straight line in
PhotoPlus, which is just a very thin shape. The line can be of
varying Weight (thickness) and can be constrained to 15-degree
increments, by holding down the Shift key as you drag.
The Freehand Pen Tool, as its name implies, lets you draw a
squiggly line made up of consecutive line segments and nodes
(each new segment starting from another’s end node), which
can be attached back to itself to create a closed shape. Use the
Smoothness setting on the Context toolbar to even out ragged
contours automatically.
The Pen Tool can produce complex combination curves (and
shapes) in a highly controlled way.
150
Painting and Drawing
Each tool's supporting context toolbar lets you create the line on
a shape layer, as a path or directly as a filled bitmap. Additionally, combination
buttons let you add the line to its own layer (or path), and can also be used to
control how the new line interacts with existing shapes on the layer.
Besides being useful with QuickShapes, the Node Edit and Shape Edit tools
really come into their own when editing lines.
To edit a line:
1.
Click its layer name to select the layer.
2.
To move, resize, scale, skew, or rotate the line, choose the
Shape Edit
Tool. This deform tool works by manipulation of the bounding box around
the line—drag on a corner or edge. (For details on its use, see Deforming on
p. 108.)
3.
To reshape the line, choose the
Node Edit Tool. The line consists of
line segments and nodes (points where the line segments meet). You can
drag one or more individual nodes, or click and drag directly on a line
segment.
When you select a node, control handles for the adjacent line segments appear;
each segment in the line has a control handle at either end. The selected node is
drawn with a red center, with the control handle(s) attached to the nodes by blue
lines.
Any node can be one of several node types: sharp, smooth, or symmetric.
Depending on node type, the node's control handles behave a bit differently, as
you can tell with a bit of experimentation. Essentially, the node type determines
the slope and curvature of each adjoining segment, and can be chosen from the
Context toolbar, i.e.
Painting and Drawing
151
Sharp Corner means that the
segments either side of the node are
completely independent so that the
corner can be quite pointed.
Smooth Corner means that the
slope of the line is the same on both sides
of the node, but the depth of the two
joined segments can be different.
Symmetric Corner nodes join line
segments with the same slope and depth
on both sides of the node.
To edit a node:
1.
Select it with the Node Edit Tool.
2.
Drag its control handle(s) to fine-tune the curve.
You can also use the context toolbar to define a line segment as either straight or
curved.
To add a node, double-click on a line segment. To remove a selected node, press
the Delete key.
Use the
Straighten Line button to make an line segment straight.
152
Painting and Drawing
Creating outlines
Two approaches to creating outlines are available within PhotoPlus—creating an
outline from any current selection and creating outlines around layer objects,
especially text and shapes (as a layer effect). You'll primarily create outlines
around text and other objects so the latter method is predominantly used (but
we'll cover both!).
Selection
(before and after)
Text
(before and after)
For any outline, you can set the outline width, solid color, opacity, and choose a
blend mode. The outline can also sit inside, outside, or be centered on the
selection or object edge.
An outline layer effect can also take a gradient fill, a pattern fill, or a unique
contour fill (fill runs from the inner to outer edge of the outline width); another
advantage over outlines made from selections is the ability to switch the layer
object outline off/on, and complement the outline with other layer effects such
as Drop Shadow, Glow, Bevel, etc. at the same time.
To create an outline from a selection:
1.
Create a selection on a standard or background layer ((but not on Text or
Shape layers). (See Making a selection on p. 96).
2.
Select Outline... from the Edit menu.
From the dialog, choose a Width for the outline.
Select an outline color from the drop-down list. The Foreground
option sets the currently set foreground color; Background sets the
current background color. (See Choosing colors on p. 124). For a
Custom color, click the Color swatch, and select a color from the
displayed Adjust Color dialog.
Painting and Drawing
153
3.
(Optional) From the Mode drop-down menu, pick a blend mode,
which controls how the outline color and underlying pixels blend to
make a combined resulting color. Select the percentage Opacity for
the outline when blending, and check Preserve Transparency to make
transparent areas resist the flood color; otherwise, everything in the
selection or layer will be equally washed with the fill.
4.
Click OK. The outline appears around the selection area.
Once applied, selection outlines no longer remain editable, although if you're
not happy with your outline you can still Undo.
To create outlines on a layer (as a layer effect):
1.
From the Layers tab, select a layer to which outlines will be applied. Note
that all objects (Shapes, Text, or lines) on the layer will be affected.
2.
Layer Effects button on the Layers tab and check Outline in
Click the
the Layer Effects dialog.
3.
(Optional) From the Blend Mode drop-down menu, pick a blend mode,
which controls how the outline color and underlying pixels blend to make a
combined resulting color. Select the percentage Opacity for the outline
when blending.
4.
Choose a Width for the outline, and whether the outline Alignment is
"Outside" or "Inside" the object's edge (or placed in the "Center").
5.
To set a fill for your outline, pick from the Fill type drop-down menu, one
of: Solid, Linear, Radial, Conical, Square, Contour, or Pattern. Choosing
Solid will display a color swatch which, when clicked, shows the Adjust
Color dialog. For other fills, click the gradient fill swatch and apply/edit
your gradient fill accordingly (see Editing a gradient fill in PhotoPlus help
for details). Pattern fills can be applied via a clickable Pattern swatch (see
Using patterns on p. 134 for details).
6.
Click OK. The outline appears around any layer object.
You may notice the
icon appear next to the layer with your outline applied.
Remember that you'll be able to apply a combination of 2D layer effects along
with your outline, by checking other options in the Layer Effects dialog.
154
Painting and Drawing
To switch off the layer effect:
With the layer selected, click the
Outline in the Layer Effects dialog.
Layer Effects button and uncheck
Using paths
Paths are basically outlines. As such, every filled shape you draw has a path—
namely the outline that defines it. In fact, each shape layer has its own path
thumbnail next to the layer name, representing the shape(s) that reside on that
layer. But more significantly, the concept of a path extends to independent
paths: unfilled outlines that don't reside on any particular layer, but which are
created separately and can be applied in various ways to any layer.
What are paths good for? Consider the precision and editability of vector-based
drawing and apply it to the concept of a selection. Now think of all the ways that
selections can be used (and reused). In PhotoPlus, selections and paths are
interchangeable.
In much the same way as layers in the
Layers tab, independent paths are listed
in the Paths tab, depicted with their own
name and the path outline shown in the
path's thumbnail.
If hidden, make this tab visible via
Window>Studio Tabs.
There are two methods for creating a path. You can create:
a path outline directly from drawn QuickShapes (see Path 2's Quick Star
above) or outlines.
a selection on your image from which the path outline can be created (see
Path 3).
Either way, once you've got a path outline, you can reshape it (using the Outline
tools), convert it to a selection, create a filled bitmap, or stroke a path—that is,
draw the path onto a bitmap layer using the current brush. Paths are saved along
with the image when you use the .SPP format.
Painting and Drawing
155
To create a path outline from a QuickShape/outline or selection:
1.
Select a QuickShape or Outline tool, then ensure
Paths is selected on
the Context toolbar. (For details on using these tools, see Drawing and
editing lines and shapes on p. 145).
2.
Drag across the page to create your path.
OR
3.
To create a path outline whose shape matches any selection area, first create
the selection on a layer.
4.
Click
5.
In the dialog, choose a Smoothness setting (to even out jagged selections)
and click OK. The new path outline appears on a new path with a default
name (which you can change, as described below).
Selection to Path on the Paths tab.
To duplicate the selected path and its outline:
Right-click its name and choose Duplicate Path.
To delete the selected path:
Click the Path tab's
Delete Path button.
To rename the selected path:
1.
Double-click its name Rename Path....
2.
In the dialog, type a new name for the path.
To edit a path outline:
Use the Node Edit Tool to modify a path's shape by moving nodes or
adjust outline curves by moving node handles.
Use the Shape Edit Tool to move, resize, reshape, rotate, and skew the path
by dragging the displayed bounding box handles in any direction.
For both methods, see Creating and editing outline shapes on p. 149 for more
details.
156
Painting and Drawing
You can also flip a path outline either horizontally or vertically. Use the Flip
Horizontally>Path or Flip Vertically>Path option from the Image menu,
respectively.
To create a selection from a path:
1.
Select the Background or standard layer where you want to create the
selection.
2.
On the Paths tab, select the path from which you want to create the
selection.
3.
Click the
4.
In the dialog, set options for the selection:
Path to Selection button (or right-click the path entry).
The Feather value blurs the selection's edges by making edge pixels
semi-transparent.
Check Antialias to produce smooth edges by softening the color
transition between edge pixels and background pixels.
Select New Selection, Add to Selection, Subtract from Selection, or
Intersect with Selection to determine how the path-based selection
should interact with an existing selection, if any.
5.
Click OK. The selection marquee appears on the target layer.
To draw (stroke) a path onto a bitmap layer:
1.
Select the Background or standard layer where you want to add the bitmap.
2.
Choose a brush tool (such as the Paintbrush or Picture Brush) and set
Color, Brush Tip, and other properties from the Context toolbar.
3.
On the Paths tab, select the path you want to stroke. Make sure the path is
positioned where you want it.
4.
Click the
Stroke Path button.
Painting and Drawing
157
To create a filled bitmap from a path:
1.
Select the Background or standard layer where you want to create the filled
bitmap.
2.
Set a foreground color.
3.
On the Paths tab, select the path you want to fill. Make sure the path is
positioned where you want it.
4.
Click the
Path).
Fill Path button (or right-click the path and choose Fill
158
Painting and Drawing
7
Making Images for
the Web
160
Making Images for the Web
Making Images for the Web
161
Slicing images
Image slicing and image maps are two convenient ways to create navigation
bars and clickable graphics for web pages. With image slicing, a graphic is carved
up into smaller graphics—each of which can have its own link, like any web
graphic—and PhotoPlus saves the sections as separate files when you export the
image. The process also exports HTML tags describing a table containing the
separate graphics, allowing a web browser to reassemble them seamlessly. The
result appears as a single larger graphic, but with different regions linked to
different targets.
For example, the menubar graphic (below top)... can be sliced into four separate
graphics (below bottom), each linked to a different web page.
The Image Slice Tool lets you divide the image into sections which can be
exported to the .GIF or .JPG file format. You can specify alternate text and URL
links for each of the image sections individually.
To slice the image:
Choose the
Image Slice Tool from the Standard toolbar.
To place a horizontal slice guide on the image, click on the image at your
chosen cursor position. Shift-click to place a vertical guide. A guide line
appears with each click.
To move a guide, simply drag it.
To delete a guide, drag it out of the image window.
To specify the alternate text and/or link:
Right-click an image slice (any area enclosed by horizontal and vertical slice
guides) and enter the alternate Text and URL (link) information in the
dialog.
162
Making Images for the Web
Once you've sliced up your image you have to export it to make the image slices
understandable to a web visitor's browser.
To export a sliced image:
When exporting with File>Export Optimizer, specify a name and folder for
the files as usual, and choose either .GIF or .JPG as the export file type.
Ensure the Create Image Slices box is checked on the second Export dialog.
Since exporting slices creates multiple files, you may wish to create a
separate folder for them.
The export will create multiple files in the specified folder, depending on how
many slices you have defined. The output consists of a series of image files of the
format selected (for example, MYFILEH0V0.GIF, MYFILEH0V1.GIF, etc.) and a
single HTML file (for example, MYFILE.HTM). The HTML file contains the tags
for the set of image slices, ready to be pasted into the source code for the web page.
Creating image maps
Image maps consist of hotspots that you draw with special tools over selected
parts of an image. When a visitor passes their mouse cursor over the hotspot, a
small caption is displayed and the pointer will change to a pointing hand.
Clicking the mouse while the cursor is over the hotspot will invoke a hyperlink
to a specified URL.
You assign each hotspot its own target—for example, the URL of a web page.
Hotspots aren't attached to a particular image, but become part of a larger "map"
that gets exported (p. 203) along with an image and turns into HTML code. It's
then up to the web developer to embed the image map code properly into the
web page.
Image maps are useful if you want to define isolated and/or irregularly shaped
clickable regions on a web graphic, as opposed to subdividing the entire graphic
into rectangular image slices.
Making Images for the Web
163
To draw a hotspot:
1.
Click the
Image Map Tools flyout on the Standard toolbar and
choose one of the following tools:
Image Map Rectangle
Image Map Circle
Image Map Polygon
2.
For rectangles and circles, use the tool to drag out a hotspot on the active
layer. To draw a polygon, drag and release the mouse button to define each
line segment; double-click to close the polygon. All hotspots are shaded in
turquoise.
When using the Image Map Rectangle, hold down the Ctrl key while
dragging out to constrain the hotspot's shape to a square.
To edit a hotspot:
1.
Click the Image Map Tools flyout and choose the
Selection tool.
Image Map
2.
Select your hotspot on the page, which then offers you several editing
options.
To resize the hotspot, drag the displayed square nodes.
To move the hotspot, drag from the center.
Right-click the hotspot to set hotspot Properties.... Enter hover-over
Text and add an associated target URL. Previously used URLs are
saved and can be selected from the drop-down list by clicking on the
arrow at the end of the box. On export, entered text will pop up when
the cursor moves over the hotspot.
The right-click menu also lets you order overlapping hotspots and to
Delete selected hotspots.
164
Making Images for the Web
To export an image map:
When exporting via Export Optimizer, export the image for which you
have created the image map as a .GIF (for non-photographic images) or a
.JPG (for photographic images). Ensure the Create HTML for Image Maps
box is checked on the second Export dialog.
The output consists of an image file and an HTML file with the same base name.
The HTML file contains the tags for the image map, ready to be pasted into the
source code for the web page.
8
Macros and Batch
Processing
166
Macros and Batch Processing
Macros and Batch Processing
167
Understanding macros
If there are operations that you want to repeatedly perform in PhotoPlus, you
can apply a macro. Put simply, a macro is a saved sequence of commands that
can be stored and then recalled at a later date. Macros can be used for:
Downsampling
Reformatting
Applying effects
Applying adjustments
Framing and vignetting
PhotoPlus offers a wide range of
pre-recorded macros ready for
your use. These macros are
available in the Macros tab, where
they are separated into various
categories including Black &
White Photography, Color,
Commands, Vignettes, Layout
Blurs, and Frames (shown) to
name but a few.
You'll notice an
icon next to each
macro which, when clicked, displays
the commands that make up the macro
(click to collapse again). For example, a
macro that creates a wood frame would
have a series of recorded commands
listed chronologically. They may be
enabled, disabled, reordered or made
interactive "on the fly".
168
Macros and Batch Processing
You can cut, copy, paste or even duplicate any macro. This allows you to modify
preset macros once pasted into your own user-defined categories.
Recording Macros
Of course at some point you may want to record your own macro. It’s probably a
good idea to create a new category into which you can save your newly recorded
macros—this keeps them separate from the pre-recorded macros supplied with
PhotoPlus. This is because recorded macros will be indistinguishable from your
preset macros once recorded.
When recording macros, it can be a good idea to ensure that the Layout
Rulers/Grid units in File>Preferences are set to "percent". This approach
ensures that recorded macro commands such as document resizing or framing
are carried out in proportion to the original photo rather than by an absolute
value. Imagine adding an absolute frame size to a small photo that would
otherwise be acceptable on the larger photo. On some occasions you may want
to use absolute values—simply use absolute grid units.
Try to plan ahead before recording—If you jot down your intended
command sequence you'll make fewer mistakes!
To create a new category:
1.
Display the Macros tab.
2.
Click the
3.
In the dialog, enter a new category name and click OK. The new empty
category is displayed automatically.
New Category button on the Macros tab.
Any currently displayed category can be edited or deleted via the
Menu button at the top right of the Macros tab.
Tab
169
Macros and Batch Processing
To record a macro:
1.
In the Macros tab, select a category from the drop-down list of category
names.
2.
New Macro button at the bottom of the Macros tab, enter a
Click the
macro name in advance of recording your macro, then click OK. The
macro name appears at the bottom of the list of macros in the currently
displayed category.
3.
Select the
Start Recording button. Any command that can be saved
in a macro will be stored while recording is in progress.
4.
Carry out the command sequence you want to record, following the
instructions when necessary.
5.
Stop recording your macro with the
Stop Recording button!
To view the macro, navigate to the correct category, then click on the
to expand the entry to show the command list recorded by the macro.
icon
Playing Macros
To play a macro you need to choose a photo to which you want to apply the
preset or custom macro you've just recorded. Any macro needs to be played to
repeat the recorded commands.
To play a macro:
1.
Open the photo you wish to apply the macro to.
2.
From the Macros tab, choose a category from the drop-down menu, then
select your macro.
3.
Choose the
Play button to play the macro.
Abort any macro playback at any time with the ESC key.
170
Macros and Batch Processing
Modifying Macros
Once you’ve recorded and played back your macro it's possible to modify the
macro’s saved sequence of commands. These are listed in the order they were
recorded and may be enabled, disabled, reordered or made interactive "on the
fly". Macro commands are enabled by default.
In the command list, the command order can be rearranged by simple drag and
drop of any command into a new position.
For custom macros you've created yourself, it is also possible to perform a rightclick to delete, rename or duplicate a command from the flyout menu.
Any changes made will be applied to the macro immediately such that no file
saving is required.
It is possible to copy and paste preset macros to any user-defined
category but not individual commands within each macro.
If you significantly modify your macro command list your macro may
become unusable, so it’s important to exercise some restraint while
editing—experimentation and testing is the rule of thumb.
To switch a command off:
1.
Click the
icon next to the macro name to reveal the macro’s command
list in the drop-down menu.
2.
Each list entry begins with a check box
which switches on or off the
relevant command. Uncheck the box to switch the command off.
Experimentation is required when switching commands on or off—some
commands are integral to the way a macro operates!
Macros and Batch Processing
171
To enable command interactivity:
This allows you to intervene in the macro running process to alter some dialog
values, i.e. the next time a macro is played, the macro will pop-up the relevant
dialog associated with a command, pausing the macro temporarily. For example,
for a "Frames" macro, the Fill dialog could be made to display during macro
playback to allow a new fill to be entered manually (try some preset Frames
macros + options for examples of this).
1.
Click the empty box before a command name to display
the Enable\Disable Dialog icon.
2.
Load a photo and play the modified macro. The macro pauses to display a
dialog associated with the above command name.
3.
Modify any settings and press the OK button. The macro will continue.
To switch off command interactivity, simply click the
icon again.
Did you spot that some commands have no "interactive" boxes? This is
because some commands by their nature have no dialogs associated
with them!
To add manual instructions to your command list:
Another example of interactivity is the inclusion of a pause into any custom
macro. This allows you to pop up manual instructions (or important notes) in a
dialog at pre-defined points as your macro runs. There are a number of reasons
for doing this—your macro can’t record selections or operations that are
particular to each photo so manual selection is essential in some instances, or
maybe you want to add a helpful note (e.g., "perform a brush stroke") or warning
in advance of a required action or dialog.
1.
Right-click on a command in a custom macro's command list and select
Insert Pause... from the flyout menu.
2.
Add some relevant notes into the Stop Options dialog—check Allow
continue if you want to present a Continue button in your dialog as the
macro runs. Clicking the button will continue the macro process.
172
Macros and Batch Processing
3.
Click OK. The Stop command is added to the command list below the
command you performed a right-click on (you may want to drag it to
before the command).
4.
Load a photo and play the modified macro (see Playing Macros above).
The macro pauses to display a dialog with your instructions—remember
these before the next step!
5.
Click the Stop button.
6.
Perform the task(s) as instructed in the dialog.
7.
button to continue the macro from the next command in
Press the
the list after the Stop command.
If you don’t need to perform the manual operation, click Continue to
continue the macro without pausing.
Copying, duplicating and deleting Macros
With the vast collection of macros and commands at your disposal, it’s useful to
know that you can copy/paste any preset macros to any user-defined category
for modification—simply right-click on the macro to be copied and select Copy.
You can paste the macro by right-click then selecting Paste (the macro will be
added to the end of the category list). Additionally, commands can be moved (as
opposed to copied) between any user-defined macros by drag and drop.
You can't copy macros or commands into any preset category.
User-defined macros and their associated commands can also be duplicated (or
deleted) by right-click and selection of the Duplicate (or Delete) command.
Batch processing
The batch processing feature is especially useful if you want to repeat the same
operation again and again... Batch processing allows you to:
Use Macros: uses preset or custom macros as part of the batch process.
Change File Type: to bulk convert images to a new file type (with different
file properties if needed).
Macros and Batch Processing
173
Resize Images: to resample images to various widths, heights, or resolutions
(using different resampling methods).
Change File Name: to alter the file names of images in bulk.
For any of the above, you specify separate source and destination folders as your
input and output. There are several advantages to this, mainly that your original
photos are not overwritten.
The Batch dialog, available from
the File menu, is used to perform
all of the above operations.
As a pre-requisite, you have to
define a specific Source Folder
for any batch processing
operation, whether using a
macro or not, or if converting
photos to a different file format.
A Destination folder can
optionally be defined, creating
new files in that new location.
If you don’t select a
destination folder, the
source files will be
processed and your
original files will be
overwritten—exercise
caution with these settings!
To save you time, PhotoPlus will remember previously selected Source and
Destination folders while PhotoPlus is loaded.
You may be wondering how batch processing affects photos currently loaded in
PhotoPlus. PhotoPlus’s batch processing only operates on source folder contents
and not on the currently loaded photos themselves—so these remain unaffected.
However, as a visual check, you will see each photo temporarily being loaded
and converted one-by-one in the Photo window during batch processing.
Check the output folder via Windows Explorer to ensure the results are as
you expect.
174
Macros and Batch Processing
Using macros
Macros (see p. 167) can be applied to a batch process easily (via Use Macros).
PhotoPlus doesn’t differentiate between pre-recorded and recorded macros. If
available, they are selected from the same Category and Macro drop-down
menus equally.
Changing file type
It is possible to convert your photos into one of many different file types
available in PhotoPlus (via Change File Type). In addition, conversion options
such as bit depth, palette, dithering, compression/quality, and matte can be
selected depending on the file type.
File conversions can be
carried out independently
or in conjunction with
macros (the dialogs
shown opposite converts
each image to 24-bit PNG
format).
Changing image size
As well as changing file formats, PhotoPlus can use batch processing to alter
image sizes in bulk (using a choice of resampling methods) via Resize Images.
Typically, this is a quick and easy way to make your images scale to a maximum
image dimension (height or width) with aspect ratio maintained, to absolute
image dimensions (with stretching/shrinking to fit), scale by percentage, and
scale by resolution (DPI). Use for sending your digital photos via email or
perhaps to publish your images online via a website.
Macros and Batch Processing
175
Check Maintain aspect ratio then
enter values for Max Width and Max
Height to scale to maximum
intended dimensions while
preserving the image's original aspect
ratio.
With Maintain aspect ratio
unchecked, enter values for absolute
Width and Height to make images of
a fixed size. As aspect ratio is not
maintained, images may be stretched
horizontally or vertically.
Change the units of measurement to
percent, then enter identical
percentage values to scale Width and
Height in proportion (maintain
aspect ratio); otherwise, different
values will stretch images
horizontally or vertically.
Enter a DPI value to alter the original
resolution of the images.
Pick a method from the drop-down
list. Use Nearest Pixel for hard-edge
images, Bilinear Interpolation when
shrinking photos, Bicubic
Interpolation when enlarging photos,
and Lanczos3 Window when best
quality results are expected. The list is
ordered according to processing
times (fastest to slowest).
176
Macros and Batch Processing
Changing file names
It is also possible to define a Destination File Name for the files to be processed
by selecting the dialog's Modify... button. In the File Name Format dialog you
can select new file names that can be built up using the current date/time,
document names, sequence number, or text string, individually or in
combination.
Use the sequence number to generate a separate file for every file to be
converted—otherwise your first converted file will be overwritten
continually!
9
Creating Animations
178
Creating Animations
Creating Animations
179
Getting started with animation
Animation creates an illusion of motion or change by displaying a series of still
pictures, rapidly enough to fool the eye—or more accurately, the brain. With
PhotoPlus, it's easy to create and edit images with multiple frames, then export
them as animated GIFs that a web browser can play back, or AVI movies for
multimedia applications. You use exactly the same tools and interface as for
creating standard, multi-layer PhotoPlus images, with an extra tab, the
Animation tab, that includes all the additional controls you need to set up
frames, add special effects, and preview the animation. Once you're satisfied, use
the Export Optimizer to output to Animated GIF or AVI movie.
PhotoPlus gives you the choice of creating your animations from scratch,
importing a .GIF or .AVI file to edit, or converting existing photos to an animation
by selecting Convert to Animation from the File menu. Either way, once
PhotoPlus detects an animation file, it switches on the Animation tab. If the image
file is new, you'll see a single, blank frame, labeled "Frame 1." If you've imported an
animation, the tab displays each frame separately. Animation files can have one
layer, or many, but all their layers are standard (transparent) layers; there's no
Background layer. If a photo is used, the first frame will be the photo image.
The Animation tab only displays when an animation is currently open.
Layers and frames
Animations are created in the Animation tab (docked next to the Documents
tab at the bottom of your workspace) which works in conjunction with the
Layers tab. The tab displays a sequence of frame thumbnails. Each frame is a
different state of the image, defined in terms of which layers are shown or
hidden, the position of content on each shown layer, and the opacity of each
shown layer.
180
Creating Animations
In this file (as in any imported .GIF animation) the individual frames can each
occupy one layer in the PhotoPlus image. This is controlled with the Add Layer to
Each New Frame check box, available by right-clicking the Animation tab. Each
new frame can therefore be edited independently as it occupies its own layer.
On the Layers tab, the layer stack for this animation
corresponds with the frame sequence, with default
names—in this case, the default "Layer 1" through to
"Layer 5". You'll notice the thumbnails correlate between
frame and layer.
If you select Frame 1 on the Animation tab (above), you'll
see that on the Layers tab (left) only the "Layer 1" layer is
marked as shown, with an open-eye button; the other
layers are all hidden, with closed-eye buttons.
If you then select Frame 2, only the "Layer 2" layer will be shown, and the rest
will be hidden. And so on with the other frames.
The above example, with its one-to-one correspondence between frames and
layers, is easy to grasp—but don't make the mistake of thinking that a "frame" is
just another name for a "layer." Frames in PhotoPlus are actually much more
versatile!
Key point: A so-called "frame" is really just a particular state or snapshot of the
various layers in the image, in terms of three layer properties:
Shown/Hidden: Which layers are shown and which are hidden
Position: The position of the contents of each "shown" layer
Opacity: The opacity setting of each "shown" layer
As you switch between frames, you switch between states. In the simple example
above, the six frames define six states in terms of Property 1—each of the six
frames defines a different layer as "shown." We could rearrange the stacking
order of the layers, or rename them—the animation itself wouldn't change.
When you create a new frame on the Animation tab, you're not adding a new
layer. The new frame merely enables you to define a new state of the layers that
already exist. Of course, you could go on and create an additional layer (using
the Layers tab), but then all your animation frames would need to take that layer
into account—in other words, hide it when it wasn't needed.
Creating Animations
181
Single-layer animation
Let's look at a different example (below) which shows the Yin-Yang symbol as a
bouncing ball, and although it has four frames it only has one layer (Add Layer
to Each New Frame was unchecked). Three additional frames were cloned from
Frame 1 (using the New Frame button), and then, within each subsequent frame
the layer was dragged slightly (with the Move Tool) to reposition its contents in
the window.
Working with animation frames
Let's cover the "nuts and bolts" of creating and arranging animation frames using
the Animation tab. You'll use the tab in conjunction with the Layers tab to
varying extents, but we'll focus on the Animation tab for the moment.
Here are some general guidelines to help you produce memorable animations:
1.
Decide if you want layers to be created with each frame. Check or uncheck
the Add Layer to Each New Frame option (if needed) by right-clicking on
the Animation tab. This means that each new frame can be edited
independently as it occupies its own layer.
2.
Create enough frames to define the separate states of the animation.
3.
Step through the frames, adjusting layer content and state for each frame.
You can delete or reposition frames as needed, and preview the animation
at any time.
4.
Save the animation as a regular PhotoPlus (.SPP) file, and export it to the
.GIF or .AVI format.
To create a new frame:
Click the
New Frame button (or right-click a thumbnail and choose
New Frame).
182
Creating Animations
The previously selected frame is cloned as a new frame, immediately following it
in the sequence.
To select a single frame:
To select any one frame, click its thumbnail.
Click the
(rewind).
First Frame button to select the first frame of the sequence
Click the
Previous Frame button to select the previous frame of the
sequence.
If the first frame was selected, you'll cycle back to the last frame of the
sequence.
Click the
Next Frame button to select the next frame of the sequence.
If the last frame of the sequence was selected, you'll cycle forward to the
first frame.
Click the
Last Frame button to select the last frame of the sequence.
To select more than one frame:
To select multiple non-adjacent frames, hold down the Ctrl key when
selecting each one.
To select a range of adjacent frames, hold down the Shift key and click the
first and last thumbnail in the range.
To speed up the animation process:
Tweening, short for "in-betweening", automatically creates a chosen
number of frames between the currently selected frame and the previous or
next frame. This gives a smoother transition of your animation during
playback and saves you time. Click to launch the Tween dialog.
Set the number of new frames to be created between the next and
previous frames.
Apply the tweening to just the currently selected layer or all layers.
Creating Animations
183
Set which frame attributes are to be tweened—choose Position,
Opacity and/or Effects. Position lets you distribute frame objects
evenly between next and previous frames (great for creating motion
quickly).
To clone multiple frames, select (see above) then click the New Frame
button. To clone all frames, right-click the tab and choose Select All then
clone.
Use Reverse Frames on the right-click menu to reverse the order of a series
of selected frames. For example, for bouncing ball animations, create the
animated ball as if it were being dropped, use the above "clone all frame"
technique on all frames, then reverse the newly cloned frames while
selected. You may need to remove the first of the cloned frames because of
duplication.
To mirror a frame layer's attributes:
To mirror the attributes of a frame's layers with respect to Position,
Opacity, Blend Mode, Visibility and Effects, select specific or all frames (see
above) ensuring that the "target" frame which possesses the attribute(s) to
be copied is selected first, then choose Unify Layer Across Frames. All
"destination" frames adopt the layer attributes of the "target" frame.
To delete one or more frames:
Select the thumbnail(s) and click the
Delete Frame button. (To delete
a single frame, you can also right-click it and choose Delete.)
To reposition a frame in the sequence:
Drag its thumbnail and drop it before or after another frame. Note the
black vertical insertion cursor to indicate the proposed new position of a
frame.
To play (preview) the animation:
Click the
Play button.
The Animation tab includes two options—one global, the other local—that you
should consider before exporting the animation.
184
Creating Animations
For .gif (not .avi files), you can set a loop property for the animation as a
whole. (You can also set this property on the Animation pane of the Export
Optimizer.)
If you want the sequence to play through only once and end displaying
the first frame, click the Fixed Loop button and enter "1" in the box. Enter a
higher value to repeat the sequence a fixed number of times.
Click the
Endless Loop button to have the sequence repeat indefinitely.
If the playback of certain frames (or all frames) seems too fast, you can
select any frame and enter a value greater than 0 in the Frame Delay field.
The frame's delay factor (in milliseconds) will be exported along with the
.GIF. Sometimes all frames may require a delay factor in order to achieve
proper pacing. You can select multiple (or all) frames and enter a common
value in the Frame Delay field.
To stop the animation:
Click the
Stop button.
To export the animation as a .GIF file:
Choose Export Optimizer... from the File menu. The animated GIF format
is selected as default.
For details on exporting, see Exporting to another file format on p. 203.
To preview the animation in your web browser:
Choose Preview in Browser from the File menu. PhotoPlus exports the
image as a temporary file, then opens the file for preview in your web
browser.
To flatten your frames:
For more complex animations, your animation project can be simplified by
flattening all frames (individual frames cannot be flattened); right-click and
choose Flatten Frames. Multiple layers associated with frames are replaced
by a single layer; layer objects are no longer independent and are therefore
no longer editable.
10
Pressure sensitivity
and pen tablets
186
Pressure sensitivity and pen tablets
Pressure sensitivity and pen tablets
187
Pressure sensitivity
Pressure sensitivity is a property of individual brushes, and is only applicable if
you're a pen tablet user wanting to:
Using:
retouch photos by painting out specific
areas.
Paintbrush Tool
retouch photos by erasing specific areas.
Standard Eraser Tool
Background Eraser Tool
retouch photos to lighten and darken areas.
Dodge Tool
Burn Tool
creatively paint over photos for stylistic
effect (e.g., Matte painting).
Paintbrush Tool
In simple terms, pressure sensitivity means that your brush stroke changes in
size, opacity, etc., in proportion with the amount of pressure you apply using
your tablet's input device (e.g., Pressure Stylus, Eraser or Airbrush).
For more information about tablets, see Using pen tablets (p. 188).
Enabling pressure sensitivity
Where appropriate, only selected PhotoPlus brushes are pressure sensitive by
default (i.e., Basic, Calligraphic, Stamps, and selected Effects or Media brushes).
Some brushes are not pressure sensitive because of their inherent characteristics
(e.g., spray brushes).
For the tablet user, you normally don't need to do anything apart from paint or
draw with your pressure-sensitive device. This is because the attributes of Size
and Opacity for those selected brushes are already pressure-enabled.
However, for less-commonly used attributes such as Spacing and Shape,
pressure is disabled by default, although you can manually switch on pressure
sensitivity for these brush attributes at any time via the brush's Context toolbar
(Brush Options), and optionally save the brush as a tool preset for future use.
188
Pressure sensitivity and pen tablets
Using pen tablets
You can either draw or paint with your mouse or, for a more natural experience,
use a pen tablet. A pen tablet is comprised of an intelligent electronic pad
equipped with pressure-sensitive input devices (e.g., Pressure Stylus and Eraser).
A rectangular "active" area responds to pressure applied by that input device.
The pad, when connected to your computer, allows sketching, freehand line
drawing and painting within PhotoPlus, making the drawing experience truly
realistic. The tablet’s pressure-sensitive capabilities in conjunction with
PhotoPlus allows control of stroke width or opacity when drawing or painting.
PhotoPlus works equally well from entry-level to professional pen tablets from
all the major tablet manufacturers including Wacom® and AipTek.
Within PhotoPlus, you can use the Pressure Studio to calibrate your tablet's
pressure response and to customize your own assignments for your tablet's
ExpressKeys*, TouchStrip*, or TouchRing*. PhotoPlus settings take precedence
over your device's original settings.
* Not available on some pen tablets.
Using Pressure Studio
PhotoPlus's Pressure Studio acts as an interface between your tablet and
PhotoPlus, purposely designed to:
Calibrate pressure response (below) for multiple input devices, so that
PhotoPlus tools respond more predictably per device.
Set up your tablet's key assignments from within PhotoPlus (if your tablet
supports function keys).
Pressure sensitivity and pen tablets
189
The studio offers:
a practice area for automatically calibrating your tablet's input devices
(Pressure Stylus, Eraser, Airbrush, etc.) by drawing soft/firm strokes.
Manual calibration for fine-tuning is also possible. As you swap between
each device (e.g., between stylus and eraser) the pressure response curve for
that device is displayed accordingly.
Management of pressure response profiles. Preset profiles are available to
resolve common problems associated with unexpected pressure response.
Enabling/Disabling of pressure input globally, to allow PhotoPlus to
operate with/without tablet pressure sensitivity. When enabled globally,
Basic, Calligraphic, Stamps, and selected Effects or Media brushes become
pressure sensitive to brush size and opacity by default.
To launch Pressure Studio:
Select
Pressure Studio from the Standard toolbar.
Before calibration, practice drawing with your input device in the
practice area!
The calibration process is described in detail in the online Help.
190
Pressure sensitivity and pen tablets
Function key assignment
If your pen tablet is equipped with
ExpressKeys (or equivalent), Pressure
Studio lets you assign your tablet's
keys to PhotoPlus tools. The studio
changes depending on the type of
pen tablet installed, so you'll get an
accurate representation of your pen
tablet's key layout shown within
Pressure Studio's Functions tab.
Example of Wacom Intuos 3's
ExpressKey assignment in PhotoPlus.
Can't see your Functions tab? This is only displayed when your pen tablet
is plugged in and operational (and possesses function keys).
To customize your function keys:
1.
With the Functions tab in view, select an alternative tool from the dropdown list. Pressing the appropriate key on your tablet will activate that tool
in PhotoPlus.
2.
Click OK.
To revert to the tablet's default key assignment:
1.
Select the "Tablet Default" option from a specific key's drop-down list.
2.
Click OK.
For Wacom Intuos4® users, your tablet will intelligently display currently
assigned PhotoPlus tool icons next to your ExpressKeys.
11
Printing and
Exporting
192
Printing and Exporting
Printing and Exporting
193
Printing
For basic printing primarily to desktop printers, Print Studio offers an exciting,
comprehensive, and versatile printing solution for your photos.
The easy-to-use studio environment lets you select from a variety of print
templates, each designed for either single- or multi-image printing. Multiimage printing in PhotoPlus lets you make the most of expensive photo-quality
printing paper by "ganging" several images onto a single output sheet using a
print layout or contact sheet template (shown above).
Single Image templates
Use for basic desktop printing of an individual image, with supporting
Layout options (custom or standard print sizes, positioning, tiling, and
image-to-cell fitting).
Print Layout templates
Use for multi-image standard print sizes (in portrait/landscape
orientation), passport sizes, and mixed print sizes.
Contact Sheet templates
Use for multi-image template-driven thumbnail prints—great for creating
labels!
194
Printing and Exporting
For any mode, you can also create your own custom template from an
existing template.
Currently open documents will be used for printing, although you can
add more directly within Print Studio.
To print (using templates):
1.
Click the
Print button on the Standard toolbar.
The Print Studio appears.
2.
From the right-hand templates list, select a template category, e.g. Single
Images (Portrait).
3.
To insert a particular template into the central page layout region, simply
click its gallery thumbnail.
4.
Depending on print mode, decide on which image(s) are to be used for
printing, i.e.
For Single Image templates, you can select a different image from the
lower image gallery.
Printing and Exporting
195
For Print Layout templates, right-click a gallery thumbnail and select
Fill Layout with Image. All occupied or empty cells in your layout are
replaced. Alternatively, to fill an individual cell, drag a replacement
image from the lower image gallery onto the "target" cell. A print
layout’s cells need to be manually populated; other modes will autopopulate cells.
For Contact Sheet templates, use the Distribution option in Image
Options to control image replacement.
5.
(Optional) From the left-hand pane, click the
Options for sizing and rotating images in cells:
button to expand Image
Enable Fit image to cell to make the image fit within the cell
boundaries.
Enable Fill cell with image to scale the image to fit all of the cell.
Check Rotate for best fit to make portrait images fit cells of landscape
orientation (and vice versa) to make maximum use of cell space.
6.
(Optional) Check Border to add a border of a configurable width (use
input box) and Color (click the swatch to select color from a dialog).
7.
(Optional) To caption your images, check Label to add a Date, image
Filename, or Sequence number under each image; select from the dropdown menu. For a combination of label formats, click Modify..., add tokens
to assemble a sample name, then click OK; the drop-down menu changes to
Custom. See Changing file names for more information.
8.
Click Print... or Close to save settings (but not print).
To open additional images for printing, click Add Images.... Select a
photo for addition then click Open.... The image is added as a thumbnail
to the gallery.
If you want to create your own layouts instead of templates you can switch print
modes and customize settings for that mode.
196
Printing and Exporting
To print using your own layouts:
1.
Click the
Print button on the Standard toolbar.
The Print Studio appears.
2.
From the Mode drop-down list, select Single Image, Print Layout, or
Contact Sheet.
3.
In the Layout section, select a custom or standard print Size.
4.
(Optional) Follow image sizing and rotating instructions described above.
To store the current page layout with images:
Click Save Layout... on the image gallery. PhotoPlus saves your layout
exactly as is, with or without images in the cells.
To open a new layout, click Open Layout... on the gallery.
To store the current page layout as a template without images:
Right-click on the right-hand template list to pop up a menu that lets you
add or delete templates and categories. After creating a custom category
using Add Category... (or selecting an existing category), right-click to save
your template exactly as is (without images in the cells) by using Add
Template....
Print modes are reset each time PhotoPlus is restarted. Changes you
make during a session are only "remembered" for the duration of the
session.
Printing and Exporting
197
Sizing and rotating images in cells
The Print dialog helps you size or
rotate your image(s) to fit a cell(s)
according to Image Options
settings.
When the dialog is opened, the default settings above will be adopted. It's likely
that some fine tuning might be needed, e.g. a portrait image may best be rotated
to fit a cell of landscape orientation.
If further images are added from the image gallery, they will also adopt these
settings. You can select an individual cell to affect the scaling or rotation on that
cell only at a later time. To again apply a setting to all cells, first deselect a cell by
clicking outside the grid.
Here's a visual breakdown of the different options.
Fit image to cell/Fill cell with image
These options toggle respectively between fitting the image to cell dimensions (it
will scale the image width to cell width or image height to cell height) or making
the image completely fill the cell, losing portions of the image from view.
Fit image to cell
enabled
Fill cell with image
enabled
198
Printing and Exporting
Rotate for best fit
You can re-orient your image to fit cells using the Rotate for best fit check
box—great for fitting a portrait image into landscape-oriented cells (and vice
versa).
Rotate for best fit
unchecked
Rotate for best fit
checked
Cropping images in cells
If you're looking to be more specific about which areas of your image to print,
you can crop your image instead of using the above Image Options. PhotoPlus
supports some sophisticated cropping options, especially the ability to crop
using the image or the image's cell dimensions.
To crop an image:
1.
From the dialog, select an image from the lower gallery and click Crop
Image....
2.
From the Crop Image dialog, choose an Aspect Ratio from the drop-down
menu which dictates the proportions of your crop area grid:
Unconstrained creates a grid which can be proportioned in any way; Cell
matches to cell dimensions; Image maintains image dimensions; Custom
uses a custom constrained ratio (e.g., a square) that you define yourself in
the adjacent input boxes.
Printing and Exporting
Before
199
After
Unconstrained
Cell
Image
(default)
Custom
(e.g., 1.00 x 1.00 in)
3.
Drag a crop area's corner to size your crop according to requirements, then
move the grid around the image to choose the preferred image area to be
cropped. To revert, click Clear to reset your crop grid.
4.
Click OK.
200
Printing and Exporting
If your image is already present in your layout then it will update automatically
to reflect the new cropping applied. If it hasn't yet been used, the crop is still
applied to the image in the image gallery.
Cropping affects every instance of the image. Once applied, all images
are updated.
Setting viewing options
The following global viewing options will be applied to every page.
Show Cells
Show Margins
Grid
Units
When checked, each cell border is displayed within
which the image is placed.
When checked, margin guides are shown in blue.
When checked, a dot snapping grid is applied to the
layout—cells will snap to the grid to aid cell
positioning. Use the input box and/or Color swatch to
enter a grid interval (spacing) or pick a different grid
color via a dialog.
Use the drop-down menu to select a different
measurement unit used in the Layout and Image
Options panes.
For professional printing, the Separations and Prepress options control CMYK
color separations and printer marks.
Printing using color separations
The Separations and Prepress options, shown for every mode, are used for
professional printing with CMYK color separations. This process is now a less
Printing and Exporting
201
popular printing method compared to electronic PDF publishing (using PDF/X1
compliance). See PhotoPlus help for more details.
Publishing a PDF file
PDF (Portable Document Format) is a cross-platform file format developed by
Adobe. In a relatively short time, PDF has evolved into a worldwide standard for
document distribution which works equally well for electronic or paper
publishing. PDF documents are uniformly supported in the Windows,
Macintosh, and UNIX® environments. Anyone with the free Adobe Acrobat®
Reader can view or print out PDF files, either from within a web browser
window or directly—for example, when delivered over a network or on CDROM.
PDF works well as a medium for distributing standalone files. By letting people
download an online PDF file, you can save yourself the trouble and expense of
printing multiple copies! PDF is also used extensively for delivering files to
professional printers. For the most part, print stores have adopted PDF artwork
using PDF/X formats—expressly targeted for graphic arts and high quality
reproduction. Several different "flavors" of PDF/X exist; PhotoPlus supports
PDF/X-1 and PDF/X-1a.
To export a PhotoPlus picture as a PDF:
1.
Choose Publish as PDF... from the File menu to display the Publish PDF
dialog.
202
2.
Printing and Exporting
Set basic output options on the dialog’s General tab (shown).
Checking Fit to complete page or Fit to page width to set the default
page view when the PDF is opened in Acrobat Reader.
Checking Preview PDF file automatically opens the PDF in a
compatible PDF viewer after it’s been created, so you can review it
immediately. (If anything looks amiss, you’ll need to fix the problems
in the file and regenerate the PDF.)
If handing off a file to a professional printer, choose either "PDF/X-1"
or "PDF/X-1a" in the Compatibility list as advised by your print
partner (otherwise just use an Acrobat X.0 option, where X is the
version number).
In the Color Management section, the Output color space setting
should always be "CMYK" for professional printing; otherwise "RGB"
is fine. Select the Destination profile recommended by your print
partner.
The Prepress Marks section lets you include printer marks in your
PDF output (check an option to switch on). Use for professional
printing.
3.
Set security options (if any) on the Security tab.
You can add password protection to keep the contents of your
document away from unintended eyes, and/or lock certain capabilities
to prevent unauthorized dissemination or changes. For example, you
can specify No document printing to prevent paper reproduction of
the publication’s contents, or No content copying to help ensure your
work can’t be easily duplicated somewhere else. You can even enter a
master password to give you—and only you—the right to alter these
security settings. (Just be sure to remember your password!)
4.
Click OK.
Printing and Exporting
203
Exporting to another file format
In many situations, you’ll want to save a file to one of the standard graphics
formats. In PhotoPlus, this is known as exporting.
Exporting an image means converting it to a specified
graphic file format other than the native PhotoPlus
(.SPP) format. This flattens the image, removing layer
information.
Only the .spp and the Photoshop .psd formats
preserves image information, such as multiple layers,
masks, or image map data that would be lost in
conversion to another format.
The Export process itself can be carried out by using either a standard file dialog
where you can specify the path, name and format of the image file, or by using
an Export Optimizer where you can additionally compare export previews for
multiple file formats before export.
To export an image:
1.
Choose Export... from the File menu.
2.
The Export dialog appears, with the file's current base name shown. Change
the base name if desired.
3.
To open the Export Optimizer to fine-tune export settings, click
Optimizer, then click OK.
4.
Click Save in the Export dialog.
The Export dialog includes additional options for use with web images
(see Slicing images and Creating image maps on p. 161 and p. 162).
You can also open the Export Optimizer first and (at your discretion) proceed to
the exporting step after checking your settings. You can access the Export
Optimizer at any time—not just at export time—to compare image quality using
different settings (your settings are retained for each format).
204
Printing and Exporting
The Export Optimizer consists of a left-hand preview display (single, dual, or
quad) and a right-hand settings region, with additional View and Zoom buttons
along the bottom of the dialog. Dual and quad previews let you test and compare
between different export formats in each pane—simply select a preview pane
and then test various quality settings, change format-specific options or resize
before going ahead with your optimized file's export—it even retains your
preferred settings for each format!
To open the Export Optimizer:
1.
Click Export Optimizer... from the File menu.
2.
From the Export Optimizer dialog, use the Options section to specify the
file Format, and format-specific options such as bit depth, dithering,
palette, and compression. The Size section lets you scale, stretch, or squash
the image, while setting an export Quality setting (e.g., a resampling
method such as Bicubic).
3.
Review your optimized image, and when you're happy with it, click Export.
The Close button will instead abort the export but save any format-specific
option changes made in the dialog.
4.
From the Export dialog, enter a file name, and choose a file format from the
drop-down list. The export format and custom settings will be remembered
for future exports. Click OK.
Printing and Exporting
205
To adjust the preview display:
To change the display scale, click the dialog's
Zoom Tool and then
left-click (to zoom in), right-click (to zoom out) on the preview, or choose a
zoom percentage in the lower left in the drop-down list. You can also select
a specific area by dragging a marquee around an item of interest.
To display a different portion of the image, first select the dialog's
Tool, then drag the image in the active preview pane.
Pan
Click one of the View buttons shown below the preview
pane to select Single, Double, or Quad display. The multi-pane (Double
and Quad) settings allow for before-and-after comparison of export
settings.
To compare export settings:
1.
Set the preview display for either Double or Quad view.
2.
Click one of the preview display panes to select it as the active pane.
3.
In the Options section, choose an export format and specific settings. Each
time you make a new choice, the active pane updates to show the effect of
filtering using the new settings, as well as the estimated file size.
4.
To compare settings, select a different display pane and repeat the process.
The Export Optimizer lets you experiment freely and evaluate the results.
To revert back to a single pane, click
Single.
To proceed with exporting:
1.
Make sure the active preview pane is using the settings you want to apply to
the image.
2.
Click the dialog's Export or OK button to display the Export dialog.
The Export Optimizer saves settings for particular formats according to
the most recent update in the Options section. In other words, if you
have two or more preview panes displaying the same file format, the
settings for the last of them you click in will be those associated with
exporting in that format.
206
Printing and Exporting
To preview an image in your web browser:
Choose Preview in Browser... from the File menu. PhotoPlus exports the
image as a temporary file, then opens the file for preview in your web
browser.
Sharing documents by email
PhotoPlus lets you send your currently selected document (or JPG) to your
standard email program (e.g., Outlook) for subsequent mailing. You can do this
by choosing Send... from the File menu to display a dialog which sets the file
type and image size restrictions.
After this, a new email message is displayed with document attached. To
complete the process, press the Send button (or equivalent) on your email
program as for any other email message.
Setting the file type
To take advantage of better file compression you may want to convert your image
to JPEG if not already in this format. The conversion would be suitable if your
original document was in TIF format or was a very complex multi-layered SPP file.
From the above dialog, send the original SPP file by enabling the Keep Original
radio button. To convert to JPEG and send as such, enable Convert to JPEG.
Setting your image size
By default, PhotoPlus sends any photo with a file size limiter applied. This
avoids sending excessively large files! You can optionally select an alternative
image resolution—this will be the new pixel height or width (the biggest pixel
dimension of the original photo will be reduced to the new image size)
Uncheck the Limit image dimensions to a maximum of check box to keep
original image dimensions.
An Internet connection is required to email pictures.
12
AlbumPlus Organizer:
Getting Started
208
AlbumPlus Organizer: Getting Started
AlbumPlus Organizer: Getting Started
209
Organizing photos
AlbumPlus Organizer is Serif's powerful photo management application that can
be used alongside PhotoPlus. From your collection of photos you can create
your own named photo albums and perform a range of management and
searching operations. For more information, see Managing your photos (p. 223)
and Searching for photos (p. 255).
More importantly, when used with PhotoPlus, AlbumPlus Organizer acts as an
album-based "front end" to PhotoPlus, from which you can open your photo
and perform photo editing seamlessly. The photo will remain locked in
AlbumPlus Organizer (and unavailable to edit) until you close it in PhotoPlus.
To launch AlbumPlus Organizer:
1.
Display PhotoPlus's Startup Wizard.
2.
Select Go to My Album. AlbumPlus Organizer is launched as a separate
application but working in conjunction with PhotoPlus.
To open a photo for editing in PhotoPlus:
1.
Select the photo thumbnail in any mode.
2.
Either:
Click Fix & Enhance on the main toolbar, then
click Edit in PhotoPlus.
OR
Right-click the thumbnail, select Fix Photo, and then Edit in
PhotoPlus. Serif PhotoPlus will be launched automatically.
Notes
With both AlbumPlus Organizer and AlbumPlus X4 installed, the Go to
My Album option in PhotoPlus's Startup Wizard uses the latest one you
installed (Windows® Vista or Windows® 7) if neither have been run yet.
Windows® XP will use the last one you ran and closed.
210
AlbumPlus Organizer: Getting Started
In PhotoPlus, if you save a photo previously launched from AlbumPlus
Organizer using Save As... (File menu), you'll be asked if you want to add
the new photo into AlbumPlus Organizer.
Creating a new album
To help you get started quickly on your photo album, AlbumPlus comes
equipped with a simple two-step Startup Wizard. This will set up your album
project name and its location on your computer and optionally add photos
automatically to your album.
If you launch AlbumPlus for the first time or select File>New... you will be
presented with Step 1 of the Startup Wizard. The wizard will help you to open
an existing album or create a new album.
To create an AlbumPlus album:
1.
Either use the Windows Start button to pop up the Start Menu, select All
Programs, and choose the Serif AlbumPlus Organizer item (only applies to
first run) or select File>New in AlbumPlus at any time. The Startup Wizard
is displayed.
AlbumPlus Organizer: Getting Started
2.
211
In Step 1 of the wizard, enable Create new album, choose an album name
and a location for your proposed album file, e.g. C:\Photos\2010\.
Your album name is based on a standard prefix “My Album” and, if
the album name already exists, an additional “[0]”, “[1]” ,“[2]” etc. Of
course, you can replace the album name with your own choice—as
we’ll see later. Your album will always be saved in the Serif AlbumPlus
(*.sap) format.
You can define your album save location. You can either edit the
folder name directly in the field or use the Browse... button to navigate
and specify a new location. If using the former method, typing in the
new location will automatically create a folder if it does not already
exist.
The directories will be created for you automatically if not already
present. Click Next>>.
3.
In Step 2 of the wizard, you can choose to search for media files for inclusion in
your album immediately.
To add media straight away, click the "Yes" radio button.
212
AlbumPlus Organizer: Getting Started
In the Search text box, select the drive/device containing your media
files from the drop-down menu; choose the Browse... button at the
bottom of the list to navigate to your folder location.
In the For text box, select the type of file to be added from the dropdown menu.
Option
File types included
Common
Media Files
Includes all Image, Audio, or Video files listed
below
All Image Files
bmp, cur, emf, gif (includes animated), ico,
img, j2k, jp2, jpeg, jpg, pcx, png, tif, tiff, wmf,
spp (Serif PhotoPlus files).
All RAW files
bay, crw, cr2, dc2, dcr, dng, erf, k25, kdc, mos,
mrw, nef, orf, pef, pxn, raf, raw, srf, sti, x3f
All Audio Files
mid, midi, mp1, mp2, mp3, mpa, wav, wma
All Video Files
asf, avi, mov, mpeg, mpg, mpv, wm, wmv
OR
To skip adding media until later, check the "No" radio button.
4.
Click the OK button. The Startup Wizard closes.
When adding files from CD, DVD and digital cameras, you will be presented
with additional import dialogs. See Adding Photos to your Album on p. 214 for
more information.
While you are using AlbumPlus, the application operates in auto save
mode with background saves occurring regularly. This can be disabled in
File>Preferences.
To open an AlbumPlus album:
AlbumPlus will automatically reload the album that was last used. However, you
can open a different album at any time.
1.
Select Open…. from the File menu.
AlbumPlus Organizer: Getting Started
2.
From the dialog, navigate to the AlbumPlus file you want to open.
3.
Select the file and click the Open button.
213
Album View
Album View allows you search for photos on the basis of their previously
assigned tags, e.g. Vacations and Hobbies. An easy-to-use Tags pane lets you
click the tag name(s) of interest to display your matching photos in an adjacent
main Photos pane. Easy retrieval of such categorized photos makes this a key
feature of AlbumPlus.
Some simple management tasks can be performed to make the Album View
mode operate most effectively. These tasks include:
Creating and assigning tags (see p. 247 and p. 248)
Adding comments to photos (see p. 234)
Changing the photo order (see p. 228)
The powerful search feature allows you to locate photos by selecting one or more
tags.
A – Tagspane, B – Search Results bar, C – Frequency bar, D – Photos pane
214
AlbumPlus Organizer: Getting Started
It's also possible to search for photo comments, ratings, import history,
and inherent photo properties by using the Search button on the main toolbar.
Adding photos to your album
Media is linked to an album in AlbumPlus—the media remains stored in
its original location. To add media to your album click Get Media on the main
toolbar and choose from the following options:
Add photos from disk
Add photos from other sources
For a list of supported file formats, see Creating a new album on p. 210.
Adding photos from disk
The procedures for addition of photos from hard disks and from removable
media (CDs, DVDs, USB devices, etc.) differ slightly. For the former, the photo
addition is straightforward—files are always available. For the latter, an optional
step lets you copy photos to your hard drive.
To add photos from a hard disk:
Get Media button on the main toolbar.
1.
Click the
2.
In the drop-down menu, select Add photos from disk.
3.
In the displayed dialog box, navigate to the folder containing your photos.
4.
(Optional) In the Files of Type field select the type of file to be added from
the drop-down menu.
AlbumPlus Organizer: Getting Started
215
Option
File types included
Common
Media Files
Includes all Image, Audio, or Video files listed below
All Image Files
bmp, cur, emf, gif (includes animated), ico, img, j2k,
jp2, jpeg, jpg, pcx, png, tif, tiff, wmf, spp (Serif
PhotoPlus files).
All RAW files
bay, crw, cr2, dc2, dcr, dng, erf, k25, kdc, mos, mrw,
nef, orf, pef, pxn, raf, raw, srf, sti, x3f
All Audio Files
mid, midi, mp1, mp2, mp3, mpa, wav, wma
All Video Files
asf, avi, mov, mpeg, mpg, mpv, wm, wmv
All Files (*.*)
Use to find the above file types with unusual file
extensions.
For adding specific files:
5.
Select one or more photos. Use Shift-click to select adjacent items. Ctrlclick to select non-adjacent items.
6.
Click the Open button to import photos.
Or, for bulk addition:
7.
Click the Get All Photos button at the right-hand side of the dialog to
import all photos from the selected folder. This will include all photos in
sub-folders contained within the selected folder (uncheck the Sub
Directories button if this is not required).
8.
Click the Open button to import photos in bulk.
If adding tagged photos, you will be prompted to decide how to deal
with the tags—ignore, create as new, or map to existing tags (see
Importing tags in AlbumPlus Organizer Help).
If you always organize your photos in the same root folder, e.g. a My
Photos folder, why not use the Watch folders function? This way, new
content will always be added to your album. (See the Watch folders topic
in AlbumPlus Organizer Help.)
216
AlbumPlus Organizer: Getting Started
CD Import
As photos are linked to an album in AlbumPlus, a CD Import dialog provides a
Copy item to hard drive option to copy photos onto the hard disk—this makes
the photos available at all times. If the check box remains unchecked, then
photos are still added to your album but will remain on your CD/DVD.
To add photos from a CD/DVD:
1.
Follow either the standard Windows or bulk procedure described above.
2.
After selecting Open or Get All Photos, the CD Import dialog is displayed.
Check the Copy item to hard drive option.
3.
Check the Maintain directory structure option to reproduce the folder
structure of the CD/DVD on the hard drive.
4.
If you want to rename your files, check the Rename box and enter a Name
e.g. Photo, which will make up the file name of each added photo. A
number will also be added to each photo as a suffix, i.e. Photo[1].png,
Photo[2].png, Photo[3].png, etc
5.
Specify a Destination Folder for your photos to be copied to. You can either
edit the Folder name in the field or use the Browse... button to navigate and
specify a new location, e.g. C:\Photos\2010\.
6.
Click OK.
This copying process may also retrieve archived photos back into your
current working environment.
AlbumPlus Organizer: Getting Started
217
Autoplay
Your computer may have Autoplay enabled which means it will be able to detect
any new photo content being introduced to your computer from removable
devices, e.g. when a CD/DVD is inserted into your CD/DVD reader, or when
you plug in a USB flash drive. A dialog box will automatically be displayed,
irrespective of whether AlbumPlus is open or not.
1.
Select the option Import Media into Photo Album. AlbumPlus is launched
automatically if not already loaded.
2.
The Add Photo(s) dialog is displayed to allow your photos to be added.
Note that AlbumPlus has detected the removable disk automatically.
3.
Follow the procedure described in “To add photos from a hard disk”. A log is
made of any additions to your album so you can view photos added on
specific dates. See Searching By Import History on p. 260.
Import reports
Adding photos is a simple process. However, you may encounter some issues
during file addition which may require resolution, i.e.
Duplicate Photos: A photo you are trying to add will not be added because
it already exists in your album. The duplicate check is based on the file
content and not the file name, type or path.
Corrupt Photos: The added photo is corrupt and will not be added to your
album. An example would be a WMF file with invalid header or excessive
dimensions.
Invalid Imports: The format of the photo means that it cannot legally be
decoded by AlbumPlus.
218
AlbumPlus Organizer: Getting Started
The user is informed of any of the above by the display of an Import Report
dialog. This will only be displayed if an error occurs. A tree display will indicate
error counts for duplicate, corrupt and invalid photos (not shown).
In the above example, for Duplicate Photos, the parent photo listed above the
child photo is not added to the album, as the child photo already exists. A photo
may be a duplicate even when it has a different file name—photos are always
identified by their content.
Don’t let Import Reports stop you from importing from a folder you’ve
imported from before. Only the new files will be added.
Adding files from other sources
Photos may be added into AlbumPlus from a camera, scanner or removable USB
flash drive at any time. The process involves the transfer of photos from camera
or scanner to a user–defined file folder and then the creation of a thumbnail of
each photo.
If adding photos from a digital camera, this option may not be available if
your digital camera drivers/software are not installed correctly.
AlbumPlus Organizer: Getting Started
219
To add photos from your camera, scanner or removable USB drive:
Get Media button on the main toolbar.
1.
Click the
2.
From the drop-down menu, select Add photos from other sources.
3.
From the dialog, select a source for your files (if more than one source
exists). The following example imports photos from a Canon IXUS 800 IS
digital camera.
4.
Enter a Name, e.g. Photo, which will make up the file name of each added
photo. A number will also be added to each photo as a suffix, i.e.
Photo[1].png, Photo[2].png, Photo[3].png, etc. If you want to keep the
original filenames, uncheck the Rename option.
5.
Specify a Folder location to which your photos will be transferred from
your camera. Use the Browse... button to select a new folder.
6.
Click OK.
7.
A manufacturer-specific dialog is displayed to allow your photos to be
selected and then added; consult your camera manufacturer's
documentation for more information. Note that AlbumPlus has detected
the file locations automatically.
Follow either the specific or bulk import procedure described in To add photos
from a hard disk.
220
AlbumPlus Organizer: Getting Started
13
AlbumPlus Organizer:
Managing Photos
222
AlbumPlus Organizer: Managing Photos
AlbumPlus Organizer: Managing Photos
223
Selecting thumbnails
Before looking at each of the operations that can be used to manage your photos
it’s worthwhile familiarizing yourself with the different options available for
selecting thumbnails. Selection is the pre-cursor to performing an operation.
The main methods of selection are:
Single click: If you hover over a
thumbnail with your mouse, a thin
border will appear around your
thumbnail. A click on the thumbnail
will make it selected so that the
border will become thicker with a
light blue color.
Drag select: This
can typically be
used for
selecting more
than one
thumbnail
simultaneously.
Click next to a
thumbnail, hold
your mouse
button down and
drag over your
required
thumbnails.
Release the
mouse button
when you're
happy with the
selection.
Use Select All from the Edit menu (or Ctrl+A).
224
AlbumPlus Organizer: Managing Photos
Alternatively, you can choose a function without selecting any photos at all.
AlbumPlus will assume that the requested action (e.g., Slideshow, rotate, print,
and email) will be applied to only the current photos in view (excluding photos
not visible in the window).
Thumbnail styles
The media files that appear in any AlbumPlus mode will be displayed as
thumbnails representing the original media. Thumbnails are very useful as they
give you a miniature snapshot of your original photos without having to view
every full-size photo in turn. This will help you to move around your albums
more efficiently, making photo management so much easier.
To help you remember the media type that your thumbnail represents, when you
have Thumbnail Details turned on, an icon will be displayed in the top-left
corner of your thumbnail. Here’s a quick run down of the main icons you may
encounter:
Media
Image File
Modified Image File
Video File (with audio)
Video File (no audio)
Audio File
Unknown media
AlbumPlus Organizer: Managing Photos
225
My Projects
Slideshow Project
Calendar Project
Photo Album Project
Greetings Card Project
Postcard Project
Print Project
Flash Slideshow Project
If an operation is being performed on a photo, a padlock symbol may appear in
the top-left corner of the thumbnail (the thumbnail will also be grayed out).
Once the operation is complete the item is unlocked and the padlock icon will
disappear.
226
AlbumPlus Organizer: Managing Photos
Thumbnail details 'on':
Thumbnails can be displayed with or without the extra detail—the default
thumbnail style is Thumbnail Details on.
A - Caption (or filename if no
caption exists)
B - Media type
C - Tags
D - Photo date
E - Geo-Tagged - click to
switch to PhotoMap View
F - Photo time
G - Star rating
H - Comment marker
Additional information is displayed alongside the thumbnail. Icons are used to
represent the media type, the attached tags, the photo rating and whether or not
a comment is attached. The photo creation date and time is also displayed
beneath the thumbnail image.
Display menu, select or clear the Caption option to toggle the
In the
photo caption (or filename) on or off view.
AlbumPlus Organizer: Managing Photos
227
Thumbnail details 'off':
This view is useful if you want
to quickly see your album
photos and you don't need the
additional information.
In the
Display menu,
select or clear the Thumbnail
Details option to toggle the
thumbnail details view.
To view photo information:
Click
Display on the main toolbar and select Photo Information
from the drop-down list to view file names/locations, file sizes, metadata,
comments, tags, histogram, and EXIF information.
To view/hide thumbnail details:
Click
Display and check Thumbnail Details to turn details on;
uncheck to turn Thumbnail Details off.
Resizing thumbnails
Several methods can be used to set thumbnail sizes to your preferred
dimensions.
Click on the drag handle
at the bottom-right corner of the thumbnail
and drag the thumbnail to your chosen new thumbnail size.
Double-click the thumbnail or press Ctrl-Tab to "maximize" it to the
Photos pane. If you double-click again, it will revert back to its original size.
Choose a pre-defined size: from the menu or via keyboard shortcuts.
228
AlbumPlus Organizer: Managing Photos
Click
the list.
OR
Display then click Thumbnail size and choose a size from
Use the keyboard shortcuts: Ctrl+1, +2, and +3 for Small, Medium
and Large respectively.
With a thumbnail selected, use the magnification slider in the
Status Bar to zoom in or out. Alternatively, click on the Zoom In and
Zoom Out icons for magnification in increments. The aspect ratio for each
thumbnail is maintained.
Click
OR
Click
Display and from the drop-down list, click Full Screen View
Full Screen View on the Status Bar.
Changing photo order
The thumbnails displayed in AlbumPlus can be sorted in ascending or
descending order. This can be carried out on the following sort types:
Photo Time (time that photo was taken; from Exif)
Album Time (time photo added to album)
File Creation Time (time copied to hard disk)
File Modified Time
Caption (or filename if caption is not available)
Rating
The file date and times are displayed underneath each thumbnail when
Thumbnail Details are on.
Photos can be ordered in ascending order which shows the oldest photos first
and descending order which shows the newest. If sorted by Caption, photos are
sorted numerically and then alphabetically.
AlbumPlus Organizer: Managing Photos
229
To change photo order:
Display on the main toolbar and then click Sort.
1.
Click
2.
Select a different sort type.
3.
(Optional) To reverse the order, select Descending.
Rating your photos
Any photo can be allocated its own star rating. This is really useful when you
want to categorize your favorites—assign a rating to your photos and
subsequently search for your photos by rating in combination with other tags.
See Searching by Rating, p. 259.
Ratings can be from one star to five stars (maximum); five stars would normally
be allocated to your most favorite photos.
To rate your photos in the Photo pane:
1.
In any mode, select one or more
thumbnails.
2.
Move your mouse pointer to the
rightmost side of any photo
thumbnail. You don’t need to
select the thumbnail! The ratings
setting is displayed as yellow stars
as the cursor is moved over the
ratings area.
3.
Set the required star rating by
hovering over the rating you want
to assign.
4.
Click the mouse button to assign.
Use your keyboard's numeric keys 1-5 to assign 1 to 5 stars to any
selected photos.
230
AlbumPlus Organizer: Managing Photos
To rate your photos in Full Screen View:
Full Screen View.
1.
In any mode, click
2.
On the toolbar, click the desired star rating, e.g.
To unassign a star rating:
Right-click the selected thumbnail(s) and choose Ratings>Clear from the
flyout menu.
Changing dates and time
When Thumbnail Details are on, the date and time is displayed beneath the
thumbnail.
The date and time displayed
will either be Photo Time (date
and time that photo was taken;
from Exif) if available, or File
Creation Time (time copied to
hard disk) if not.
Any date and time can be altered, however, only the Photo Time is likely to be
adjusted, for example:
You may want a scanned photo to reflect the time the photo was taken
rather than when it was scanned.
When on vacation or business, your digital camera’s time zone settings
were not adjusted—meaning that the Photo Time is incorrect. Imagine a
vacation photo taken at night with a Photo Time set at 13:00:00!
For information on how to search by date see Searching By Date on p. 264.
AlbumPlus Organizer: Managing Photos
To change a photo date:
1.
Click on the date display in the lower left corner of the thumbnail.
2.
Click the down arrow to display a calendar flyout.
3.
Click the date that you want to set for the photo. (You can navigate to
different months of the year using the left and right arrows.)
4.
Click away from the thumbnail to save the change.
To change a photo time:
1.
Click the time display in the lower right corner of the thumbnail.
2.
Click to highlight the hour, minute or seconds and type in a new value.
3.
Click away from the thumbnail to save the change.
The time is always displayed as the 24-hr clock.
231
232
AlbumPlus Organizer: Managing Photos
Changing time zones
Suppose you’re on vacation and in your excitement you forget to adjust the time
settings on your digital camera upon arrival—assuming you’ve gone somewhere
hot, sunny and far away! You’ve returned home to find that the date and time
settings are incorrect. Don’t panic—it is possible to adjust the Photo Time on
some or all of your photos to reflect the correct time zone from a single dialog,
accessible via Time Zone on the Actions menu (or via right-click). The date and
time can be changed:
relative to the currently set Photo Time (see below).
OR
by selecting a specific date and time (all selected photos will be set to
exactly the same time and date).
For example, the above dialog will fix photos with an incorrect date and time
when taken on a vacation in Australia (+11 hours ahead of Greenwich Mean
Time). The adjustment is always made relative to the photo’s creation date and
time only.
Setting a specific date and time may be preferred if calculating the difference
between the photo’s currently set Photo Time and the required date is too
complicated, or if you know the exact date/time for your photos, e.g. those from
a New Year celebration.
If Specific date/time adjustment is used, all selected photos will have
exactly the same time and date as both date and time will be applied.
AlbumPlus Organizer: Managing Photos
233
The Relative date/time adjustment is better when adjusting multiple
images in one batch as it preserves the time differences between each
image.
Instead of the default Photo Time, you can also update times for different time
types (i.e., Album Time, File Creation Time, or File Modified Time) via the Type
drop-down menu.
Adding captions
You can add a caption to any of your photos or projects quickly and easily from
the Photos pane. Once added, these can be used to quickly search your photos
(see Searching by text p. 261).
To add a caption:
1.
Click to select the photo or
project thumbnail and then,
click on the filename.
2.
Click and drag on the text to
select it.
3.
Type your new caption and
press Enter. The caption is
updated.
Click
Display and then
click Sort>Caption to order
your photos by caption (or
filename).
234
AlbumPlus Organizer: Managing Photos
Adding comments and file information to photos
Why would you add comments? You may already be using tags to identify your
photos (see Using the Tags pane on p. 245) but comments can add more detailed
photo-specific notes about the file.
Type of Comment
Example
Specific photo locations
Sydney
People’s names appearing on a photo
Susan with Auntie Jean
Alterations needed
Fix brightness sometime
Funny comments!
Auntie bungee jumping
If a thumbnail has comments associated with it, the comments marker will
be displayed in the top-right corner of the thumbnail when Thumbnail Details
are on—if there is no comment marker shown this means that no comments
have yet been associated.
The addition of more general file information to your photos is also possible.
Such information includes Title, Subject, Authors, and Copyright. This
information is mostly created as XMP metadata but copyright information is
stored as IPTC keyword metadata.
To add comments or file information to a photo:
1.
In the Photos pane, click to select a photo thumbnail.
2.
Click
3.
In the displayed dialog, click
4.
Click to the right of any Title, Subject, Authors, Copyright, or Comment
and type into the displayed white box.
Display and then click Photo Information.
to show the file information.
It is possible to update the Title, Subject, Authors, Copyright, or
Comment information on multiple photos all at once. Simply select all of
the images that you want to update before opening the Photo
Information dialog and make the changes in the usual way.
AlbumPlus Organizer: Managing Photos
235
To view/edit comments/file information in a photo:
View the Photo Information dialog as described above, then if necessary
edit any Title, Subject, Authors, Copyright, or Comment accordingly, then
click away from the field.
While it is very useful to be able to read the comments or file information
associated with each thumbnail in the Photos Pane, the real power is in the
ability to search by metadata and comments. See Searching by Text on p. 261.
Viewing your photos
There are many ways in which you can view your photos:
Double-click a thumbnail to see it at the maximum size that will fit to the
Photo pane (or pressing Ctrl-Tab on a selected thumbnail).
Click
on the Status Bar to view in full screen mode. You can also edit
your photos in this view.
The
Navigation buttons on the Status Bar allow you to step
through your photos one by one (either forwards or backwards). Try this
when your thumbnails are maximised to the Photos pane. Alternatively, use
the Page Up or Page Down button.
Your mouse may have a wheel which will allow you to scroll up/down your
thumbnail window or jump to the next or previous photo.
The photo can be launched in Serif PhotoPlus—if you want to perform
editing of the photo.
Create & Share. Use for creating Photo Discs, Slideshows, Calendars, Photo
Albums, Photo Cards, Prints and many more. See Creating and Sharing in
AlbumPlus Organizer Help.
You can also preview your thumbnails without launching your
associated player—just hover over the thumbnail. To play at full
resolution, right-click and select Open to launch the file with its
associated application.
236
AlbumPlus Organizer: Managing Photos
Full Screen View
In Full Screen View, you can manage your photos while viewing them at full
size. In this view, it is possible to rotate, flip, tag and rate your images. You can
even delete them from the album!
To enter Full Screen View:
Click
OR
Click
Full Screen View on the status bar.
Display and select Full Screen View from the drop-down list.
Using Full Screen View
The following list is an overview of the available functions from the toolbar:
See previous photo.
See next photo.
Rotate your photo 90° left.
Rotate your photo 90° right.
Flip your photo horizontally.
Flip your photo vertically.
Opens the Actions menu. Here you can perform several actions,
including attaching/detaching tags.
Delete the current photo from AlbumPlus.
Displays one photo at a time in a single page layout.
AlbumPlus Organizer: Managing Photos
237
Displays two photos side by side, in a split screen mode—each
with independent control.
Displays two photos, one above the other, in a split screen
mode—each with independent control.
Zoom to fit the screen.
Zoom to actual size.
The current level of zoom.
Zoom out.
The zoom level can also be controlled by the slider.
Zoom in.
When selected, the pan and zoom level is synchronized between
both photos in split screen view.
Set the star rating on the photo.
Return to your album.
238
AlbumPlus Organizer: Managing Photos
Viewing and editing photos in split screen mode
In the split screen modes, each photo can be viewed and edited
independently.
To edit a photo:
1.
Click to select the photo you want to change. A blue border will appear.
2.
Click the relevant toolbar button.
3.
The selected photo will be updated.
Synchronized pan and zoom
When the Pan and Zoom Sync button is selected, the pan and zoom level
of the dual screens are 'locked' together. This means that when you change the
zoom level on the selected photo, the unselected photo will also be changed. This
is particularly useful for similar images that have had effects applied to them.
Deleting photos
Photos can be removed from your album at any time by a series of methods. It is
possible to remove the photo from just your album and from both album and
disk at the same time.
To remove a photo from your album:
1.
Select your photo(s).
2.
From the Edit menu, choose Delete from Album.
Remember that you're not deleting your original photo, but the link to
the album!
To remove a photo from album and disk simultaneously:
This method will permanently delete the original file from disc.
1.
Select your photo(s).
2.
From the Edit menu, choose Delete.
AlbumPlus Organizer: Managing Photos
239
You'll get a confirmation message asking if you want to delete your photos from
disk. If Yes is selected, your photo(s) will be sent to your recycle bin (restore
from there if you want to revert).
Copying and moving photos
AlbumPlus includes the ability to copy and move photos to new folder locations,
without affecting any assigned photo information (tags, ratings, etc.) within the
current album.
Select Copy to Folder from the Actions menu to copy the selected photo to
another folder (using the Browse to Folder dialog). The photo's folder
location will remain unchanged.
The Move to Folder option moves the photo to the location specified in the
Browse to Folder dialog.
Rotating and flipping photos
For more advanced digital cameras, a photo's orientation (portrait/landscape) is
detected and stored automatically in the photo's Exif data. This means that
AlbumPlus will be able to auto-rotate such photos to their correct orientation as
soon as they are imported into your album.
However, for legacy digital content, photo acquisition from more basic cameras,
and scanned images, you'll have to manually rotate your photo to its intended
orientation; typically by a rotation of 90° clockwise. Of course, you may choose
to rotate any photo for artistic reasons at any time.
To rotate a selected photo:
Fix & Enhance on the main toolbar.
1.
Click
2.
Click
OR
Rotate Right 90° for clockwise rotation in 90° intervals.
Click
Rotate Left 90° for counter-clockwise rotation.
240
AlbumPlus Organizer: Managing Photos
To flip a selected photo:
Fix & Enhance on the main toolbar.
1.
Click
2.
Click
OR
Flip Horizontal to flip the image horizontally.
Click
Flip Vertical to flip the image vertically.
Creating panoramas
If you have Serif PanoramaPlus installed, you can create seamless
panoramas from your photos.
To create a panorama:
1.
In the Photos pane, select the photos that you want to 'stitch' together.
2.
Click Create & Share, then click Panorama.
3.
The Panorama studio opens and your photos are automatically stitched
together as a panorama.
AlbumPlus Organizer: Managing Photos
4.
241
You can modify your panorama with the following options:
Click Stitch to create a panorama from selected source
files. Note: You only need to do this if you change the
selection within Panorama studio.
Click Rotate Left for counter-clockwise rotation in 90°
intervals.
Click Rotate Right for clockwise rotation in 90°
intervals.
Click Straighten and using the Straighten cursor, drag a
new horizon line across the panorama (the length of the
horizon line is not important), and then release the mouse
button. The panorama orients itself to the new line.
When you have finished straightening your panorama,
remove the grid by clicking Crop.
Click Crop to display the crop outline. To change the
crop outline, click on the square crop ‘handles,’ and
then drag to the desired position.
Click Presets to expand the drop-down list containing
a variety of crop area presets.
Click Export Panorama to export your panorama to a
specified image format.
Click Export Movie to export panoramas as Apple
QuickTime® virtual reality (VR) movies. This exciting
feature is particularly effective when used with 360°
panoramas.
Click Options to set export preferences.
242
5.
AlbumPlus Organizer: Managing Photos
Click Close to exit the studio. Your new panorama is displayed in the Photos
pane.
File management
Most users would normally store their media content on their computer’s hard
disk drive (HDD), and consequently add photos to albums from there. However,
it’s also possible to add photos to albums that are stored on removable media
such as CDs and DVDs.
This gives an interesting advantage to the user—the ability to manage a CDbased offline photo library without having to copy photos to your hard drive
(using up your valuable disk capacity!). However, if you need to perform any Fix
& Enhance or Create & Share operations on photos you need to make them
available by inserting the appropriate CD/DVD.
To access photos from CD:
1.
Select the photo(s) for use.
2.
Choose an operation from the Fix & Enhance or Create & Share options.
3.
If the item is unavailable, you'll be asked if you want to resolve the issues.
AlbumPlus Organizer: Managing Photos
243
4.
Click Yes (selecting No will abort the operation).
5.
The Insert CD(s) dialog is displayed, which indicates the CD(s), along with
unavailable items, which need to be inserted. Insert the CD.
6.
The operation chosen will continue as if the image is stored on your hard
drive.
Using multiple CDs
AlbumPlus lets you fully utilize all CD drives available to you. If selected photos
belong to different CDs, AlbumPlus will indicate those CDs as it would for a
single CD. For automatic resolution, simply insert each CD into separate drives
one by one, or simultaneously.
Consider a two-CD scenario involving unavailable items on a "Fireworks" CD
and a "Flowers" CD.
Before CD Insert
Insert CD "Flowers"
After CD Insert
244
AlbumPlus Organizer: Managing Photos
After inserting the “Flowers” CD the flowers photos are made available for use
(and removed from the list) but photos on the “Fireworks” CD are still
unavailable. Subsequently, inserting the Fireworks CD will automatically resolve
this, and remove the dialog.
If you have many photos spread across multiple CDs/DVDs which are all
contained within the same album, you may think that a “Catch-22” situation
could exist—because there may be insufficient CD drives to make all your
photos available. AlbumPlus has a trick up its sleeve to overcome this! Any
photos made available are stored temporarily so you can continue to insert then
remove the requested CDs until you have cleared all items in the Insert CD
dialog. It’s a powerful solution that’s also very simple.
Setting preferences
You can control global preferences from a Preferences dialog, available from the
File menu. This will enable you to fine-tune some settings to your liking—
typically you would set these up at the start of your project or the first time you
launch AlbumPlus, changing them infrequently after this point.
Show all warning messages: The Show All button is linked to the All Displayed
Photos dialog displayed when an action is invoked (e.g., Print) but no items are
currently selected. It lets the user re-enable the “Don’t ask this question again”
message after it had previously been checked. If the Show All button is grayed
the above option is not checked.
AlbumPlus Organizer: Managing Photos
245
Photo Cache: Specifies the pixel size for low resolution caching. A lower setting
reduces the disk space requirements for the cache and increases the speed at
which the thumbnails load.
Archive: Specifies the interval at which you are prompted to archive your
AlbumPlus projects. If archiving is not required, uncheck the box.
Autosave: Sets the interval period between each autosave of your AlbumPlus
project file. If autosave is not required, uncheck the box.
Auto Update: Sets the interval period between each prompt to automatically
update your program. The auto update enables maintenance releases to be
downloaded from Serif. If auto update is not required, uncheck the box.
Audio/Video Preview: Enables or disables the previewing of audio or video
thumbnails in your album. A Delay time will set a default number of seconds
before a thumbnail preview is seen on hover over. If you have problems playing
AVI files on your computer (e.g., codec issues), uncheck the check box.
Using the Tags pane
If you have assigned tags to your photos, you can use one of the most powerful
features of the Album View mode—Searching by tag (see p. 255). There are
several tags created for you to use in AlbumPlus or you can create your own.
Tags can be associated with any file type or project created in AlbumPlus.
The Tags pane can be displayed/hidden by clicking the respective black
arrow at the left of your AlbumPlus workspace. It enables you to manage your
tags and to control which photos are displayed in the Photos pane.
Any new album will be set up with a default tag structure that you can modify at
any time.
246
AlbumPlus Organizer: Managing Photos
A - Create
new tag
entry
B - Delete tag
entry
C - Show
photos
with this
tag (click
to select)
D - Don't show
photos
with this
tag (ctrlclick to
select)
E - Tag icon
F - Tag name
G - Expanded
view
H - Collapsed
view
I - Mouse
over to
see the
number of
photos
with this
tag
AlbumPlus Organizer: Managing Photos
247
When a previously tagged photo is imported, you can also import the associated
tags. This can either create new tags or map to existing tags. See Importing
Tags in AlbumPlus Organizer Help for more information.
To navigate the search tags:
In the Tags pane, click
to see more tags. To see fewer tags, click
.
To create search tags:
Add Tag button at the top of the Tags pane.
1.
Click the
2.
The current tag structure is displayed. Click
list.
3.
Type a new tag name in the Name: text box.
4.
Click on one of the existing tag names to highlight it. The new tag will be
created as a 'child' or sub-level of the selected tag.
to expand or
to collapse the tag
For example:
5.
Click Choose Icon and select an icon from the Choose Icon dialog. Click OK
to apply the tag icon.
6.
In the New Tag dialog, click OK.
You can also automatically tag photos with their folder name using the
Auto tag feature in Folder View.
248
AlbumPlus Organizer: Managing Photos
To delete a tag:
In the Tags pane, select the tag and click
Delete Tag.
When you delete a tag from the Tags pane, it does not remove that tag
from the associated images. Tags must be manually detached from any
image that they are assigned to.
To reorganize search tags:
You can reorganize your tags by clicking on the tag name and dragging the tag
entry to its new location while holding down the mouse button. Alternatively, to
display tags in alphabetic ascending or descending order, right-click on any tag
name and check Ascending or Descending, respectively. Tags on all levels are
reordered accordingly. To revert back to non-alphabetic listing, right-click and
choose Custom.
To rename a tag:
Click on a tag name in the Tags pane to create an insertion point to edit
existing text.
To assign a search tag to a thumbnail:
1.
Select the thumbnail(s) which are to have the same tag. A blue border will
appear around the thumbnail(s).
2.
Hold down the mouse button and drag the thumbnail(s) on top of the tag
name in the Tags pane.
OR
Right-click on one or more selected thumbnails, select Attach Tag, then
select a tag from the root menu or a sub-category.
Your assigned photos can then be searched for. See Searching by tag on p. 255.
To remove tags from thumbnails:
Right-click on one or more selected thumbnails, select Detach Tag, then
select the tag to be removed.
AlbumPlus Organizer: Managing Photos
249
Tag icons
Every tag that is created can be assigned a unique icon. These appear on the lefthand side of the photo thumbnail when details are turned on, and give a quick
visual reference when viewing your photos in the Photos pane.
Any tag that doesn't have an icon assigned will be represented by a
'paper tags' icon. This icon is also used to represent multiple tags when
there are too many to fit next to the thumbnail.
To assign a tag icon:
1.
In the Tags pane, click the empty square (or current icon) next to the tag name.
2.
In the Choose Icon dialog, choose from one of the following options:
From Gallery to assign an icon from a set of pre-installed icons.
From File to create an icon from a file on your hard disc.
From Album to create an icon from an image within your album.
3.
Adjust your icon in the Preview pane as necessary. (For more information,
see Creating tag icons in AlbumPlus Organizer Help.)
4.
Click OK. Your icon is assigned to the tag.
Geo-Tagging tags
Tags can also be assigned a Geo-Tag. When a Geo-Tag is added to the tag, any
photo or project that is associated with the tag can be located in the PhotoMap
View.
To display your tags in the PhotoMap View, click the
Show on Map button.
For more information about adding Geo-Tags to your tags, see Geo-Tagging in
AlbumPlus Organizer Help.
250
AlbumPlus Organizer: Managing Photos
Understanding metadata
The main strength of modern photo albums comes in their support for various
metadata types, all intended to report the photo and file information that will
help identify your photo. Three of the most popular metadata formats,
EXchangeable Image File (EXIF), International Press Telecommunications
Council (IPTC) and the eXtensible Metadata Platform (XMP), are supported
within AlbumPlus.
Assigning XMP-based tags, file information, ratings, and comments to a photo
means that your album contents can be distinguished from each other by
initiating simple searches for such metadata (see p. 262). Read-only EXIF and
IPTC metadata can also be viewed (see below) or searched for at any time.
If you've assigned metadata to a large number of photos and you then
attempt to close down AlbumPlus, you may encounter a dialog saying
AlbumPlus is currently busy. Select Yes to complete outstanding
"tagging" operations (a further progress bar is shown—use the Stop
button as a last resort!) or select No to return back to AlbumPlus.
Metadata types
XMP
XMP is an editable Adobe XML-based metadata format, now superseding IPTC,
where data is stored as "keywords" representing the photo's subject matter.
The tags you can assign to your photos from the Tags Pane are XMP-based—
you can create tag names and a tag structure that represents the photo contents
of your album (see Using the Tags pane on p. 245). Assigning photos to your
tags then becomes a simple drag-and-drop procedure.
You can also view and search XMP metadata and, in particular, modify
information such as the photo's descriptive Title, Subject, Authors, Copyright,
and Comments.
AlbumPlus Organizer: Managing Photos
251
To display XMP metadata for a selected photo:
1.
Display and then select Photo Information from the drop-down
Click
list to open the Photo Information dialog.
2.
Click
at the top of the dialog to show XMP metadata for the selected photo.
To modify metadata, click to the right of any Title, Subject, Authors,
Copyright, or Comment and type or edit the text in the displayed white
box.
EXIF
When using your digital camera, EXIF metadata is associated with your photo
irrespective of its file format (RAW, JPG, or otherwise). This information
comprises your digital camera's specifications, current photo properties
(including size and resolution), and shoot details (time taken, exposure, flash
details, white balance, ISO rating, etc.). The information is displayed in a series
of fields; the fields listed may vary for photos taken on cameras from different
manufacturers. EXIF metadata is read only in AlbumPlus.
EXIF metadata can also be searched for (see p. 262).
252
AlbumPlus Organizer: Managing Photos
To display EXIF data for a selected photo:
1.
Click
Display and then select Photo Information from the drop-down
list to open the Photo Information dialog.
2.
Click
, and then click the Exif tab to view EXIF data arranged into
name/value fields.
IPTC
IPTC is an older metadata format (used for news organizations and photo
agencies) which contains photo details (including captions, keywords, credits,
copyright, photo location and time). IPTC metadata is read only in AlbumPlus.
IPTC metadata can also be searched for (see p. 262).
To display IPTC data for a selected photo:
1.
Display and then select Photo Information from the drop-down
Click
list to open the Photo Information dialog.
2.
Click
, and then click the Iptc tab to view IPTC metadata arranged into
name/value fields.
14
AlbumPlus Organizer:
Searching for Photos
254
AlbumPlus Organizer: Searching for Photos
AlbumPlus Organizer: Searching for Photos
255
Searching for photos
A range of diverse methods to search for photos exist within AlbumPlus:
Tag: Photos are retrieved by matching tags previously assigned to your
photos.
Media Type: This searches for different media formats.
Rating: Searches for personal ratings assigned to your photos.
Import History: Retrieves photos from photo import session logs.
Text: This searches the metadata, comments, tags, captions, file names,
paths, and slideshow names associated with your photos.
Date: This searches the dates associated with your photo files.
Photo: Searches for inherent photo properties.
Searching by tag
If you have assigned tags to your photos, you can use the tag as a search tool.
"General" tags, such as Events, Family and Friends>Children, Hobbies, etc. are
created by default to help start you off. You can also create specific, user-defined
tags (See To create search tags on p. 247).
To search by tag:
1.
2.
In Album View Mode, ensure the Tags pane is shown.
If necessary, expand the tag list by clicking the
to search for.
arrows to see the tag you want
256
3.
AlbumPlus Organizer: Searching for Photos
Click to select the box next to a tag name to include that tag. It will display a
green check mark , e.g., all photos tagged with "Children".
OR
Select multiple tag entries to perform multi-tag searches, e.g., all photos tagged
with "Children" and/or "Pets".
OR
Ctrl-click to select the box next to a tag name to exclude that tag. It will display a
red cross , e.g., all photos tagged with "Children" but not the ones that also
include the "Pets" tag.
4.
Your photos will be displayed in the adjacent workspace.
To start your search afresh, click the Show All Media button to clear all
current search tags.
AlbumPlus Organizer: Searching for Photos
257
Refining a multi-tag search
The Match All Tags or Match Any Tags options shown after a multi-tag search
(see example below) indicates the search results for a) photos containing all
selected tags, or b) photos containing one or more of the selected tags (default
behavior).
Using the "Family and Friends" example above, Match All Tags displays photos
tagged with both "Children" AND "Pets" tags. By contrast, Match Any Tag
results displays photos tagged with the "Children" tag OR the "Pets" tag OR both
tags.
Using the frequency bar
The frequency bar on the Tags pane provides a visual indication, both as a bar
and tool-tip, of the extent to which photos are tagged with a particular tag in
relation to all photos in the current album.
The blue markers on the bar indicate the number of tagged photos vs. all photos
in your album. This visual indication is not exact, but gives you a quick
snapshot, e.g. in this example, the album has approximately a quarter of its
photos currently tagged as "Unassigned".
A tool-tip, is
displayed by
hovering over any
frequency bar. It can
be used for exact
analysis. In the
example, 572 photos
have the “Family and
Friends” tag assigned
to them out a total of
1674 photos in your
album.
258
AlbumPlus Organizer: Searching for Photos
Unassigned status
The Unassigned tag will let you view photos that have no tags assigned. This can
be used to separate your "processed" photos from "unprocessed" photos—newly
imported photos will often not have assigned tags. As you process your photos
you can keep checking the unassigned status to check your progress.
Searching by media type
Search for specific media types such as Photos, Audio, Video, AlbumPlus
projects, or any combination thereof. Projects relate to slideshows, prints, etc.
created in AlbumPlus, which have been saved for future use (see Create and
Share in AlbumPlus Organizer Help).
To search by media type:
Search button on the main toolbar.
1.
Click the
2.
On the Search toolbar, select the Media type option and click on one or more
appropriate media type icons.
Matching types are shown in the AlbumPlus workspace.
AlbumPlus Organizer: Searching for Photos
259
Searching by rating
Search for photos with a particular "star" rating level. You can refine your search
to show items matching "at least", "at most" or "exactly" the number of stars set;
you can equally just limit the search to unrated items.
Stars have to be assigned to photos in advance, as described in Rating your
photos on p. 229.
To search for photo ratings:
Search button on the main toolbar.
1.
Click the
2.
On the Search toolbar, select the Rating option and click on a star
rating level.
3.
(Optional) By default, the search displays items with "at least" the number of stars
set. Click the accompanying button to change this to "at most", "exactly", or
"unrated" items from a Filter by Rating dialog. (You can also set the star rating
by clicking on a star shown in the dialog.)
4.
Click the OK button.
to set the
260
AlbumPlus Organizer: Searching for Photos
Searching by import history
An import history search lets you display specific photo import sessions used to
previously build up your current photo album. The set of thumbnails shown in
the Import History box on the Search toolbar represents either the last set of
photos imported (by default) or a previous session that you specifically want to
search on.
You may want to use this feature to display photos recently added so that you
can make image adjustments, or assign ratings, tags and comments.
To search by import history:
Search button on the main toolbar.
1.
Click the
2.
On the Search toolbar, select the Import History search option to view just the
last set of photos imported.
3.
Alternatively, to retrieve a previous import session, click the accompanying
button and select an import session from the displayed dialog, e.g.,
The display shows sessions from the most recent to the oldest, with the
import Time, the Source folder from which the photos were imported, an
Images import count (3/4 means 3 photos were successfully imported out
of 4—one of the photos may have been a duplicate), and Thumbnails
representing each imported photo.
AlbumPlus Organizer: Searching for Photos
261
4.
Highlight an entry in the list (as shown above) to view that session only.
Remember multiple log entries can be grouped or selected one-by-one via
Shift-click or Ctrl-click, respectively.
5.
Click the OK button.
The Clear button deselects any highlighted log entries. This means that filtering
will not take place when the OK button is selected.
If thumbnails have been deleted or have had their “added to album”
date modified then there may be a discrepancy between the number or
date of the photos displayed in the log information and those shown in
the AlbumPlus workspace.
Searching by text
A text search can be performed on added photo comments (XMP), metadata
(XMP, IPTC, EXIF), tags, folder paths, captions and/or file names. For
comments, tags, and general file information, you have to add these to your
photos in advance (see Adding Comments to Photos on p. 234).
To search for word(s) or phrase(s):
Search button on the main toolbar.
1.
Click the
2.
On the Search toolbar, select the Text option and type a word or phrase into
the search input box. (Only photo comments and captions are searched for
by default.)
3.
Press the Enter key to perform the search. Any photos which match are
displayed in the Photos Pane.
262
AlbumPlus Organizer: Searching for Photos
To search for specific metadata (file information, IPTC or EXIF), tags, path
names, file names, and/or slideshow names:
button to check the option(s) you wish to search on.
1.
Click the accompanying
2.
(Optional) Check the Case sensitive box to limit the search to match
uppercase/lowercase characters exactly.
3.
For multiple words and phrases, check either Search for all words or Search
for any words. For the former, all words/phrases must be present; for the
latter, any of the words/phrases can be present.
4.
Click OK.
Searching by photo properties
The file properties for any photo can be searched on by using a Filter by
Properties dialog. The minimum and/or maximum levels for width (pixels),
height (pixels), bit depth, resolution (DPI) and file size (KB) can be set
independently. The specified range will include the actual value proposed for
minimum or maximum, as well as the values above or below.
To search for properties:
Search button on the main toolbar.
1.
Click the
2.
On the Search toolbar, select the More option and click the
3.
Click the Filter by Properties tab.
4.
Click on a check box (minimum or maximum, or both) next to the
property you want to search on.
5.
Set a value. Use the up/down arrows or type over to change the current
value next to the check box.
6.
Click OK. Any photos which match the search criteria are displayed.
button.
AlbumPlus Organizer: Searching for Photos
263
For example:
This will show you all photos in your album in excess of 5 Megabytes. This will
enable you to keep track of your high resolution digital photos (e.g., those in
RAW format).
264
AlbumPlus Organizer: Searching for Photos
Searching by date
The Search feature lets you search for dates when photos were taken, files
created or files modified most recently or over a specified time period. In
addition, searches can be made on dates on which photos were added to your
photo album.
To search by date:
Search button on the main toolbar.
1.
Click the
2.
On the Search toolbar, select the More option and click the
3.
Click the Filter by Date tab.
4.
Check the check box next to the type of date search you want to use
(combinations can be made), i.e.
button.
Photo: Photo Time (time that photo was taken; from EXIF)
Album: Album Time (time photo added to album)
Creation: File Creation Time (time copied to hard disk)
Modified: File Modification Time
5.
Click OK.
15
Index
266
Index
Index
.AVI format, 179
.GIF format, 179
.HDR format, 84
.PSD format, 20, 203
.PSP format, 20
.SPP (PhotoPlus) format, 26
16 bit images, 123
2D layer effects, 78
3D layer effects, 79
3D painting, 41
8 bit images, 123
Add Layer Mask command, 45
Add Mask command, 46
adjustment layers, 4, 54
alpha (opacity) channel, 44
animation
concepts, 179
working with frames, 181
antialiasing, 99, 128
background color, 124
for new image, 19
Background Eraser Tool, 131
Background layer, 31, 101
batch processing, 172
Black and white film, 62
blend modes, 38, 128
bracketed photos, 84
Brightness/Contrast (adjustment),
62
browser (web), 184
brushes, 5, 128
defining custom, 130
bump maps (layer effects), 80
Burn Tool
pressure-sensitive, 187
267
cameras
digital, 26
canvas size, 19, 102
for new image, 19
channels, 117
Channels tab, 118
Character tab, 143
Chromatic Aberration Remover
(distortion effect), 62
circle
drawing, 145
placing hotspot, 163
selecting, 92
Clipboard operations, 101
Clockwise Twirl Tool, 83
Clone Tool, 141
CMYK
separations, 200
color
adjusting, 51
choosing, 124
concepts, 123
defining custom, 125
foreground and background,
124
palettes, 127
separations, 200
storing, 126
swatches, 126
Color Fill (layer effect), 78
Color Mode, 123
Color Pickup Tool, 125
Color Range command, 95
Color tab, 124
268
Index
combination buttons
for lines, 146
for paths, 156
for selection, 92
for shapes, 146
Conical (gradient fill), 138
copying, 101
correction (of images), 51, 57, 60
counter-clockwise Twirl Tool, 83
Crop to Selection command, 106
Crop Tool, 103
cropping, 4, 61, 104
curves, 62
custom
brushes, 130
canvas sizes, 19
colors, 125
Cut/Copy commands, 101
cutouts, 114
Deform Tool, 108
deforming, 110
meshes, 110
selections, 96
depth maps, 41, 80
Deselect command, 92
digital cameras, 26
Disable Mask command, 47
Documents tab, 21
Dodge Tool
pressure-sensitive, 187
downsampling, 174
drawing and painting, 128, 145
Drop Shadow (layer effect), 78
duplicating a selection, 101
effects
filter, 67
layer (2D), 78, 153
layer (3D), 79
special, 67
Elastic Warp Tool, 82
ellipse
drawing, 145
selecting, 92
email
sharing documents by, 206
Emboss (layer effect), 78
Eraser tools, 131
erasing, 131
pressure-sensitive, 187
Export Optimizer, 203
exporting an image, 203
extracting, 114
feathering, 99
features
existing, 6
new, 4
Fill command, 136
fills
flood, 136
gradient, 138, 153
pattern, 136
solid, 136
tolerance in, 136
Filter Gallery, 4, 74
filter layers, 4, 68
masks, 71
filters
adjustment, 51
special effects, 67
flattening an image, 27, 38
flipping, 107
Flood Eraser Tool, 131
Flood Fill Tool, 136
foreground color, 124
frames (animation), 179
Index
Freehand Pen Tool, 149
GIFs
animated, 179
Gradient Fill Tool, 138
gradients, 138
graphics tablet, 129, 188
HDR Merge, 84
HDR Photo Merge, 17, 84
Histogram tab, 119
Histograms, 119
hotspots (image maps), 163
HSL, 62
HTML
for image maps, 162
for image slices, 161
hyperlinks
for image maps, 162
for image slices, 161
image
acquiring TWAIN, 26
creating new, 19
exporting, 203
fixing, 60
formats for Web, 206
opening file, 21
saving file, 26
sharing by email, 206
Image Cutout Studio, 5, 114
Image Map tools, 163
image size, 19, 102, 174
Image Slice Tool, 161
Import from Twain, 17, 26
importing from TWAIN source, 26
Inner Bevel (layer effect), 78
Inner Glow (layer effect), 78
Inner Shadow (layer effect), 78
installation, 13
Instant Effects tab, 79
269
Invert (selection) command, 98
Layer to Background command, 35
layers, 31
adjustment, 4, 54
and animation frames, 179
Background layer, 101
creating, 34
extracting parts of, 114
filter, 4, 68
grouping, 37
hide/show, 35
Layer to Background, 35
linking/unlinking, 36
moving, 36
opacity of, 41
outlines on, 153
Promote to Layer, 35, 101
selecting, 34
selecting linked, 34
shape, 145
text, 142
using 2D effects, 78
using 3D effects, 79
using depth maps, 41
Lens Distortion (distortion effect),
62
Lens Vignette (distortion effect),
62
letter spacing, 143
lighting, 62, 80
for 3D layer effects, 80
Linear (gradient fill), 138
lines
drawing, 145
Load Selection command, 96
locking, 35
all, 35
layer position, 35
270
Index
pixel opacity, 35
pixels, 35
macros, 167
copying, 172
modifying, 170
playing, 169
recording, 168
Magic Wand Tool, 93
Magnetic Selection Tool, 93
masking
PhotoFix for, 64
masks, 44
filter, 71
PhotoFix, 65
Mesh Warp Tool, 110
mesh warping, 110
modes
color, 123
Move Tool, 100
movies (AVI), 179
New Adjustment Layer command,
55
New Animation, 17, 19
New Image, 17, 19
New Layer command, 34
Node Edit Tool, 148
nodes (Mesh Warp Tool), 111
opacity, 32, 40, 45
selecting, 94
opening an image file, 21
optimizing an image, 203
Outer Bevel (layer effect), 78
Outer Glow (layer effect), 78
Outline (layer effect), 78
outlines, 152
on layers, 153
on selection areas, 152
path, 154
Paint to Select mode, 99
Paintbrush Tool, 128
painting, 128
in 3D, 41
pressure-sensitive, 187
palettes
color, 127
Paste command, 101
paths, 145, 154
pattern maps, 80
Pattern Tool, 134
patterns, 134
filling with, 136
PDF publishing, 201
pen tablet, 5, 129, 188
Pen Tool, 145
Pencil Tool, 128
PhotoFix, 4, 60
applying adjustments in, 63
masking in, 64
saving favorites, 67
PhotoPlus Picture (.SPP), 26
Photoshop (.PSD), 203
Picture Brush Tool, 130
picture tubes (PaintShop Pro)
importing, 131
Pillow (layer effect), 78
Pinch/Punch tools, 83
polygon
drawing, 145
placing hotspot, 163
selecting, 93
pressure sensitivity, 187
Pressure Studio, 5, 188
Preview in Browser command,
184, 206
Print Studio, 193
Index
printing, 193
as PDF, 201
cropping to print sizes, 105
marks for, 200
professional, 200, 202
Promote to Layer command, 35,
101
Publish as PDF command, 201
QuickShape tools, 145
Radial (gradient fill), 138
Rasterize, 35, 145
raw formats, 20
Raw Studio, 22
rectangle
drawing, 145
placing hotspot, 163
selecting, 92
red eye (removing), 4, 57, 61
registration, 3
resampling, 174
resizing, 103
images, 103
in bulk, 174
on export, 206
selection, 96
resolution, 103
changing (via Batch processing),
173
Retouch tools, 57
Revert, 27
rotating, 108, 110
Rule of thirds, 106
Saturate (Sponge tool), 58
saved work, 17
opening, 20
saving an image, 26
scaling
image size, 103
271
in printing, 197
selections, 96
scanning, 26
Security options (PDF), 202
Select All command, 92
Select All Layers command, 34
Select Linked Layers command, 34
selection, 91
cropping to, 106
defining region, 93
deforming, 96
duplicating, 101
from mask, 48
manipulating, 100
modifying, 96
of non-transparent regions, 94
storing, 96
text, 144
transforming, 96
Selection Deform Tool, 96
Selection tools, 92
Send command, 206
separations
CMYK color, 200
Serif contact details, 2
Shape Edit Tool, 149
shape layers, 145
rasterizing, 35
shaped regions, 93
selecting, 92
sharing documents (by email), 206
sharpening, 62
Show Marquee command, 91
size
canvas, 19, 102
image, 102, 206
skewing, 108
slicing images, 161
272
Index
Solid fill, 138
special effects, 67
spot repair, 61
square
drawing, 145
placing hotspot, 163
selecting, 92
Square (gradient fill), 138
stamping pictures, 130
standard layers, 32
Startup Wizard, 17, 19, 20
statistics
in histograms, 119
Store Selection command, 96
Straight Pen Tool, 149
Straighten Tool, 59
straightening, 4, 58, 62
support, 2
tablet, 188
technical support, 2
text, 142
adjusting size and position of,
143
creating selection in shape of,
144
layers, 32, 142
typographic control, 143
using layer effects on, 78
Text Selection Tool, 93, 142
Text Tool, 142
Thick/Thin Warp Tool, 83
Tolerance property, 93, 131, 136
tone mapping, 84
transparency, 32, 40, 45
applying, 40, 138
protecting on layer, 35
TWAIN image, 26
acquiring, 26
tweening, 182
twirl tools, 83
Unsharp Mask, 62
URLs
for image maps, 162
for image slices, 161
Use all layers, 34, 141
vector shapes, 145
vignetting
fixing lens, 62
Warp tools, 82
warping, 82, 110
Web images
creating animated GIFs, 179
formats for, 206
image maps, 162
image slicing, 161
previewing in browser, 206
Welcome, 3
What's New, 4
white balance, 62
workspaces, 18
AlbumPlus Organizer
Album View, 213
albums, 210
creating new, 210
archiving
reminder for, 245
Autoplay, 217
camera
adding photos from, 218
captions, 233
adding, 233
searching, 261
comments
adding, 234
searching, 262
Index
dates
changing photo, 231
searching for, 264
duplicates, 217
EXIF, 251
searching, 262
file management, 242
file names
searching, 262
flipping, 240
Frequency bar, 257
Full Screen View, 236
get media, 214
GIF, 212
history
searching, 260
import
history, 260
reports, 217
IPTC, 252
searching, 262
JPG, 212
media types, 212
searching, 258
metadata, 250
searching, 262
PanoramaPlus, 240
panoramas, 240
creating, 240
path names
searching, 262
photos
adding, 214
changing order of, 228
copying/moving, 239
date management of, 231
deleting, 238
importing, 214
273
rating your, 229
searching for, 255
by date, 264
by history, 260
by media type, 258
by properties, 262
by rating, 259
by tag, 255
by text, 261
by unassigned status, 258
PNG, 212
preferences, 244
projects
thumbnail styles, 225
ratings
assigning, 229
clearing, 230
searching, 259
RAW files, 212
reports
import, 217
rotating, 239
SAP files, 212
scanner
adding photos from, 218
split screen
in Full Screen View, 238
tags, 245
assigning, 248
creating, 247
EXIF, 251
IPTC, 252
modifying, 248
removing, 248
searching, 255
XMP, 250
274
Index
thumbnails
adding captions to, 233
assigning tags to, 248
changing order of, 228
removing tags from, 248
resizing, 227
selecting, 223
styles for, 224
time zones, 232
times
changing photo, 231
unassigned photos, 258
viewing your photos, 235
full screen, 236
views
Album View Mode, 213
XMP, 250