1
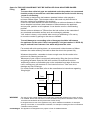
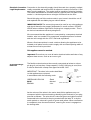
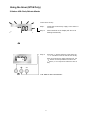
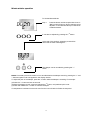
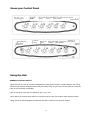
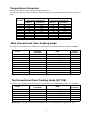
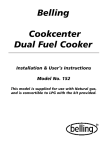
GT 755 - GT 756
Slot-in Natural Gas Double Cavity Cooker
INSTALLATION AND USER INSTRUCTIONS
Note:
These appliances are supplied for use with the category of gas specified
(Natural Gas I2H) and cannot be converted to any other gas.
Contents
Introduction ............................................................................................................................................ 3
Installing Your Cooker .................................................................................................................... 4-8
For your own safety - Never ............................................................................................................... 9
............................................................... 10
-Always
Know your Cooker / Specification .................................................................................................... 11
..... 12
Using the Timer (GT 756)
3 Button LED Clock/Minute Minder .................................................................................................. 12
Minute Minder Operation ................................................................................................................... 13
Know your Control Panel ................................................................................................................... 14
Using the Hob
General Notes on Safety ....................................................................................................................... 14
The Hob Glass Lid / Burner operation / Advice on pan suitability .............................................. 15
Energy Saving Tips ............................................................................................................................ 15
Safety Requirements for Deep Fat Frying (IMPORTANT) ............................................................. 16
Safety advice in case of a chip pan fire / Choosing your utensils ............................................... 16
Using the Grill
GT 755 & GT 756 Grill Operation ....................................................................................................... 17
Grilling Guidelines / Use of the Grill Pan Handle ............................................................................ 18
.............................................................. 18
Using the Ovens
Shelf Positions/Use of the Ovens/Oven Lamp Operation (GT 756) .............................................. 19
Temperature Conversion ................................................................................................................. 20
Main Conventional Oven Cooking Guide .......................................................................................... 20
Top Conventional Oven Cooking Guide (GT 756) ........................................................................... 20
Care and Cleaning/Replacing the Oven Lamp .......................................................................... 21-22
Something Wrong With Your Cooker .............................................................................................. 23
Customer Care ..................................................................................................................... Back Cover
This appliance conforms to the following EEC Directives:
Gas Appliance Directive:EN 30
Low Voltage Directive:73/23/EEC
93/68/EEC
Electromagnetic Compatibility:89/336/EEC
92/31/EEC
93/68/EEC
2
Introduction
Your Belling
Cooker
Thank you for purchasing a new Belling GT 755 & GT 756 Gas Cooker.
It's stylish and practical design will enhance your kitchen and make cooking a
pleasure.
The GT 755 model features a conventional main oven, a grill and a hob with 4
gas burners.
The GT 756 model features a conventional main oven with light, a top conventional
oven/grill, a hob with 4 gas burners and a clock/minute minder.
Even if you have used an electric or gas cooker before, it is important that you
read these instructions thoroughly before starting to cook, paying particular
attention to the installation and safety instructions.
Getting Help
If you have any problems with installing, operating, or cooking with your
Belling Cooker, please check through these instructions thoroughly to make
sure that you have not missed anything. If you still need help, then please
contact (including a daytime telephone number if possible):
Belling Customer Care Centre
Stoney Lane
Prescot
Merseyside
L35 2XW
Tel: 0844
0871815
223746
22 503
Please quote the cooker model and serial number with all enquiries.
This can be found on the rating plate on the plinth below the main conventional
oven.
WARNING! For your own safety, make sure that these instructions on
installation, use and maintenance are followed.
We advise you to keep these instructions in a safe place for future reference.
If you sell or transfer ownership of this product, please pass on these instructions
to the new owner.
3
Installing your cooker
Unpacking
After unpacking your cooker, make sure that you remove all the
packing from the ovens and grill, and any stickers from the oven
doors and hob.
Examine your cooker. Make sure there is no damage or missing items.
If there is anything damaged or missing, please contact your supplier for advice.
Sitting/Moving
the Cooker
Prior to installation, ensure that the local distribution conditions (nature of the
the Cooker gas and gas pressure) and the adjustment conditions are compatible.
The adjustment conditions for this appliance are stated on the rating label, which
is fitted on the plinth.
This appliance is not designed to be connected to a combustion products
evacuation device. It must be installed and connected in accordance with current
installation regulations. Particular attention should be given to the relevant
requirements regarding ventilation.
Gas
installation
The appliance is factory set for use with Natural Gas ONLY G20 at 20mbar.
It is not convertible to any other gas.
Gas Safety (Installation and Use) Regulations
It is the law that all gas appliances are installed by competent persons in
accordance with the current edition of the above regulations. It is in your interest and
that of safety to ensure compliance with the law.
In the UK, CORGI registered installers work to safe standards of practice.
This appliance must be installed and connected in accordance with current installation
regulations. Failure to install the cooker correctly could invalidate the warranty liability
claims and could lead to prosecution.
Location
The cooker may be located in a kitchen, kitchen/diner or a bed-sitting room, but not in a
room containing a bath or shower. The cooker must not be installed in a bed-sitting room
of less than 20m2.
Levelling
The appliance should be located on a level surface. The front/rear feet can be
adjusted to a maximum height of 910mm as required. To ensure that your appliance
is standing level, adjust the rear feet by turning clockwise or anticlockwise until
the rear of the product is set to the required height. Position the cooker in the
correct location and adjust the front feet by turning clockwise or anticlockwise to
ensure firm contact with the floor. Check the cooker is level using a spirit level
(Not provided). Adjust if necessary.
Provision for
Ventilation
The room containing the cooker should have an air supply in accordance with
current regulations in force.
The room must have an opening window or equivalent; some rooms may also
require a permanent vent. If the room has a volume between 5 and 10m3, it will
require an air vent of 50 cm2 effective area unless it has a door which opens
directly to outside. If the room has a volume of less than 5m3, it will require an air
vent of 100 cm2 effective area. If there are other fuel burning appliances in the
same room, current regulations should be consulted to determine air vent
requirements.
4
Space for THIS APPLIANCE MUST NOT BE INSTALLED ON A NON-FIXED RAISED
Fixing
BASE.
To ensure that critical air gaps are maintained under the product, we recommend
that this product is mounted on a solid base and that the feet do not sink into any
carpet or soft flooring.
The cooker is designed to slot between standard kitchen units spaced a
minimum 500mm apart. The clearance either side need only be sufficient to
allow the cooker to be withdrawn for servicing.
It can be used with cabinets on either side but for a minimum distance of 400mm
above hotplate level allow a side clearance of 60mm between the appliance
and any wall, partition or tall cupboard. It can also be used in a free standing
position.
Allow a minimum distance of 750mm from the hob surface to the underside of
any overhead combustible surface such as overhanging cabinets.
Your cooker is heavy, so be careful when moving or positioning it. Do not try
to move the cooker by pulling on the doors or handles.
To avoid damage to surrounding units a 10mm gap should be left between
the appliance and the units. If this is not possible, a kit (part number 01 25552 00)
may be ordered from Customer Care which will protect the units.
For models with side opening doors, we recommend a side clearance of 60mm
between the cooker and any side wall to allow the door to be opened fully.
r=
65 mm Min
750 mm Min
Whatever the position, remember to leave enough room for the cooker to be
pulled out for cleaning and service.
Movement of your cooker is most easily achieved by lifting the front as follows
and pulling forwards. Open the Grill door and the Conventional Oven door
sufficiently to allow a comfortable grip on the underside front edge of the oven
roofs, avoiding any grill elements or oven interior furniture. Take care not to
damage any floor coverings.
If a cooker hood is to be fitted, refer to the manufacturer's instructions regarding
fixing height.
_ 65 mm Min
o.
_ 500 mm Mm
WARNING
The use of a gas cooker results in the production of heat and moisture in the room in which
it is installed. Ensure that the kitchen is well ventilated; keep natural ventilation holes or install
a mechanical ventilation device (mechanical cooker hood)
Prolonged intensive use of the appliance may call for additional ventilation, for example
opening of a window, or more effective ventilation, for example increasing the level of mechanical
ventilation where present.
Connecting to This appliance is designed not to project in front of standard 600mm
5
Gas Supply
worktops (excluding handles). To achieve the best fit the cooker must be pushed against the
wall. If the wall mounted adapter backplate (Fig.1) is to be fitted behind the appliance then
the suitable area for this fitting is shown as the area in (Fig.2).
The temperature rise of areas at the reara of the cooker that are likely to come into contact
with the flexible hose do not exceed 70°C. However, do not allow contact of the hose in the
top 150mm/6 inches (the shaded area shown in Fig.3).
A Rp 1/2 union is fitted to the cooker. Connection to the appliance should be made with an
approved appliance flexible connection to BS669. The length of the hose should be such that
when the cooker is in situ, it does not touch the floor.
Stability Chain The cooker must be secured by a security chain to the wall or partition behind the cooker.
(Fig.4)
Flame Failure All burners are protected by flame failure devices, if the flames are extinguished for any reason
the gas will automatically be cut off.
Device
The burner control knobs have a safety feature.
Flame
failure
device
1 Push the appropriate knob in slightly and turn anti-clockwise to the required setting.
2 While keeping the knob depressed press the ignition button. /4;
3 Keep the knob depressed for 15 seconds after the burner has lit to override the safety
device.
If still no ignition occurs, wait for 1 minute and repeat again.
Warning: Do not keep the knob in pressed position more than 15 seconds.
4 To switch a burner off turn the corresponding knob to I.
• Turning the control knob fully anti-clockwise to the small flame symbol enables you to
simmer without accidently switching off.
Fig.1
Fig.2
A=150
B=175
C=700
D=500
E=150
Fig.3
Fig.4
%NMI hook
;rot '4'ppl:c:d.)
The hose must
not come into
contact with
the shaded
area
coc.kef rear
6
Electrical Connection Connection to the electricity supply should be made via a properly earthed,
Legal Requirements readily accessible wall socket which is adjacent to and not more than 1.25m
away from the appliance. The socket must be capable of electrical isolation.
The mains lead should be routed such that it cannot touch hot parts of the
cooker i.e. the back panel above a height of 650mm from the floor.
Should this plug not fit the socket outlet in your home it should be cut off
and replaced with a suitable plug as outlined below.
IMPORTANT NOTE: The severed plug cannot be used for any other appliance
and should therefore be properly disposed of in a safe manner. DO NOT
LEAVE where children might find it and plug into a supply socket - This is
an obvious hazard and extremely dangerous.
We recommend that the appliance is connected by a competent electrical
installer, who is a member of a recognised "competent persons" scheme
and who will comply with the I.E.E. and local regulations.
Where a fixed connections is used, a device allowing the appliance to be
isolated on all poles from the mains supply with a contact opening width of
at least 3mm must be provided.
This appliance must be earthed.
Important: Ensure that you route all mains electrical cables well clear of any
adjacent heat source, such as an oven or grill.
If the Fitted Plug is
Removed
The flexible mains lead must be correctly connected as below to a three
pin plug of not less than 13amp capacity. If a BS 1363 plug is used, then
it must be fitted with a 3amp fuse approved to BS 1362.
IMPORTANT: The wires in the mains lead fitted
to this appliance are coloured
in accordance with the following code:
Blue to
Neutral
GREEN AND YELLOW
BLUE
BROWN
- Earth
- Neutral
- Live
Mains Lead Clamp
Green &
Yellow to
Earth
Brown to
Live
13 Amp Fuse
As the colours of the wires in the mains lead of this appliance may not
correspond with the coloured markings identifying the terminals in your plug,
proceed as follows:- The wire which is coloured green and yellow must be
connected to the terminal in the plug marked with the letter 'E' or by the
earth symbol or coloured k green or green and yellow. When connection
is completed, close the terminal block, ensuring the cover is engaged on
the locking tabs.
7
The wire coloured blue must be connected to the terminal marked with the
letter 'N' or coloured black. The wire coloured brown must be connected
to the terminal marked with the letter 'L' or coloured red. When wiring the
plug, ensure that all strands of wire are securely retained in each
terminal.
Do not forget to tighten the mains lead clamp on the plug. As the appliance
must be earthed, do not use 2-pin socket outlets. If you are in doubt, consult
a qualified electrician. Should the mains lead ever require replacement, it is
essential that this operation be carried out by a suitably qualified
electrician and should only be replaced with a flexible cord of the same size
i.e. 0.75mm2 cross sectional area and temperature rating of 85°C e.g. heat
resisting PVC.
After connection to the electicity supply please check that all electrical parts
of the appliance are working.
The maximum power rating is specified in the Technical Data of this handbook
and also on the Data Label on the appliance.
If a Moulded Plug
is Fitted
In the event of replacing a fuse in the plug supplied, a 13amp ASTA
approved fuse to BS 1362 must be fitted.
NOTE: The fuse cover must be refitted when changing the fuse. In the event
of losing the fuse cover, the plug must not be used until a replacement fuse
cover has been obtained and fitted. A new fuse cover can be obtained from
your local electrical retailer. The colour of the correct replacement fuse
cover is that of the coloured marks or inserts in the base of the plug.
Operational Checks
After installation check for gas soundness.
Assemble burner caps and rings; fit pan supports in position.
Turn on the gas supply and check for soundness at the hotplate injector. Light two
burners and check that the pressure is correct.
Before you cook for the first time, we recommend that you light each burner in turn to
burn off any odours remaining from manufacture. Simply operate the grill on maximum
for a few minutes and the oven(s) for approximately 30 minutes. Ensure that the room
is well ventilated (e.g. open a window or use an extractor fan) and that persons who
may be sensitive to the odour avoid any fumes. It is suggested that any pets be removed
from the room until the smell has ceased.
Instruct the user on the operation of the cooker.
8
For your safety
When used properly your Belling GT 755,GT 756 Gas cooker is completely safe, but as
with any electric or gas appliance there are some precautions you must take in its use.
Never..
•
Never allow anyone except an authorised Belling Service Agent to service or repair your cooker.
Never remove any part of the cooker other than those intended in normal use, or attempt to modify the
•
cooker in any way.
•
Never use the cooker for commercial catering. It is designed for domestic use and for cooking food only.
•
Never allow young children to operate or play with the cooker, as all surfaces get hot while in use.
•
Never allow children to sit or stand on any part of the appliance.
•
Never store items above a cooker that children may attempt to reach.
•
Never use a chip pan or deep fat fryer more than 1/3 full of oil, or use a lid while frying, and do not leave a
fryer unattended while cooking.
•
Never operate the grill with the grill/top oven door closed. This may cause overheating of your cooker.
•
Never line the shelves, floor, or sides of the oven or grill, with aluminium foil as overheating and damage may
result.
•
Never place materials which might catch fire, such as tea towels on the hob or elements, even when the
cooker is not in use.
Never allow aluminium foil or plastic to touch any hob element when it is hot.
•
Never use an asbestos mat, trivet or rack of any kind under pans on the hob.
•
Never store anything which might catch fire in the oven or grill.
•
•
Never heat unopened containers.
•
Never place flammable or plastic items on or near the hob.
•
Never dry clothes on either hob or oven doors.
•
Never store flammable liquids, aerosols, etc. in adjacent cabinetry.
•
Never use large preserving pans or fish kettles across two hotplates as this will damage the hob.
9
For your safety
Always..
•
•
•
•
•
•
•
•
•
•
•
•
•
Always take care when touching any part of the cooker which may be hot. Use dry oven gloves when
removing or replacing food or dishes. Care should be taken to avoid touching the heating elements inside
the oven.
Always stand back when opening the oven door to allow any build-up of heat or steam to disperse.
Always keep the oven and grill doors closed when not in use to prevent accidents, but remember that
the grill door must be kept open when grilling to prevent overheating.
Always make sure that the roof, side and back panels, and shelves are fitted correctly before using the
oven or grill.
Always keep your cooker clean, as a build-up of grease or fat from cooking may be a fire hazard.
Always switch off at the mains supply and allow the cooker to cool before cleaning your cooker.
Always supervise children and pets, particularly when grilling, as exposed parts of the cooker may become
hot.
Always place pans centrally over the hotplate burners, and position them so that the handles cannot be
accidentally knocked or become heated by other burners.
Always keep handles away from the edge of the hob. For added safety you should consider using a
suitable hob guard.
Always make sure that all the controls are switched off when you finish cooking.
Always remember that your cooker may stay hot for a time even after you have finished cooking.
Always keep ventilation slots clear of obstructions.
Always keep children away from cooker when cleaning at maximum
oven setting.
10
Know Your Cooker
Glass Lid
2.0 kW
3 Button Clock/Minute Minder
(If Fitted)
Control Panel
Top Oven and/or Grill
Grill Pan with removable Handle
and Wire Food Support Grid
(1) Oven/Grill Shelf With baffle
Cookclean Side & Rear Liners
(If Fitted)
(2) Oven Shelves With baffles
Plinth Ventilation Slots
Conventional Oven
Windowed Metal Doors
Specification
Supply Voltage
Supply Frequency
Maximum Wattage
230 V AC
Ignition
Push Button Electric
50 Hz
Safety Device
Gas valves are lockable
Unpacked
H: 900 mm
External Dimensions
W: 500 mm
GT 755
Electric=0.02 kW
GT 756
Electric=0.06 kW
Gas = 12.7 kW
2.3 kW
Top Oven Wattage
GT 756
2.1 kW
Conventional Oven Wattage GT 755
2.5 kW
Conventional Oven Wattage GT 756 inc 25W-230V Lamp 2.5 kW
Rear Left Burner
2.0 kW
Front Left Burner
2.0 kW
Front Right Burner
2.9 kW
Rear Right Burner
1.0 kW
Grill Wattage
and Flame Failure Devices
D: 600 mm
Packed
H: 985 mm
External Dimensions
W: 560 mm
D: 700 mm
Grill Area
Gas
G 20
Supply Pressure
20 mbar
800 sq cm
I 2H AT 20 mbar
Destination Countries
Cat I 2H
GB
Because we continually strive to improve our products, we may change our specifications and designs without prior notice.
11
Using the timer (G756 Only)
3 Button LED Clock/Minute Minder
To Set Time of Day
a
I
100
It*
Step 1
Check that the electricity supply to the cooker is
turned on.
Step 2
When switched on the display will shou 0.00
flashing intermittently.
Step 3
Press the "1" button and then press either the
"+" or "2 buttons to set the correct time of day.
*
o
..........
Note: If the electricity supply has been off, the
"+" button must be prissed once before the
" 2 button, if it is required to reduce thi time of
day.
$
THE TIME OF DAY IS NOW SET.
12
Minute minder operation
To Set the Minute Minder
DO.cr
Step 1
::: .::::::: i.
:::
::::. .::: .:
:::::::. :::. :::::::
::::::: ::: .:::::::
.:::,
:
......
000
Press the button until the required time is set. A
"Bell" symbol will light up. During setting the time
adjusts in 10 second intervals up to a maximum
of 99mins 50secs.
It can also be adjusted by pressing the " 2 button.
At the end of the set time, a bleeping sound will be
heard and the "Bell" will disappear.
0
The bleeper can be cancelled by pressing the "+"
button.
NOTE: If necessary the minute minder can be cancelled before the bleeper sounds by pressing the "+" and
"-"buttons together until 0.00 appears in the display window.
To adjust the pitch of the bleeper, press the " 2 button while the bleeper is sounding. For example:
(a) Press the "+" button and set 10 seconds.
(b) When the bleeper sounds, press and release the " 2 button, until preferred pitch is set.
(c) Press and release the "+" button to cancel the bleeper.
If a temperature is selected for the main oven first the oven will switch off after the set period.
13
Know your Control Panel
Rear left burner
Front left
burner
Rear left burner
Clock/Minute
Minder
Front right Rear right Main Conventional Grill Control
burner
burner
Oven Control
Ignition Switch
Front left
burner
,
Front right
burner
Top Oven &
Rear right Main Conventional Grill Control
burner
Oven Control
Ignition
Switch
Oven light Switch
Using the Hob
GENERAL NOTES ON SAFETY
1 When the hob is in use do not leave unattended and make sure there are no small children in the vicinity.
Check that pan handles are positioned correctly and always keep an eye on the pan whenever oils or fats are
used, as they are easily immflamable.
2 Do not use spray cans near the appliance when it is in use.
3 Even after use, surfaces retain heat for a long time so do not put your hands or other objects on them.
4 After you have used the appliance make sure that all the controls are in the OFF position.
14
The Hob Glass Lid
The hob glass lid on the cooker is toughened for your protection and safety. Before opening it remove any food
deposits from its surface. The glass lid is purely decorative and is not intended as a work surface and should
not be used for this purpose. As with any glass surface care must be taken to avoid scratches or damage, as
this may result in the glass breaking. The glass lid incorporates a safety valve that shuts off the gas supply to
the four hob burners, when the lid is lowered.
The oven(s) and grill will still operate with the lid in its closed position. Do not use this facility as a means
of controlling the burners. This device is fitted in the interests of safety.
WARNING: Always make sure that all the control knobs are in the OFF position and the burners have cooled
before the hob lid is closed. Failure to do so could result in damage to the lid and a risk of personal injury.
Please note that if the gas taps have not been turned off, the supply of gas to the hob burners will restart when
the hob is lifted and will not re-light until a spark or flame ignites them.
Burner operation
1. Check that the electricity supply is switched on.
2. Ensure the glass lid is in its open (Upright) position. Select the burner to be used. Push in and turn the control
knob anti-clockwise to the large flame symbol. Press the ignition button until the burner lights (Or manual ignition
by match, taper or other auxiliary methods may be used). Turn the control knob to the required setting. A simmer
position is achieved when the control knob is turned fully anti-clockwise.
3. To turn off, turn the control knob fully clockwise to the '0' symbol.
Advice on
Pan Suitability
Do not use pans which are unstable when placed on a flat work top. The use of split pans,
i.e. those comprising two or more pans designed to fit together over a single burner, is not
recommended as these can be unstable on the hotplate. In order to get best value out of
your hob, the following economy tip is recommended. Choose the correct burner for the size
of pan e.g. 18cm (for auxiliary burner), 20cm (for semi-rapid burner) and 22cm (for rapid burner).
Energy Saving Tips
1. Do use saucepans with lids.
2. Place pans centrally over burner.
3. Do not allow flames to lick up the sides of the pan.
4. Only fill kettles or pans with the amount of liquid needed.
5. Turn down the gas as soon as the contents of the pan boil.
6. Do not light the burner until the pan is in position and turn off before removing the pan.
7. Cut vegetables into smaller pieces so that they cook quicker and cook more than one vegetable in the same
pan, e.g. carrots and potatoes.
8. In hard water areas de-scale kettles regularly.
9. Consider using a pressure cooker.
15
Safety Requirements for Deep Fat frying
IMPORTANT:
As there could be some fire risk attached to the heating of oil, particularly for deep fat frying, cooking utensils
containing oil must not be left unattended (e.g. to answer the telephone) or in close proximity to hotplates.
In the unfortunate event of a fire it will assist in smothering the flames if the pan lid is replaced. Turn off all the gas
taps.
1. Use a deep pan, large enough to completely cover the appropriate heating area.
2. Never fill the pan more than one third full of fat or oil.
3. Never leave oil or fat unattended during the heating or cooking period.
4. Do not try to fry too much food at a time, especially frozen food. This only lowers the temperature of the oil
or fat too much, resulting in greasy food.
5. Always dry food thoroughly before frying, and lower it slowly into the hot oil or fat. Frozen foods, in particular,
will cause frothing and spitting, if added too quickly.
6. Never heat fat, or fry, with a lid on the pan.
7. Keep the outside of the pan, clean and free from streaks of oil or fat.
Safety advice in case of a chip pan fire
In the event of a chip pan fire or any other pan fire.
1. TURN OFF ALL THE GAS TAPS.
2. COVER THE PAN WITH A FIRE BLANKET OR DAMP CLOTH, this
will smother the flames and extinguish the fire.
3. LEAVE THE PAN TO COOL FOR AT LEAST 60 MINUTES BEFORE
MOVING IT. Injuries are often caused by picking up a hot pan and rushing outside with it.
NEVER USE A FIRE EXTINGUISHER TO PUT OUT A PAN FIRE as the force of the extinguisher is likely
to tip the pan over.
Never use water to extinguish oil or fat fires.
Choosing your Utensils
For best results we recommend the use of good quality saucepans with smooth flat bases. Aluminium pans with
coloured vitreous enamelled bases absorb heat and are therefore more efficient in use. Almost equally as good
are saucepans with a thick machined aluminium base. If using enamelled steel or cast iron pans, ensure that they
have good smooth flat bases as otherwise the heat will not be distributed evenly and damaging heat spots may
be created.
Never use recessed or ridged base utensils. Ideally the base of saucepan should be approximately the same size
as the heating area, up to a maximum of 254mm (10").
16
Using the grill
Parts may become hot when the grill is in use, children must be kept away.
ALWAYS ENSURE THE DOOR IS OPEN WHEN GRILLING
GT 755 Grill Operation
1
Turn the grill on by depressing and turning the grill control knob anti-clockwise to the large flame position.
Depress and hold the control knob while at the same time pressing the spark ignition button until the spark lights
the gas. Keep the knob depressed after the burner has lit for a further 15 seconds for the flame to establish.
Allow the grill to pre-heat for around 5 mins.
2
Rotate the grill control knob anti-clockwise to the required setting. Only turn the control knob between
the large flame symbol and the small flame symbol when adjusting the setting. (Refer to 'Grilling Guidelines' on
Page 18)
3
To turn off, turn the control knob fully clockwise to the '0' symbol.
4
In the event of the burner flames being accidentally extinguished, turn off the control knob and
do not attempt to re-light the grill for at least one minute.
GT 756 Grill Operation
1
Turn the grill on by depressing and turning the grill control knob clockwise to the large flame position.
Depress and hold the control knob while at the same time pressing the spark ignition button until the spark lights
the gas. Keep the knob depressed after the burner has lit for a further 15 secs for the flame to establish. Allow
the grill to pre-heat for around 5 mins.
2 The gas flame is not adjustable. (Refer to 'Grilling Guidelines' on Page 18)
3 To turn off, turn the control knob fully anti-clockwise to the '0' symbol.
4 In the event of the burner flames being accidentally extinguished, turn off the control knob and
do not attempt to re-light the grill for at least one minute.
GT 756 Grill Operation
• Only use the bottom shelf position for grilling. Do not use any other position.
•
Ensure the food is correctly positioned under the grill burner.
• Food that requires browning only should be placed under the hot grill, either in the grill pan, or on the floor
of the grill compartment, according to the depth of the dish. The grill pan wire grid can be removed.
•
Do not line the grill pan with aluminum foil.
•
Plates and dishes placed on the floor of the grill compartment will be heated when the main oven is in use.
•
Do not switch on the grill when using the compartment for storage.
• During use the appliance becomes hot. Care should be taken to avoid touching heating elements
inside the oven.
17
Grilling Guidelines
Use the following chart for guidelines.
For thicker foods requiring longer cooking, turn the control to a lower setting after the
initial sealing on both sides. The thicker the food, the lower the control should be set.
When grilling thicker food, the grill rack should be turned over to its lowest position.
Food
Toasting of Bread products
Grill Setting
Full On
Approximate Cooking time
3 - 10 mins.
Small cuts of meat, sausages,
bacon, etc.
High to Full
15 - 20 mins.
Chops etc.
Gammon steaks
Chicken pieces
Med to Full
20 - 25 mins. Wire food support
used in upturned position for
chicken.
Fish:
Fingers
Whole Fillets
Med to High
10 - 20 mins. Whole fish and
fillets placed in the base of the
grill pan.
Fish in breadcrumbs
Med to High
15 - 20 mins.
Pre — Cooked potato products
Med to High
15 - 20 mins.
Pizzas
Med to High
12 - 15 mins. in the base of the
grill pan.
Full On
8 - 10 mins. Dish placed directly
on the base of the grill
compartment
Browning of food
Note:- The Grill setting on the GT 756 is Full On Only. Adjust cooking times accordingly.
Use of Grill Pan Handle
Warning! Always use an oven glove to protect your hand when using the grill
as all metal parts can become very hot.
The grill pan has a detachable handle. Make sure the handle is securely located
between the raised profiles across the front of the grill pan. See the diagrams for fitting
the handle. To remove the handle, reverse the sequence of operations.
Always take care not to touch hot surfaces when
using the grill panhandle. Ensure when using the grill
panhandle that it is centralized and secure. Please
note that the grill panhandle will get very hot during
use.
18
Using the Ovens
Your appliance has either one or two conventional ovens. The ovens have different heat zones with the thermostat
settings referring to the temperature on the middle shelf; above the shelf it is hotter and below it is cooler. The
main oven has two shelves and five possible shelf positions (reference numbered 1 to 5 from the top down). The
top oven (GT756 Only) has one shelf and two possible shelf positions (reference numbered 1 to 2 from the top
down). The varying shelf positions allow full use of the different temperatures inside the ovens.
Shelf Positions
The shelf positions are counted from the top runner down as shown below.
1
2
3
Shelf
Levels
1
4
2
Shelf
Levels
Control holes
Control holes
MAIN CONVENTIONAL OVEN
TOP CONVENTIONAL OVEN
Use of the ovens
1 Open the door
2 Adjust the shelves to the positions required
3 Turn the oven on by depressing and turning the oven control knob anti-clockwise to setting 7.
Depress and hold the control knob while at the same time pressing the spark ignition button until the spark lights
the gas. Keep the knob depressed after the burner has lit for a further 15 seconds for the flame to establish.
The flame is visible through the control holes as shown in the diagrams above.
4 Close the door
5 Select the temperature in the oven by rotating the knob to the required setting.
6 Allow 10 minutes for pre-heating.
7 To turn off, turn the control knob fully clockwise to the '0' symbol.
8 In the event of the burner flames being accidentally extinguished, turn off the control knob and
do not attempt to re-light the oven for at least one minute.
Ensure you stand back from the appliance when opening the oven door to allow any build up of steam
or heat to escape.
• Check food is thoroughly cooked and is piping hot before serving.
• When cooking, rotate the food and turn the food over (If suitable) approximately half way through the cooking
cycle. This will ensure even cooking/baking results.
Oven Lamp Operation (GT 756)
The main oven is fitted with a 25W - 230V SES (300°C) lamp and can be illuminated by depressing the lamp
switch situated on the control panel (See Know Your Control Panel Page 14).
NOTE:- The oven lamp is not covered by the guarantee. For a replacement call our Spares Department
on (tel. 0844 815 3745)
19
Temperature Conversion
The oven temperature control markings are gas marked 0 to 9.
The equivalent degrees Celsius (sometimes called Centigrade) and degrees Fahrenheit are shown below as a
guide.
Gas Mark
MAIN OVEN
(Centre Oven Temperatures)
Celcius °C
1/2
1
2
3
4
5
6
7
8
9
TOP OVEN (GT 756)
(Centre Oven Temperatures)
Celcius °C
Fahrenheit °F
110
120
150
175
195
210
220
230
235
240
230
250
300
350
385
410
430
445
455
465
110
130
140
150
165
175
190
205
220
235
Fahrenheit °F
230
265
285
300
330
315
340
400
430
455
Main Conventional Oven Cooking Guide
This chart is for guidance only, follow food manufacturers recommendations whenever available.
FOOD
BEEF
LAMB
PORK
POULTRY
CASSEROLES
FRUIT CAKE
SMALL CAKES
VICTORIA SANDWICH
APPLE PIE
SCONES
TIME
COOKING
GAS MARK
4-5
4-5
4-5
4-5
3
2
5
4
6
7
25-30 mins/450g + 30 mins
25-30 mins/450g + 30 mins
35-40 mins/450g + 40 mins
25-30 mins/450g +25 mins
1.5/2 hours dependant on quantity
2 - 3.5 hours dependant on size
17-25 mins
20-30 mins
50-60 mins
12-15 mins
SHELF
POSITION
5
5
5
5
4 or 5
3
2&4
2&4
1
1&3
Top Conventional Oven Cooking Guide (GT 756)
This chart is for guidance only, follow food manufacturers recommendations whenever available.
FOOD
COOKING
GAS MARK
BEEF
LAMB
PORK
POULTRY
SMALL CAKES
SCONES
5-6
5-6
5-6
5-6
5
7
TIME
25-30 mins/450g + 30 mins
25-30 mins/450g + 30 mins
35-40 mins/450g + 30 mins
25-30 mins/450g + 25 mins
17-25 mins
12-15 mins
SHELF
POSITION
2
2
2
2
1
1
Accuracy:- Note that times and temperatures in this book are for guidance only.
20
Care and Cleaning
TURN OFF COOKER AT MAIN WALL SWITCH BEFORE CLEANING
Before switching on again, ensure that all controls are in the OFF position.
Refer to instructions below for cleaning the 'Cookclean' removable side oven panels.
Glass Lid (Glass)
Clean with a cloth wrung out in soapy water. Stubborn stains can be removed with a cream, paste or liquid
cleaner, or by gently rubbing with liberally soaped, very fine steel wool pads. Polish with a clean dry cloth
or kitchen roll.
Glass Lid (Painted Trims)
Clean with a cloth wrung out in hot soapy water only. Polish with a clean dry cloth or kitchen roll.
DO NOT USE ABRASIVES.
Burners
The pan supports can be removed and the top burner plate can be cleaned with soapy water and rinsed
with a dry cloth. Wash and rinse the gas burner caps and the pan supports with soapy water. Never wash
them in a dishwasher. For the dirt and stains on the burner heads that does not wash off, use a proprietary
metal surface cleaner
Vitreous Enamel Hob Surround
Clean with a cloth wrung out in soapy water. Stubborn stains can be removed with a cream, paste or liquid
cleaner, or by gently rubbing with liberally soaped, very fine steel wool pads.
Control Panel
Wipe over the control panel with a damp cloth and polish with a dry cloth. Do not use oven cleaners or
aerosols scouring pads or abrasive powder for cleaning the plastic knobs, as damage will occur.
How 'Cookclean' Oven Liners Work (If fitted)
The surfaces of the 'Cookclean' oven liners are treated on the mottled face with a special vitreous enamel
which absorbs cooking soils at temperatures of 220°C (Gas Mk 6) or above, the special
surface enables these soils to be slowly destroyed. The higher the temperature the more effective it is. In
most cases normal cooking operation at this temperature will permit this cleaning operation to proceed
during cooking. However if higher cooking temperatures are not used regularly it may be necessary, to
prevent heavy soiling, to run the oven at a higher temperature setting of 230°C (Gas Mk 9) for a couple of
hours. This may be necessary once a month or once every two or three months, depending on the type
and amount of oven cooking.
'Cookclean Panels' (If fitted)
It should not normally be necessary to clean the 'Cookclean' panels in water. If the user feels it is desirable
to do so, remove the rod shelf and the side panels and wash them in warm soapy water, followed by rinsing
in clear water.
Do not use enzyme/biological washing powder, harsh abrasives or oven chemical cleaners of
any kind.
Do not rub the surface dry as it can damage the 'Cookclean' finish. After cleaning, replace the
panels immediately and run the oven at maximum setting for about 30 minutes to prevent
deterioration of the enamel.
21
Oven & Grill compartments
Remove the grill/meat pan and grid. It is best to wash these items immediately after use to prevent stains
from being burnt on when used again.
Wipe around the oven or grill compartment, removing stubborn stains with a fine soap impregnated steel
wool pad. Harsh abrasives should be avoided.
Remove the rod shelf for washing at the sink. Use a fine steel wool soap pad for removing stubborn stains
from the rod shelf and floor of the oven. Take care during cleaning not to damage, bend or dislodge from
the supporting clips the thermostat phial which is across the back of the oven just below the roof in the
oven compartment.
Doors and Handles
Wipe over with a cloth wrung out in hot soapy water and rinse with a cloth wrung out in clear water. Dry
with a soft clean cloth.
Do not use scouring pads or abrasive powder which may scratch the surface.
Take care during cleaning not to damage or distort the Door Seal. Do not lift the Door Seal from the Oven
Front Frame, if necessary remove the seal by carefully unhooking the corner clips.
N.B. Care must be taken that Rating Label edges are not lifted during cleaning and furthermore that the
lettering is not blurred or removed . Only use oven cleaners which carry the Vitreous Enamel Development
Council's Approvals symbol, and always follow the manufacturers instructions for use.
Models with removeable inner glass panels
When you wish to clean the interior glass of the oven door, use a screwdriver to remove the top and bottom
washers that secures the interior glass to the door, remove the glass with care.Clean as above, but do not
use house hold detergent, bleach,scouring pads or rust removers. After drying, position the gasket back
into its place. Reinstall the glass panels carefully preventing sudden shocks.
* If low emissive glass is fitted, ensure the printed side is facing outwards.
Replacing the Oven Lamp (GT 756)
If the oven lamp fails you can replace it yourself by following these few instructions:WARNING! Switch off the cooker at the mains supply before attempting to replace the oven lamp.
Remove the oven shelves. Unscrew and remove the lamp cover glass. Unscrew the lamp and replace it
with a new 25W - 230V SES (300°C) lamp. These are the only lamps suitable for use in your cooker.
Replace the lamp cover glass before switching on.
NOTE:- The oven lamp is not covered by the guarantee. For a replacement call our Spares
Department on (tel.0844
0870815
458
9695)
3745
22
Something Wrong with your Cooker?
Before contacting your Belling approved Service Centre/Installer, check the problem guide
below; there may be nothing wrong with your cooker.
Problem
Check
Slight odour or small amount of smoke
when using the cooker for the first time.
This is normal and should cease after
a short period.
Sinking of cakes
The following may cause cakes to
sink:
1. Cooking at too high a temperature.
2. Using normal creaming method with
soft margarine.
Over/Under cooking
Fast/Slow cooking
Refer to the cooking times and
temperatures given in the oven
temperature charts, however, it may be
necessary to increase or decrease
temperatures by 1/2 gas mark (10°C) to
suit personal taste.
Do not use oven/meat pans greater than
56mm (2 1/4 ") in height.
Rotate/Turn the food.
Nothing works
Is the main cooker electric wall switch
turned on?
Is the gas supply turned on?
Hob Burners do not work
Is the glass lid in its fully opened (Upright)
position?
If all hotplate burners fail to ignite, check
that there are sparks at the burners, a
clicking noise should be heard.
Check that the burner parts are seated
correctly and that the slots in the burner
body are not blocked.
All burners can be lit with a match in case
of ignition failure.
Ignition does not work
23
Customer Care Centre
In case of difficulty within the UK please call,
having the model number and serial number to hand:
Opening Hours for Customer Care Centre
Monday to Friday
Saturday
Sunday
8am - 8pm
8:30am - 6pm
lOarn - 4 pm
For Belling Customer Helpline please call
0844
81522
3746
0871
22
503
For Belling Service please call
0844
815
0871
223746
22
503
For Belling Spares please call
0844
3745
0870815
458
9695
Model No
Serial No
Glen Dimplex Home Appliances, Stones Lane,
Prescot, Merseyside L35 2XW
Part no. FS 756001 June 2005
c6 .i Tlii"
485.9209.38/R.0/23.07.2008
24